• Skip to primary navigation
  • Skip to main content
  • Skip to primary sidebar

Scale Modelling Now

Scale Modelling Techniques

  • HOME
  • CONTENTS
    • What’s New
    • Techniques Bank
    • Aircraft
    • Armour
    • Classic Kit Builds
    • Vehicles
    • Sci-Fi, Fantasy, Space
    • Maritime
    • Figures
    • Book Reviews
    • Dioramas
    • Gift Certificate
    • Modelling Workshops
    • Podcasts
  • WHAT WE OFFER
  • AREAS
    • Techniques Bank
    • Aircraft
    • Armour
    • Vehicles
    • Sci-Fi, Fantasy, Space
    • Maritime
    • Dioramas
    • Figures
  • FREE SAMPLES
  • EVENTS
  • NEWS
  • ABOUT
    • ABOUT US
    • TRADERS
  • LOGIN
  • CONTACT

Revell German Command Armoured Vehicle Sd.Kfz.247 Ausf B 1:35 – build review

March 29, 2023 By Francis Porter

Revell German Command Armoured Vehicle Sd.Kfz.247 Ausf B 1:35
Full Review by Sarah Frazer
Kit Ref: 03335

The Revell Sd.Kfz.247 (247) is a re-box of the ICM Sd.Kfz.247 and there are a few reviews available on the Internet of the ICM version. As I was going to build the 247 in early German Grey it would be important to add some form of colour modulation to break up the otherwise plain grey finish. Various parts of the chassis underneath will be painted in slightly darker shades and some components, like the engine, will be given a satin finish.

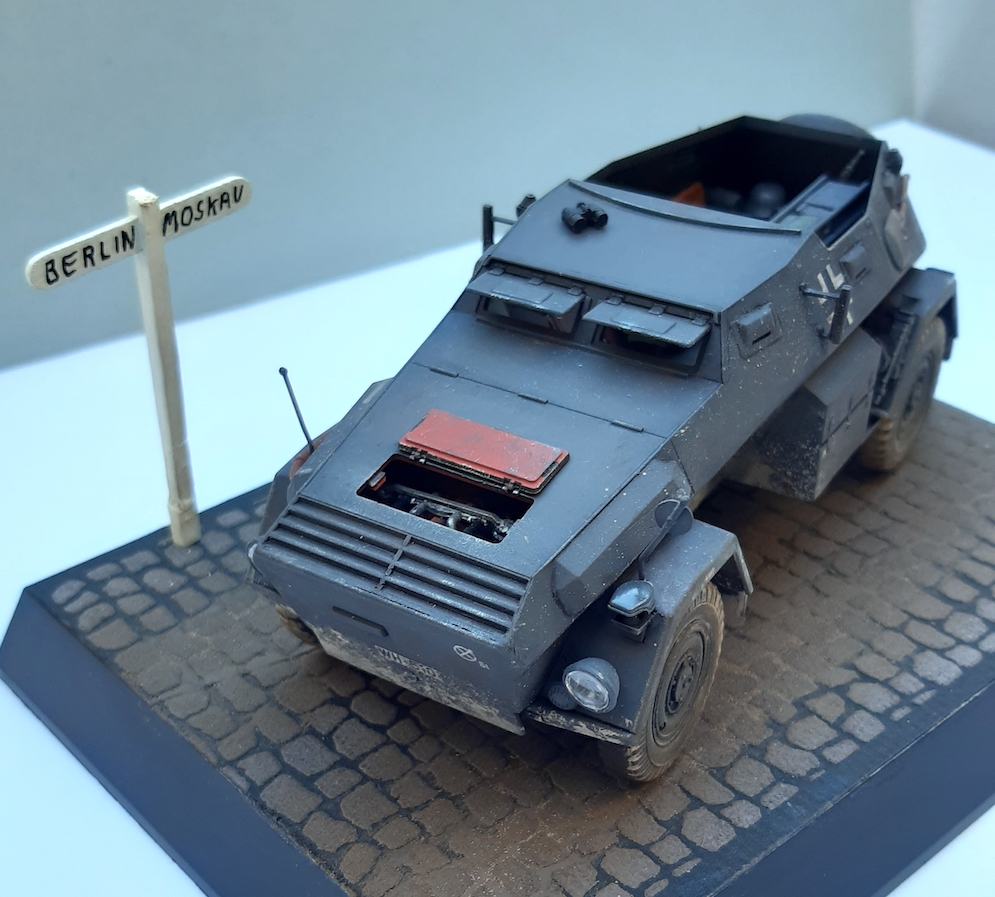
Just before we get started, here’s a quick look at how it all turned out…
Revell German Command Armoured Vehicle Sd.Kfz.247 Ausf B 1:35

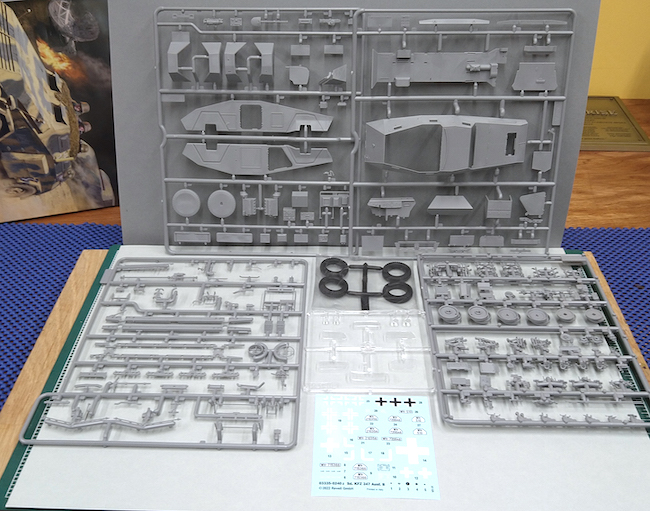
The contents include 5 sprues, four grey and one clear plastic, along with a set of rubber tyres and the decal sheet.


One of my first actions with any kit is to give all the sprues a good wash then I go over each sprue identifying letter with a Sharpie.

It can be worthwhile looking through the manual to identify where parts are assembled to form a whole part from two ‘halves.  Generally once I glue these parts I will leave them overnight for the glued edge to harden so it can be sanded if required.  This can be a bit of a bother to keep doing this and waiting for another glued joint to harden.  So I look ahead for these ‘half’ parts and bond them all at the same time.  After they have hardened overnight I will sand the joint and apply filler as required.  On the 247 I assembled the chassis rail left and right sections, the two major cross beams, the eight shock absorbers, the front bumper and the engine.  A little filler was required on the chassis rails, the front bumper and the engine.

Read on…

Primary Sidebar


LOGIN/LOGOUT

Lost your Password?


All the completed Armour builds.

Click on a Manufacturer below for all SMN's completed builds of their kits.

BACK TO ARMOUR MAIN PAGE

SEARCH THE WEBSITE

More results...

Generic filters
Exact matches only
Search in title
Search in content
Search in excerpt

Finished Now Armour

Academy
Accurate Armour
AFV Club
Airfix
Amusing Hobby
Azimut Productions
Border Models
Bronco
CMK
Copper State Models (CSM)
Cyber Hobby
Das Werk
Dragon
Eduard
Field of Armor
First Fight
Great Wall Hobby
HobbyBoss
ICM
Italeri
Master Box
Meng
MiniArt
Mirage Hobby
ModelCollect
Resicast
Revell
RFM
Riich Models
Roden
Ryefield Model
Sovereign
Specials
Takom
Tamiya
Tiger Model
Tristar
Trumpeter
Ultracast
Zvezda

Armour Areas

Armour Home
Build Now
Finished Now
Photo Reference Library
Subscriber Gallery
Here Now
Book Reviews

Copyright © 2025 · Scale Modelling Now · Online Scale Modelling Magazine · Scale Modelling Techniques and Tips · Privacy Policy

ar Arabicbn Bengalibg Bulgarianzh-CN Chinese (Simplified)zh-TW Chinese (Traditional)cs Czechda Danishnl Dutchen Englishfi Finnishfr Frenchde Germanel Greekhi Hindihu Hungarianid Indonesianit Italianja Japanesemt Malteseno Norwegianpl Polishpt Portuguesepa Punjabiru Russianes Spanishsv Swedishth Thaitr Turkishuk Ukrainiancy Welshyi Yiddish
en English