Whether you’re a seasoned modeller or just getting started, this gallery is a place to share your work, appreciate the craftsmanship of others, and draw inspiration for your next project.
Each submission has a ‘gallery’ of thumbnails which you can click on to see an enlarged image along with some short text describing the model – enjoy!
Galleries: A | B | C-I | J-L | M | N-P | R-S | T-Z


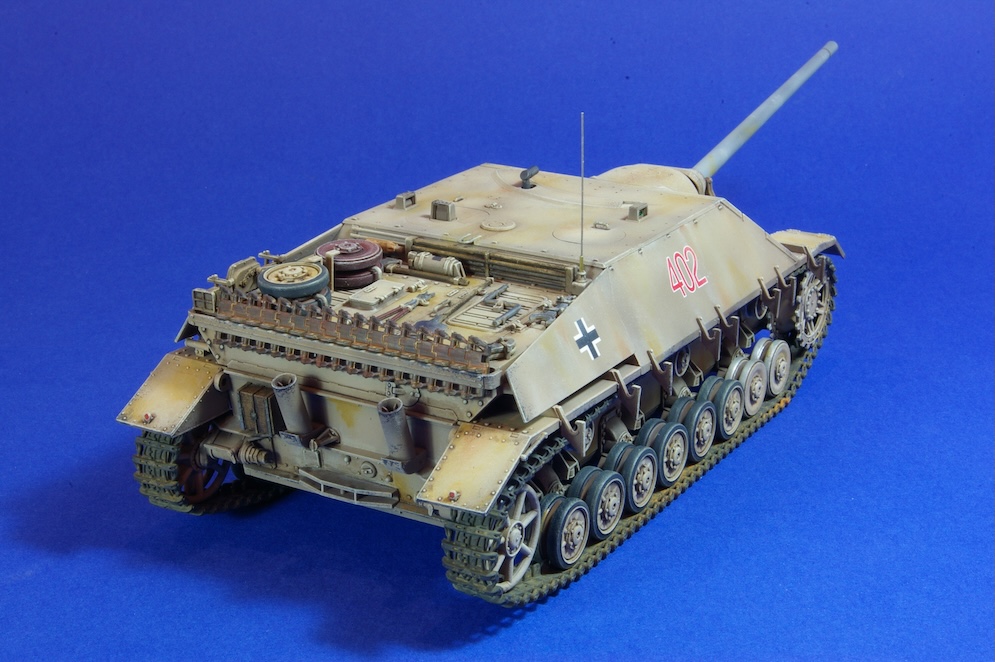
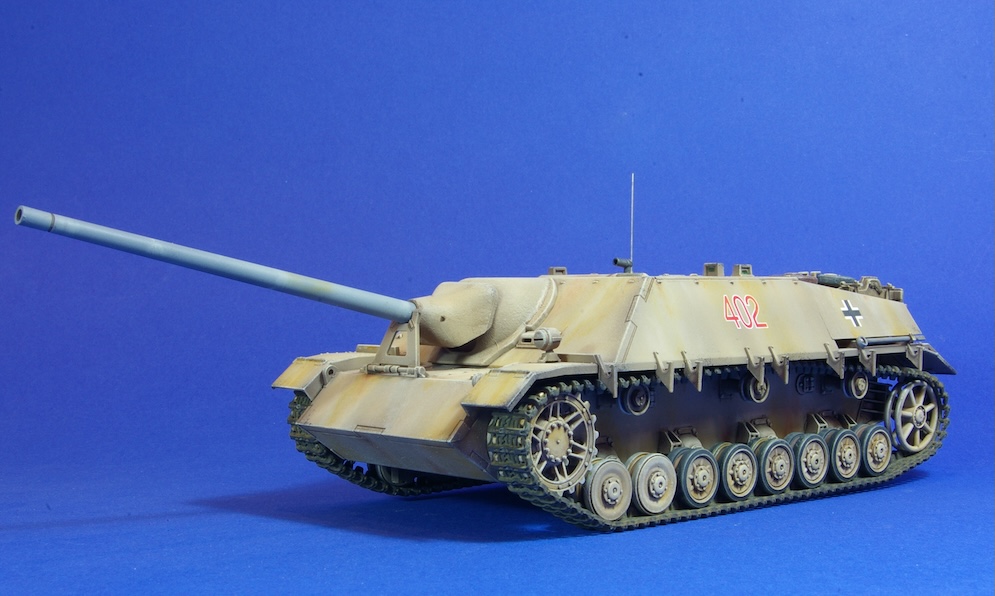

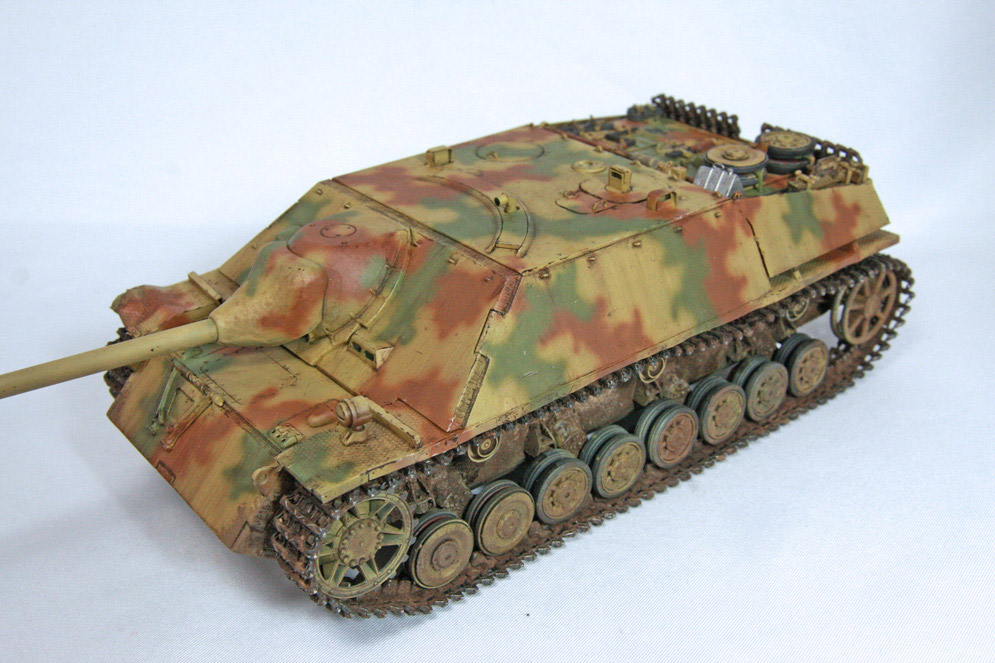
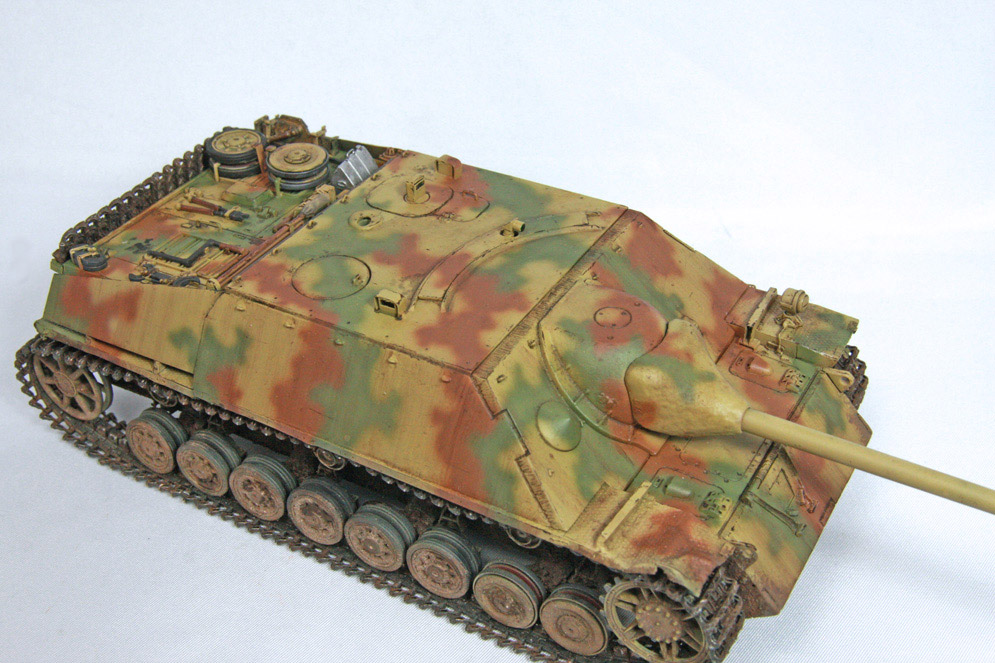
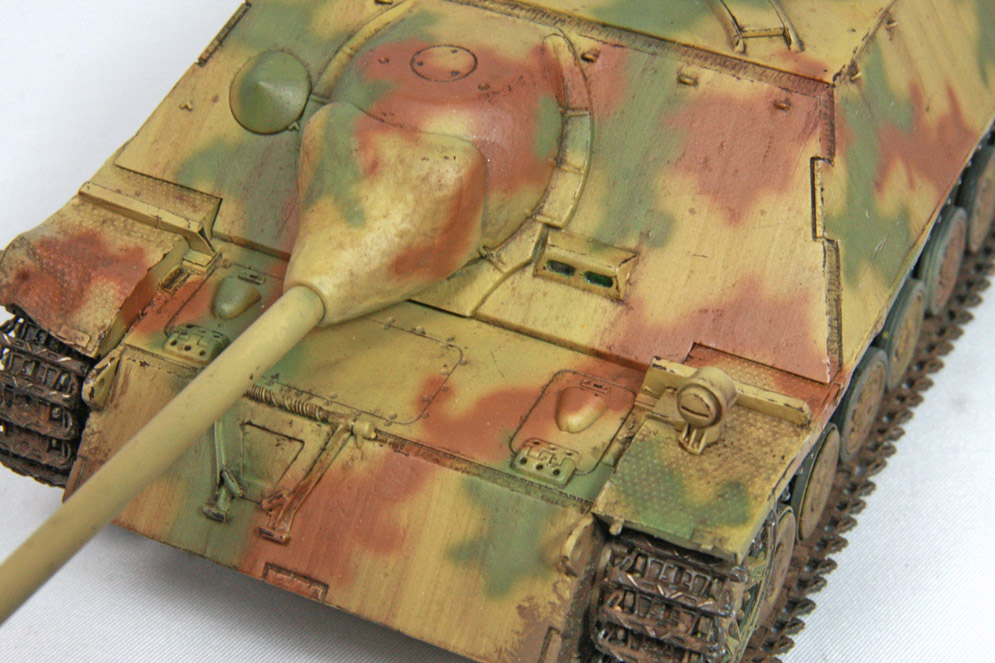
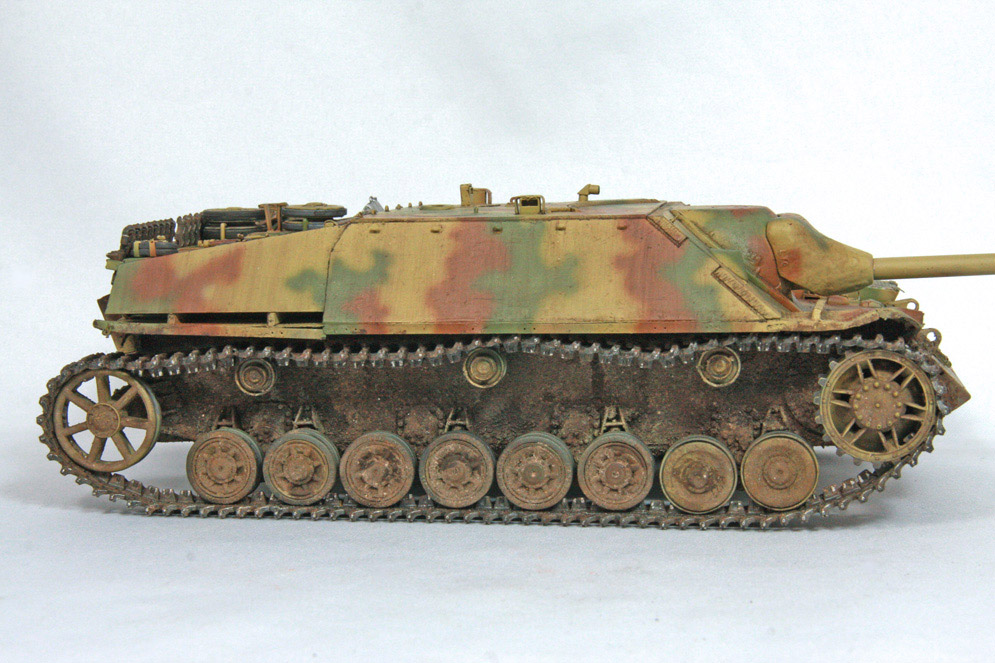
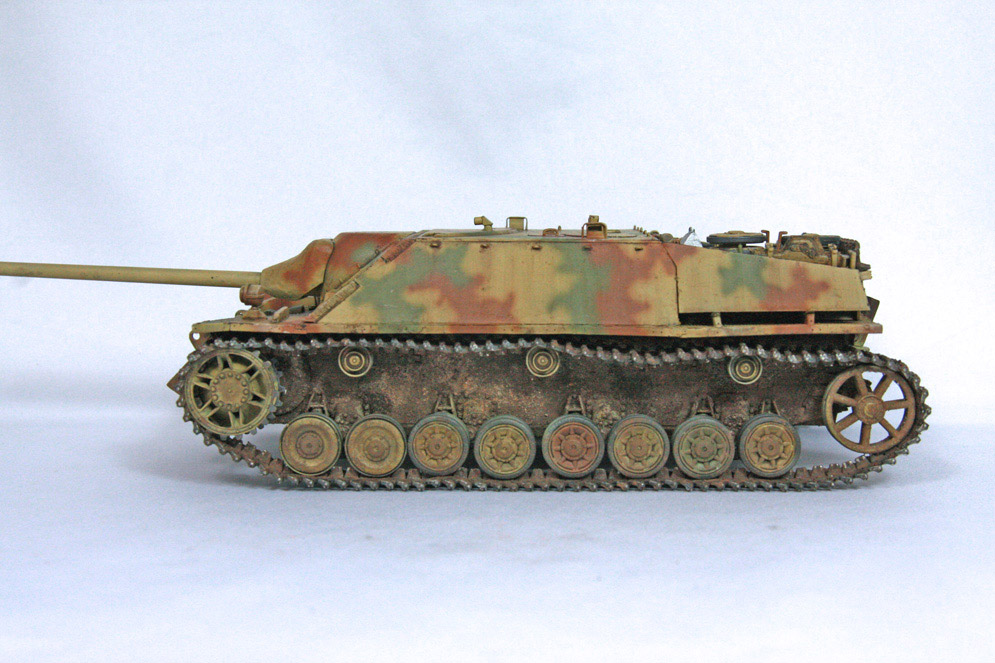
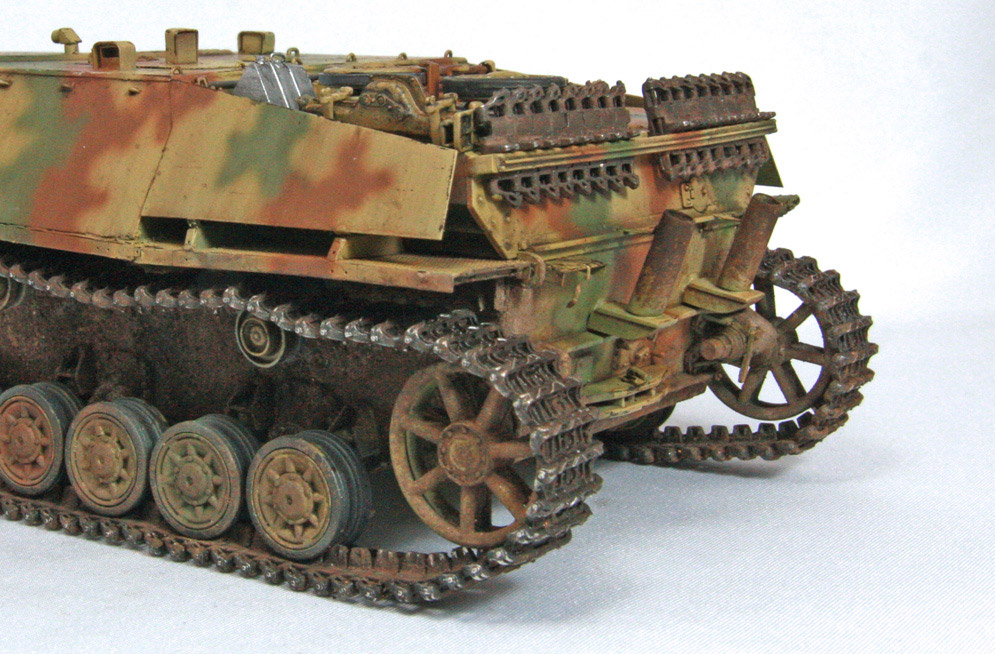
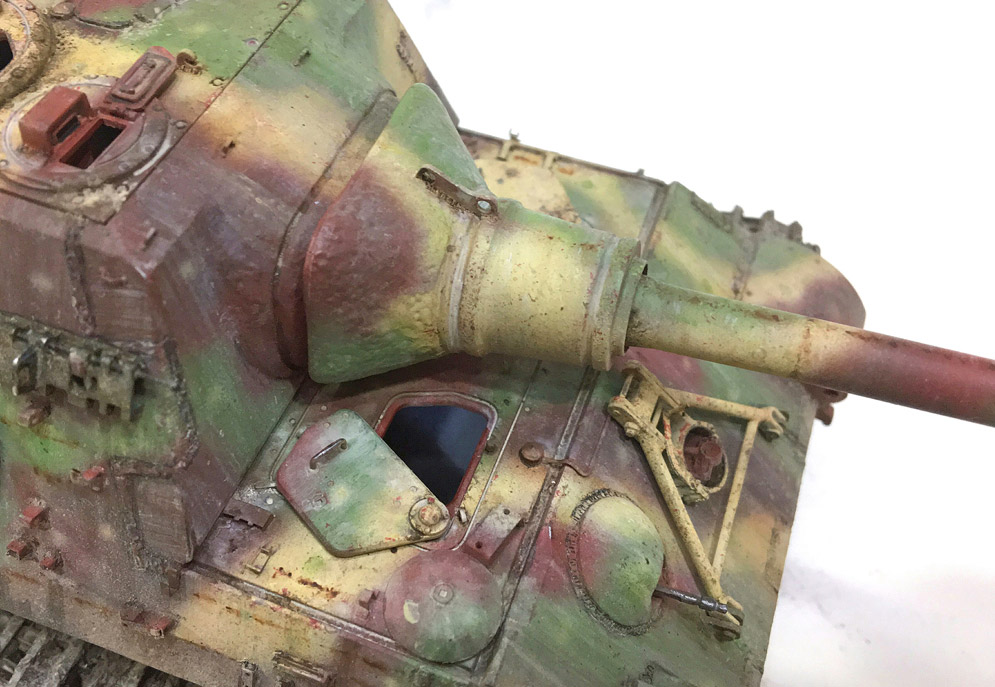
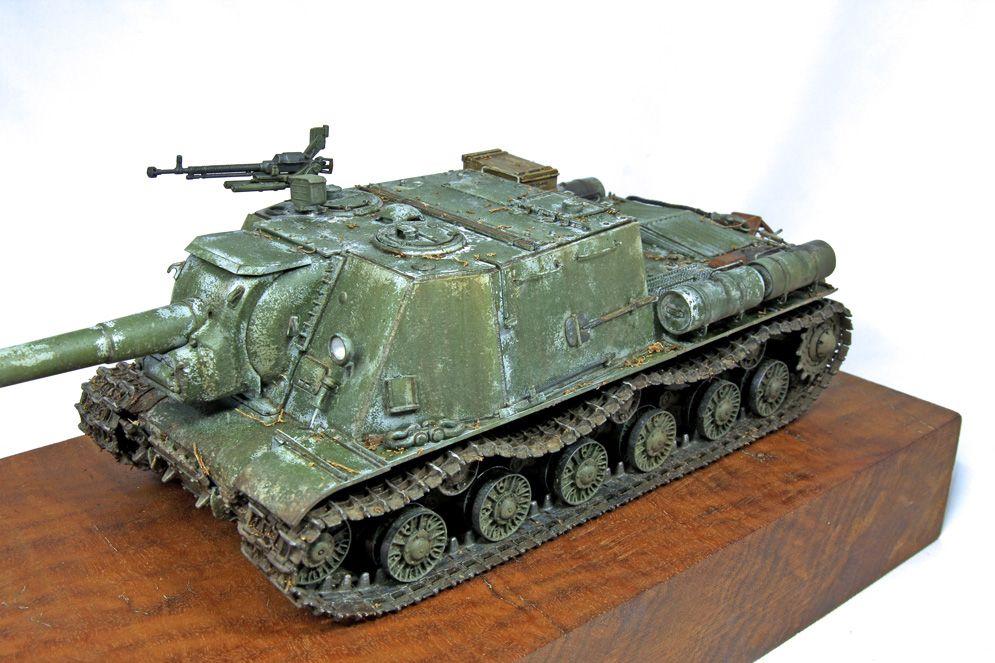
This vehicle was a modification of the Pz.Kpfw IV tank with the turret and upper hull replaced with a casemate allowing a more powerful gun to be carried than that used on the original tank.
It was seen as a replacement for the Sturmgeschütz III and whilst the vehicle was successful, the installation of the heavy gun made the vehicle nose heavy and difficult to operate.
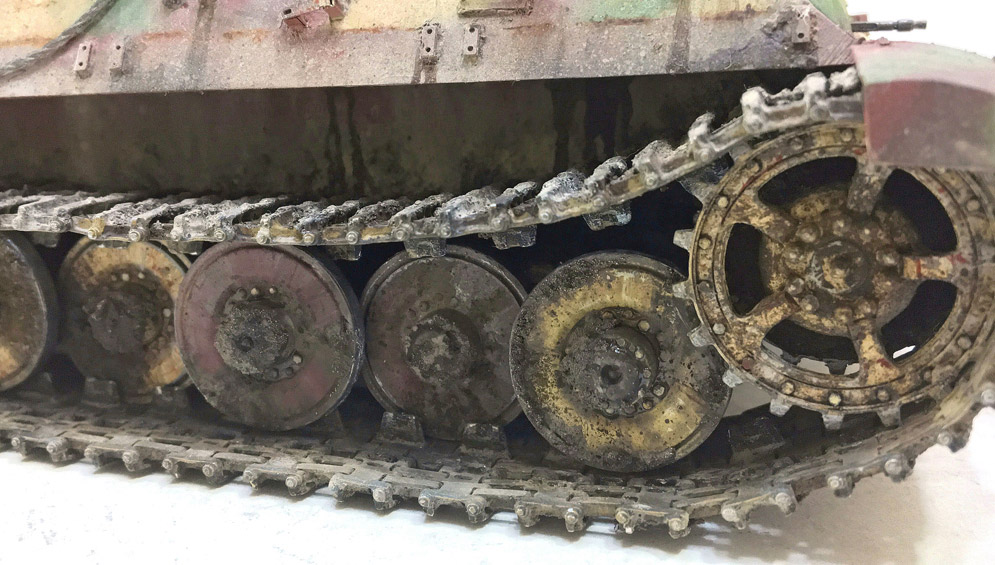
The Tamiya kit represents one of the later versions of the Jagdpanzer IV with only three return rollers per side. The weight of the gun apparently caused damage to the rubber tyres on the road wheels, and so on later versions the first two rubber rimmed road wheels on each side were replaced with metal rimmed wheels. These metal rimmed wheels are provided in the Tamiya kit.
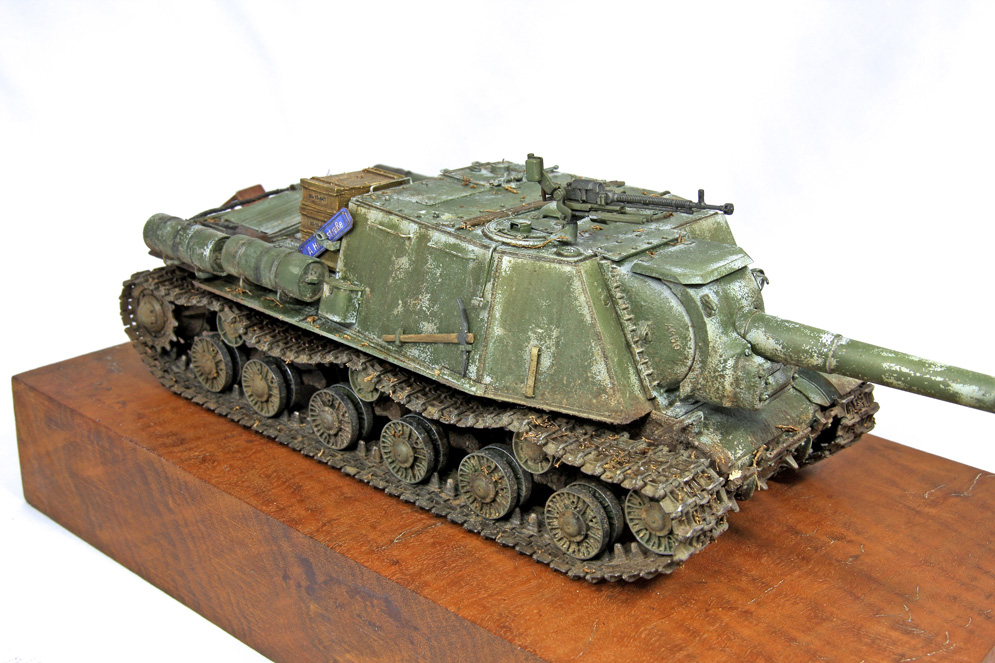
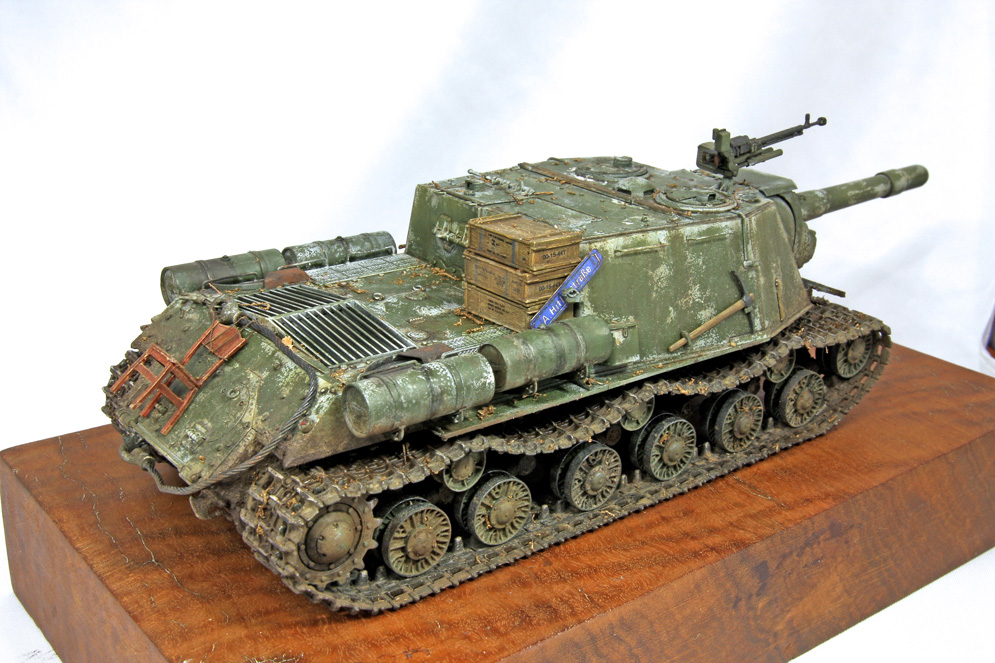
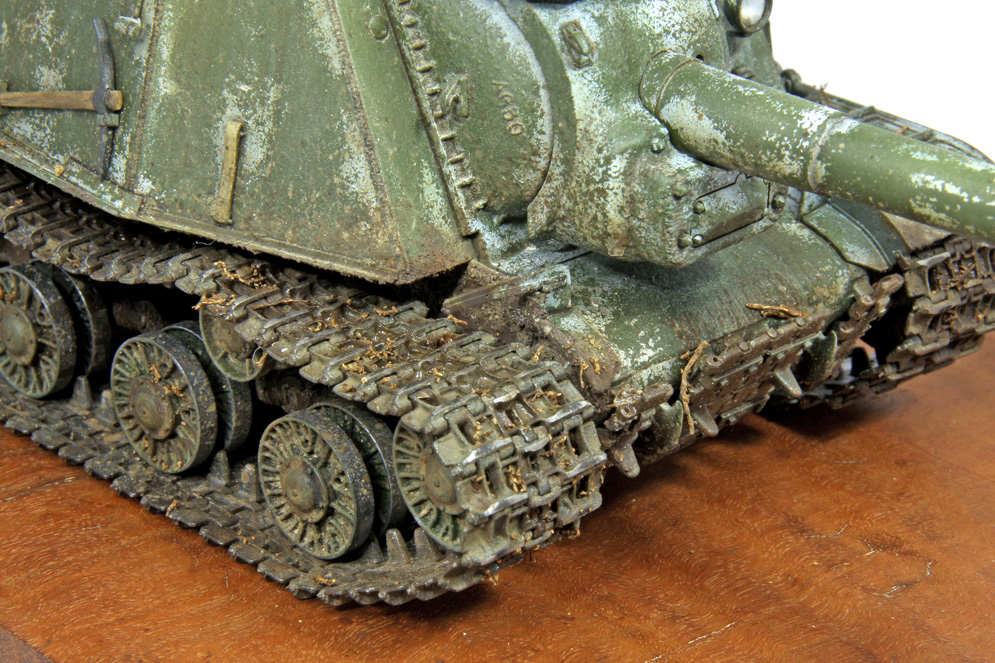
I had originally intended to paint the model in a three-colour camouflage scheme representing the ‘ambush’ scheme seen in Northern Europe towards the end of the war. However, by the time I had applied the dark yellow base coat using about four shades of brown, dark yellow and buff Tamiya paints over a coat of Mr. Colour Mahogany Primer I rather liked the faded / worn look of it and so left it as it was.
I normally use pastel chalks to add some extra colour / weathering to my armour models, but in this case, I experimented with oil paints.
Buff, Ochre, Sepia, Raw Umber and Vandyke Brown oil paints were used. However, instead of putting dots of each colour onto the model and then blending them in all together in one go, I applied the colours one at a time, working from light to dark, allowing each to dry completely for several days before adding the next. This allowed each area of colour to stay separate and discrete from the colours applied on top of it. The Vandyke Brown was used last of all as a sparingly applied pin wash.
I rather liked the way that this turned out and will experiment further with this in the future, though the long drying time of oil paint between applying each colour does mean that it takes ages to finish the model!!
Dai W.


ABER photo etch (PE)
RB-Model Barrel
Friul tracks
Paint: Tamiya
Weathering: Oils, MIG pigments.
Glad you like it,
Martin V.


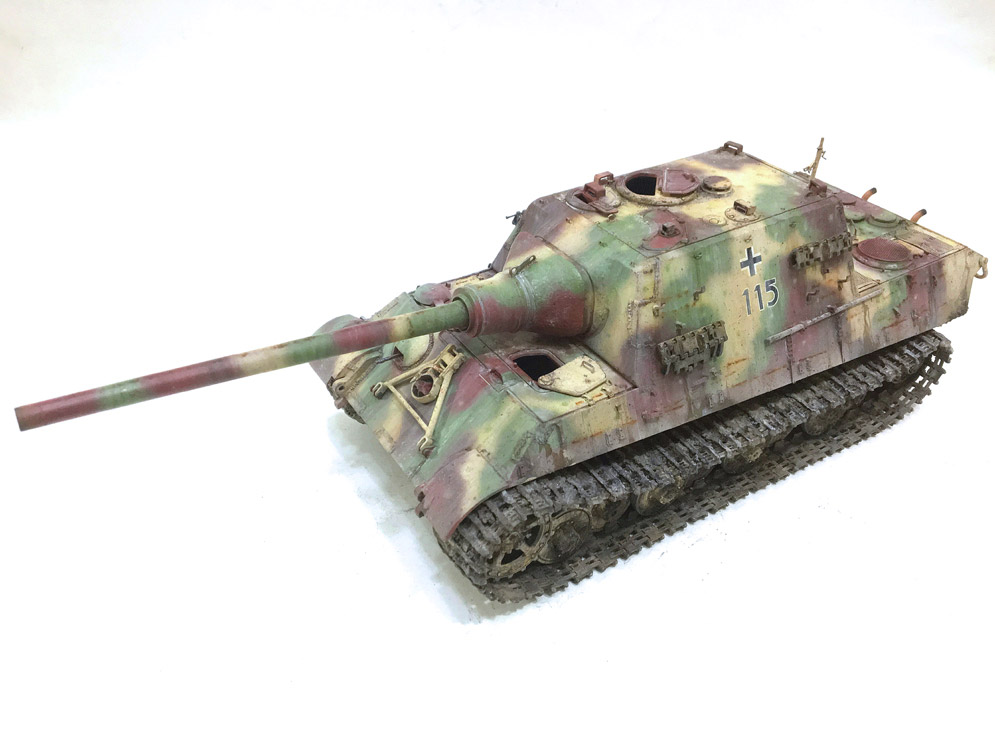
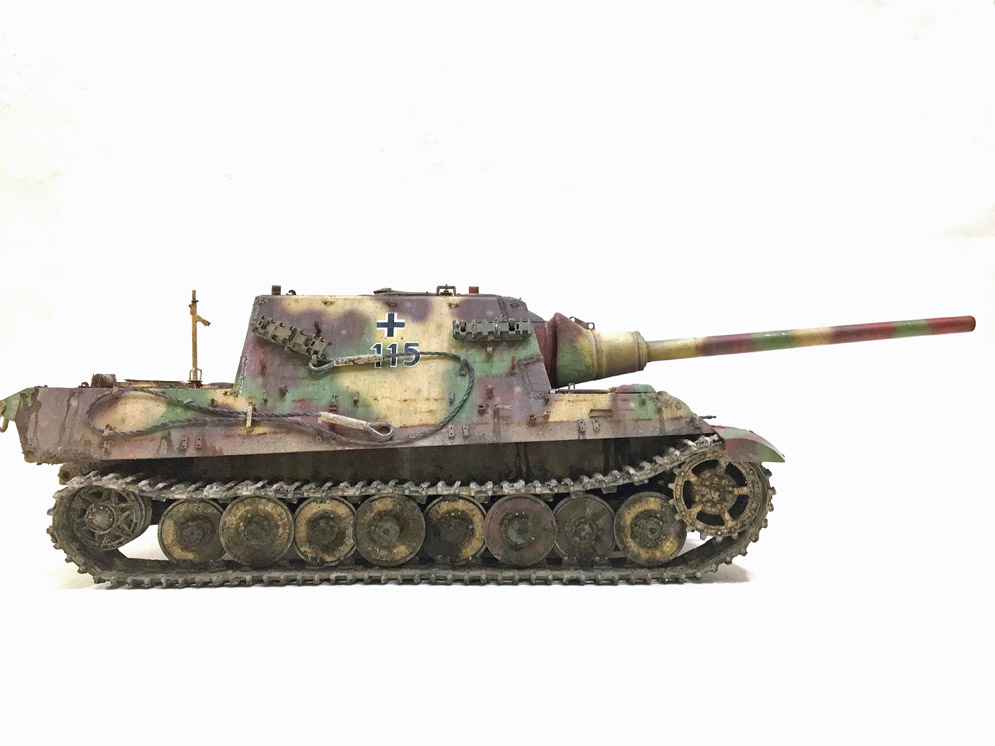
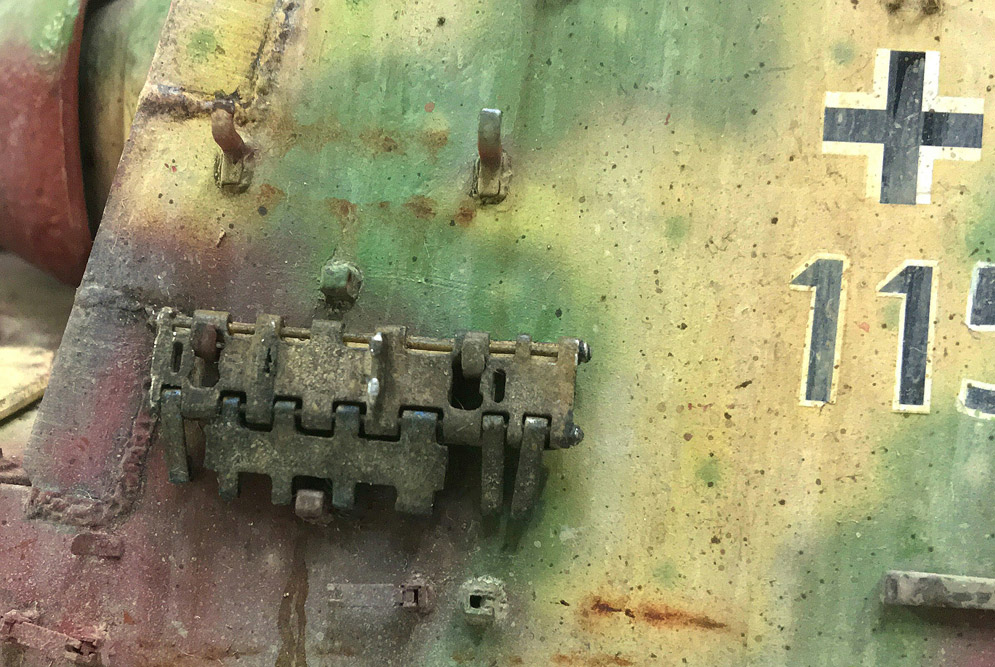
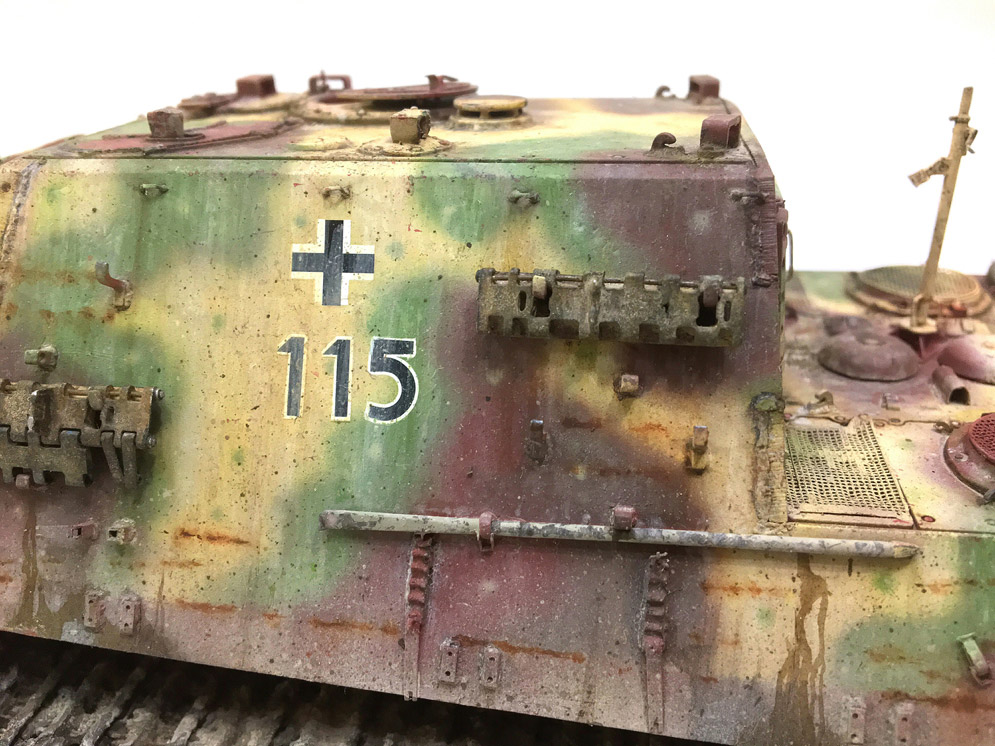
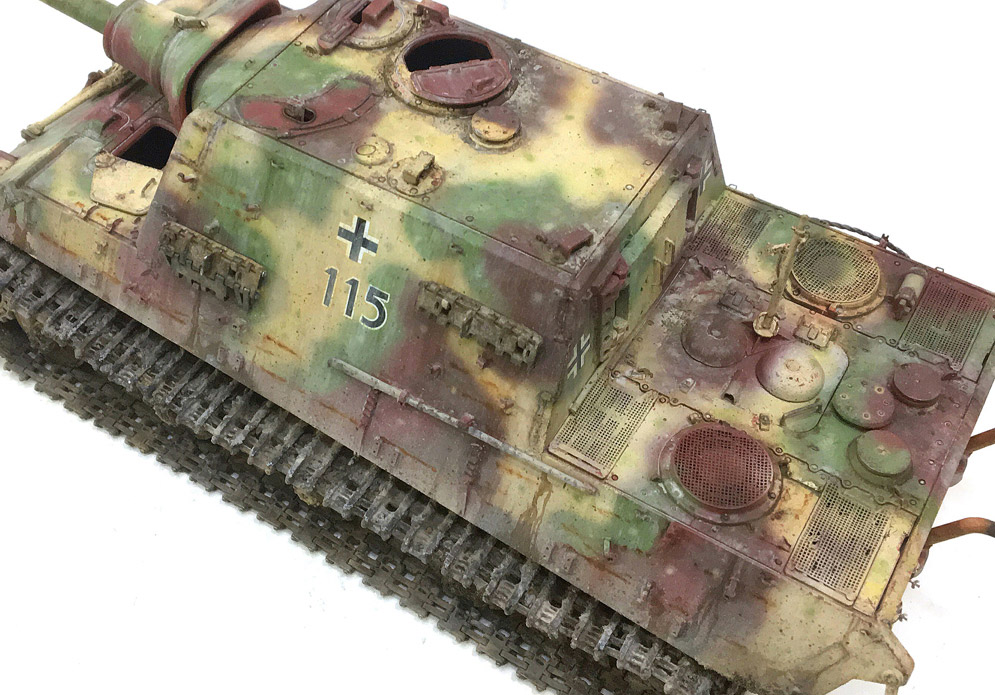
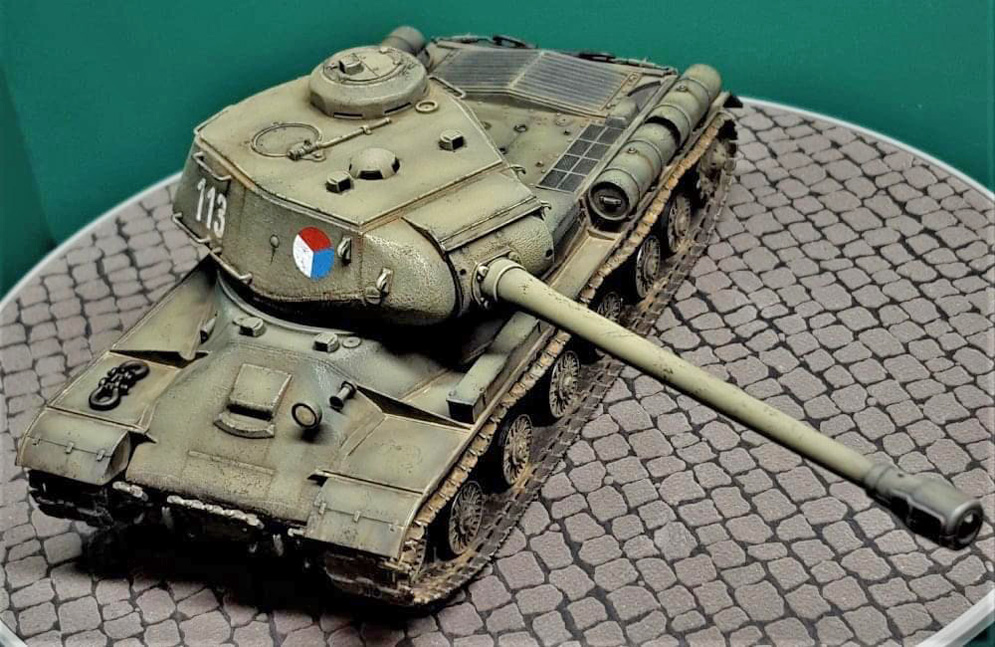
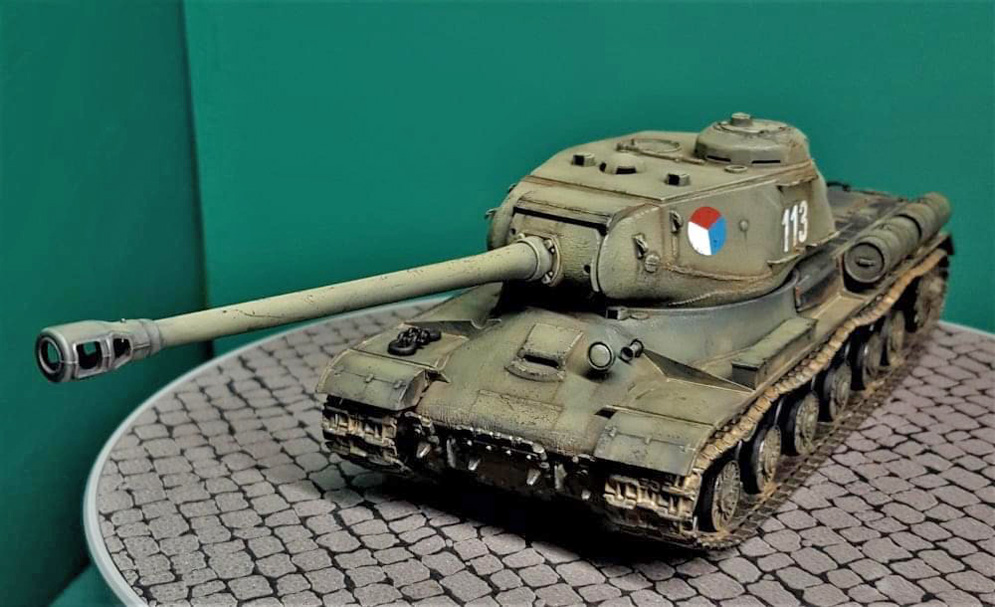
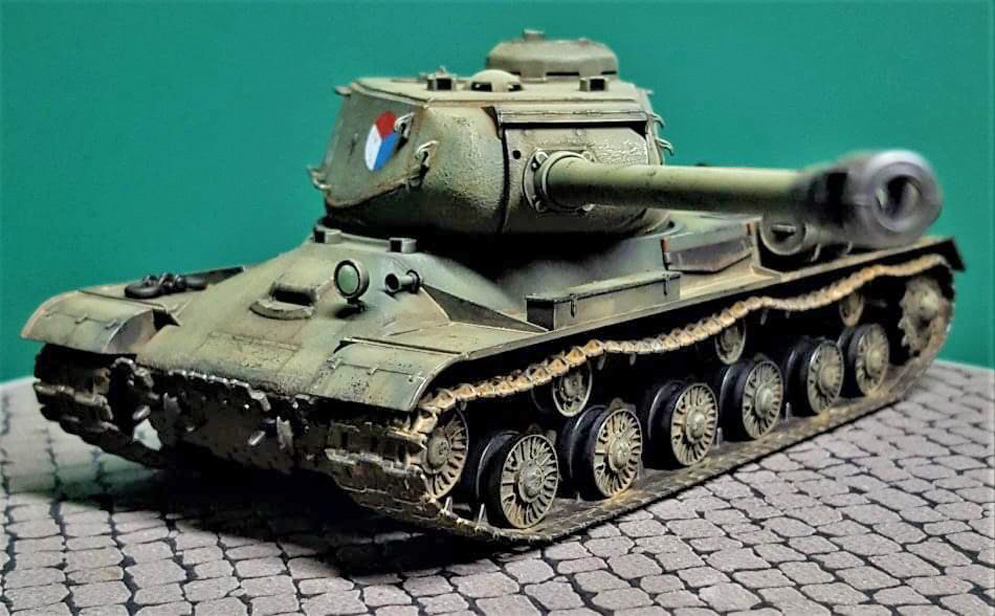
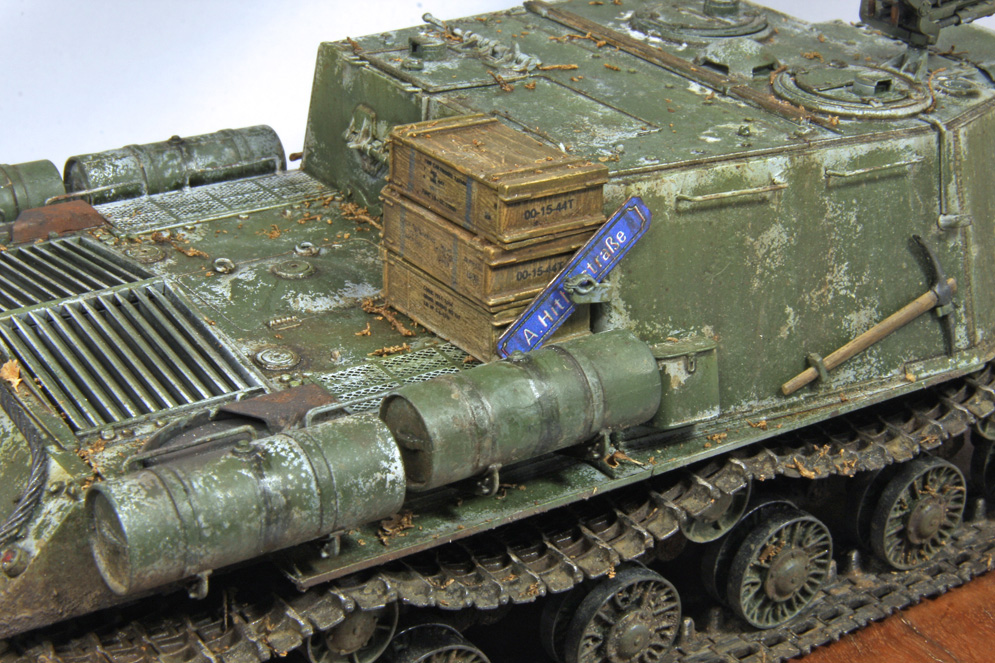
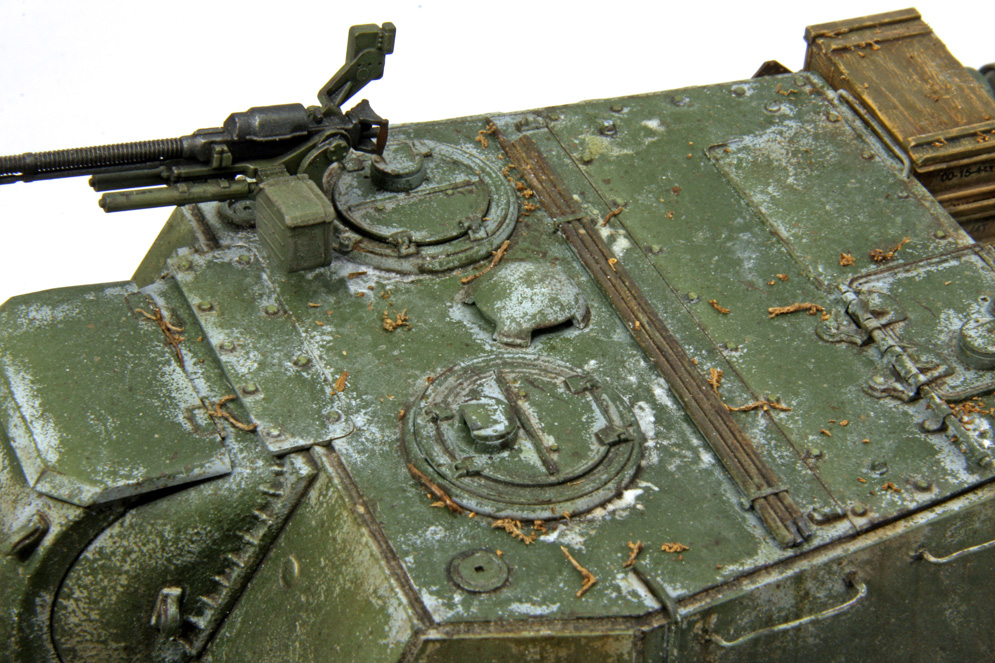
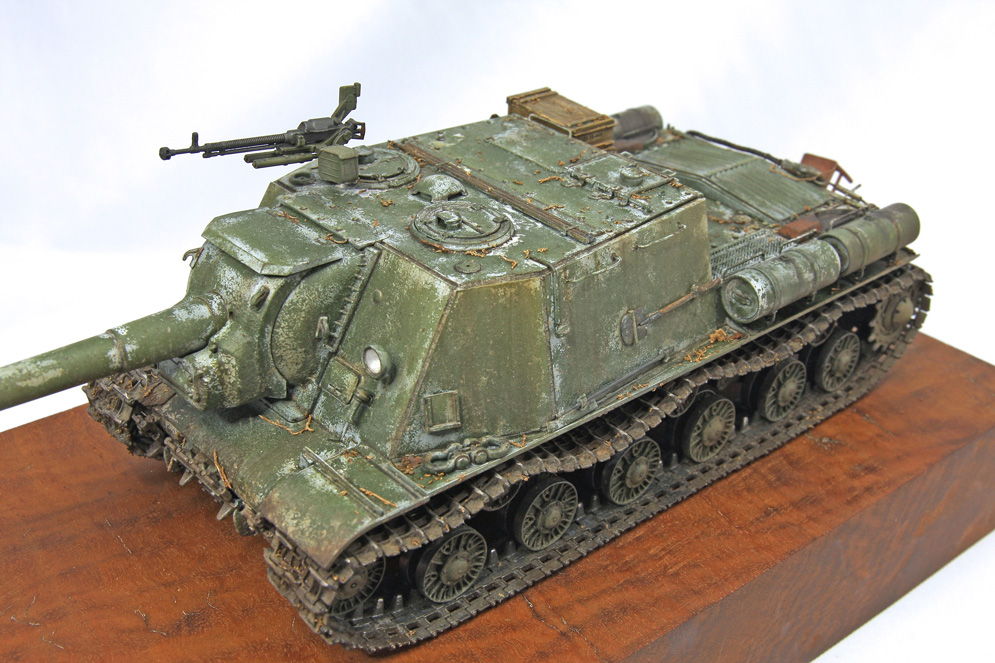
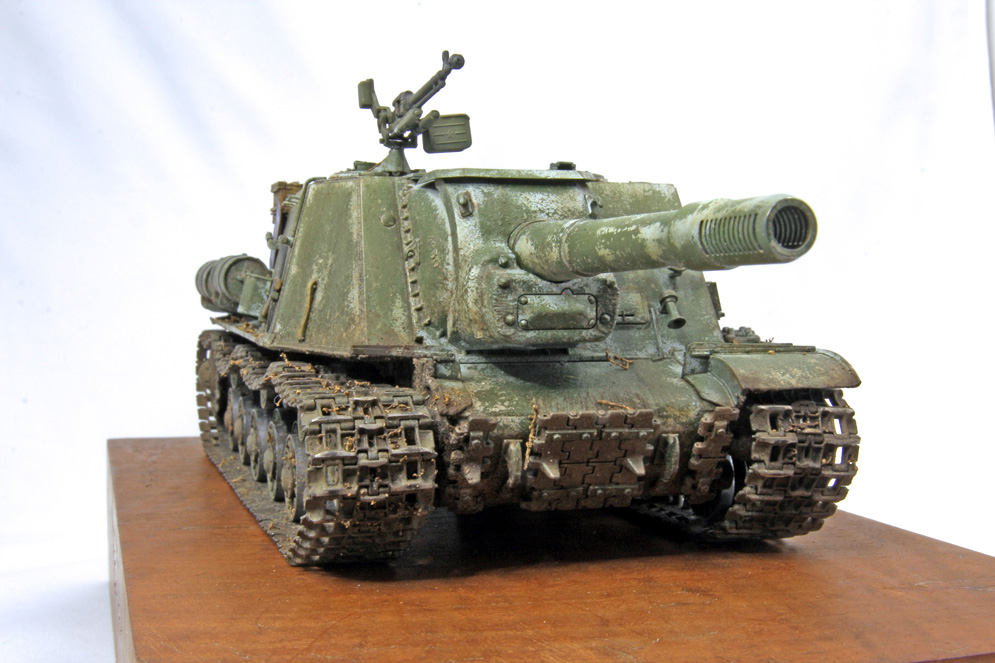
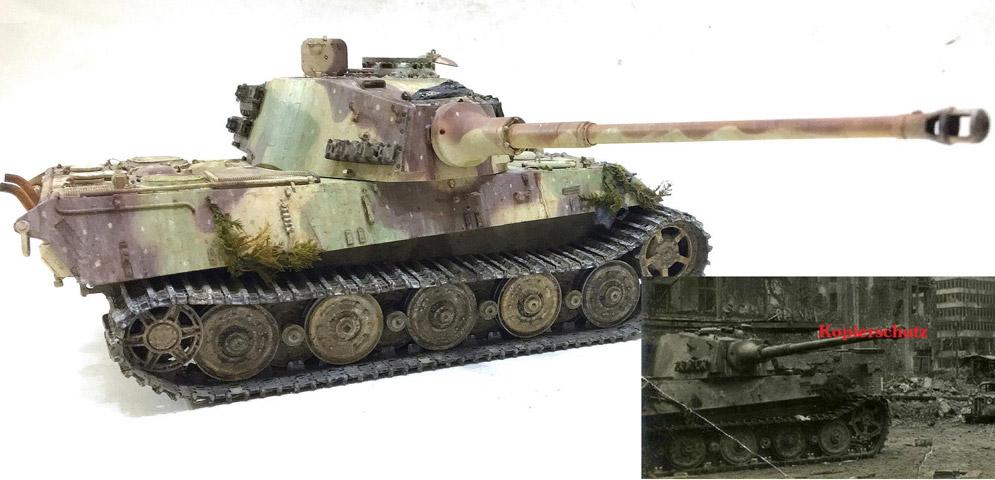
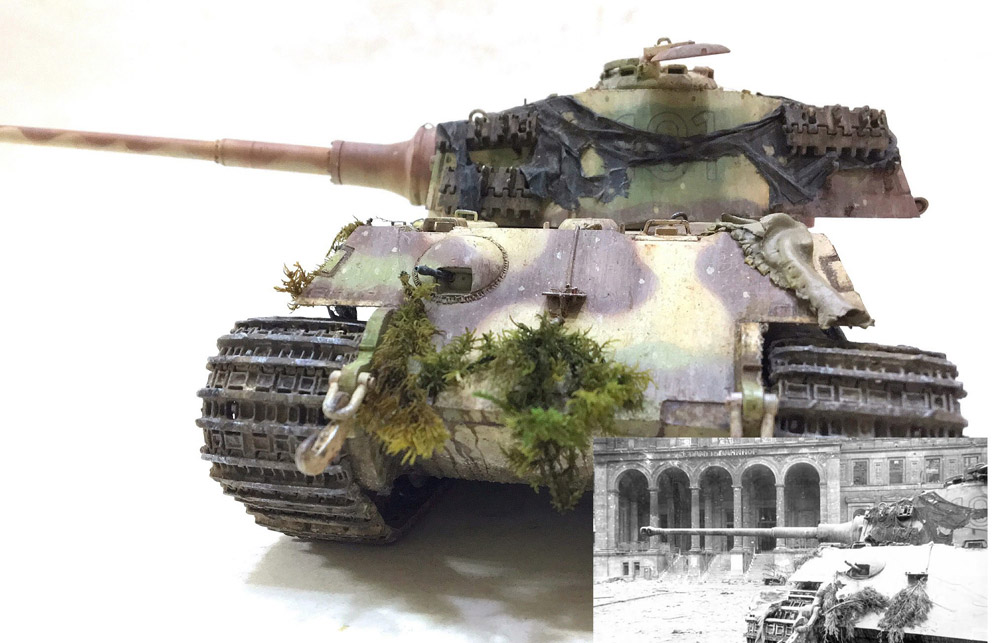
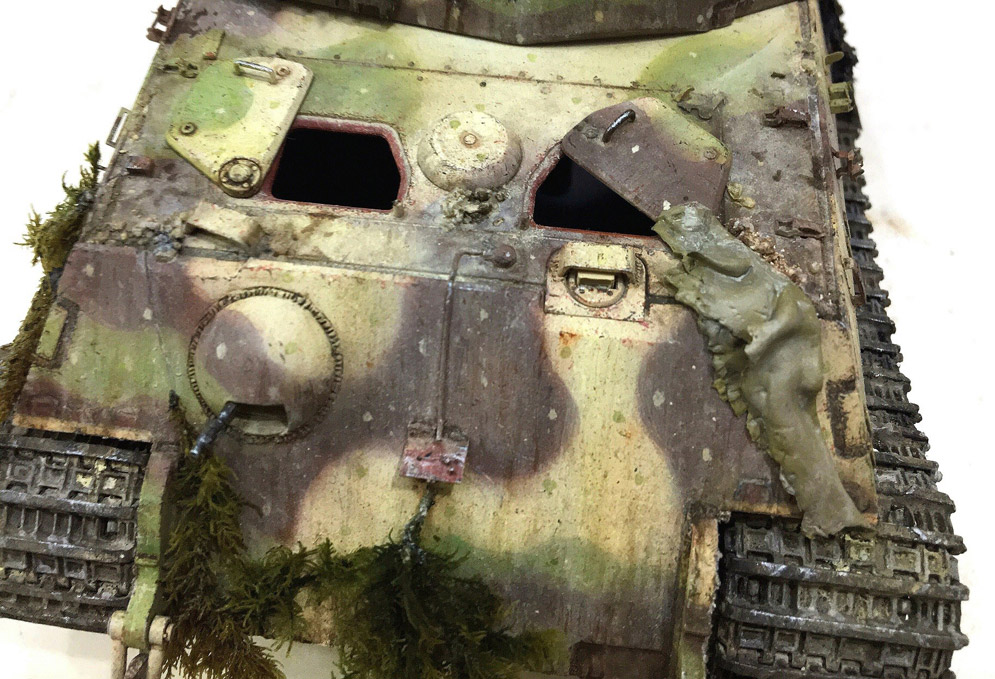
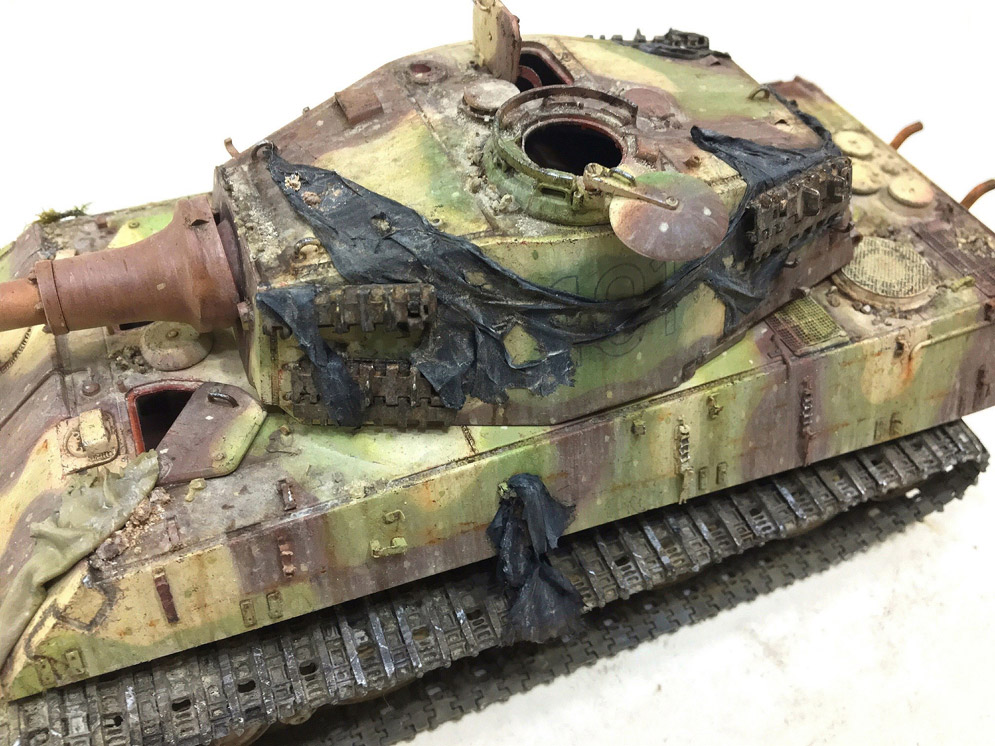
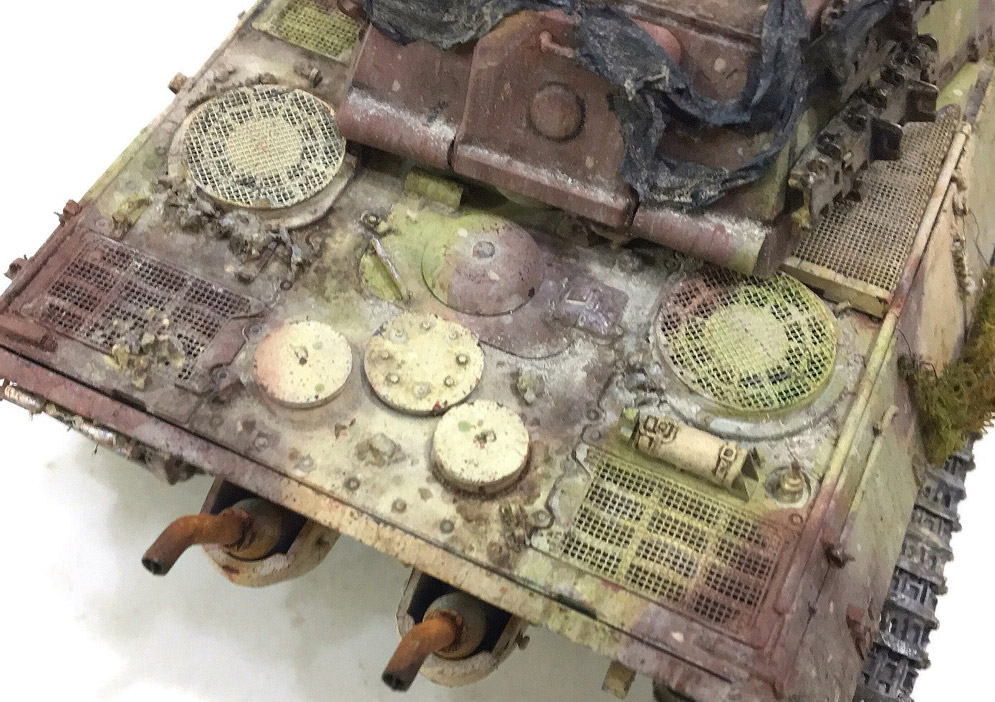
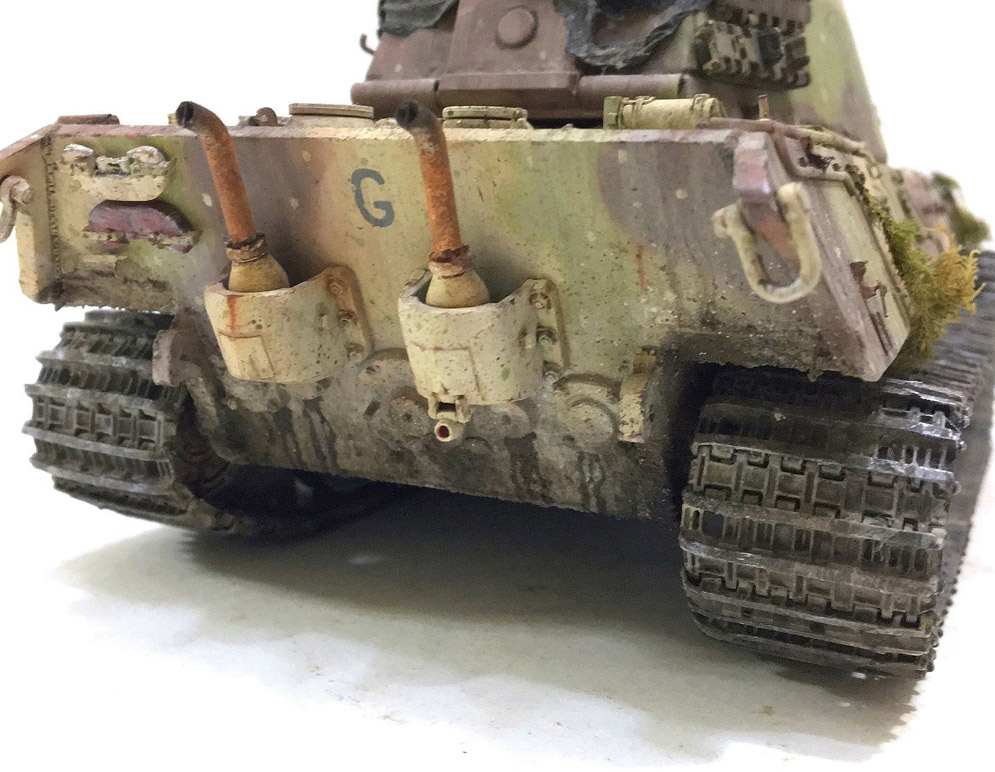
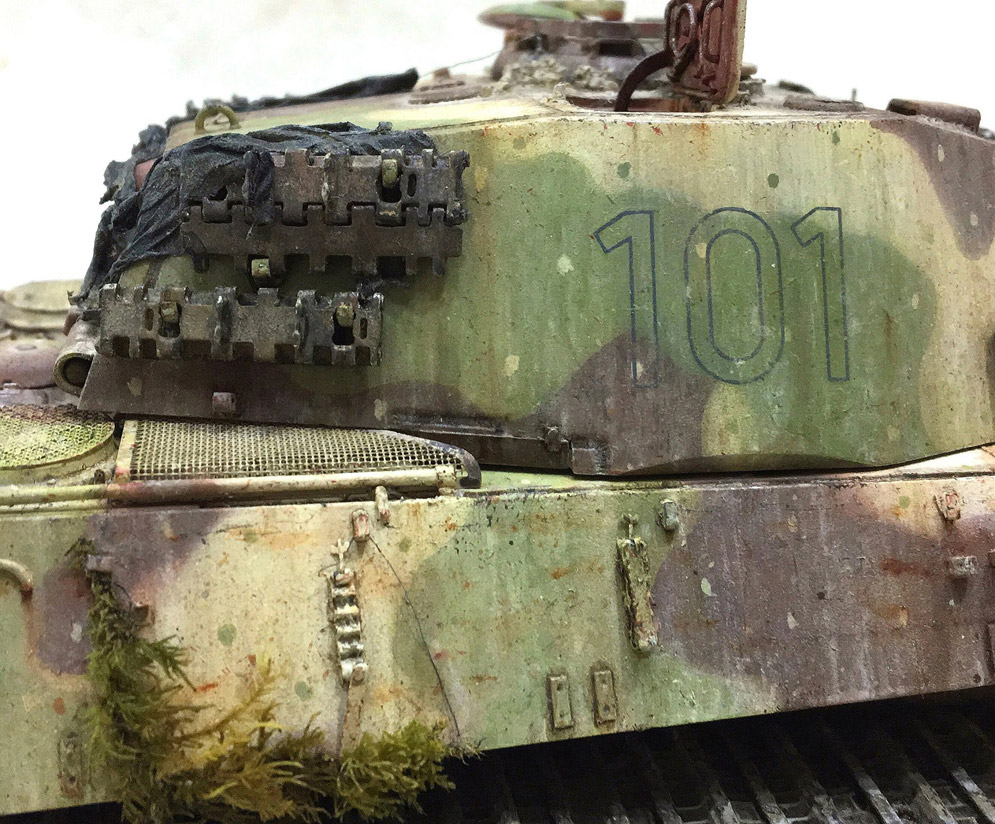
The model background base on two pictures from “Combat History of s’Pz Jg 653” by JJF and “Panzer Wrecks Vol3” Jagdtiger (P) “115” commanded by Lt. Hans Knippenberg operated in it’s last position. Northern Schwetzingen, Germany, 30 March 1945 before knocked out.
Hope you all like it!
Gary K.


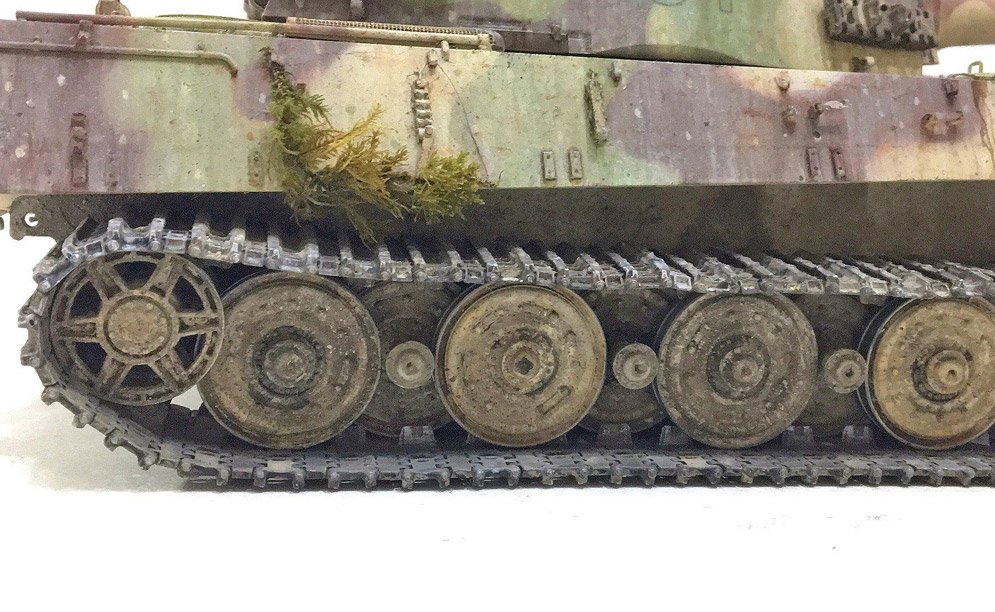
I have added various earth and dust colour pigments to the tracks, lower hull and suspension plus over the whole model in selected areas. Also added metal effects to road wheels, return rollers, idlers, sprockets and track guide horns with AK dark steel pigment and cotton buds, plus some general wear to hatches, grab handles etc. using an HB pencil.
Added exhaust stains with back pigment. Some very light and limited streaking effects plus extremely limited rust effects using artists oils raw umber and burnt sienna.
I’m happy with it now and was in danger of going too far with it.
Cheers, Andy.
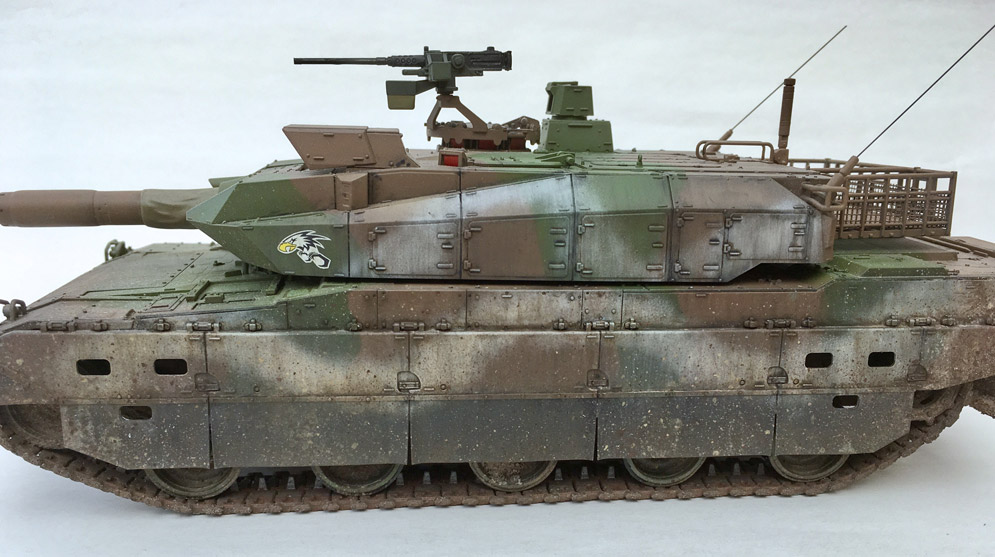
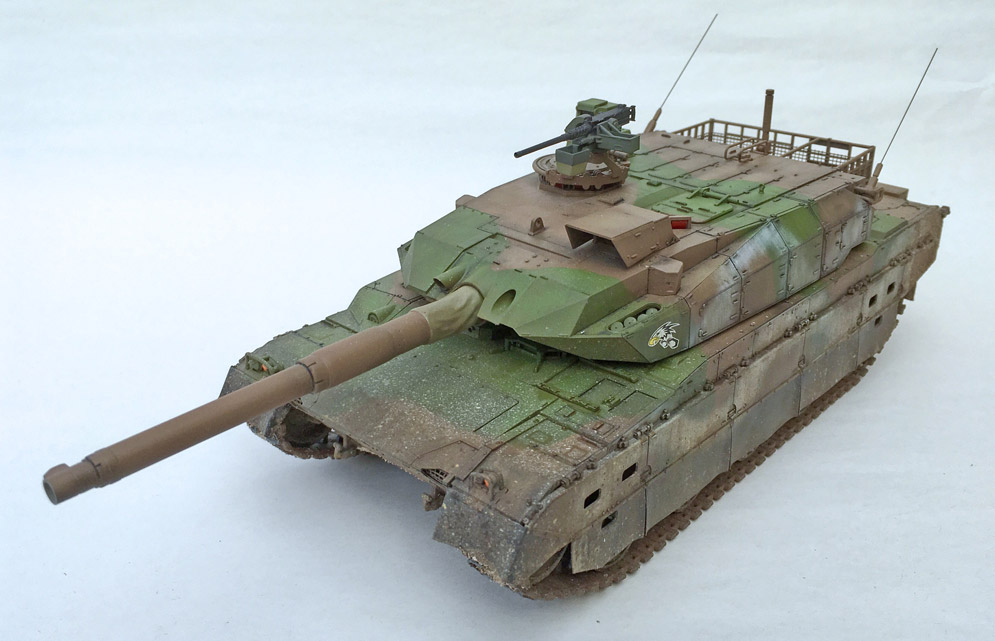
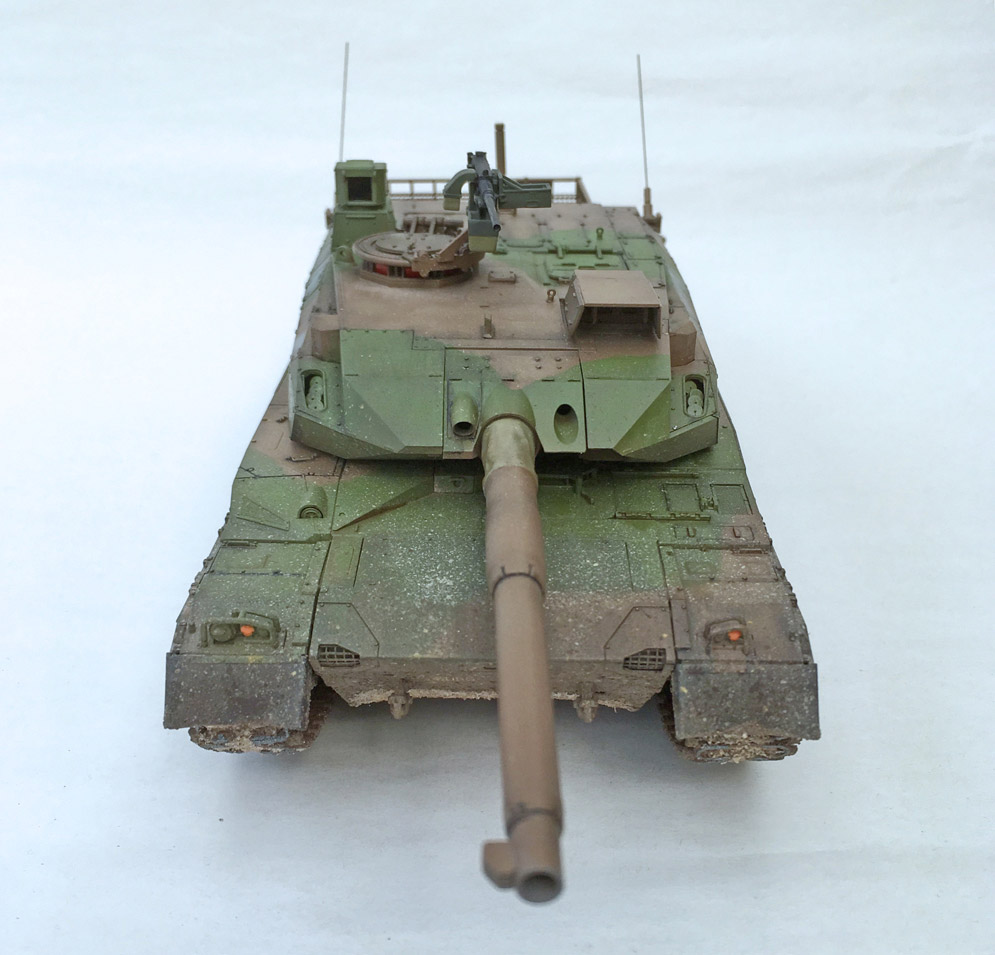
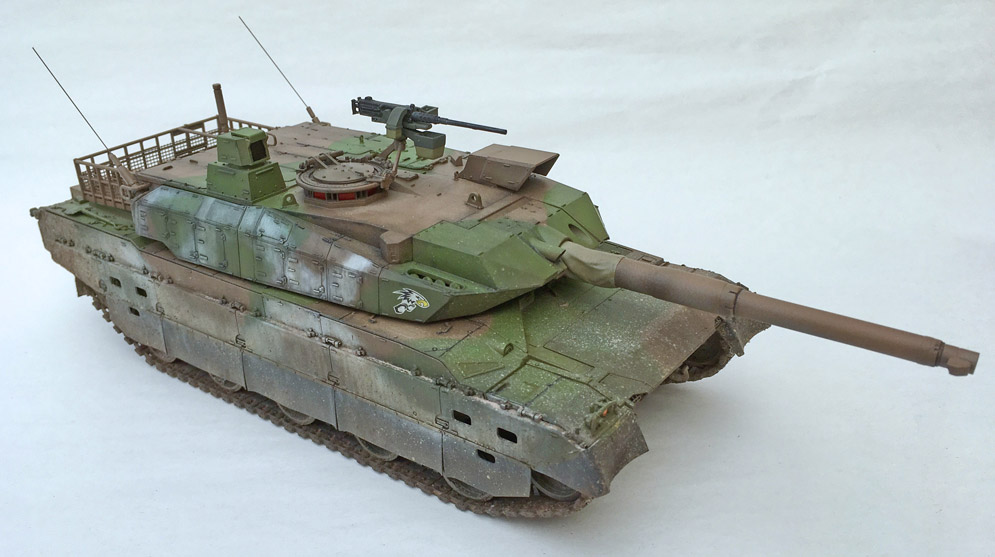
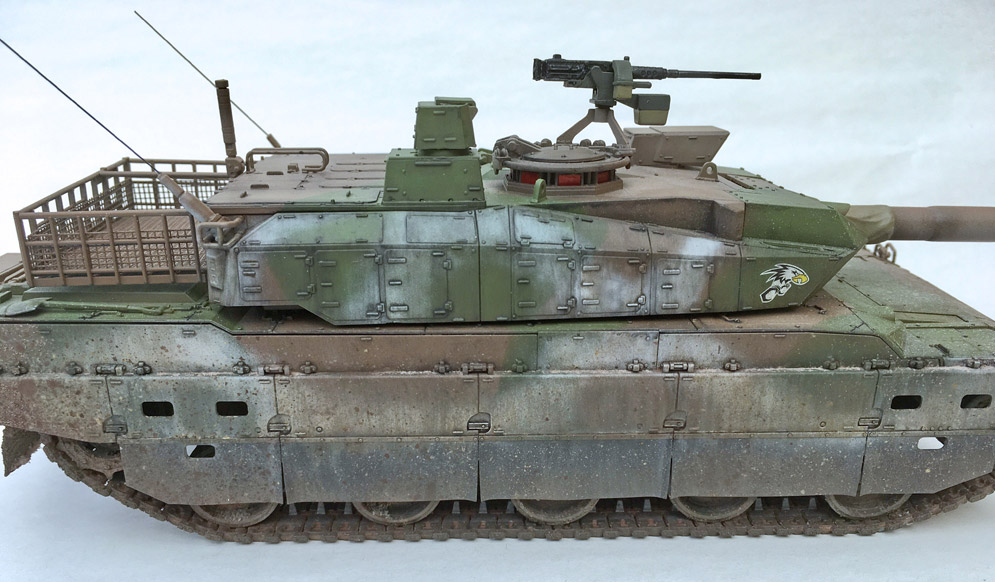
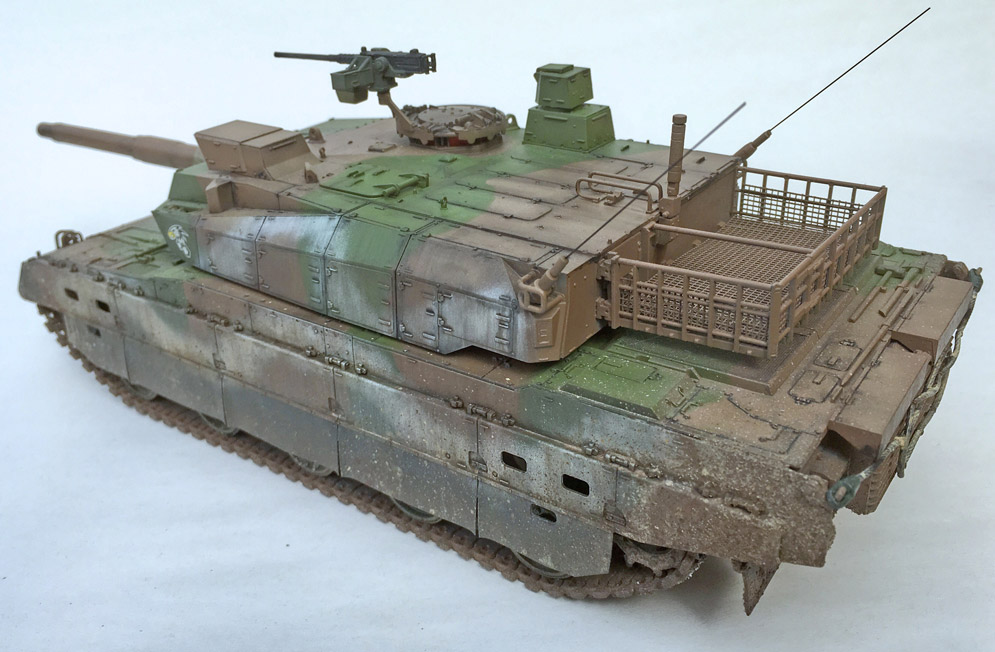
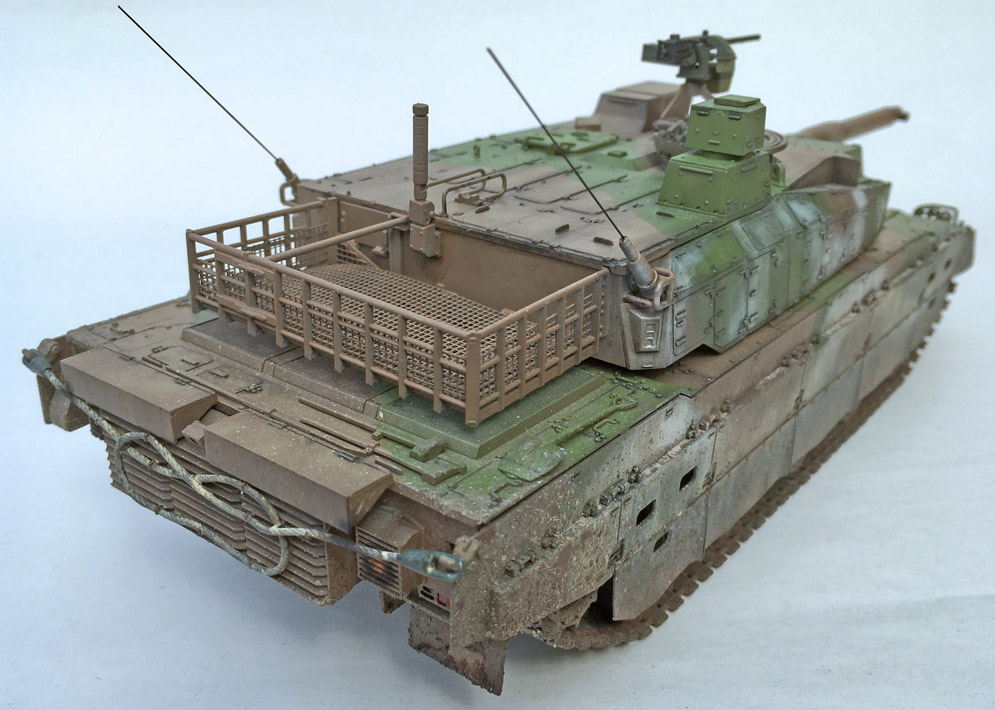
I was given this kit as a present but at the time was concentrating on WWII German armour, however an interest in modern tanks piqued my interest and I decided to give it a go.
What can you say about Tamiya kits that hasn’t been written about? Fabulous engineering and an ease of construction, had the basic hull and turret built in a few hours and ready for primer. Once the primer was dry and I had looked for any imperfections it was ready for camouflage.
I wanted to do something different and had a look at winter improvised schemes. The ones I came across didn’t really inspire me so I decided to embark on my own take on it.
Once I had sprayed the green and brown pattern, I lightened the colours and sprayed on the higher panels to give a slight colour difference. I then applied an off white colour in a wavy pattern to break up the standard colours to replicate a form of winter whitewash for manoeuvres.
I left it to dry thoroughly for a few days and then it was time of weathering.
My aim was to recreate a tank after being on exercise. I opted for thin colour washes built up over a few days and various oil paints to replicate the streaking.
Pigments were added to the running gear and wheels to give it a muddy look.
The only added extra was carbon fibre aerials.
James S.

One of my bad ass looking models. I really like the look of this thing.
A quick build but lots of fun weathering.
Paint: Tamiya
Weathering: oils, AK stuff for mud.
Picked up this kit at a contest several years back so it’s been around the block a time or two. How many remember that ‘Golden Opportunity Kit’ promo MPC had going back in the day?
I replaced the chin radar dome as the variant I’m building has the smaller, less bulbous version. Looks much better, IMHO.
Wish there was more to say about the paint scheme, but not much to say about Naval Haze Gray.
As for the decals, I wanted something other than the usual Soviet markings found on most Ka-25 build ups. I think Indian Navy markings do the trick rather nicely. I made the Hindu script on the tail boom on my computer and then printed it out on decal film. The rest of the decals came from the scrap bin.
I applied a few coats of Acryl semi-gloss clear.
Albert Moore


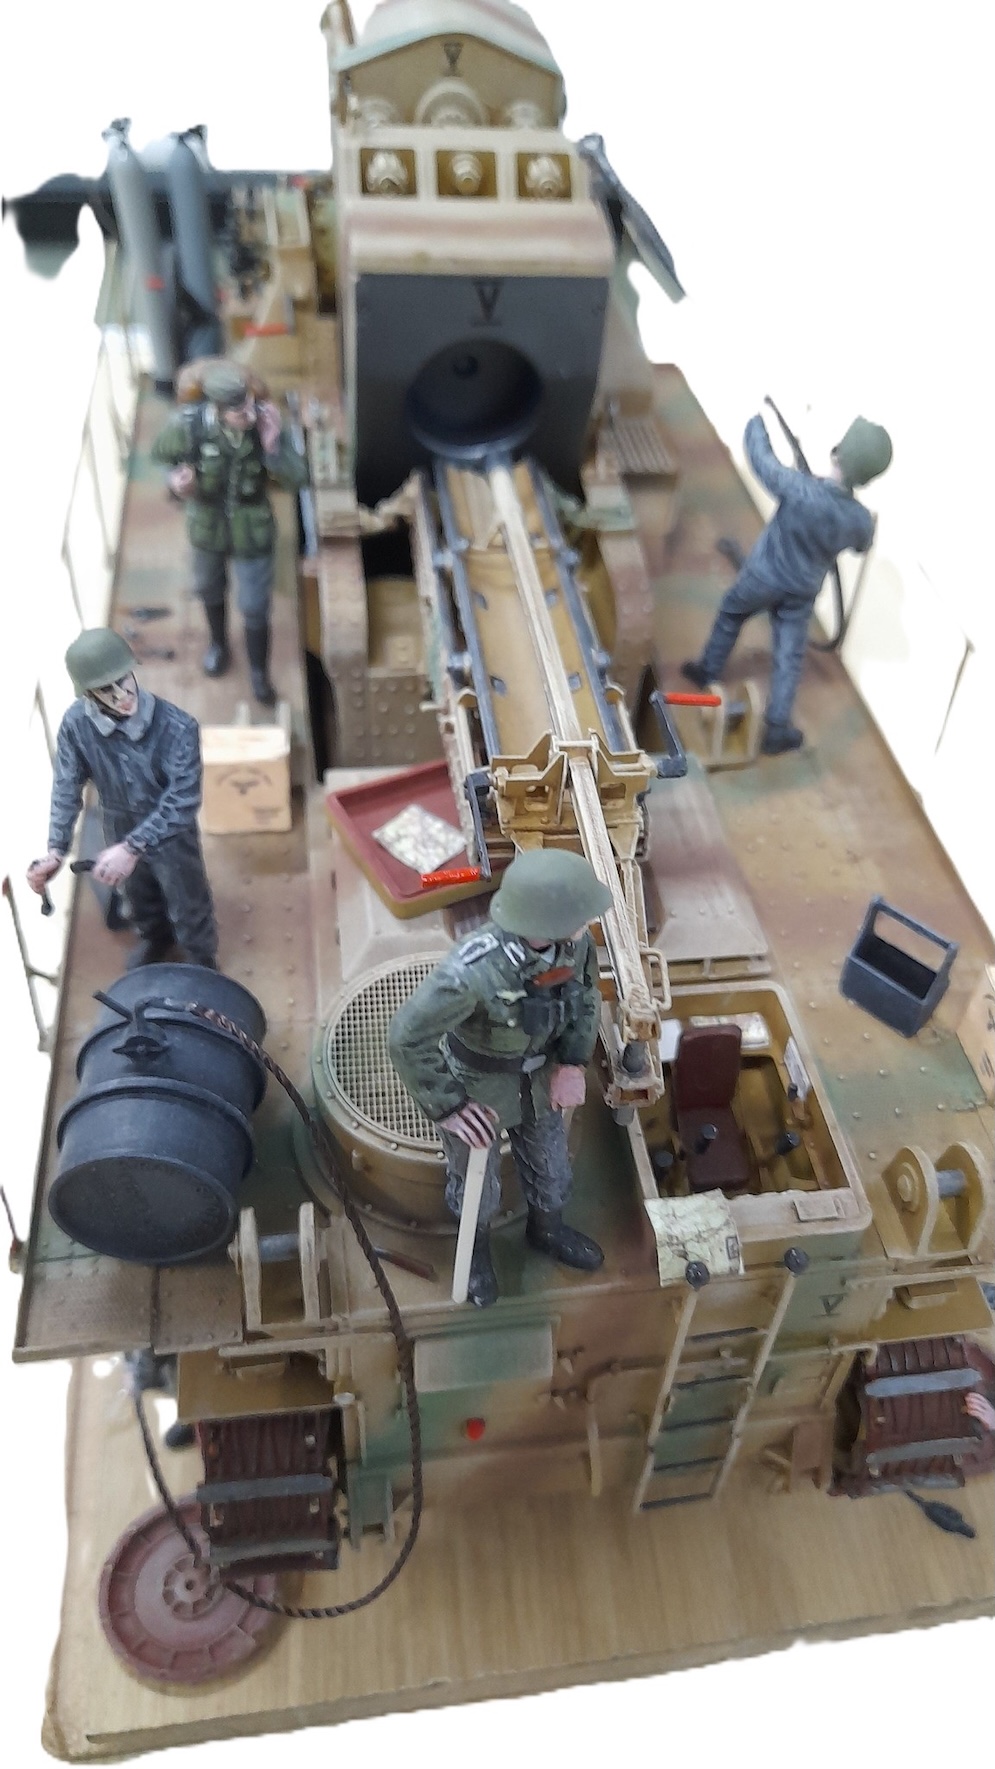


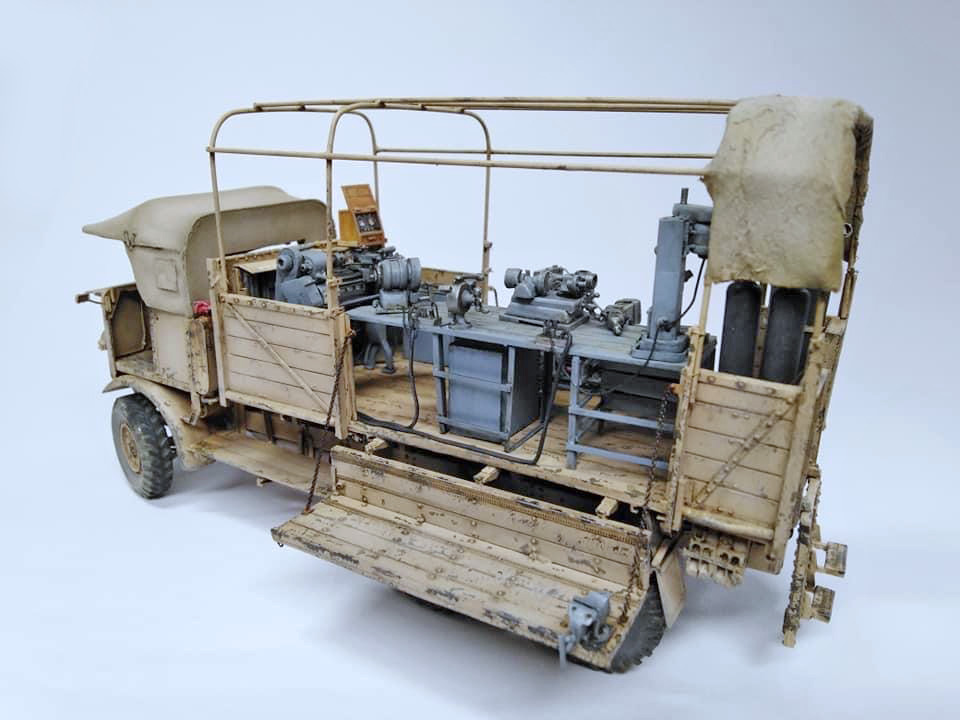
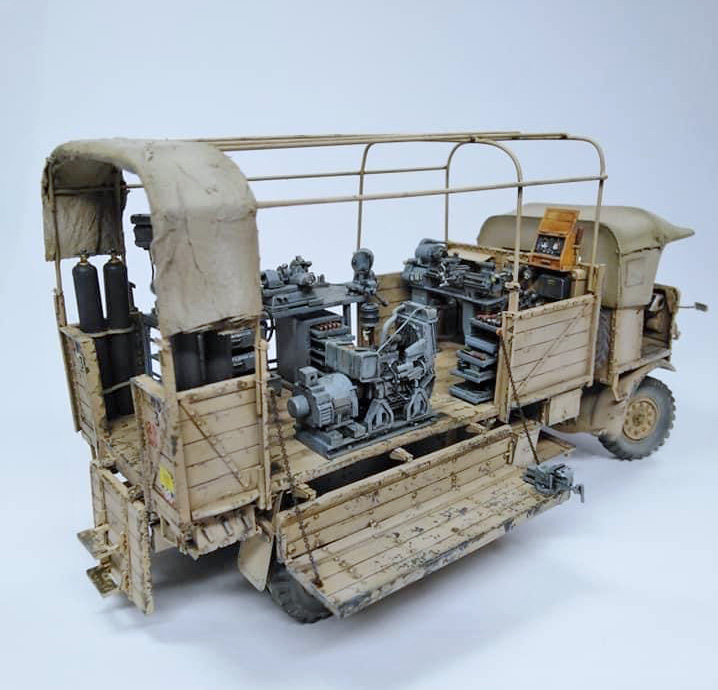
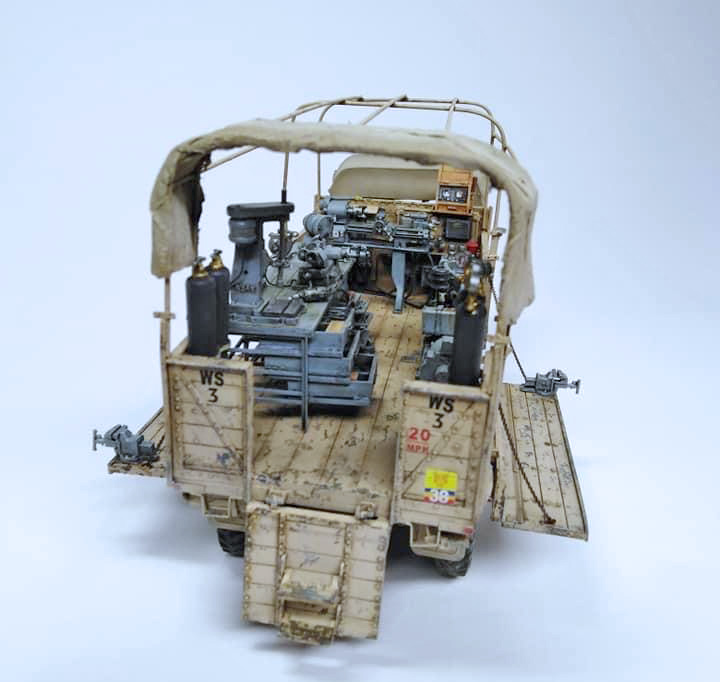
Acrylic sand base coat with my usual chalk green and brown cammo. This is the largest area of chalk I have done to date but it seems to have worked fine.
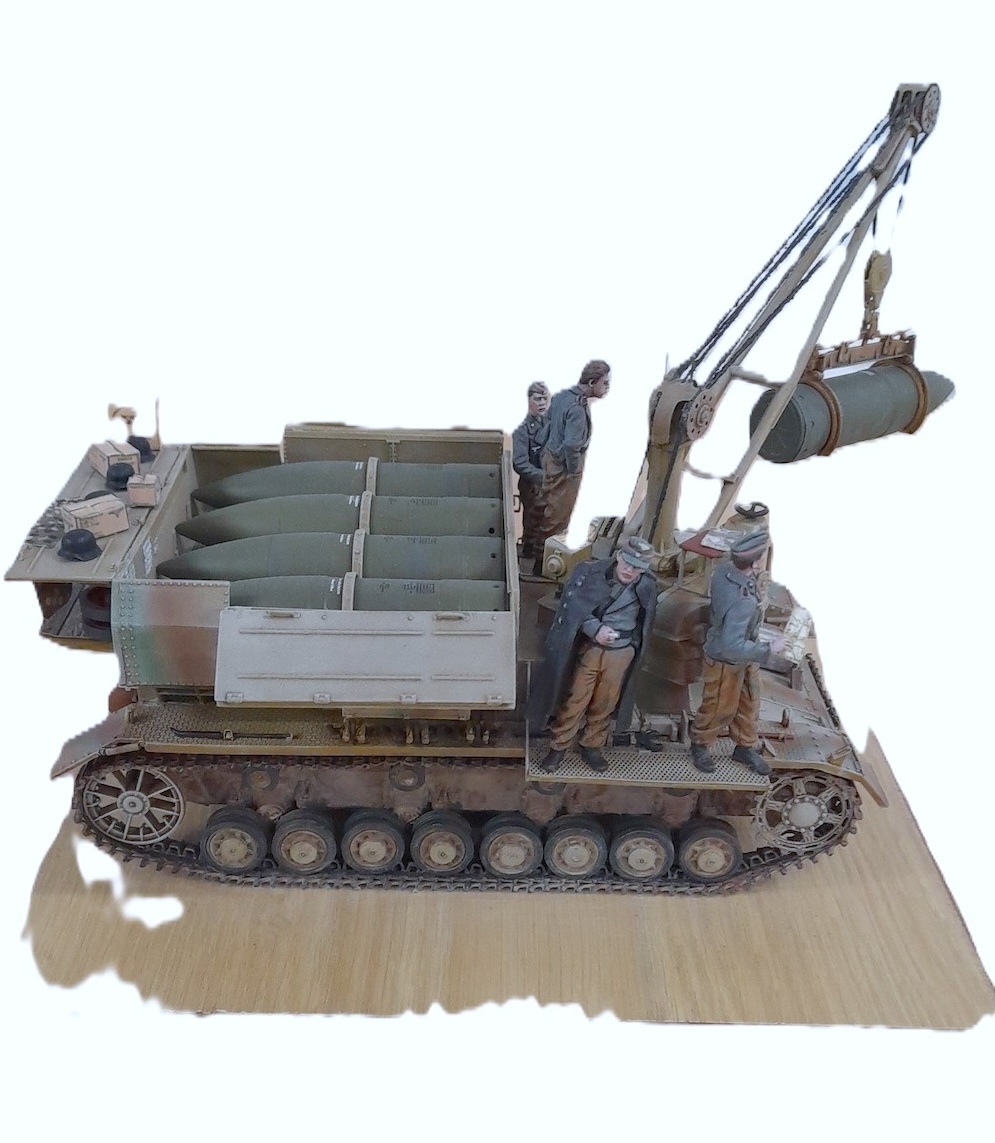
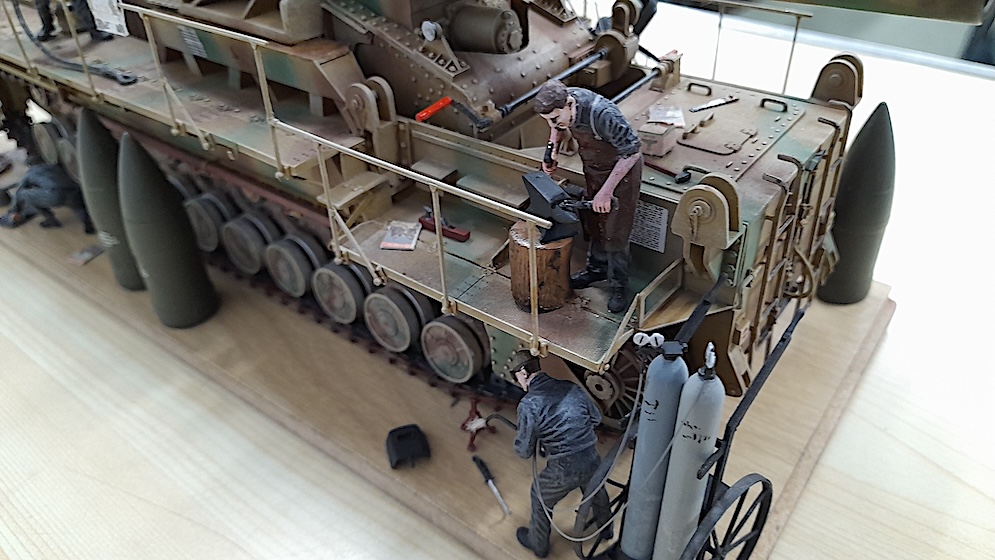
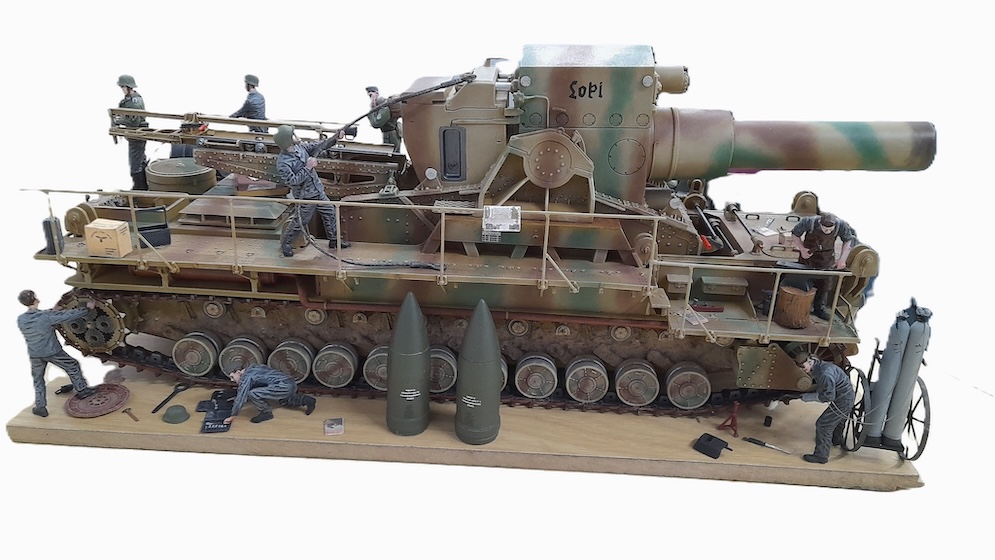
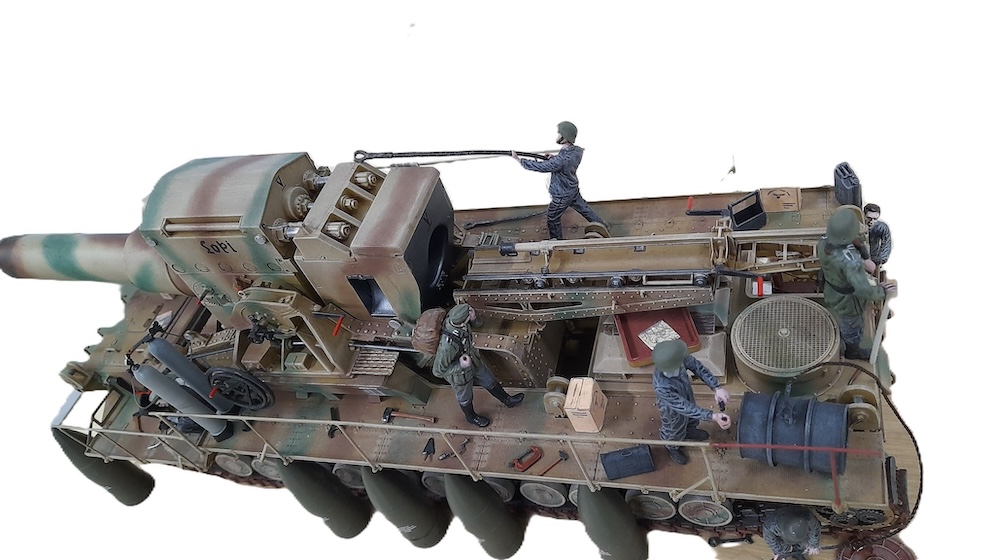
Figures are MiniArt for the workers in their fatigues and Dragon for the two in more conventional uniforms.
Pete S.
Hope you all like it!
Gary K.
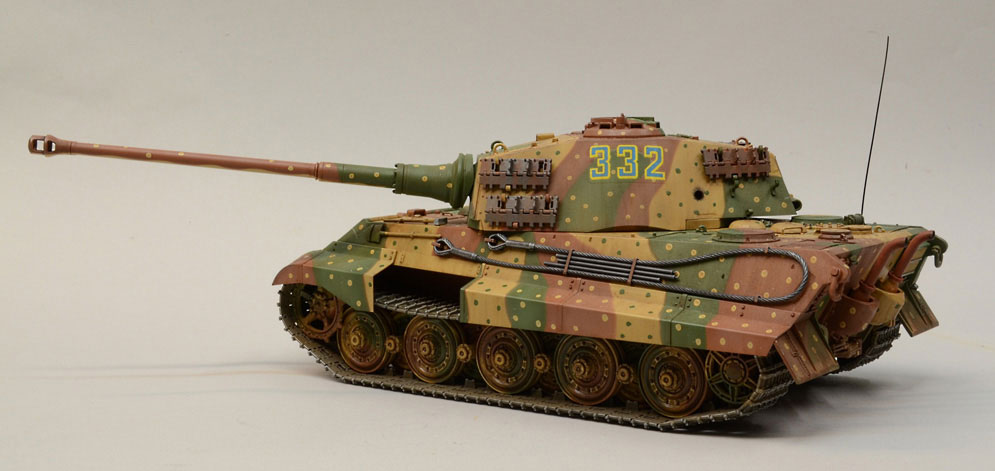
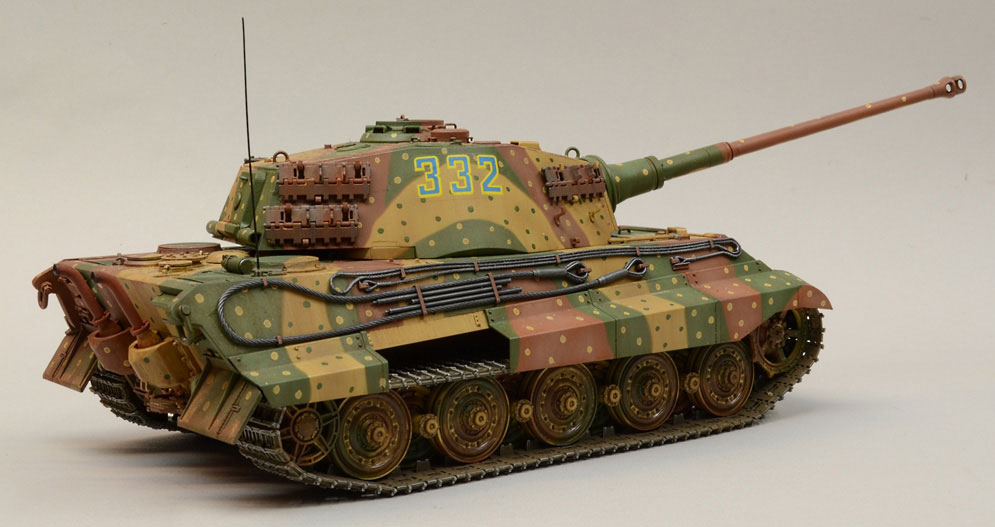
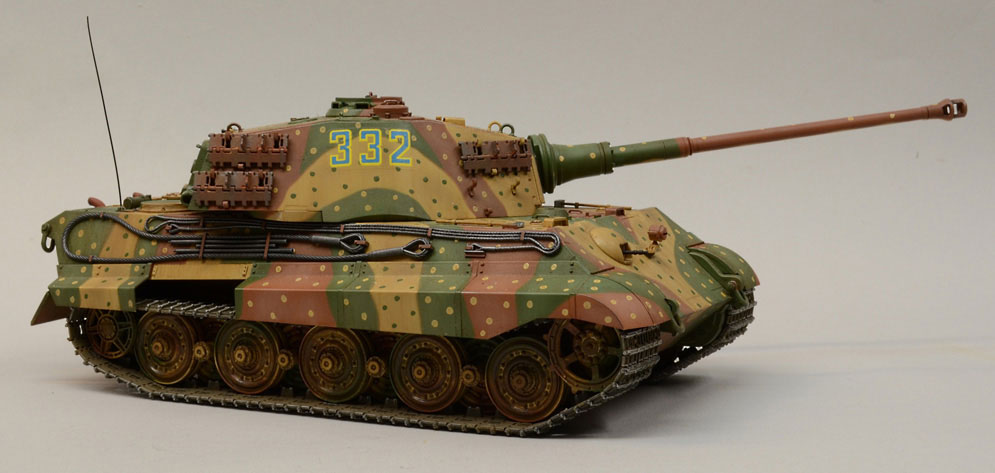
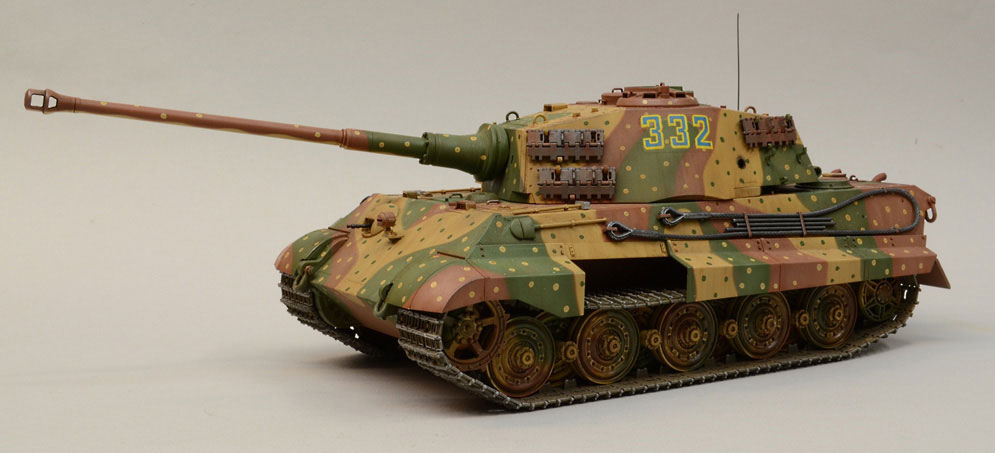
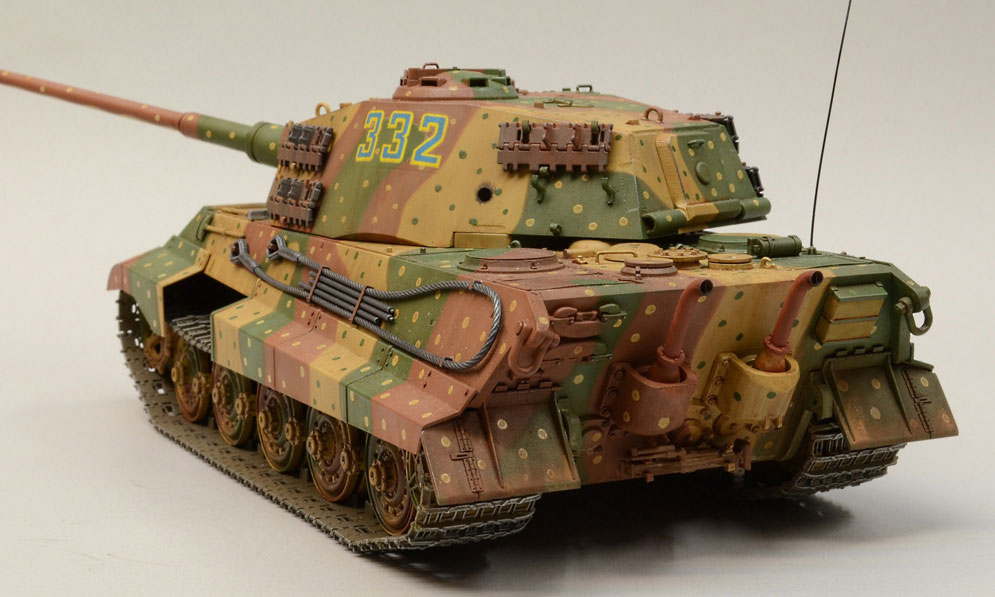
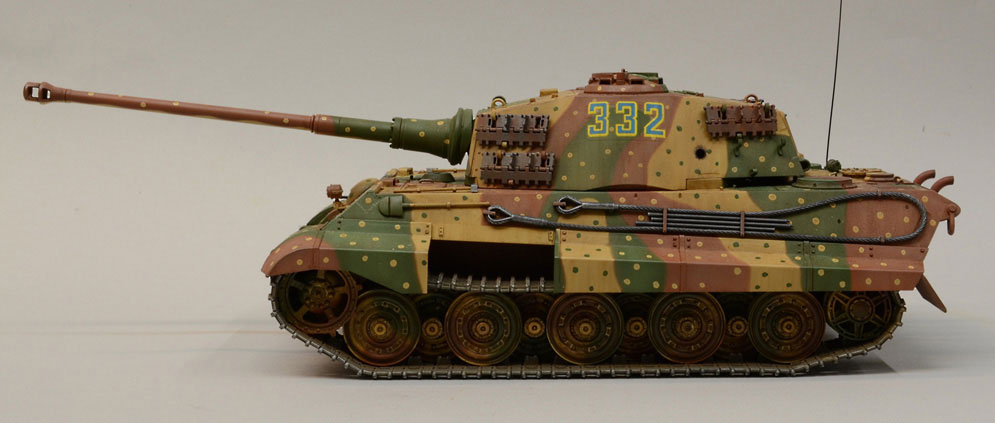
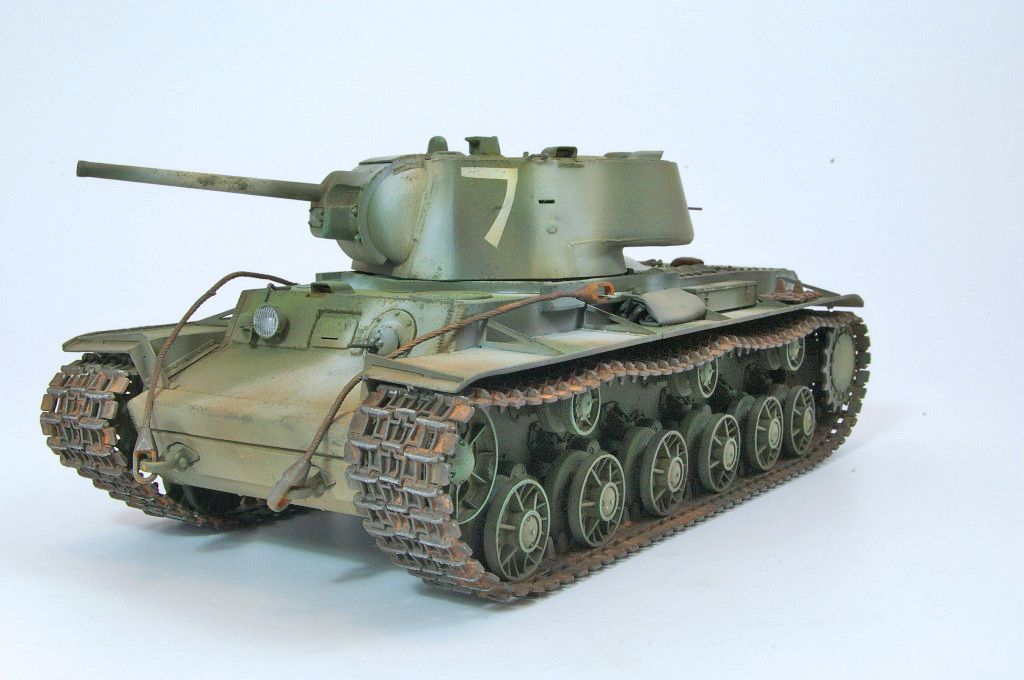
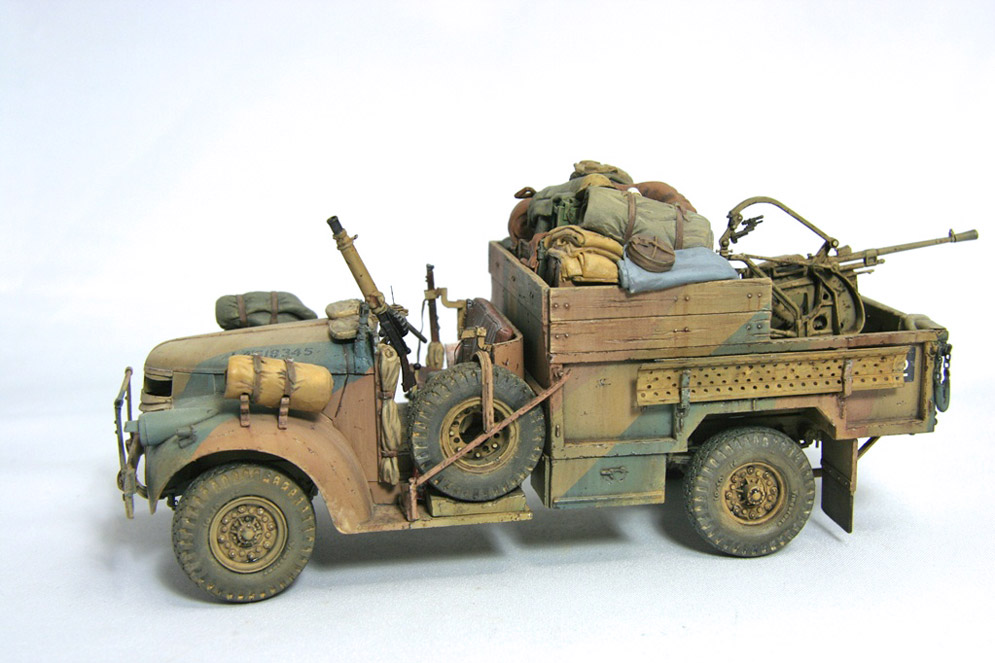
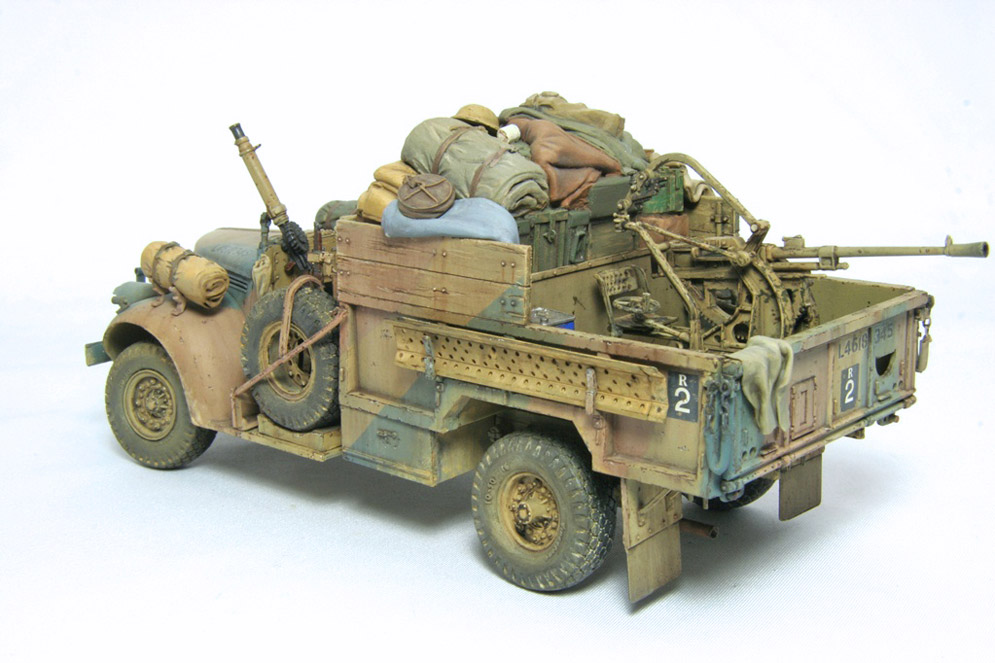
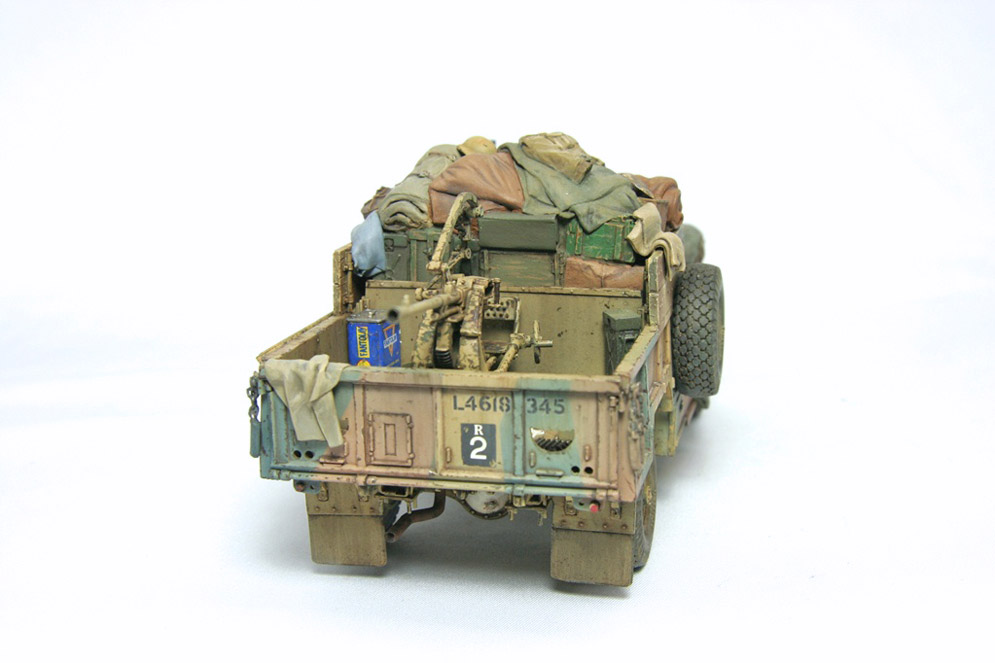
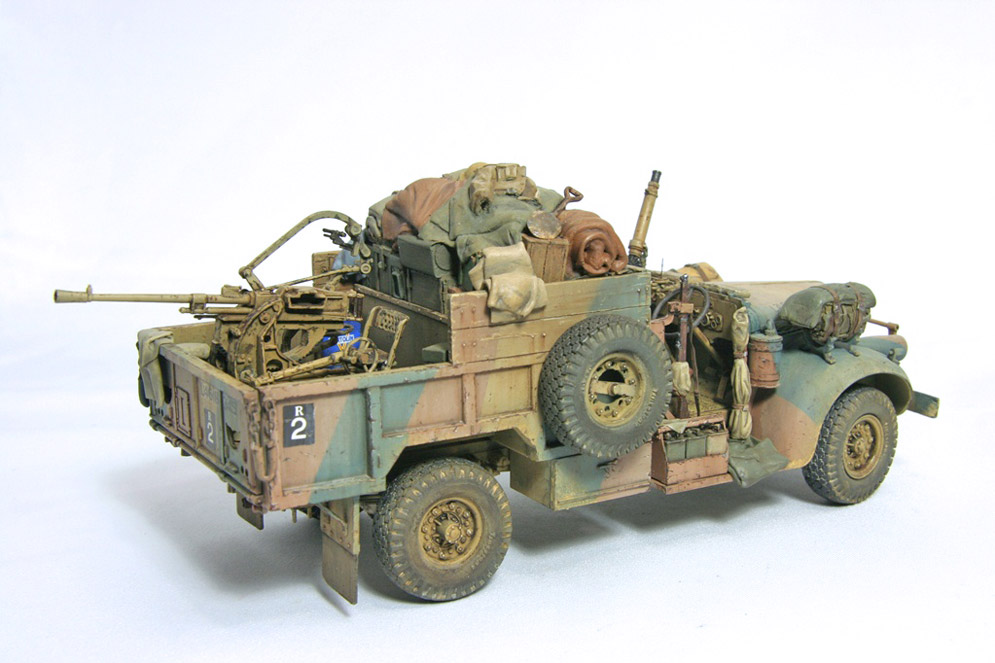
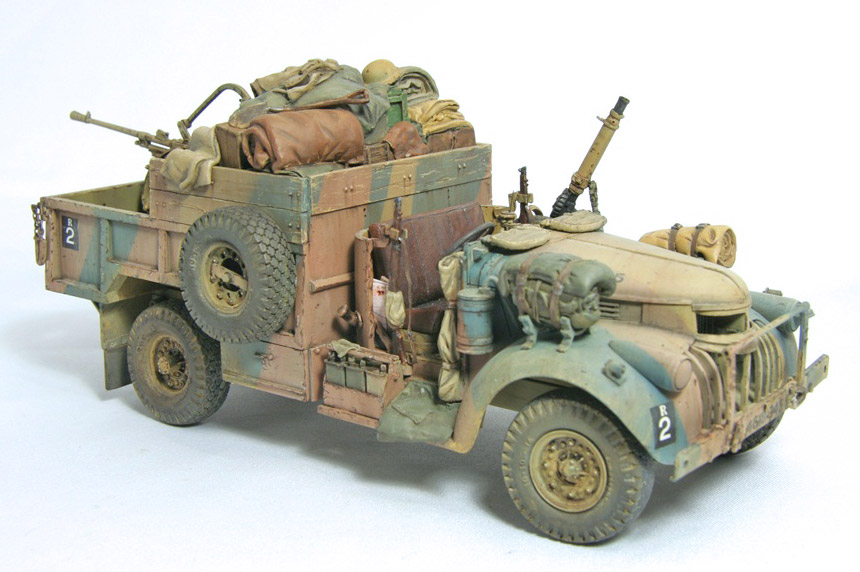
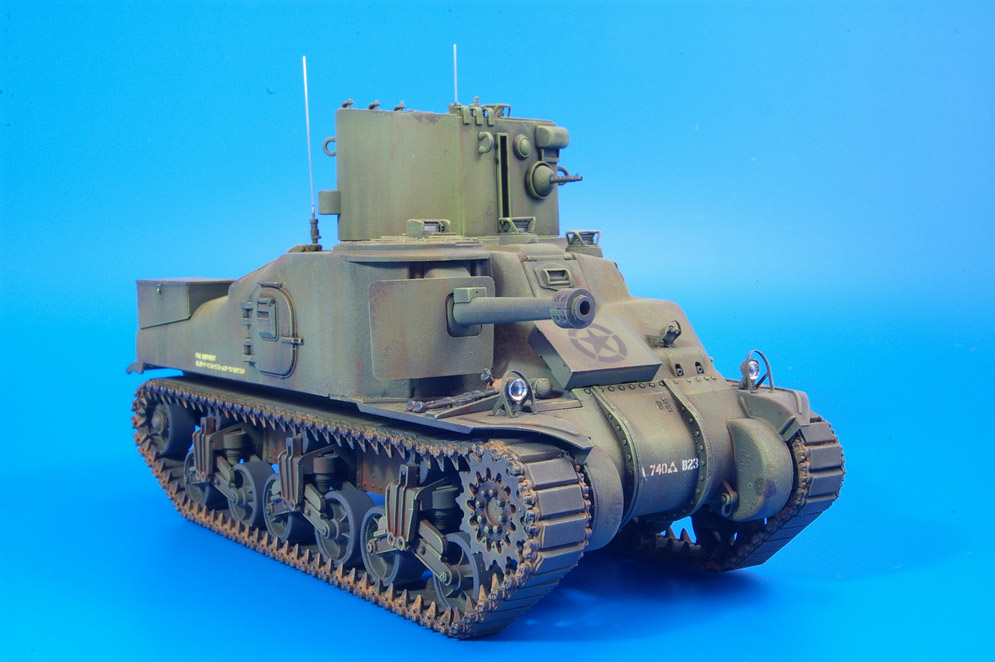
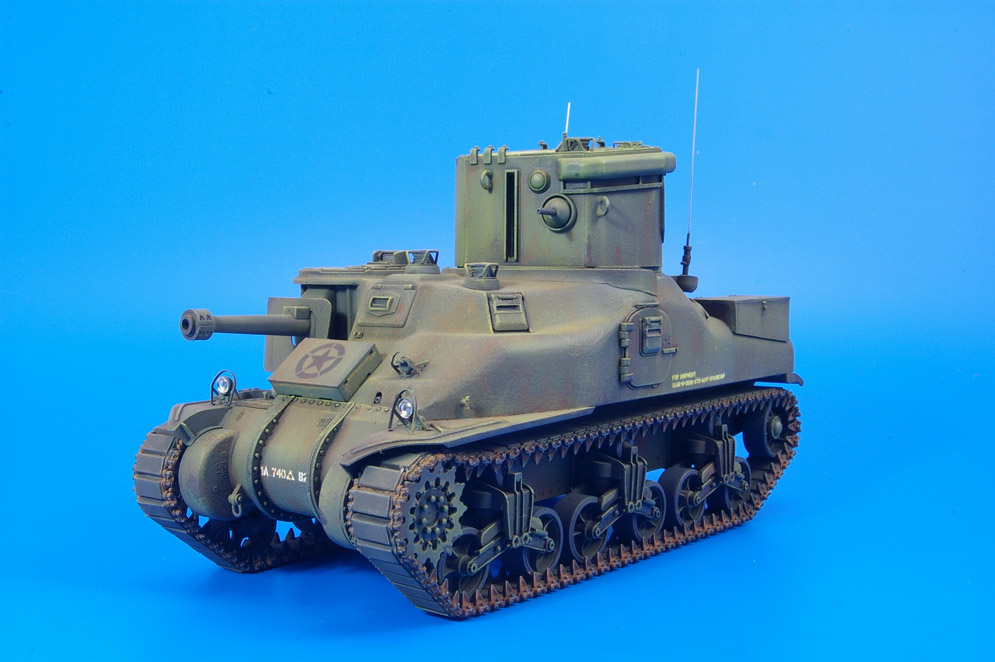
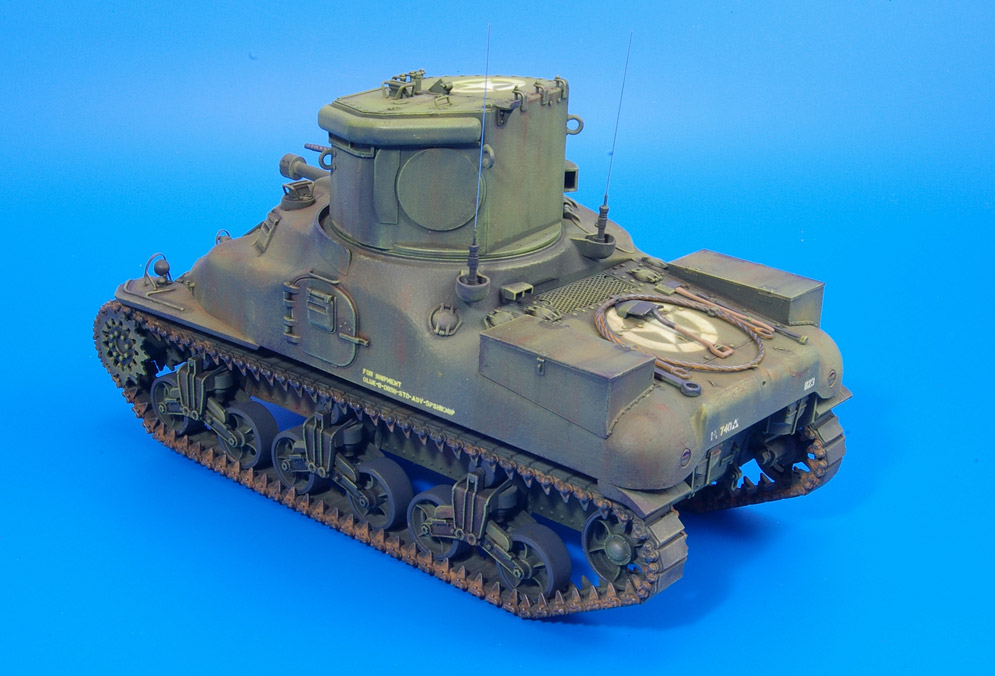
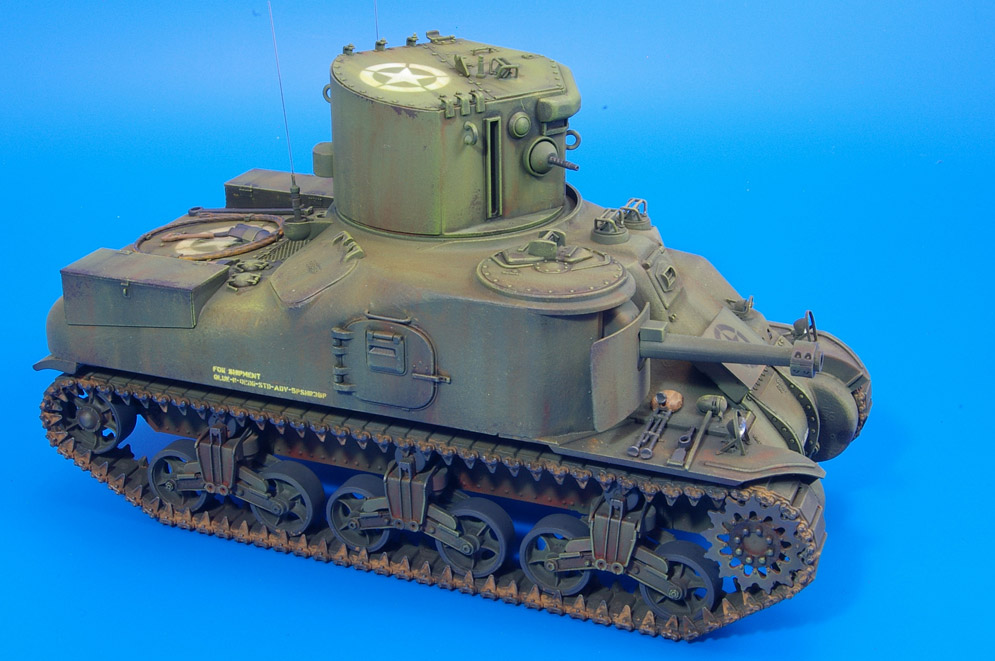
- I cut a section from each track guard and held the remaining guards in position with Blu-Tack for the spray painting
- The tank was painted using Xtracolor paints, X801 red/brown, X806 olive green and X29 light stone for the yellow
- I first sprayed the yellow, then masked up using Blu-Tack string and masking tape for the red/brown
- The masking was repeated for the olive green
- The red/brown and olive green were then faded by adding some gloss white to each colour
- The wheels were camouflage painted freehand
- The ambush scheme of olive green spots on the yellow and yellow spots on the red/brown and green were applied with a small brush
- The tactical number decals were then applied
- The entire model was then sprayed with Klear to protect the enamel paints from the oil washes
- For the washes I used burnt umber, raw umber and Humbrol dark earth all thinned about 10:1
- The wheels were then added, followed by the tracks and then the track guards, fixed on with super glue – finally the spare track links, towing cables and tools were detail painted and added on.


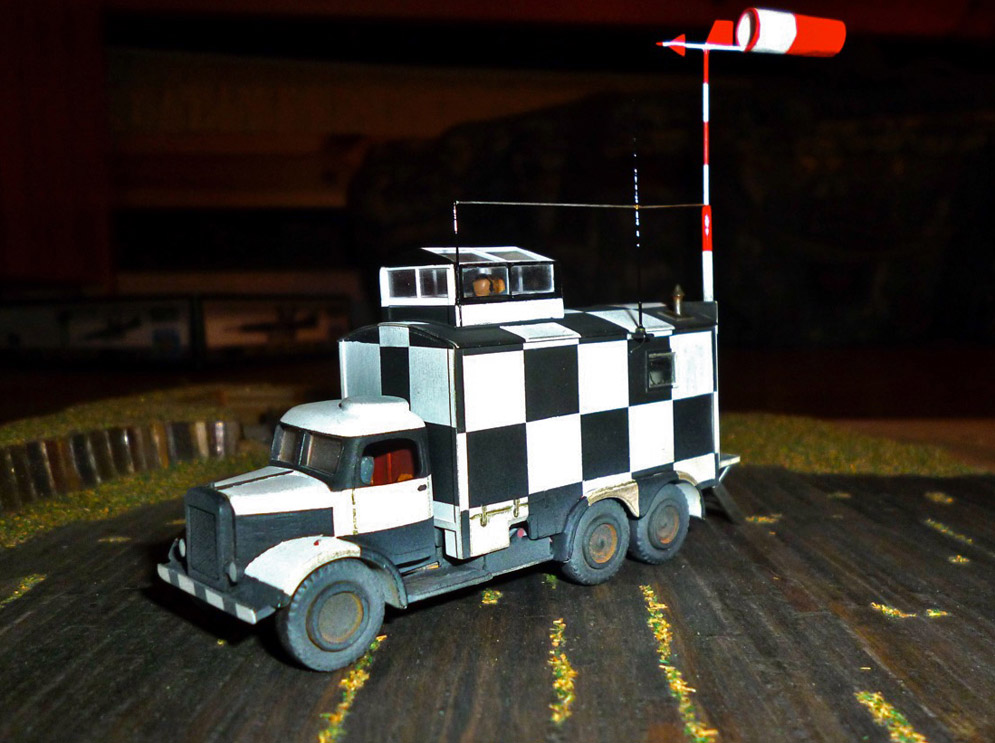
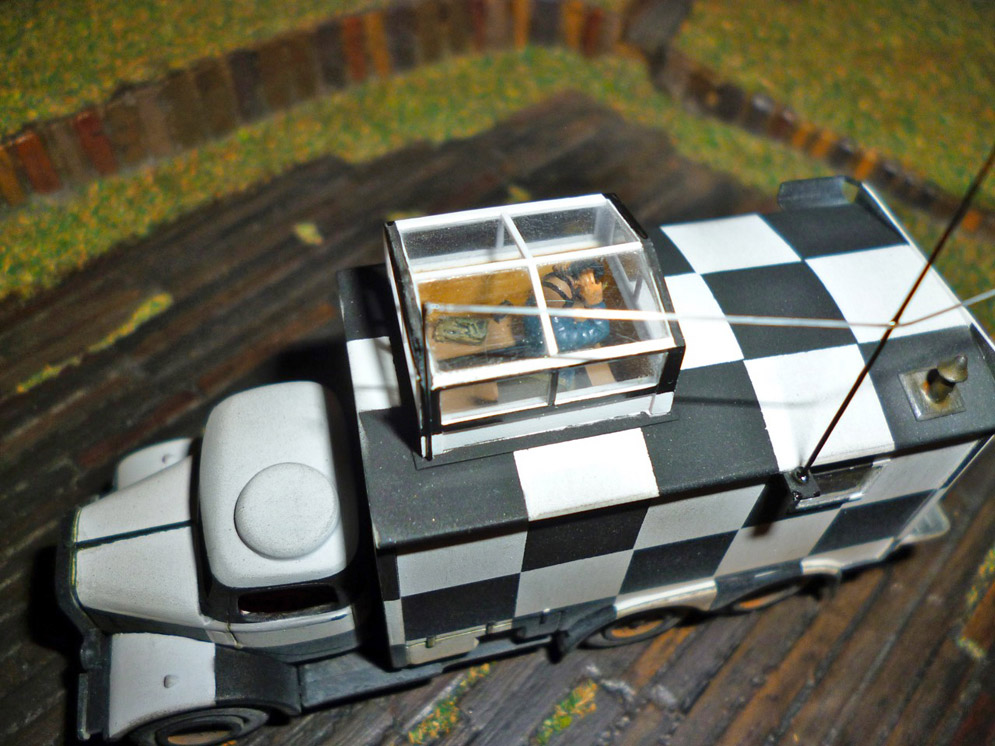
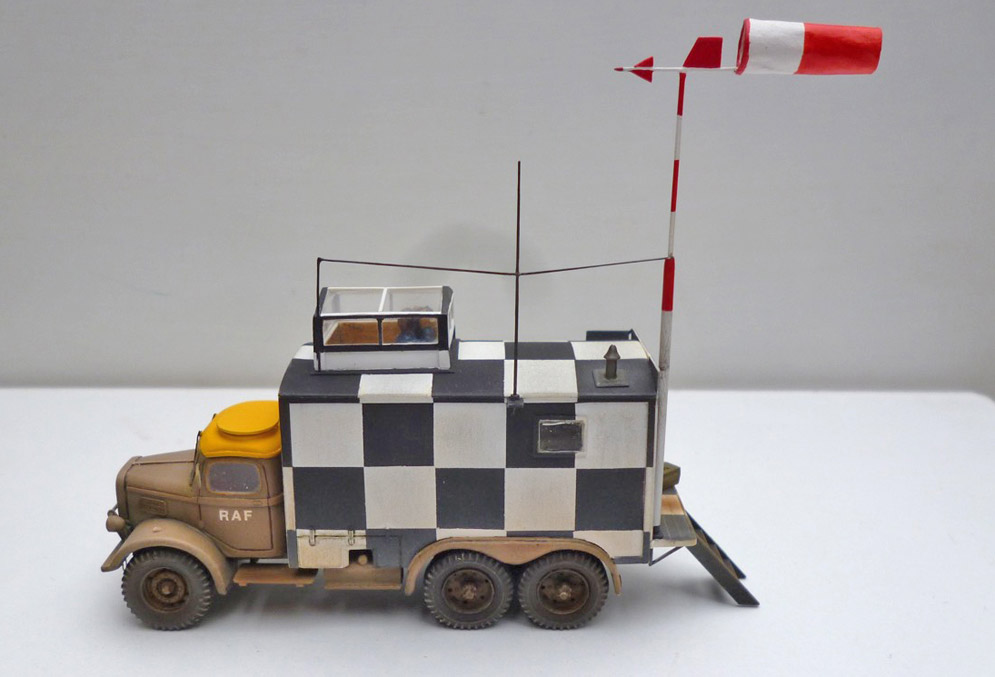
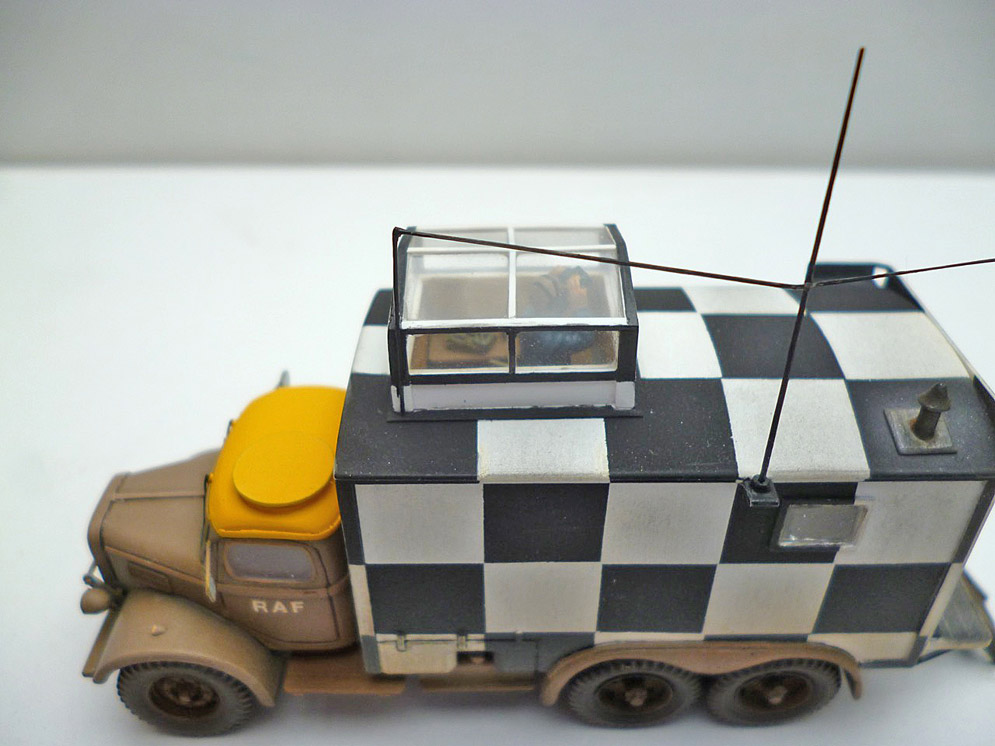
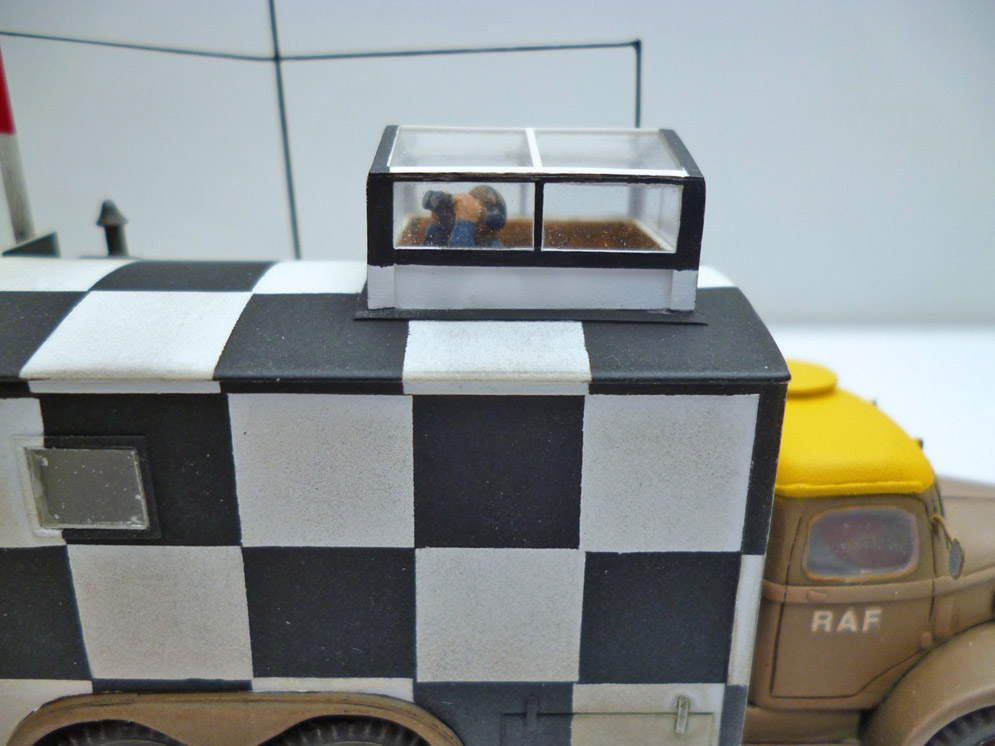
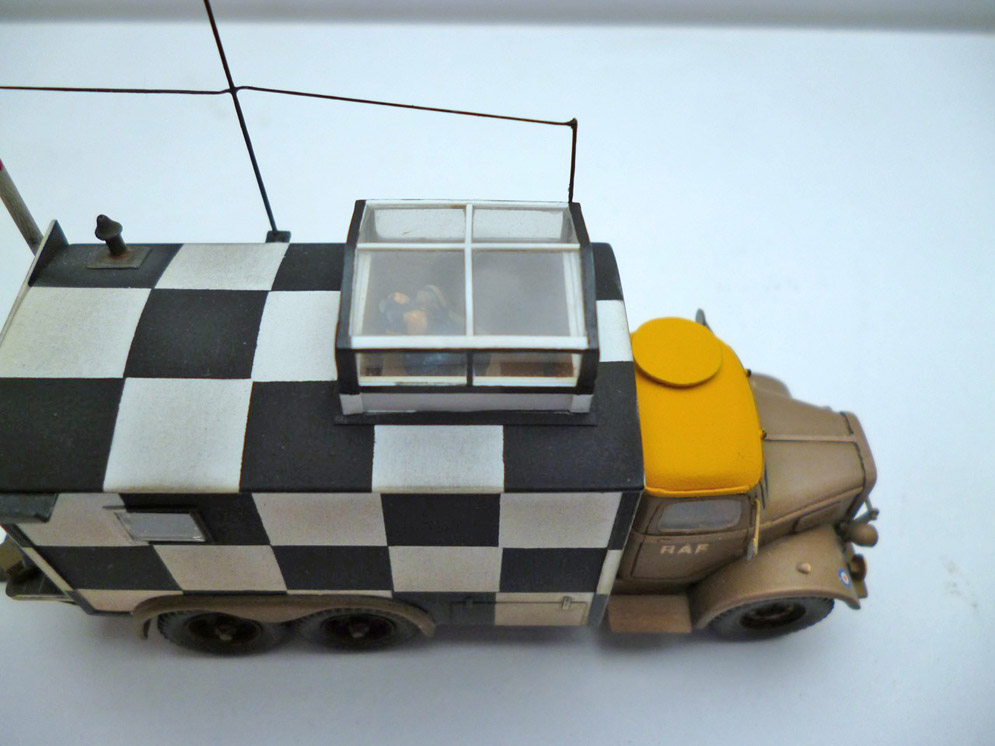
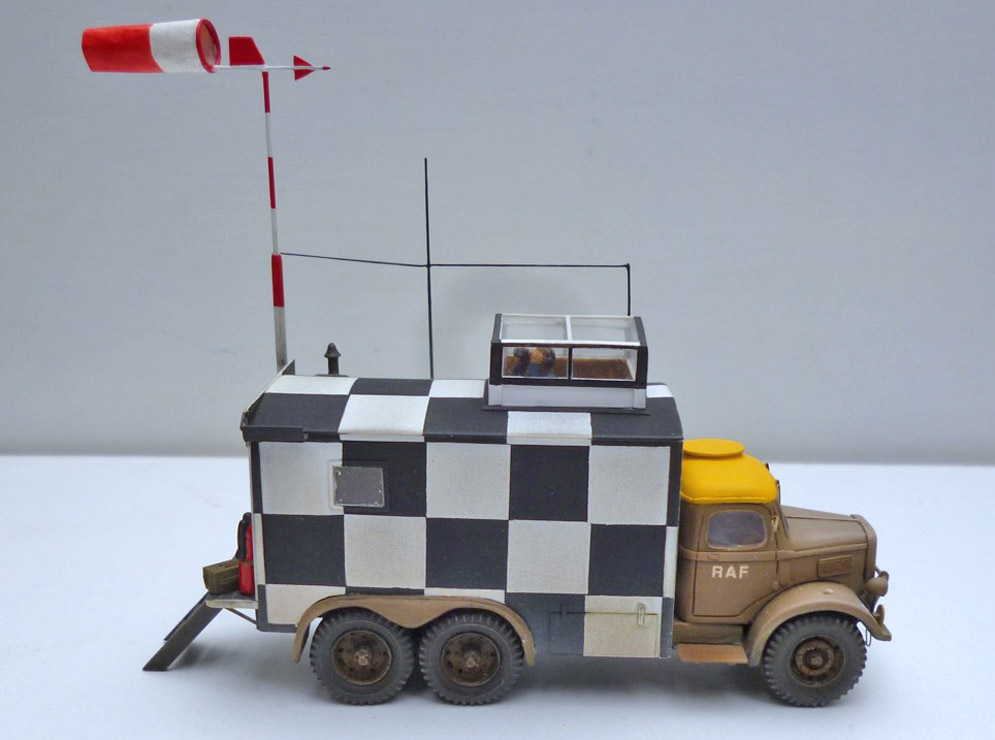
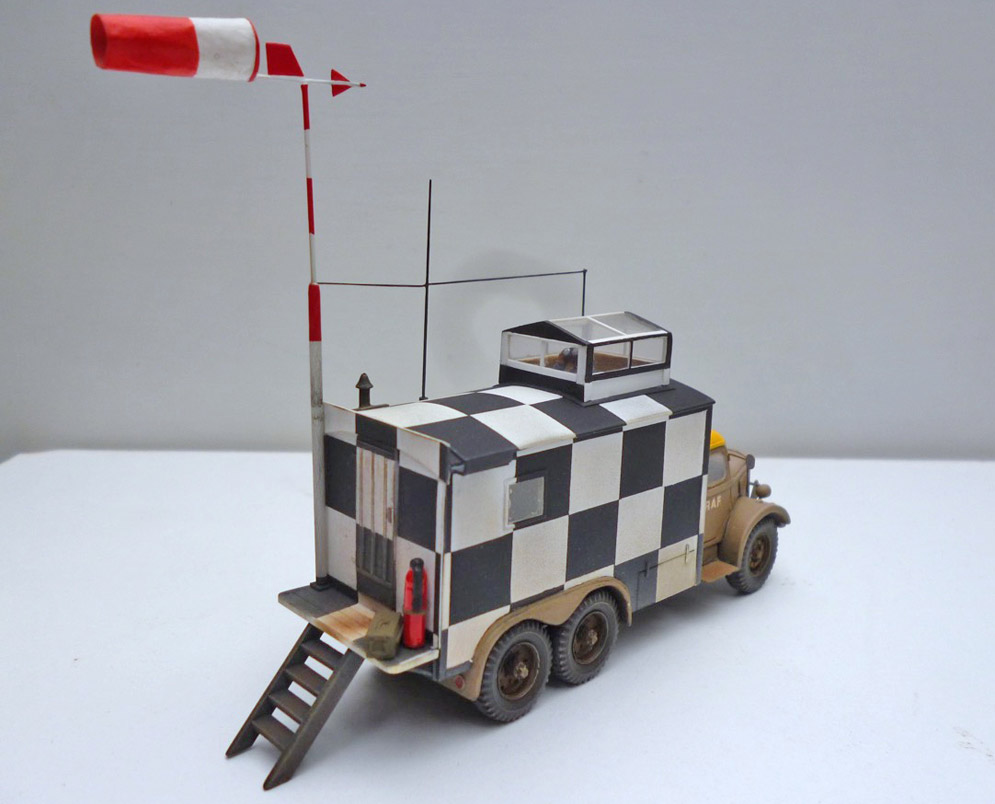
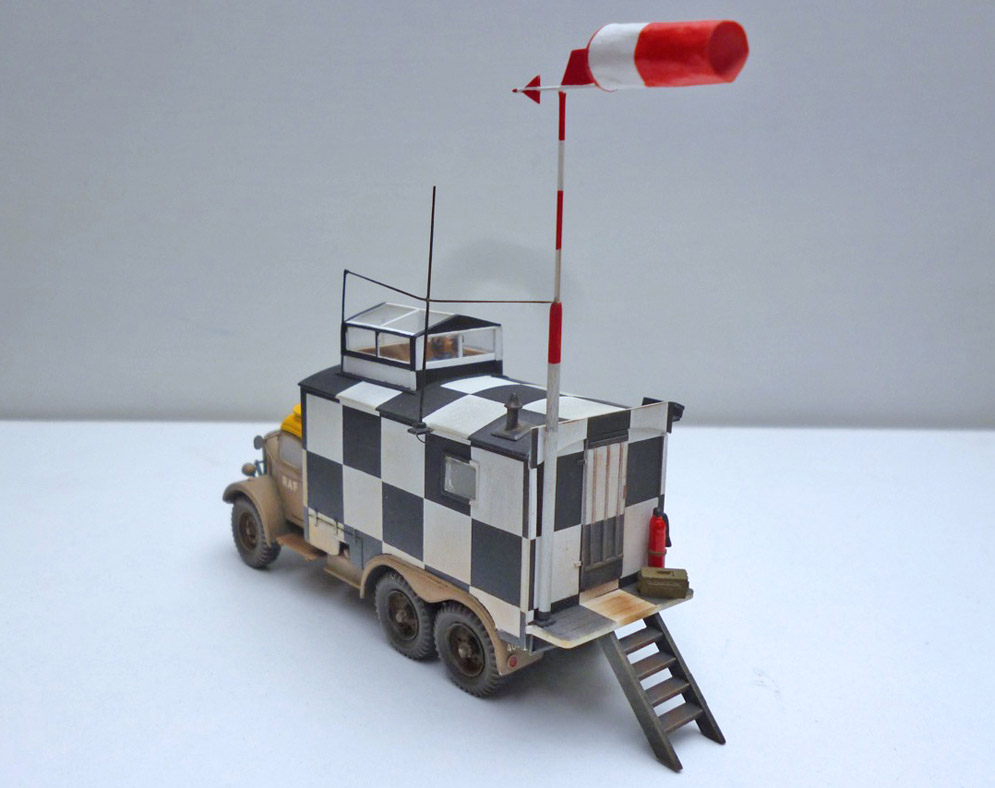
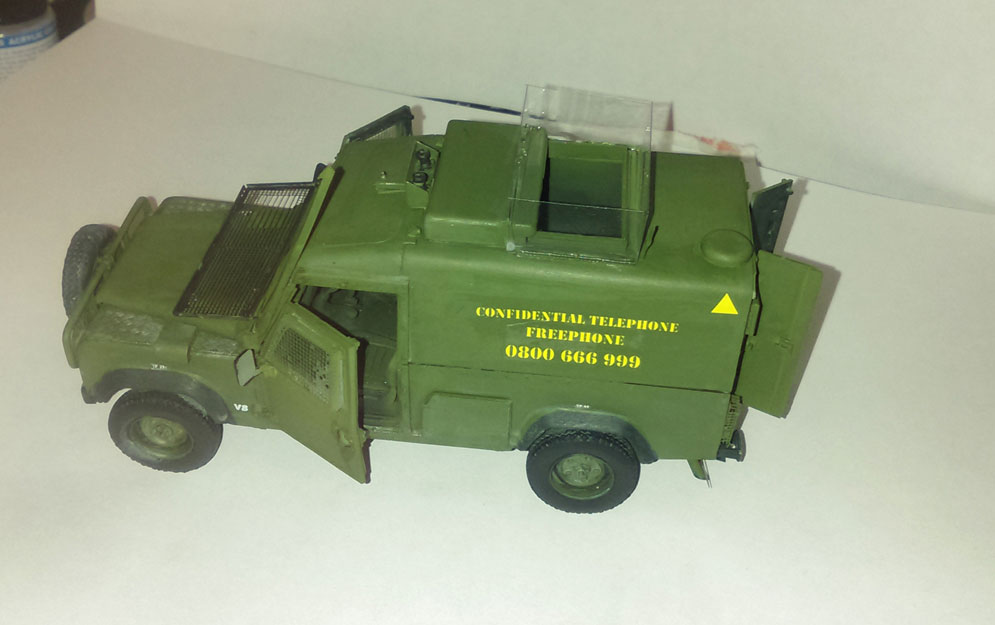
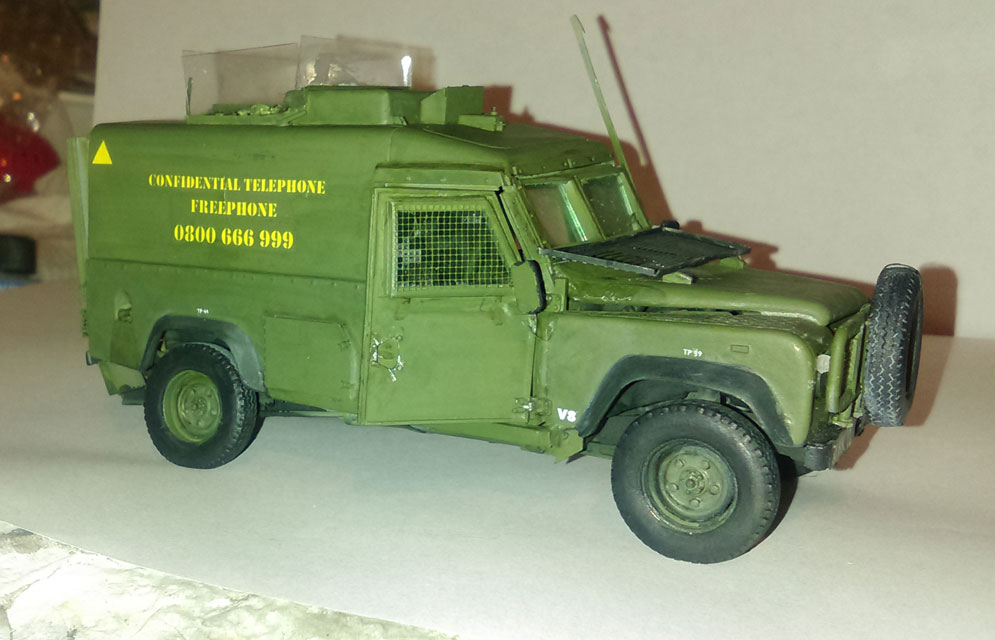
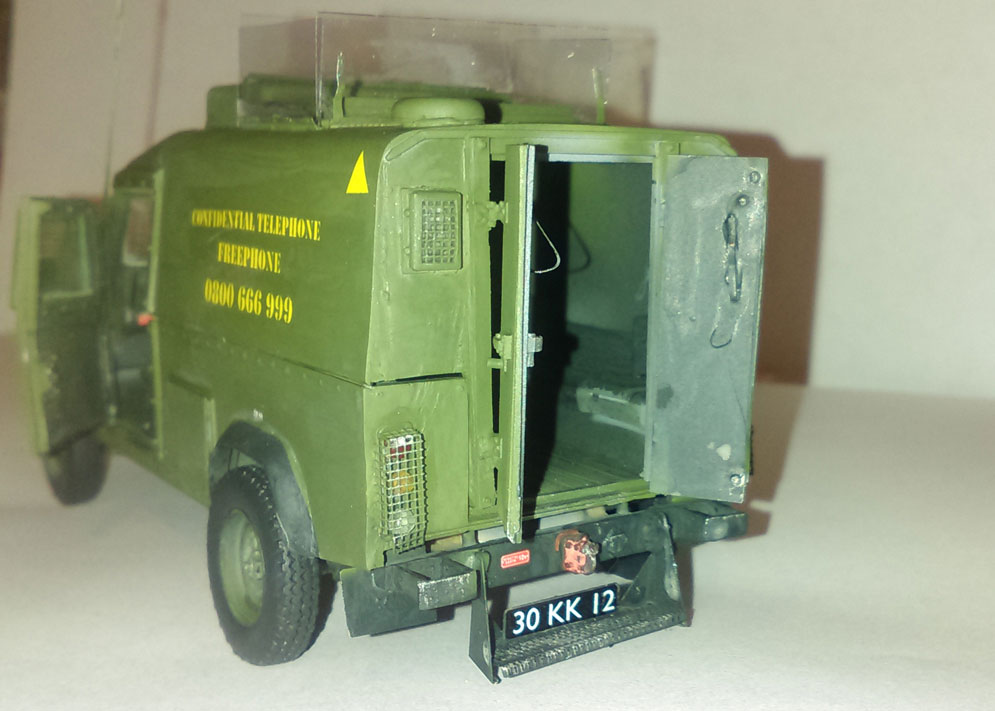
After a few years, last year after the 2018 North Shields Model Show I decided to make the car better, and a more realistic colour for an RAF car in 1943/44.
So I made new windows, headlights, and mirrors.
The result that I found much better…
Hope you like it! Gerhard La C.
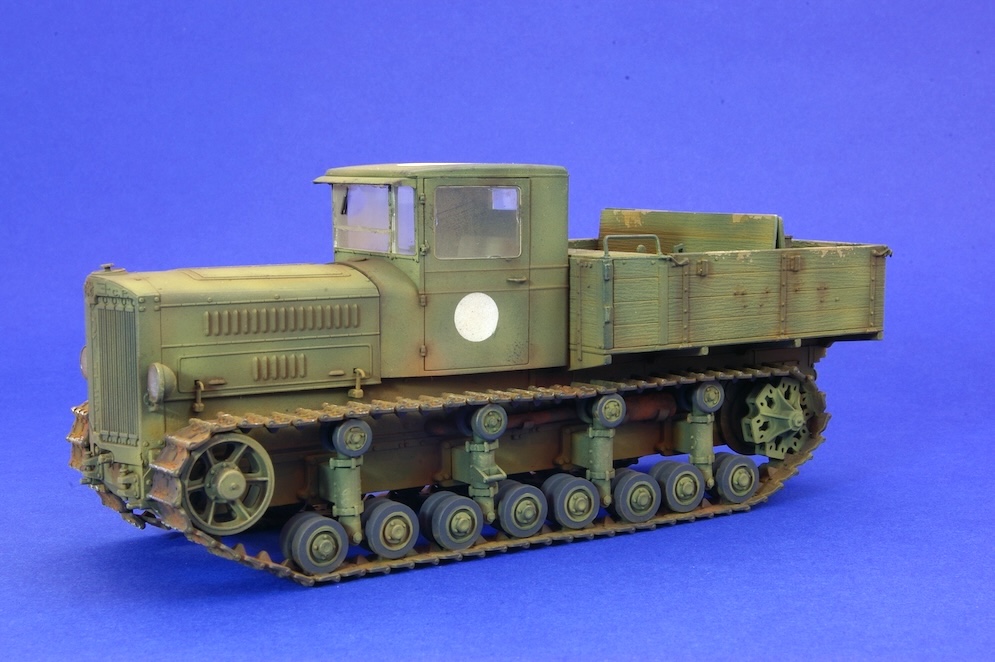
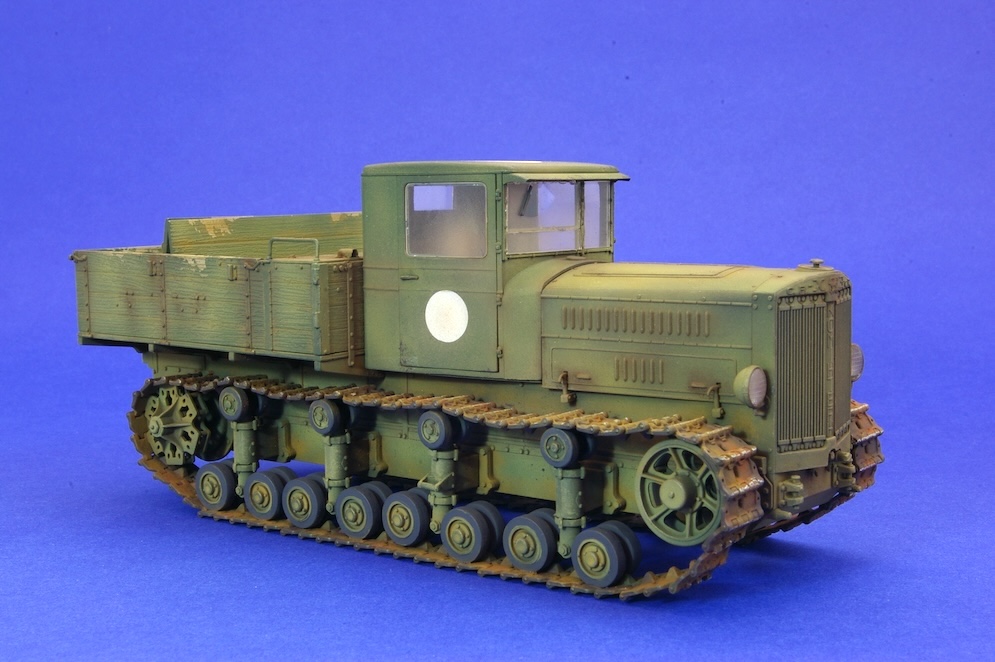
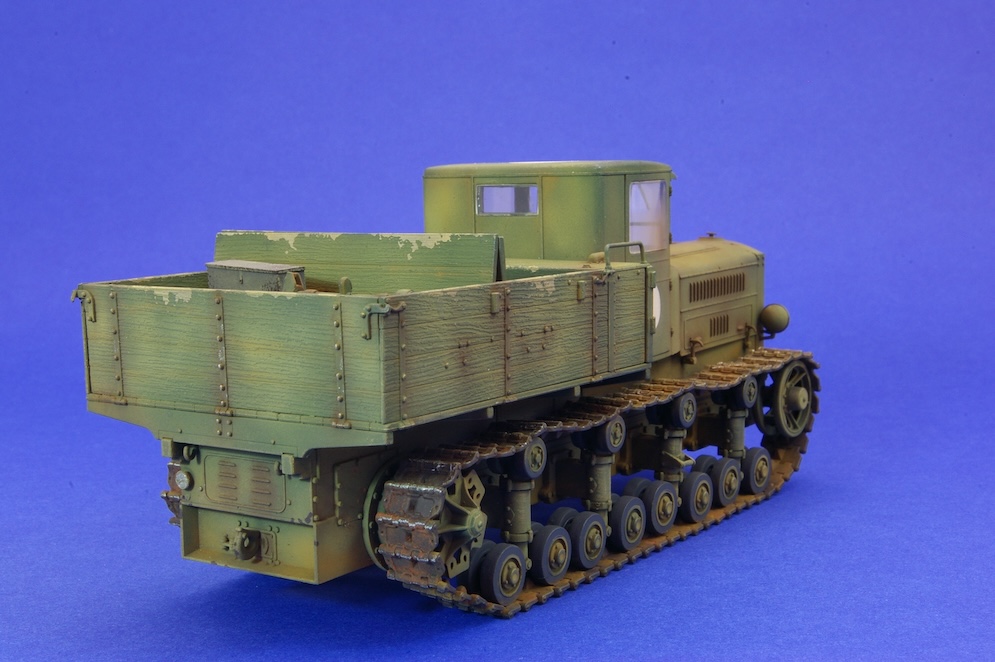
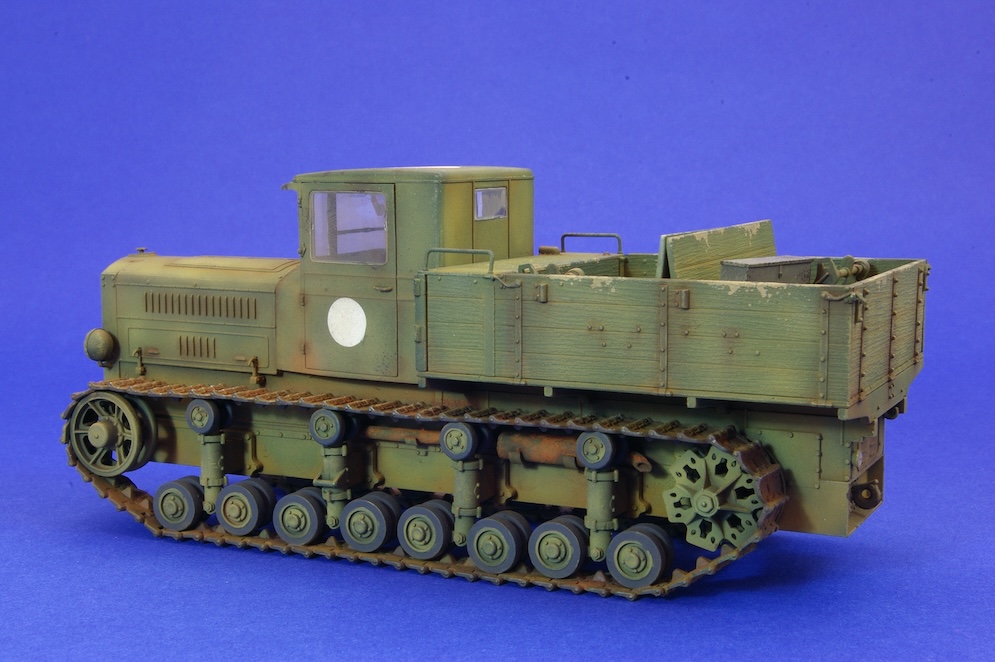


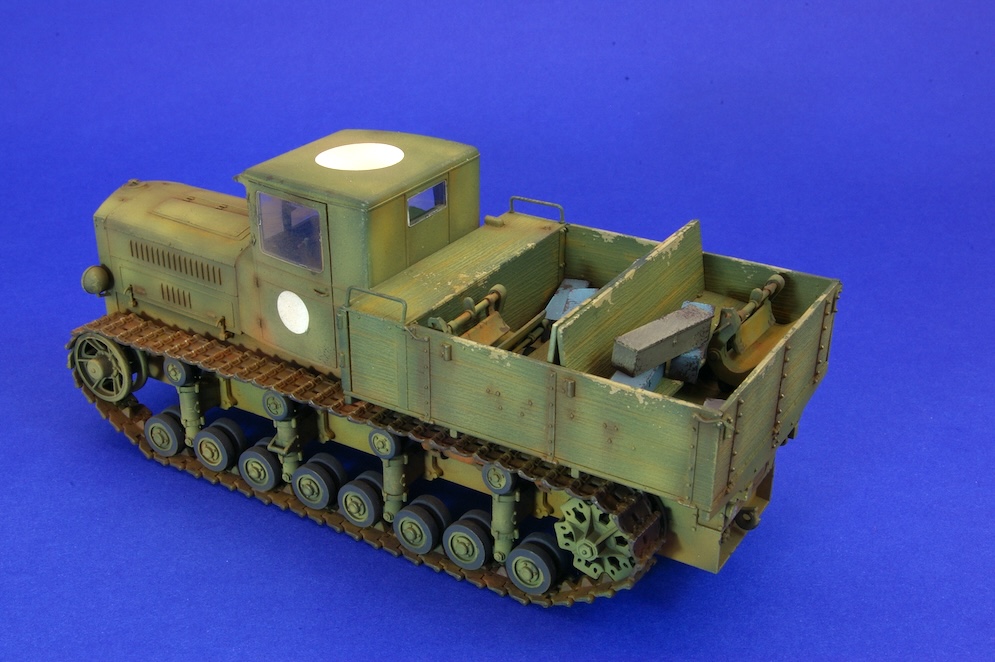
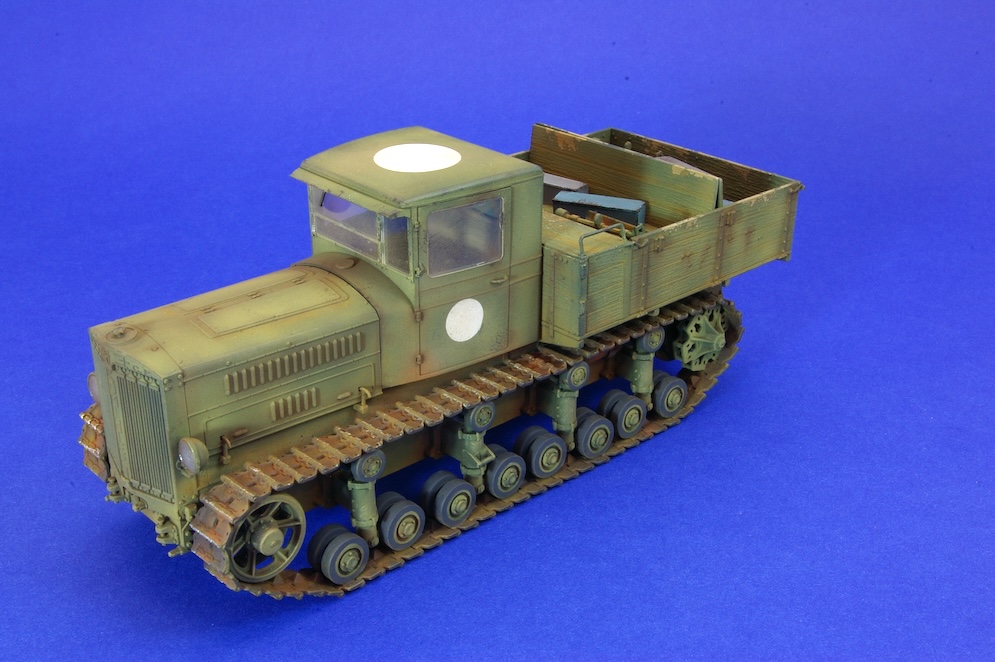
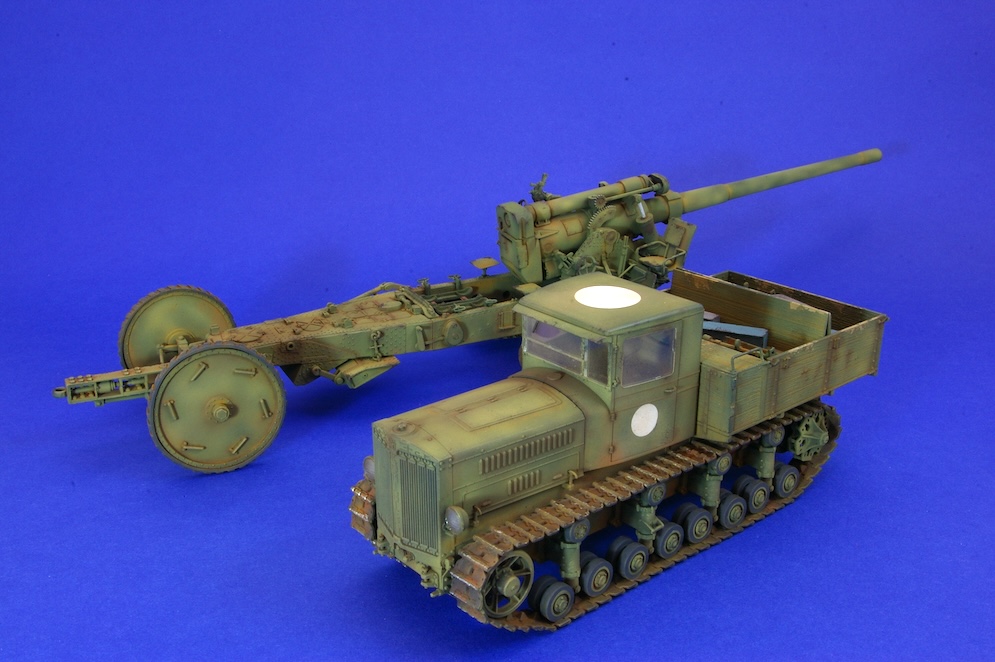
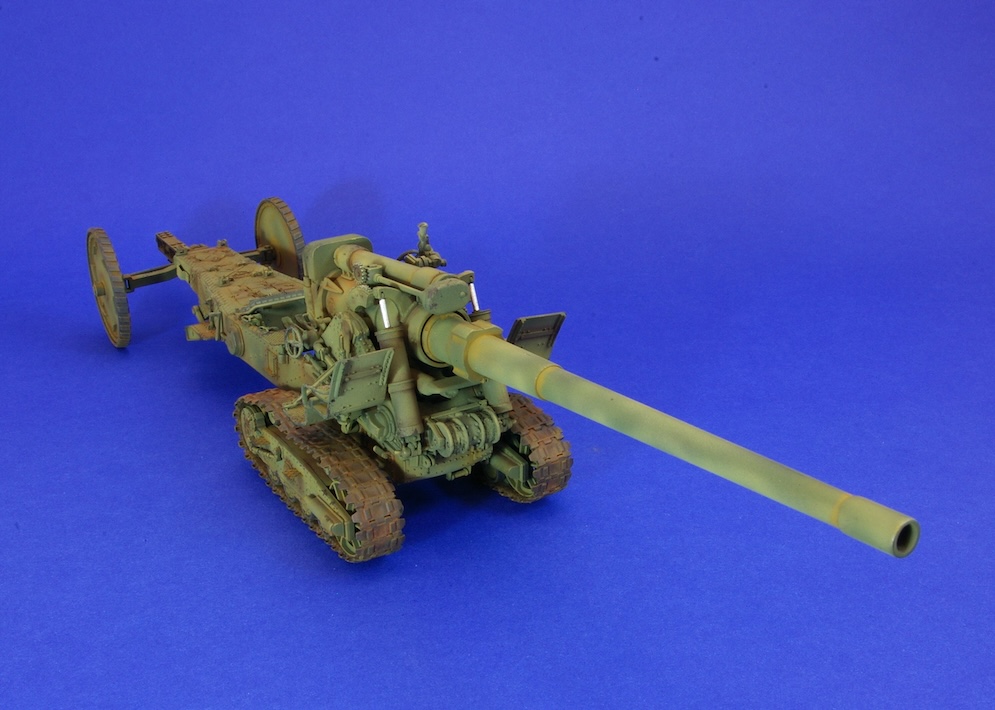
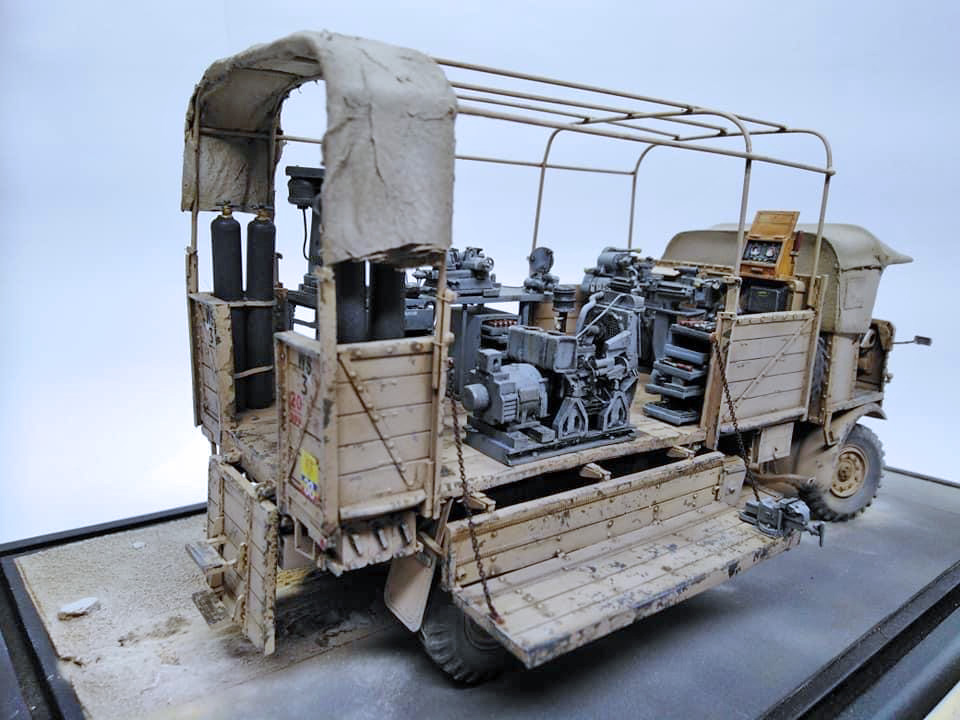
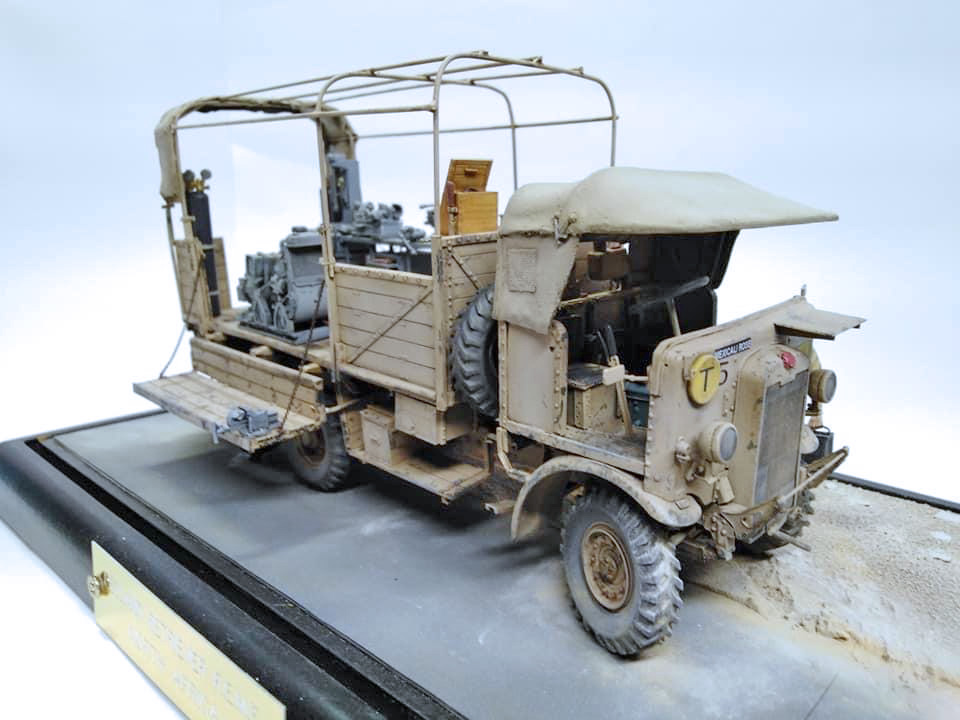
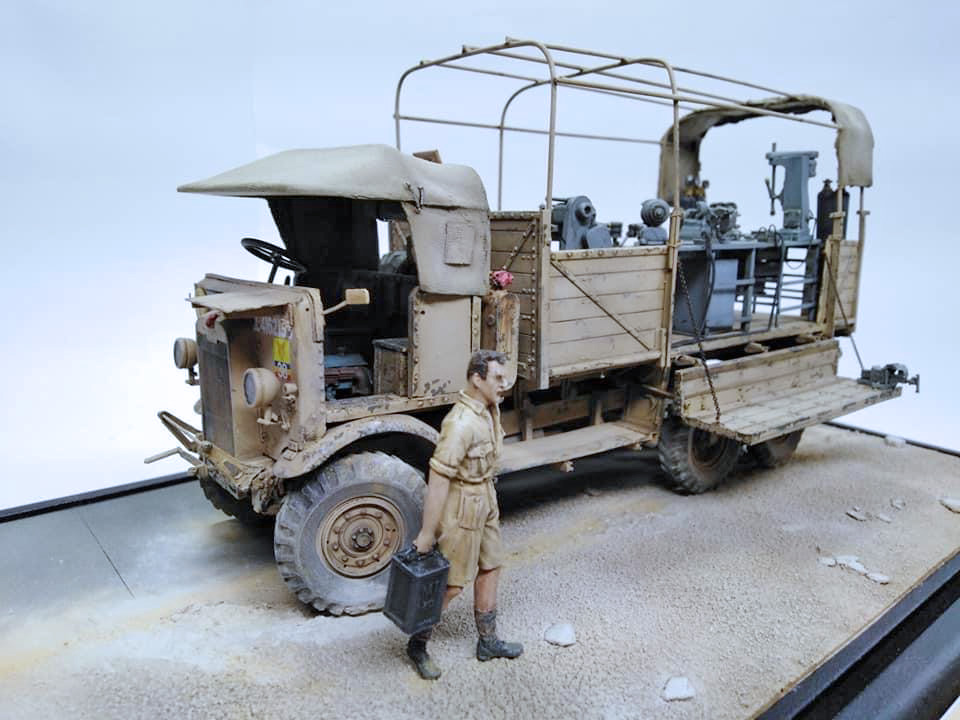
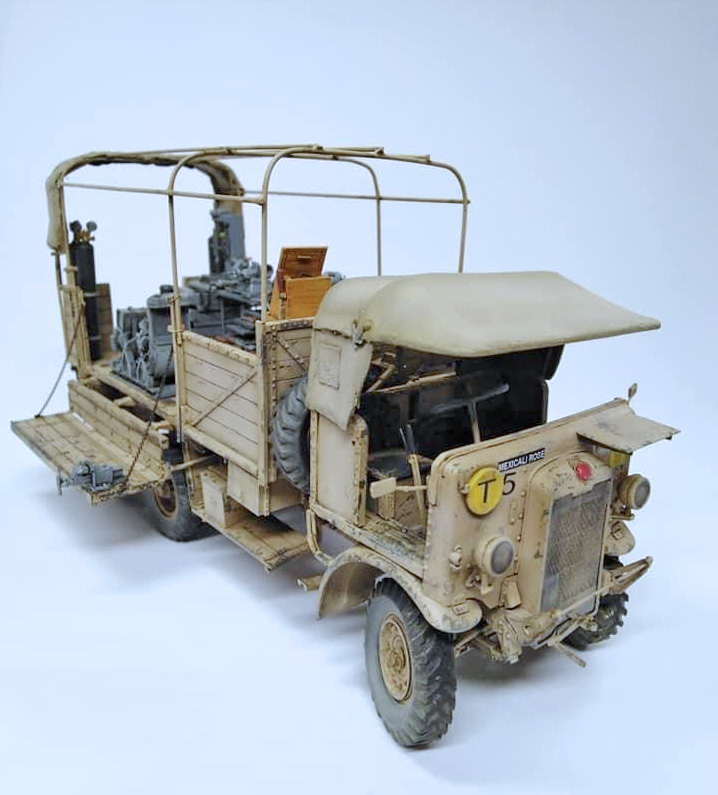
As I was building the tractor kit, it occurred to me that a tractor really should be towing something, so I searched through my ‘loft insulation’ and came up with Trumpeter’s BR-2 152mm artillery gun. So that the two models looked as if they were meant to be together, I built them at the same time and painted / weathered them in the same way.
The models were built (mostly) straight from the box.
Trumpeter’s Kommintern Tractor kit is typical of their armour kits in that it fits together well, but there are maybe a few extras that could be added by the modeller, particularly inside the cab.
The BR-2 gun attracted me because of the odd-looking tracked carriage. This kit originates from 2013 and again fits together well (apart from the vinyl rims for the rear wheels), while again leaving a few areas that could be improved.
The gun carriage has almost no detail on its underside and I’m sure that there were a lot of rivets that could be added here as the rest of the carriage is covered in them. Because of the way the kit fits together there are a couple of awkward looking gaps in the gun carriage behind the tracked suspension units. I covered these over with thin card and detailed the area with rivets made using a punch and die set. In retrospect there is almost nothing of this correction that can be seen on the finished model, so I probably need not have bothered.
A few boxes representing ammunition crates and general stowage were made using 20 and 30 thou card and old photo-etched parts left over from other kits. These were painted in several different colours (using anything except green to get a little much needed colour onto the model). These were placed at random into the back of the tractor along with the two shell carriages from the BR-2 gun kit.
I enjoyed building these kits, but noted after their completion that the towing points on the tractor and the gun are at completely different heights making it impossible for the tractor to actually tow the gun. However, as long as I don’t mention this in a popular online modelling magazine nobody is ever going to know.
Dai W.
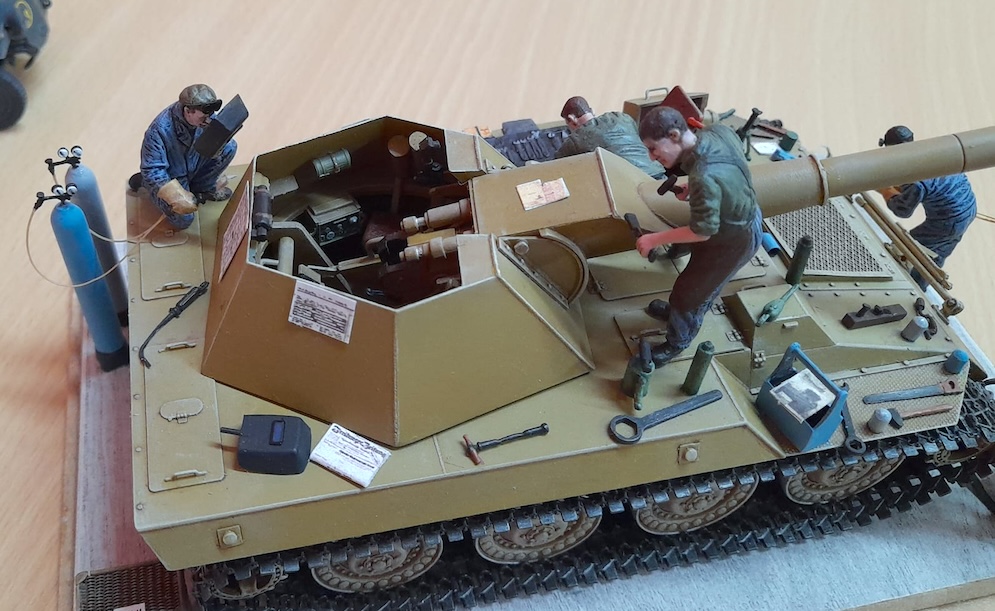
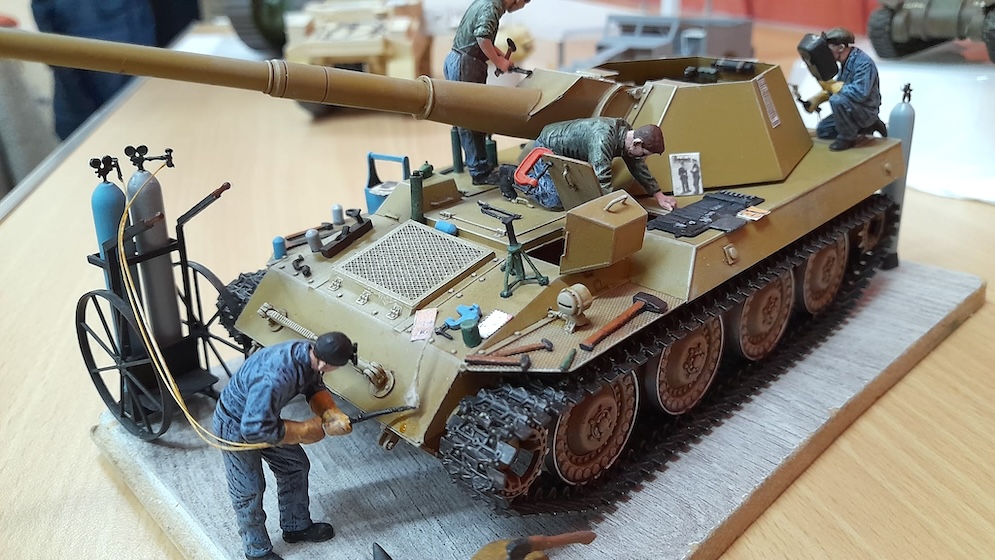
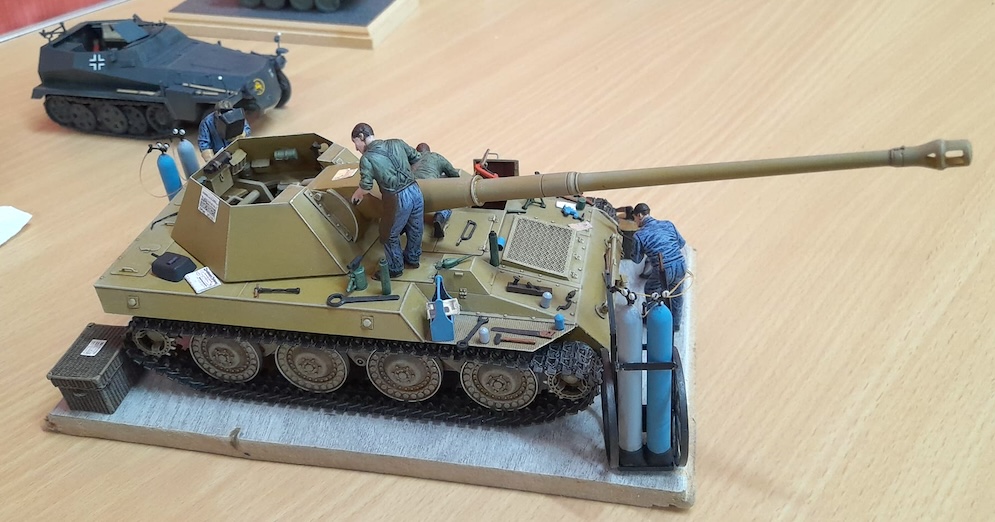
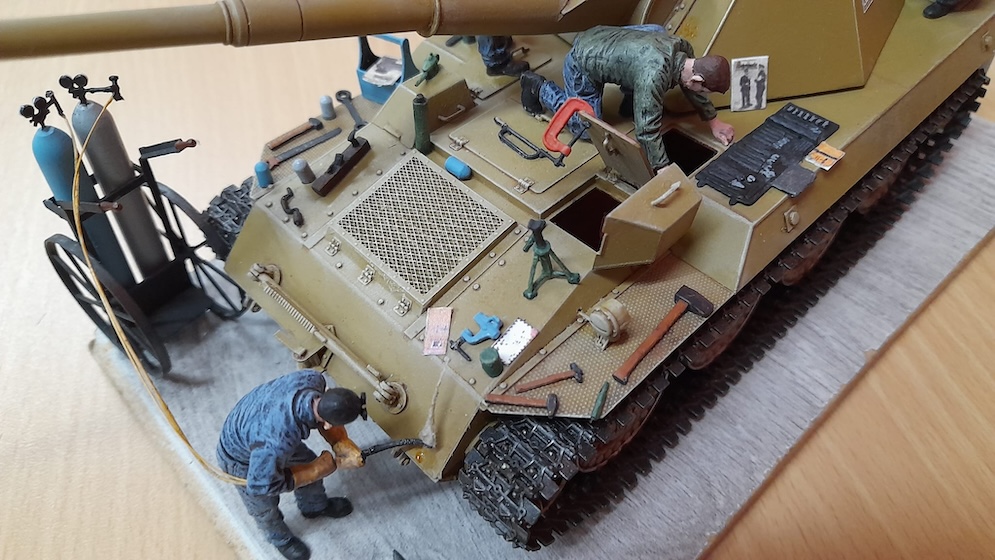
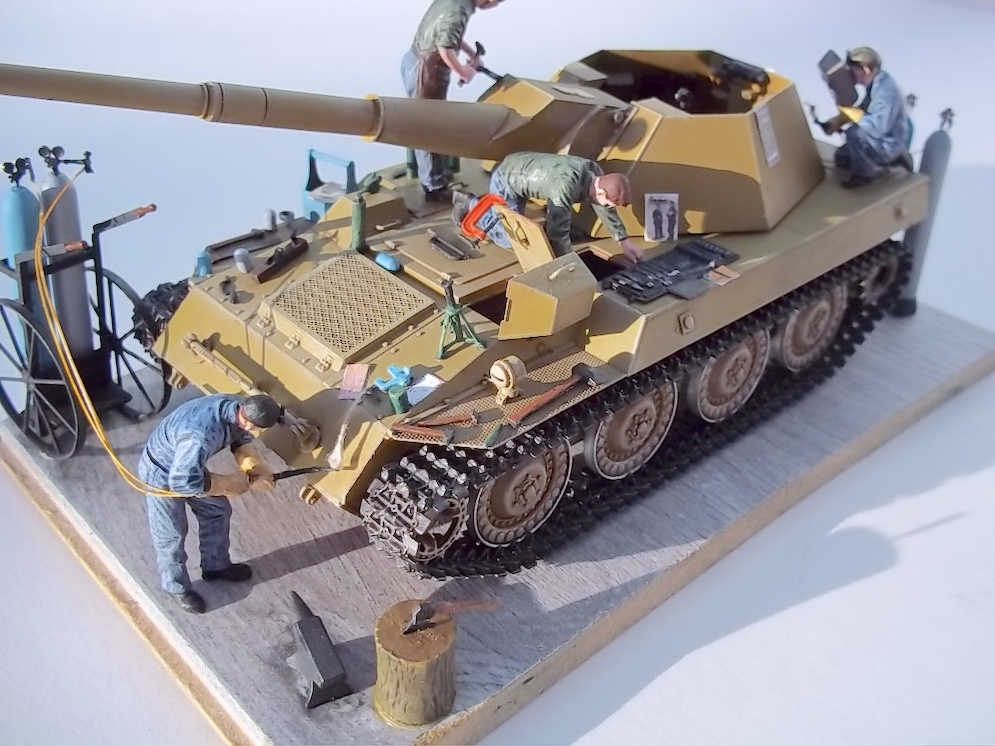
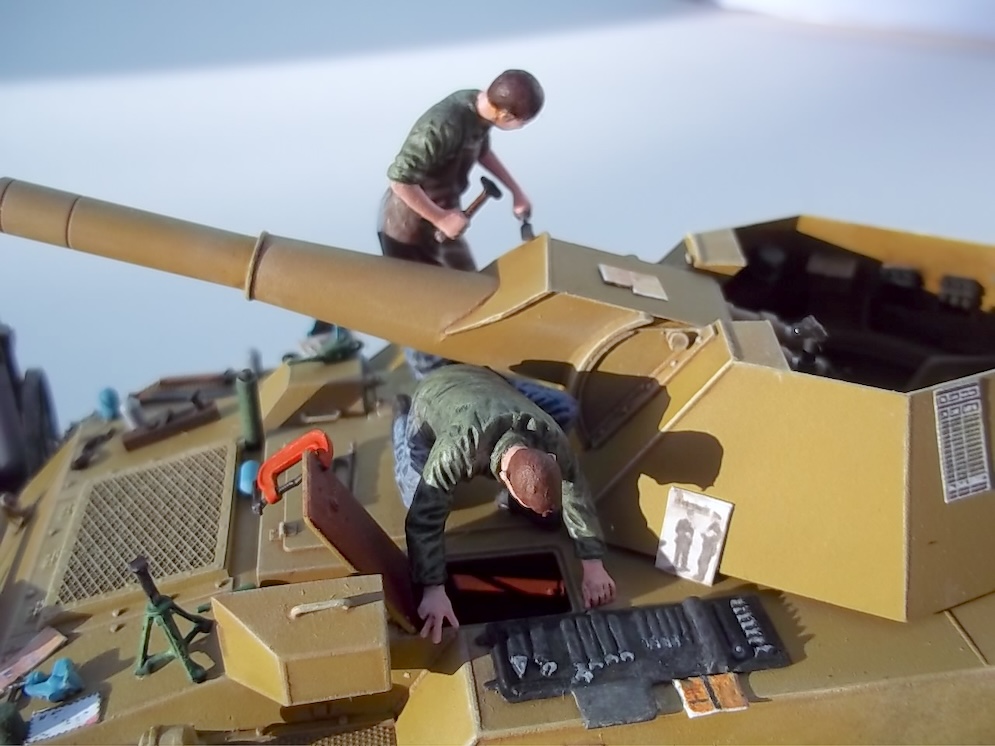
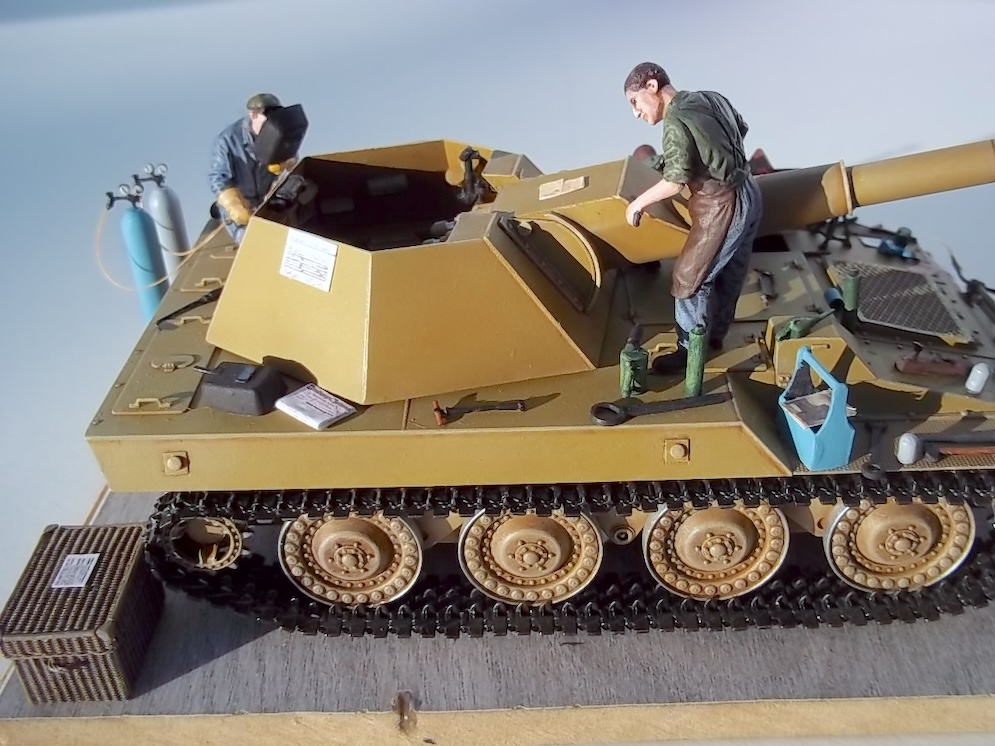
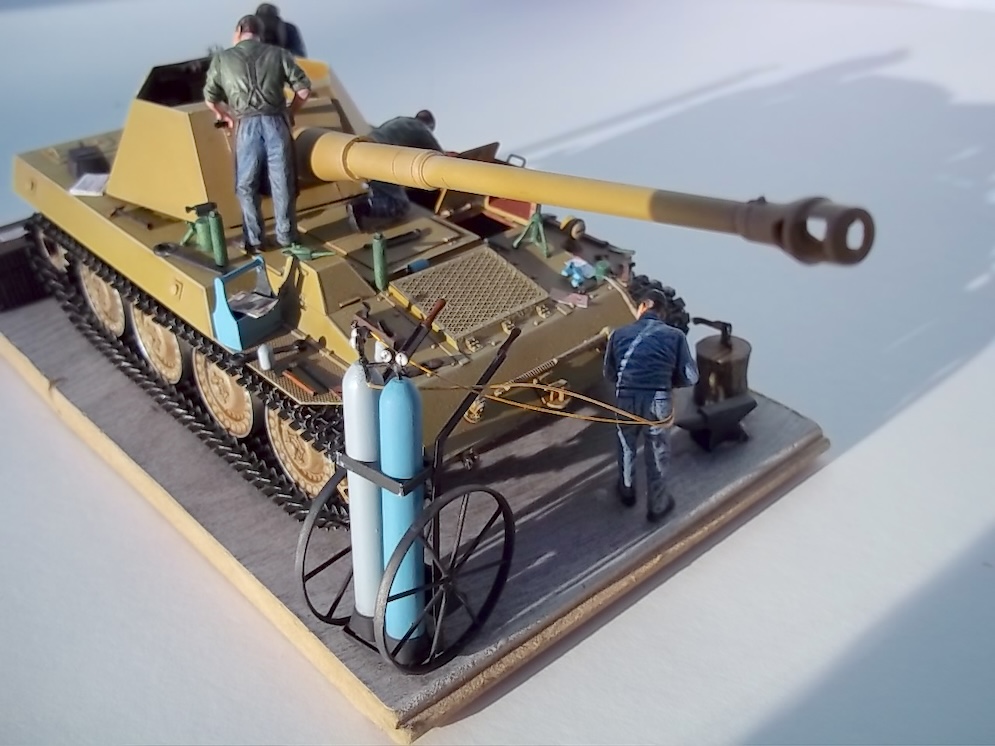
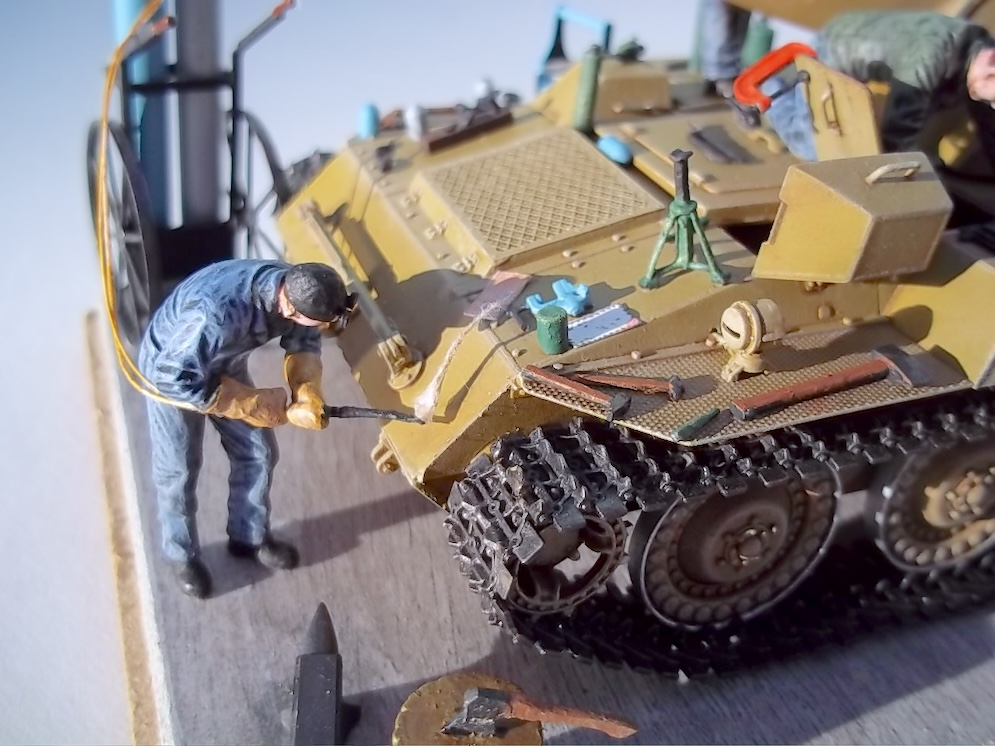
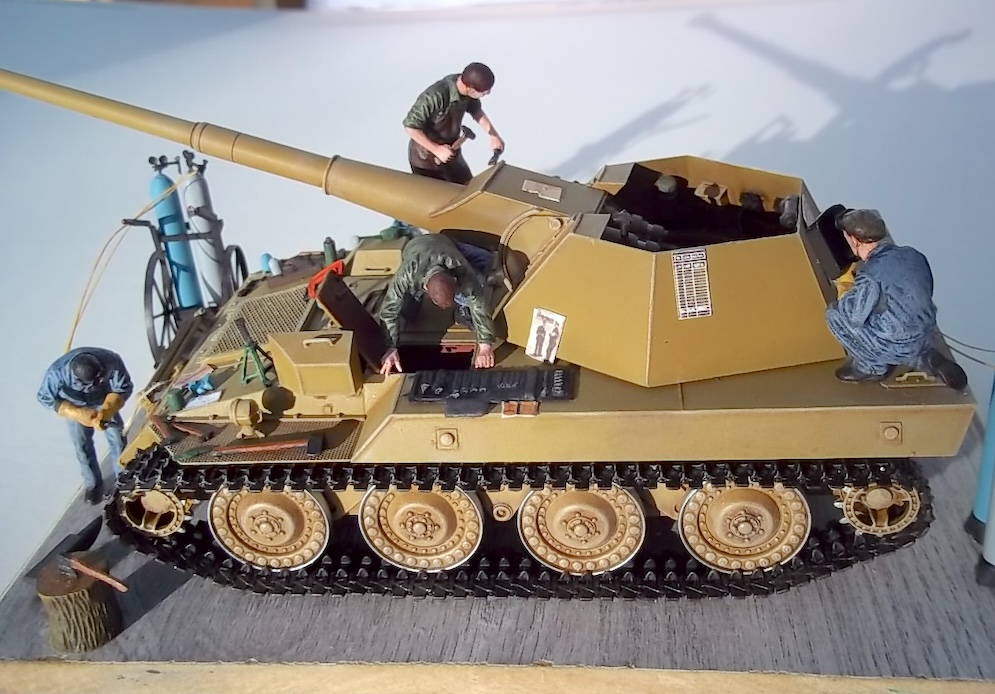
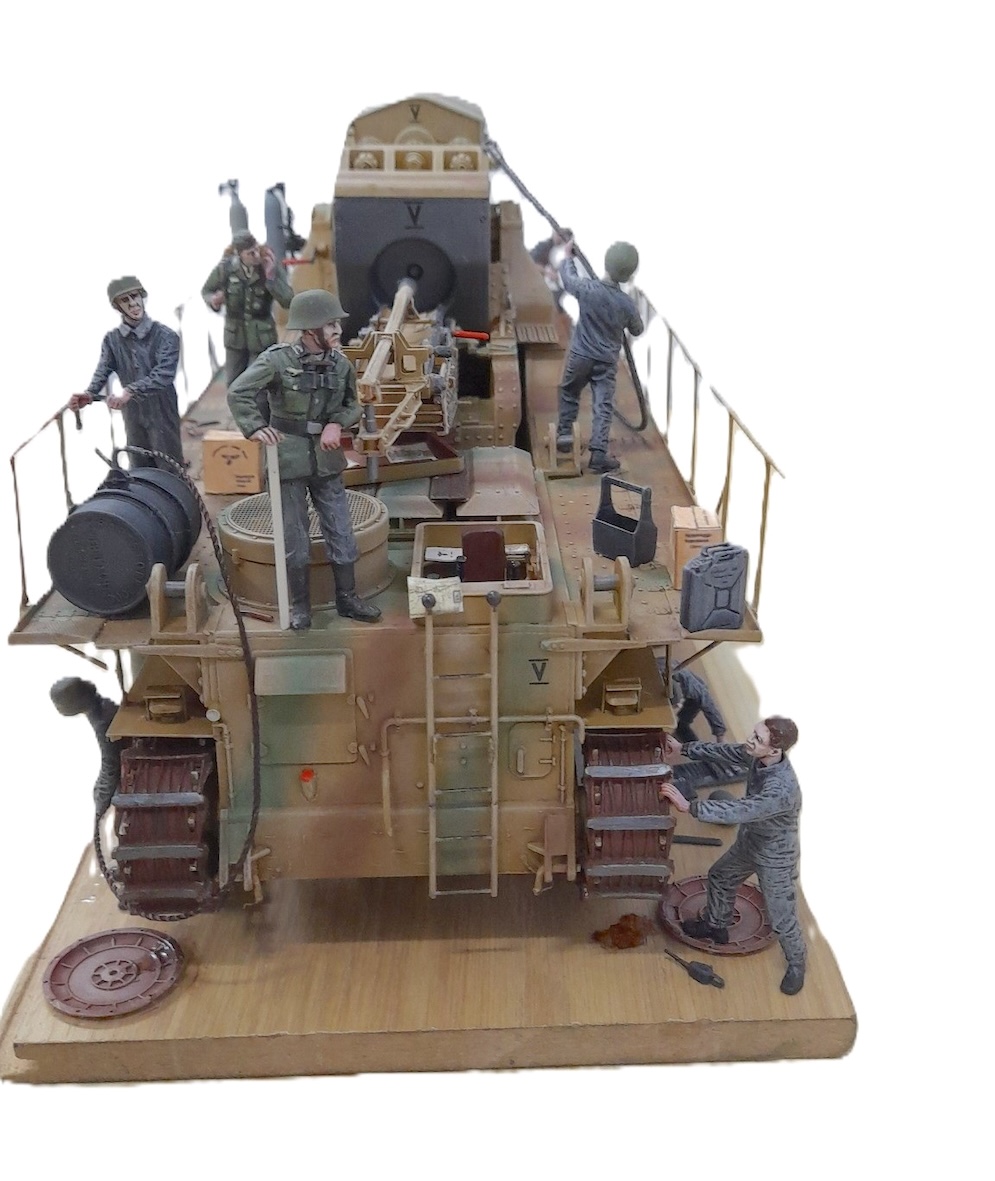
The kit is straight from the box, a comprehensive build review by Chris Mcdowell, on SMN, May 2018, shows the details supplied in the kit.
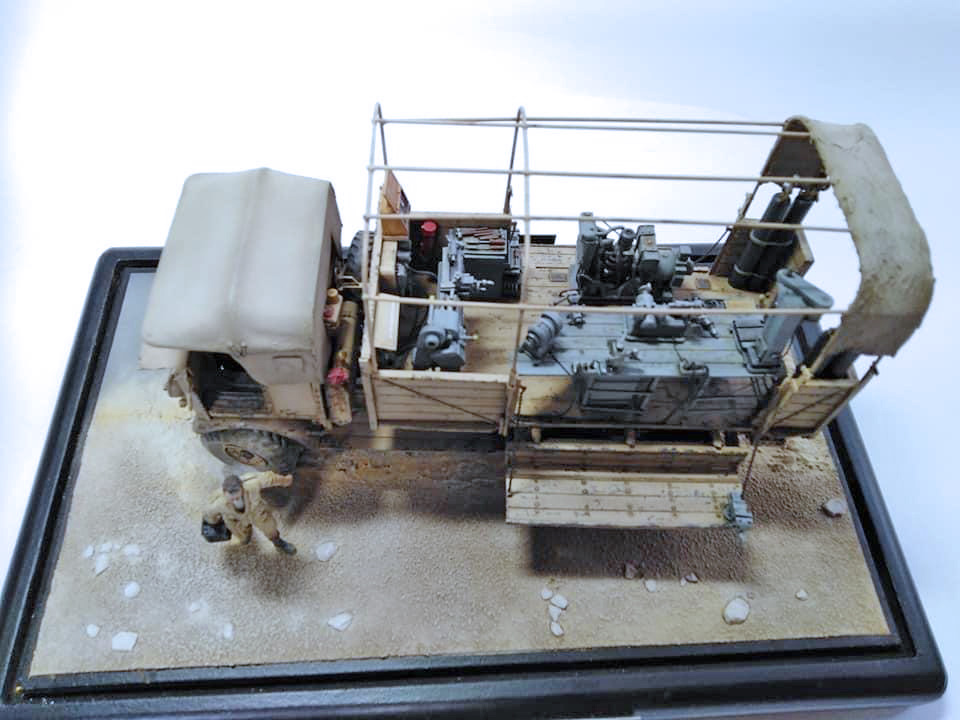
MiniArt’s excellent figure sets ‘Welders’ and ‘German Repairmen’ provide all the figures and accessories, both are superb.
Pete S.
Neil P.


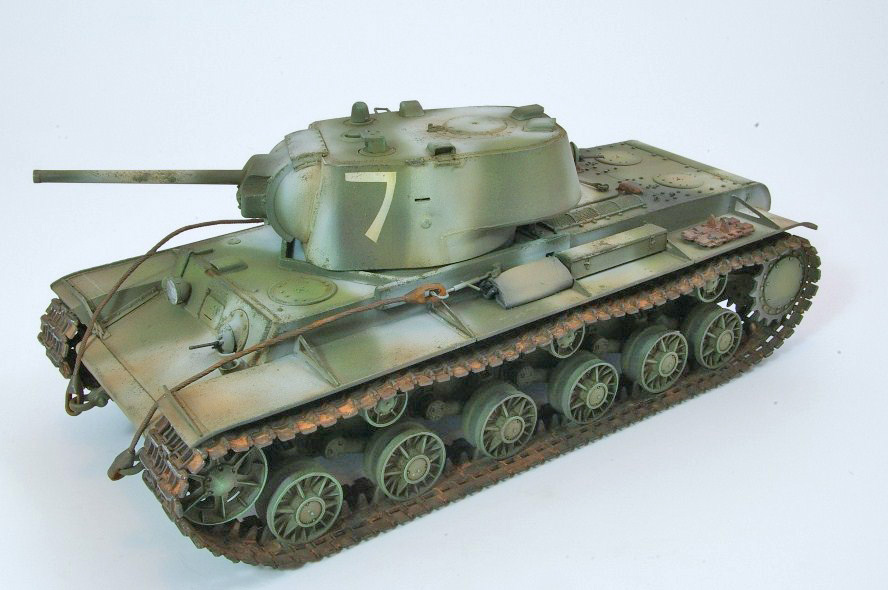
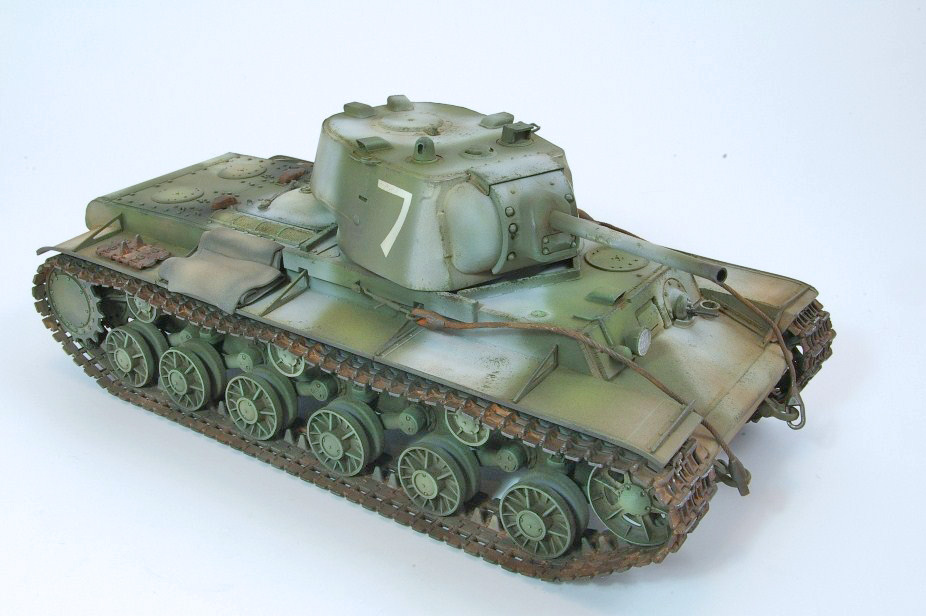
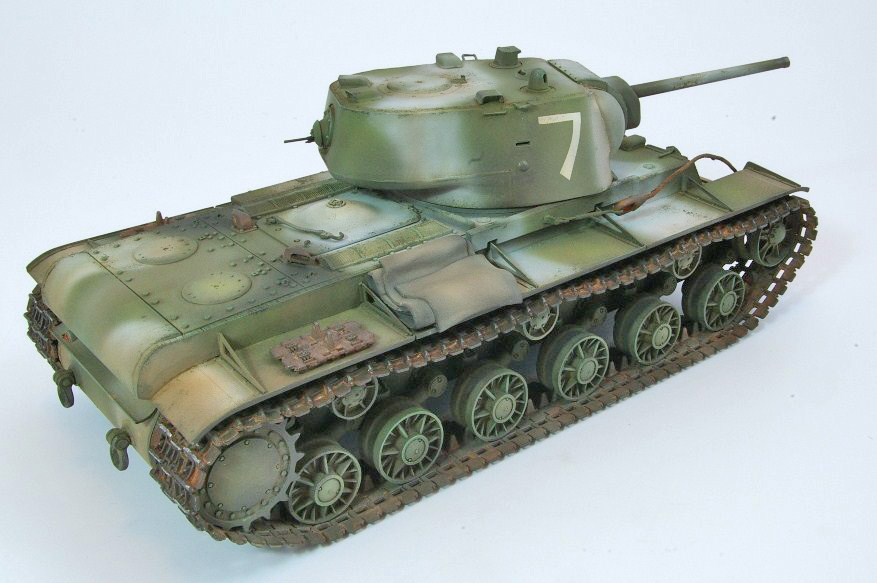
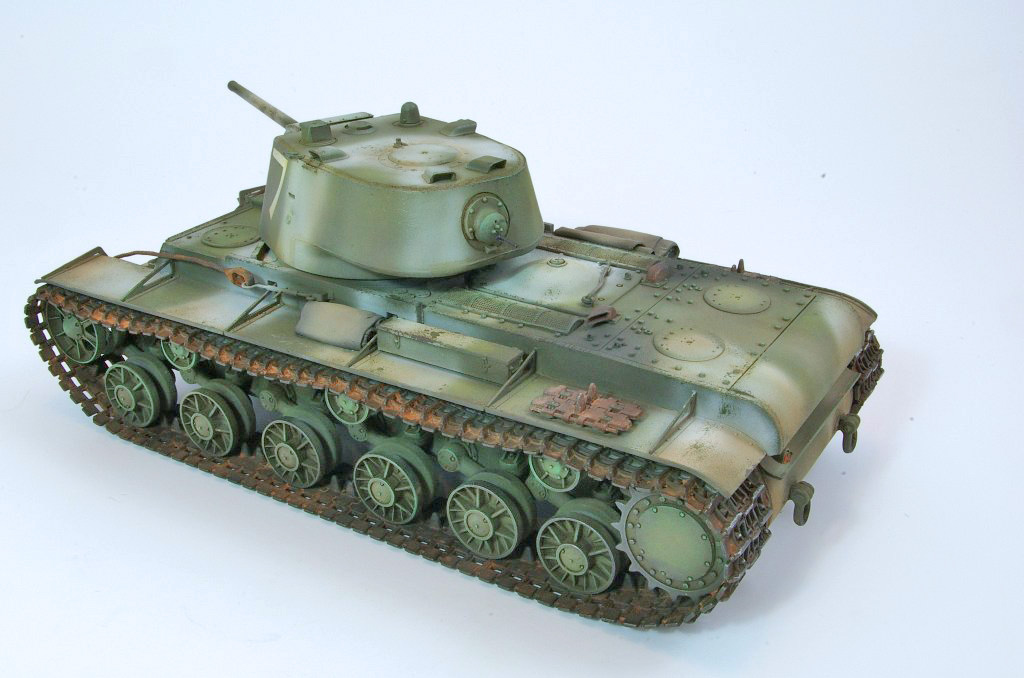
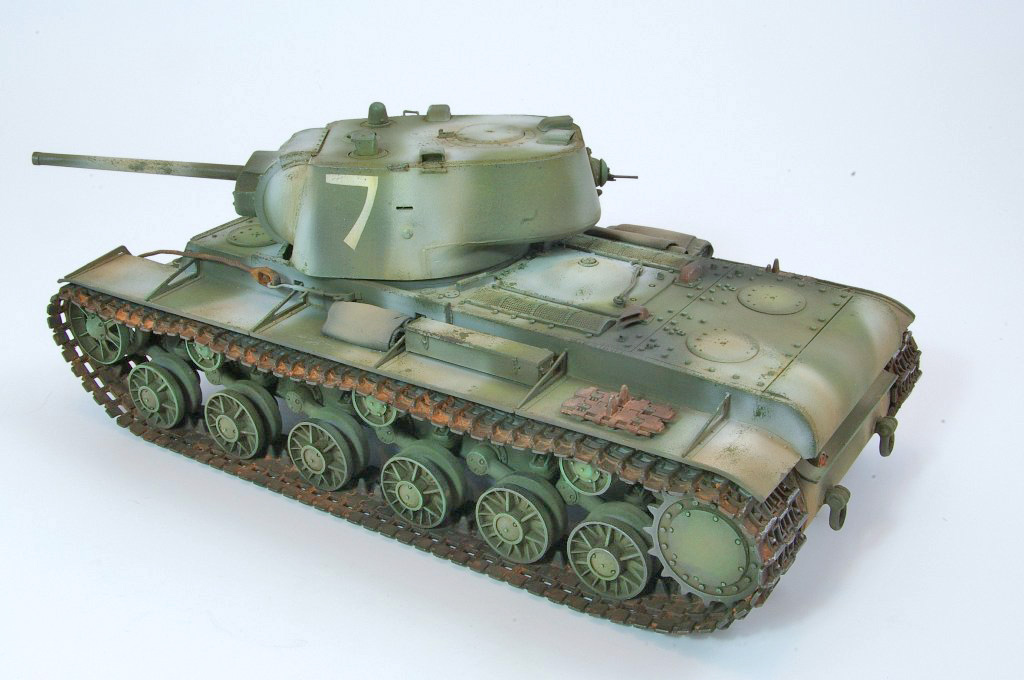
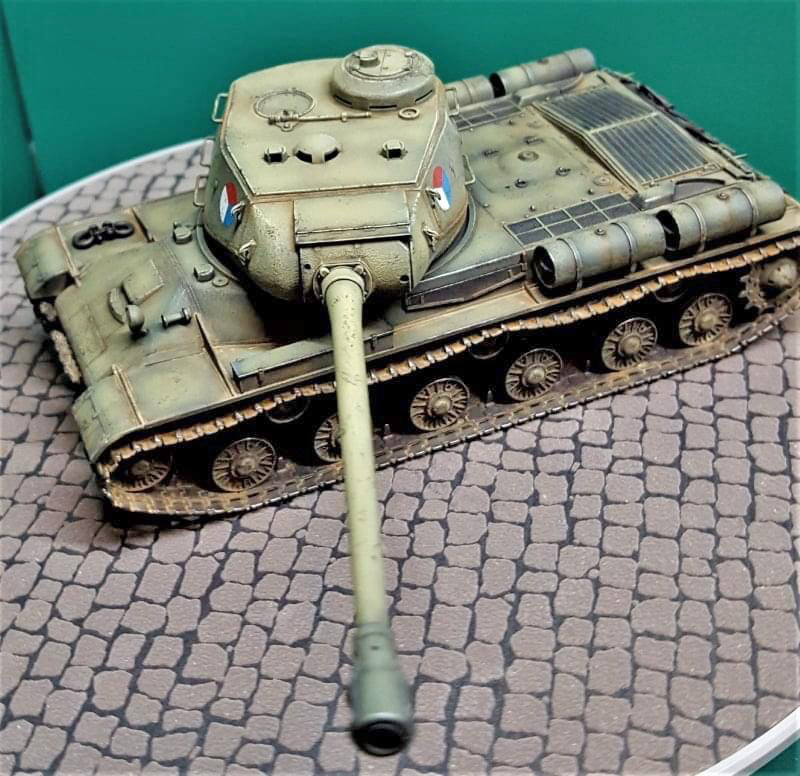
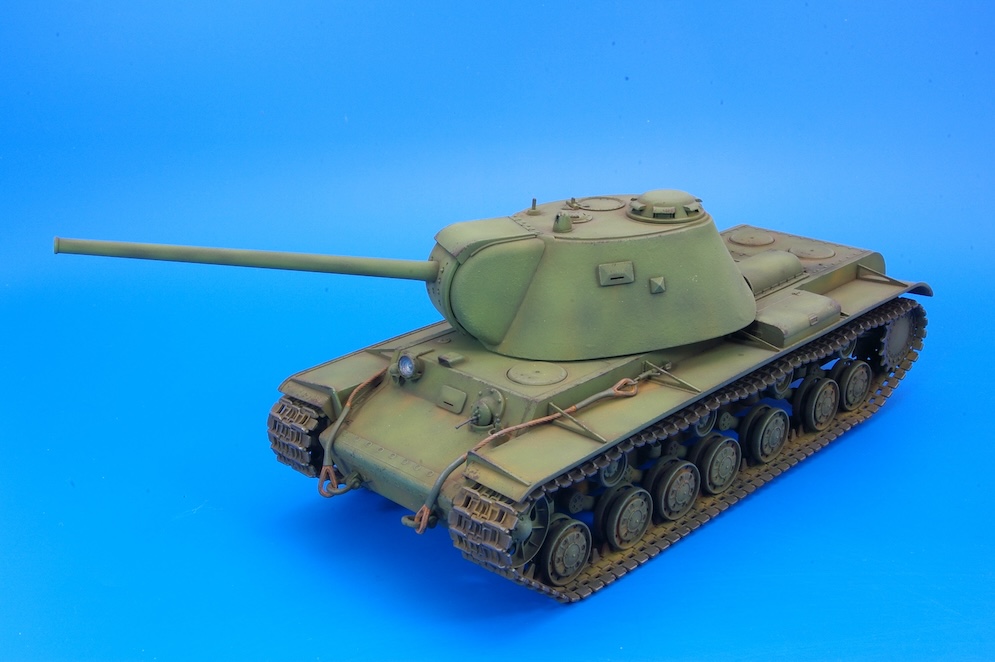
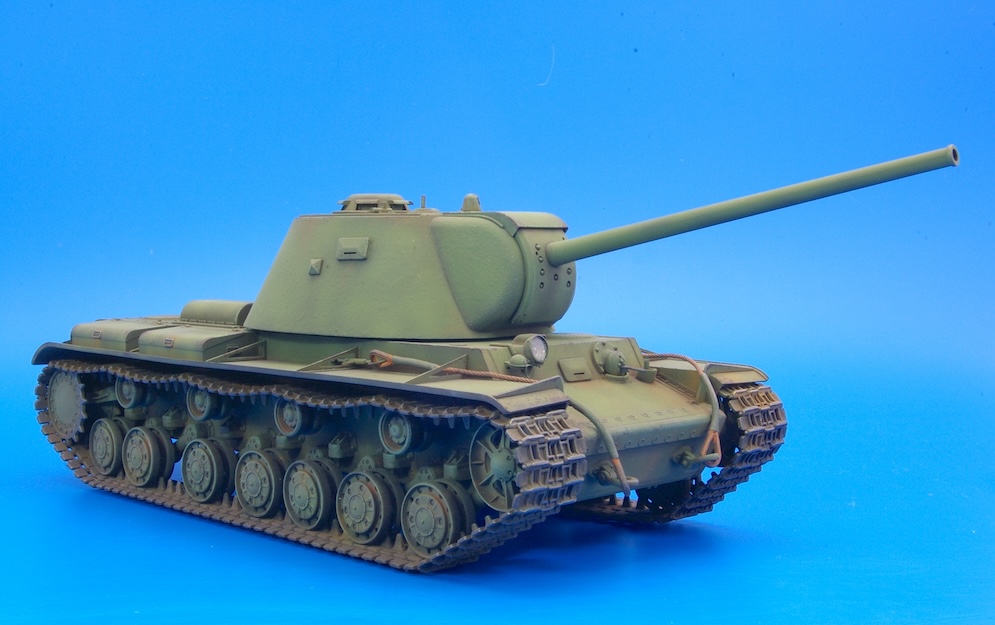
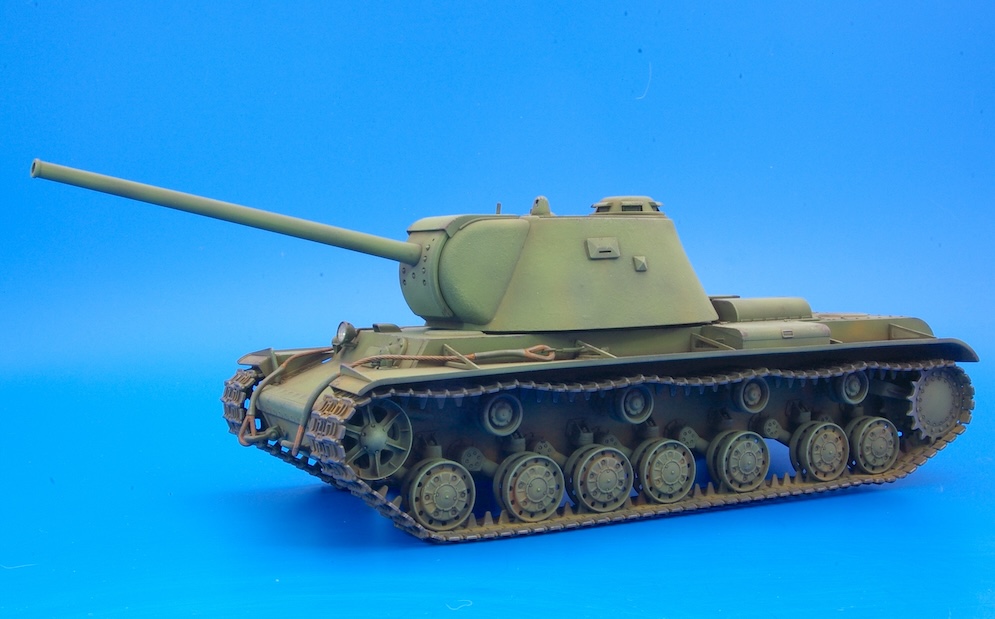
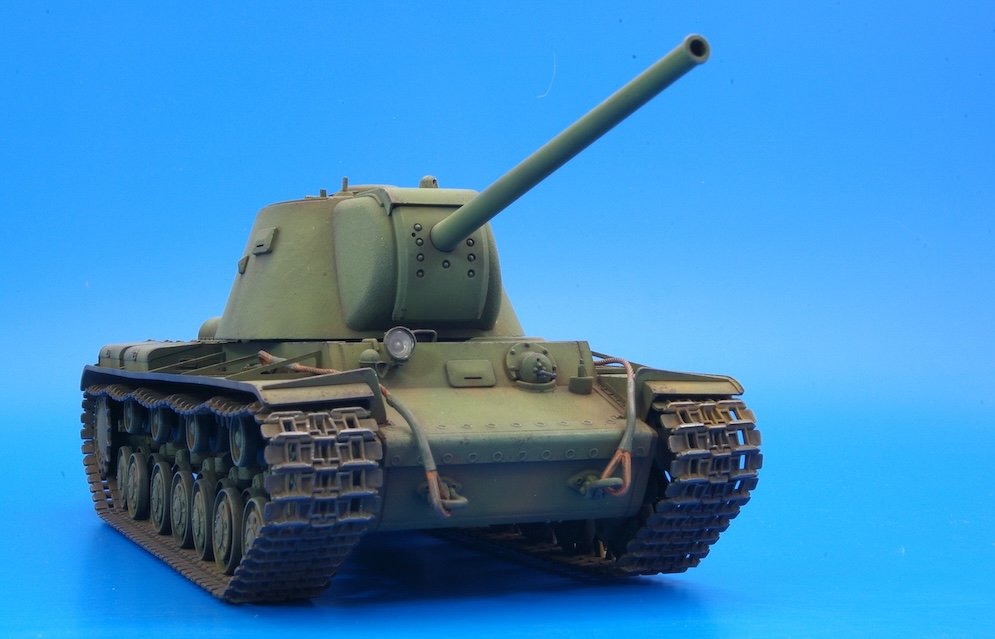
I think that fashions come and go within the modelling world. Techniques such as dry-brushing which were once popular seem to have gone the same way as the maxi skirt and (thankfully) the tank top. Something that is currently in vogue these days is the use of hairspray to introduce a water-soluble layer between two coats of paint so that the top coat can be removed with water, revealing the layer of paint underneath to represent chipping. I must admit that though I’ve experimented with this I’ve never really got on with the technique and the results I’ve had never seem to look as good as those achieved by other modellers.
Because of this I’ve experimented with a few alternatives. Here I’ve applied a green base coat to one of Trumpeter’s excellent KV1 tanks. Tamiya’s Nato Green was used over a dark green undercoat to produce the base colour. Following a picture I saw on the internet I then applied Tamiya Matt White toned down slightly with Buff to represent the temporary white overcoat.
To represent slight wear on the white areas I mixed a green colour that approximated to the same shade as the green base coat using Vallejo acrylics. These seem to be the best medium for doing this. Chipping was then done by dabbing this colour on with a sponge and using a fine brush in areas where things were difficult to reach or a specific effect was required.
This was done lightly to keep the effect quite restrained as I’m not a fan of heavy weathering on my models.
The turret number was applied using a home-made mask. The colour being slightly different from that used for the temporary whitewash finish to imply that it had been added at a different time.
This method of simulating chipping / wear on the white paint is exactly the same as that used to represent exposed metal under worn or chipped paintwork except that the colours used are different. I think that this may be a useful alternative to using hairspray or a chipping medium over a single base colour, but may not be a practical alternative when used over a multi-coloured scheme.
Hope you like it?
Dai W.
Neil P.


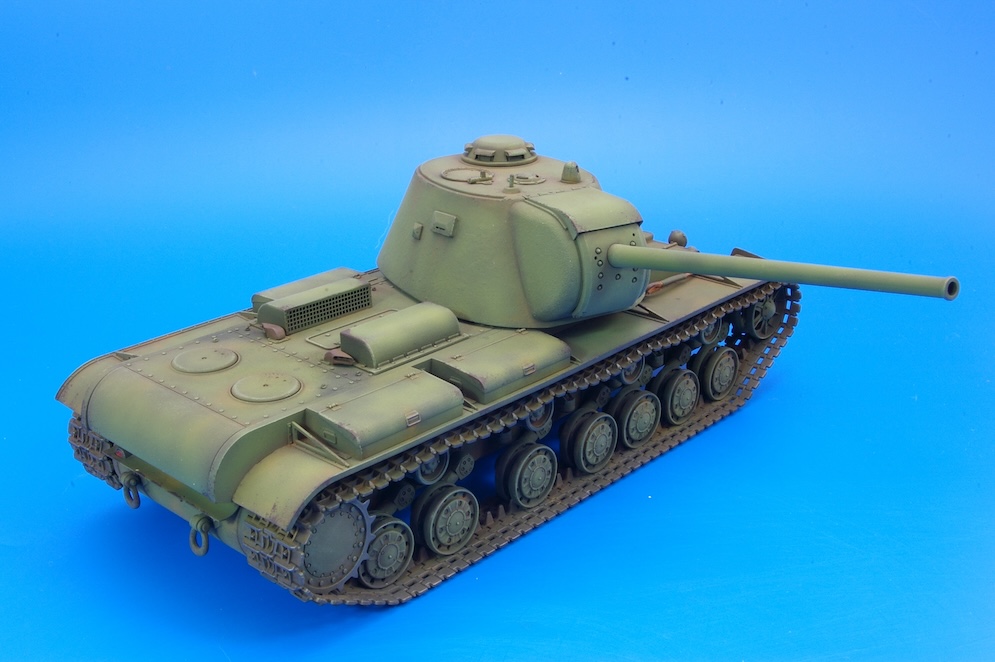
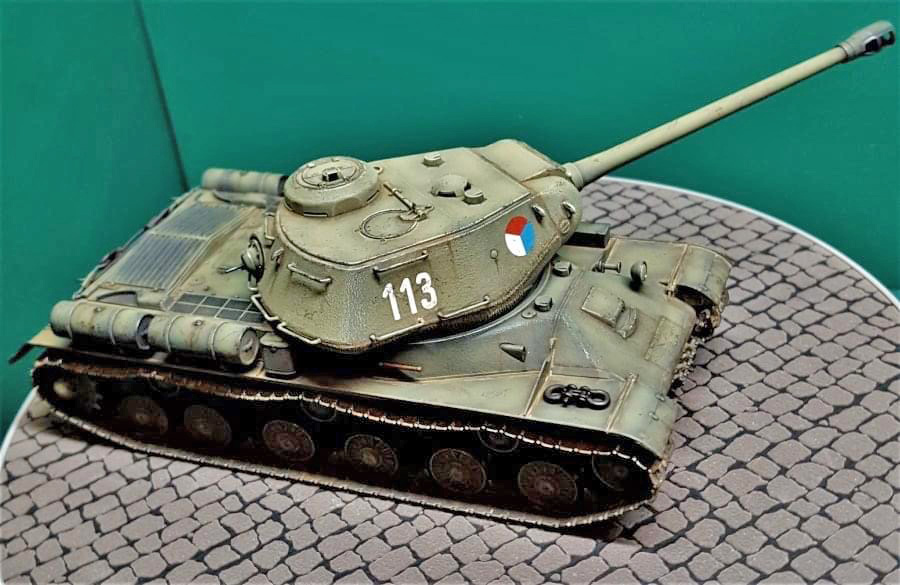
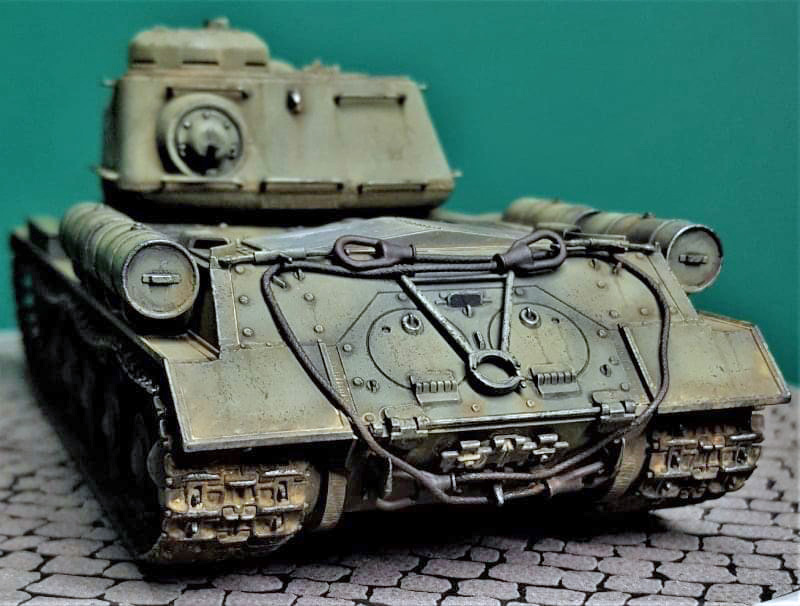
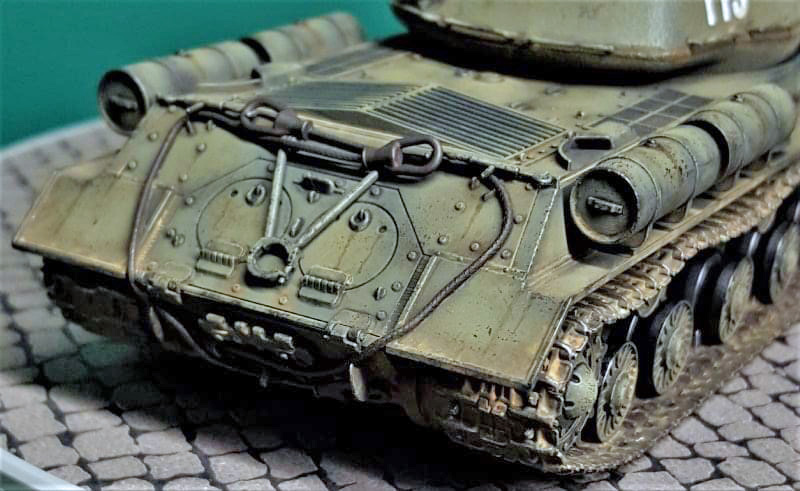
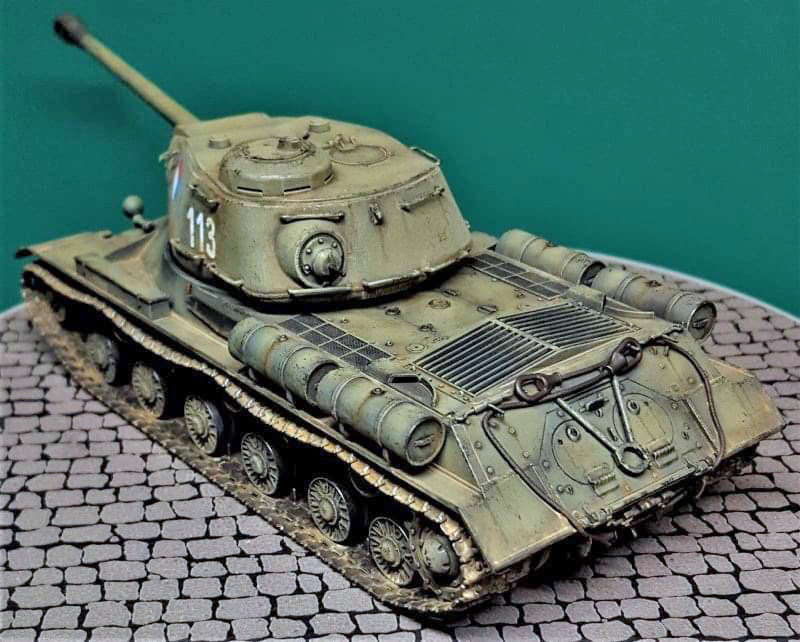
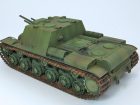
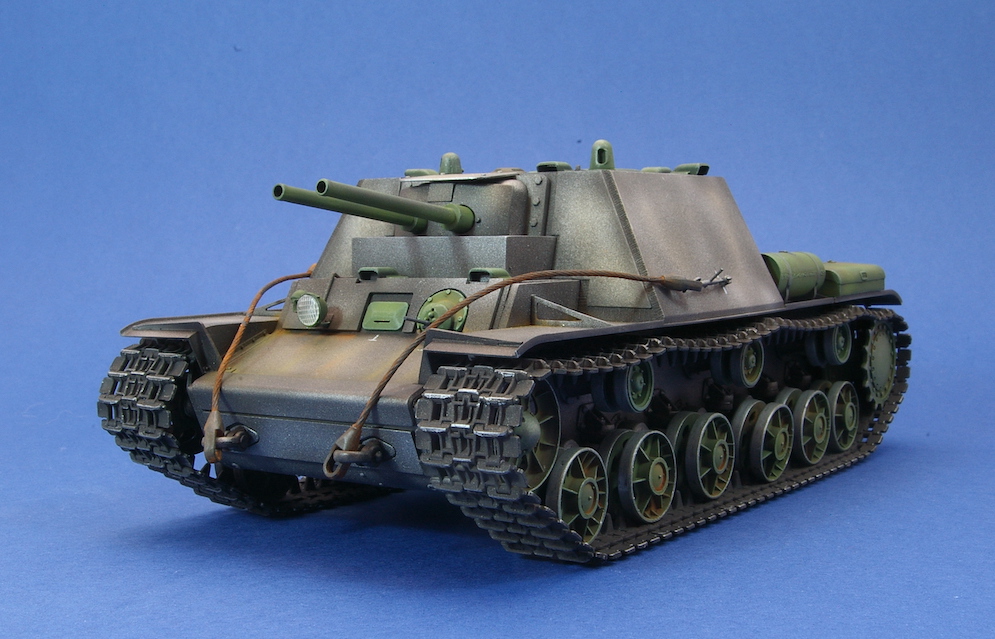
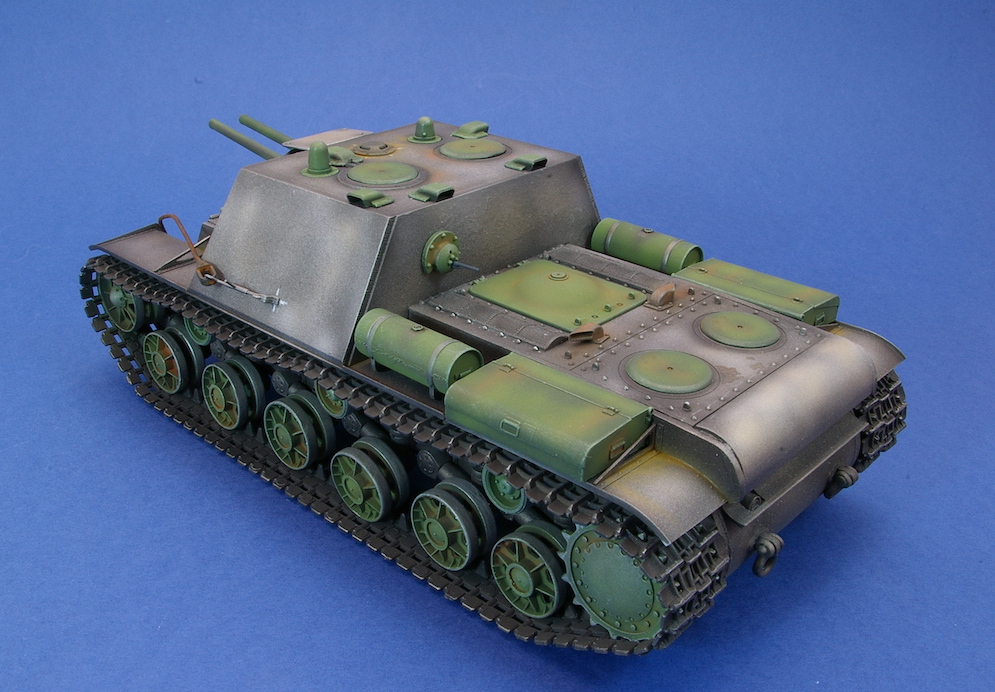
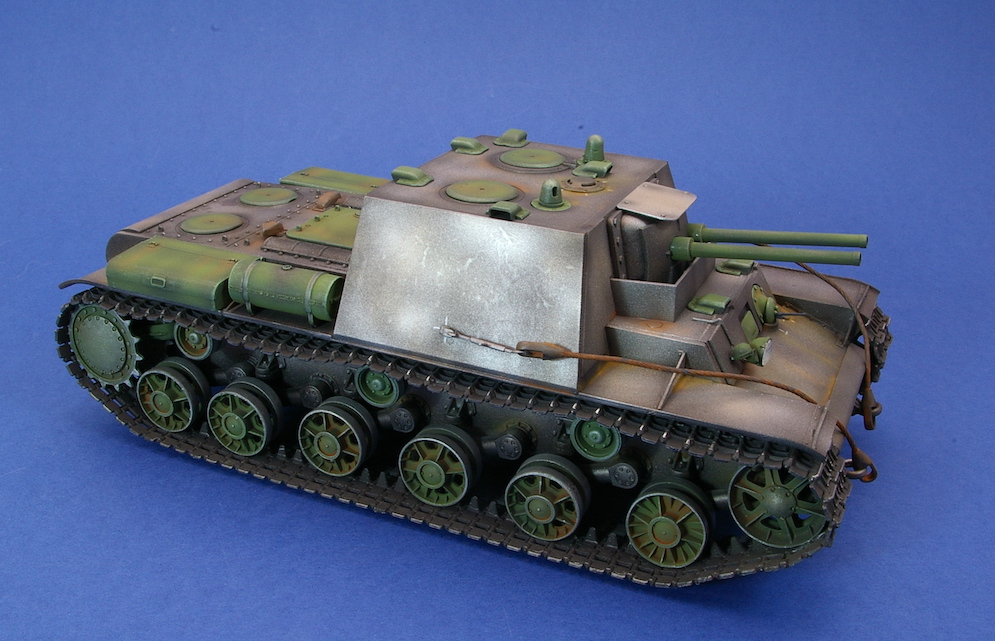
Trumpeter has covered the Russian KV tank very thoroughly with all the main variants produced in kit form including one-off prototypes and in the case of the KV3 a vehicle that reached only the mock-up stage.
Those who have built any of their previous KV kits will find much that is familiar here and I believe that the hull is based on that of their earlier KV220 kit.
Having reached only the mock-up stage it is hard to say whether the kit accurately represents the vehicle as it would have appeared had it reached production, though photos of the mock-up show an extension on the side of the turret under the commander’s cupola which is not present on the kit turret. There is no way of knowing if this feature would have been carried over to the production vehicle so I felt that I could live with this.
Having said that the kit was a quick, easy and enjoyable project in between more complex and demanding builds and is a welcome addition to my rapidly expanding collection of KV variants.
Dai W.
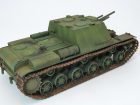


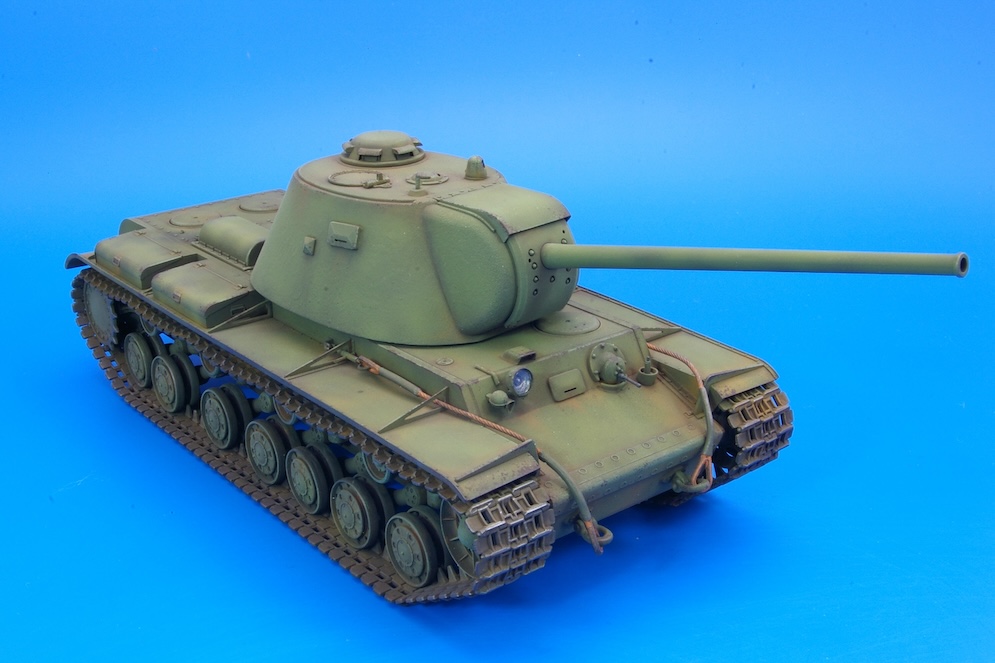
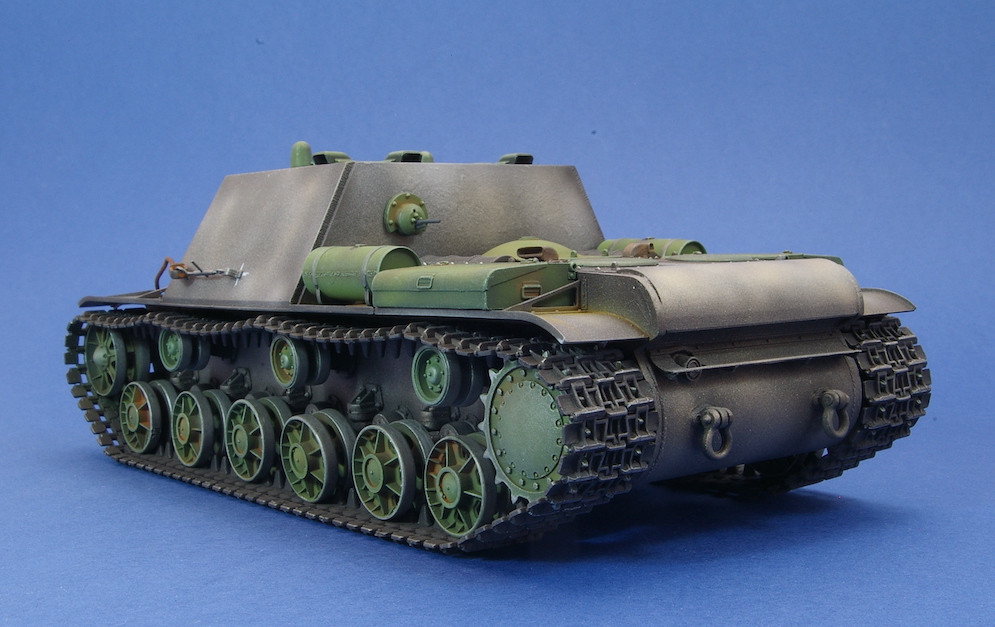
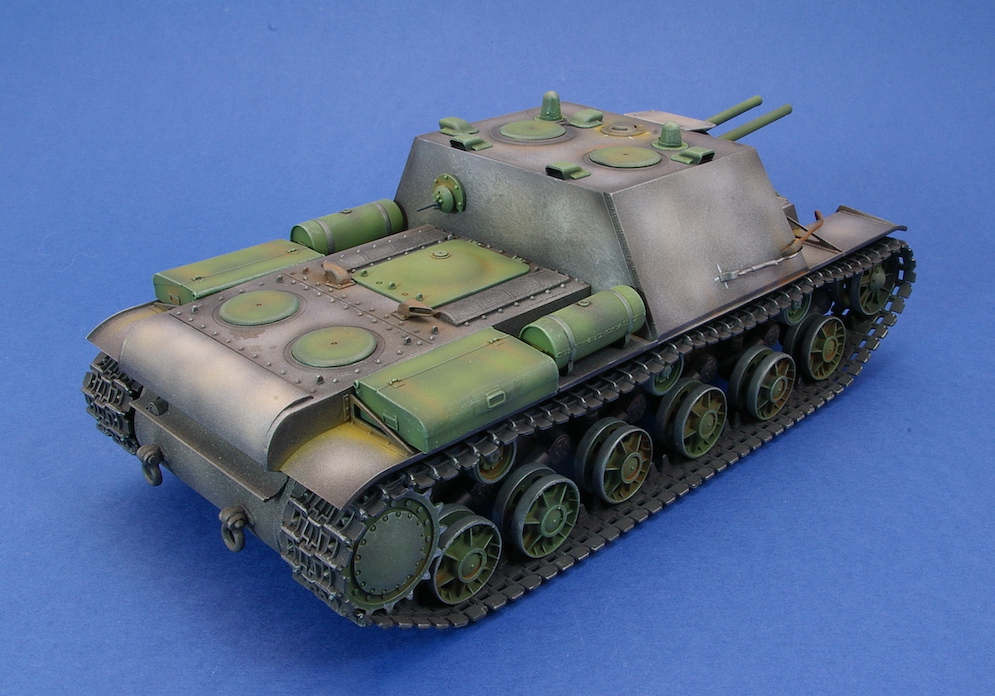
I often build one of these kits as a nice simple project in between more complex builds and often use them to try new techniques – well new to me anyway.
In this case I tried using oil paint as a filter. Having put on an acrylic base coat onto the model, this was sealed with a coat of Jonson’s Klear in preparation for an oil wash. However this darkened the paint alarmingly though I managed to partially restore the colour with an overall filter of green oil paint.
I believe that Trumpeter are about to release a second version of this vehicle which was used to test the idea of mounting two 76mm guns – this will probably be a nice restful project for me at some point in the next few months.
Dai W.
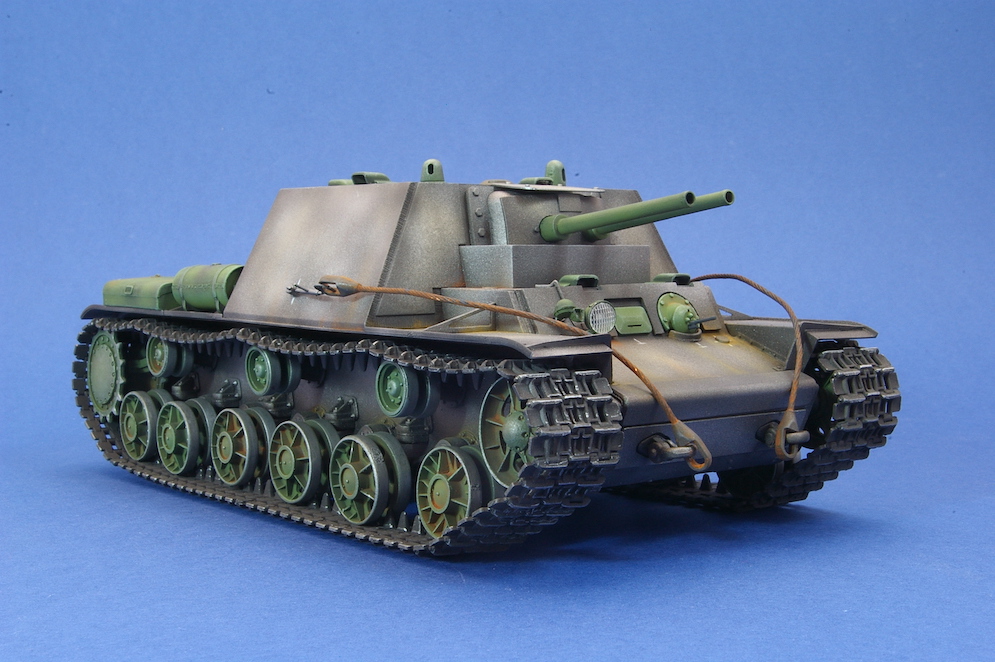
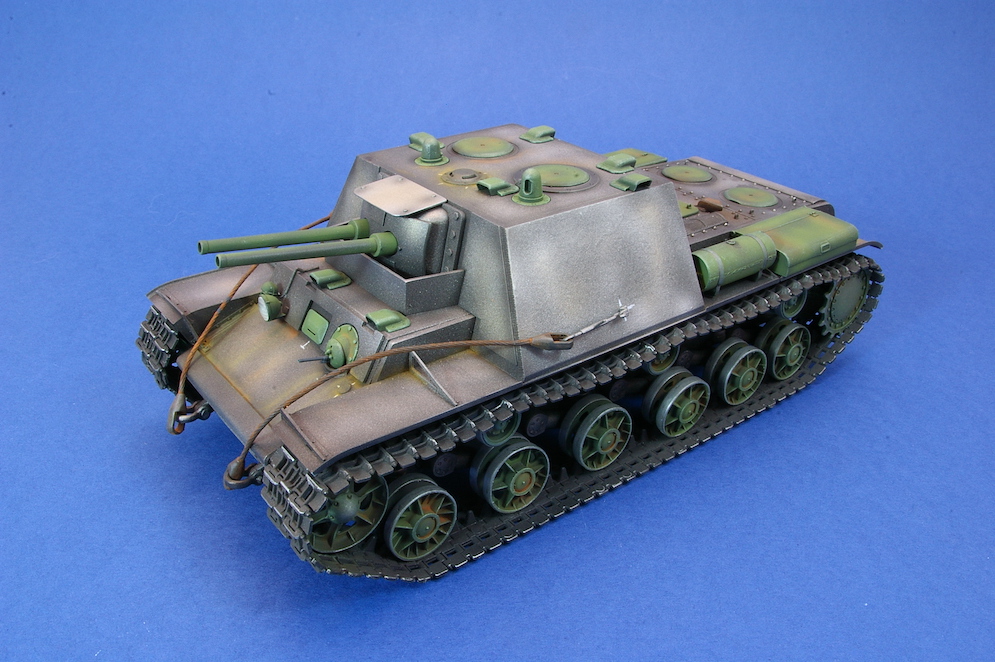
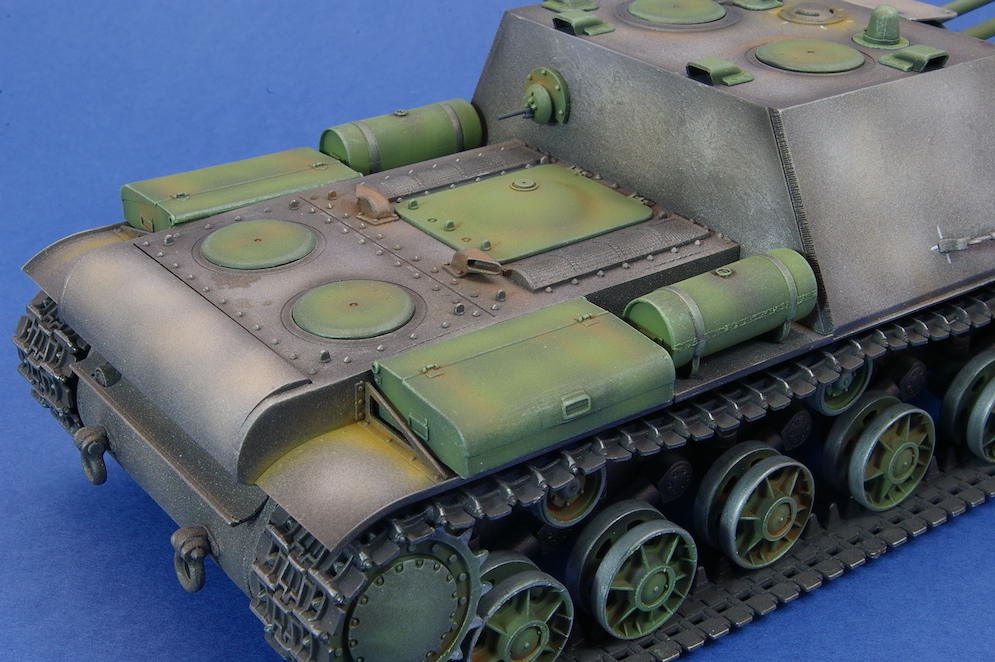
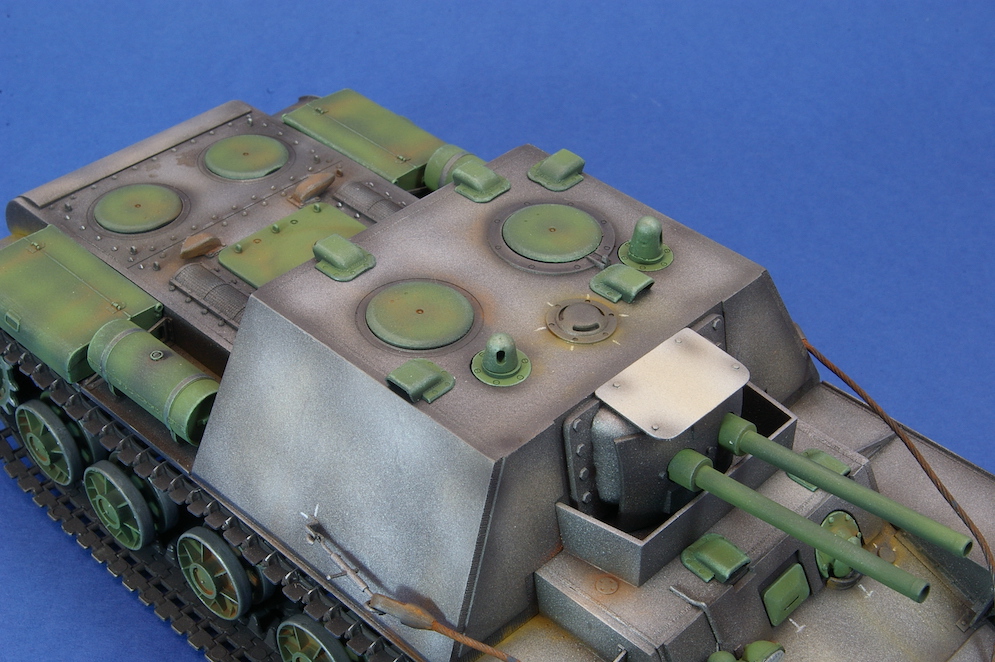
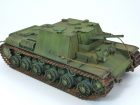
The KV7 was a prototype vehicle built to test the idea of carrying multiple guns to knock out static fortifications such as pill boxes.
The prototype appeared in two forms. The first carried one 76mm gun flanked by two 45mm guns. The vehicle was later modified to carry two 76mm guns.
It was eventually decided that the KV7 was difficult to operate particularly for the gunner who was expected to fire two or three guns at the same time. Vehicles mounting one much heavier gun were considered to be more useful and practical and no further development of the KV7 was undertaken.
Trumpeter has produced both versions of the KV7 and I built the earlier version some time ago. To make this model look a little different I decided to paint the main part of the vehicle in natural metal using several layered shades of Alclad paints working from dark to light. The ‘add on’ parts such as the wheels, guns and hatches were painted in green to look as if they had either been taken from an existing vehicle or had been supplied to the factory already painted.
There seem to be only a few surviving black and white photos of the KV7 and it’s not immediately obvious from these how the vehicle was painted. I think that overall green would have been a more likely scheme and that what I’ve done here probably comes under the heading of ‘speculative’ to say the least. However, I thought it looked a bit ‘different’ and I rather liked it!
Dai W.


I’ve used a conversion of Resicast to make the Breda carrier.
Hope you like it?


http://hobbyshopandy.com/gallery/2-001.html
I have to say the kit was an absolute joy to do and am looking forward to doing the RUC Tangi conversion that they have just released. Hope you approve? Kind Regards
Mark McKevitt

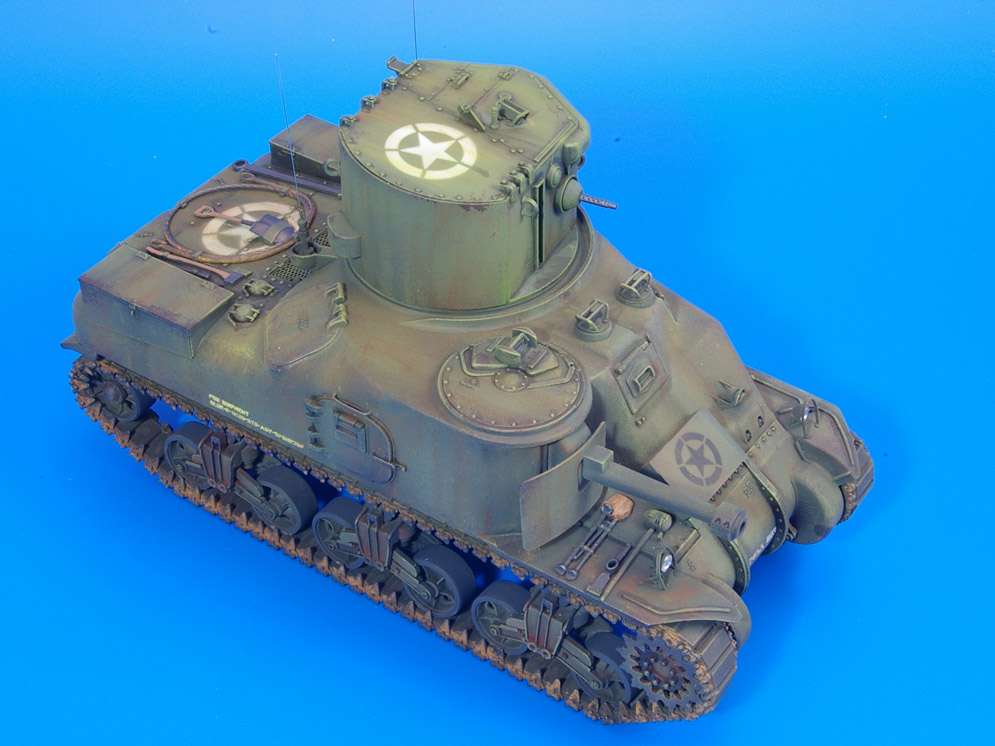
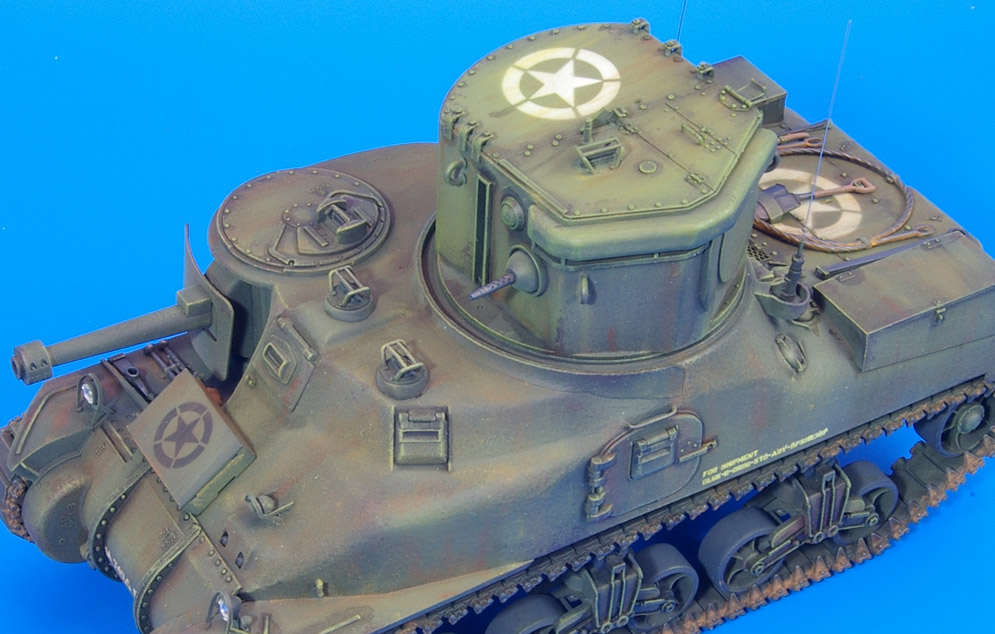
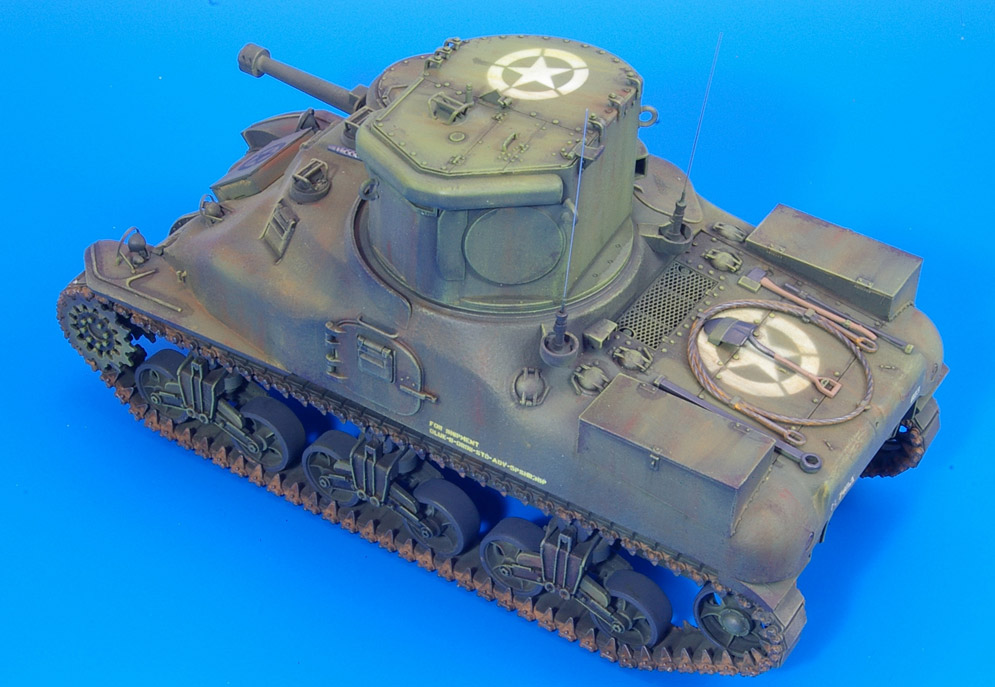
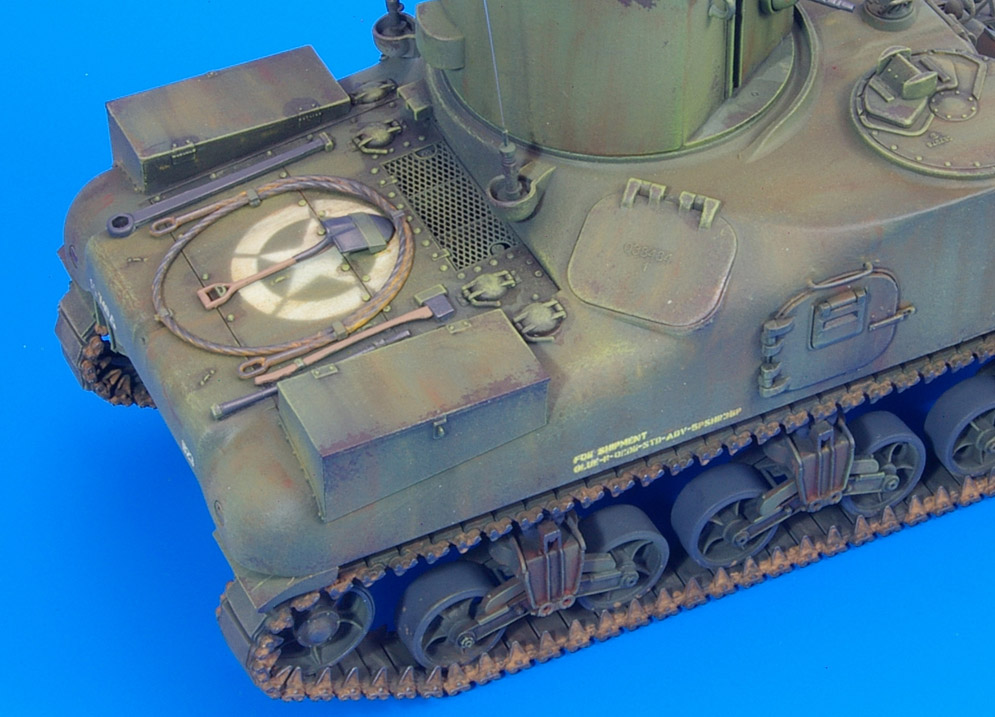
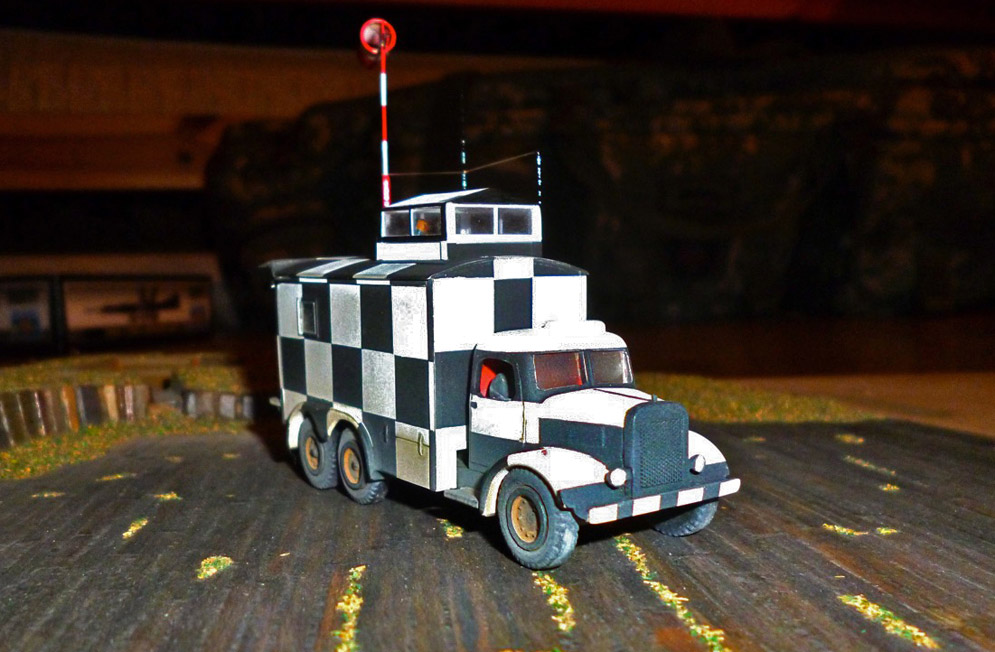
The Canal Defence Light (CDL) was a weapon developed around a carbon arc lamp which was intended to illuminate enemy positions at night. The lamp could also be used much like a strobe in order to blind and disorientate enemy troops. The CDL was developed in great secrecy and the designation ‘Canal Defence Light’ was used by the British to divert attention from its real purpose and to draw as little attention as possible to the new vehicles. The Americans used the term ‘Shop Tractor T10’ and referred to the turrets as ‘coastal defence turrets’ for the same reason.
The British mounted their lights on Matilda and Churchill tanks while the Americans chose the Lee which carried a 75mm gun in a sponson in the hull allowing the vehicle some offensive capability.
The secrecy with which the system was developed turned out to be an issue when it came to deploying the vehicles operationally. Few commanders had even heard of them, let alone knew how to use them and had therefore not factored them into their plans.
The vehicles saw limited operational use during World War Two notably in holding the Ludendorff Bridge against German attempts to destroy it following its capture in 1945.
The Takom kit is of a light mounted on the M3A1 Lee which had a cast hull which makes a change from the rivetted hull vehicles more readily available to modellers. The kit was easy to build, though I found that care had to be taken with the etched brass light guards. Luckily Takom provides two small jigs for shaping these which would probably serve for other models as well.
There are markings supplied for three vehicles, but these are all essentially the same being in overall olive drab. Transfers are provided for large aerial identification stars to be placed on the turret roof and engine deck. I thought that there was little chance of me applying these without the carrier film silvering and so I attempted to cut my own masks based on the kit transfers. This proved to be beyond me and I ended up with a twisted and completely unusable pile of tape! I ended up using brass masks that I acquired years ago. Not being able to burnish these down onto the surface of the model the stars ended up looking a little ‘fuzzy’, but I felt that this was not too noticeable under some washes and weathering.
All in all, this was a quick enjoyable project and I think that the kit can be recommended to all fans of ‘something a little different’.
Dai W.
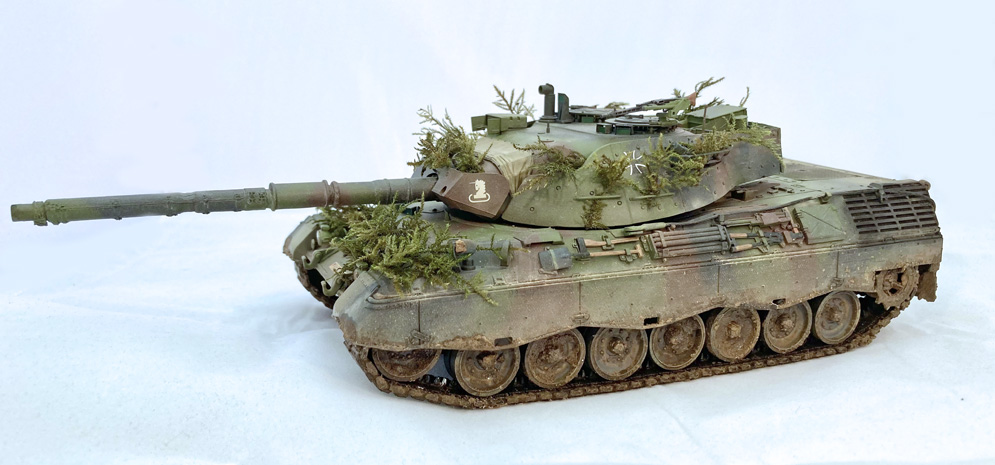
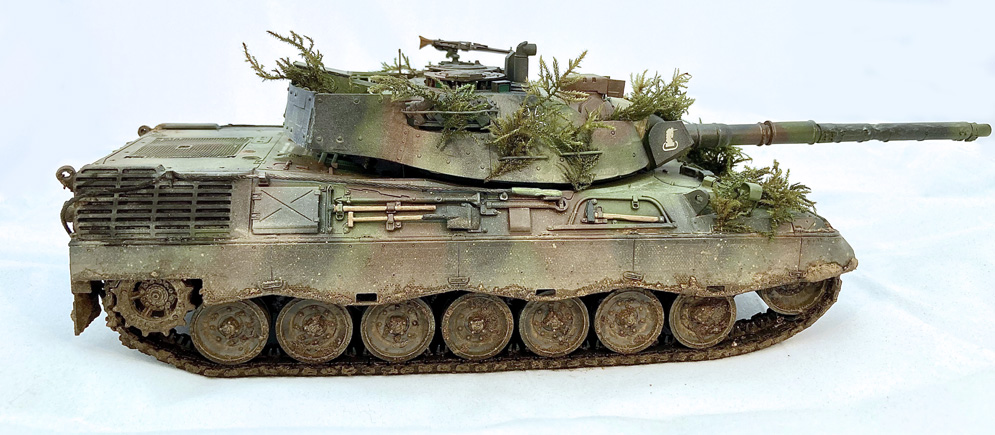
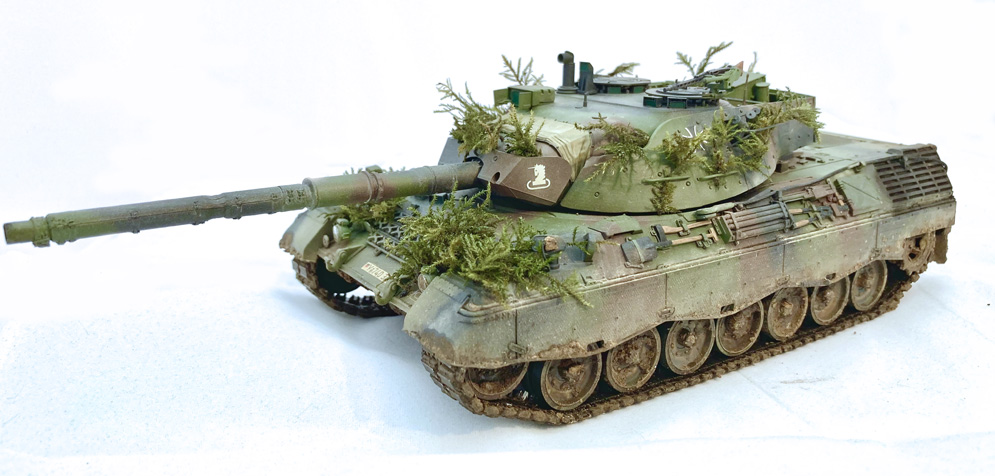
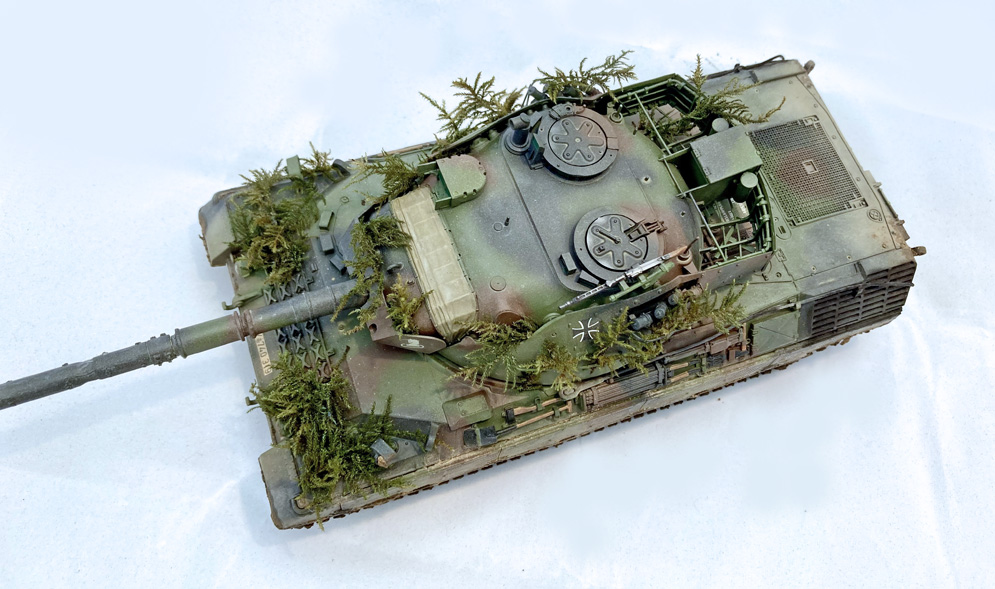
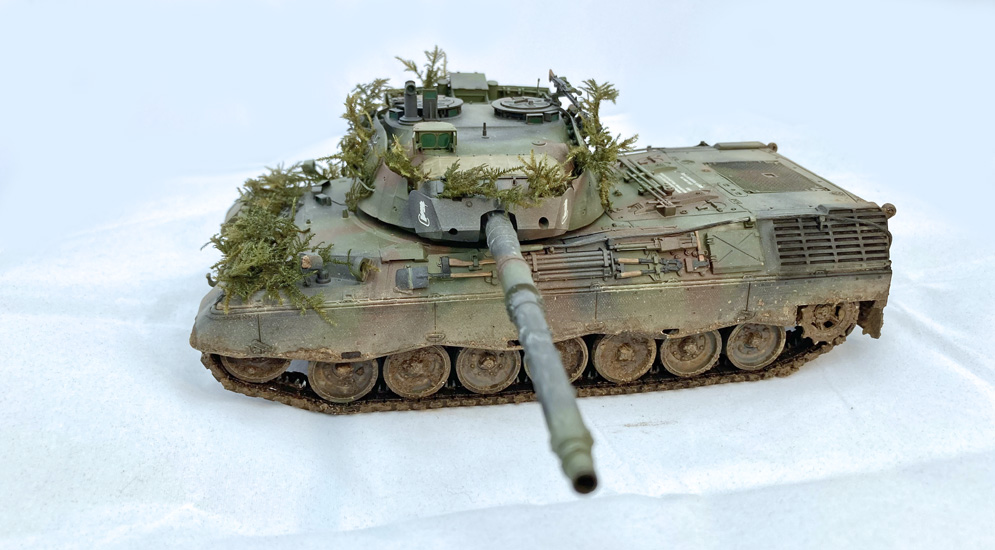
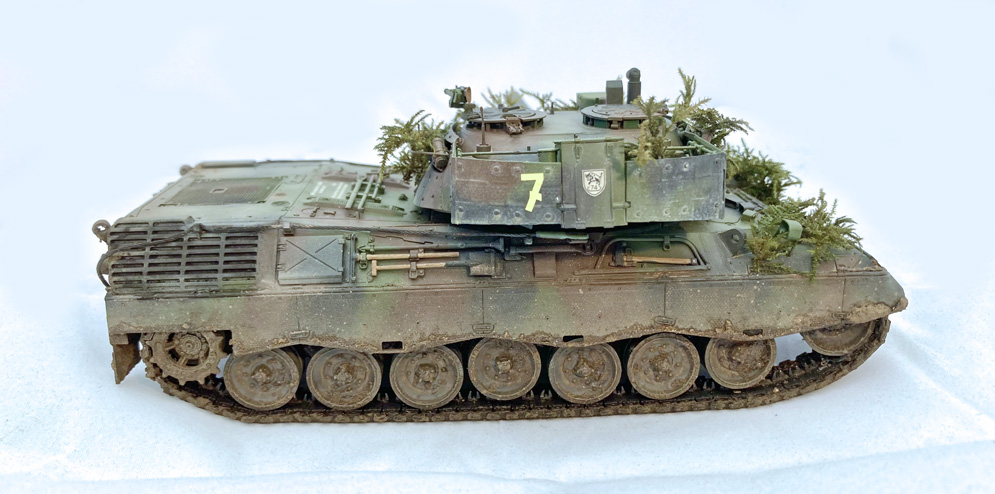
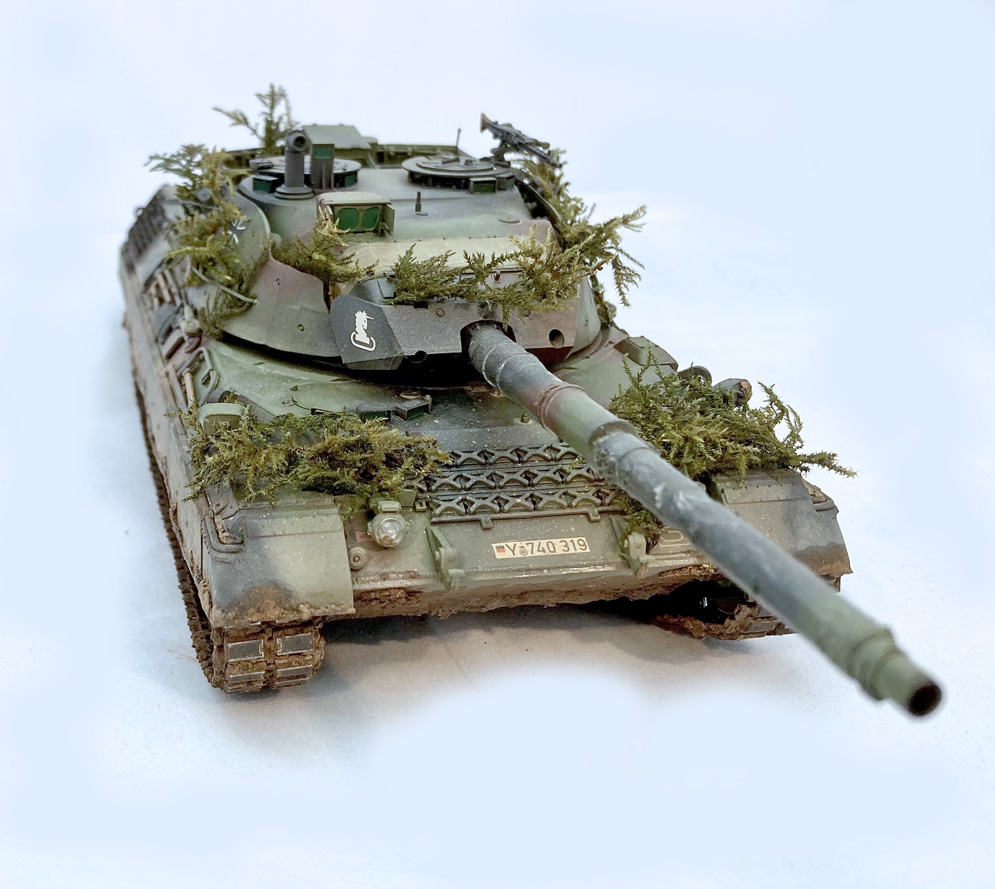
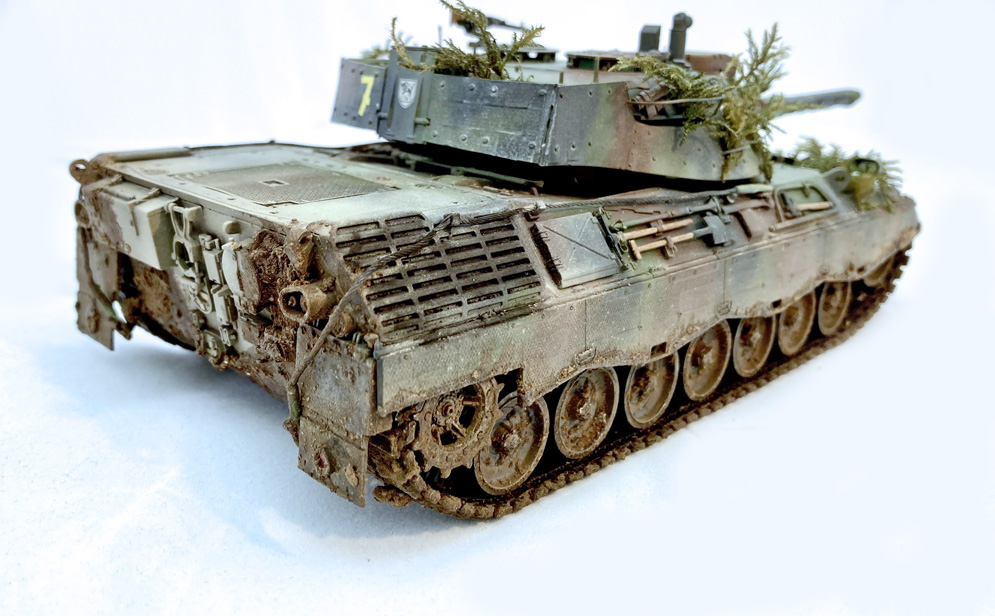
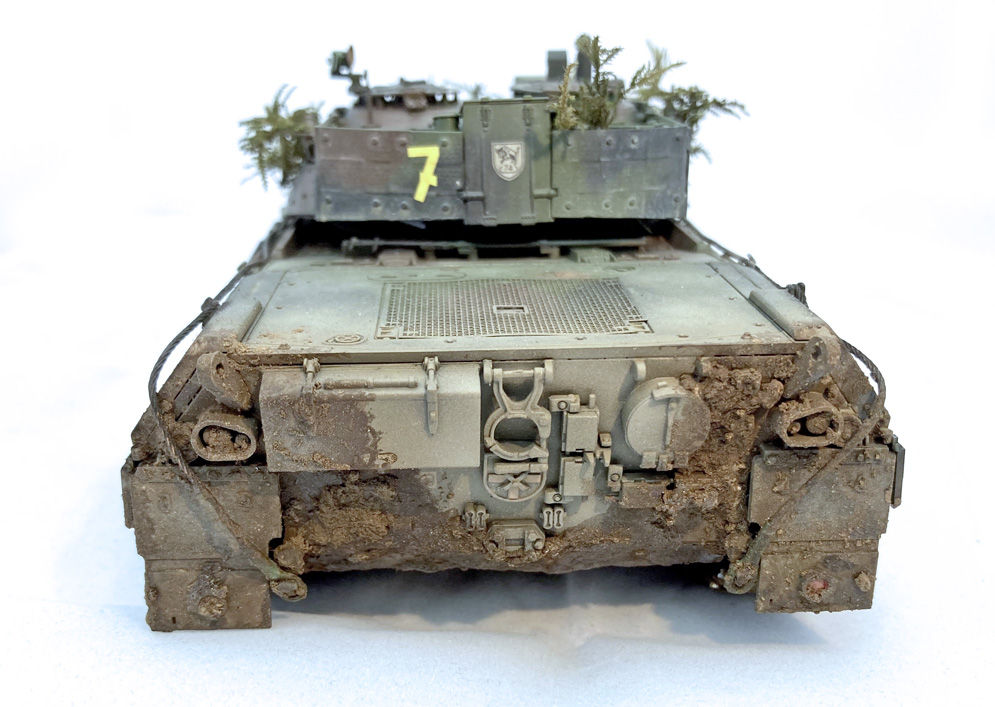
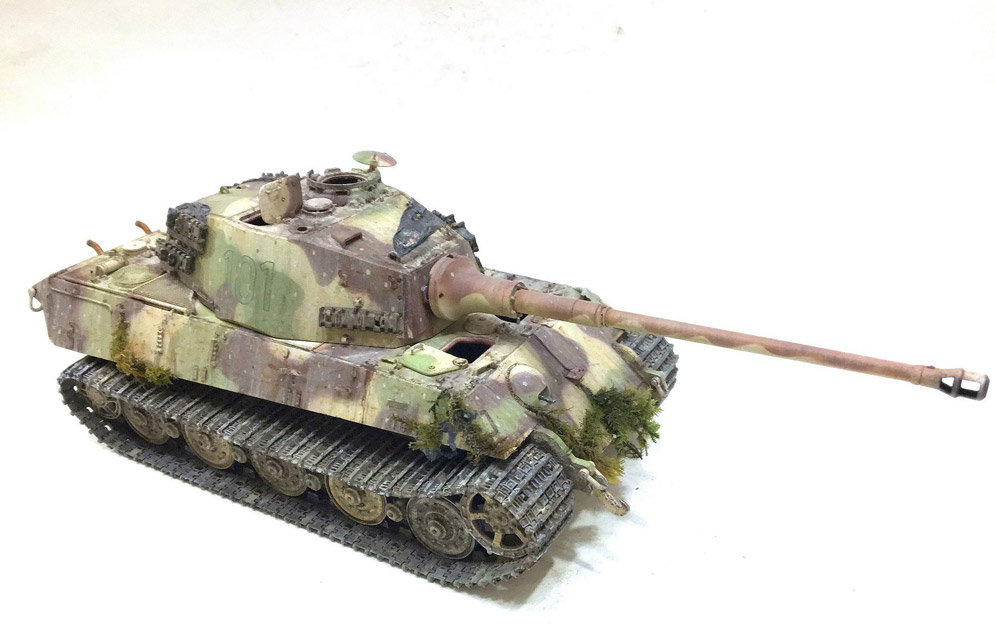
Sprayed with AK Real Colours Nato paints freehand. The foliage is moss I collected locally. Dipped in a liquid resin and painted various greens.
Thanks very much for taking the time to include it in the magazine.
James S.


Ian R.
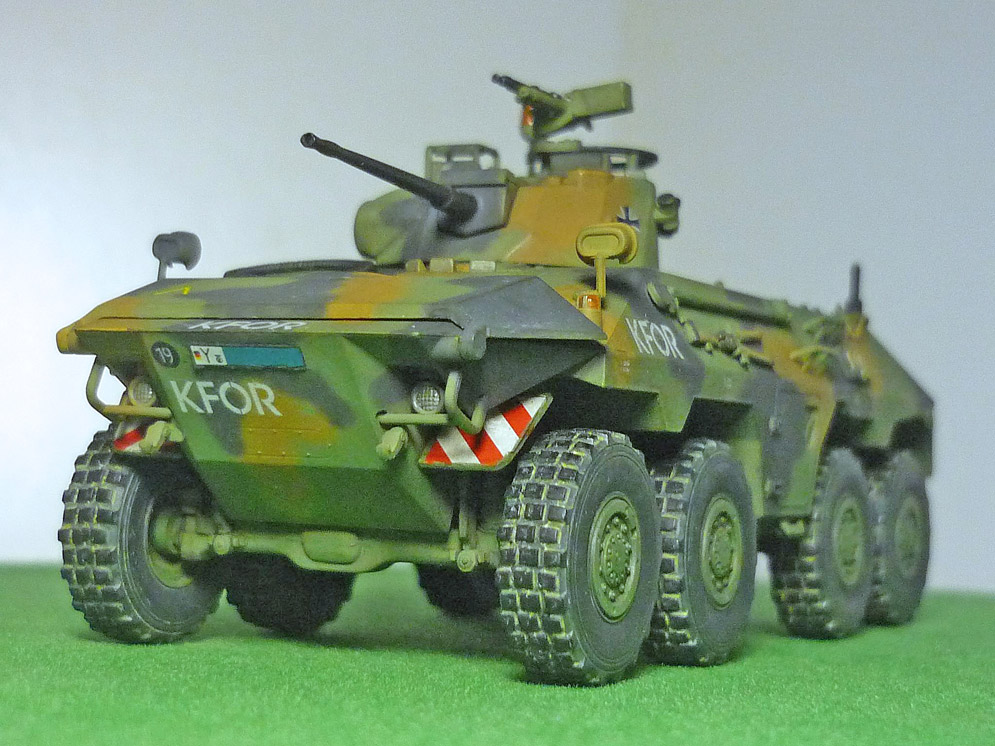
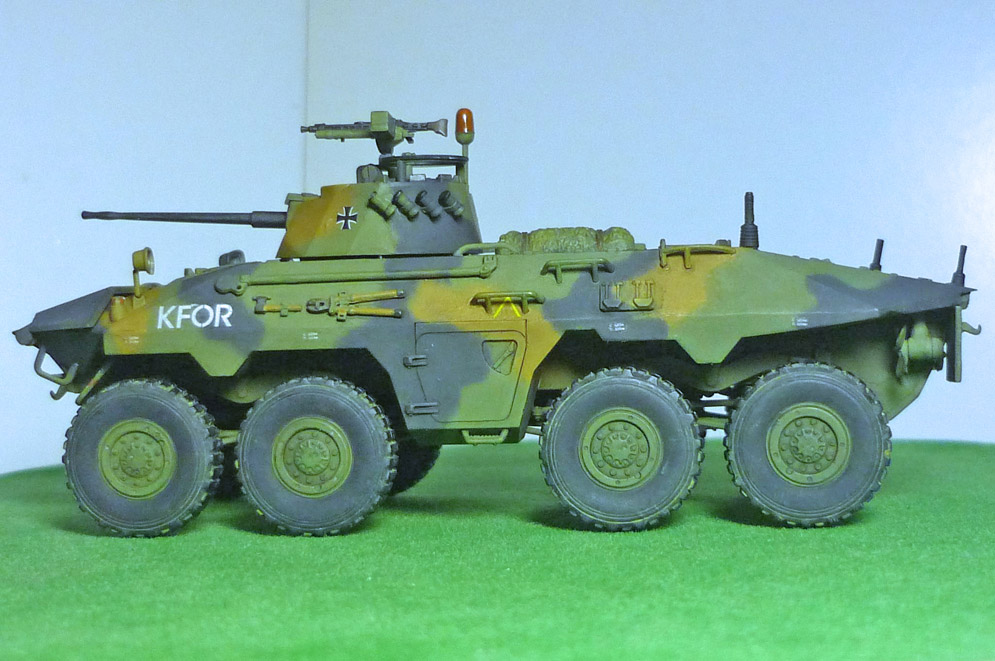
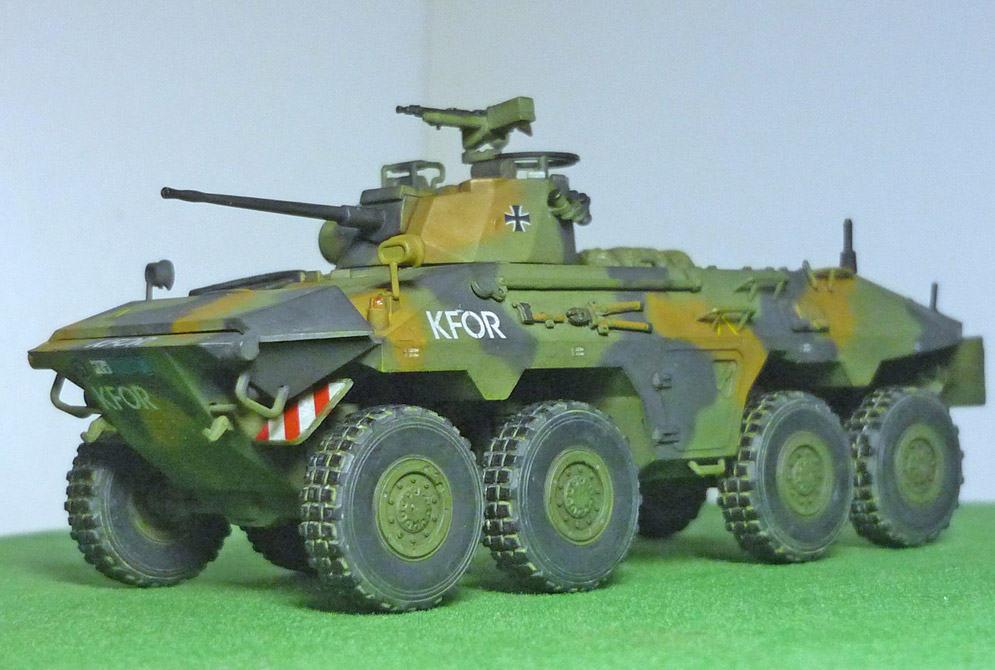
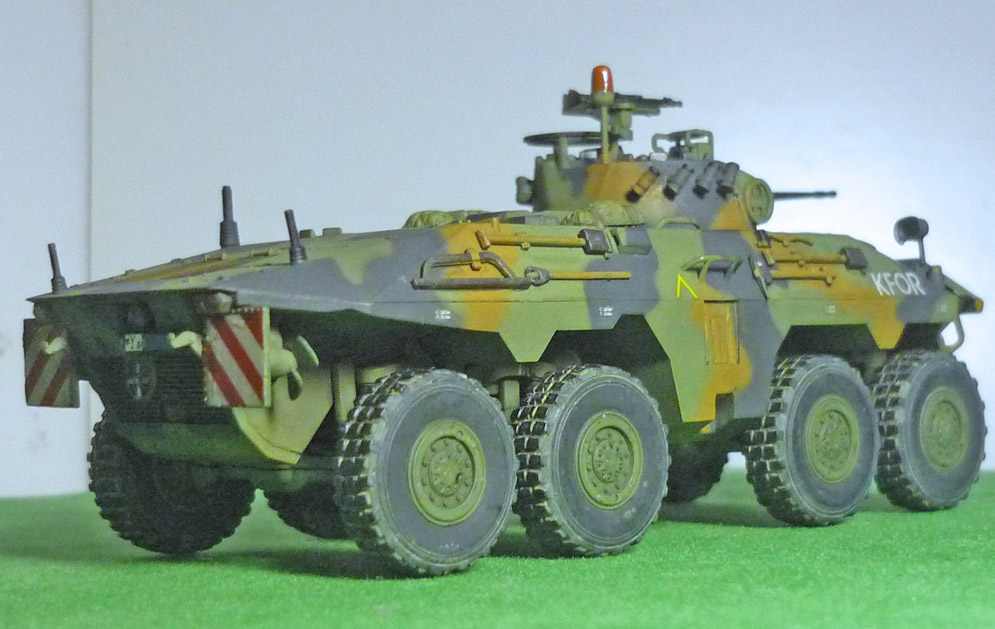
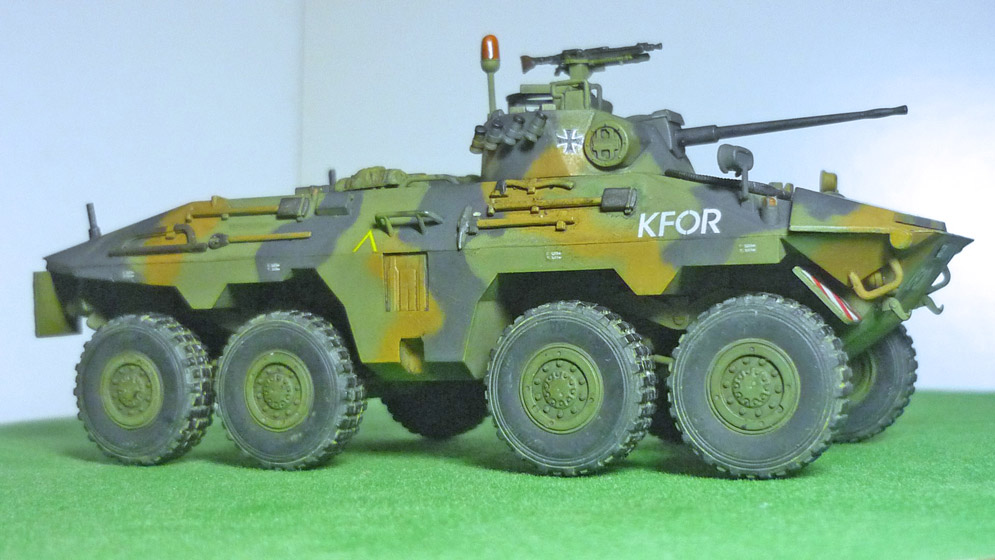
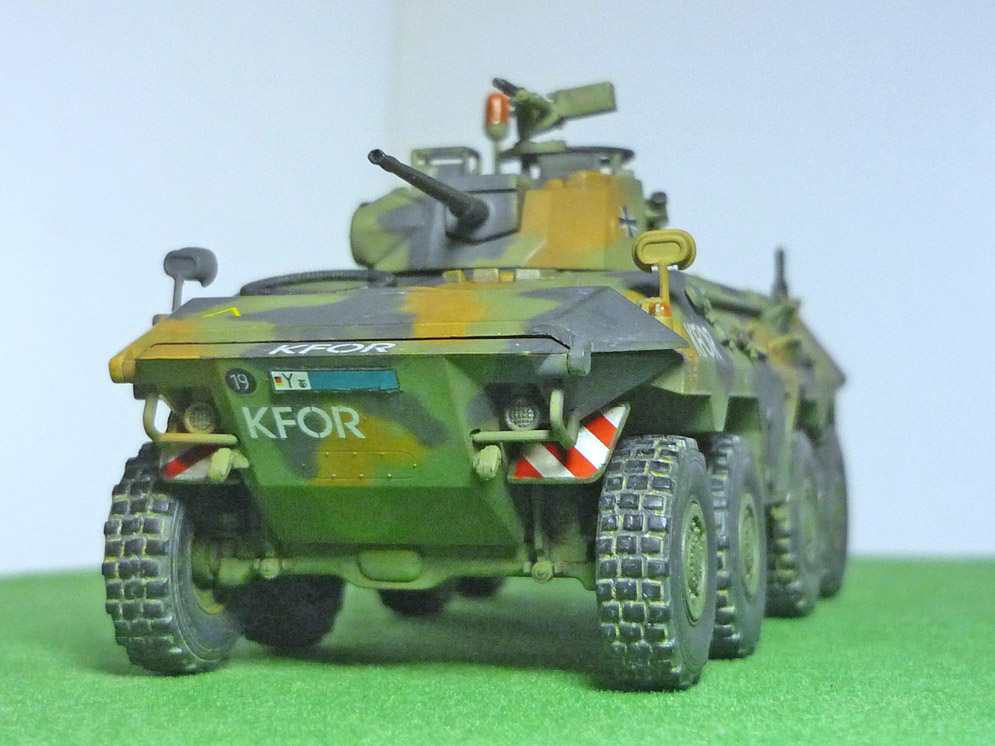
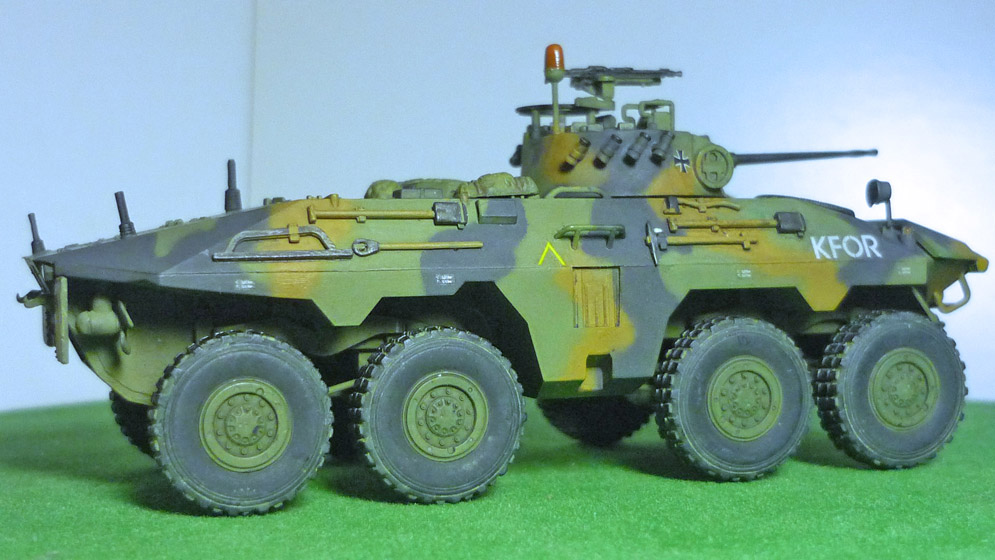


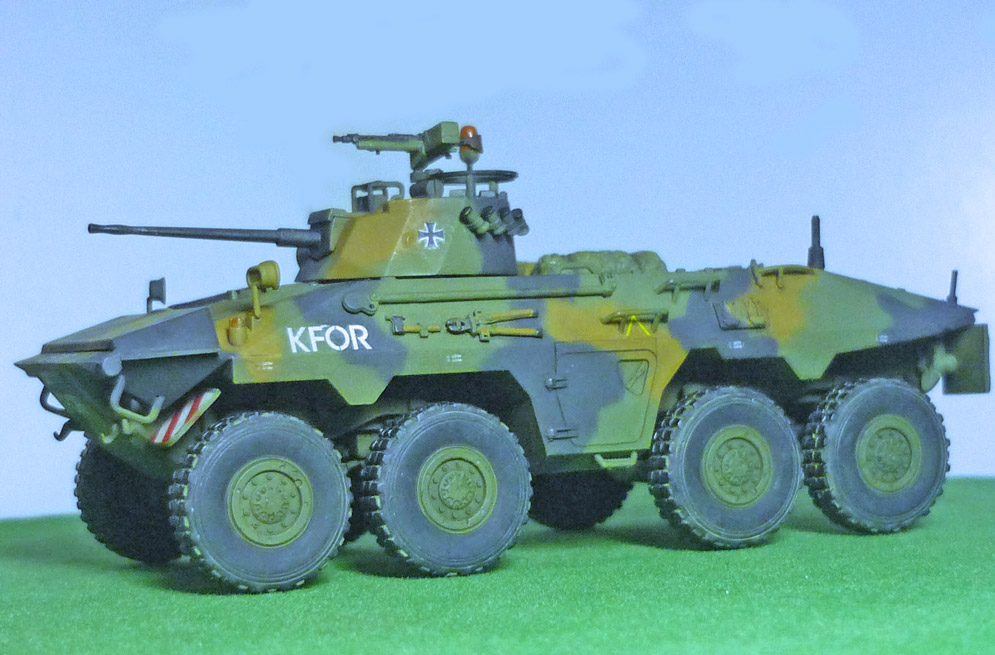
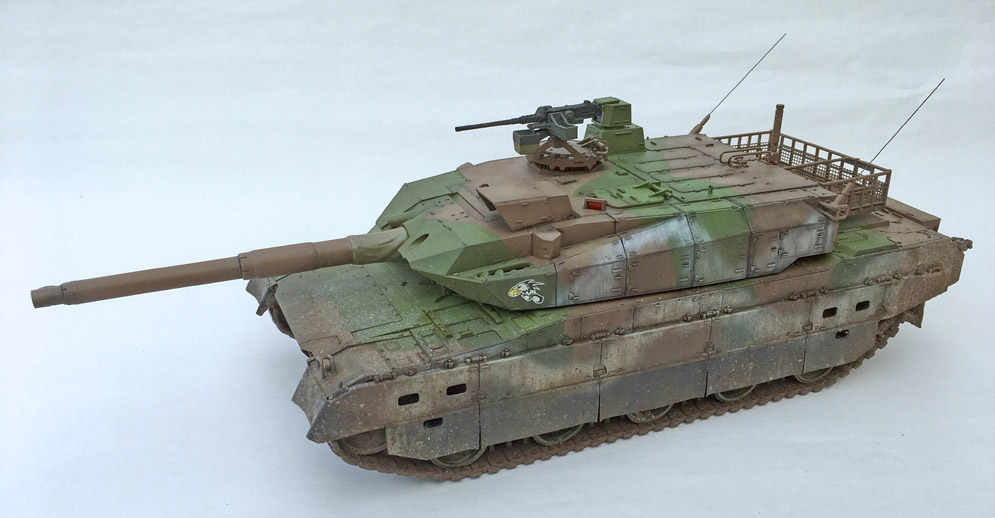
o OOB of a quite decent kit
o wheel tires assembled from multi-layer parts (a very good design and seldom seen in this scale), depicting better defined tire treads
o busy assembly beneath vehicle but hardly be seen unless placing the vehicle upside down
o size of decals cannot cover two rear white-red panels being a major drawback of this kit
o NATO camo treated same way as previous Leopard 2A5.
Hope you all like it!
TF Au