Let’s talk about rivets
Somewhat of a controversial subject in our hobby, there are many schools of thought on how rivets contribute to a finished model. This ranges from the old days of the mad raised riveter, an example of which that comes to mind is the original Frog Shackleton MR3 in 1:72 scale, to the now more modern and accepted recessed rivet detail seen on the majority of kit releases today.
Firstly, lets define exactly what I am talking about here, flushed riveting detail on a stressed metal skin aircraft surface. In my mind flush riveting is exactly that, nothing raised above the surface of the skin to impede the airflow and add a drag component to the design. Now take that definition into scale modelling and by rights neither recessed rivets or raised detail would be accurate, however in most cases from reference photographs, the panel lines on the skin show up where the riveting is present, the question is how best to represent that and to what degree.
Recessed rivet detail works well in my opinion once primer and top coats are added in sufficiency to reduce the depression into a ‘hint’ of the rivet line, pre-shading or post-shading then complements the effect. I am certainly not in the school of thought that then adds a surface wash, filling the rivet lines and making them stand out.
Raised rivets, although uncommon on modern kits except where they truly exist e.g. tail area of a BAe Hawk? …are also acceptable, as long as they are sanded down to the degree of that elusive ‘hint’ mentioned earlier.
So, what about if we have NO rivet detail on an older kit, this BF109 subject being a case in point. This may be a re-release from 2015, but the kit itself dates back way earlier, so fuselage and wing surfaces are smooth, only recessed panel lines are represented.
The choices are clear, break out your old faithful riveting tool and spend many a happy hour masking and adding that recessed rivet detail, or as offered as an alternative by HGW, positive rivet transfers.
Before I go on to cover these positive rivets in more detail, let me add that the opinions expressed are my own, not up for discussion, as everyone is free to choose their own school of thought and in my view the comments section of this review is not the forum to enter into debate, there are plenty other places on the web where that can take place. Agree or disagree I do not intend to be drawn into lengthy discussion and will not be making any reply. I wish all success in any method they choose or school of thought they follow.
Soap box speech over, let’s get on with the build…
Positive rivet transfers…

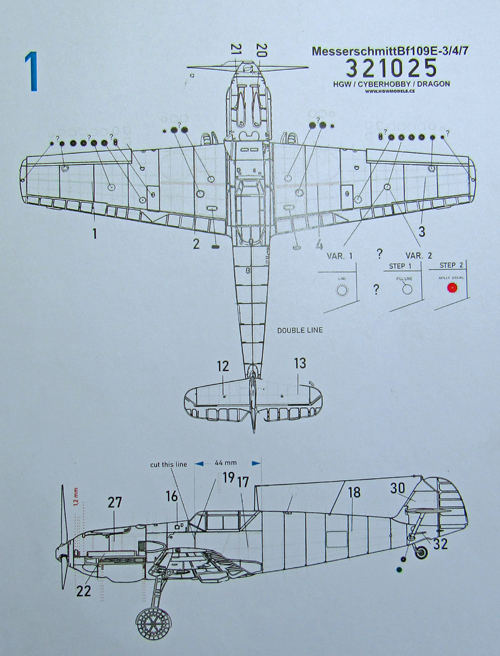
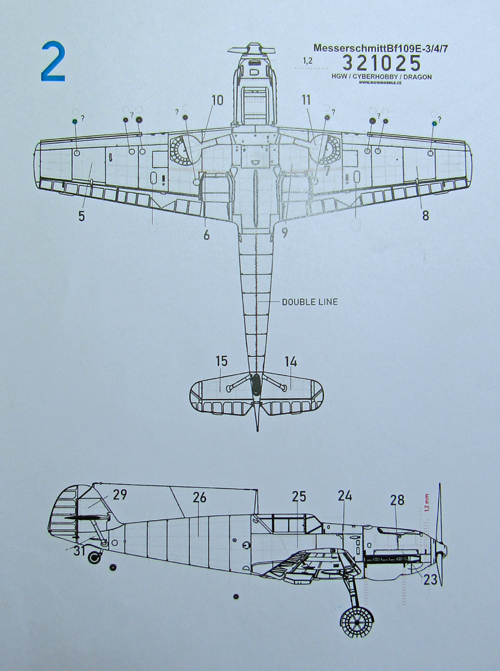
I noticed in the in-box review that the two A4 sheets of rivet detail transfers did not come with a guide of any sort. Not that it would take a rocket scientist to work out where each transfer section would go, I thought it incumbent to reach out to HGW and ask their advice. Within 24hrs I had a reply to my email attaching a specific guide sheet to placement, now THAT is customer service in my opinion, Kudos to Martin at HGW for the extremely fast and helpful response.
These are wet transfer decals, so there is no adhesive backing or transfer film involved, they are also not pre-cut so the approach to applying is a little different and slightly more time consuming that the usual decal sheets.
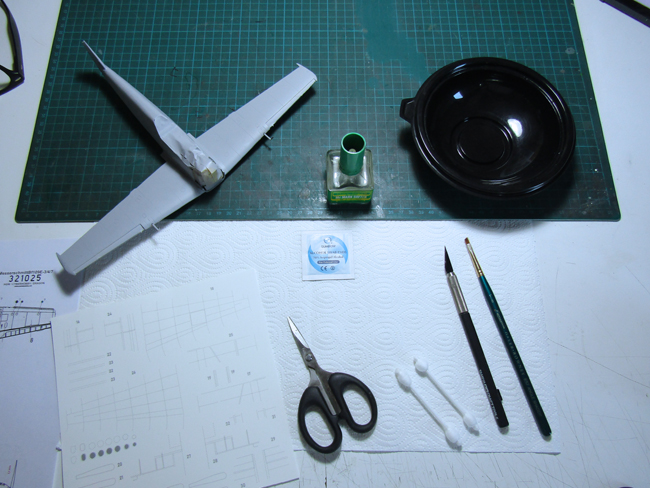
Here is what you are going to need:
- Alcohol wipes to clean the surface
- Sharp scissors to cut out the section required
- A fresh blade in your favoured scalpel
- A wide dish for warm water to soak the transfer
- A softening or setting solution to apply to the surface PRIOR to the transfer
- A flat brush and cotton buds (Q-Tips to our Colonial cousins) to get any fluid out from under the transfer
- Time and patience in bounds.
The secret here is to have ensured your surfaces are final, all preparation complete, sanding material put back in the drawer and surfaces clean of all dust, smear’s or fingermarks. A pair of surgical gloves at this point wouldn’t go amiss. The aim is to apply the transfer in the exact position you want it and ensure the rivet detail is in direct contact with the surface, leave no fluid underneath.
Ask a question or add feedback:
You must be logged in to post a comment.