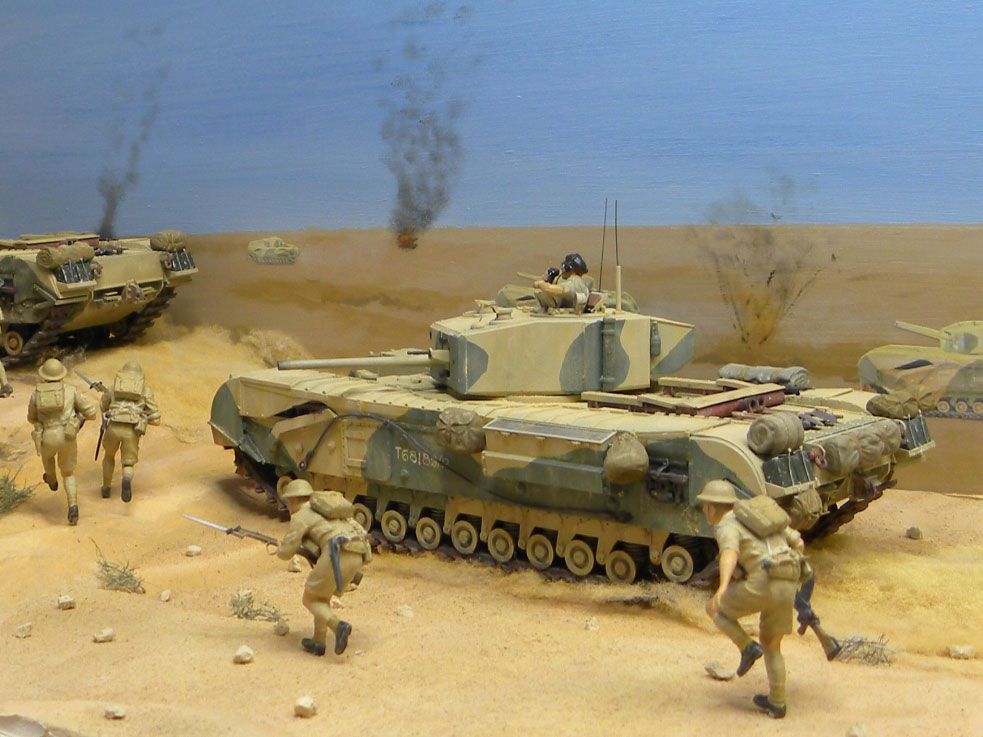
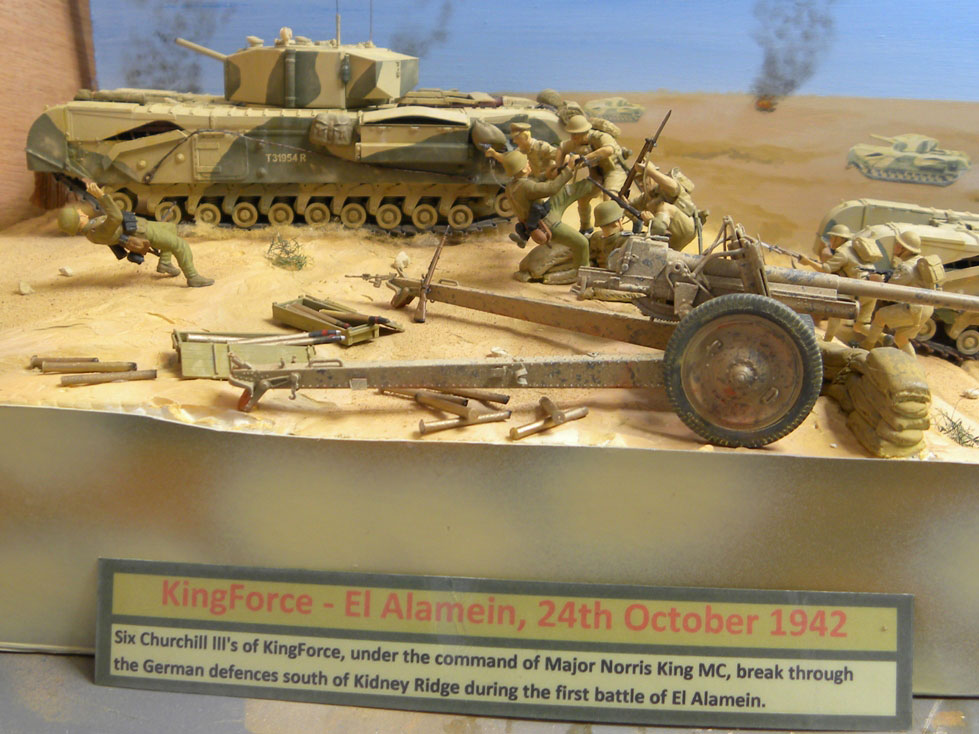
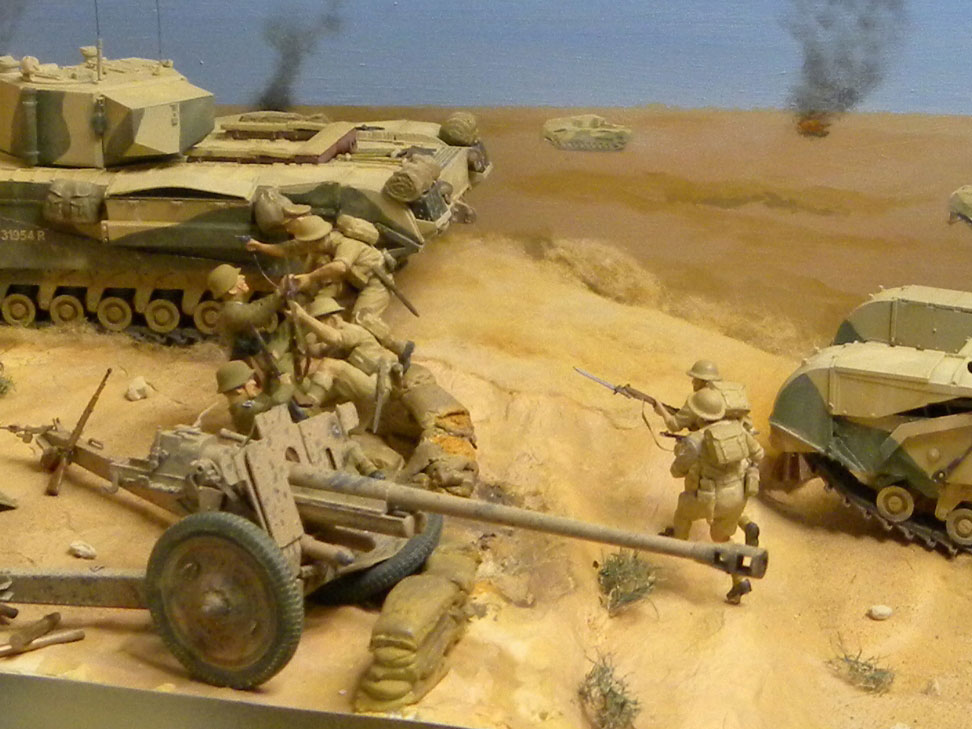
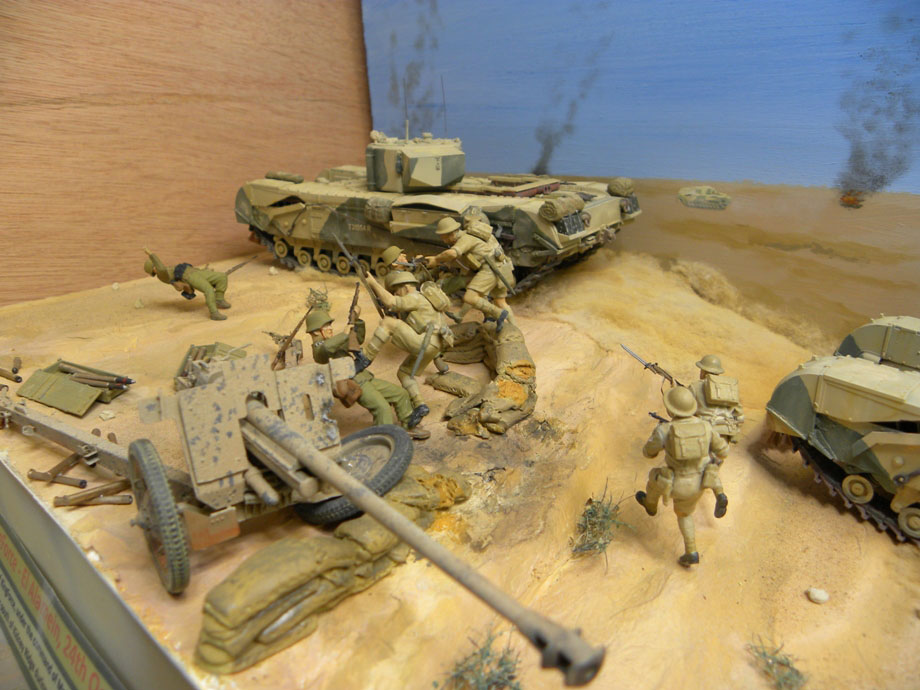
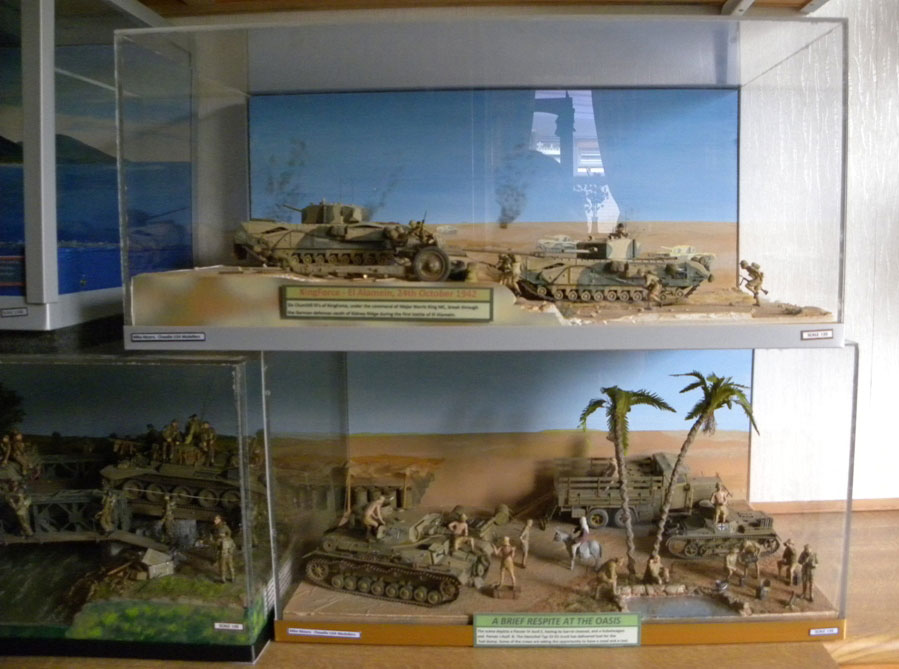
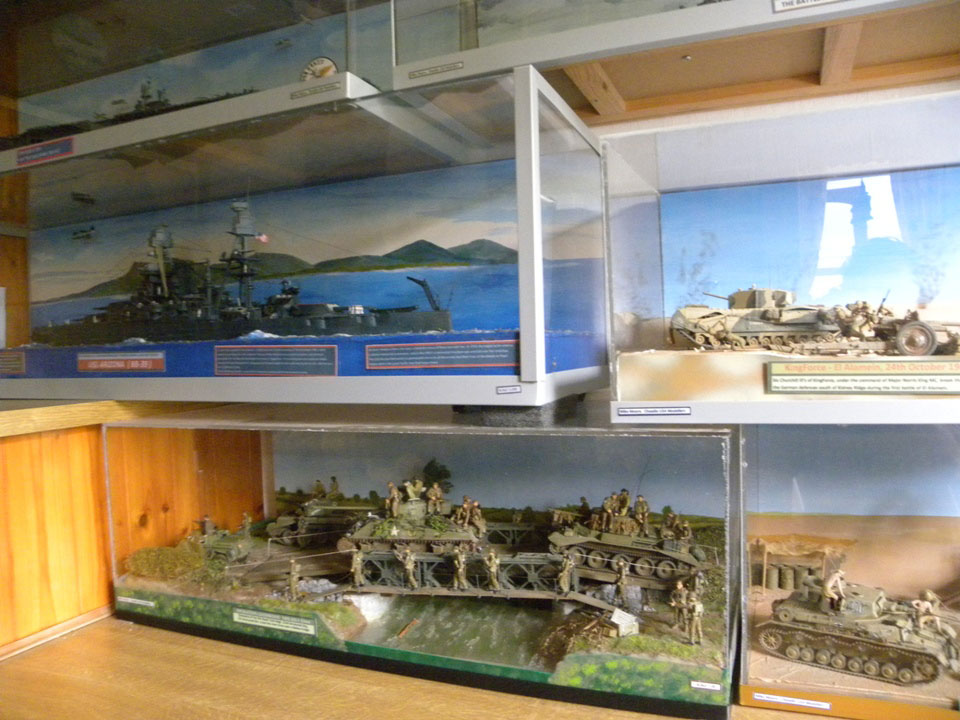
I have always liked the aggressive, solid look of the Churchill tanks, having made a couple of Tamiya’s renditions in the past, so when HFV Club brought out their version of the Mk lll, I just had to make it. A happy hour spent on the internet resulted in finding a brief history of King Force and its part in the battle of El Alamein.
After completing the tank I looked around for figures to give some scale to the scene I had in mind, and low and behold, I found Master Box had started to issue sets of figures in action poses that would be perfect for my scene.
To give the effect of dust kicked up by the tanks, cotton wool was sprayed with a pale sand colour and glued down behind the tracks with photographer’s adhesive spray.
Mike Moore
no images were found
Just finished a diorama, elements of which were started while on holiday in the summer.The Panzers I and IV are the old 3 in 1 Dragon kits, the Kübelwagen, Tamiya and theHenschel typ.33 D1, Revell. Figures are Master Box and Mini Art and the palm trees scratch built using twigs, garden string, tissue paper and wire.
I have titled it ” A brief respite at the oasis ”
Hope you like it, the bench is now clear to start my 1:200 Arizona having studied Les’s excellent build in the mag.
All the best, Mike Moore
[/wptabcontent] [wptabtitle]Abram’s M1A2 Main Battle Tank by Ian Whyte aka Big-E[/wptabtitle] [wptabcontent]Here we have the Trumpeter 1:35th M1A2 Abram’s Main Battle Tank. The model was built nearly entirely out of the box, the only additions being some lead wire for the smoke discharger and copper wire to form the protective cage over the beacon. The stowage came from the spares box and is parts from Tamiya, Dragon and Italeri.
Construction was simple with minimal clean up required which was surprising for such an old kit, I did take time to fill the openings in the lower hull where the on/off switch should have been (the kit is intended to be motorised) and to fill the sponsons. The main problem with the kit is the poor fit of the turret to the hull, in the end this took several shims to be fitted to allow the turret to sit level and at the correct height.
The kit was supplied with the anti slip texturing as part of the mould but I enhanced this further by using flour applied over a coat of PVA. Once the PVA was dry I removed the excess and then sealed the flour with a coat of matt varnish. I then allowed this to dry for 24 hours before starting the painting process.
The model was primed using Alclad excellent primer which also contains a micro filler and then any flaws were repaired or reworked if needed. I then sprayed the entire model in Vallejo Model Air Desert Sand but lightened and toned slightly with Sunny Skin tone. When this was dry I applied an even lighter shade to the centre of the panels to bring some definition to the surface. To enhance this further I then applied several coats of Mig filters and then finally blew the whole thing over with a highly diluted coat of the base coat (ratio of about 5% paint to 95% airbrush cleaner!).
The weathering sages consisted of applying scratches with the “Scotch Bright” method and then lighter scraps being applied with a size 0 brush using acrylic paints. Streaking and rust marks were applied using Aberteilung 502 Oils and Mig pigments. The tracks were sprayed German Tank Brown and the running blocks were then painted in Vallejo Black Grey. They then received a wash of Mig pigments using various shades. To finish things off some edges were rubbed with a graphite pencil to show wear and also to provide more definition to specific areas.
The final job of painting the crew and stowage was done using Vallejo Model colour Acrylics and oil washes where required.
For my first attempt at “modern” armour I am happy with the result and look forward to building more AFV’s of this type in the future.
no images were found
[/wptabcontent] [wptabtitle]Abrams MIA2 Tusk II by José Luis Lopez Ruiz[/wptabtitle] [wptabcontent]Kit: Abrams M1A2 Sep from DragonScale: 1:35
Conversion: Tusk II Conversion kit from Perfect Scale Modellbau
Other accessories: M1 Abrams Tracks from Bronco; front and tail lights from SKP; PE Set from Eduard; gun barrel from Voyager
Stowage: Blast Model, Black Dog, Tamiya
Surprise (Murphy Law): Tamiya will release one Tusk II Abrams this Christmas! (2012)
Best regards, José Luis
no images were found
[/wptabcontent] [wptabtitle]4 X 4 Ambulance by Tony Per[/wptabtitle] [wptabcontent]no images were found
The Ambulance is Italeri’s with the Plus Models 4×4 Ambulance conversion set, 1:35 scale. The only thing used from the original kit was the cab and chassis rails. I used the Eduard PE set also.Tony P.
[/wptabcontent] [wptabtitle]AFV Club Centurion I by Julian Seddon[/wptabtitle] [wptabcontent] “This is the Oz Centurion I built a while ago. It was the AFV club 1:35thkit. It has a lot of Eduard extras on it (straps buckles etc) and as it did not come with the cloth mantlet I carved it from Milliput filler. I started with an Oz Vietnam green but not very seriously as I knew that this was not going to be near the final colour which, with washes etc was more Vietnam dust!”
no images were found
[/wptabcontent] [wptabtitle]Aufkl auf Fgst Kpfw 38(t) mit 2cm KwK38 – by Bill Curtis[/wptabtitle] [wptabcontent] This was a stop gap measure produced by BMM of which about 50 were produced with the 2 cm gun being issued to the armoured reconnaissance units from April 44, on both the Eastern and western fronts.The model consists of the Italeri 38(t) gun tank with the turret and gun from a Tamiya Sdkfz 222 kit.The superstructure was cut in front of the engine access panels and using the kit glacis plate all other panels were fabricated from flat card. The visor covers were used from the original kit being glued to the front plate along with a blanking plate for the machine gun mounting. Lines were pencilled on the card and marked for the rivet head position. The rivets were then made with a punch and die set and then attached with liquid cement. The turret was made as per the instructions and set aside for painting. Two boxes were fabricated for the fenders from flat card and attached.
The model was then washed and set aside to dry. This was followed by a primer coat of Halfords grey which was allowed 24 hrs to dry. The base coat and camouflage colours were then airbrushed on and again left to dry. Pin washes of dark brown were applied in to all recess lines, rivets and raised detail. A light dry brush with the base yellow was done next. The exhaust was painted with dark brown and talcum powder and then dry brushed to give a worn effect. The sub structure was painted with a mix of black and earth colours. Tracks painted black then dry brushed with gunmetal and washed with a brown earth colour
A small base was made and a figure added to give scale to the model. Finally a name plate was purchased made from brass and engraved with black lettering.
no images were found
[/wptabcontent] [wptabtitle]Beast Hunter Tiger I (Late) Eastern Front by Wu Bayin[/wptabtitle] [wptabcontent]Really dirty work!Thanks, Wu B. (Eric Torch)
no images were found
[/wptabcontent] [wptabtitle]BMP 2, Zvezda kit 1:35 by Simon Antelmi[/wptabtitle] [wptabcontent]Notes on assembly and painting/weatheringThe BMP 2 is an APC largely used by the Russian army, the specimen in question belongs to the al Shaheed Brigade (Army of Kuwait), used in Desert Storm (1991).To differentiate it from similar examples used by the Iraqis, some white stripes have been painted on the hull, and some chevrons on the turret.
The model in 1:35th scale from Zvezda and is a satisfactory kit and although the tracks are plastic sections, it assembles easily. The large hull surfaces require different chromatic modulations, so I sprayed with the airbrush in the center of the panels as a tint clear (desert yellow Humbrol + yellow and white), then I added weathering to emphasize the abrasion wear of the tank.
Thanks to the use of Winsor and Newton oil paints I have created some streaks caused by rust; some areas have been affected by pigments in powder form and graphite pencil carefully rubbed onto the raised detail to highlight the neglect of the vehicle.
no images were found
[/wptabcontent] [wptabtitle]Cromwell Mk.IV British Cruiser Tank by Roger Brown[/wptabtitle] [wptabcontent]Here is my Tamiya 1:48 Cromwell Mk.IV British Cruiser Tankno images were found
The kit was built from the box with the addition of some stores from the Tamiya Jerry can set.The model was sprayed with Xtracolor Olive Drab and shaded with the same paint with some white added.
I made up a thin wash from Tamiya XF-52 Flat Earth and applied this in the panel lines, grooves and crevices and in the wheels.
Using an acrylic wash eliminates the need to spray on a protective coat of Klear over the enamel paint. A great little model.
All the best,
Roger
[/wptabcontent] [wptabtitle]Challenger 1 Mk.3 MBT by Gary Wickham[/wptabtitle] [wptabcontent]Following the Gulf War, Tamiya updated their 1:35 kit of the Challenger I to a Mk.3 variant with Chobham armour etc. Being my first serious attempt at building armour, I added an Eduard PE set and assorted resin/plastic accessories to the kit to make it look war weary.
I very much enjoyed the change from my steady diet of 1:48 aircraft. I hope you like the end result.
Gary W.
no images were found
[/wptabcontent] [wptabtitle]Crusader Mk.II British Army 1940 by Andy Burton – Italeri 1.35 kit[/wptabtitle] [wptabcontent] This a fairly old Italeri 1/35th scale kit but it still builds into a nice looking model straight from the box and makes a nice change from a lot of today’s super kits full of extra details that contain huge amounts of parts and multi options to choose from. I built it purely for that reason, to see how good a job can be done with a relatively old kit built more or less straight from the box without adding any extra detailing. I wasn’t concerned with the models accuracy and just wanted to open a box, build a model and paint it like I used to years ago, job done!I preshaded the model with Humbrol Matt 29 + 10% matt black then sprayed Tamiya desert yellow as the base coat followed by successive highlights of desert yellow plus white, Then used various pin washes of oils for shadows and stains etc. and painted scratches and chips with humbrol dark red brown + black. Tracks were painted dark chocolate brown and drybrushed with Citadel Boltgun metal. The Desert base is a bread board and the ground work is polyfilla sprinkled with crushed cat litter and sand, the reed grass is made from an old shaving brush, all painted with oil washes and enamel drybrushing. This simple model went on to win a local club competition 1st place and model of the year for the same club, a highly commended at Lincoln and Newark model expo and a Silver medal at IPMS Scalemodelworld 2004.no images were found
[/wptabcontent] [wptabtitle]DML Panther G Steel Wheel Version by Christianto E.P.[/wptabtitle] [wptabcontent]no images were found
This kit is DML Panther G Steel Wheel version. I built it almost straight from the box.Due to good quality of this kit, I almost haven’t got any problem with the assembly process. I only replaced tool clamps and made few scratch build with brass which you can see in my model before painting process.Before assembly process was completed, I applied mud at lower hull area. I made mud texture from wood filler.
First of all, I sprayed whole area with Mr Surfacer 1200, let the primer cured and then I preshade my model with dark brown acrylic. I left the model for a day then continued with basecoat. As usual I paint my basecoat with Tamiya acrylic. For dark yellow base color I mixed tamiya Dark yellow + Desert Yellow about 70:30 ratios. Then the second layer received sprayed of thin Dark Yellow mix with Buff, and then I added a bit of flat white for lighter color at the horizontal surface of the model.
For brown pattern I used Tamiya Red Brown mixed with buff at 90:10 ratios. After all dried, I sprayed green pattern with Tamiya Olive Green, and the next layer I sprayed with thin Tamiya Olive Green + Field Grey. I added more Field Grey for the next layer until I feel satisfied with my base color.
For muddy area, I sprayed with Tamiya Dark Brown + Flat Earth.
I left my model for a day once more to give the paint really cured.
This also gives me a time to check my paint job and I could correct it if I found any problem with my paint job. I sprayed future polish on the area which decals would apply; after I applied all decals I sprayed the models with satin varnish. This step also sealed the decals. Then I painted the details such tools, exhaust, tow cable, wood block and spare tracks.
Next step was filtering; I gave my model with yellow ochre filter. This step is important to toning down and blend the camo. After I felt satisfied with the filter, I sprayed satin varnish all over the model. When the varnish has dried, I applied faded effect with multi dot color of oil paints then blended with damp brush.
I left the model once more and moved to worked on the wheels and tracks. I glued the center wheels and track all together so I could pull off the tracks and wheels and painted them separately, even the road wheels could painted separately. The wheels and track has been given primer. So I started to spray them with Nato Black color for preshade it, then I sprayed the tracks with thin dark brown color, layer by layer. I used to paint my models in several thin layers.
After that, I sprayed all wheels with dark yellow mix with buff. After all has dried I sealed it with satin varnish.
The next day, I prepared to wash my model. First of all, I give thin wash of raw umber to all over model and then I gave pin washed with darker brown color to bring out the details.
After washed was finished, I create chipped paint and scratch with Vallejo and oil paint. I used two layers method for chipped paint combine with sponge method to give random effect; I also added rust here and there. I also added worn effect on grab handle, machine gun rail, and hatch by combination of dry brush with flat black and graphite powder.
For rusty exhaust, first I painted the exhaust with red brown, and then applied rust color pigment on it and blended with mineral spirit. After that, I mixed plaster, acrylic medium gel which I bought from local art store, water and pigment to create mud. I applied mud to all wheels and tracks. After the mud was dry, I applied more pigment on wheels and blended them with mineral spirit. To avoid monotonous appearance I applied various color of dark pigment onto wheels. After all pigment dried, I dry brush the tracks with metallic grey and steel. I also applied various color of pigment onto hull and turret.
The last step was adding splatter mud to the model.
To create splatter mud; I dip a brush to the mud mixture and blew it to the model with airbrush. I did it little by little; try not to overdo this effect.
Finally the big cat was done, and I brought it to the display at local hobby store.
[/wptabcontent]
[wptabtitle]Dragon Flak 36 1:35 scale By Julian Seddon[/wptabtitle]
[wptabcontent]This is the Dragon 1:35th Flack 36. It was built straight out of the box. The kit was good and quite easy to assemble in spite of the number of small parts. I really built it to have fun with painting and this I did using a desert photo as reference and adding my own variation, as I imagine most crews did at the time. It was done to have a rest from planes! As you know I like weathering and armour is the best way to learn some of the techniques which were then transferred to aircraft.
no images were found
[/wptabcontent] [wptabtitle]Fiat Semovente by Jenny Ryan 1.35[/wptabtitle] [wptabcontent] It is the Model Victoria kit and it really is the best model I have ever made, the quality of the craftsmanship, not my model ability…Far too modest as I’m sure you’ll agree… Geoff
no images were found
[/wptabcontent] [wptabtitle]Flussiges Gold by Michael Mandau[/wptabtitle] [wptabcontent]This is my second attempt on build a Diorama. This time orientated in the desert of Libya in 1943 – called “Flüssiges Gold” (liquid gold).Gallery 1
no images were found
The PzIII is the old Dragon-Model, build completely out of the Box. It’s coloured with Revell-Aqua-Color and finished with different weathering-techniques. The same for the Sdkfz251 – but it’s an old Revell-Model.
The Generator-trailer is 70% scratch – only the Tyres and the outer frame is from an old Quad-20mm Gun from Tamiya.
The Base is all made by myself. The Ground is a mix of Plaster and fine sand. The palm trees are made of sticks, wrapped with wire, tissue and Glue. The leaves are cut out of paper, glued with a wire and painted in different green colours.
The Figures are from Tristar & Dragon.
Gallery 2
no images were found
I hope you like it. It normally takes me 2-4 months to build a diorama. But stay tuned for further step-by-step updates.
You can see more on my Blog
Michael M.
[/wptabcontent]
[wptabtitle]Goodwood by Michael Moore[/wptabtitle]
[wptabcontent]03 January 2012
Dear Geoff,
Just subscribed to your mag, and find it excellent. What a great idea.
The images attached are of a diorama that I have just completed. Five months in the making but most enjoyable. I have used, I think, 38 figures including two sets of the new Miniart British tank riders NWE.
Everything is constructed from light weight materials wherever possible. The background is hand painted using water based household paints (Dulux) and then enclosed in a 4mm acrylic case to keep it stackable and dust free.
The scene depicts elements of the 7th Armoured Div. crossing a Bailey bridge at the start of Operation Goodwood.
The bridge, owing to size restrictions is only a 1/4 of the length it should be.
Keep up the good work.
Mike Moore.
no images were found
[/wptabcontent] [wptabtitle]IDF Fitter by Tony Per[/wptabtitle] [wptabcontent]no images were found
The IDF Fitter is Academy’s kit. I used the Verlinden Fitter update set and Fruille tracks. The Academy kit comes with minimal interior parts, I scratch built all other interior parts to make a complete interior; both the engine compartment and the interior were detailed to match my references.More pics on my Blog
[/wptabcontent] [wptabtitle]Italeri Panzer 1 Ausf B by Bill Curtis[/wptabtitle] [wptabcontent]Finished in Panzer Grey and Sand with a light dry brushing and a dust coating. A real gem of a kit which with a little extra attention to detail can match the more modern offerings.
no images were found
[/wptabcontent] [wptabtitle]Italeri 1:35 Puma by Bill Curtis[/wptabtitle] [wptabcontent]no images were found
The modifications were the armour texture and the engine deck grills replaced with plastic card items. Paint finish was done with Tamiya colours, light pin washes, subtle weathering and dry brushing.Another not new kit but one which builds into a very nice representation of the real vehicle. Hope you like it?
[/wptabcontent]
[/wptabs]