Welcome to the Subscribers’ Armour Gallery N – P
Each submission has a ‘gallery’ of thumbnails which you can click on to see an enlarged image along with some short text describing the model – enjoy!
Galleries: A | B | C-I | J-L | M | N-P | R-S | T-Z
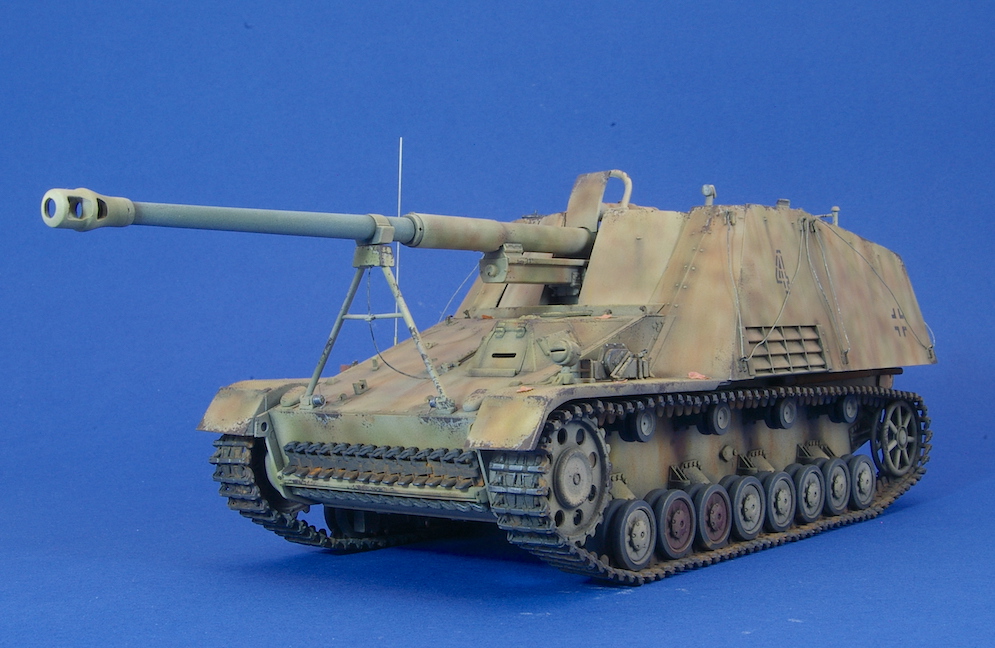

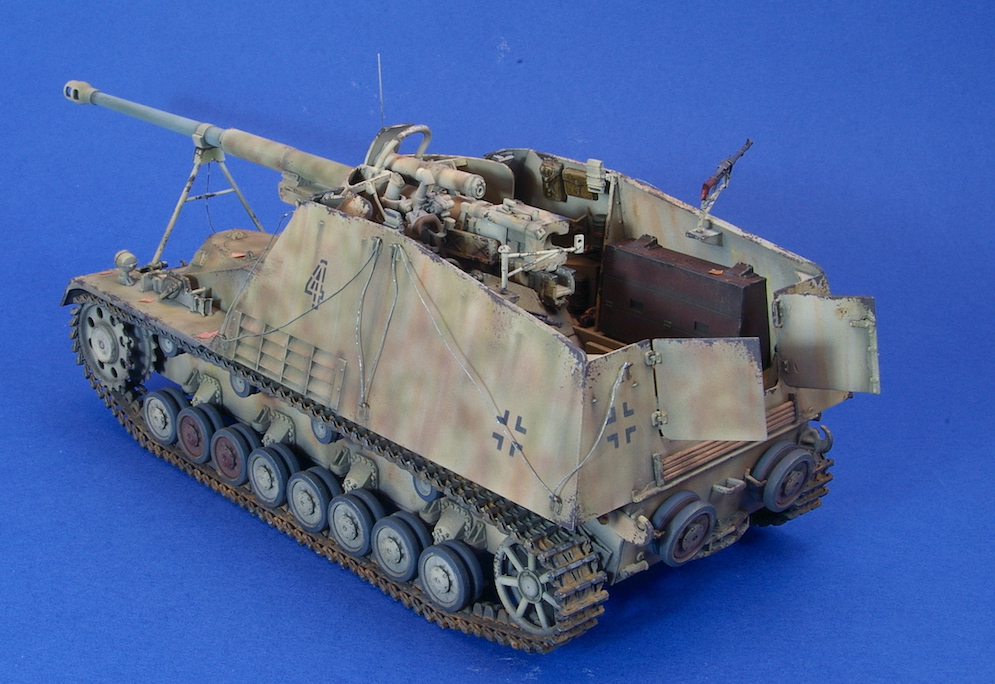
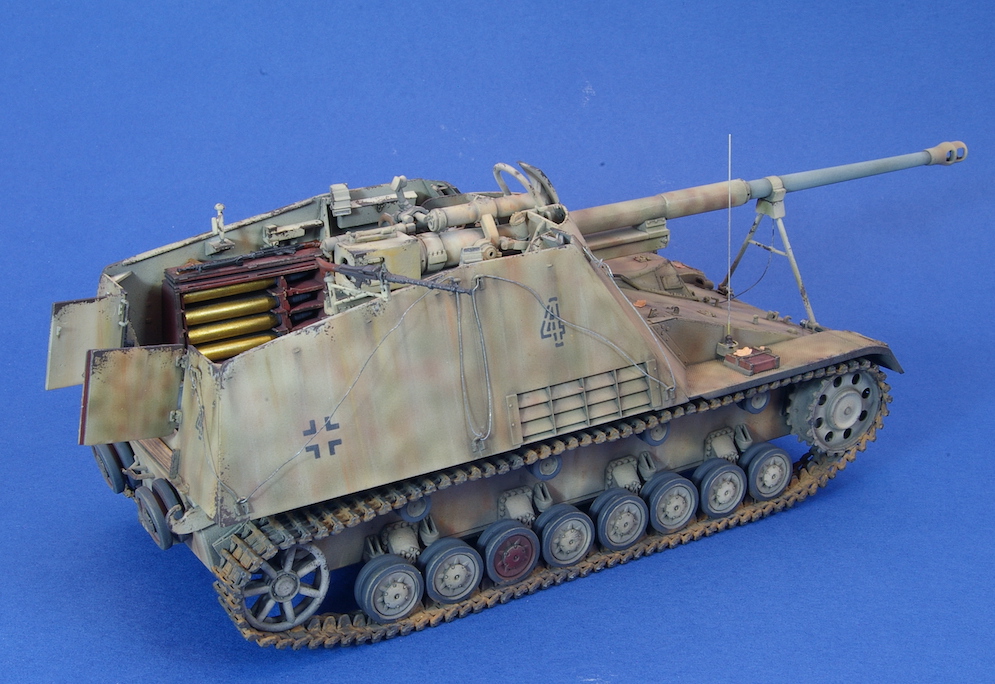
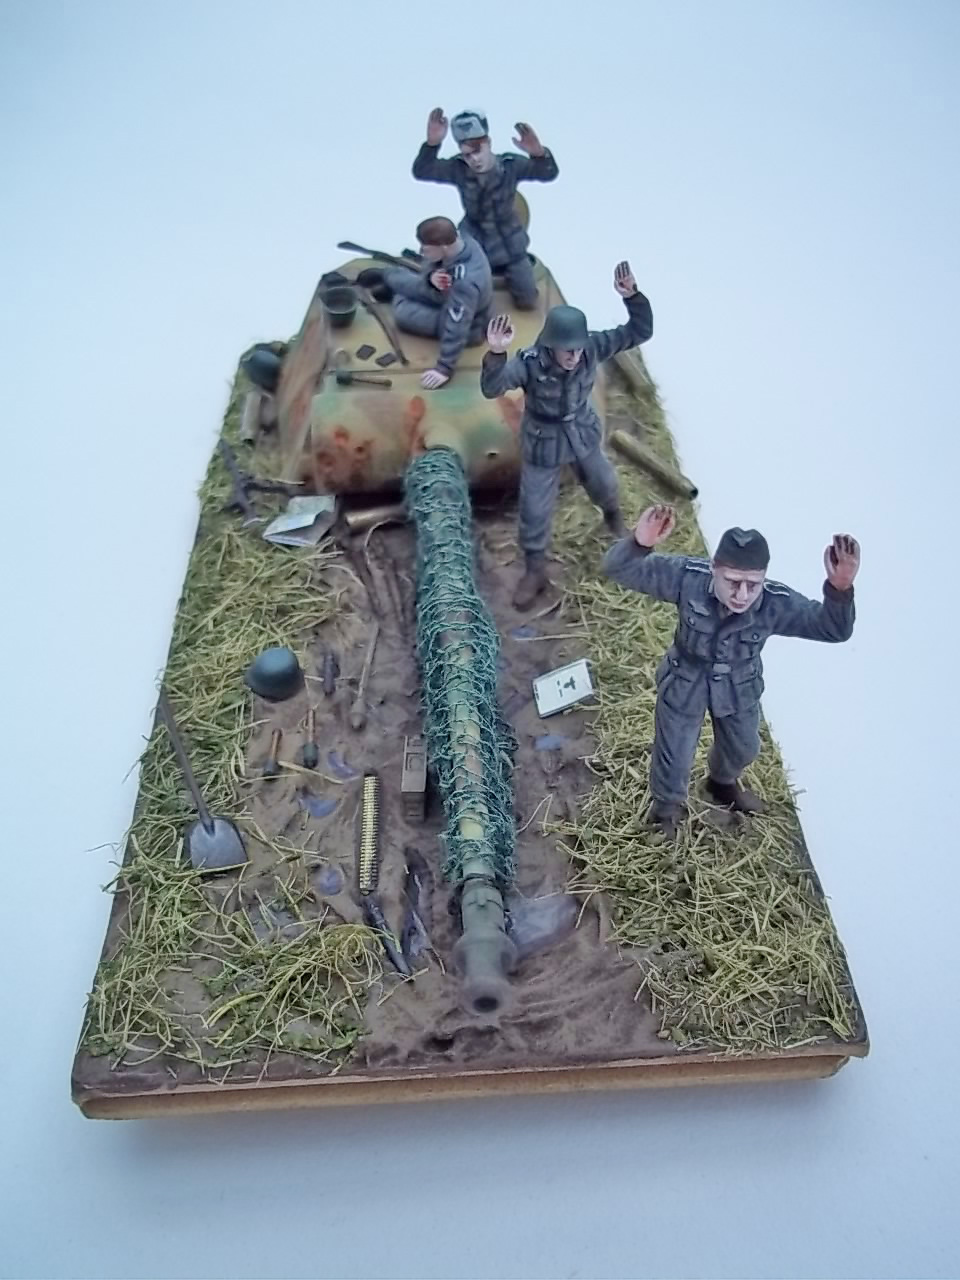
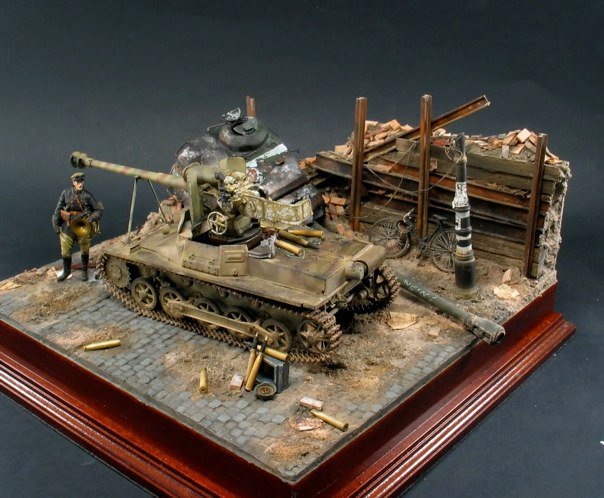
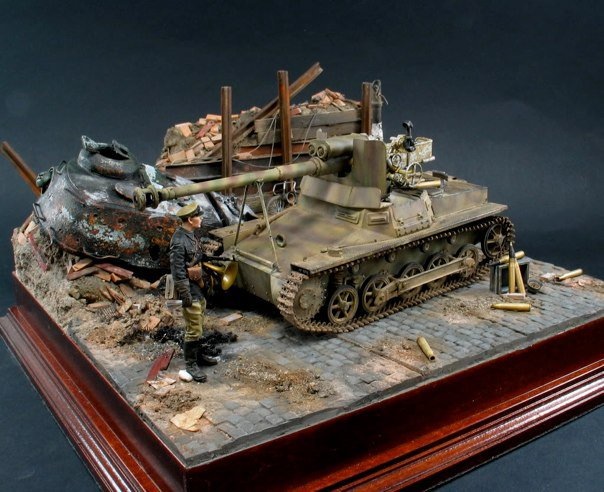
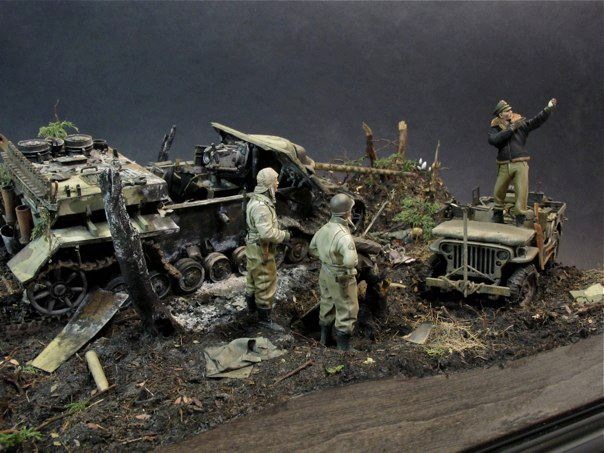
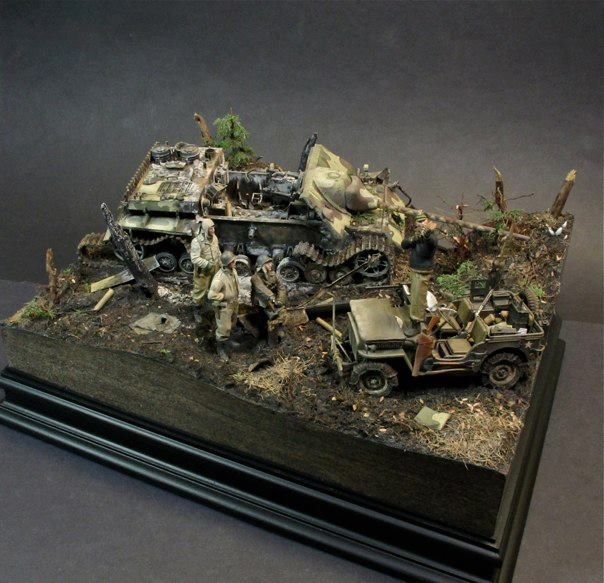
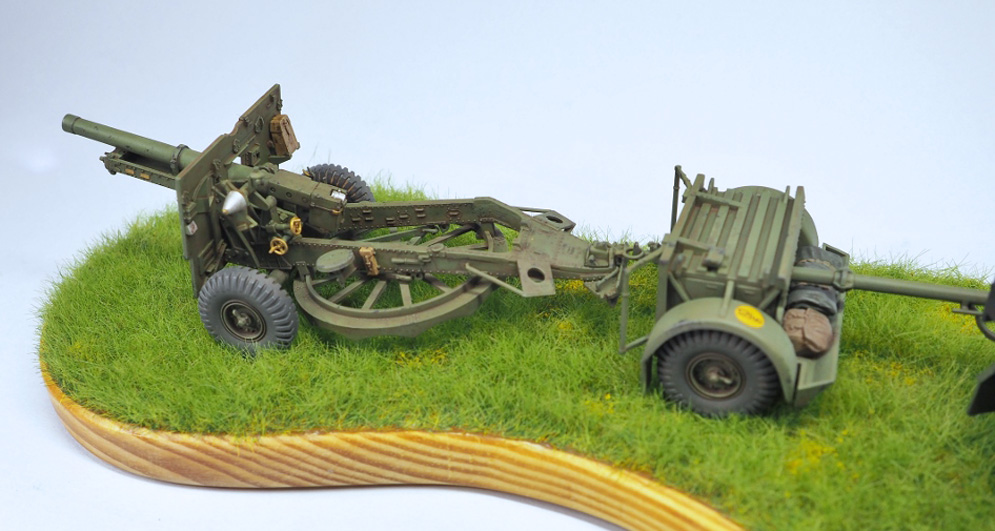
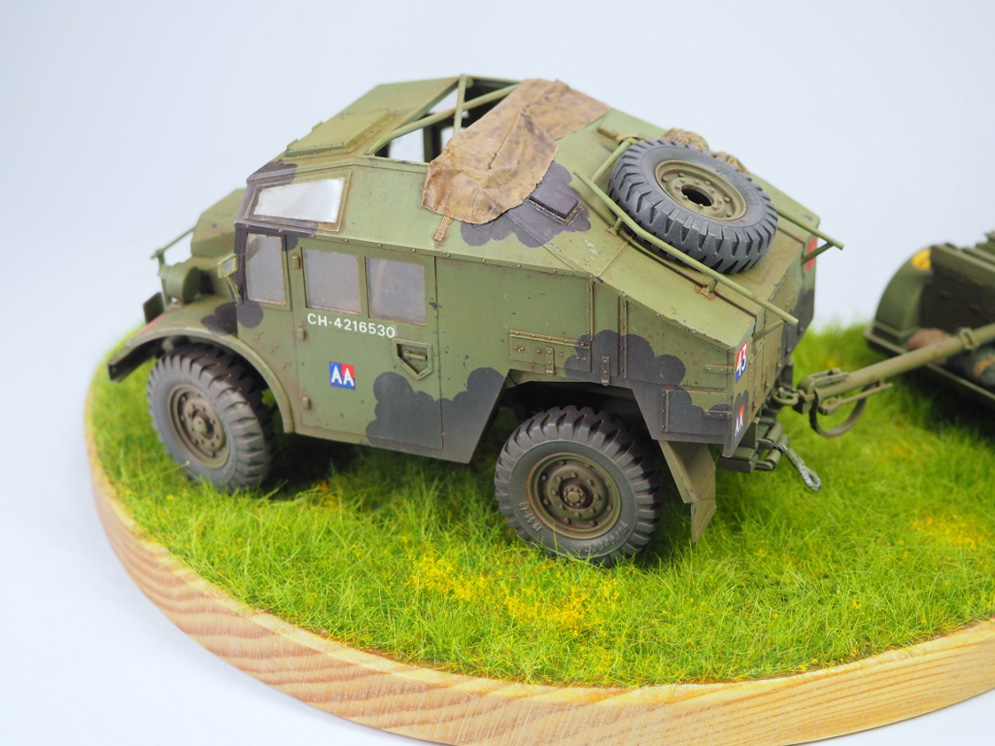
When the German Army encountered Soviet KV and T34 tanks during the early stages of Operation Barbarossa in 1941 it became obvious that there was an urgent need for mobile anti-tank guns.
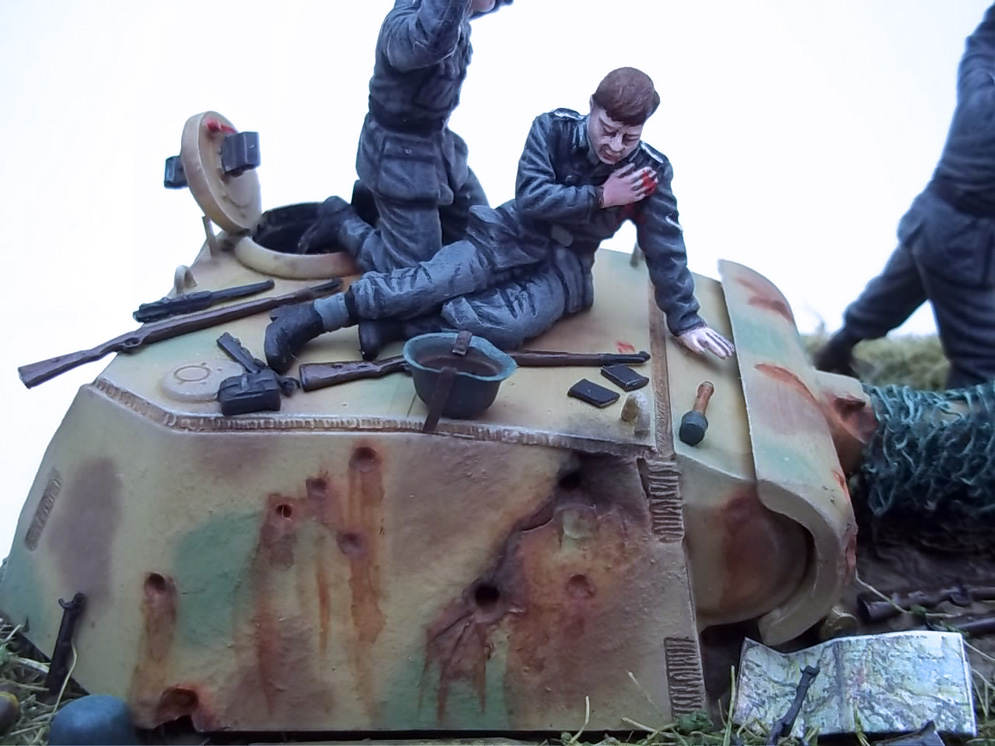
The Hornisse (later renamed Nashorn at the insistence of Adolph Hitler) was designed by the German arms firm Alkett. It carried the powerful 88mm Pak 43 anti-tank gun on a chassis which used components from the Pz.Kpfw. III and Pz.Kpfw. IV tanks.
Like the similar Marder series of vehicles the Nashorn had an open topped fighting compartment which provided its crew with some protection from small arms fire and shell splinters, but not from armour piercing rounds. This made it unsuitable for direct engagements with enemy armour.
The Nashorn first appeared at the battle of Kursk in 1943. It was eventually replaced with the fully armoured Jagdpanzer IV, though production continued until the end of the war.
I believe that the Nashorn was one of the first kits released by DML back in the early 1990s. This retooled version of the kit was released about ten years later and was far more accurate, and easier to build. The kit has been periodically upgraded with new parts in the following years.
The instructions in this release of the kit were a ‘photographic’ type which were thankfully only briefly used by DML. I found them rather difficult to follow.
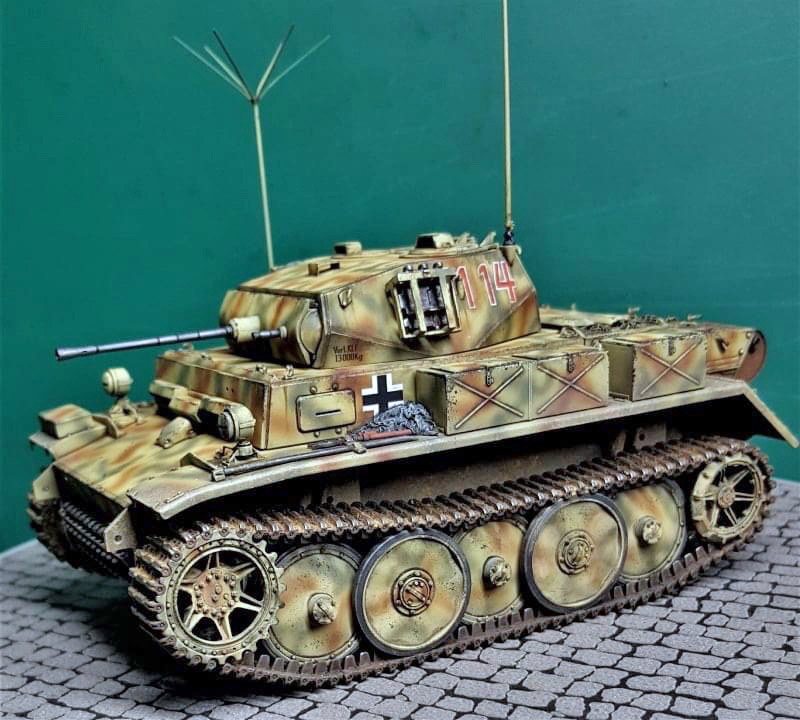
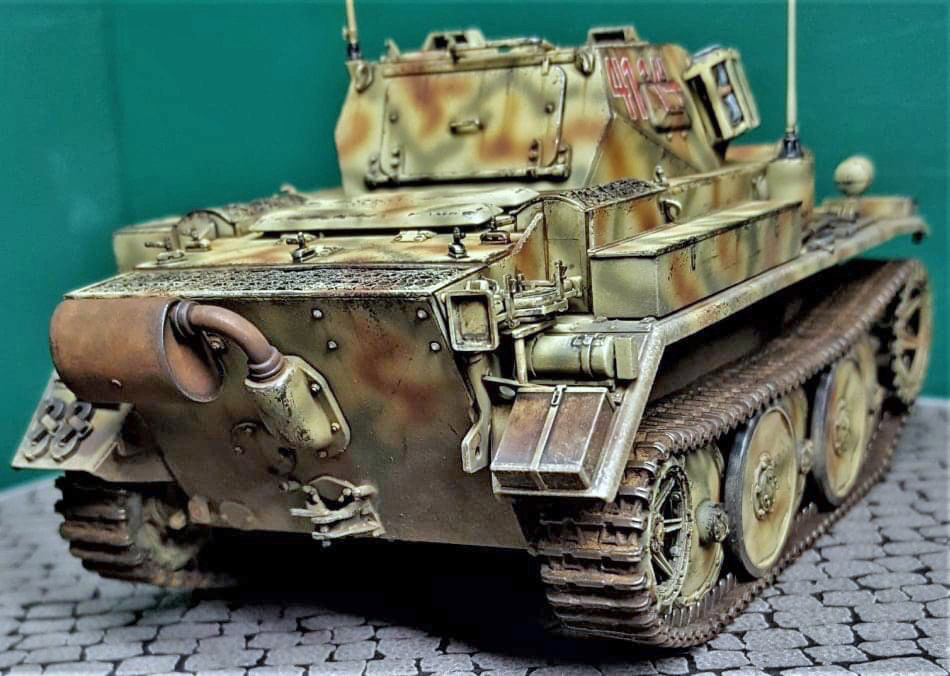
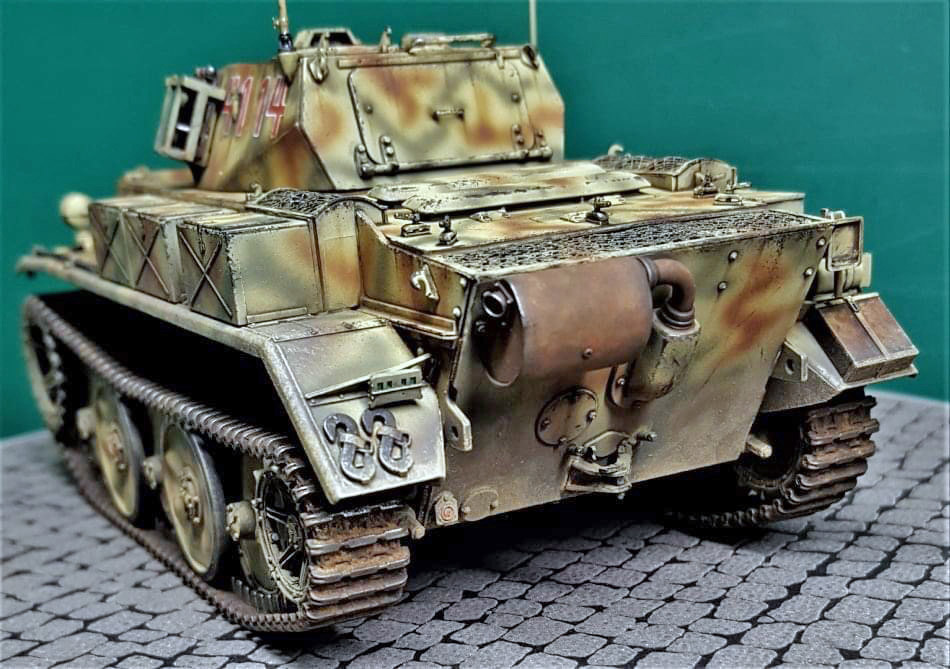
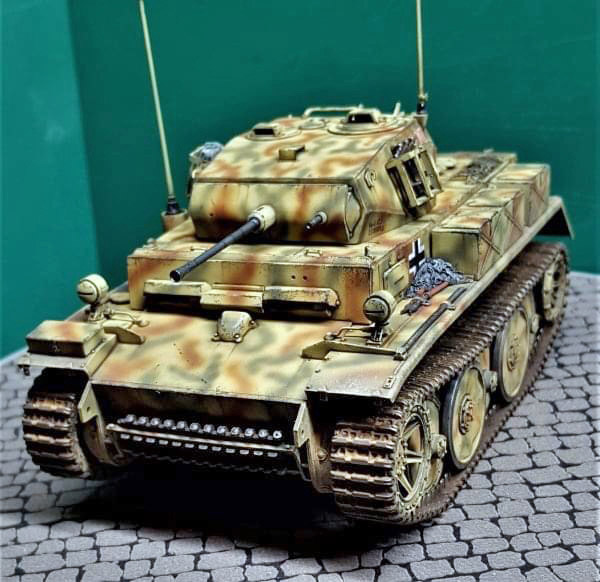
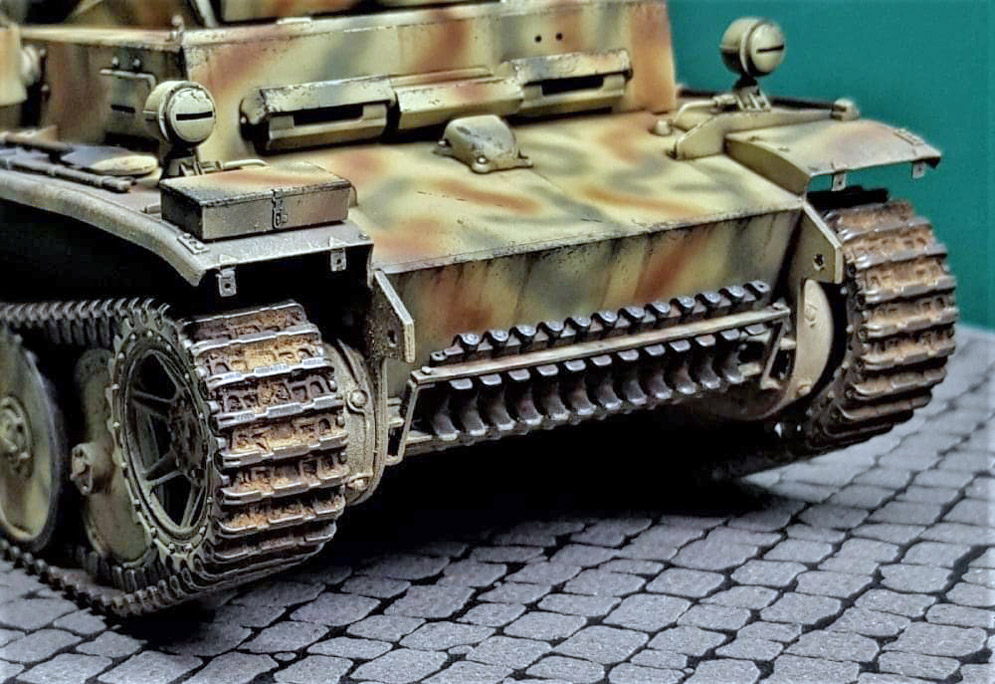
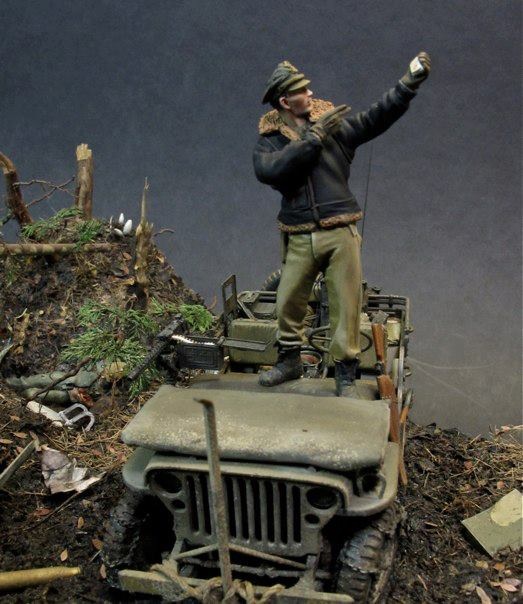
The model represents a vehicle which still carried the early pattern drive sprockets, but which had been upgraded during its life. The early vehicles had a gun lock which had to be released by an intrepid crewman from outside the vehicle leaving him dangerously exposed. The later vehicles were equipped with a cable mechanism allowing the gun lock to be released from inside the vehicle. This cable was added from thin wire as it is not supplied in the kit. The later vehicles also dispensed with the rear-mounted exhaust muffler, the rear fenders and the right-hand headlight.
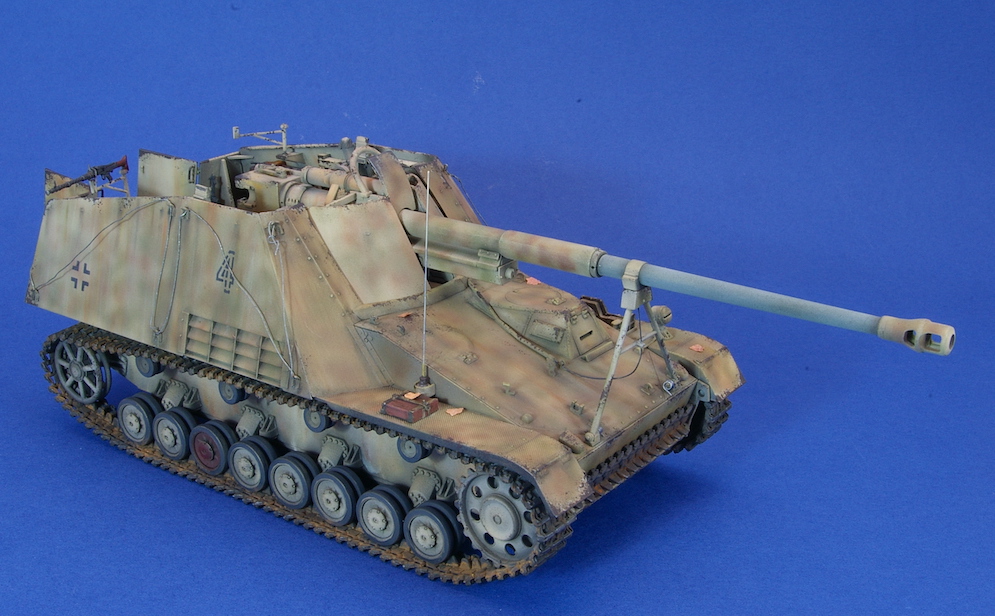
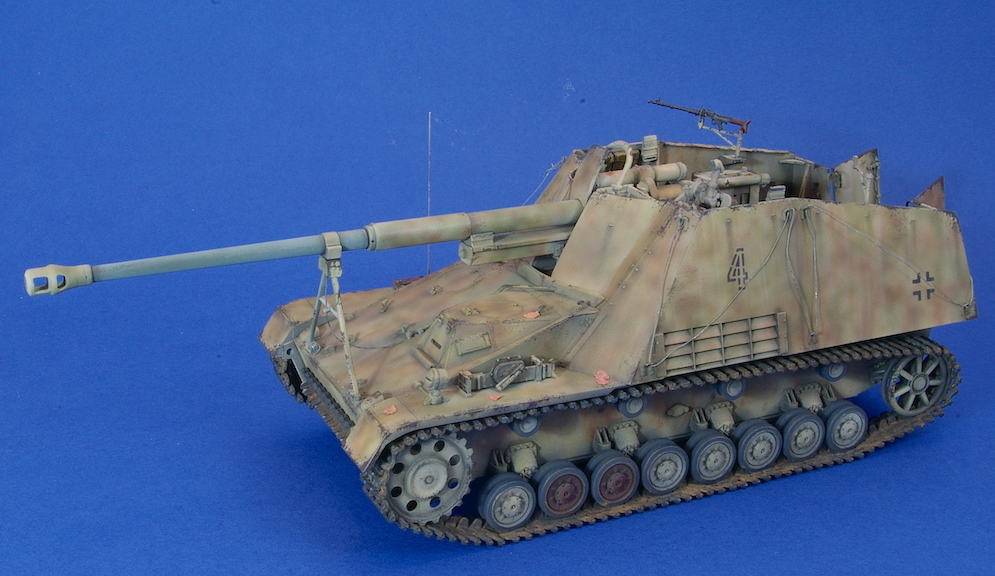
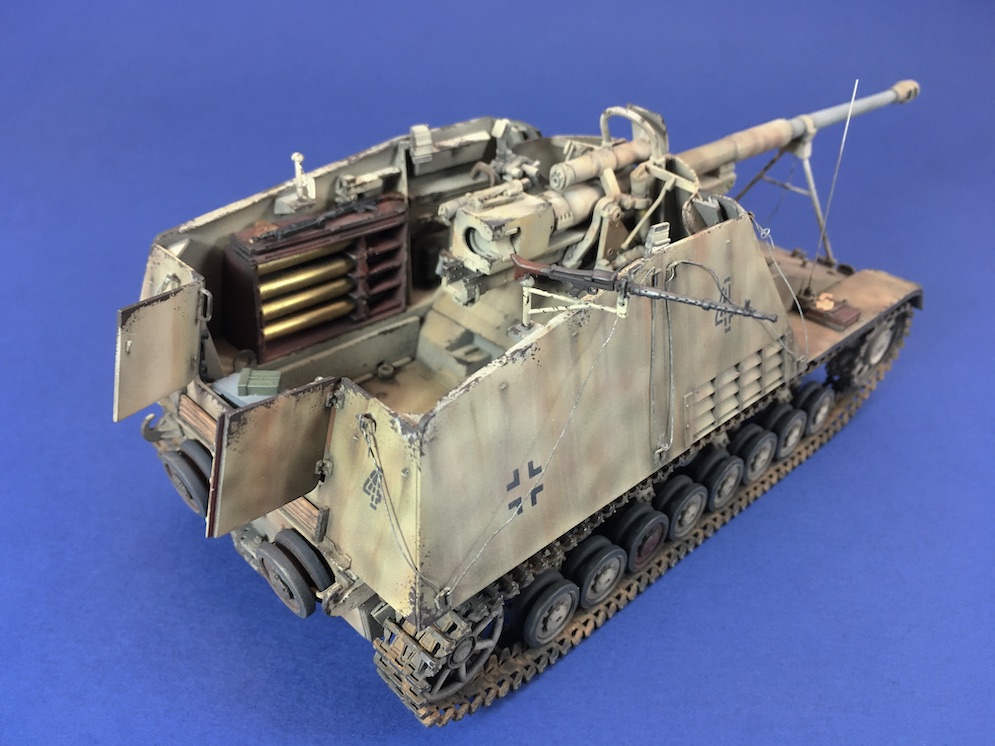
I added some machine gun mounts and crew equipment from the spares box using some drawings from the old ‘Panzers At Samur’ book as a reference.
The model was painted with Tamiya paints over a coat of Alclad’s Black Primer. The initially bright finish was toned down with oil paints worked into the paintwork followed by some shading using pastel chalks.
These vehicles frequently carried foliage to break up their distinctive ‘boxy’ outlines. This foliage was often secured behind lengths of wire which I added, based on period photographs, wrapped around the ‘U’ shaped hangers on the sides of the fighting compartment.
All in all, this was an enjoyable project and I’m glad that DML has now reverted to a more ‘normal’ format for its instructions!
Hope you like it… Ian R.


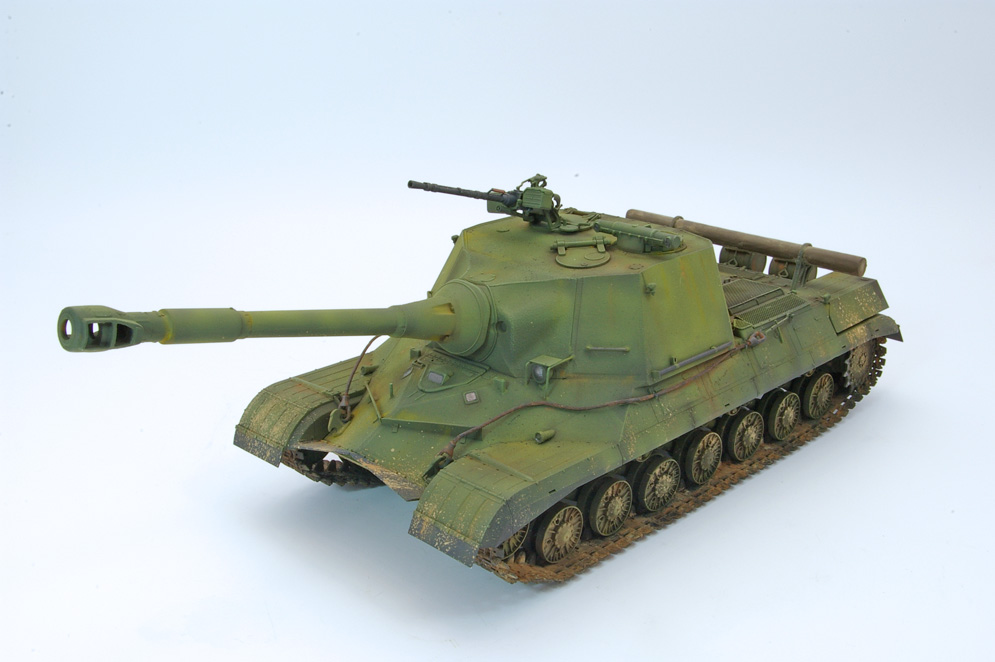
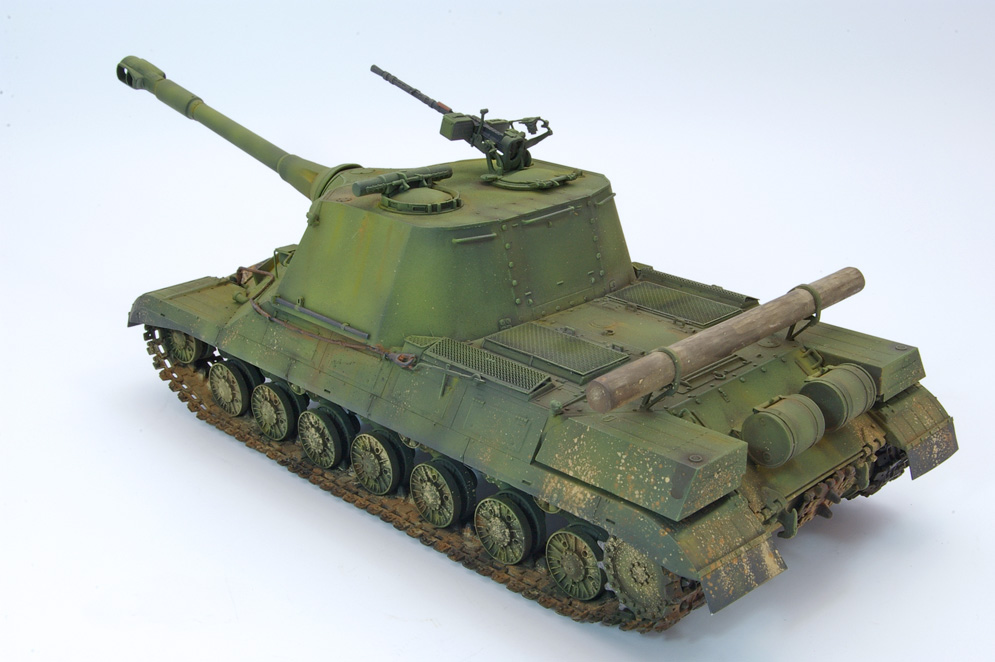

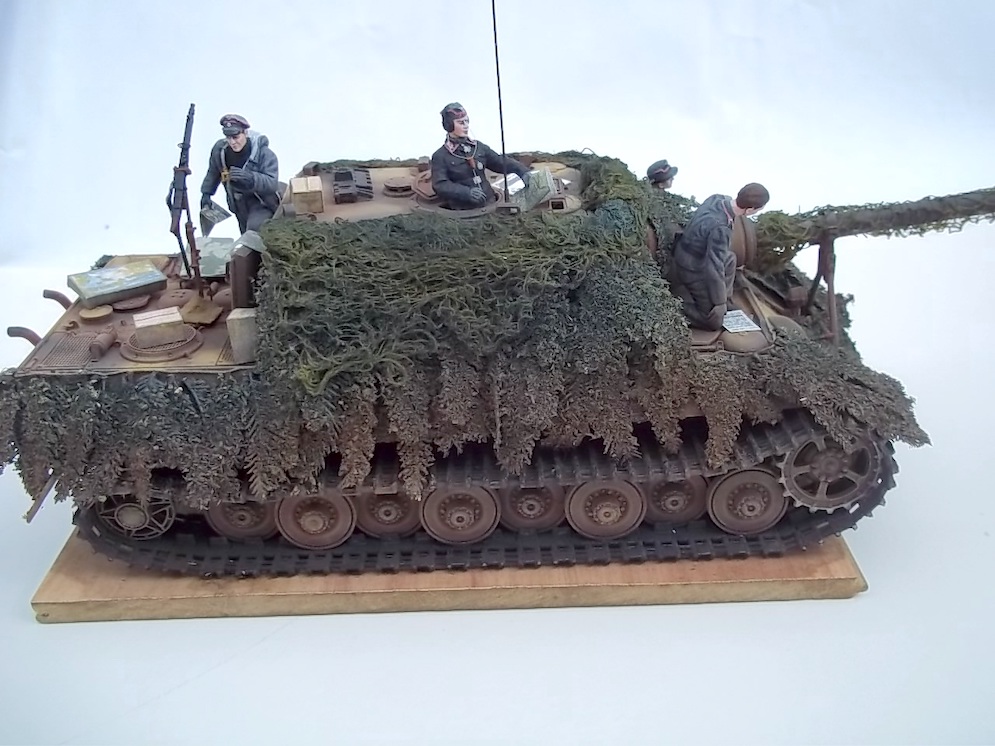
The kit was easy to build though care was needed with the etched frames for the two smoke canisters on the rear of the hull. I replaced the etched brass retaining straps with self-adhesive foil which was easier than bending and attaching the kit parts.
The grab rails were replaced with 0.5mm brass rod. I also replaced the etched brush guard over the headlight with 0.5mm rod and thin plastic sheet.
I used Halford’s Grey Metal Primer on the metal parts and Halford’s Grey Plastic Primer sprayed over this to cover the rest of the model.
The base colour was Tamiya Dark Green (XF61). The tracks were sprayed with a 50:50 mixture of Matt Black (XF1) and Nato Brown (XF68). This was also used to shade the model reducing the need for washes. A light over-spray of Nato Green (XF67) was applied over this. Nato Green mixed with Yellow / Green (XF4) was applied sparingly and randomly over this to finish off the scheme.
I limited weathering to some general discolouration using pastel chalks and some mud spatters made by dragging a brush loaded with a slurry of earth coloured pigments across a piece of scrap sprue.
I applied random patches of earth coloured pigment to the tracks. Vandyke Brown and Lamp Black oil paints were mixed and heavily thinned as a wash to add depth to the recessed track detail. Powdered graphite was rubbed onto the outer surfaces of the tracks using my fingertip and onto the metal areas of the tools using a rubber oil painting brush.
Dai W.
What I did on the kit:
1. Added fire extinguisher decal
2. Added more weathering on wheels including oil brusher on bolt heads (dust colour)
3. Dismounted, re-painted, chipped the C hooks
4. Added fixing pins and chains for the C hook
5. Re-mounted gun travel lock in its correct position, added blocking pin in brass rod and chain. Painted the gun lock chain in steel and weathered
6. Added oil and fuel stains to the engine deck.
Davide M.
Here are pictures of my Panther made in 2009. The model is the older DML Panther Ausf. A early model (1:35th scale), updated with Fruil tracks, RB Model barrel and part fenders and side skirts. The zimmerit was made with Greenstuff and magic sculp putty. The model was painted with the use of color modulation (this was my first try, before I made the Soviet Pz IV E) with Tamiya acrylics. The weathering was done with oils and Vallejo pigments and still water.
Regards, Radek


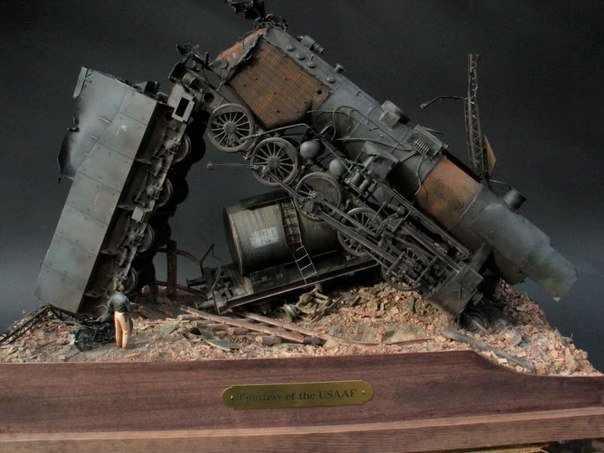
Resin turret with moulded in battle damage.
Chalk camo, rust and smoke over an oil washed base-coat with some oil rust streaks.
Pete S.
Wow! Incredible stuff!
http://www.angelfire.com/goth/bobtank/


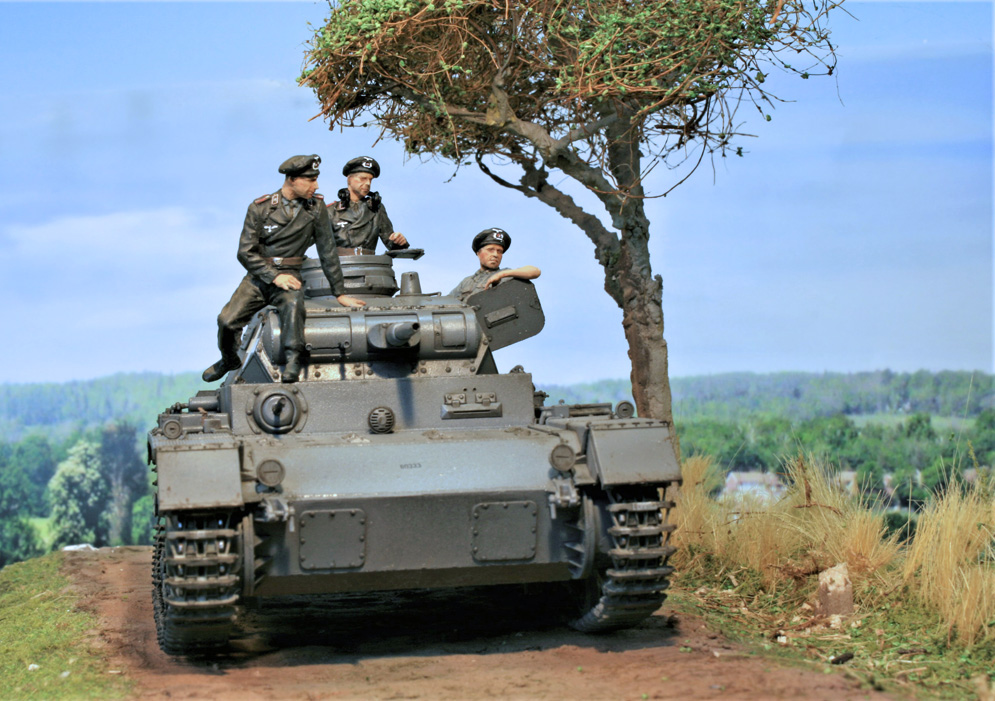
Here’s my Tamiya 1:35 Panzer II AusfG Tank “I’ve had enough”. The kit goes together well and I wanted to create a scene that had some meaning and a story behind it – hope you like it?
Mike T.

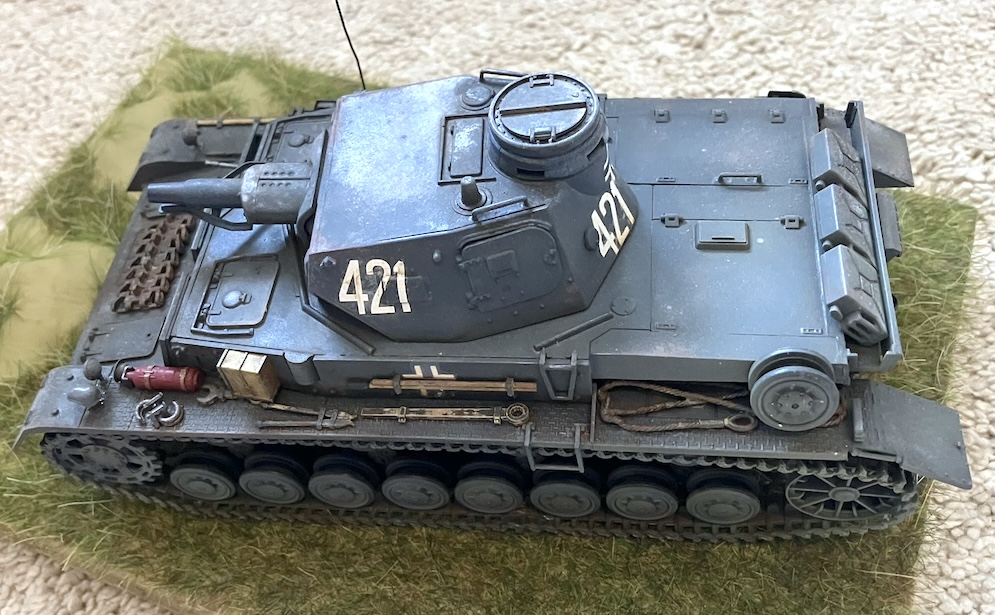
This was bought as a quick model to build whilst travelling for work, hence I didn’t bother to spend money on aftermarket tracks.
I decided that I wanted to try some extreme weathering which I achieved mainly through use of chipping fluid. I really struggled with the decals silvering (I hate decals), but managed to paint over the worst of it. Overall I’m pleased with how it turned out as a test piece.
Craig W.
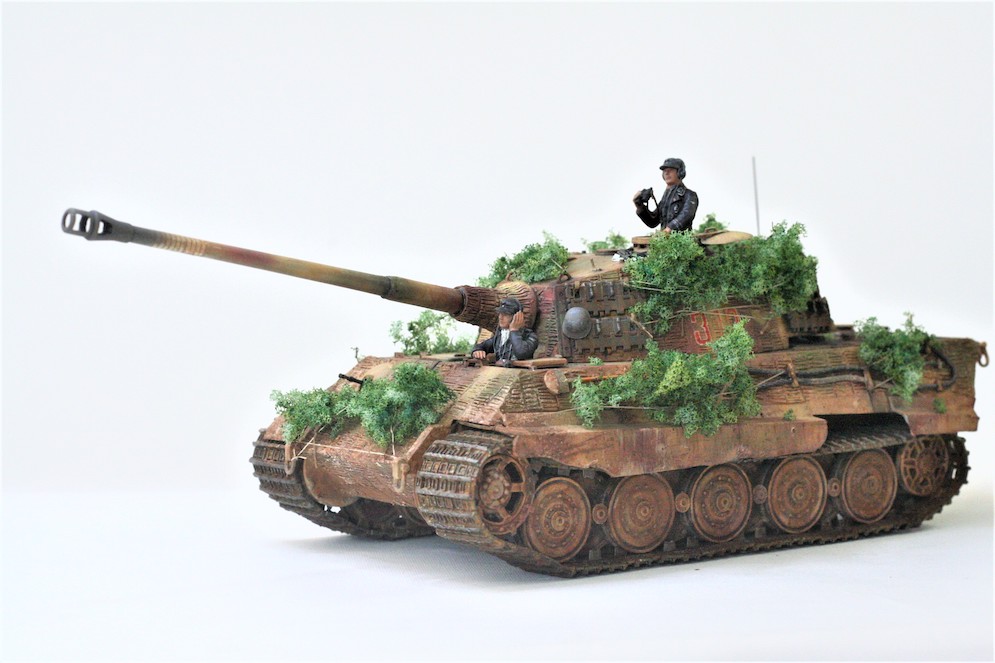
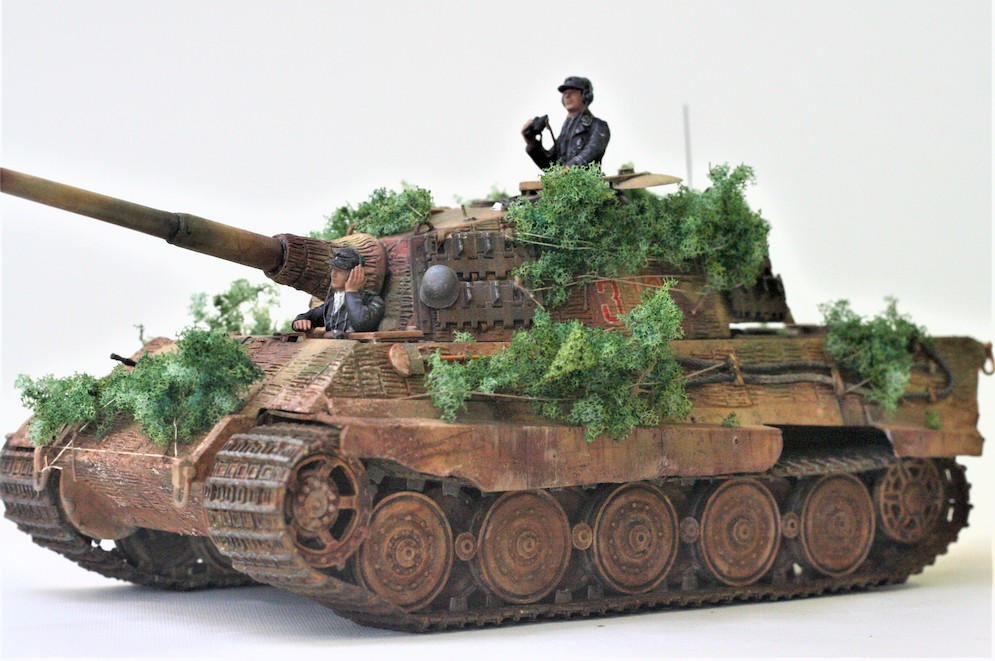
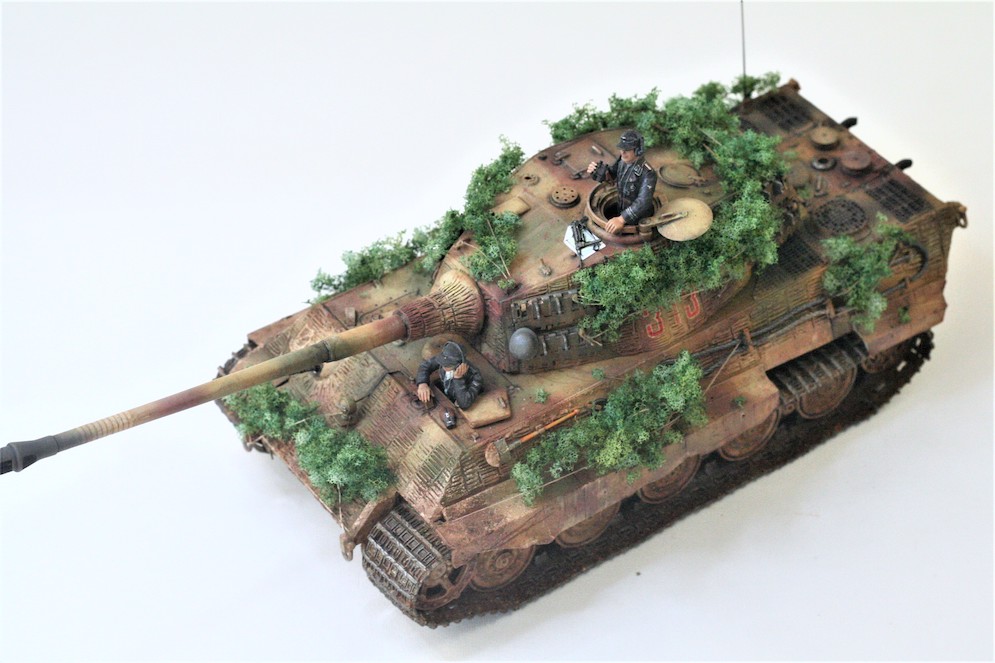

I started building the 1975 re-box kit (code MM157) of the King Tiger in the late 1980’s and, due to bad tracks, shelved it until this spring. Back then, can’t precise when, I’ve bought (plastic) separate tracks links for this kit which, however, remained boxed until now.
During the building process, in the 1980’s, I’d covered the hull with ‘zimmerit’ and kept it untouched.
With the kit almost built, it only remained to complete the paint task, figure assembly and painting.
Following that, the main job was, of course, painting the tracks. Some Youtube tutorials helped with that.
Figures are from the kit, accessories from the scrap box and bushes made from wire and railway model scenes.
Although vehicles and figures are both not my field of action, I enjoyed every minute of this build.
Yes, it’s not perfect, but I enjoyed.
Hope you like it too.
Cheers,
Manuel M.

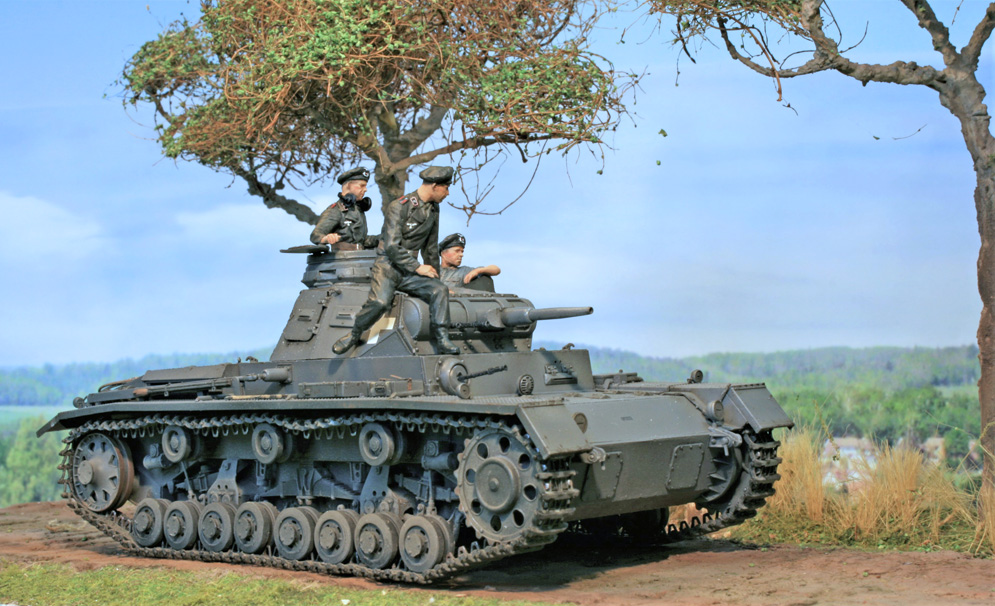
I had tried to weather it but I wasn’t happy with my results and left it incomplete. I have changed and supplemented the weathering to finally finish this model. The Tamiya Panzer II is a classic, it’s only about £8 to buy but builds into a lovely model considering it’s vintage. It also has a lot of scope to be modified significantly.
Sarah F.


I was concerned about using the rubber band type tracks but they’re well detailed and after gluing them in position with liquid poly they look pretty good. Just need to place it on a nice little display base which I’ll start work on next (maybe?) if I don’t get side tracked by another project
Cheers,
Andy B.

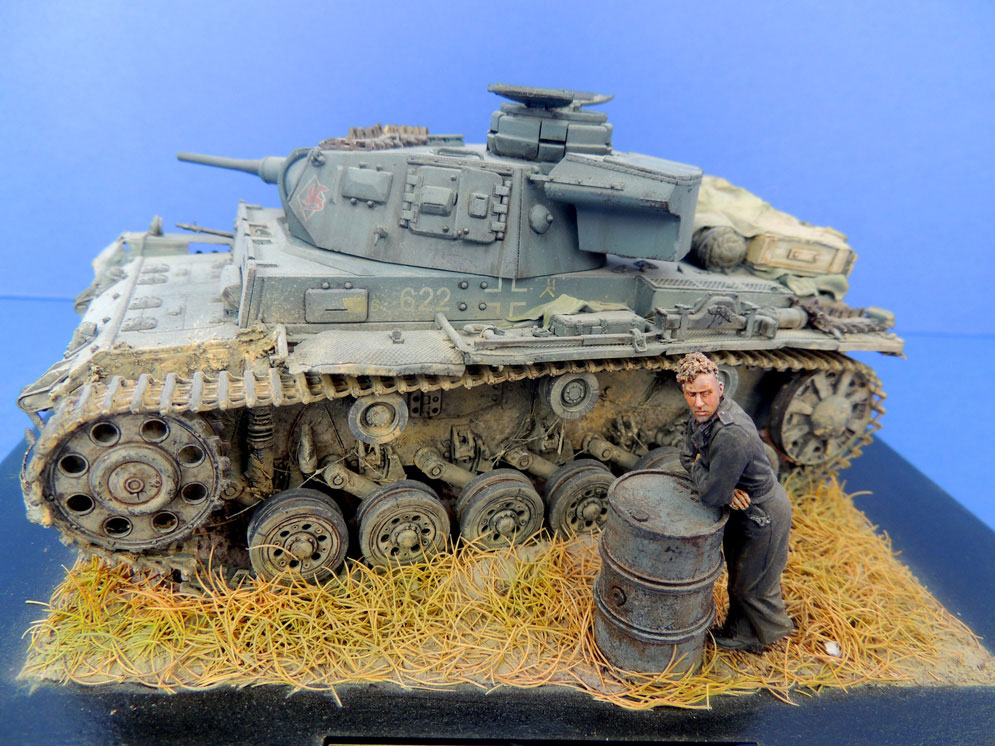
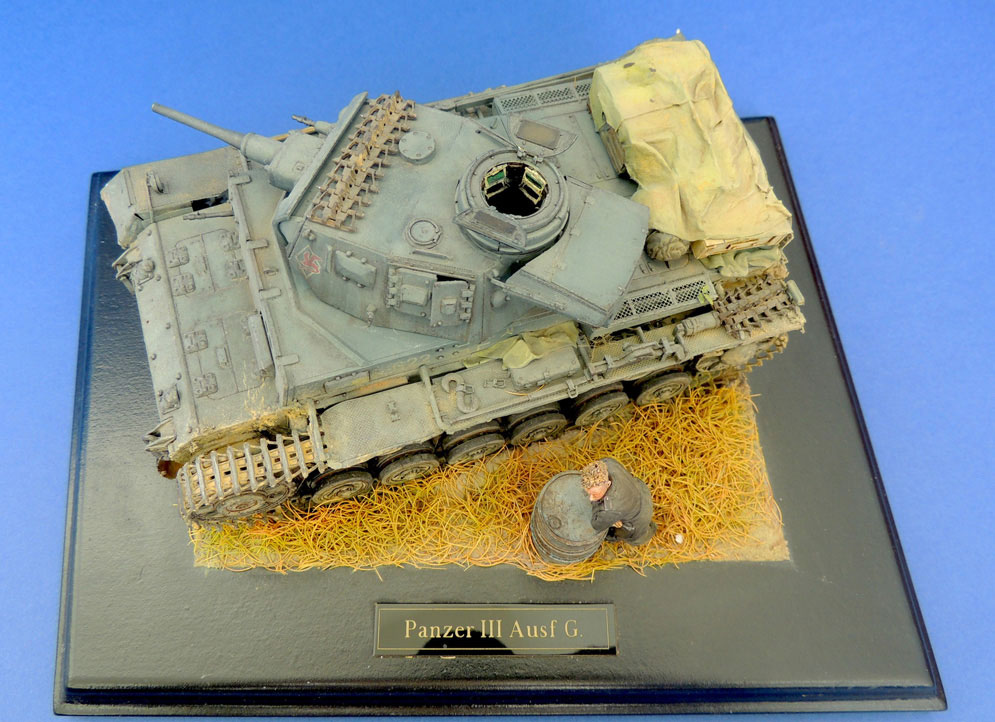
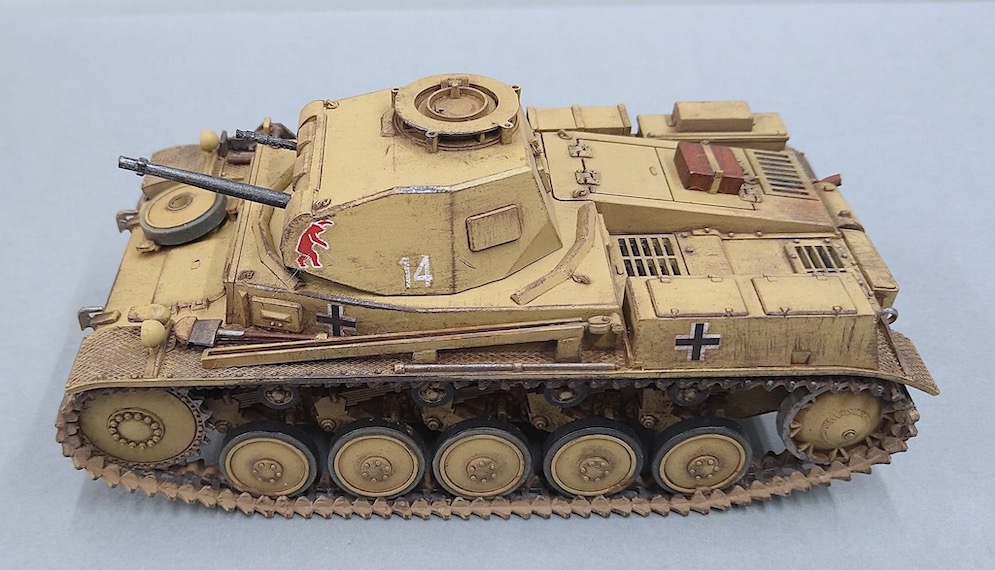
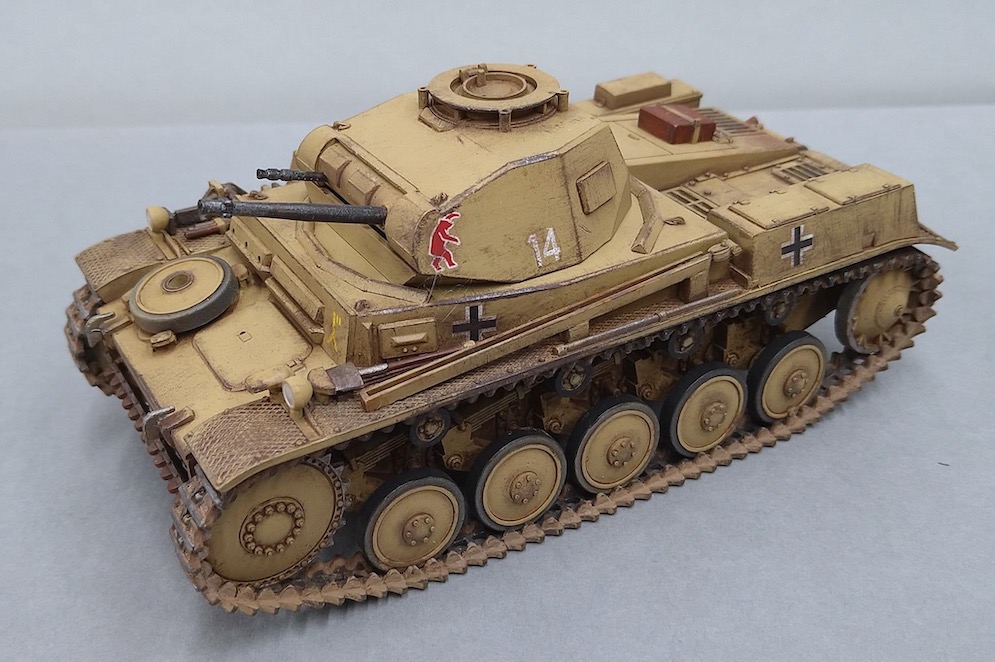
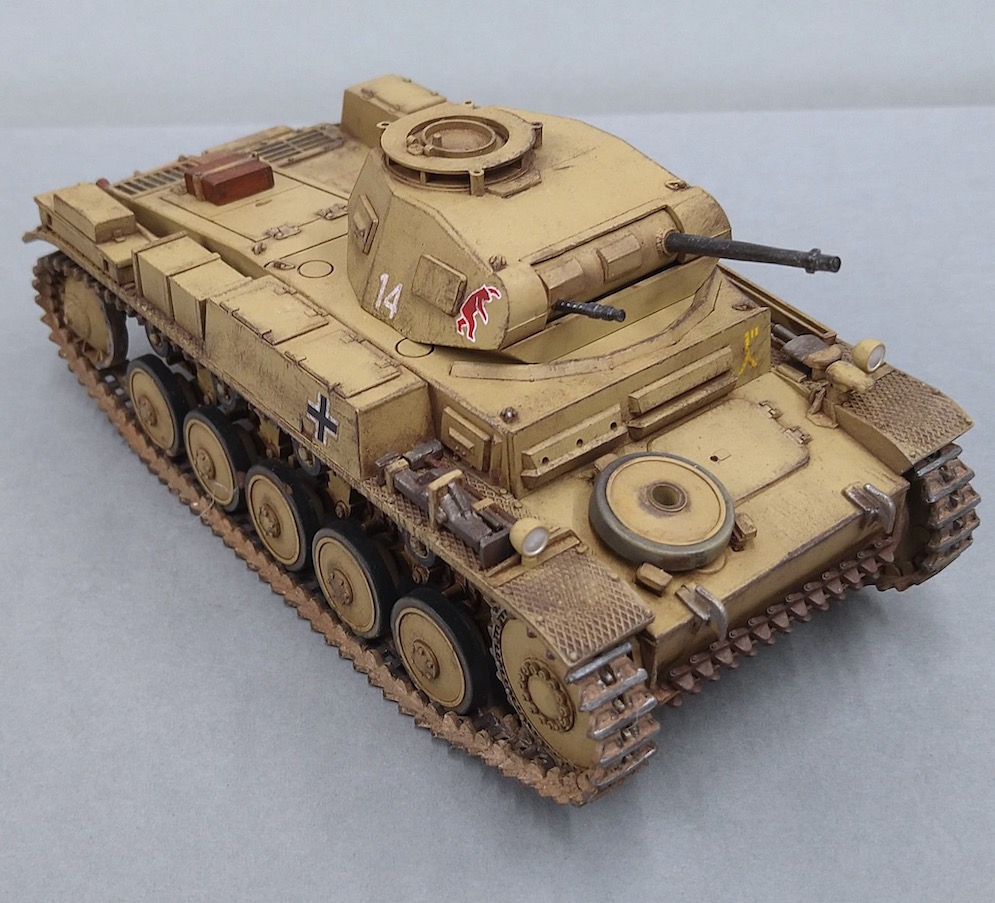
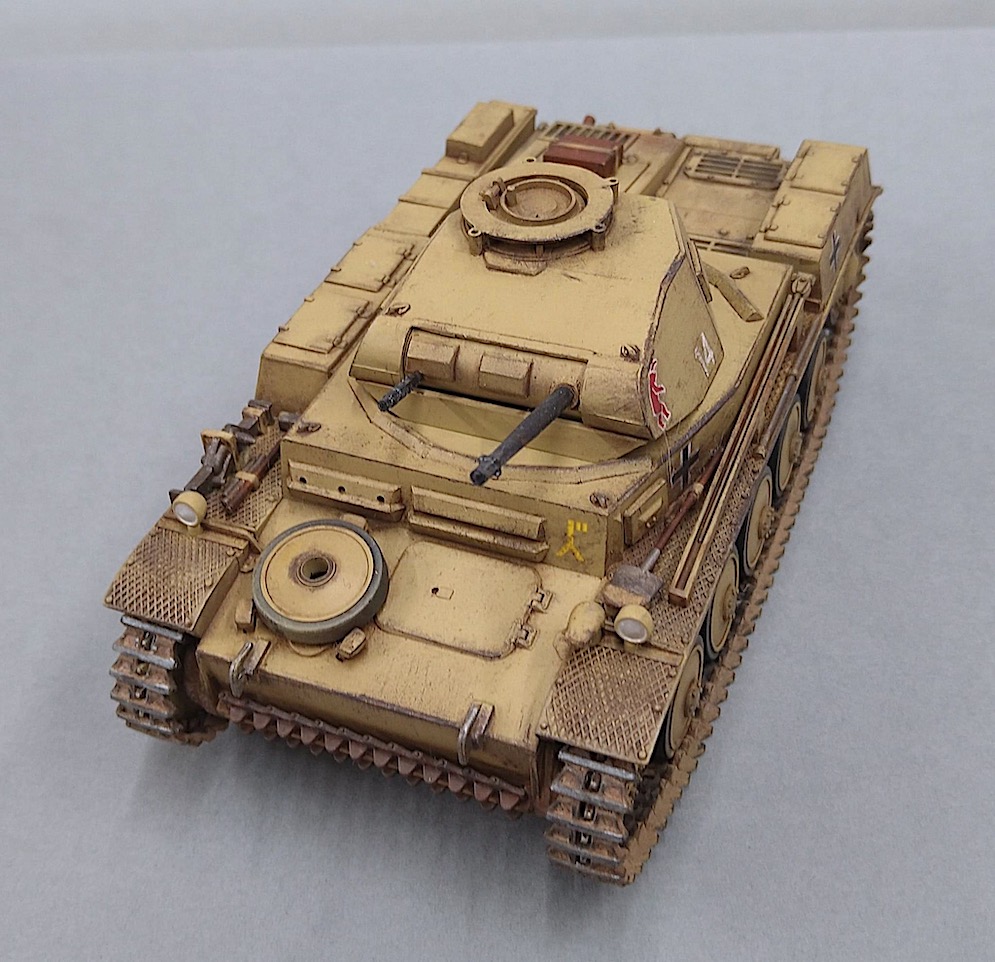
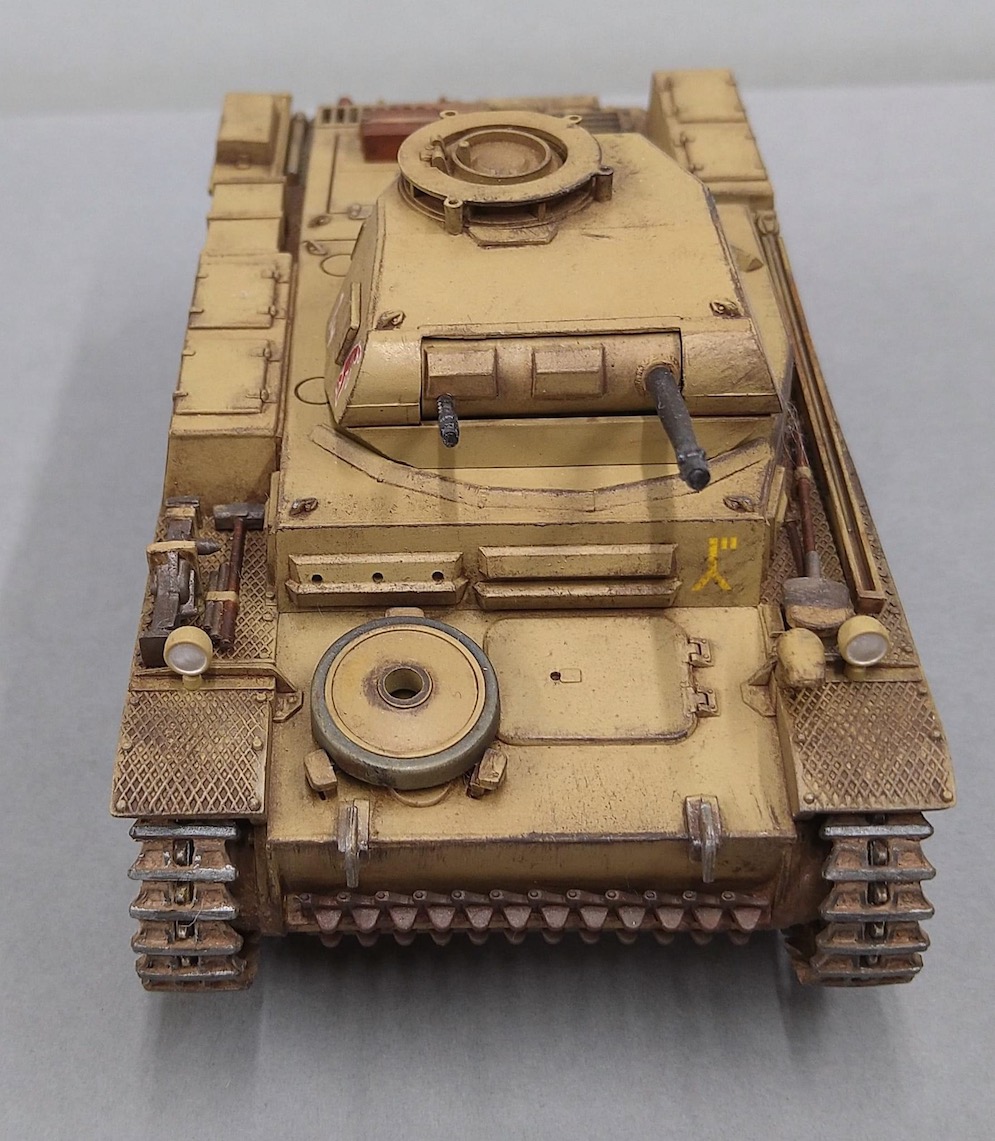
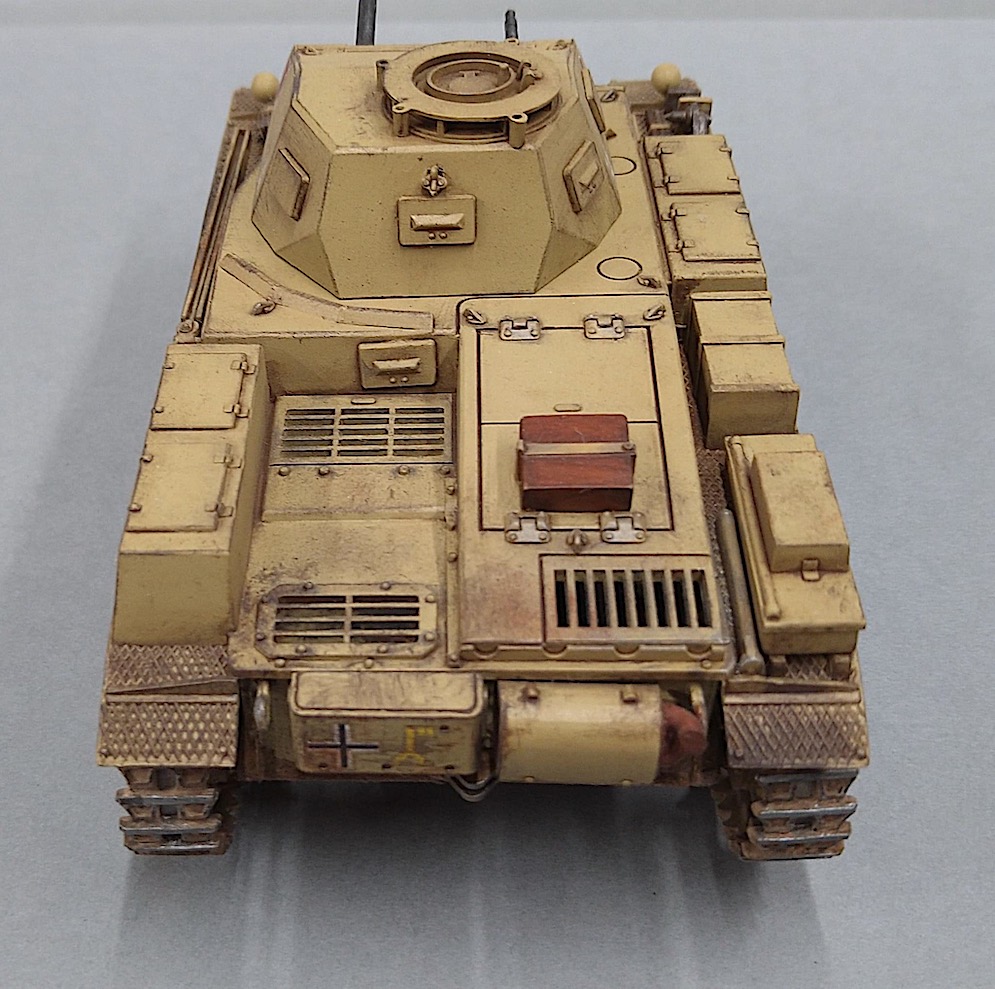
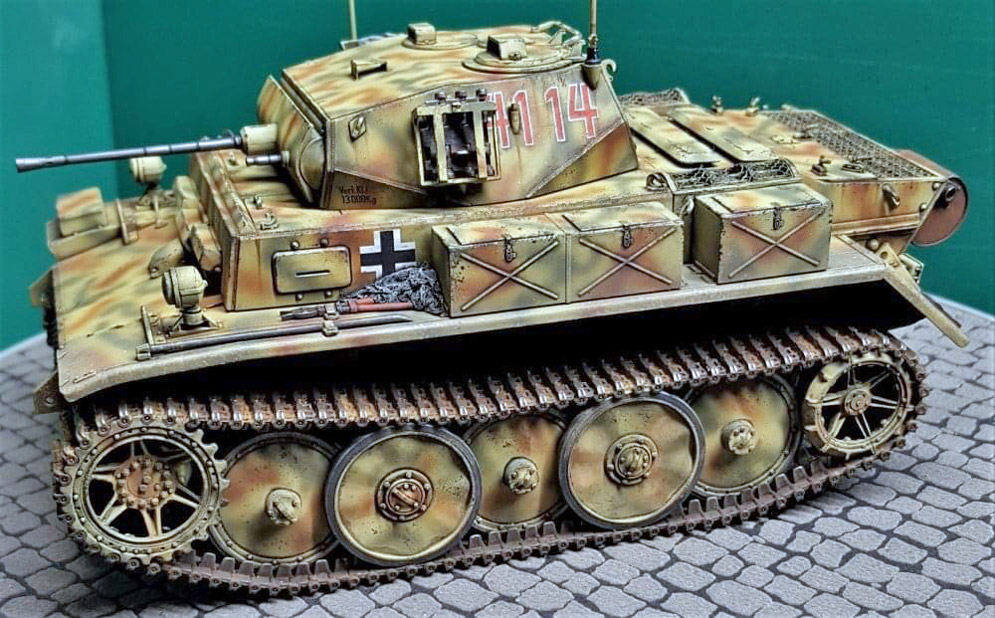
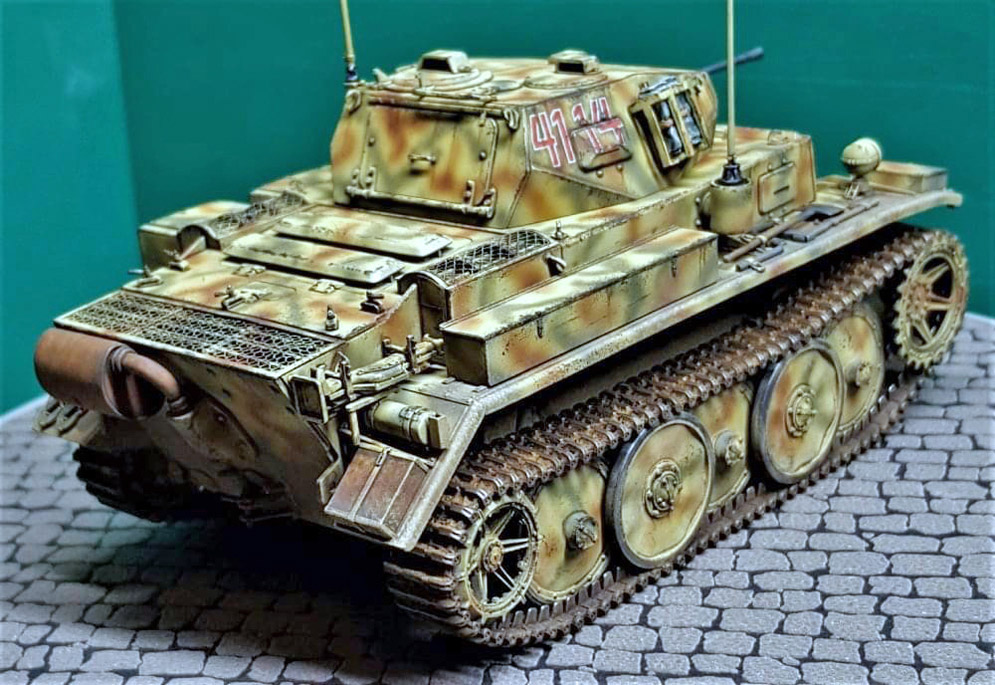
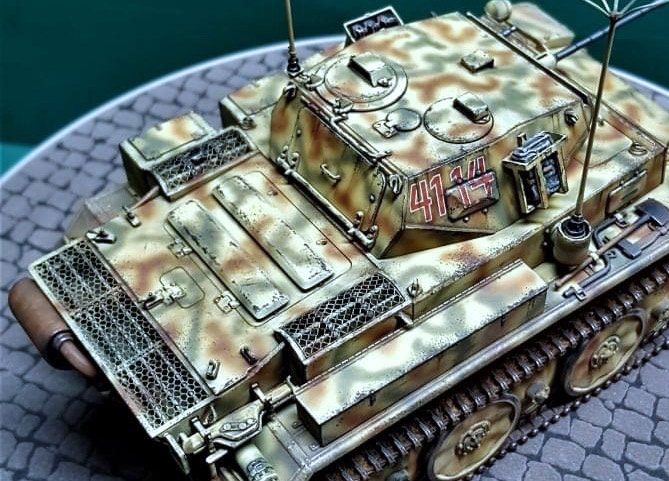
After much fiddling and fettling I have finished the Miniart 1:35 Panzer IIID, yes the one with the funny suspension system. The Germans trialled a number of different suspension systems for their Panzer III, this had paired wheels on bogies with leaf springs and dampers. I think only 15-30 B to D types were built before settling on torsion bars in the E. Nevertheless although a trials vehicles they were pitched into the invasion of Poland. The figures are from Miniart too.
As you may know, Miniart does not consider structural strength in their assemblies and tolerances here can be as little as 0.2 mm. But to their credit things do in deed fit!
Hope you like it?
Andrew J.


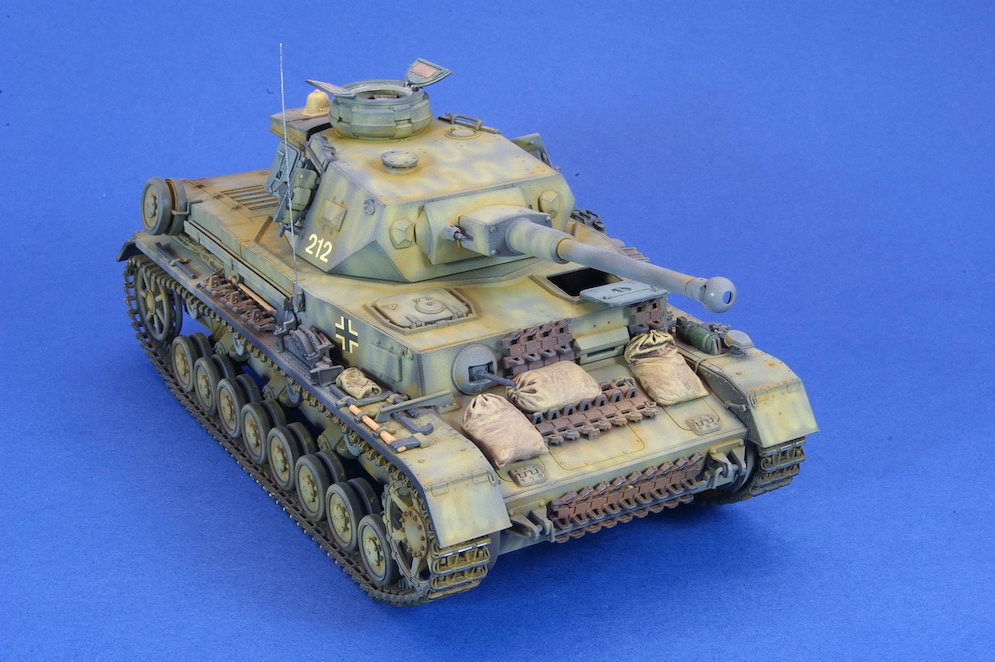
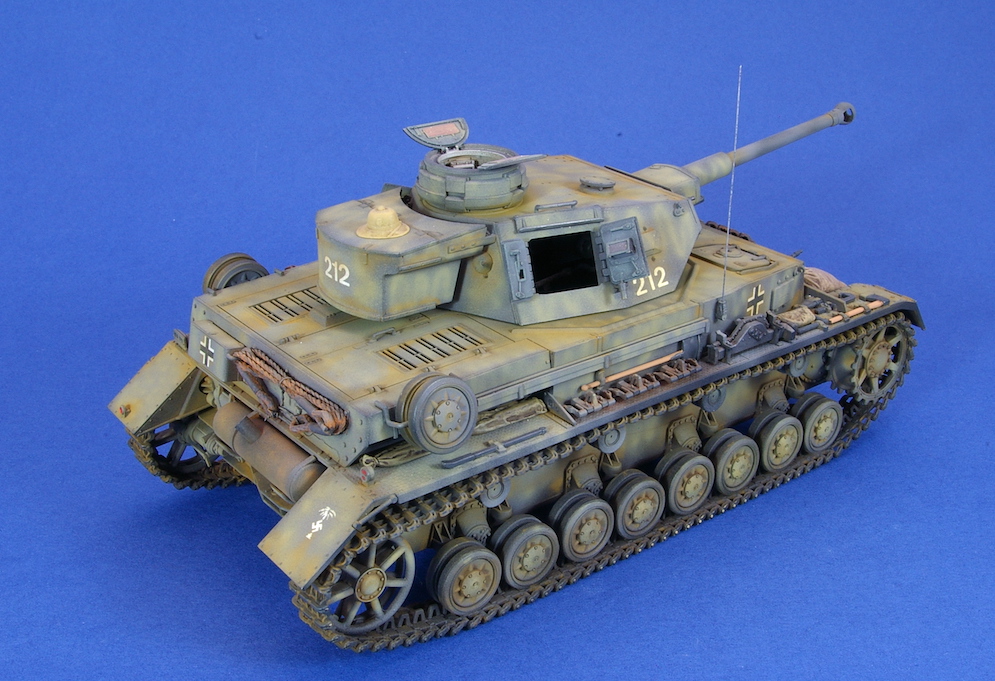
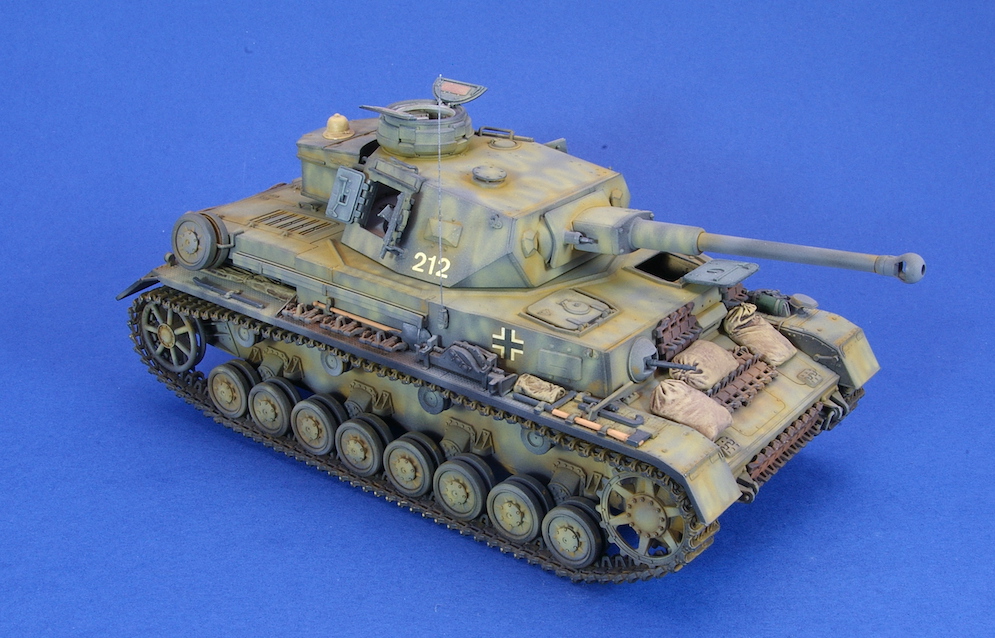
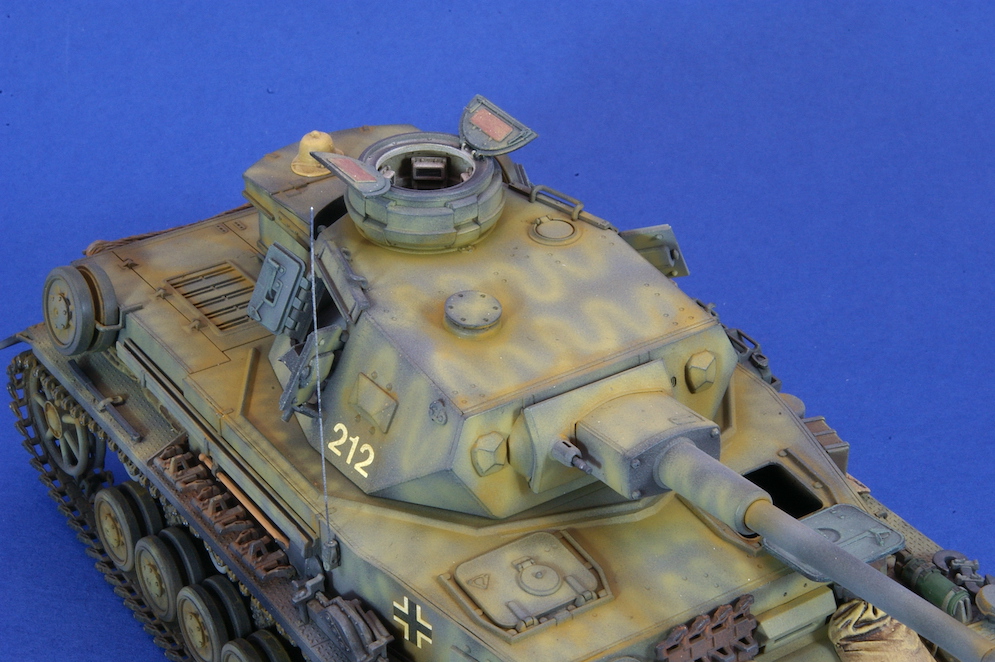

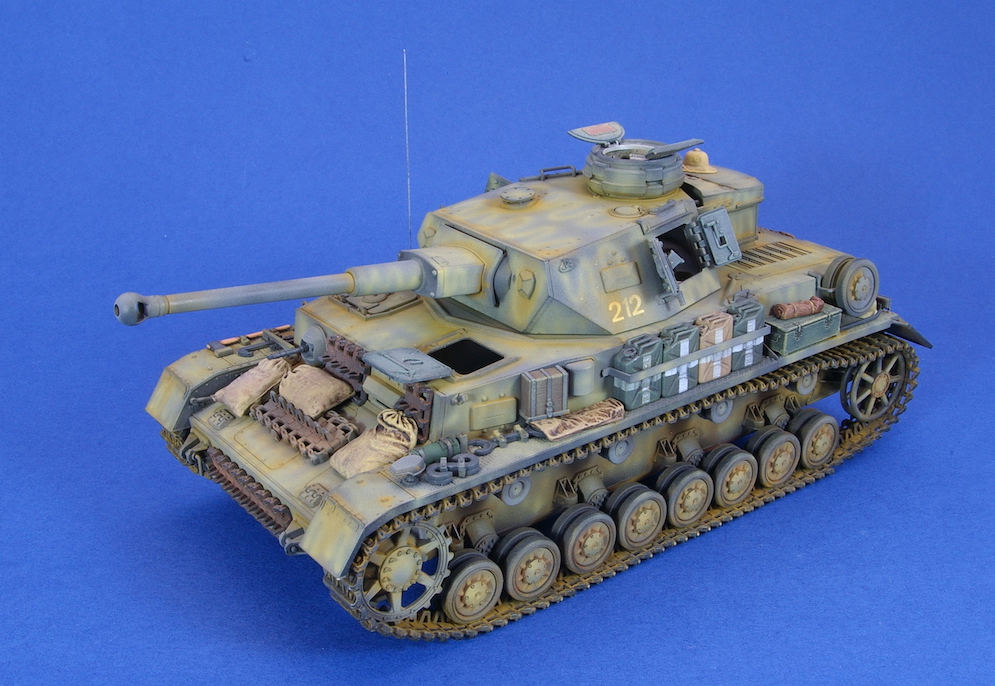
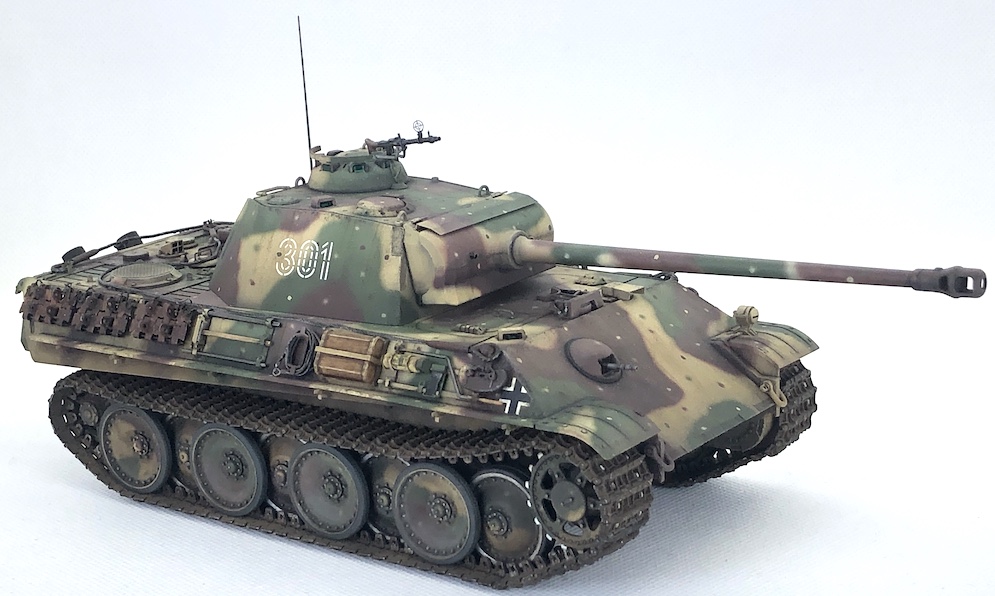
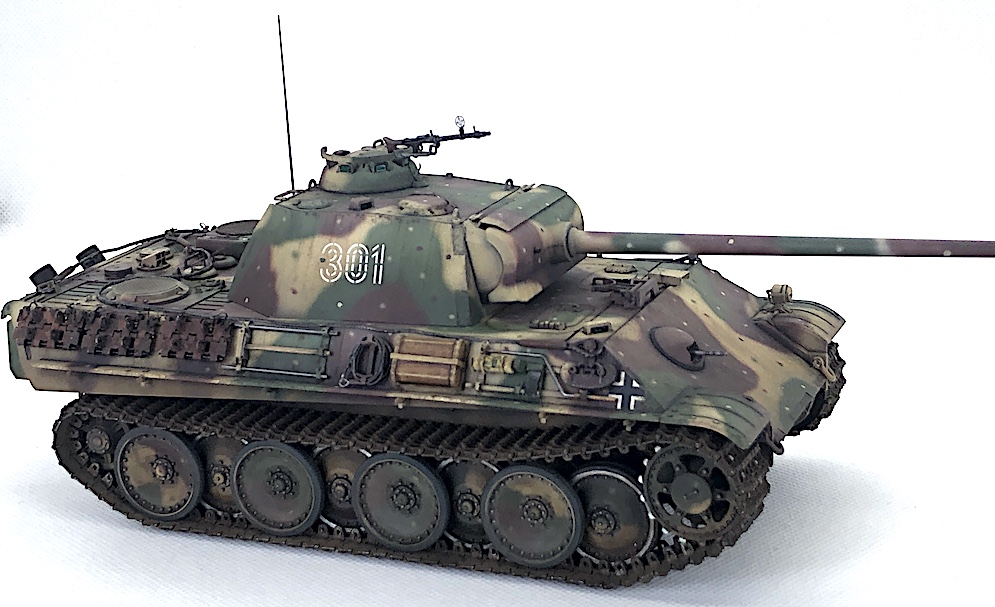
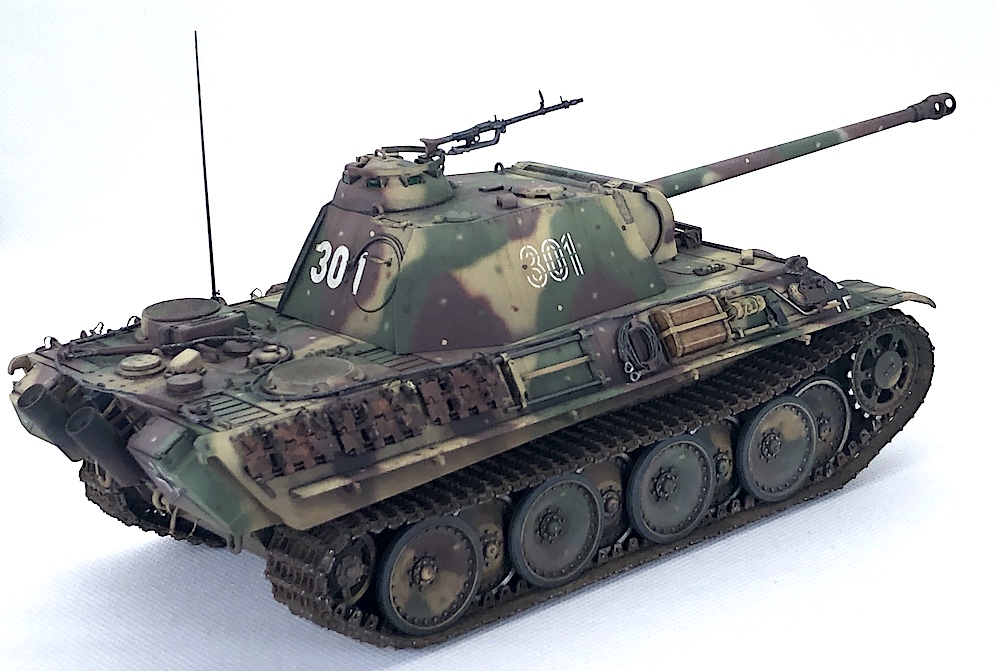
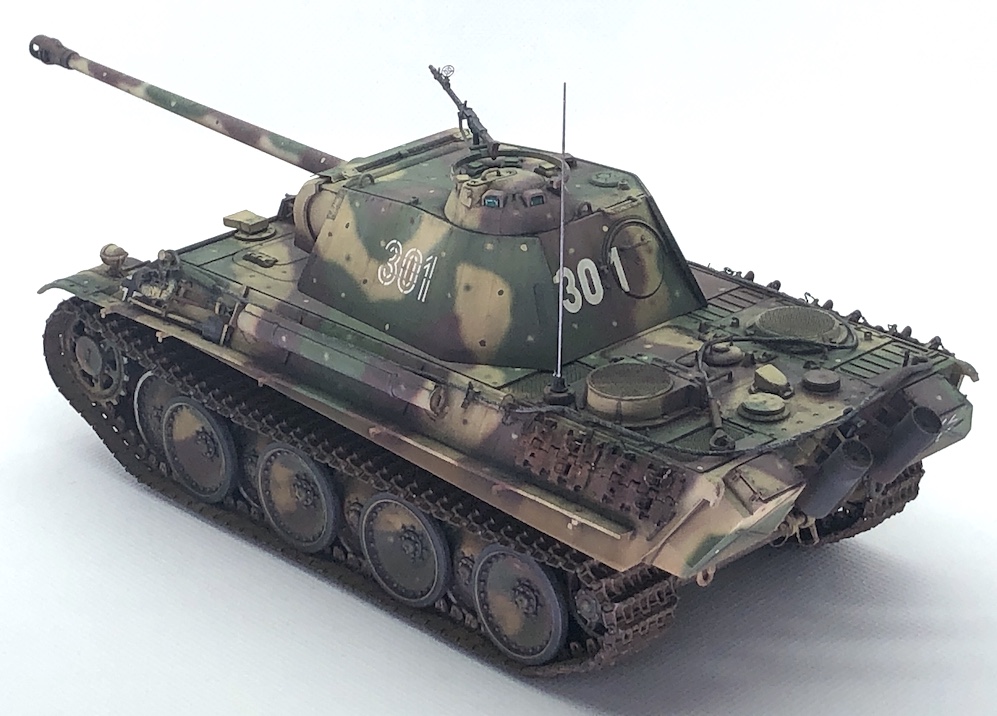
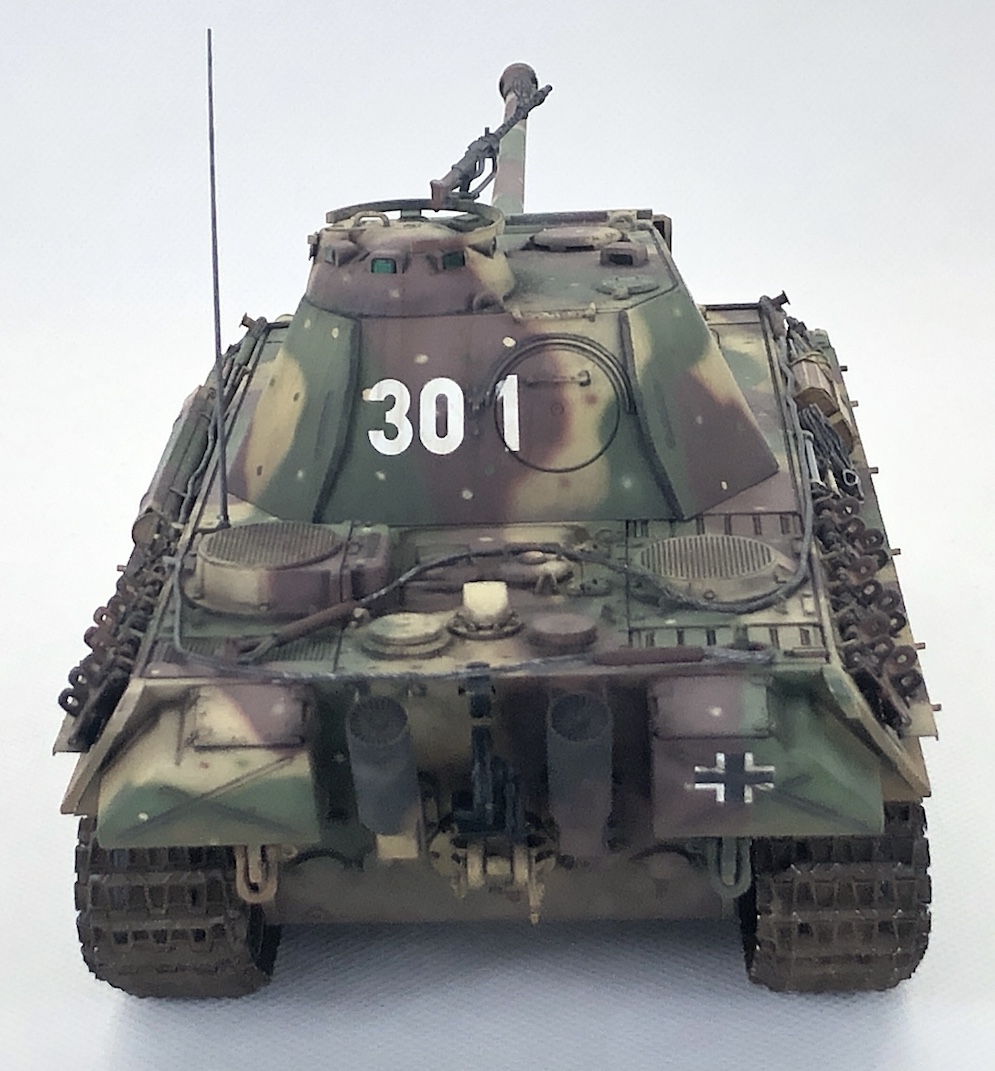
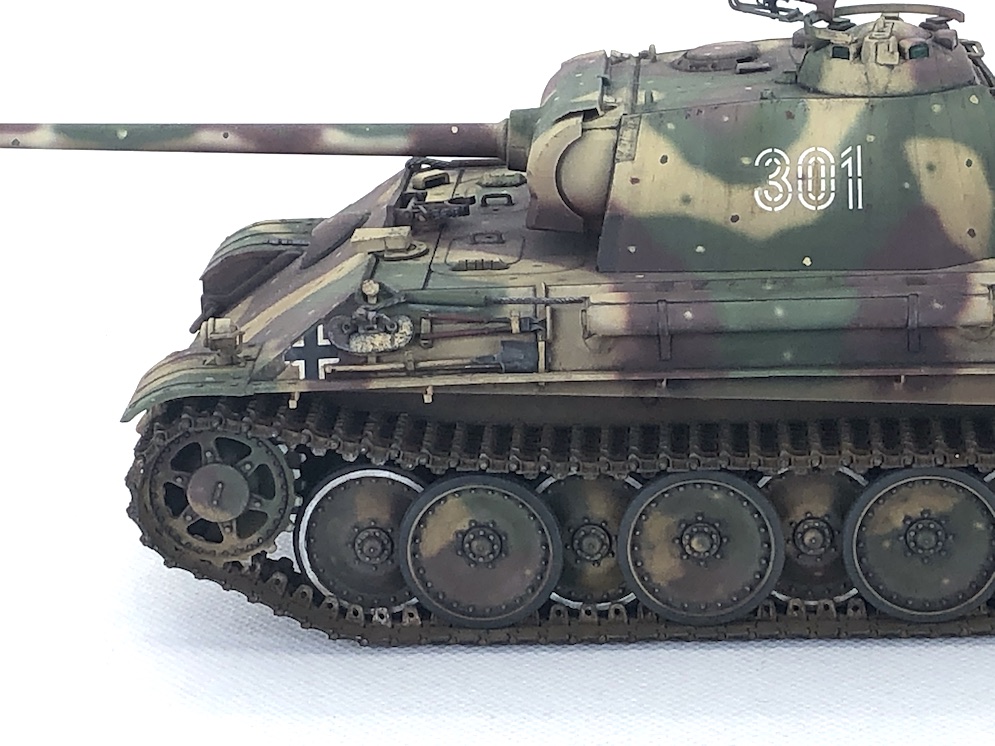
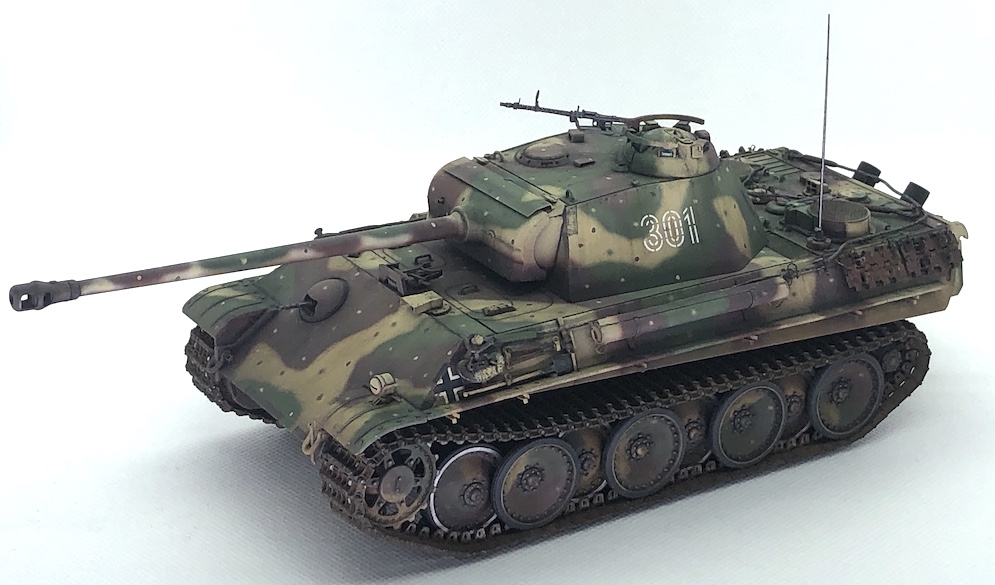
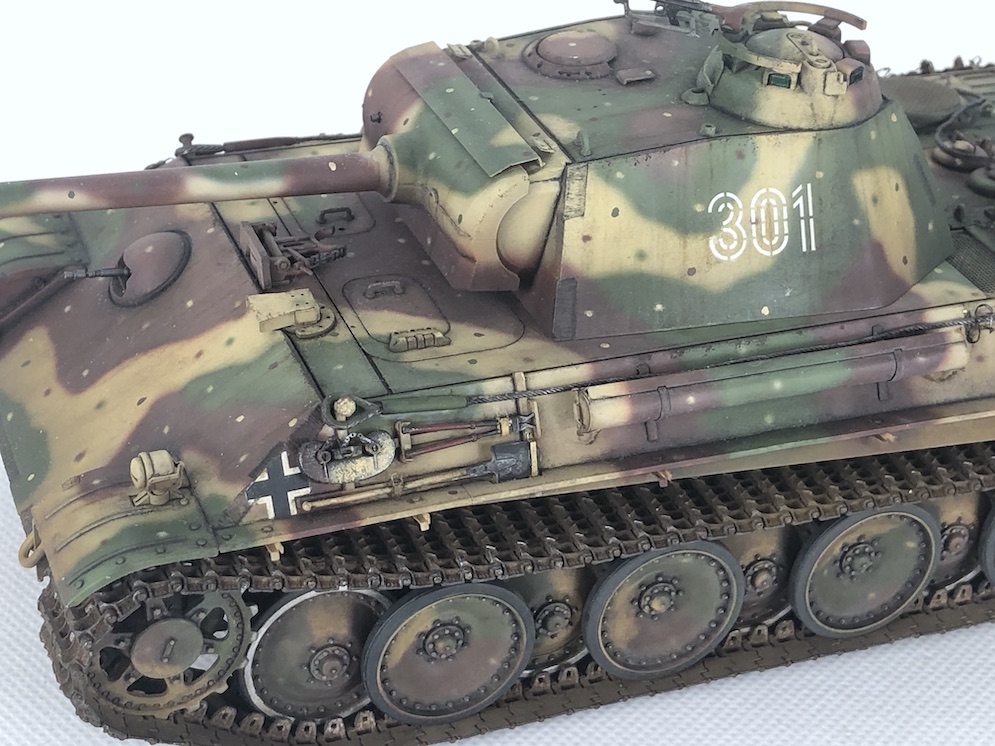
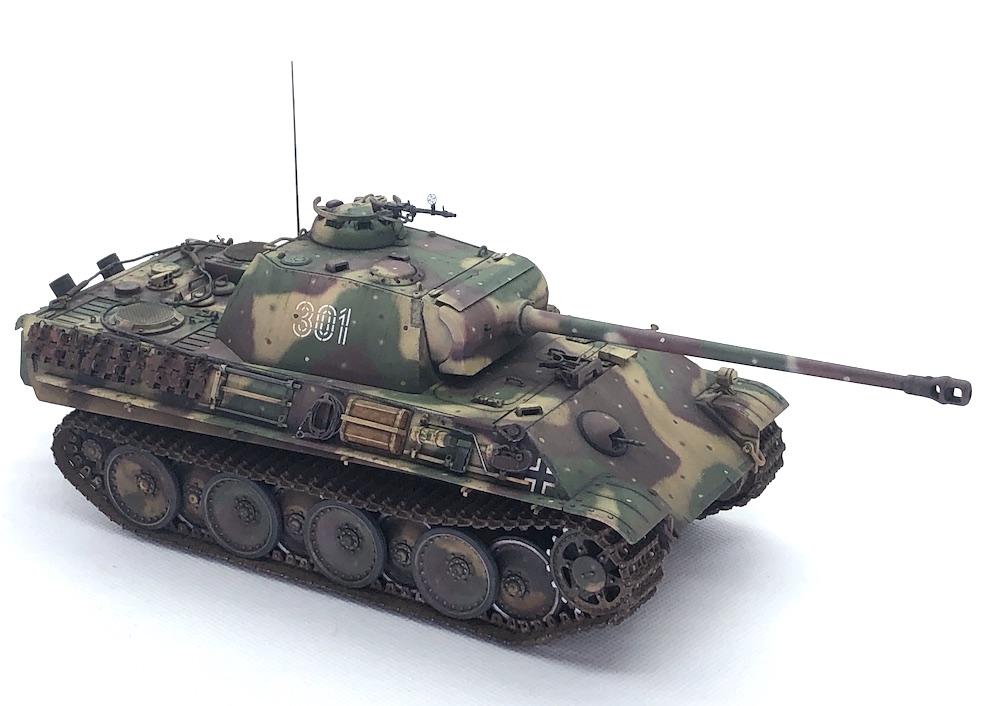
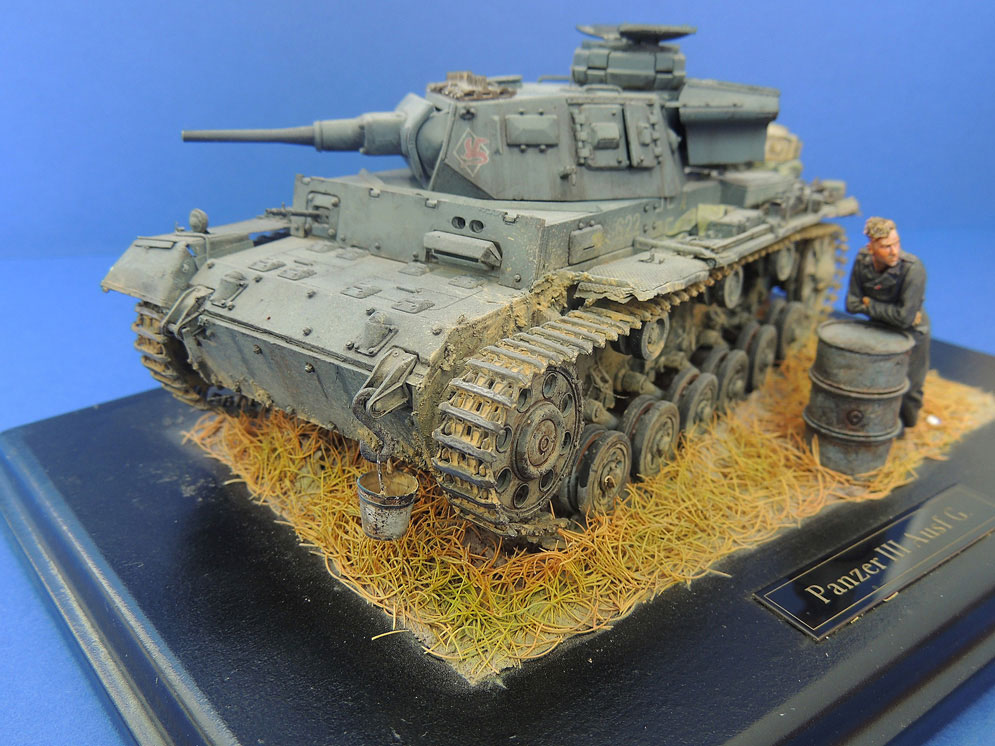
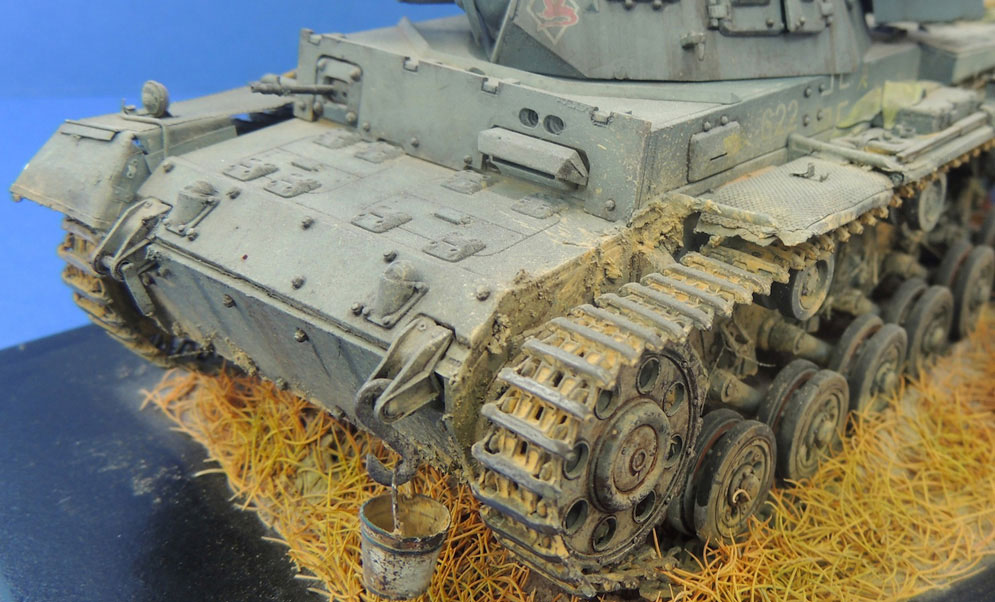
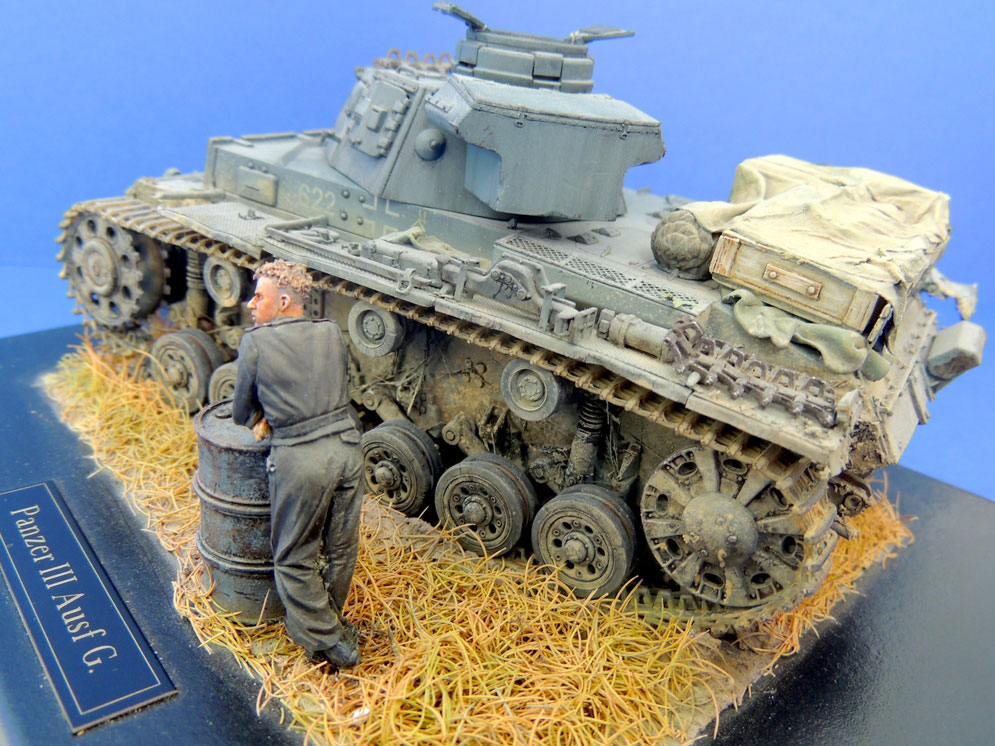
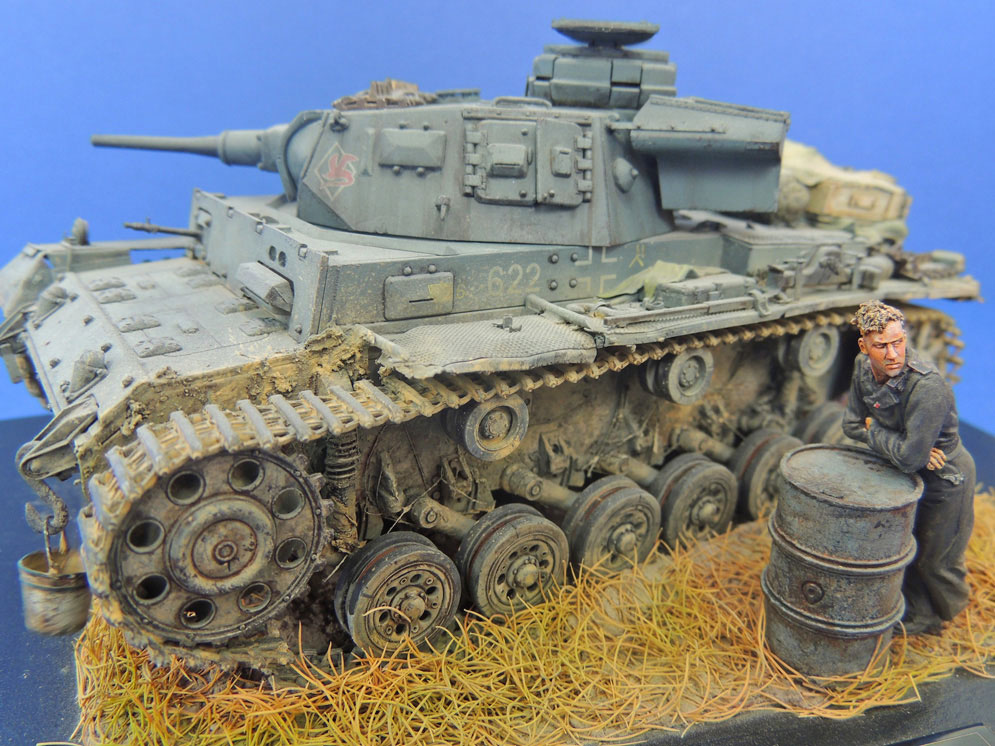
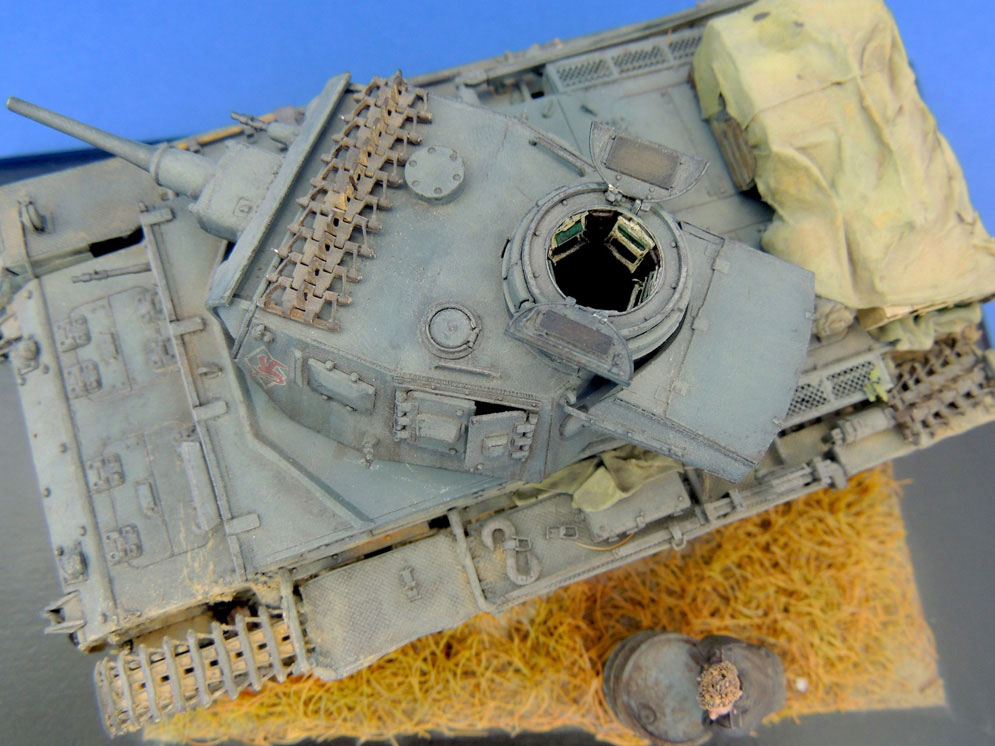
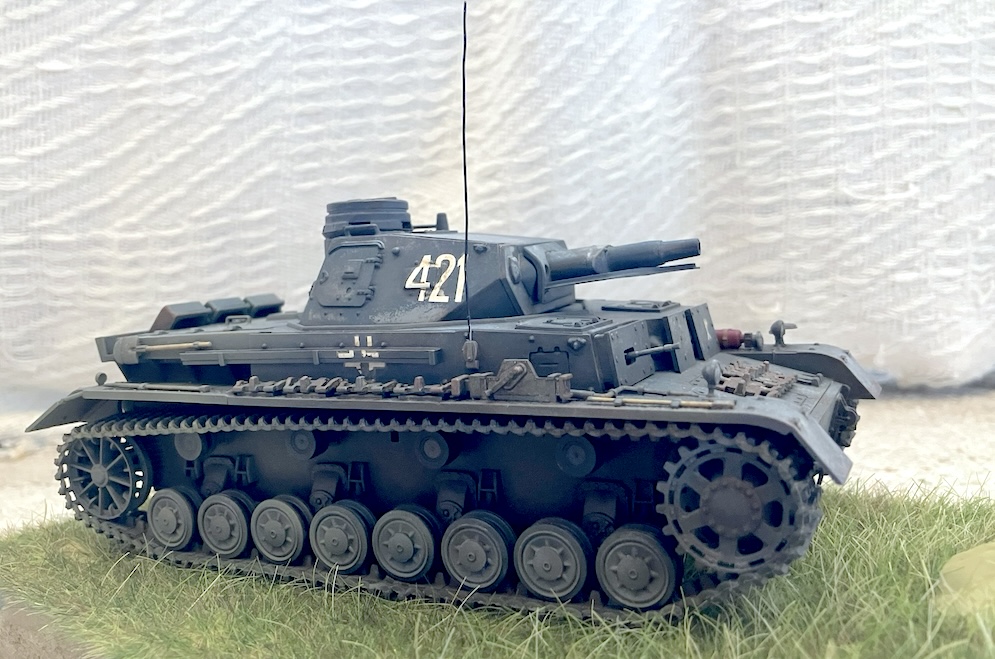
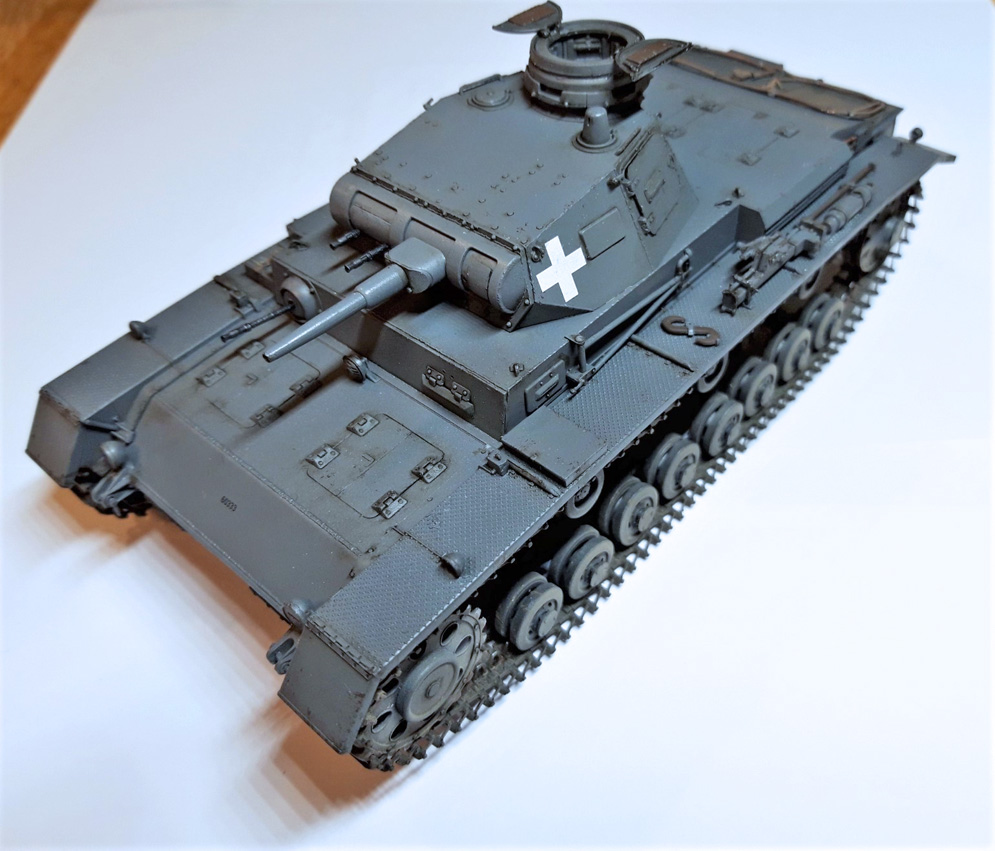
The kit depicts an early Ausf. G with the rounded, single baffle muzzle brake on the main gun. This kit appears to be based on Tamiya’s earlier Pz.Kpfw IV kits first seen in the 1990s, the hull and suspension being marked with the year 1994.
There are new parts for the upper hull and turret which I believe are common to Tamiya’s Ausf. F kit released in 2020.
There are five new figures which I thought were very good indeed. These are intended to be modelled as Afrika Korps troops, but I suppose that if painted differently (and perhaps with some different headgear) they could pass for summer operations in the European theatre.
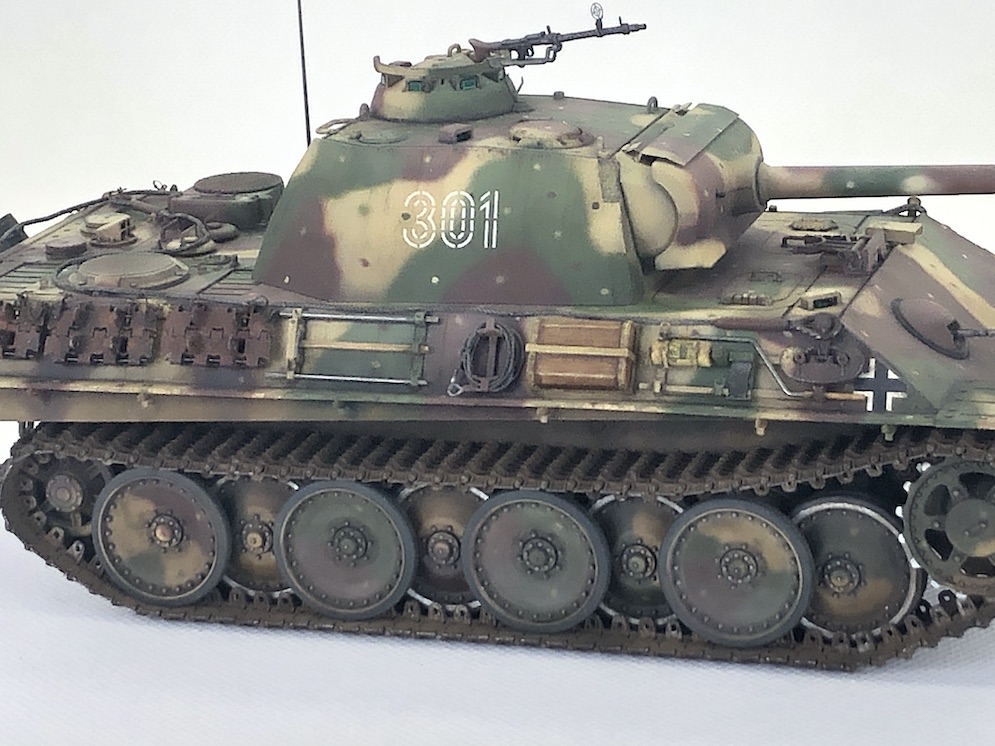
There are also some accessory parts such as sandbags which I thought looked very good, although the modeller may wish to replace some of these with items made from Milliput, or a similar product, which might conform a little more convincingly to the underlying areas of the model.
The assembly of the kit was very easy and does not really need a detailed account here. However, there are a few points worth noting.
The kit includes link and length tracks along with a former to shape the upper track run. Care needs to be taken with this as it’s made of the same plastic as the kit parts. I found that it’s easy to stick the track links to the former! Unfortunately, there are a few sunken ejector marks on some of the tracks. I filled these with Mr Surfacer and then sanded them smooth. However, the tracks fit together well, have hollow guide horns and, when assembled, fit around the suspension perfectly.
There are also some sunken pin marks on the insides of the hatches which were more difficult to disguise neatly.
Apart from the gun breech and a seat for the tank commander there are no interior parts provided. This would not be a problem if the model was built with the hatches closed, but if it was built with the hatches open there are some rather obvious voids unless the crew figures are used.
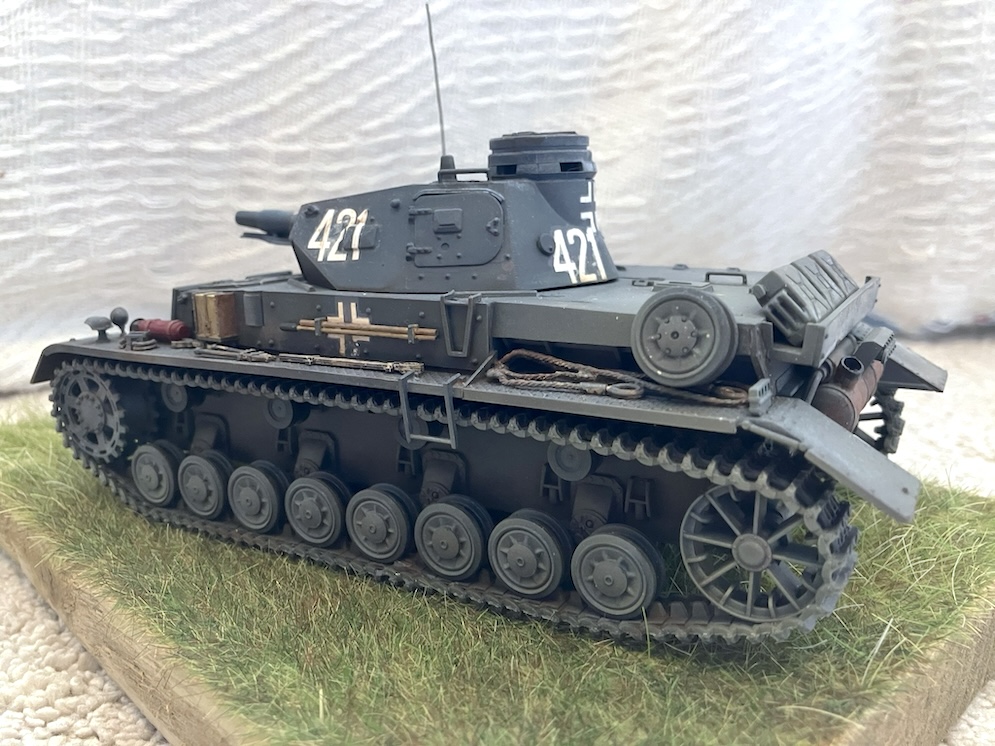
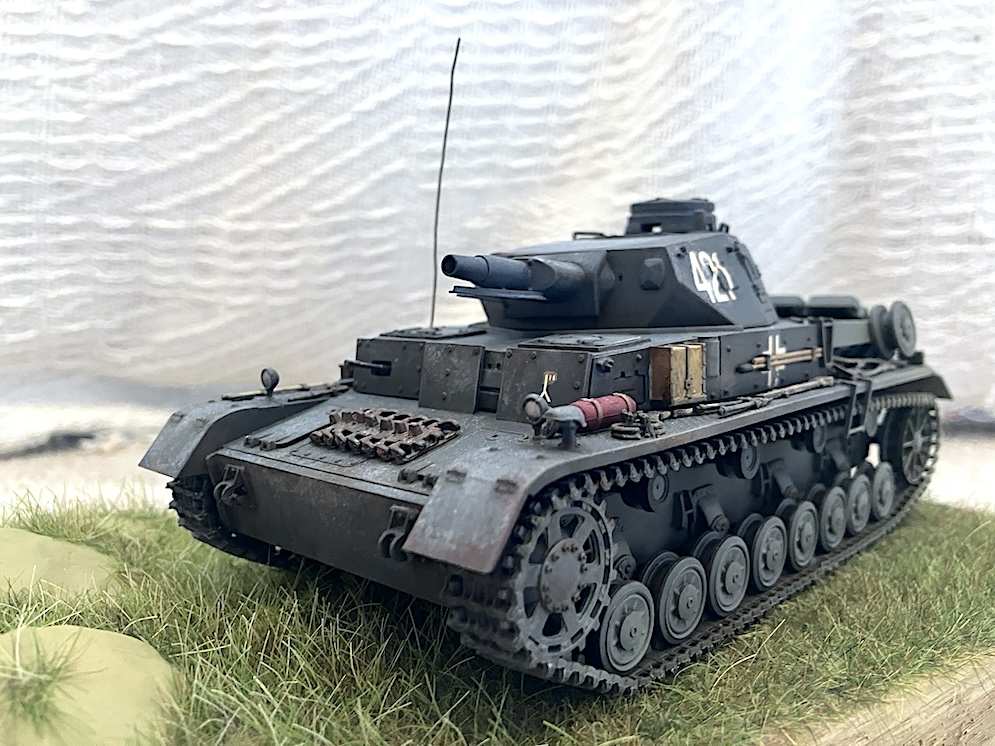
I wanted to depict a vehicle serving with the Afrika Korps. Instead of painting this in an overall brown / sand colour as suggested in the instructions I wanted it to look as if it had been supplied in its original European colour scheme of overall dark grey which had then been hastily and roughly over-sprayed with a sand-coloured camouflage pattern before going into action. I have copies of the old Panzer Colours books from the 1980s with photos and colour profiles showing several vehicles painted in this way which I thought looked quite interesting.
The model was primed using Alclad’s Black Primer, ensuring all the nooks and crannies were covered to avoid any bare plastic showing. This was then over-sprayed with Tamiya’s NATO Black (XF69) which is actually a very dark grey. This was followed by a light patchy overspray of Deep Sea Grey (XF54). The markings were applied at this point, and these came from a combination of old Letraset sheets and Archer’s dry-rub transfer sheets. This completed the base European scheme.
The camouflage was a pattern of ‘squiggles’ using Dark Yellow (XF60). This was sprayed on using heavily diluted paint with the pressure on my compressor turned down so that I could get the tip of the airbrush as close as possible to the model. This may look as if it was not done particularly neatly, but I was trying to replicate what a crewman might have been able to do with a spray gun whilst clambering around on the vehicle.
The model was then dry-brushed with dark grey enamel paint to represent the hastily applied camouflage beginning to wear off on exposed edges.
Dust was applied to recessed areas using a couple of suitably coloured pastel chalks from the Pan pastels range, working from light to dark. These were blended into the paintwork using a clean flat brush.
The tools and other detail items were painted with a combination of Vallejo acrylics and oil paints. The radio aerial is supplied as a plastic part, but this was broken into several pieces in my kit and so was replaced with some steel wire rolled flat under a ruler to straighten it.
Having permanently fixed all the hatches in the open position and having installed the figures I eventually decided that this was a mistake as my figure painting is not only terrible, but also horrible. The figures were therefore removed from the model never to be mentioned again.
With this kit having its origins in Tamiya’s original Pz.Kpfw IV kits from the 1990s there are a few simplifications. For example, there is no detail under the mudguards like that found in the DML kits, and many modellers may wish to add after-market tool clamps etc. Despite this I enjoyed building the kit. It’s simple and easy to construct and I was (despite my lamentable efforts at figure painting) happy with the end result.
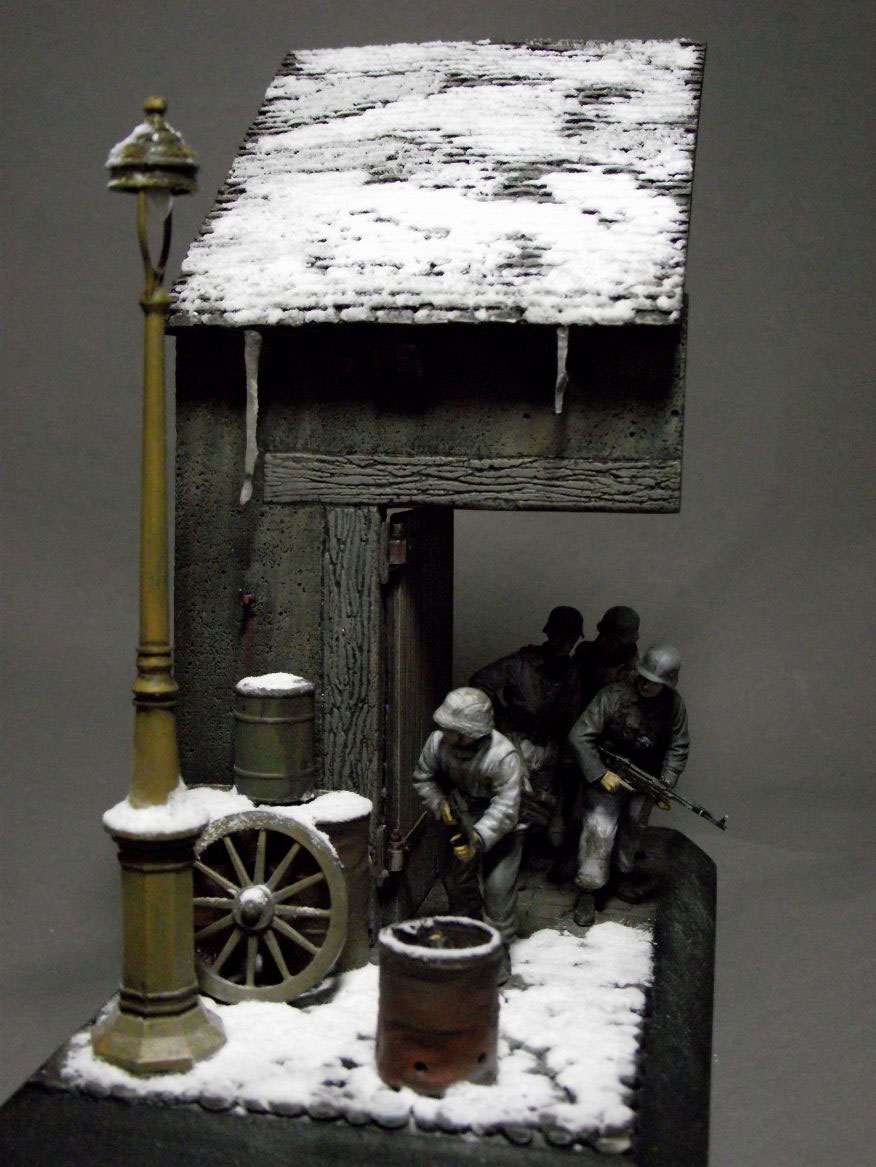
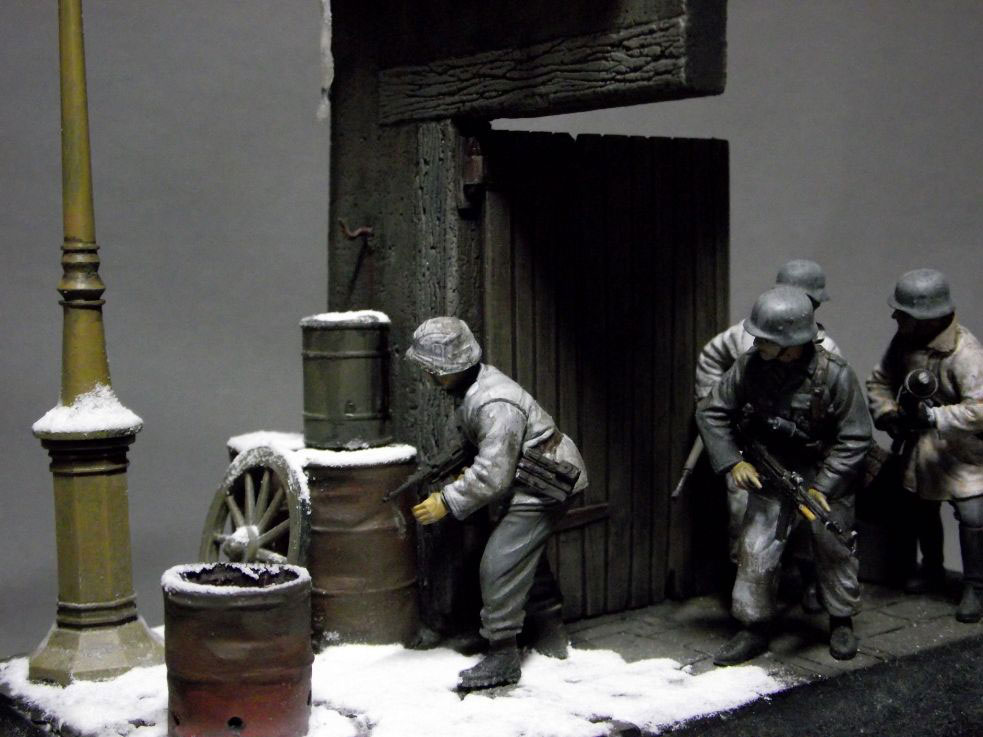
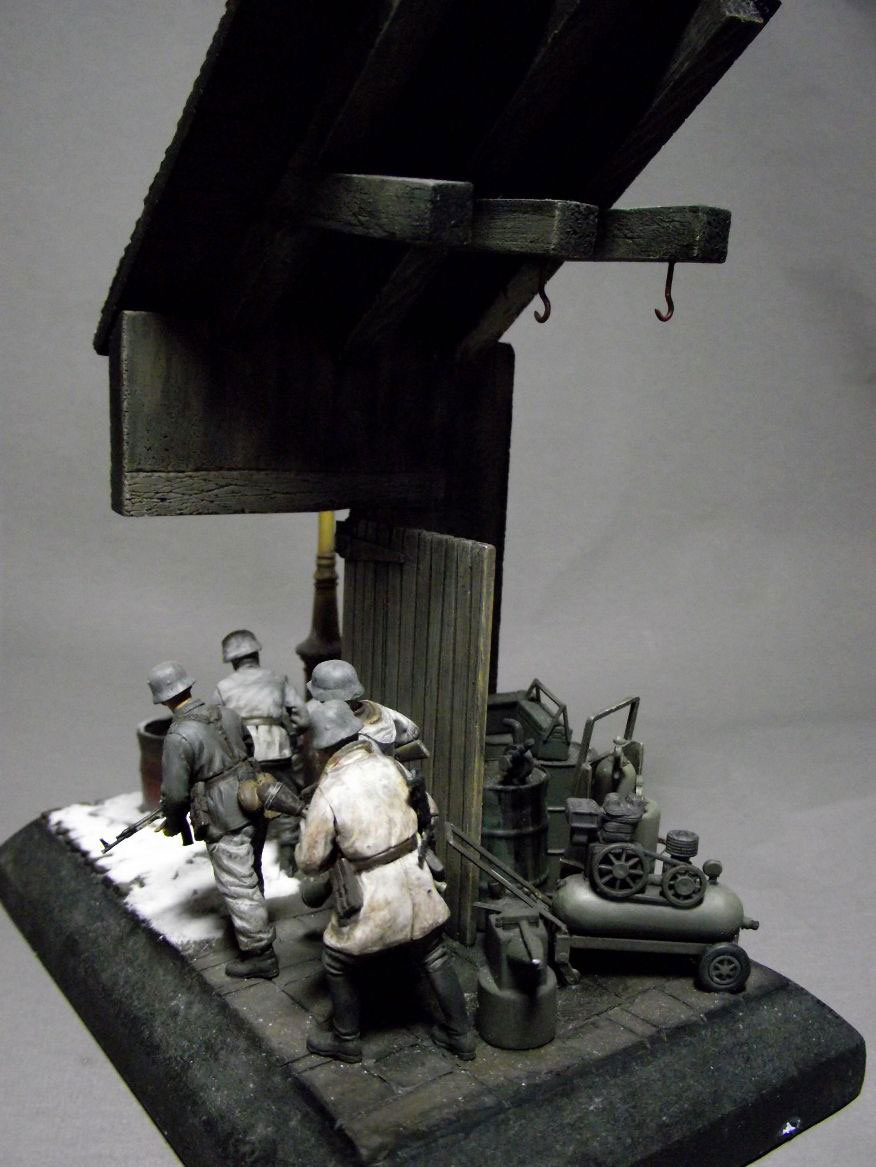
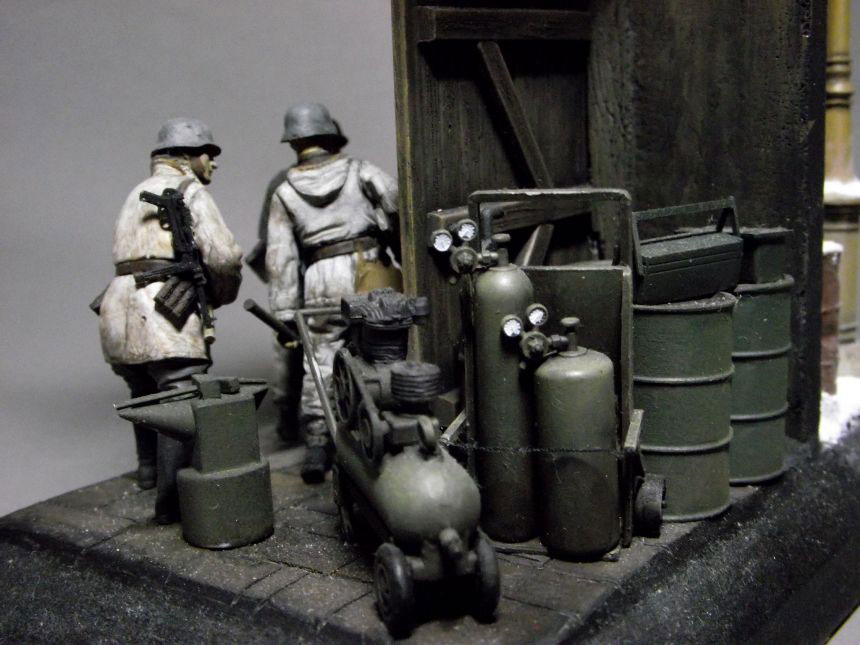
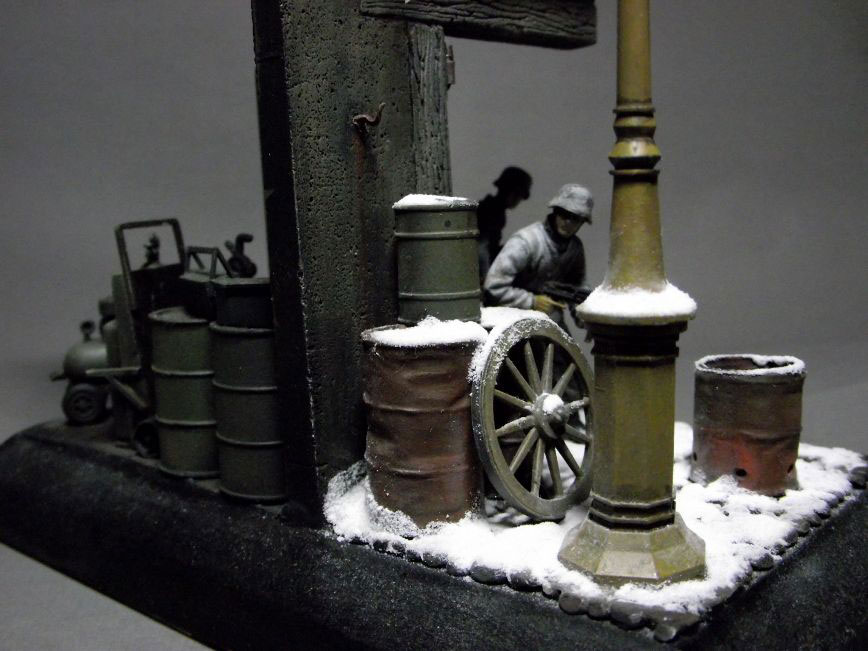
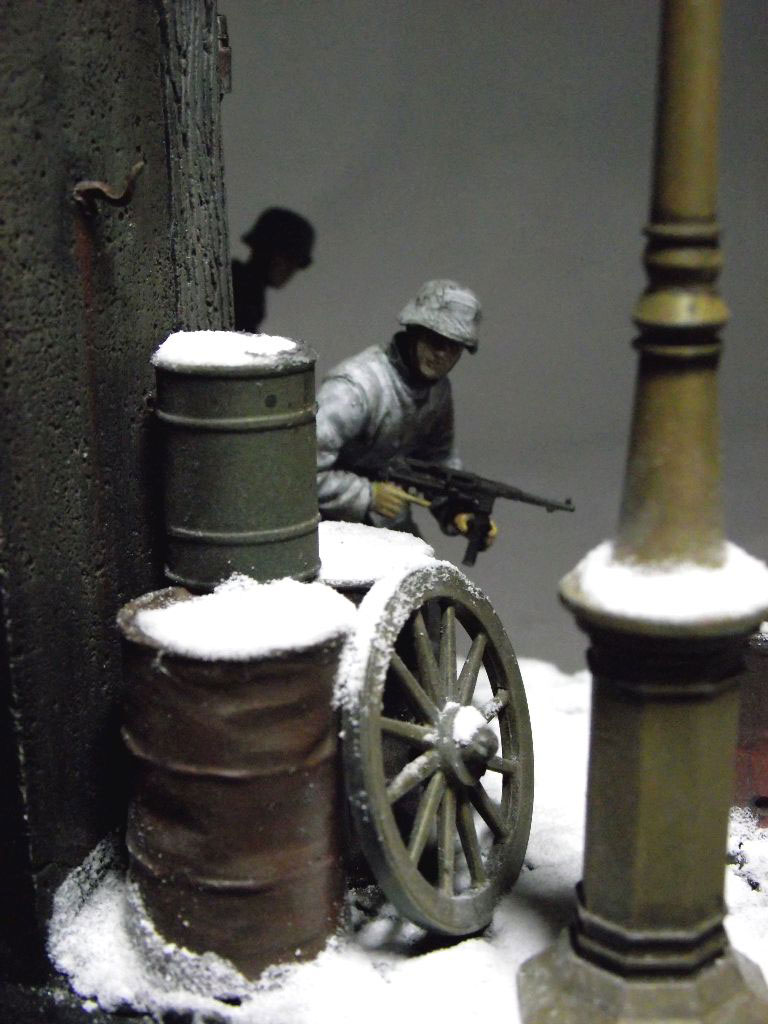

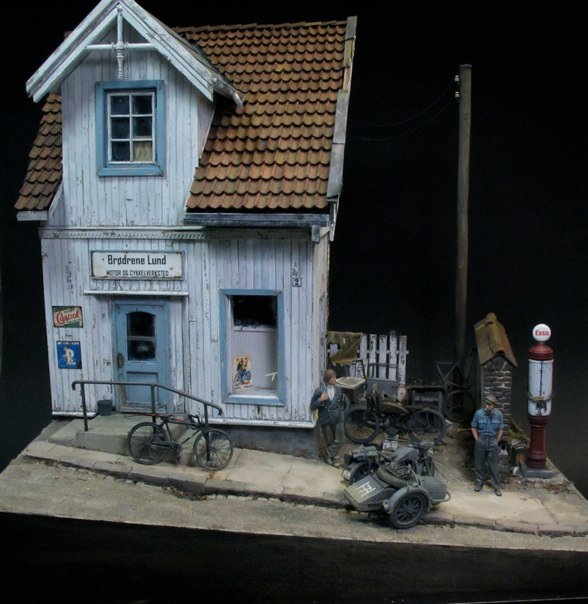
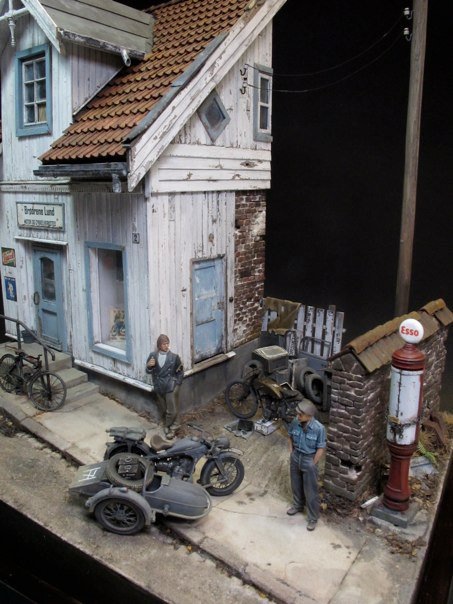
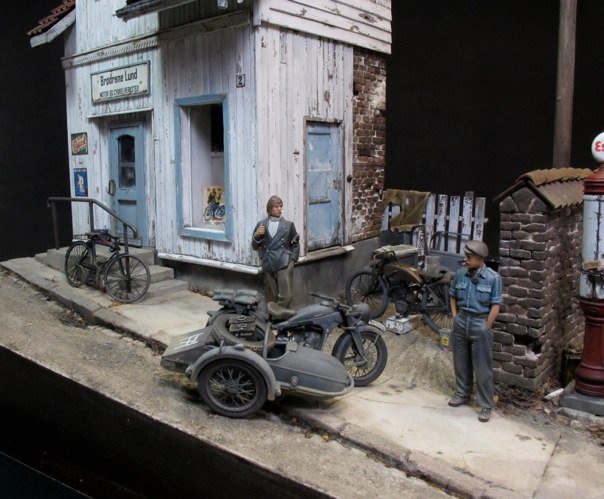
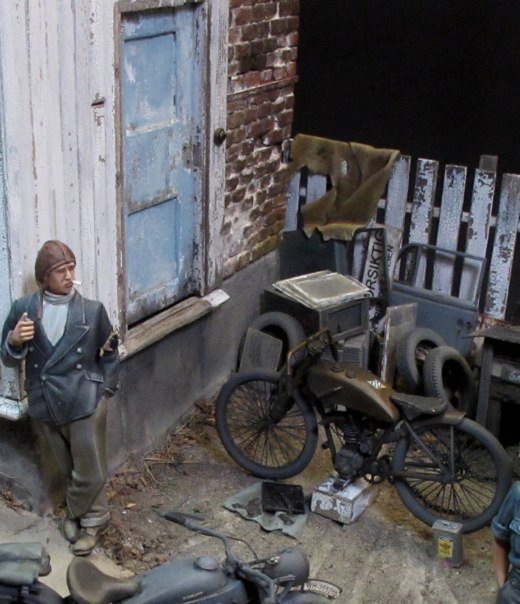
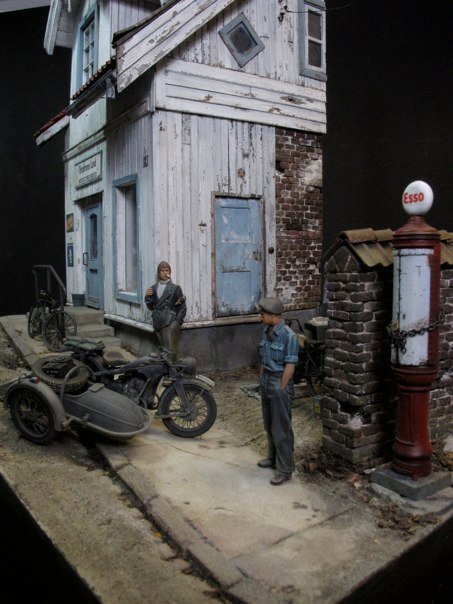
The oil drums are from my spares box; I think they are Italeri as is the lamp post – the tools inside are either scratch built or Tamiya. These are painted darker as if they are in shadow inside the building, as in the floor it actually gets lighter as you go towards the door.
It has drawn some attention at a show, just because it has a couple of icicles on it, these are made from clear plastic sprue from a truck kit, coated with super glue and left to drip down, this gives the ice a sparkle and an uneven look – took about an hour to get the look right.
…and I even superglued my hand to the table top, doing it, placed my hand on a drip spot!
Dave B.

Thanks Per OL.
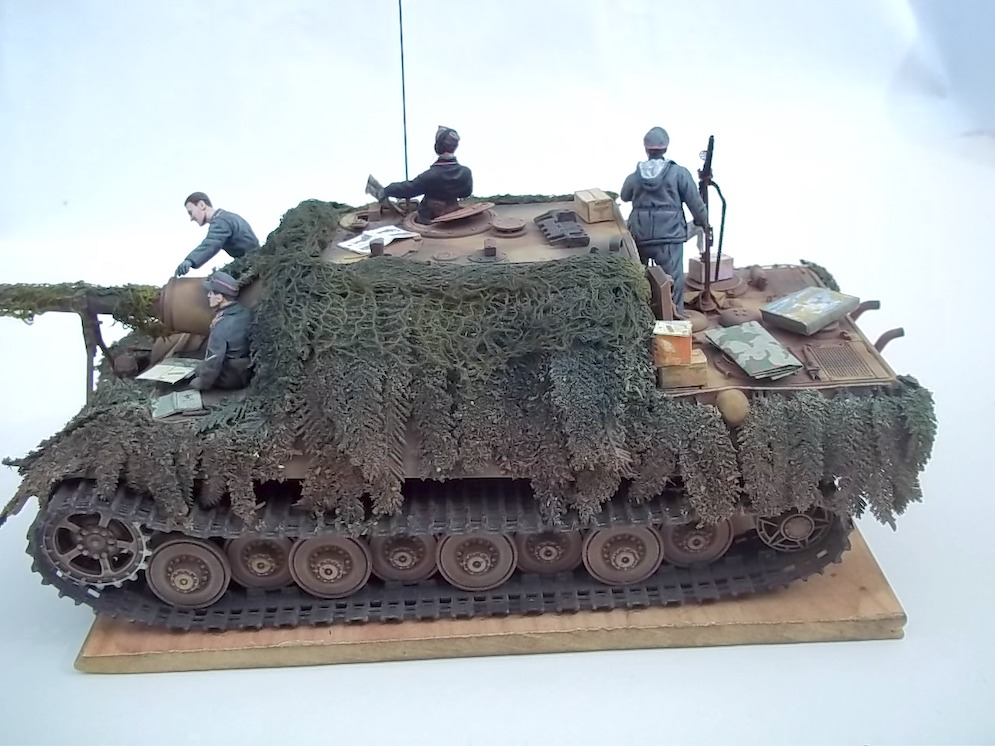
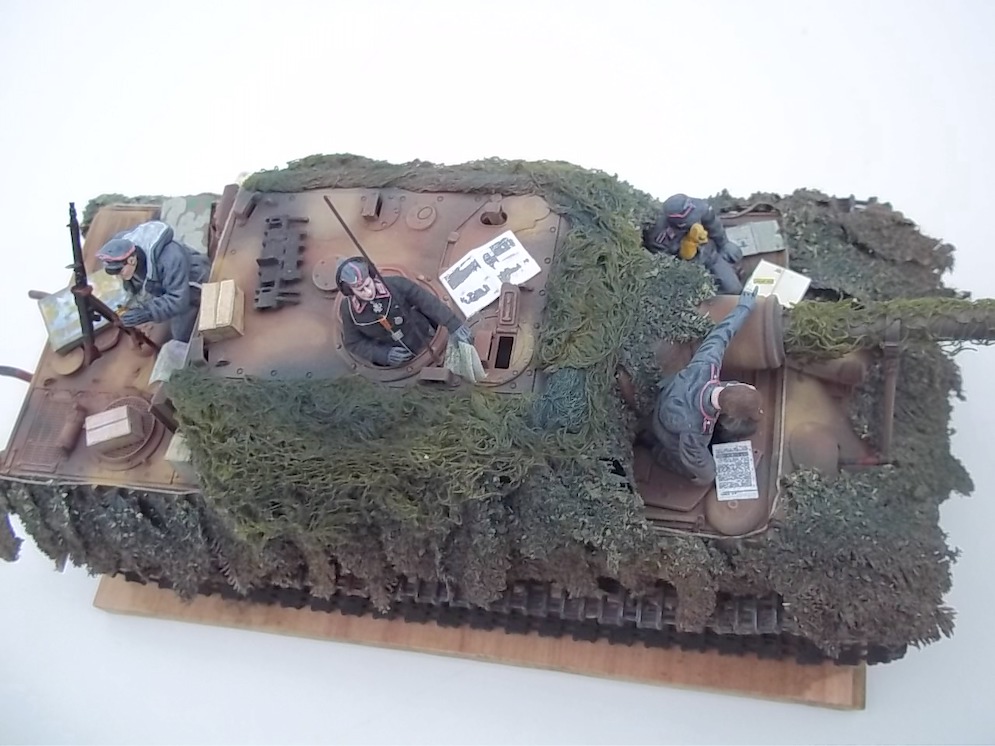

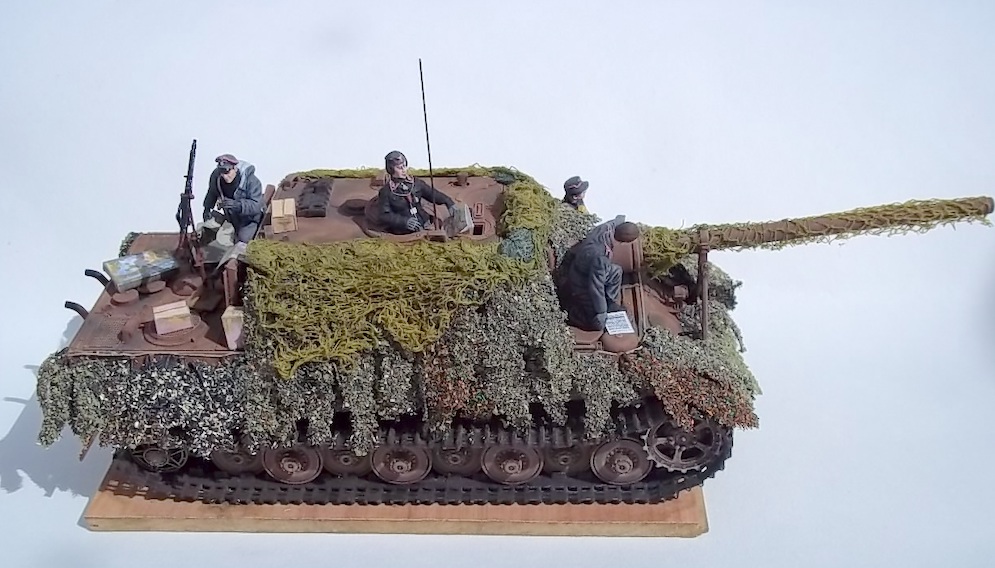
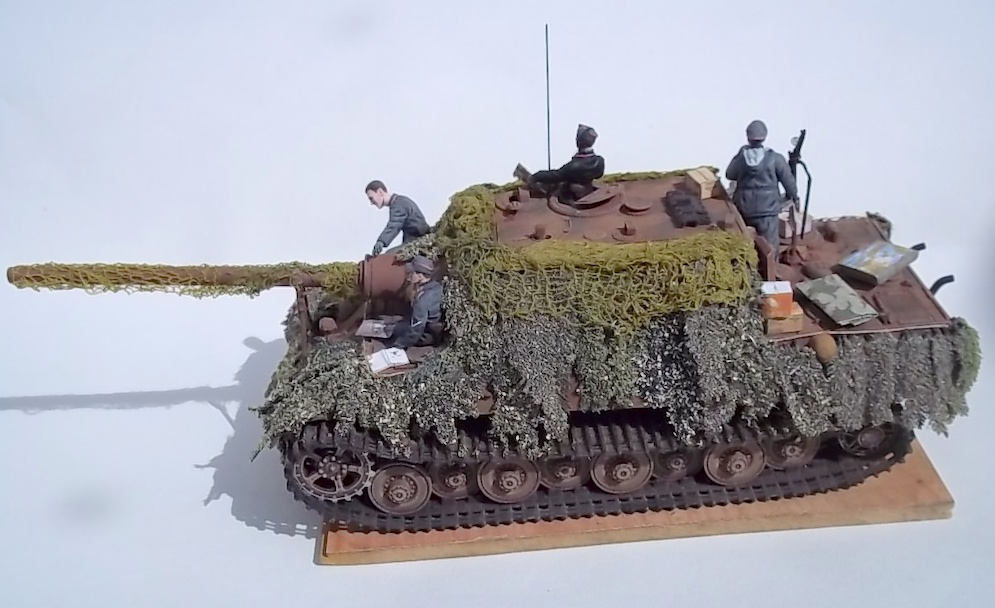
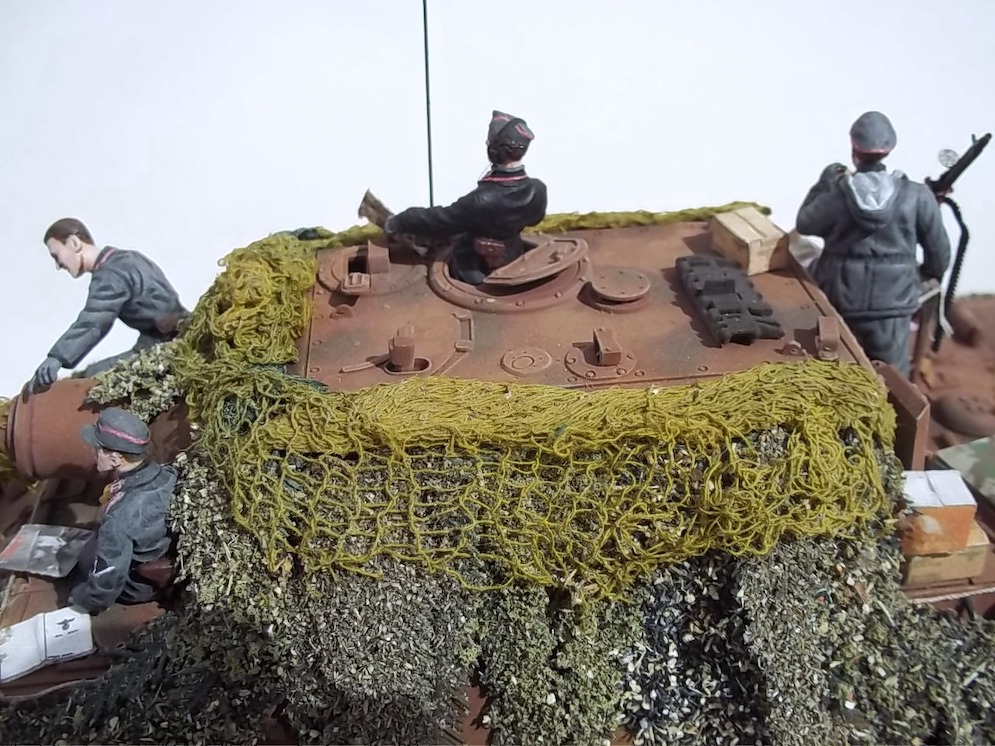
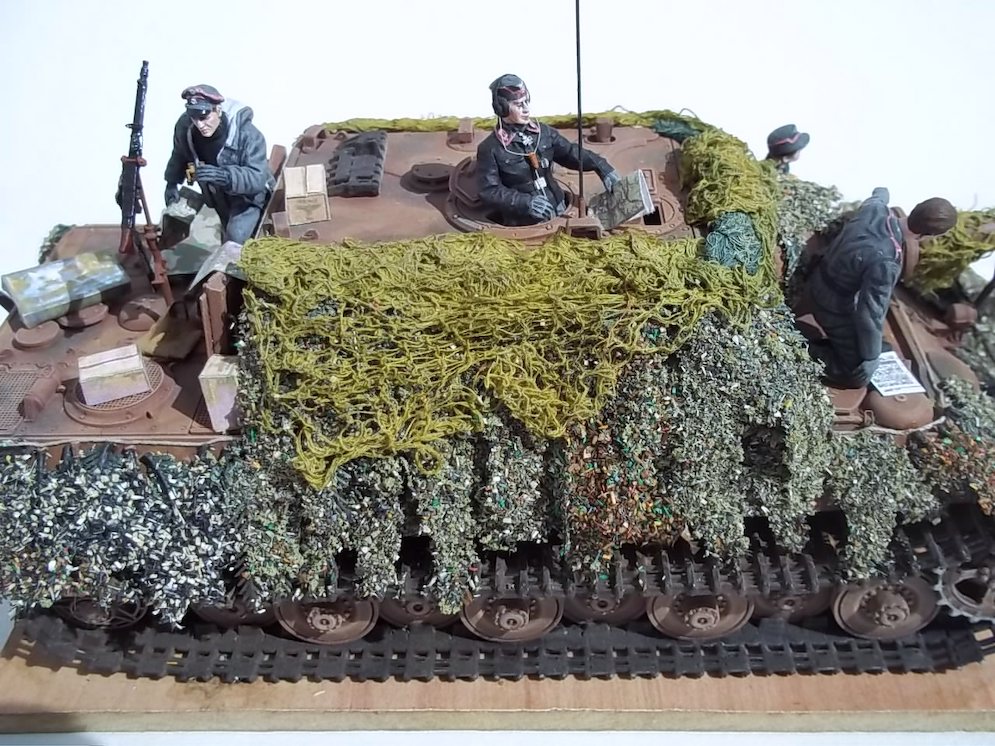
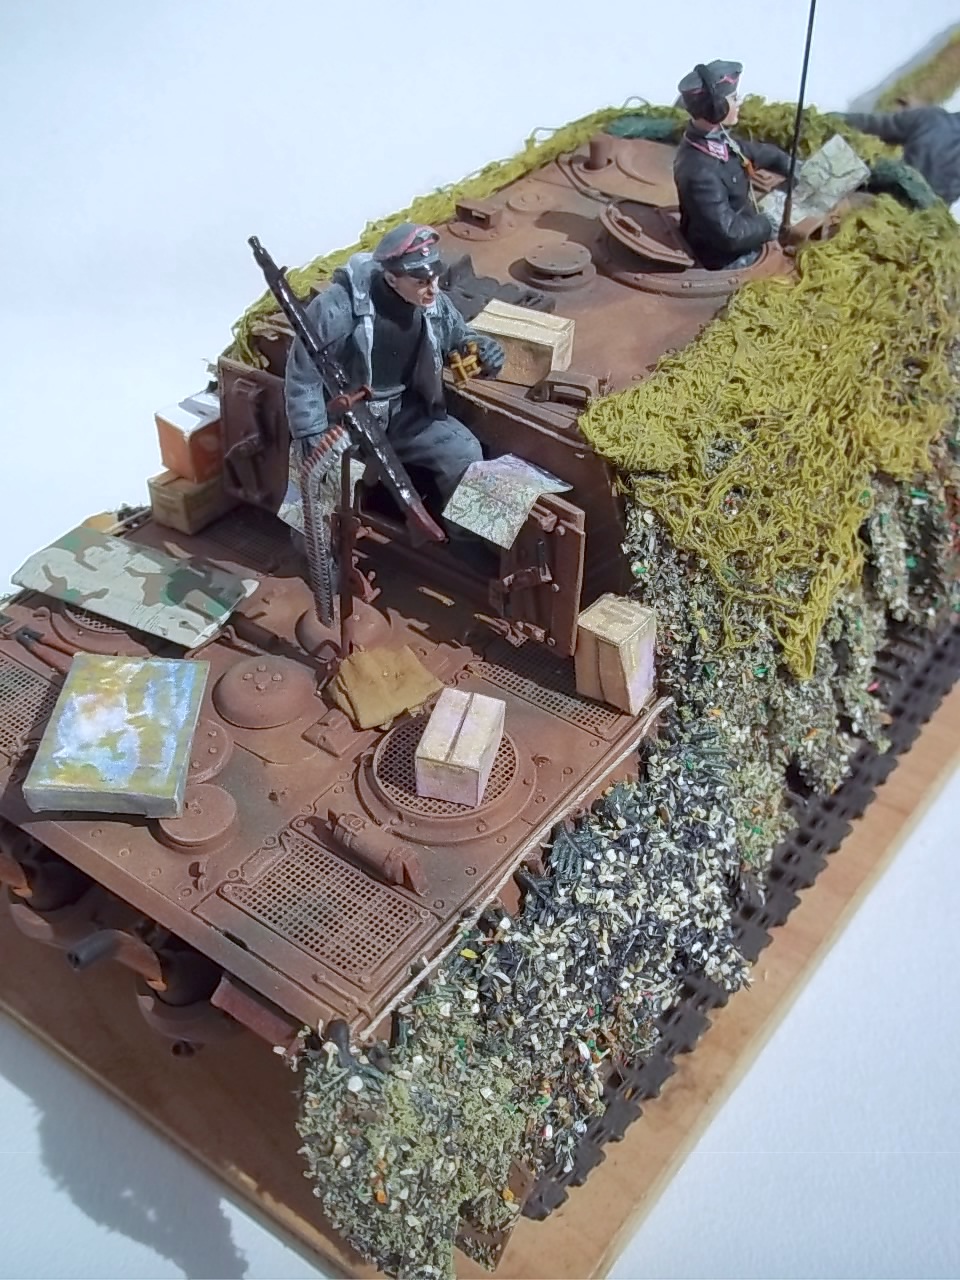
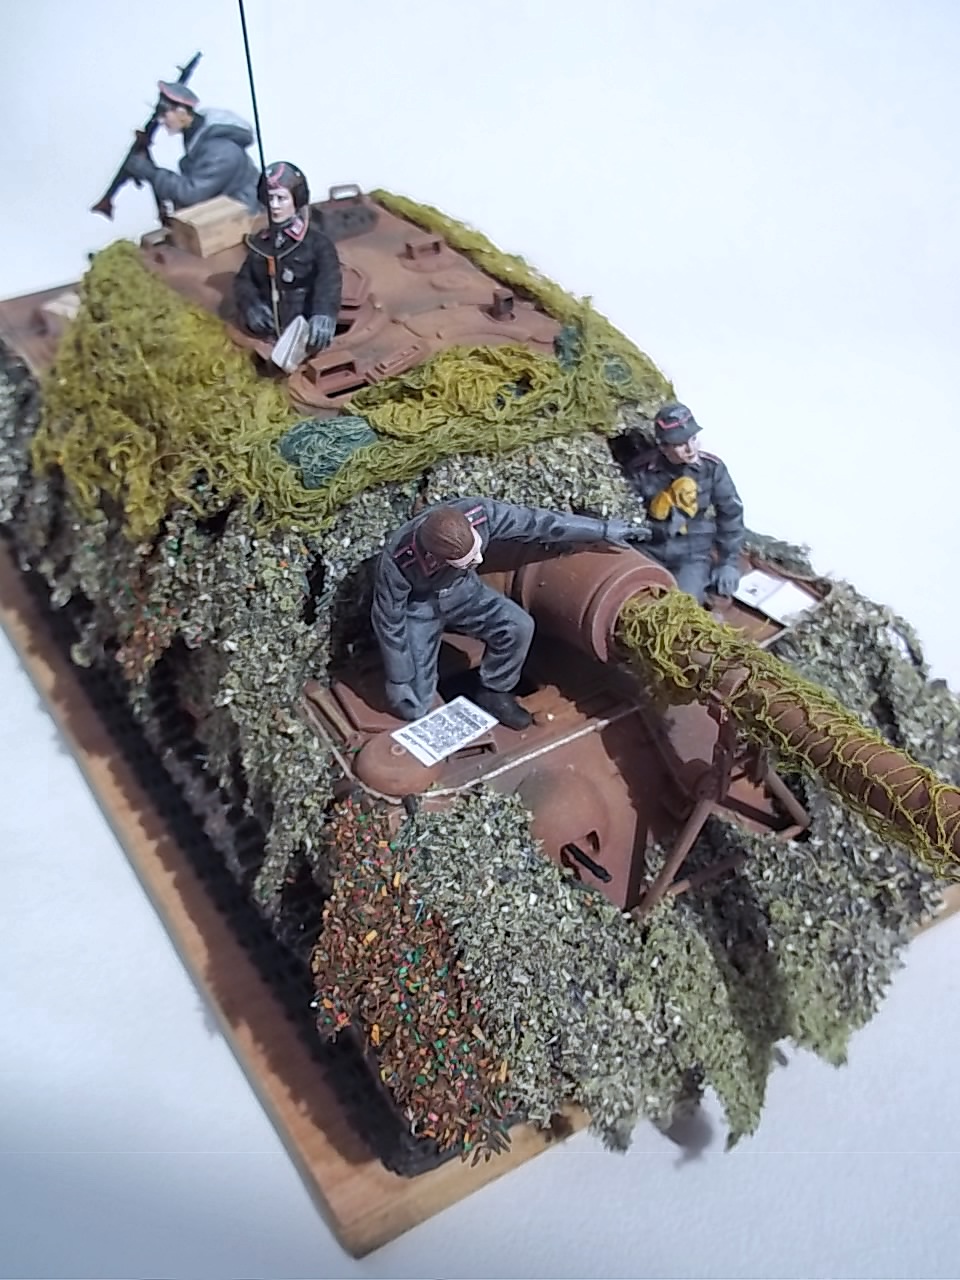
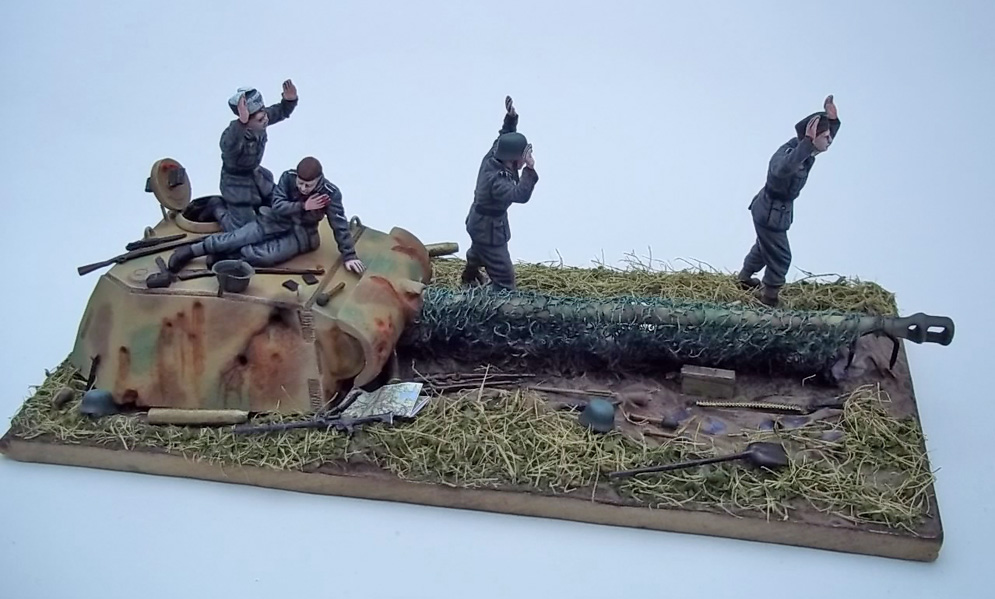
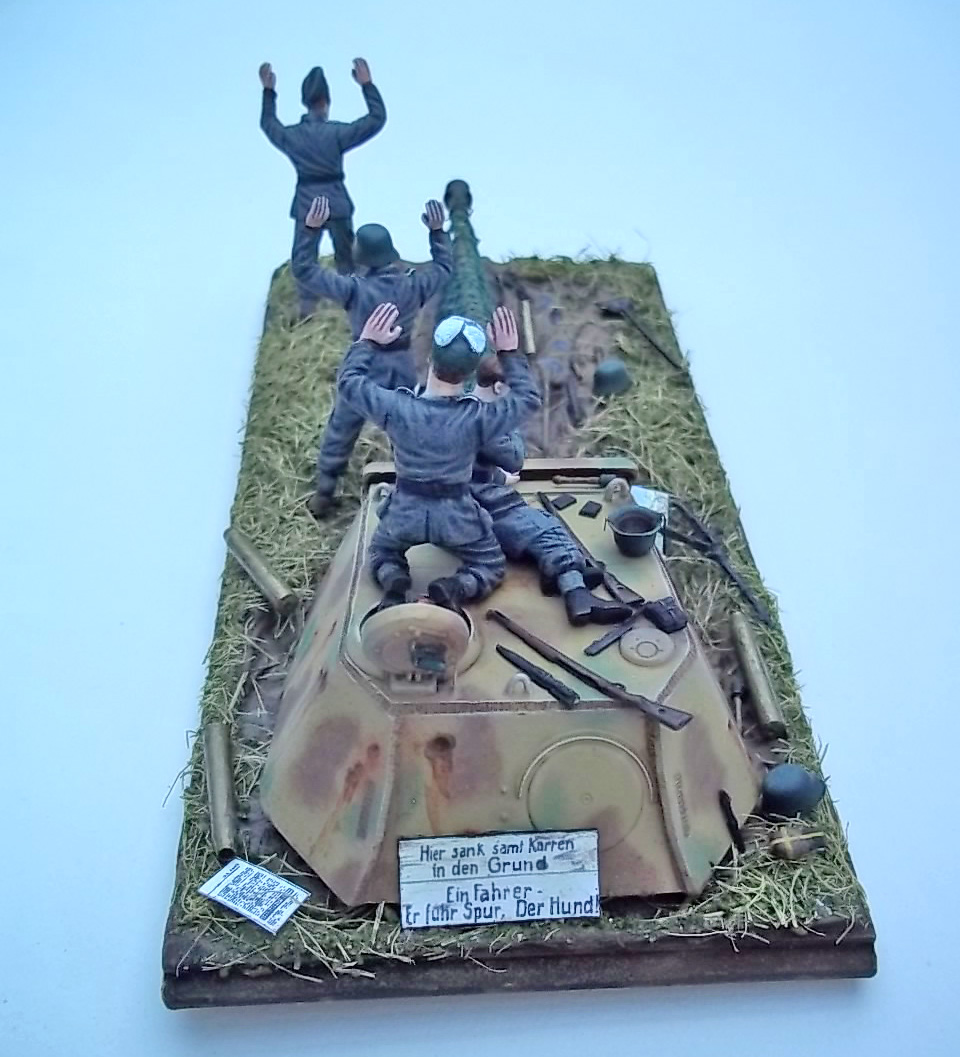
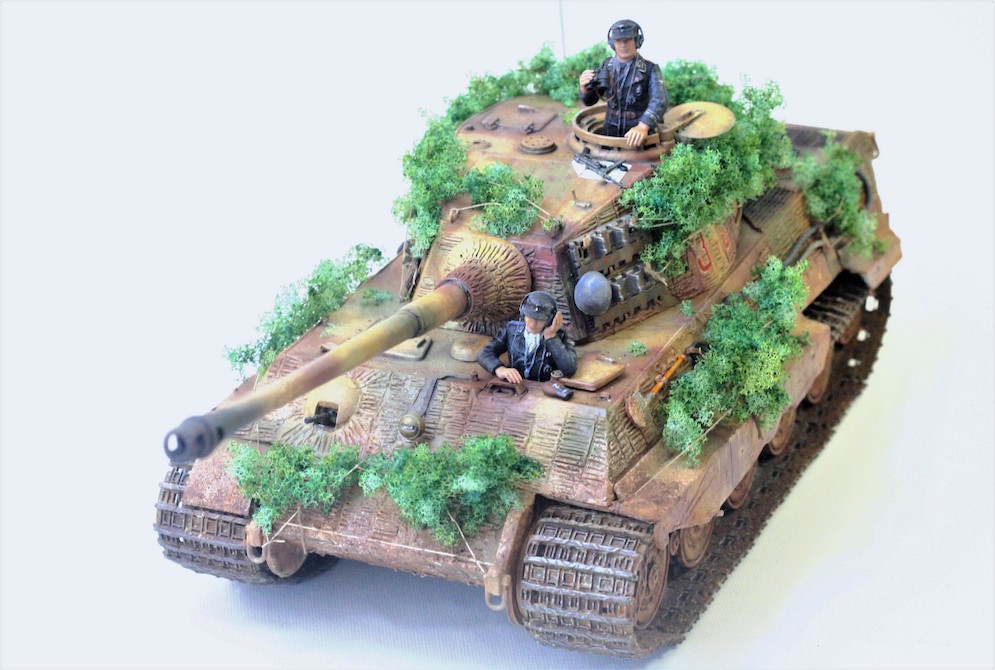
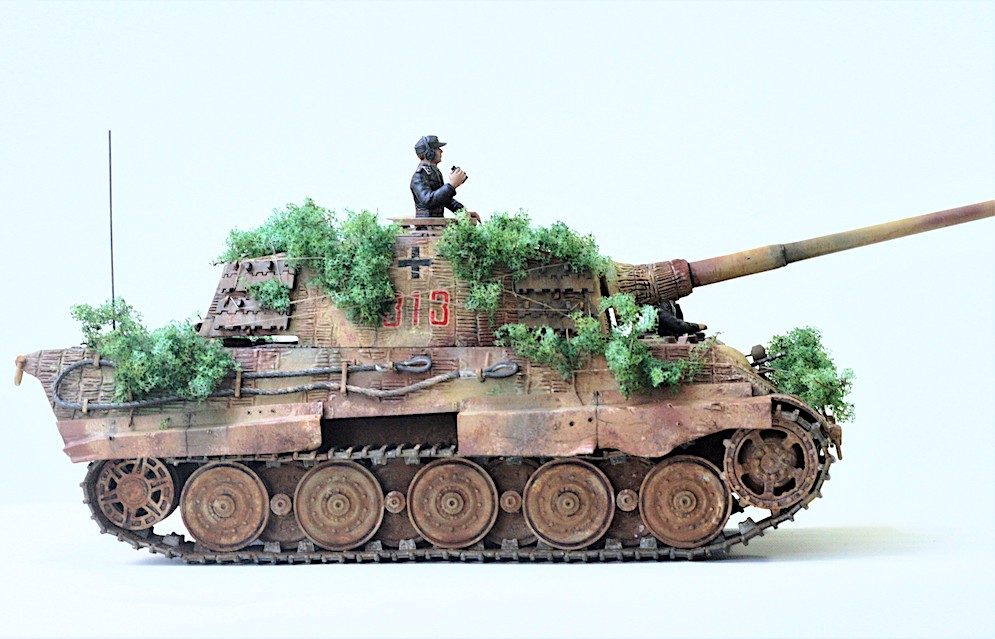
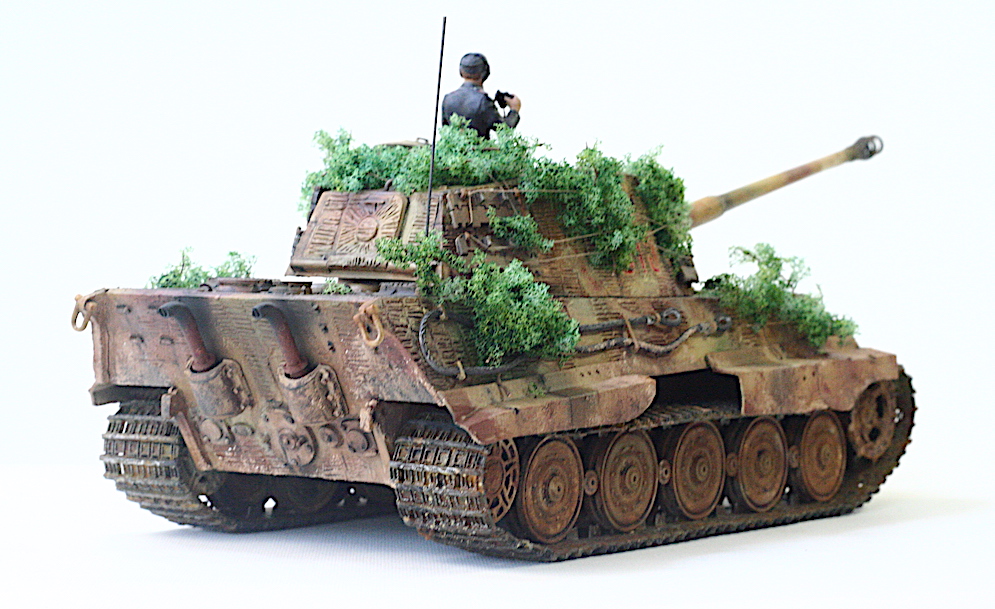
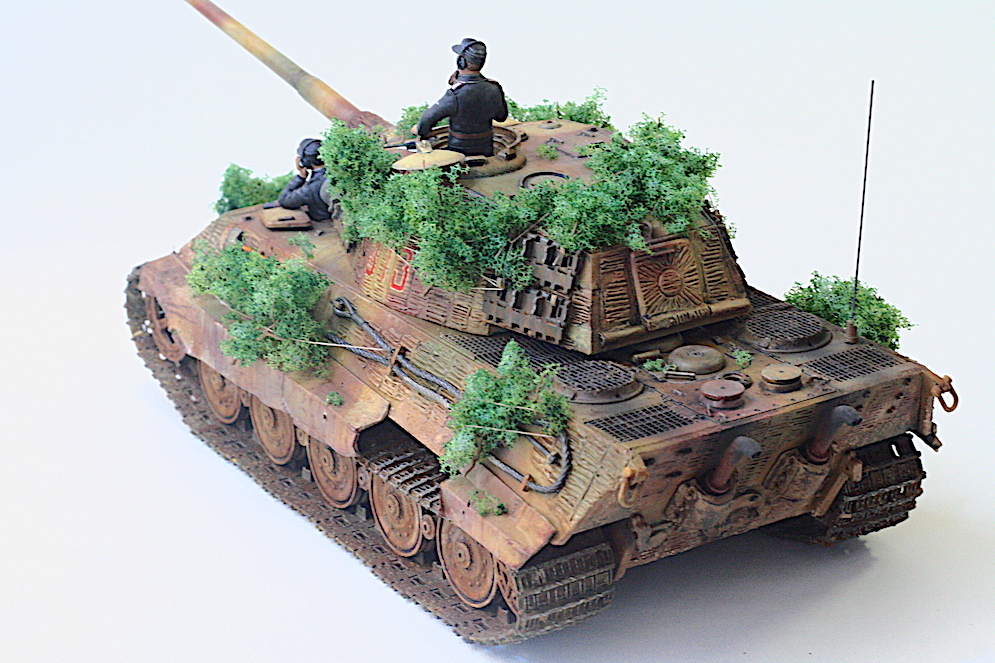
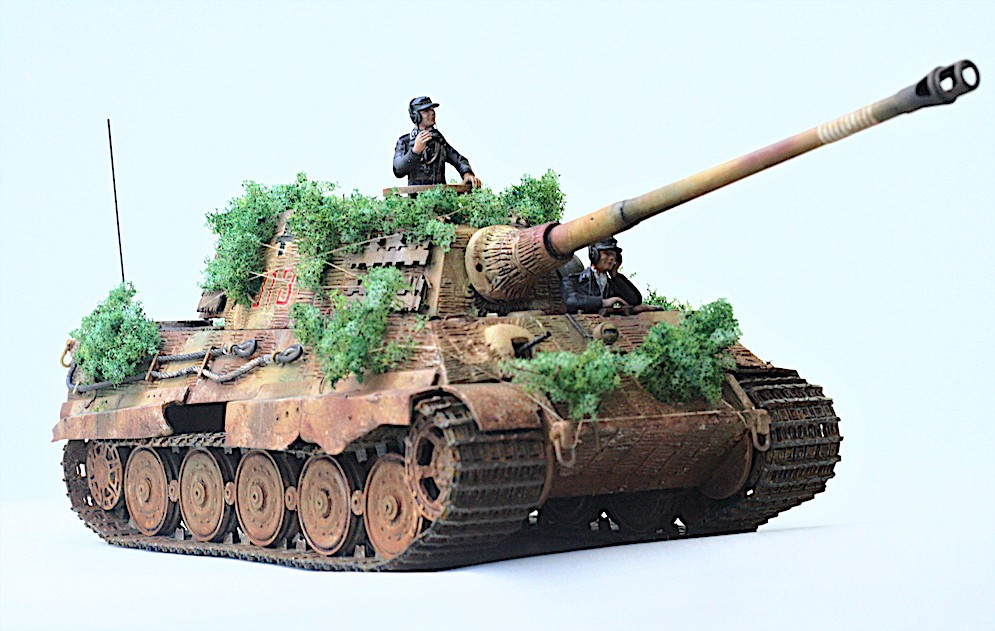
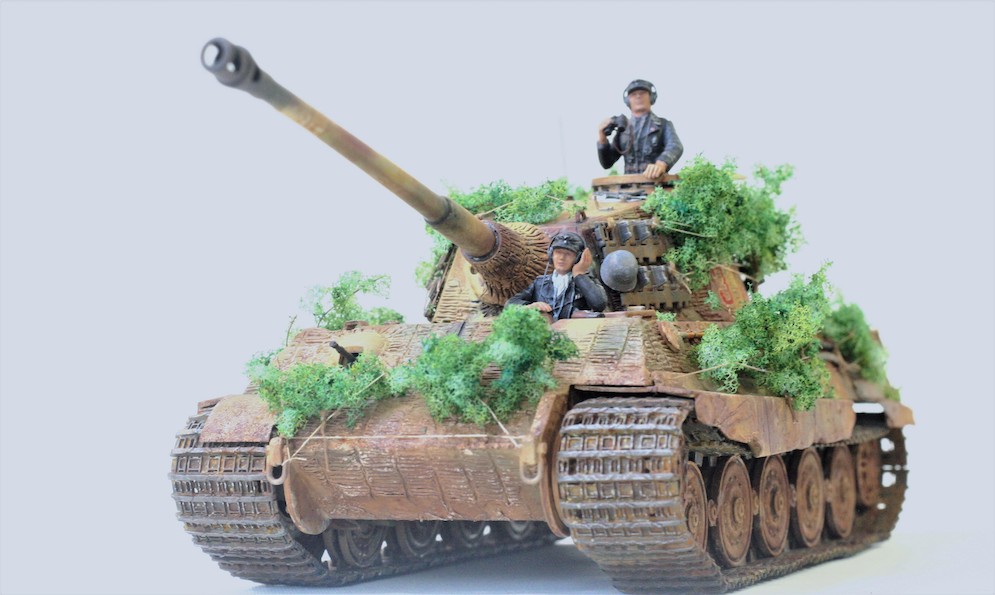
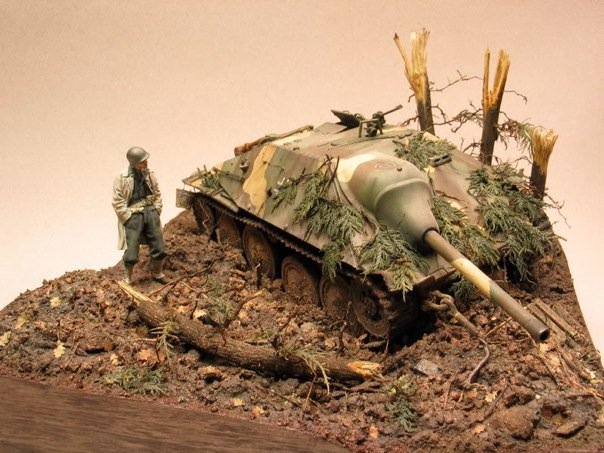
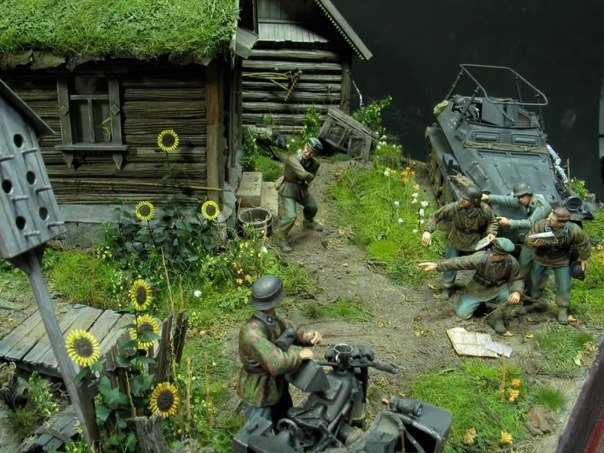
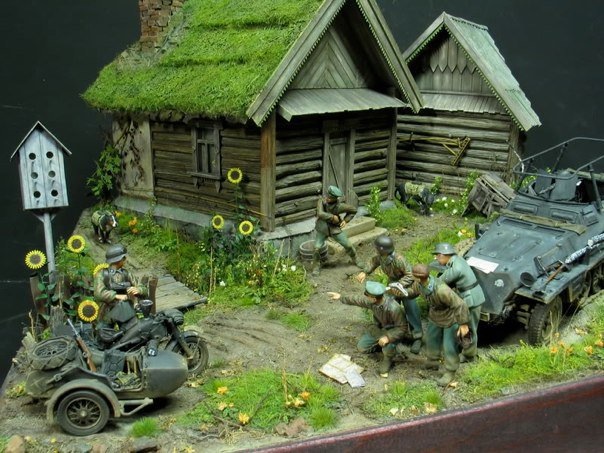
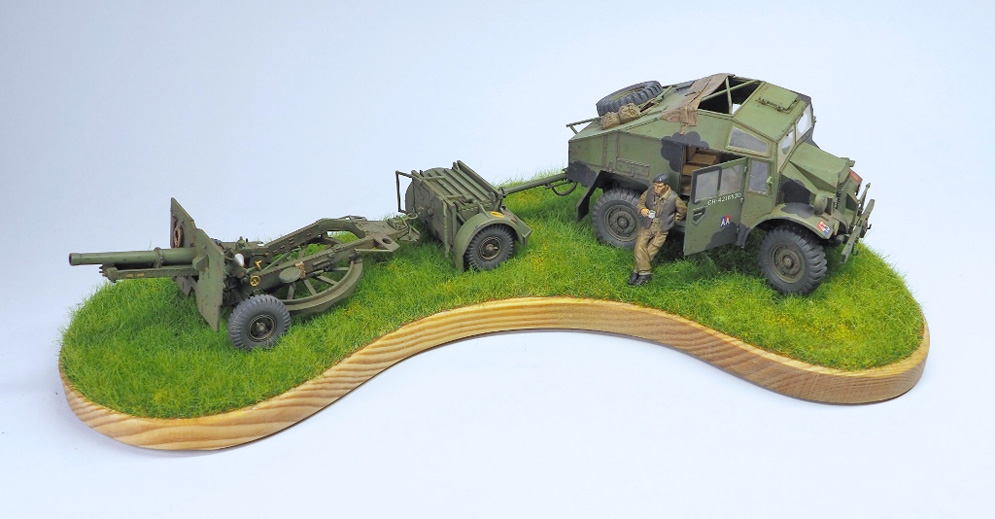
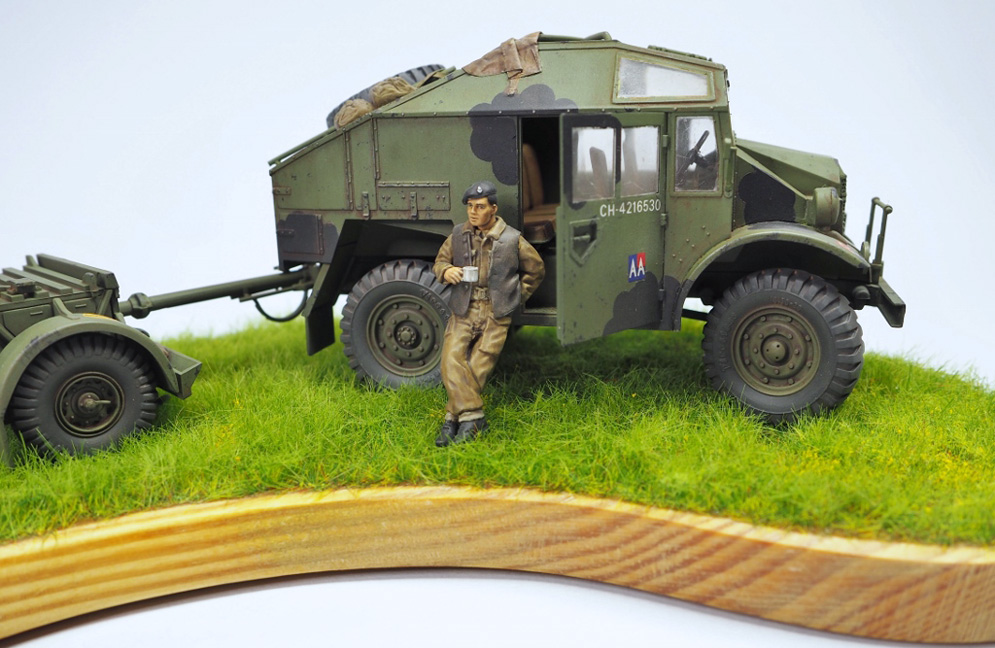
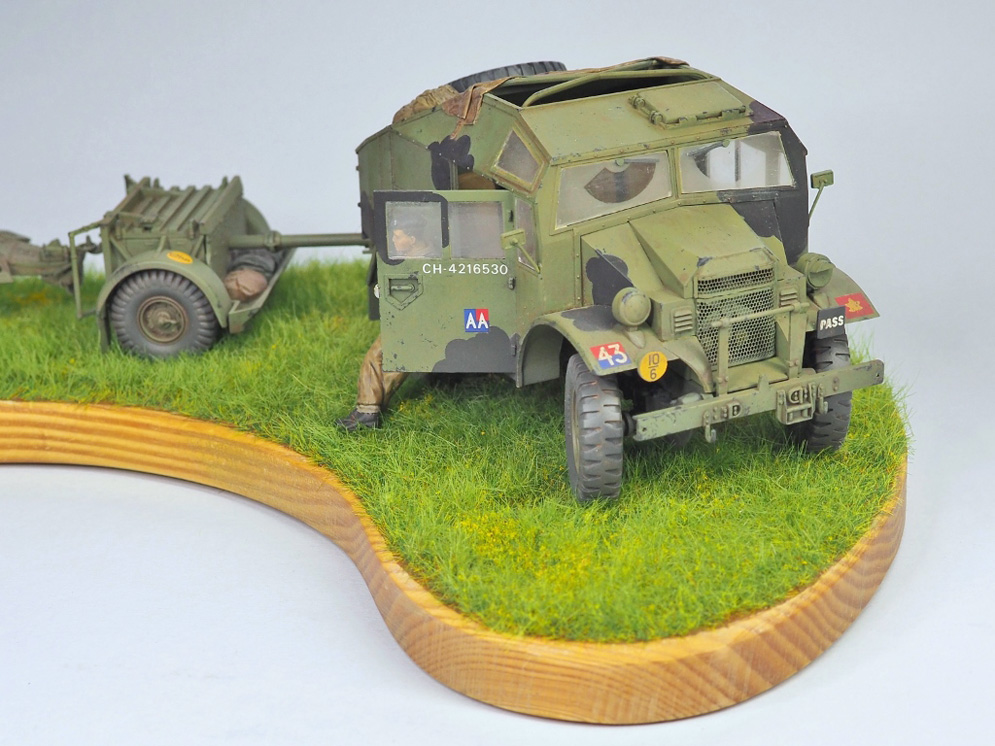
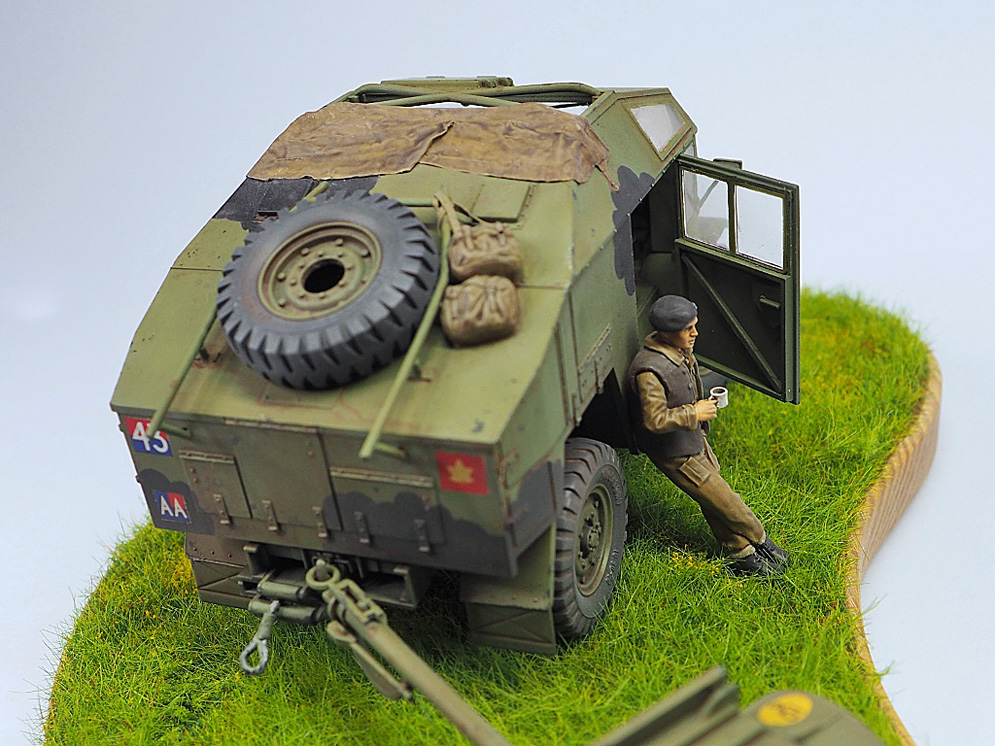
I envisaged an end of war scenario with the vehicle fully camouflaged with netting and foliage. The tank is hidden in a wood with a blank fitted to the main gun and bow machine gun muzzle. The anti-aircraft machine gun is available for immediate use. If they have to move off suddenly then a lot of foliage would be lost.
For the foliage I used model railway accessories. Plastic ferns or fronds, then white PVA to enable me to add scatter to bulk them out.
The first few pictures show the results but I was not entirely happy as it seemed too garish.
Out came the airbrush to tone it down with dark green and some dusty brown around the lower parts to blend it all in.
I am much happier but still not entirely convinced, what do you think?
Cheers
Pete S.


The modifications were the armour texture and the engine deck grills replaced with plastic card items. Paint finish was done with Tamiya colours; light pin washes, subtle weathering and dry brushing. Another not-new kit but one which builds into a very nice representation of the real vehicle
Regards, Bill C.
Best wishes, Thompson Lam


Regards, Andrew E.