• Skip to primary navigation
  • Skip to main content
  • Skip to primary sidebar

Scale Modelling Now

Scale Modelling Techniques

  • HOME
  • CONTENTS
    • What’s New
    • Techniques Bank
    • Aircraft
    • Armour
    • Classic Kit Builds
    • Civilian Aircraft Builds
    • Vehicles
    • Sci-Fi, Fantasy, Space
    • Maritime
    • Figures
    • Gift Certificate
    • Book Reviews
    • Dioramas
    • Modelling Workshops
    • Podcasts
  • WHAT WE OFFER
  • FREE SAMPLES
  • EVENTS
    • EVENTS
    • NEWS
  • ABOUT
    • CONTACT
    • ABOUT US
    • TRADERS
  • LOGIN
  • More results…

    Generic filters
    Exact matches only
    Search in title
    Search in content
    Search in excerpt

Using Fairy Power Spray Cleaner to strip paint

July 17, 2018 By Francis Porter

Stripping paint


with Geoff Coughlin and Howard Kilburn

Quite a lot to say about this below so you can be successful, but the doing is very easy …and tedious! There’s a short video to see as well, so do check that out. There’s a similar entry to this one using Mr Muscle Oven Cleaner in your TB and the approach is pretty much identical to this one.

What’s the problem we’re trying to solve with this entry in your SMN Techniques Bank?

Good question! The simple fact is that there can be many reasons why we apply paint and decide right away, or later, that it doesn’t look right or hasn’t given us the effect we are after. So, what to do?

You do have options, depending on your subject:

  • Bin your model and start again! An expensive course of action and it’s almost always worth trying to save your model and see if you can complete it and be happy with the results. You may have the resources but not the time to fiddle about trying to remove the paint and good luck to you. And so leaving well alone to dry thoroughly before spraying over your first efforts can resolve the problem to your liking without the need to bin it :)
    If not, you may just chuck it in the bin and start again – if you’ve the time and energy and haven’t ruined your motivation for that subject!
  • Sand and buff away the unwanted paint – not really a good idea as it takes ages and you are likely to damage delicate surface detail like rivets and recessed or raised panel lines
  • Use an agent to remove the paint and attempt to get back to your start point of an unpainted model – usually using some kind of strong oven/pan cleaner or other caustic/aggressive cleaner. The key thing here is to find an agent that will not attack your plastic model in any way, just remove the unwanted paint and this is frequently a matter of trial and error and practice on an old model first!
    Trying this approach is much easier when your paint to be removed hasn’t been on very long. Coming back to a model that’s been painted for months and even years is much harder to remove, but it can be done with a lot of time and patience.

So, which choice should I pick?

Well, that’s your decision really, perhaps bearing in mind the above.

Using an agent…

OK, so let’s say we opt for the third option – using an agent to remove the paint.

HEALTH WARNING!

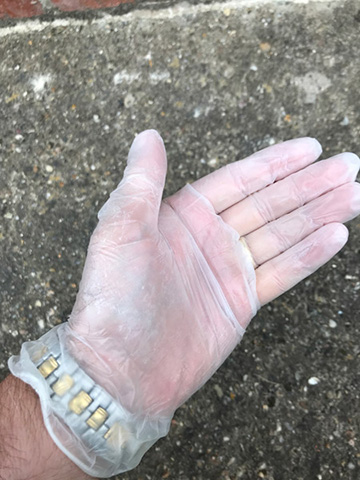
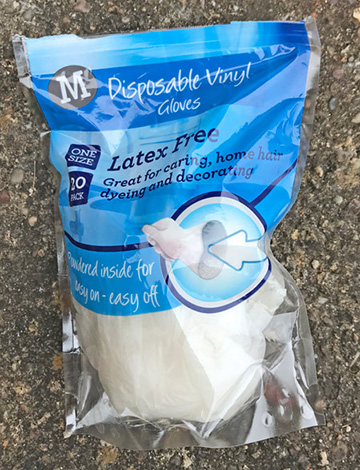
The first thing to do is give you a health warning – just about all and any of the cleaning agents that are likely to work have ammonia in them and no doubt a whole host of other ‘nasties’ that won’t do you any good health-wise. This means physically – they will burn your skin and so make sure that you use protective gloves like the vinyl ones shown here designed for the task.

Additionally carry out all your cleaning outdoors in the open where there’s plenty of fresh air and minimal chance of breathing in the vapour, so sit or stand up-wind to assist this.

Wear eye-protection – the standard and very cheap goggles you get from hardware DIY stores designed for workmen and people doing some home decorating are ideal. You absolutely want to avoid getting any agent at all in your eyes and should that happen make sure you follow the instructions on the bottle/can and which I strongly recommend you DO read in full before you start.

Have I put you off yet?

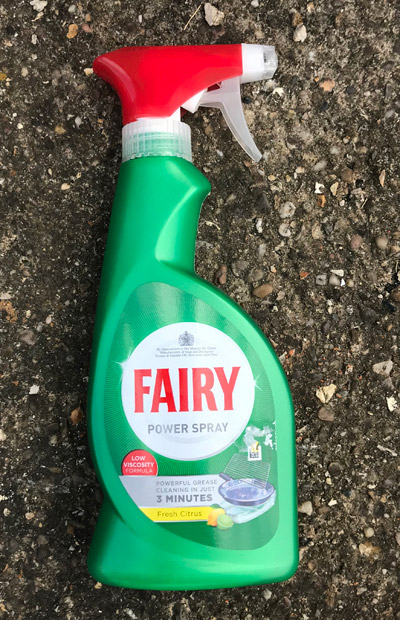
No? Ok, read on to see how you can use just one cleaning agent for this task – Fairy Power Spray. Fairy Power Spray is designed for cleaning burnt in mank on pans and saucepans?

What other materials and stuff do I need?

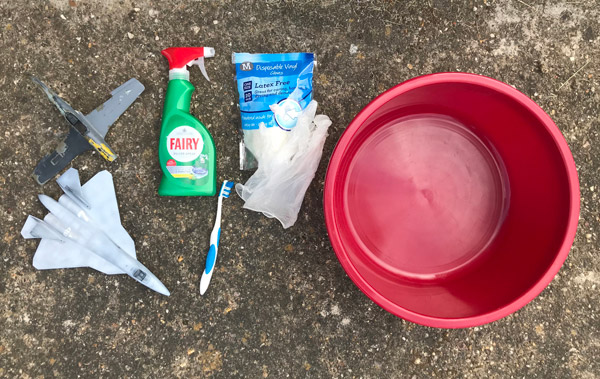
Here’s a list of what I use and that I find helps – I’m sure you and others can find other gear to help:

  • a clear, open space out doors – to work in
  • a plastic washing up bowl – in which to do most of your scrubbing!
  • an old toothbrush – these are good for using to work the agent into your paint finish and are not going to scratch and damage the plastic kit surface beneath the paint
  • a can or bottle of Fairy Power Spray – your cleaning agent
  • access to clean running water – ideally an outside tap where you can rinse off your model between applications of agent
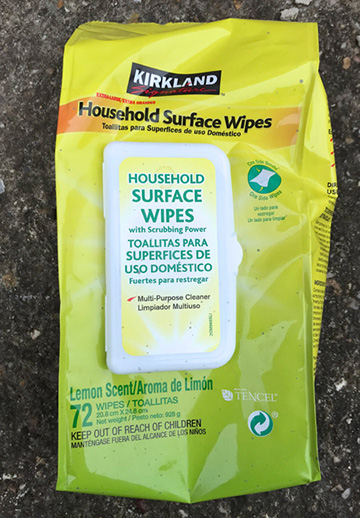
  • kitchen surface wipes – good for working the surface between applications of Fairy Power Spray
  • an old dish cloth – good for working the surface along with your toothbrush when using the agent to help the paint come away
  • a roll of paper kitchen towel or old clean tea towel – to dry off your model after rinsing it with clean water at the end of the process

Tissue paper/kitchen roll can be wetted and used to mask / plug openings such as cockpits (if there isn’t delicate Photo Etch (PE) and other fine detailing within – you really don’t want to damage all your hard work!


How do you do it?

Prepare your model: The first thing to do is prepare your model. You really should try and remove any and all of the external parts that are likely to get damaged, leaving you the base model to work on. You just need to take a view on how far to go and I usually take some time removing even undercarriage legs, doors, hatches, aerials – the list is long and better to get this off now and keep all these items somewhere safe until they can be re-attached later after re-painting and main weathering has been completed.

Mask any openings like undercarriage wells, cockpits, turret entrance hatches etc using damp tissue paper or Tamiya (or other) masking tape. This prevents agent and mank getting into areas where you don’t want it.

Test your agent: This is important too and I recommend doing well before you attempt it on your main model project. Apply the agent and leave for 20 minutes or so to allow it to work on the paint and then carry on as below.

Put on your vinyl gloves – to protect your hands

Put on your eye protection – you must avoid the risk of any splashes of agent getting into your eyes

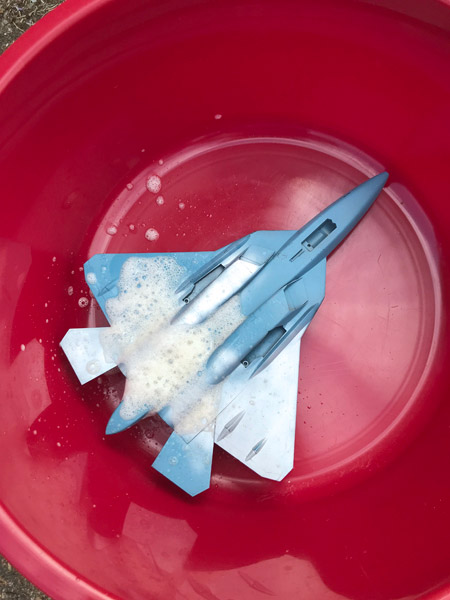
Put your model in the plastic washing up bowl

Shake the can of agent thoroughly (if using the foaming cleaner shown here)

Spray the model liberally with agent, holding the can at arms length and about 20cm (12ins) from your model

Leave your model in the bowl for about 20 minutes – to allow the agent to work on your paint finish. You don’t want to leave your model overnight as the agent will dry out and can damage the plastic.

Start working the surface with the toothbrush – I test the effectiveness of the agent after about 20 minutes and start working the surface with an old toothbrush. There’s no real method to this, just keep working the bristles into the surface to help break up the paint. You’ll see the paint coming away as the agent turns to a kind of paste.


VIDEO DEMO


Use the surface wipes to work away the agent and remove much of it and see how it’s going? If all the paint looks like it’s been removed…

Rinse off your model in clean running water – this will leave your model ready and clean for the new paint.

Repeat if all the paint hasn’t come away – just replay the above steps for as long as you are prepared to spend time doing it, or until the paint is completely removed – whichever comes soonest!

Results – test piece

You can see here my paint test-bed – an old aircraft model where the plastic is black. This was a hard test given that there are multiple coats of different types of paint applied over a few months – mainly Alclad2 lacquer and Stynlrez primers. So what can we learn from this test using Fairy Power Spray (foaming variety)?

1. Paint of whatever type is much more easily removed if you try to strip it soon after application – the sooner the better

2. Water-based paints and water-based acrylics come away the easiest and quickest

3. Acrylics (non-water-based) will usually come away after a couple of applications of agent, even if the paint has been on for a few months (maybe even years – not tried that yet)

4. Enamels and lacquers are the hardest to remove using Fairy Power Cleaner and may not come away completely at all.


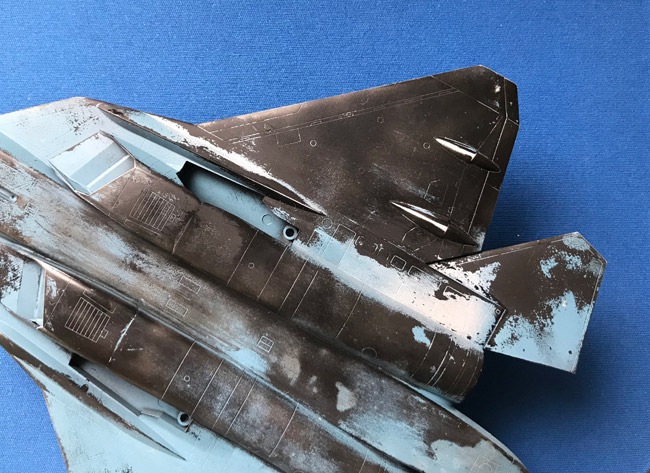
(Photo: Note here I have stopped after a few minutes to show you how well the paint comes away. It might not have missed your attention that this is also a good technique for creating extreme weathering effects like chipped and worn paintwork!)

Final thoughts

Although I haven’t tried it yet, enamels and lacquers that have been recently applied are quite likely to come away using this agent – the problem seems the length of time the paint has been allowed to dry and set hard.

Good luck!
Geoff C.

PS – Thanks again to Howard K for suggesting the use of Fairy Power Spray in the first place and at least you have two cleaning agents that can be used for stripping paint. Thanks Howard! GC

Primary Sidebar

LOGIN/LOGOUT

Lost your Password?


modelpainting
techniques-landing

Model Painting & Airbrushing Techniques

  • AIRBRUSHES
    • Evolution Airbrush – Harder & Steenbeck
    • Iwata Revolution M1 airbrush – 2 VIDEO DEMOS
    • Ultimate APEX Airbrush – VIDEO DEMO
  • AIRBRUSHING WITH ACRYLICS
    • Acrylic Ink Paints for airbrush – Mr Paint
    • Acrylic Metal Color by Vallejo – Intro
    • Correct use of AMMO Primer
    • Getting rid of airbrush overspray between colours – Video
    • How to use Hataka Red Line acrylic paints – Video
    • How to mix and spray acrylics – 4 Videos
    • How to Paint a Car Transporter Trailer – AMMO ATOM Paints
    • How to paint with AMMO Acrylics – Problems and Solutions with Mig Jimenez – Video
    • How to Paint Winter Camouflage – AMMO ATOM
    • Humbrol Acrylics and how to spray them – Video
    • Painting a Messerschmitt Bf109 with AMMO ATOM paints – Video
    • Storing your Lifecolor paints
    • Stynlrez primers and how to use them – Video
    • Using Ultimate Airbrush Thinner – 2 Videos
    • Vallejo Model Color – How to airbrush tutorial – Video
    • What paint what thinner? What to mix with what – a simple guide
    • Yellow and Red, airbrushing and painting – 6 Videos!
  • AIRBRUSHING WITH ENAMELS
    • Getting rid of airbrush overspray between colours – VIDEO DEMO
    • Getting the mix right and spraying
    • Stynlrez primers and how to use them – VIDEO DEMOS
  • AIRBRUSHING METALLIC FINISHES
    • Acrylic Metal Color by Vallejo – Intro – VIDEO DEMOS
    • Alclad2 metal finishes – How to spray – Part 1
    • Alclad2 metal finishes – How to spray – Part 2
    • Burnt metal effects
    • How to paint metal bodies
    • How to spray Alclad2 clear varnishes onto Alclad2 Metallic Lacquers – VIDEO DEMOS
    • Stynlrez primers and how to use them
  • AIRBRUSHING – LOOKING AFTER YOUR AIRBRUSH
    • Airbrush lubricant, how to use it – VIDEO DEMO
    • Choosing the right brushes
    • Cleaning your airbrush and blow-back technique – VIDEO DEMOS
    • Removal of airbrush tip for cleaning – VIDEO DEMO
    • Using an ultrasonic cleaner to clean your airbrush – VIDEO DEMO
  • BODYWORK
    • How to paint Bodywork with Cobra Motor Paints
    • How to paint metal bodies
    • How to paint a motorcycle
    • How to paint a Subaru Impreza rally car
  • BRUSH PAINTING
    • How to Brush Paint with AMMO ATOM paints
    • How to brush paint with Humbrol Water-Based Acrylics
  • CANOPIES
    • Applying tinted shades – 3 VIDEO DEMOS
    • Cleaning up frame lines after painting
    • CT Scale Models Masks – how to use them
    • FrogTape low-tack masking tape – 2 VIDEO DEMOS
  • CAR MODELLING
    • Beginners Resource
    • How to Paint a Car Transporter Trailer – AMMO ATOM Paints
  • CODES AND INSIGNIA
    • Hinomaru – Spraying Japanese Hinomaru markings
    • How to paint D-Day identification stripes
    • Spraying German WWI crosses – VIDEO DEMOS
    • Spraying your codes and insignia – VIDEO DEMOS
  • COMPRESSORS
    • Iwata Studio Series Smart Jet Pro Compressor – VIDEO DEMO
    • Neo Air for Iwata miniature air compressor 2 VIDEO DEMOS
  • FIGURE PAINTING
    • How to Paint 1:35 German Fallschirmjager Monte Cassino Tutorial – VIDEO DEMO
    • How to paint 28mm Napoleon and Napoleonic Horses – VIDEO DEMO
    • How to paint Bravo 6 ‘Wardaddy’ – VIDEO DEMO
    • Making a wet pallet – VIDEO DEMO
    • Painting 1:35 scale faces : a beginners guide – VIDEO DEMO
    • Quick figures – Painting with Lifecolor water-based acrylics
    • Ultracast SS Tiger Tank Commander 1:32
  • GERMAN VEHICLE COLOURS
    • German Vehicle Colours
  • GLOSS FINISHES
    • Why a gloss finish?
  • MASKING
    • AMMO Masking Sheets – 1mm Grid
    • AMMO Masking tape with Mig Jimenez – VIDEO DEMO
    • Blu-Tac putty : using rolls of putty – VIDEO DEMO
    • CT Scale Models Masks – how to use them
    • Creating your own camouflage masks
    • Creating your own masks with Gilles Pepin
    • Creating round masks for circular windows
    • DSPIAE Masking Tape Cutting Mat B – how to use
    • Gyro Cut swivel head cutting tool – VIDEO DEMO
    • Infini Easy cutting mat Type B – VIDEO DEMO
    • Make your own Luftwaffe paint masks
    • Making your own masks for spraying – from the decal sheet! – 2 VIDEO DEMOS
    • Masking canopies
    • Masking canopies and clear parts – 2
    • Masking canopies with Parafilm-M
    • Making paper masks
    • Masking tape
    • Masking tape adhesion problems – solved! VIDEO DEMO
    • Pre Cut Camouflage Masking Sets
    • Quick Wheel Masks for AFVs – 3 VIDEO DEMOS
    • Specialist paint masks for camo and markings
    • Strawberry laces to mask camo fine feathered edges
    • Tamiya Curved Masking Tape – How to use it – VIDEO DEMO
    • Using Tamiya tape to create curved camo patterns – VIDEO DEMO
  • METALLIC FINISHES
    • AK Xtreme Metal finishes – how to get an Aluminium finish – VIDEO DEMO
    • Alclad2 metal finishes – How to spray – Part 1
    • Alclad2 metal finishes – How to spray – Part 2 – VIDEO DEMO
    • Aluminium foil to create a NMF – The Peter Doll way
    • Applying metal pigment with a Rubber Brush – with Mig Jimenez – VIDEO DEMO
    • Burnt metal effects
    • Chrome lenses using a Molotow ink pen – VIDEO DEMO
    • Cowls on WWI aircraft – textured and hammered effects
    • How to apply metal foil – 3 HD VIDEO DEMOS
    • How to paint metal bodies
    • Mr Metal Colour – VIDEO DEMO
    • Vallejo Acrylic Metal Color – Intro – 3 VIDEO DEMOS
    • Vallejo Acrylic Metal Color – hand painting – 2 VIDEO DEMOS
  • PAINT BRUSHES
    • How to use AMMO Long Live The Brushes – VIDEO DEMO
    • Humbrol paint brushes
    • Kolibri paint brushes
  • PAINTING
    • Correct use of AMMO Primer
    • How To Paint A Rusty Turret – VIDEO DEMO
    • How To Paint A Typhoon Truck – Part 1 – VIDEO DEMO
    • How To Paint A Typhoon Truck – Part 2 – VIDEO DEMO
    • How to paint with AMMO acrylics
    • Hand-painting Tamiya Color acrylic paint
    • How to paint a resin seat with molded in belts
    • Labels for Tamiya paint pots
    • What paint what thinner? What to mix with what – a simple guide
  • PAINTING ARMOUR INTERIORS
    • How to paint and weather armour interiors tutorial
  • PAINTING CAMOUFLAGE FINISHES
    • Luftwaffe WWII camouflage mottling – VIDEO DEMO
    • Spraying acrylic camo patterns freehand – VIDEO DEMO
  • PAINTING WHEELS
    • Getting a neat demarcation between hub and tyre – 7 VIDEO DEMOS!
  • PASTELS FOR MOTTLING
    • Using pastels to apply German armour camouflage pattern – VIDEO DEMO
  • PRIMERS
    • Correct use of AMMO Primer
    • How to Use AMMO One Shot Primer – VIDEO DEMO
    • Decanting paint from spray cans for airbrushing – VIDEO DEMO
    • Humbrol Acrylic Grey Primer – how to spray – VIDEO DEMO
    • It’s Prime Time – using primers
    • Primers: Russian Green & Tracks – Ammo of Mig Jimenez
    • Stynlrez primers and how to use – 6 VIDEO DEMOS
    • Ultimate Primer – 4 VIDEO DEMOS
  • STRIPPING PAINT
    • Using Fairy Power Spray Cleaner to strip paint – VIDEO DEMO
    • Using Mr Muscle Oven Cleaner to strip paint
  • SURFACE PREPARATION
    • Correct use of AMMO Primer
    • Micromesh to get rid of paint demarcation lines – VIDEO DEMO
    • Micromesh Polishing Cloths – 6 VIDEO DEMOS
    • Using Micromesh to polish the paint surface
  • VINYL TRACKS
    • How to paint vinyl tracks
  • WOOD EFFECTS
    • Creating woodgrain effects using RB Photo etch templates – VIDEO DEMOS
    • Simulating wooden propellers
    • Wood grain effects – and how to paint them – VIDEO DEMO
  • YELLOW AND RED AIRBRUSHING / PAINTING
    • Yellow and Red, airbrushing and painting
  • OTHER
    • Choosing the right source of air
    • Hand hold for painting armour subjects
    • Hinomaru – Spraying Japanese Hinomaru markings
    • How to paint and weather cockpits – VIDEO DEMO
    • Paint pallet and cleaning
    • Pre and post shading
    • Protecting your painted finish
    • Storing your Lifecolor paints
Painting Techniques Weathering Techniques
DISCLAIMER While the hints, tips and advice in Scale Modelling Now magazine have worked for us, no guarantee is given that they will always work, that they are applicable to you or that there may be Health & Safety issues if you do follow the advice. It’s very much up to you to decide if you want to try them out. All relevant safety regulations regarding knives, adhesives, solvents, paints, etc. are implied.

Copyright © 2025 · Scale Modelling Now · Online Scale Modelling Magazine · Scale Modelling Techniques and Tips · Privacy Policy