• Skip to primary navigation
  • Skip to main content
  • Skip to primary sidebar

Scale Modelling Now

Scale Modelling Techniques

  • HOME
  • CONTENTS
    • What’s New
    • Techniques Bank
    • Aircraft
    • Armour
    • Classic Kit Builds
    • Civilian Aircraft Builds
    • Vehicles
    • Sci-Fi, Fantasy, Space
    • Maritime
    • Figures
    • Gift Certificate
    • Book Reviews
    • Dioramas
    • Modelling Workshops
    • Podcasts
  • WHAT WE OFFER
  • FREE SAMPLES
  • EVENTS
    • EVENTS
    • NEWS
  • ABOUT
    • CONTACT
    • ABOUT US
    • TRADERS
  • LOGIN
  • More results…

    Generic filters
    Exact matches only
    Search in title
    Search in content
    Search in excerpt

Broken glass effects

April 4, 2018 By Francis Porter

Canopies and Clear Parts


with Luc Po


A note from Geoff…
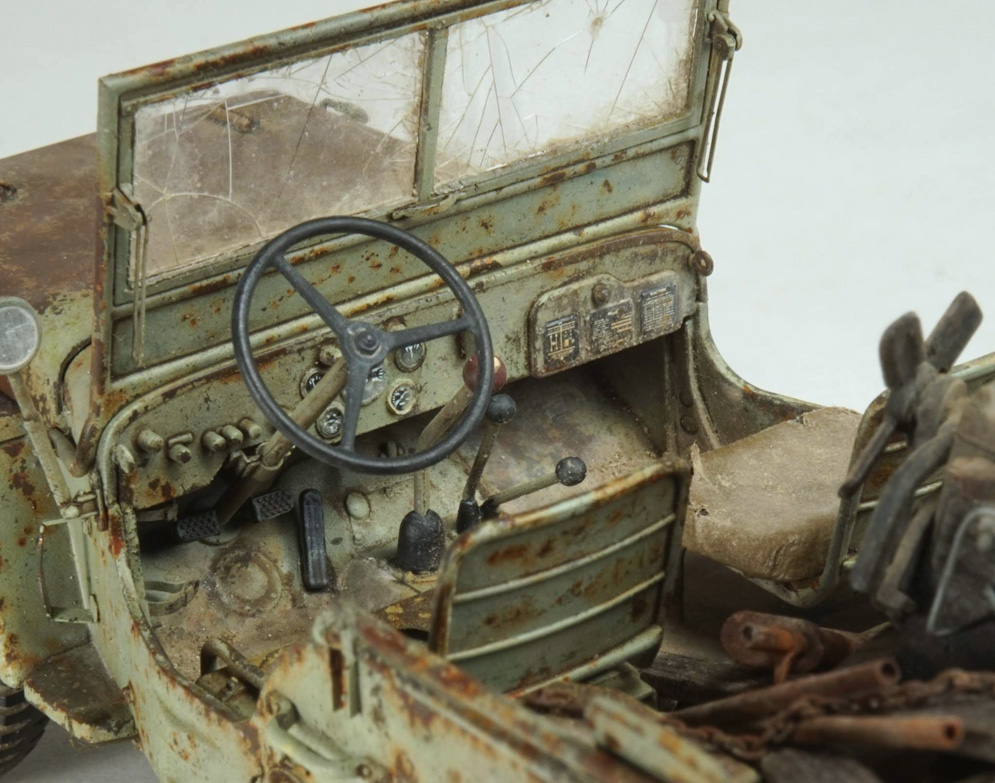
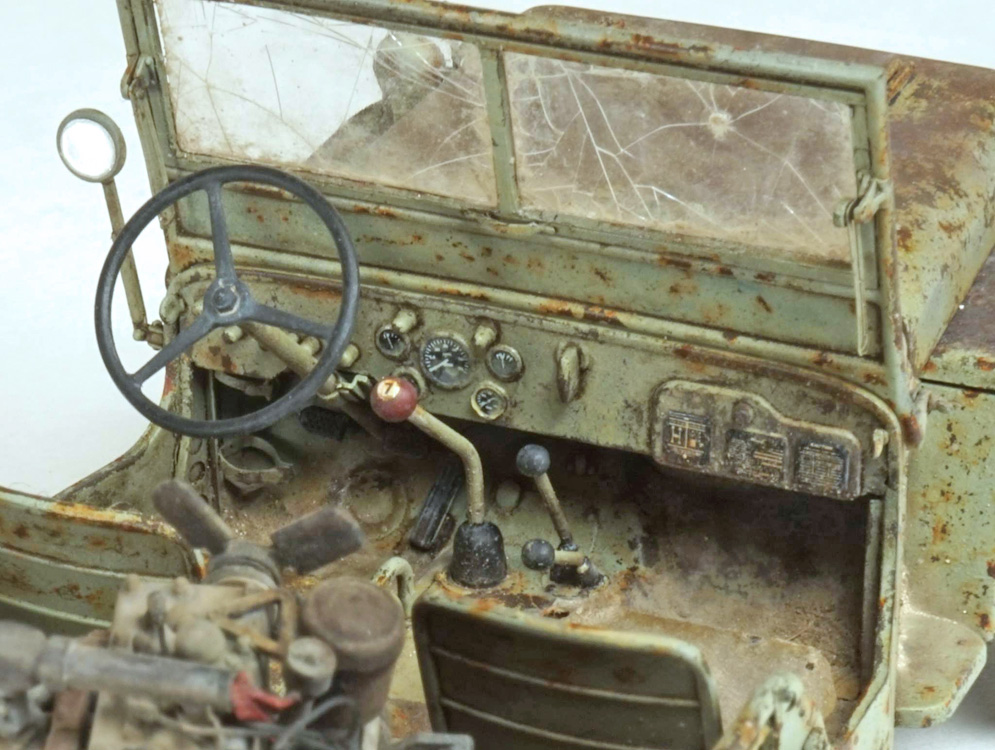
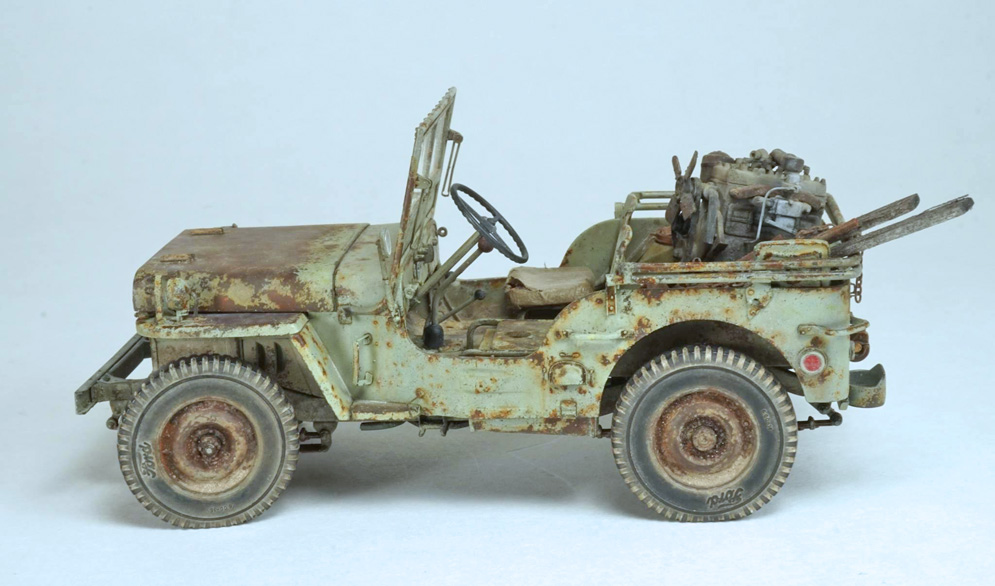
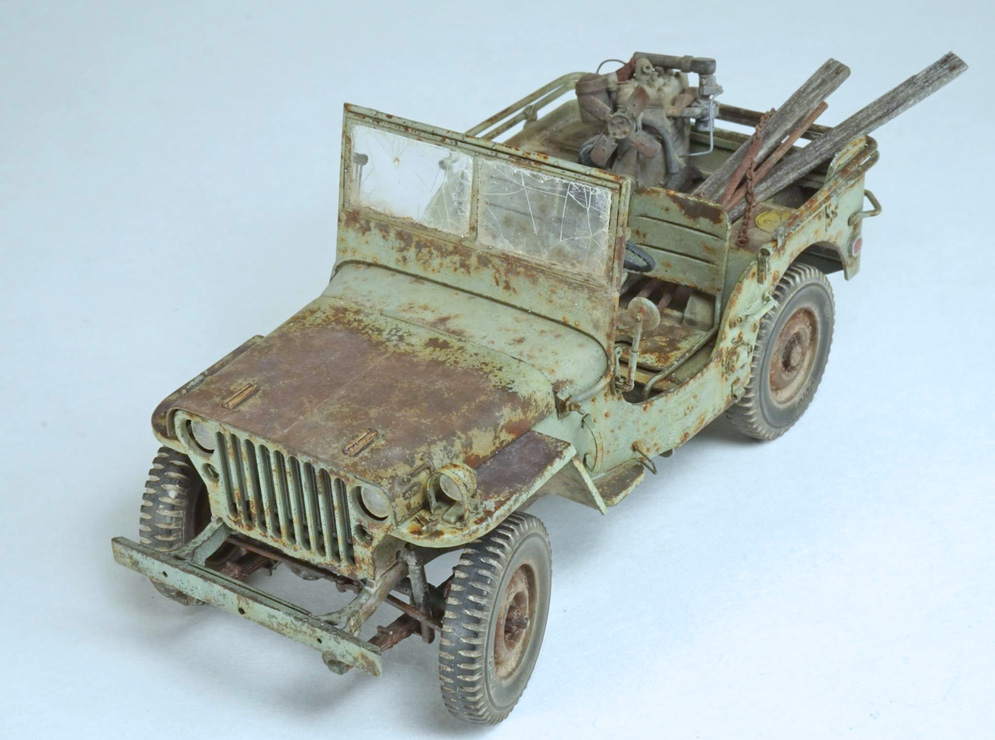
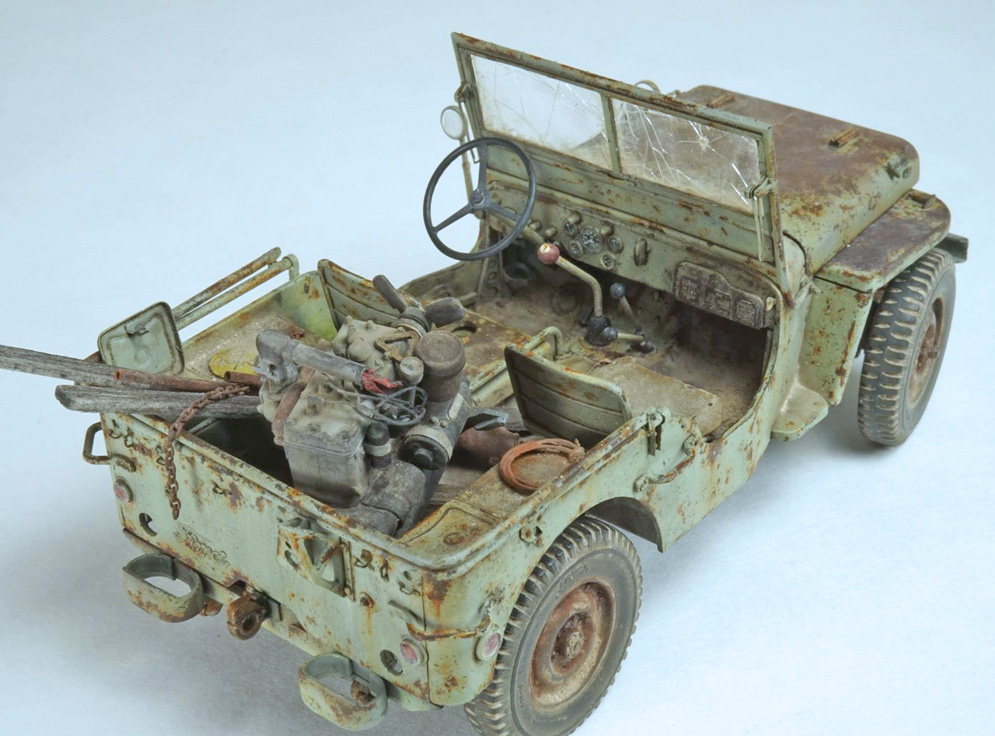
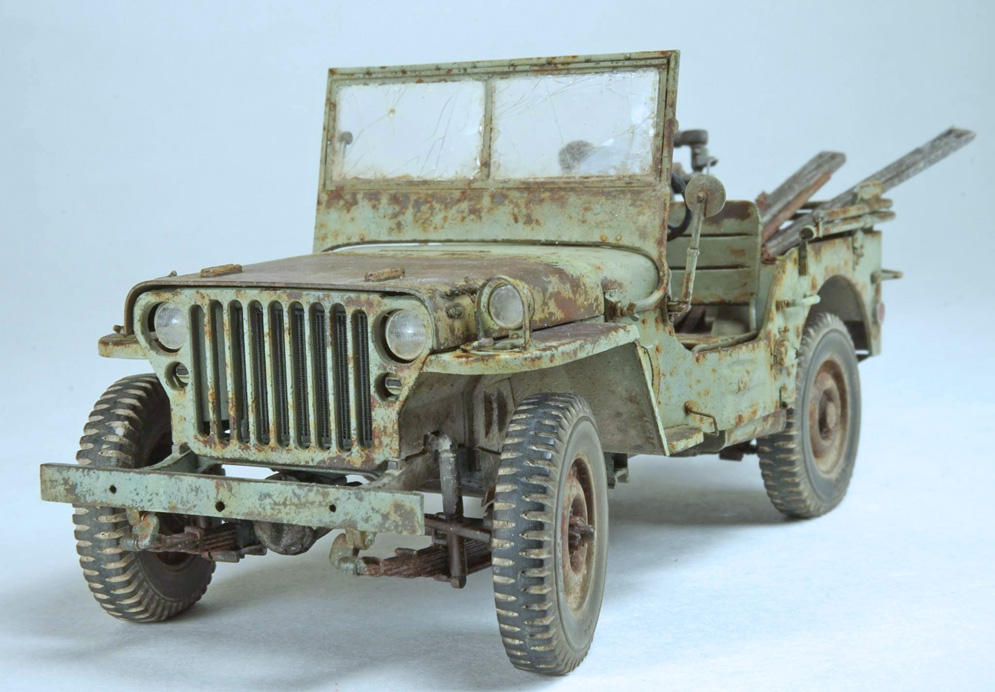
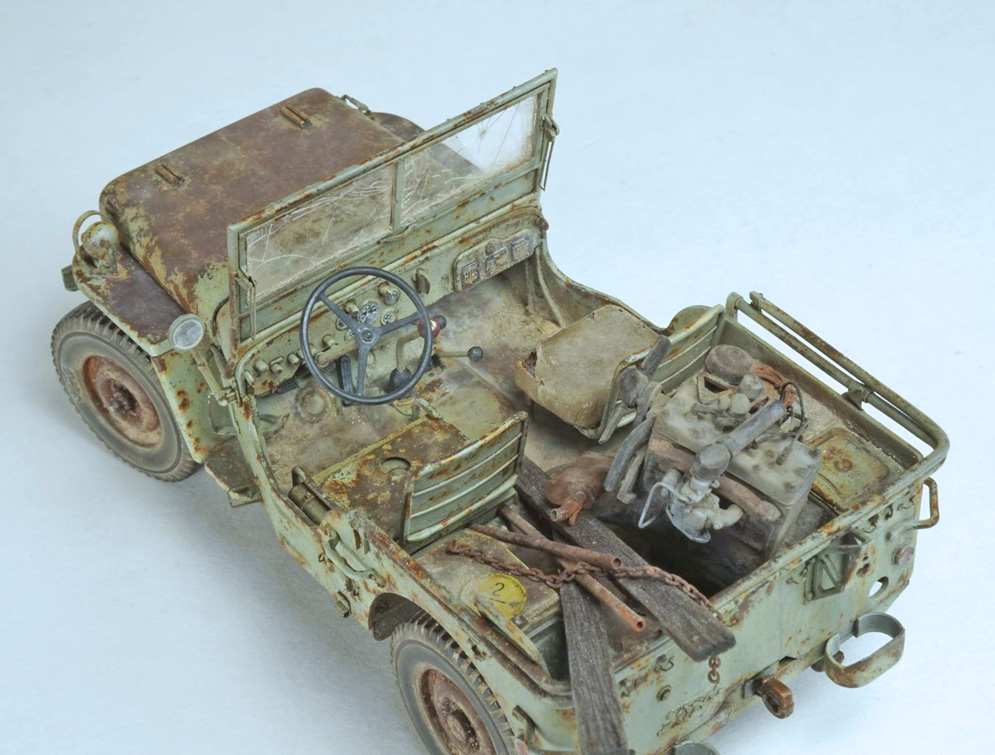
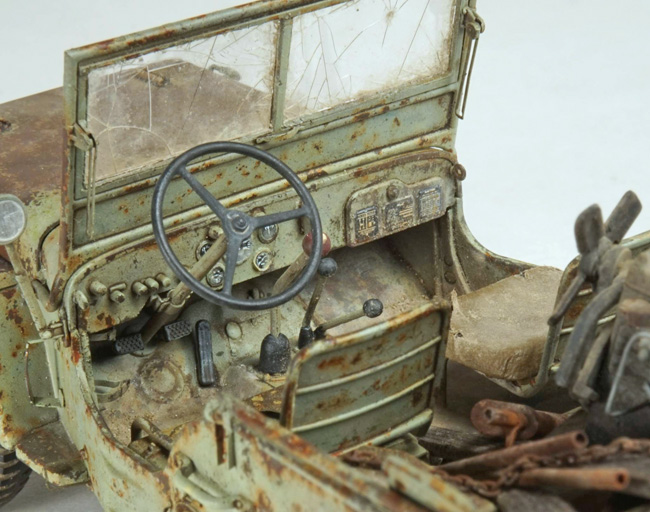
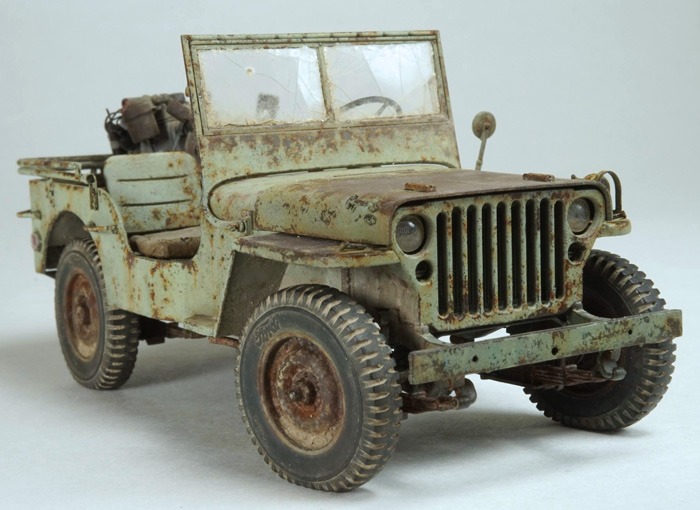
The ingenuity and resourcefulness of modellers never ceases to amaze me and once again Luc P does his stuff and creates a stunning effect with broken glass in the windscreen of his Jeep. I love the effect he’s achieved here and now he shows you how to do it too. :)

Just look at the photo above and you’ll see what I mean….

the great thing is that you can use this technique, whatever your area of interest, especially on larger scale models.

Over to you Luc…


Various break patterns can be obtained in the glass. As glass can be sharp and small shards may be produced when breaking, care is required, so use eye protection and use this technique at your own risk!

The glass can be bought inexpensively from eBay – search for microscope slide cover glass. Or scientific supply store.


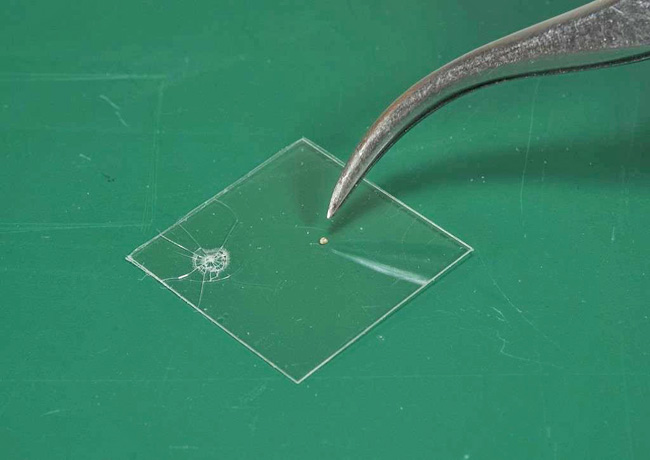
The glass can then be broken in many ways – to get a circular pattern, I place a grain of sand under the glass and press down with a covered finger (tweezer shown to identify sand, not for pressing down).

Question: Which side of the tape should be up or down when you break the glass?
Answer: I did tape side down so the glass can break freely. It is good to have a hard surface to break on.


I cut out the glass by tracing around the edge with a sharp blade.


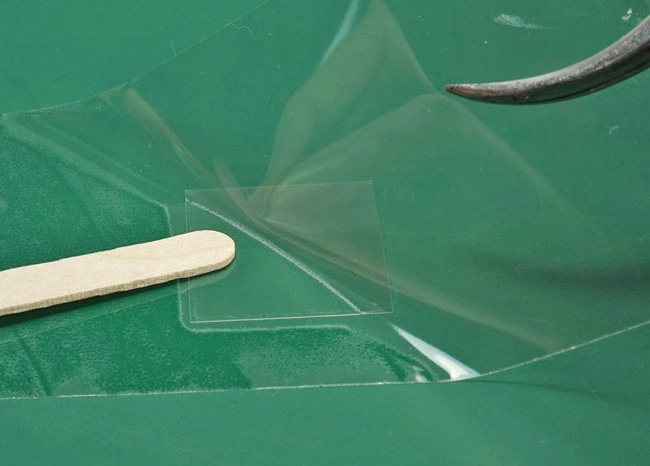
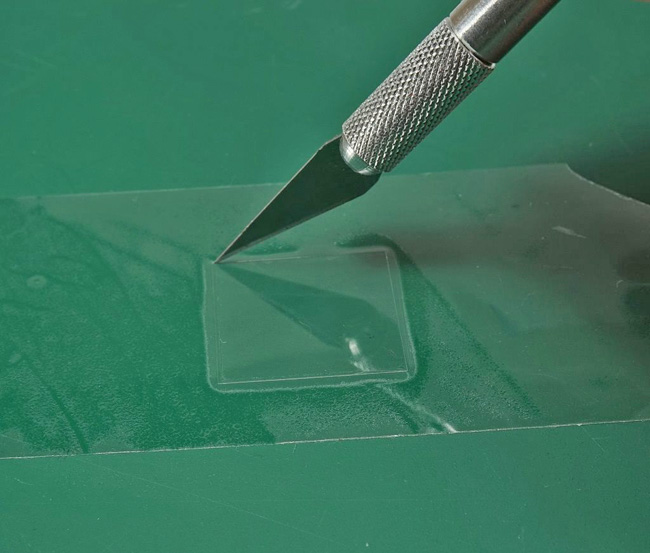
I place the glass on a flat surface, and then carefully lay down a piece of clear packing tape over the glass, starting at one corner and working across the glass to avoid air bubbles under the tape.

TIP: Spray few Windex on glass as agent before you apply packing tape will help you avoid air bubbles.

Question: Hello Luc in your glass you use the tape only on one side or both sides?
Answer: Tape is applied only to one side. This allows the glass to break more ‘freely’ on the other side. Display with the non-taped side facing toward the viewer. Also watch out for small shards of glass that can fall off the tape!

Question: Thanks Luc. Would not it be better if you covered both sides with tape? That also gives some stability.
Answer: I haven’t tried with two sides taped. There is enough stability with the one side taped for most modelling applications, but worth a try to see how it goes.


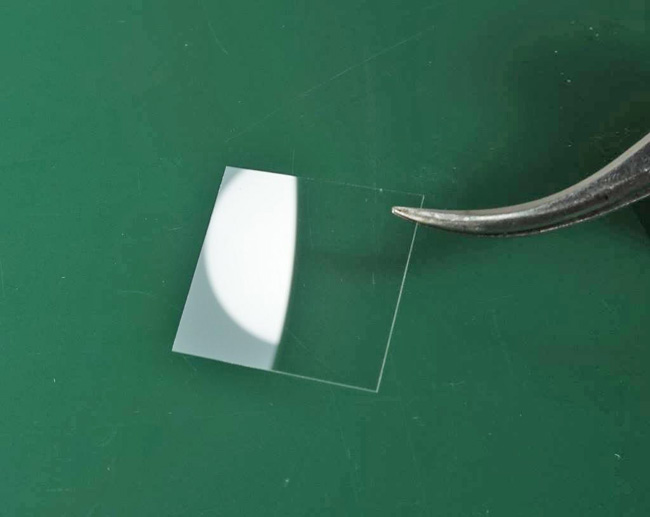
I use microscope slide cover glass which is very thin (0.14 mm) and realistic for scale models. The glass can be cut to size using a diamond tip scriber, but here I am using the full piece. I use tweezers or gloves when handling the glass to avoid fingerprints and dust.


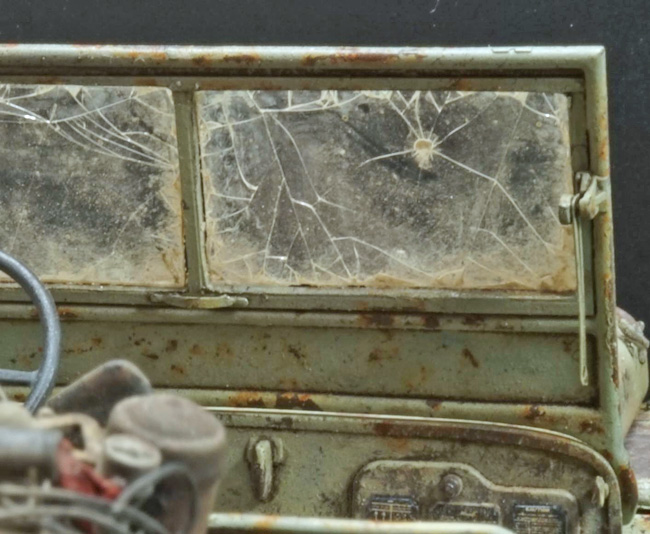
This is how I made a realistic broken glass pane for scale model windows. It is only suitable for applications with flat glass such as older vehicles and building windows.

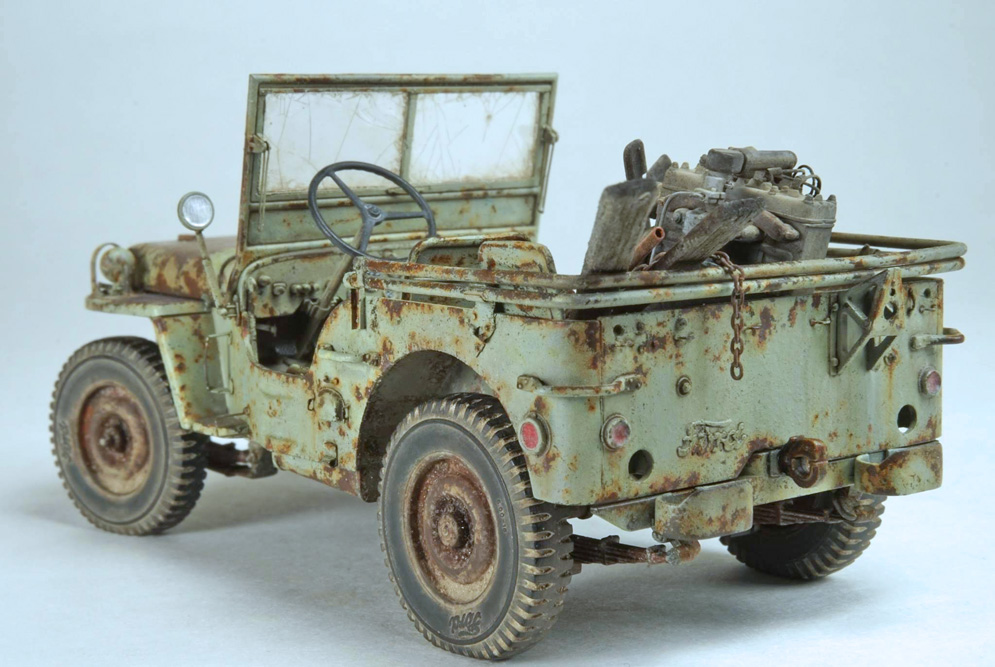
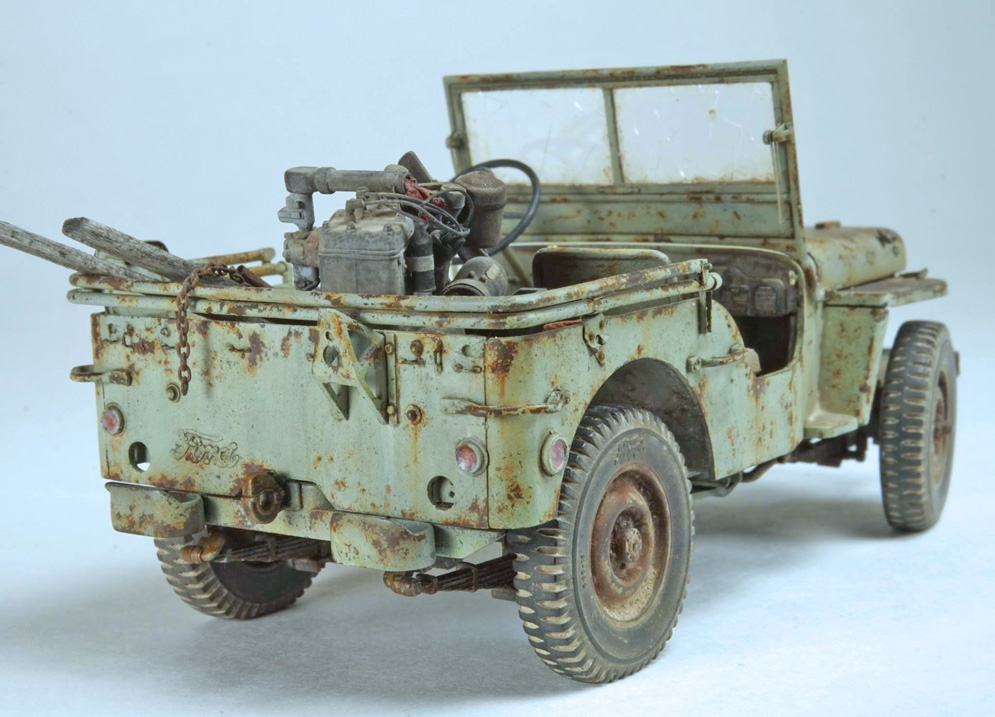
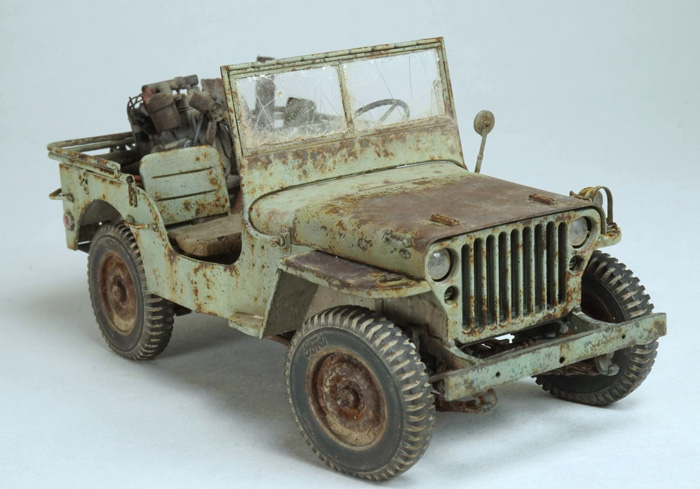
Here are a few more photos of my completed model so that you can see the full effect of adding this feature to your models.

Good luck!
Luc Po.

Gallery

Primary Sidebar

LOGIN/LOGOUT

Lost your Password?


modelconstruction
techniques-landing

Painting Techniques

Weathering Techniques


Model Construction Techniques

  • A BEGINNER’S TUTORIAL – How to Build a 1:35 AFV Kit
  • ADDING DETAIL & SUPER DETAILING
    • Adding cast texture to turrets
    • Advantages of adding Photo Etch to your Armour kits – Video Demo
    • Aerial wires – creating realistic aerial wires
    • Annealing PE belts to soften and bend to shape – VIDEO DEMOS
    • Converting AIM-9 to AAM-3 of JASDF
    • FOD guards for jet aircraft intakes – make your own! – 7 VIDEO DEMOS
    • Making corrugated iron – Video Demo
    • Making a model tree
    • Making jet aircraft mirrors for canopies
    • Making jet landing gear retraction locks
    • Making oxygen hoses for aircraft cockpits – VIDEO DEMO
    • Making sandbags
    • Metal foil for seat belts and harness
    • Metal foil to detail undercarriage and stores
    • Mini Spares Box – do you have one?
    • Navigation lights – making wing tip navigation lights
    • Pre-painted Photo Etch (PE) Brass in cockpits
    • Quinta detail sets – how to add the F-14 detail set – VIDEO DEMO
    • Ship rigging
    • Spoked wheels for WWI Bi-planes
    • Spoked wheels – Re-spoking wheels on motorcycles
    • Stretched sprue for rigging, aerials and lots of uses! – VIDEO DEMO
    • Turret periscope lenses on AFVs – VIDEO DEMOS
  • ADDING IMPROVED PARTS
    • Adding resin parts, getting the fit right
    • How to use AMMO Anti-Slip Paste – VIDEO DEMO
    • Assembling and Burnishing Friul Tracks
    • Construction of a 1:700th scale Photo Etch catapult
    • Creating ship masts in brass – VIDEO DEMO
    • Eduard Superfabric seat belts (HGW) and how to use them – VIDEO DEMO
    • HGW Micro Textile Seatbelts
    • Hinges
    • Making curved metal parts – VIDEO DEMO
    • Making one-off new components
    • Type conversions
    • Vac-form canopies
    • Vacuum forming your own components
    • Working with Fruil Modelisimo metal tracks – VIDEO DEMOS
  • CANOPIES
    • Attaching clear parts
    • Broken glass effects
    • Dipping canopies and clear parts to improve clarity
    • Epoxy lights – how to make them – VIDEO DEMO
    • Polishing canopies
    • Polishing canopies using UMP 4-Part system – VIDEO DEMO
    • Removing mould seam lines from canopies – 4 VIDEO DEMOS
    • Seamless front windscreens on aircraft – 3 VIDEO DEMOS
    • Wing tip navigation and landing light covers – VIDEO DEMOS
  • CLAMPING & FIXING PARTS
    • Making individual track links
    • Model Clamp to hold your model
    • Mini pegs for holding small parts – VIDEO DEMO
  • CUTTING TOOLS, OTHER USEFUL TOOLS and GETTING UNDERWAY
    • Starting out on your first armour project
    • The DSPIAE MT-C Stepless Adjustment Circular Cutter
    • Gyro Cut swivel head cutting tool – VIDEO DEMO
    • Infini Easy cutting mat Type B – VIDEO DEMO
    • Knives, what Geoff C uses
    • Lighting your workbench
    • Magnetic Handle 60 by RP Toolz
    • Mini Long Nose Pliers – VIDEO DEMO
    • Mini Needle Files – VIDEO DEMO
    • Revell Precision Scraper – How to use it
    • Side cutters, important choices and decisions – VIDEO DEMO
    • Simple ideas for parts holders – VIDEO DEMO
    • Tweezers – great value set from Pixnor – VIDEO DEMO
    • Using the Flex-I-File and Touch and Flow applicator
    • Using a razor saw – VIDEO DEMO
  • DRILLS AND DRILLING
    • Drilling out gun ports on aircraft – VIDEO DEMO
    • Pin vice drills – using the Humbrol Pin Vice Drill – VIDEO DEMO
  • FILLER
    • Filling seams with Mr Surfacer
    • Milliput White as filler
    • Using PVA Glue as a filler
  • GLUES & GLUING
    • How To Use AMMO Cyanoacrylate Glues – HD VIDEO
    • Applying cyano (superglue) with an applicator with Andy Brown – HD VIDEO DEMO
    • Attaching clear parts – HD VIDEO DEMO
    • Getting started on a new project – glues, tools and approach with Andy Burton
    • Glues the choices and how to use them – 7 VIDEO DEMOS
    • Gluing deck sections using Pin Flow Applicator – VIDEO DEMO
    • Homemade cyano applicator
    • Pin Point Bottle Kit – VIDEO DEMO
    • Ultimate Glue Bottle Holder (for Tamiya glue) – VIDEO DEMO
    • Using liquid poly to join parts and avoid filling – VIDEO DEMO
    • Using polystyrene cement – HD VIDEO DEMO
  • IDF MODEL PROJECTS
    • Common errors with IDF models
  • KIT INSTRUCTIONS
    • Kit instructions – an introduction and tips
    • Making a plan
  • LIGHT and SOUND PROJECTS and RESOURCES
    • Adding light and sound to Revell 1.48 Bristol Beaufighter – VIDEO DEMO
    • Revell 1:32 F4U1A Corsair – VIDEO DEMO
    • Tamiya 1:32 De Havilland Mosquito FB.VI
    • Magic Scale Modelling Now
    • SmartFX Now
  • MAGNETS
    • Preventing aircraft with tricycle undercarriage from tail sitting – VIDEO DEMO
  • PHOTO ETCH
    • Advantages of adding Photo Etch to your Armour kits – VIDEO DEMO
    • Annealing PE belts to soften and bend to shape – VIDEO DEMOS
    • Pre-painted Photo Etch (PE) Brass in cockpits
    • Working with Photo Etch, getting started – VIDEO DEMO
  • PLANNING
    • Deciding on and planning your next project
  • PLANS
    • Questions, Thoughts and Resources for using plans
  • REFERENCE MATERIAL
    • Choosing and using reference material – Aircraft
    • Operation Northern Watch 1994-95 F-4G, EF-111A, Harrier GR5
  • REPAIRING MISTAKES, REINSTATING & CREATING SURFACE DETAIL
    • AMMO Scribing Tape, Straight Edge – How to use it – VIDEO DEMO
    • Filling seams with Mr Surfacer
    • Getting rid of mould ejector pin and sink marks – VIDEO DEMO
    • Hiding join lines inside engine cowls – VIDEO DEMOS
    • Improving overdone moulded rivet detail
    • Join lines: filling and getting rid of join lines – VIDEO DEMO
    • Mini chisel set to remove kit detail – VIDEO DEMOS
    • Oil Canning, how to create stressed metal effects – technique
    • How to use Plasticator Thin & Thick by AMMO – VIDEO DEMO
    • Removing ghost seam line joins – Micromesh – 2 VIDEO DEMOS
    • Repairing broken aircraft tail wheels – VIDEO DEMO
    • Riveting aircraft – VIDEO DEMOS
    • Scribing and re-scribing panel lines – VIDEO DEMO
    • Stressed metal effects on the Avro Lancaster
    • Stressed metal effects on panels – VIDEO DEMO
    • Using Dymo tape as a guide edge – VIDEO DEMO
  • RESIN
    • How to Use the AMMO Hot Dog Hot Air Gun – VIDEO DEMO
    • Removing the casting block from resin parts – VIDEO DEMO
    • ‘Resin Rookie’ – building your first resin armour kit
    • Thinking of trying a resin kit or accessory?
  • RIGGING
    • How to rig a WWI Albatros Bi-plane in 1.32 scale – 20 VIDEO DEMOS
    • How to rig a WWI Biplane with Dave Coward – preview
    • How To Use AMMO Rigging – VIDEO DEMOS
    • Ship Rigging
    • Stretched sprue for rigging, aerials and lots of uses! – VIDEO DEMO
  • RIVETING
    • Adding rivets using a pin vice drill – VIDEO DEMO
    • HGW Positive Rivets – how to apply them
    • Improving overdone moulded rivet detail
    • Revell Rivet Maker – 2 VIDEO DEMOS
    • Riveting aircraft – 2 VIDEO DEMOS
    • Rosie The Riveter – how to use this excellent tool – VIDEO DEMO
    • Using Dymo tape as a guide edge – VIDEO DEMO
    • Using a pin vice drill to enhance rivet detail = VIDEO DEMO
  • RUBBER-VINYL TYRES
    • Removing mould seam lines – VIDEO DEMO
    • Finishing Off – VIDEO DEMO
  • SAFETY
    • Basic safety equipment – introduction
    • IPMS(UK) Safety Advice for Modellers 2024
  • SANDING & POLISHING
    • DSPIAE Reciprocating Sander – product review – VIDEO DEMO
    • Fine-sanding alternative: the coffee filter ‘onion’
    • How to use Ultimate Modellers sanders, buffers and Skinny Sticks – VIDEO DEMO
    • Micromesh to get rid of paint demarcation lines
    • Micromesh Polishing Cloths – VIDEO DEMOS
    • Polishing canopies – VIDEO DEMO
    • Tools to get you started – sander and buffers
    • Ultimate Customisable Sanding Sheets – VIDEO DEMO
    • Using Albion Alloys plastic sanding needles – VIDEO DEMO
    • Using Micromesh to polish the paint surface – VIDEO DEMO
  • SCRATCHBUILDING
    • Scratchbuilding – getting started
    • Scratchbuilding an aero engine
  • SELECTING A KIT
    • Selecting a Kit
    • 1:48 Armour
  • SOLDERING
    • Soldering – how to do it
    • Soldering for scale modelling – an introduction
  • STORING PARTS DURING CONSTRUCTION
    • Plastic containers
  • TROUBLE-SHOOTING
    • Adding nose weight to stop tail-sitters
    • Stripping a Painted Model
  • OTHER
    • Fitting painted wheels, avoiding damage to painted areas

Disclaimer

While the hints, tips and advice in Scale Modelling Now magazine have worked for us, no guarantee is given that they will always work, that they are applicable to you or that there may be Health & Safety issues if you do follow the advice. It’s very much up to you to decide if you want to try them out. All relevant safety regulations regarding knives, adhesives, solvents, paints, etc. are implied.

Copyright © 2025 · Scale Modelling Now · Online Scale Modelling Magazine · Scale Modelling Techniques and Tips · Privacy Policy