• Skip to primary navigation
  • Skip to main content
  • Skip to primary sidebar

Scale Modelling Now

Scale Modelling Techniques

  • HOME
  • CONTENTS
    • What’s New
    • Techniques Bank
    • Aircraft
    • Armour
    • Classic Kit Builds
    • Civilian Aircraft Builds
    • Vehicles
    • Sci-Fi, Fantasy, Space
    • Maritime
    • Figures
    • Gift Certificate
    • Book Reviews
    • Dioramas
    • Modelling Workshops
    • Podcasts
  • WHAT WE OFFER
  • FREE SAMPLES
  • EVENTS
    • EVENTS
    • NEWS
  • ABOUT
    • CONTACT
    • ABOUT US
    • TRADERS
  • LOGIN
  • More results…

    Generic filters
    Exact matches only
    Search in title
    Search in content
    Search in excerpt

Getting rid of mould ejector pin and sink marks

December 21, 2017 By Francis Porter

Repairing, reinstating and creating surface detail

with Geoff Coughlin
Target modelling project for this demonstration: Airfix 1:48 North American P-51D Mustang

The problem

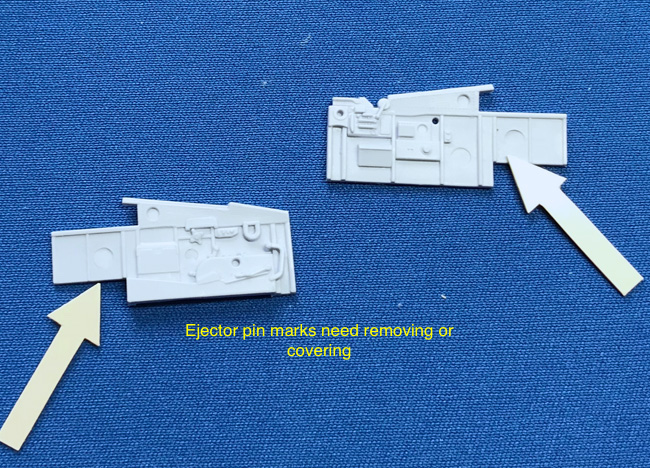
Sometimes during the ejection moulding process when parts are ejected from the mould you can get imperfections in the plastic parts that you may need to eliminate and improve because if you don’t you can get some unsightly effects that can spoil the eventual look of that part of your finished model.

Question time

The first question to ask yourself is – are you bothered? Maybe not and if so press on, although, as your skills and experience develop you may become frustrated that you didn’t attend to these things at the time as the finished look of your model leaves you disappointed in some way. I just think that preparation is everything – take care of it and you give yourself a fair chance of being pleased with your completed model. Try and cut corners, ignore what’s in front of you and get ready for disappointment! Taking a bit of time to take care of these modelling issues at the time is all part of the preparation process.

The second question to ask is ‘will the defects be seen on the finished model?’ And, if the answer to that is ‘No’, then you might just get away with not doing anything about them at all, saving time and unnecessary effort. Try some careful dry-fitting of the parts if you can to see if the (annoying) marks will be visible and decide after that.

The final consideration then is when you believe the marks will be visible and you want to do something to eliminate or mask them and that’s what this entry in your SMN Techniques Bank is going to address.

2 main choices

Ok, so you decide you want to get rid of the ejector pin marks and/or sink marks. The basic choices are to either fill, sand and buff the affected area or find a way to mask the defect so that it won’t show on your completed model.


Filling

This is my least preferred method, mainly because the ejector pin marks are often in difficult-to-get-at areas and trying to fill and sand (especially) is likely to damage the surrounding detail. This approach does work well though on flat, exposed areas. Filling does take more time to finish than masking that follows below.
The filling remedy I use (there are other options as ever) is to mix some cyano glue with some talcum powder (60-40 glue to talc) and use that to fill the defect or affected area (see your SMN TB – Glues and Gluing for how to do this). Leave to dry thoroughly overnight and sand and buff to restore the nice flat surface.

Masking the defect

I like this approach a lot and it usually works very well. The main advantages are that it’s quick, clean and easy to achieve making it one of my ‘go-to’ techniques when I want to make good quick progress with my project. The result is very effective and is near impossible to spot on your finished model :)


Materials you need for this fix:

• small sheet of metal foil – e.g. from a wine bottle top or an aluminium fizzy drink can. You can of course use thin plasticard too instead of metal foil (I would still fix it in place using cyano as shown in the demo to avoid any risk of distortion if you use too much liquid poly to attach the mask).
• scalpel – to cut your mask from the foil and trim any excess away
• Tamiya masking tape – to make a template for your metal foil plug (mask)
• cyano glue – to fix your mask in place
• cocktail stick – to press your tape mask into the corners/edges of affected area. Also to spread your glue evenly across area where your mask is to be attached.


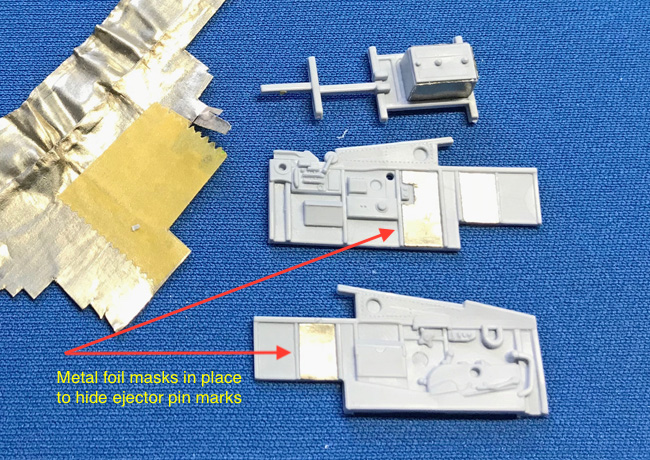
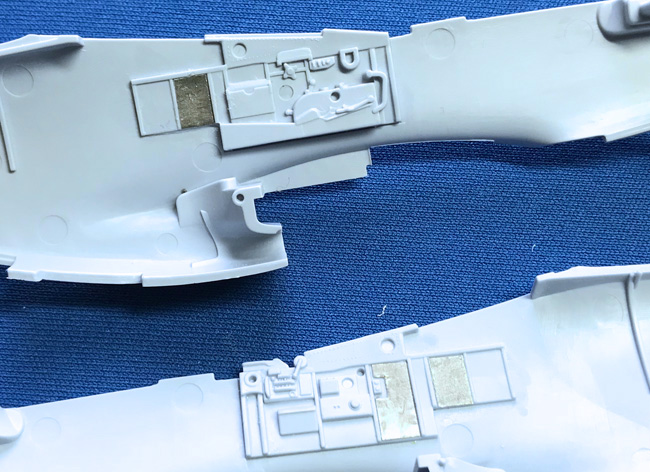
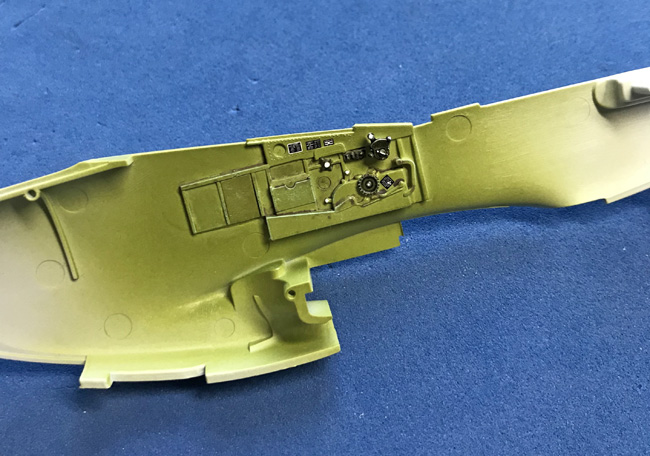
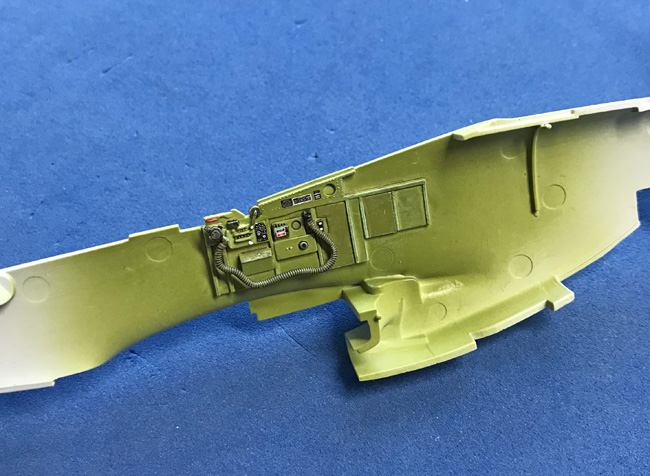
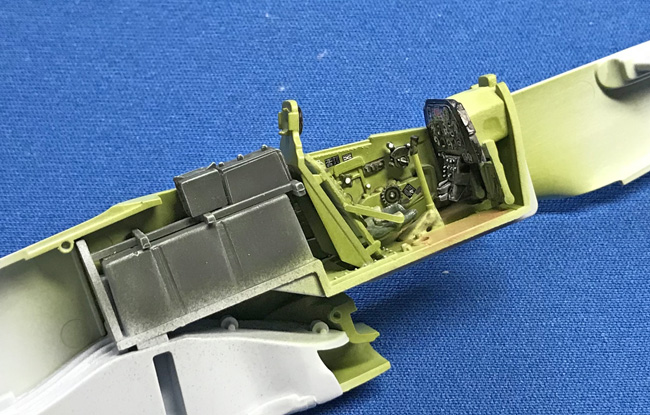
You can see the masks in place here and they neatly hide the defects and so you’re ready to paint. In this demo I have deliberately not primed the treated cockpit as I want to create some variation with the new panels looking slightly different to the others adding contrast to the finished cockpit. Just a bit of artistic licence really and along with a wash using Ammo of Mig Jimenez Dark Panel Line Wash, some dry-brushing and detail painting the cockpit looks pretty good I think.

What you see here is a cockpit 100% out of the box – still some parts to go in from the Airfix kit but what you see here comes totally from the kit.

Final thoughts

I just happened to be building this new-tool Airfix kit when I spotted the problem and so it’s given me a chance to demonstrate the techniques for you. You’ll notice that in fact, the cockpit side wall ejector pin marks probably wouldn’t have been visible anyway and so in truth the second question asked at the head of this piece would apply.
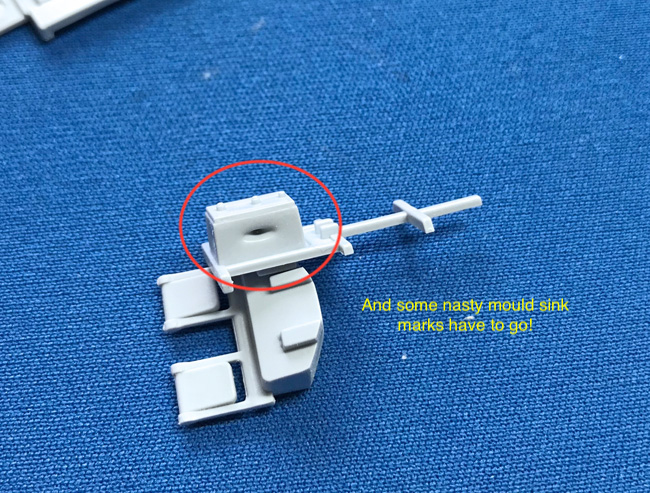
The sink marks are another story – they were disappointing on a new-tool kit from a main manufacturer although, as I hope you’ll agree, the fix is quick and easy.

Good luck!
Geoff C.

Primary Sidebar

LOGIN/LOGOUT

Lost your Password?


modelconstruction
techniques-landing

Painting Techniques

Weathering Techniques


Model Construction Techniques

  • A BEGINNER’S TUTORIAL – How to Build a 1:35 AFV Kit
  • ADDING DETAIL & SUPER DETAILING
    • Adding cast texture to turrets
    • Advantages of adding Photo Etch to your Armour kits – Video Demo
    • Aerial wires – creating realistic aerial wires
    • Annealing PE belts to soften and bend to shape – VIDEO DEMOS
    • Converting AIM-9 to AAM-3 of JASDF
    • FOD guards for jet aircraft intakes – make your own! – 7 VIDEO DEMOS
    • Making corrugated iron – Video Demo
    • Making a model tree
    • Making jet aircraft mirrors for canopies
    • Making jet landing gear retraction locks
    • Making oxygen hoses for aircraft cockpits – VIDEO DEMO
    • Making sandbags
    • Metal foil for seat belts and harness
    • Metal foil to detail undercarriage and stores
    • Mini Spares Box – do you have one?
    • Navigation lights – making wing tip navigation lights
    • Pre-painted Photo Etch (PE) Brass in cockpits
    • Quinta detail sets – how to add the F-14 detail set – VIDEO DEMO
    • Ship rigging
    • Spoked wheels for WWI Bi-planes
    • Spoked wheels – Re-spoking wheels on motorcycles
    • Stretched sprue for rigging, aerials and lots of uses! – VIDEO DEMO
    • Turret periscope lenses on AFVs – VIDEO DEMOS
  • ADDING IMPROVED PARTS
    • Adding resin parts, getting the fit right
    • How to use AMMO Anti-Slip Paste – VIDEO DEMO
    • Assembling and Burnishing Friul Tracks
    • Construction of a 1:700th scale Photo Etch catapult
    • Creating ship masts in brass – VIDEO DEMO
    • Eduard Superfabric seat belts (HGW) and how to use them – VIDEO DEMO
    • HGW Micro Textile Seatbelts
    • Hinges
    • Making curved metal parts – VIDEO DEMO
    • Making one-off new components
    • Type conversions
    • Vac-form canopies
    • Vacuum forming your own components
    • Working with Fruil Modelisimo metal tracks – VIDEO DEMOS
  • CANOPIES
    • Attaching clear parts
    • Broken glass effects
    • Dipping canopies and clear parts to improve clarity
    • Epoxy lights – how to make them – VIDEO DEMO
    • Polishing canopies
    • Polishing canopies using UMP 4-Part system – VIDEO DEMO
    • Removing mould seam lines from canopies – 4 VIDEO DEMOS
    • Seamless front windscreens on aircraft – 3 VIDEO DEMOS
    • Wing tip navigation and landing light covers – VIDEO DEMOS
  • CLAMPING & FIXING PARTS
    • Making individual track links
    • Model Clamp to hold your model
    • Mini pegs for holding small parts – VIDEO DEMO
  • CUTTING TOOLS, OTHER USEFUL TOOLS and GETTING UNDERWAY
    • Starting out on your first armour project
    • The DSPIAE MT-C Stepless Adjustment Circular Cutter
    • Gyro Cut swivel head cutting tool – VIDEO DEMO
    • Infini Easy cutting mat Type B – VIDEO DEMO
    • Knives, what Geoff C uses
    • Lighting your workbench
    • Magnetic Handle 60 by RP Toolz
    • Mini Long Nose Pliers – VIDEO DEMO
    • Mini Needle Files – VIDEO DEMO
    • Revell Precision Scraper – How to use it
    • Side cutters, important choices and decisions – VIDEO DEMO
    • Simple ideas for parts holders – VIDEO DEMO
    • Tweezers – great value set from Pixnor – VIDEO DEMO
    • Using the Flex-I-File and Touch and Flow applicator
    • Using a razor saw – VIDEO DEMO
  • DRILLS AND DRILLING
    • Drilling out gun ports on aircraft – VIDEO DEMO
    • Pin vice drills – using the Humbrol Pin Vice Drill – VIDEO DEMO
  • FILLER
    • Filling seams with Mr Surfacer
    • Milliput White as filler
    • Using PVA Glue as a filler
  • GLUES & GLUING
    • How To Use AMMO Cyanoacrylate Glues – HD VIDEO
    • Applying cyano (superglue) with an applicator with Andy Brown – HD VIDEO DEMO
    • Attaching clear parts – HD VIDEO DEMO
    • Getting started on a new project – glues, tools and approach with Andy Burton
    • Glues the choices and how to use them – 7 VIDEO DEMOS
    • Gluing deck sections using Pin Flow Applicator – VIDEO DEMO
    • Homemade cyano applicator
    • Pin Point Bottle Kit – VIDEO DEMO
    • Ultimate Glue Bottle Holder (for Tamiya glue) – VIDEO DEMO
    • Using liquid poly to join parts and avoid filling – VIDEO DEMO
    • Using polystyrene cement – HD VIDEO DEMO
  • IDF MODEL PROJECTS
    • Common errors with IDF models
  • KIT INSTRUCTIONS
    • Kit instructions – an introduction and tips
    • Making a plan
  • LIGHT and SOUND PROJECTS and RESOURCES
    • Adding light and sound to Revell 1.48 Bristol Beaufighter – VIDEO DEMO
    • Revell 1:32 F4U1A Corsair – VIDEO DEMO
    • Tamiya 1:32 De Havilland Mosquito FB.VI
    • Magic Scale Modelling Now
    • SmartFX Now
  • MAGNETS
    • Preventing aircraft with tricycle undercarriage from tail sitting – VIDEO DEMO
  • PHOTO ETCH
    • Advantages of adding Photo Etch to your Armour kits – VIDEO DEMO
    • Annealing PE belts to soften and bend to shape – VIDEO DEMOS
    • Pre-painted Photo Etch (PE) Brass in cockpits
    • Working with Photo Etch, getting started – VIDEO DEMO
  • PLANNING
    • Deciding on and planning your next project
  • PLANS
    • Questions, Thoughts and Resources for using plans
  • REFERENCE MATERIAL
    • Choosing and using reference material – Aircraft
    • Operation Northern Watch 1994-95 F-4G, EF-111A, Harrier GR5
  • REPAIRING MISTAKES, REINSTATING & CREATING SURFACE DETAIL
    • AMMO Scribing Tape, Straight Edge – How to use it – VIDEO DEMO
    • Filling seams with Mr Surfacer
    • Getting rid of mould ejector pin and sink marks – VIDEO DEMO
    • Hiding join lines inside engine cowls – VIDEO DEMOS
    • Improving overdone moulded rivet detail
    • Join lines: filling and getting rid of join lines – VIDEO DEMO
    • Mini chisel set to remove kit detail – VIDEO DEMOS
    • Oil Canning, how to create stressed metal effects – technique
    • How to use Plasticator Thin & Thick by AMMO – VIDEO DEMO
    • Removing ghost seam line joins – Micromesh – 2 VIDEO DEMOS
    • Repairing broken aircraft tail wheels – VIDEO DEMO
    • Riveting aircraft – VIDEO DEMOS
    • Scribing and re-scribing panel lines – VIDEO DEMO
    • Stressed metal effects on the Avro Lancaster
    • Stressed metal effects on panels – VIDEO DEMO
    • Using Dymo tape as a guide edge – VIDEO DEMO
  • RESIN
    • How to Use the AMMO Hot Dog Hot Air Gun – VIDEO DEMO
    • Removing the casting block from resin parts – VIDEO DEMO
    • ‘Resin Rookie’ – building your first resin armour kit
    • Thinking of trying a resin kit or accessory?
  • RIGGING
    • How to rig a WWI Albatros Bi-plane in 1.32 scale – 20 VIDEO DEMOS
    • How to rig a WWI Biplane with Dave Coward – preview
    • How To Use AMMO Rigging – VIDEO DEMOS
    • Ship Rigging
    • Stretched sprue for rigging, aerials and lots of uses! – VIDEO DEMO
  • RIVETING
    • Adding rivets using a pin vice drill – VIDEO DEMO
    • HGW Positive Rivets – how to apply them
    • Improving overdone moulded rivet detail
    • Revell Rivet Maker – 2 VIDEO DEMOS
    • Riveting aircraft – 2 VIDEO DEMOS
    • Rosie The Riveter – how to use this excellent tool – VIDEO DEMO
    • Using Dymo tape as a guide edge – VIDEO DEMO
    • Using a pin vice drill to enhance rivet detail = VIDEO DEMO
  • RUBBER-VINYL TYRES
    • Removing mould seam lines – VIDEO DEMO
    • Finishing Off – VIDEO DEMO
  • SAFETY
    • Basic safety equipment – introduction
    • IPMS(UK) Safety Advice for Modellers 2024
  • SANDING & POLISHING
    • DSPIAE Reciprocating Sander – product review – VIDEO DEMO
    • Fine-sanding alternative: the coffee filter ‘onion’
    • How to use Ultimate Modellers sanders, buffers and Skinny Sticks – VIDEO DEMO
    • Micromesh to get rid of paint demarcation lines
    • Micromesh Polishing Cloths – VIDEO DEMOS
    • Polishing canopies – VIDEO DEMO
    • Tools to get you started – sander and buffers
    • Ultimate Customisable Sanding Sheets – VIDEO DEMO
    • Using Albion Alloys plastic sanding needles – VIDEO DEMO
    • Using Micromesh to polish the paint surface – VIDEO DEMO
  • SCRATCHBUILDING
    • Scratchbuilding – getting started
    • Scratchbuilding an aero engine
  • SELECTING A KIT
    • Selecting a Kit
    • 1:48 Armour
  • SOLDERING
    • Soldering – how to do it
    • Soldering for scale modelling – an introduction
  • STORING PARTS DURING CONSTRUCTION
    • Plastic containers
  • TROUBLE-SHOOTING
    • Adding nose weight to stop tail-sitters
    • Stripping a Painted Model
  • OTHER
    • Fitting painted wheels, avoiding damage to painted areas

Disclaimer

While the hints, tips and advice in Scale Modelling Now magazine have worked for us, no guarantee is given that they will always work, that they are applicable to you or that there may be Health & Safety issues if you do follow the advice. It’s very much up to you to decide if you want to try them out. All relevant safety regulations regarding knives, adhesives, solvents, paints, etc. are implied.

Copyright © 2025 · Scale Modelling Now · Online Scale Modelling Magazine · Scale Modelling Techniques and Tips · Privacy Policy