• Skip to primary navigation
  • Skip to main content
  • Skip to primary sidebar

Scale Modelling Now

Scale Modelling Techniques

  • HOME
  • CONTENTS
    • What’s New
    • Techniques Bank
    • Aircraft
    • Armour
    • Classic Kit Builds
    • Civilian Aircraft Builds
    • Vehicles
    • Sci-Fi, Fantasy, Space
    • Maritime
    • Figures
    • Gift Certificate
    • Book Reviews
    • Dioramas
    • Modelling Workshops
    • Podcasts
  • WHAT WE OFFER
  • FREE SAMPLES
  • EVENTS
    • EVENTS
    • NEWS
  • ABOUT
    • CONTACT
    • ABOUT US
    • TRADERS
  • LOGIN
  • More results…

    Generic filters
    Exact matches only
    Search in title
    Search in content
    Search in excerpt

Annealing PE belts to soften and bend to shape

February 12, 2019 By Geoff Coughlin Leave a Comment

PE (Photo Etch)

with Geoff Coughlin

Target project: Wingnut Wings 1:32 Albatros D.V. This project is currently in Aircraft-Build Now and when finished will move to the Wingnut Wings (WW) pages in Aircraft-Finished Now. The build contains multiple HD video demos for taking a WW kit from start to finish and should help anyone who wants a steer on how to successfully complete one of these great kits :)

What’s the problem we are trying to solve here?

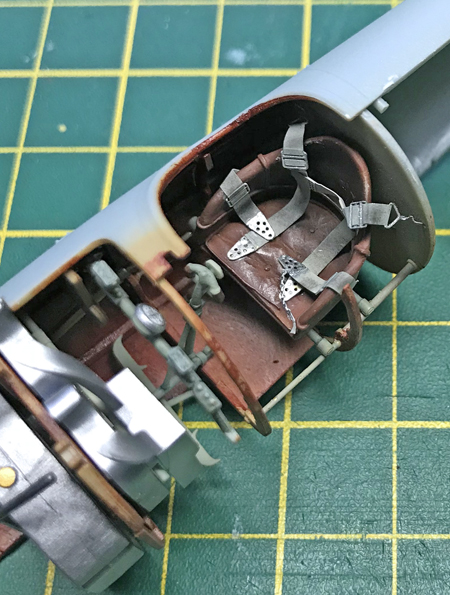
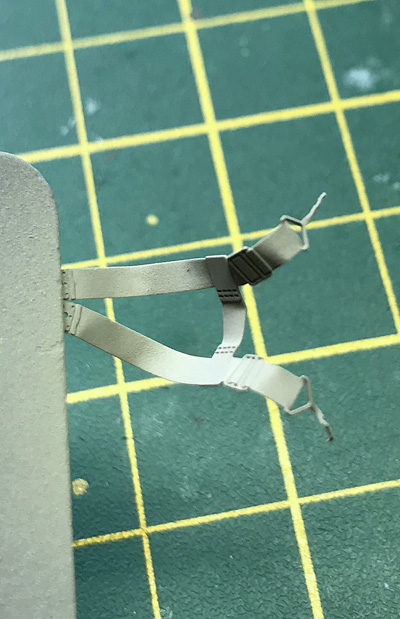
When working with some photo etch (PE) parts they can be stiff and hard to mould into shape. This is especially a problem when you are working in larger scales like 1:48 and above and fitting a seat harness to the pilot or crew seat for example. The belts can be very fiddly and stiff, making them hard to conform to the seat pan and backrest.

Warning!

We’re talking unpainted PE parts…
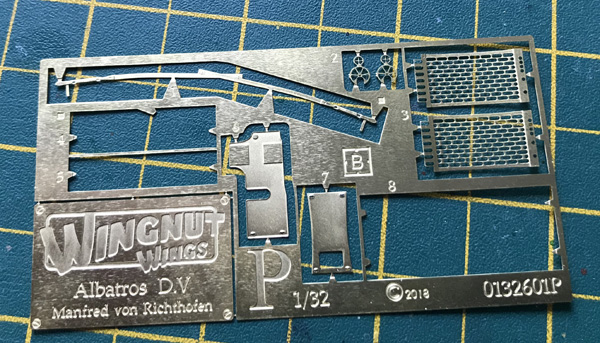
You can get pre-painted PE belts and others made of different fabrics and materials and what follows is NOT suitable for these materials. What we are looking at here is unpainted ‘bare’ PE parts, like the ones you see here supplied by Wingnut Wings in their Albatros D.V kit…

What can be done about it?

There’s a simple ‘fix’ and it involves a process known as annealing. What’s that I hear some of you say? Here’s a short definition from the Wikipedia pages:

Annealing, in metallurgy and materials science, is a heat treatment that alters the physical and sometimes chemical properties of a material to increase its ductility and reduce its hardness, making it more workable. It involves heating a material above its recrystallization temperature, maintaining a suitable temperature for a suitable amount of time, and then cooling.

So how does this work for modellers?

It’s very simple and straightforward – take a look at the videos below to see the stages.

In a nutshell, first you remove the PE part (belt) that you want to soften from it’s fret (frame with all the PE tarts on) using a sharp scalpel blade and cutting onto a hard surface such as a purpose made cutting mat.

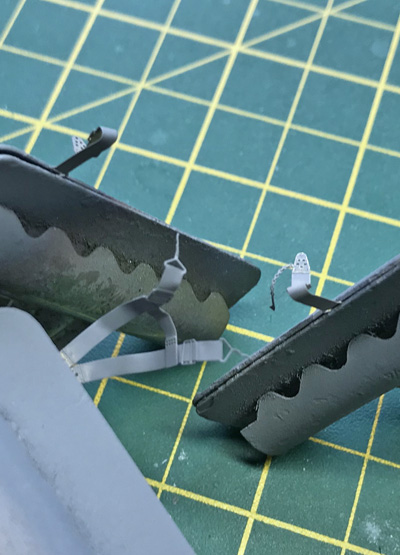
Then you heat your seat belts/harness over a candle flame while holding it with a pair of tweezers. After about 60 seconds you plunge the part into a tub of cold water for a few seconds and then it is cold enough to hold and is now much softer and much easier to bend into more realistic shapes. Importantly, you can mould the belts easily around a seat to represent a harness that is draped naturally over the contours over which it’s been placed.

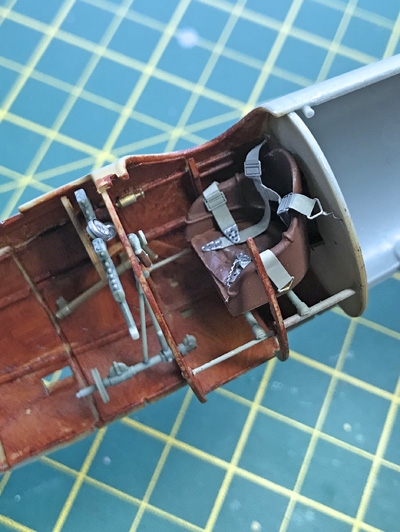
You then take your seat – in this instance the pilot’s seat for an Albatros D.V bi-plane and bend the shoulder straps and each lap belt to the location you want and remove the belts carefully and mount in clamps ready for painting.

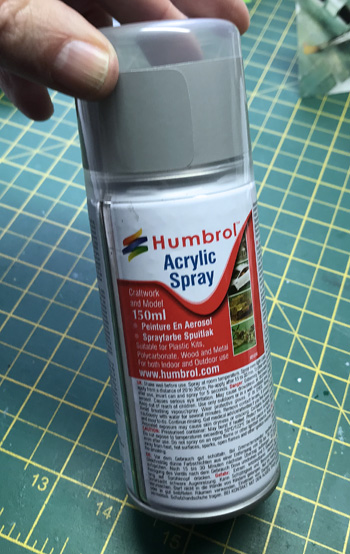
Prime your posed PE belts before painting – I usually use a few squirts of Humbrol grey acrylic primer from one of their rattle cans.

After painting just attach your belts with cyano and leave to dry thoroughly overnight. You can add some subtle weathering at this final stage using pastels and/or a thin wash to make the belts look more ‘used’ and not too bright and ‘new-looking’.

And that’s it. Good luck!

What follows are the 4 relevant videos from the series included in the full WW Albatros D.V build in SMN (see above for links).
Geoff C.


HD VIDEO DEMOS


Reader Interactions

Ask a question or add feedback:

You must be logged in to post a comment.

Primary Sidebar

LOGIN/LOGOUT

Lost your Password?


modelconstruction
techniques-landing

Painting Techniques

Weathering Techniques


Model Construction Techniques

  • A BEGINNER’S TUTORIAL – How to Build a 1:35 AFV Kit
  • ADDING DETAIL & SUPER DETAILING
    • Adding cast texture to turrets
    • Advantages of adding Photo Etch to your Armour kits – Video Demo
    • Aerial wires – creating realistic aerial wires
    • Annealing PE belts to soften and bend to shape – VIDEO DEMOS
    • Converting AIM-9 to AAM-3 of JASDF
    • FOD guards for jet aircraft intakes – make your own! – 7 VIDEO DEMOS
    • Making corrugated iron – Video Demo
    • Making a model tree
    • Making jet aircraft mirrors for canopies
    • Making jet landing gear retraction locks
    • Making oxygen hoses for aircraft cockpits – VIDEO DEMO
    • Making sandbags
    • Metal foil for seat belts and harness
    • Metal foil to detail undercarriage and stores
    • Mini Spares Box – do you have one?
    • Navigation lights – making wing tip navigation lights
    • Pre-painted Photo Etch (PE) Brass in cockpits
    • Quinta detail sets – how to add the F-14 detail set – VIDEO DEMO
    • Ship rigging
    • Spoked wheels for WWI Bi-planes
    • Spoked wheels – Re-spoking wheels on motorcycles
    • Stretched sprue for rigging, aerials and lots of uses! – VIDEO DEMO
    • Turret periscope lenses on AFVs – VIDEO DEMOS
  • ADDING IMPROVED PARTS
    • Adding resin parts, getting the fit right
    • How to use AMMO Anti-Slip Paste – VIDEO DEMO
    • Assembling and Burnishing Friul Tracks
    • Construction of a 1:700th scale Photo Etch catapult
    • Creating ship masts in brass – VIDEO DEMO
    • Eduard Superfabric seat belts (HGW) and how to use them – VIDEO DEMO
    • HGW Micro Textile Seatbelts
    • Hinges
    • Making curved metal parts – VIDEO DEMO
    • Making one-off new components
    • Type conversions
    • Vac-form canopies
    • Vacuum forming your own components
    • Working with Fruil Modelisimo metal tracks – VIDEO DEMOS
  • CANOPIES
    • Attaching clear parts
    • Broken glass effects
    • Dipping canopies and clear parts to improve clarity
    • Epoxy lights – how to make them – VIDEO DEMO
    • Polishing canopies
    • Polishing canopies using UMP 4-Part system – VIDEO DEMO
    • Removing mould seam lines from canopies – 4 VIDEO DEMOS
    • Seamless front windscreens on aircraft – 3 VIDEO DEMOS
    • Wing tip navigation and landing light covers – VIDEO DEMOS
  • CLAMPING & FIXING PARTS
    • Making individual track links
    • Model Clamp to hold your model
    • Mini pegs for holding small parts – VIDEO DEMO
  • CUTTING TOOLS, OTHER USEFUL TOOLS and GETTING UNDERWAY
    • Starting out on your first armour project
    • The DSPIAE MT-C Stepless Adjustment Circular Cutter
    • Gyro Cut swivel head cutting tool – VIDEO DEMO
    • Infini Easy cutting mat Type B – VIDEO DEMO
    • Knives, what Geoff C uses
    • Lighting your workbench
    • Magnetic Handle 60 by RP Toolz
    • Mini Long Nose Pliers – VIDEO DEMO
    • Mini Needle Files – VIDEO DEMO
    • Revell Precision Scraper – How to use it
    • Side cutters, important choices and decisions – VIDEO DEMO
    • Simple ideas for parts holders – VIDEO DEMO
    • Tweezers – great value set from Pixnor – VIDEO DEMO
    • Using the Flex-I-File and Touch and Flow applicator
    • Using a razor saw – VIDEO DEMO
  • DRILLS AND DRILLING
    • Drilling out gun ports on aircraft – VIDEO DEMO
    • Pin vice drills – using the Humbrol Pin Vice Drill – VIDEO DEMO
  • FILLER
    • Filling seams with Mr Surfacer
    • Milliput White as filler
    • Using PVA Glue as a filler
  • GLUES & GLUING
    • How To Use AMMO Cyanoacrylate Glues – HD VIDEO
    • Applying cyano (superglue) with an applicator with Andy Brown – HD VIDEO DEMO
    • Attaching clear parts – HD VIDEO DEMO
    • Getting started on a new project – glues, tools and approach with Andy Burton
    • Glues the choices and how to use them – 7 VIDEO DEMOS
    • Gluing deck sections using Pin Flow Applicator – VIDEO DEMO
    • Homemade cyano applicator
    • Pin Point Bottle Kit – VIDEO DEMO
    • Ultimate Glue Bottle Holder (for Tamiya glue) – VIDEO DEMO
    • Using liquid poly to join parts and avoid filling – VIDEO DEMO
    • Using polystyrene cement – HD VIDEO DEMO
  • IDF MODEL PROJECTS
    • Common errors with IDF models
  • KIT INSTRUCTIONS
    • Kit instructions – an introduction and tips
    • Making a plan
  • LIGHT and SOUND PROJECTS and RESOURCES
    • Adding light and sound to Revell 1.48 Bristol Beaufighter – VIDEO DEMO
    • Revell 1:32 F4U1A Corsair – VIDEO DEMO
    • Tamiya 1:32 De Havilland Mosquito FB.VI
    • Magic Scale Modelling Now
    • SmartFX Now
  • MAGNETS
    • Preventing aircraft with tricycle undercarriage from tail sitting – VIDEO DEMO
  • PHOTO ETCH
    • Advantages of adding Photo Etch to your Armour kits – VIDEO DEMO
    • Annealing PE belts to soften and bend to shape – VIDEO DEMOS
    • Pre-painted Photo Etch (PE) Brass in cockpits
    • Working with Photo Etch, getting started – VIDEO DEMO
  • PLANNING
    • Deciding on and planning your next project
  • PLANS
    • Questions, Thoughts and Resources for using plans
  • REFERENCE MATERIAL
    • Choosing and using reference material – Aircraft
    • Operation Northern Watch 1994-95 F-4G, EF-111A, Harrier GR5
  • REPAIRING MISTAKES, REINSTATING & CREATING SURFACE DETAIL
    • AMMO Scribing Tape, Straight Edge – How to use it – VIDEO DEMO
    • Filling seams with Mr Surfacer
    • Getting rid of mould ejector pin and sink marks – VIDEO DEMO
    • Hiding join lines inside engine cowls – VIDEO DEMOS
    • Improving overdone moulded rivet detail
    • Join lines: filling and getting rid of join lines – VIDEO DEMO
    • Mini chisel set to remove kit detail – VIDEO DEMOS
    • Oil Canning, how to create stressed metal effects – technique
    • How to use Plasticator Thin & Thick by AMMO – VIDEO DEMO
    • Removing ghost seam line joins – Micromesh – 2 VIDEO DEMOS
    • Repairing broken aircraft tail wheels – VIDEO DEMO
    • Riveting aircraft – VIDEO DEMOS
    • Scribing and re-scribing panel lines – VIDEO DEMO
    • Stressed metal effects on the Avro Lancaster
    • Stressed metal effects on panels – VIDEO DEMO
    • Using Dymo tape as a guide edge – VIDEO DEMO
  • RESIN
    • How to Use the AMMO Hot Dog Hot Air Gun – VIDEO DEMO
    • Removing the casting block from resin parts – VIDEO DEMO
    • ‘Resin Rookie’ – building your first resin armour kit
    • Thinking of trying a resin kit or accessory?
  • RIGGING
    • How to rig a WWI Albatros Bi-plane in 1.32 scale – 20 VIDEO DEMOS
    • How to rig a WWI Biplane with Dave Coward – preview
    • How To Use AMMO Rigging – VIDEO DEMOS
    • Ship Rigging
    • Stretched sprue for rigging, aerials and lots of uses! – VIDEO DEMO
  • RIVETING
    • Adding rivets using a pin vice drill – VIDEO DEMO
    • HGW Positive Rivets – how to apply them
    • Improving overdone moulded rivet detail
    • Revell Rivet Maker – 2 VIDEO DEMOS
    • Riveting aircraft – 2 VIDEO DEMOS
    • Rosie The Riveter – how to use this excellent tool – VIDEO DEMO
    • Using Dymo tape as a guide edge – VIDEO DEMO
    • Using a pin vice drill to enhance rivet detail = VIDEO DEMO
  • RUBBER-VINYL TYRES
    • Removing mould seam lines – VIDEO DEMO
    • Finishing Off – VIDEO DEMO
  • SAFETY
    • Basic safety equipment – introduction
    • IPMS(UK) Safety Advice for Modellers 2024
  • SANDING & POLISHING
    • DSPIAE Reciprocating Sander – product review – VIDEO DEMO
    • Fine-sanding alternative: the coffee filter ‘onion’
    • How to use Ultimate Modellers sanders, buffers and Skinny Sticks – VIDEO DEMO
    • Micromesh to get rid of paint demarcation lines
    • Micromesh Polishing Cloths – VIDEO DEMOS
    • Polishing canopies – VIDEO DEMO
    • Tools to get you started – sander and buffers
    • Ultimate Customisable Sanding Sheets – VIDEO DEMO
    • Using Albion Alloys plastic sanding needles – VIDEO DEMO
    • Using Micromesh to polish the paint surface – VIDEO DEMO
  • SCRATCHBUILDING
    • Scratchbuilding – getting started
    • Scratchbuilding an aero engine
  • SELECTING A KIT
    • Selecting a Kit
    • 1:48 Armour
  • SOLDERING
    • Soldering – how to do it
    • Soldering for scale modelling – an introduction
  • STORING PARTS DURING CONSTRUCTION
    • Plastic containers
  • TROUBLE-SHOOTING
    • Adding nose weight to stop tail-sitters
    • Stripping a Painted Model
  • OTHER
    • Fitting painted wheels, avoiding damage to painted areas

Disclaimer

While the hints, tips and advice in Scale Modelling Now magazine have worked for us, no guarantee is given that they will always work, that they are applicable to you or that there may be Health & Safety issues if you do follow the advice. It’s very much up to you to decide if you want to try them out. All relevant safety regulations regarding knives, adhesives, solvents, paints, etc. are implied.

Copyright © 2025 · Scale Modelling Now · Online Scale Modelling Magazine · Scale Modelling Techniques and Tips · Privacy Policy