Welcome to the Subscribers’ Aircraft Gallery.
This vast and growing area of SMN is all about sharing great work from modellers across the world – that’s modellers like YOU, subscribers and guest submissions from modellers whose work I find truly inspiring.
By sharing it here, I really hope that we can all get inspired to start a new project… or try something different maybe… but to keep enjoying this great hobby of ours; whatever your reason to look, be inspired and keep building!
Each submission has a ‘gallery’ of thumbnails which you can click on to see an enlarged image and read the short text describing the model – enjoy!
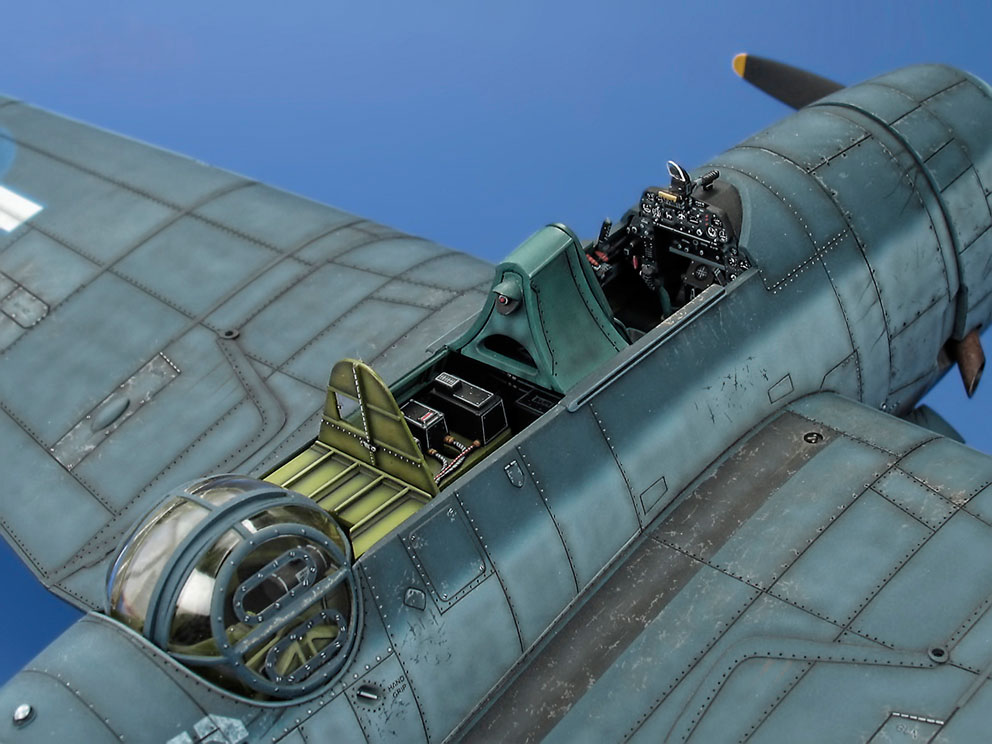
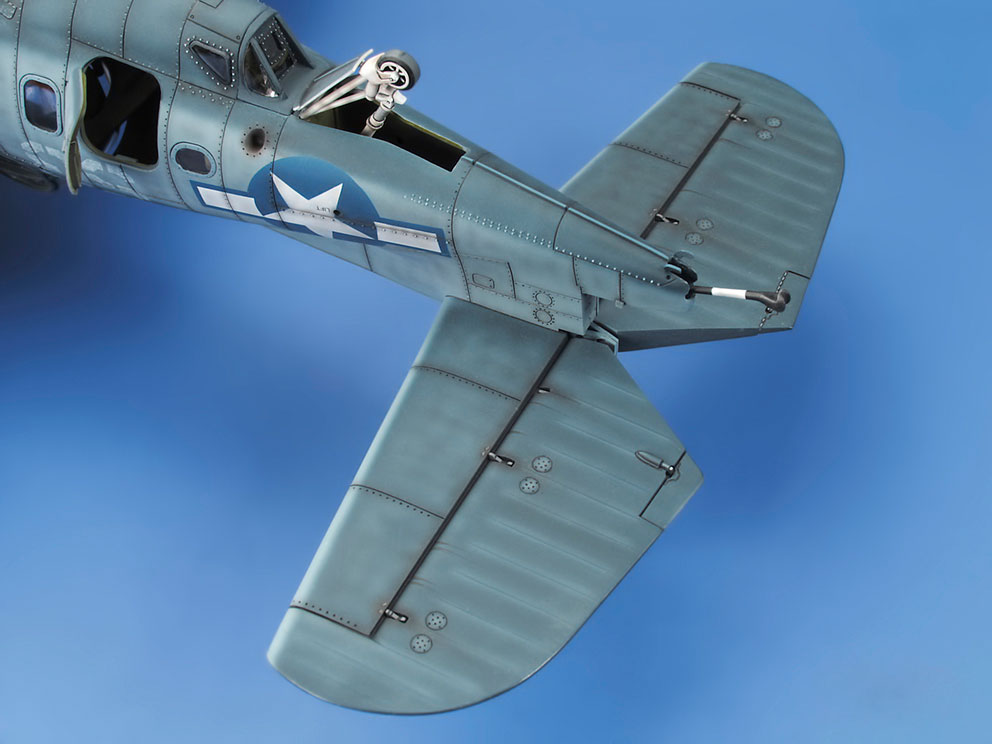
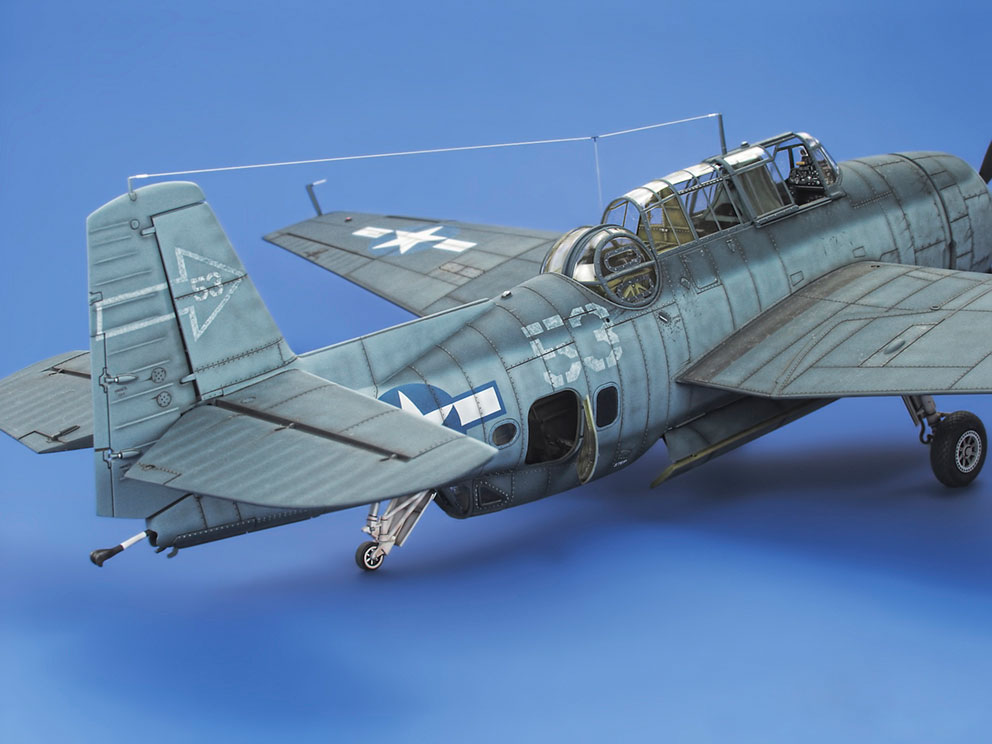
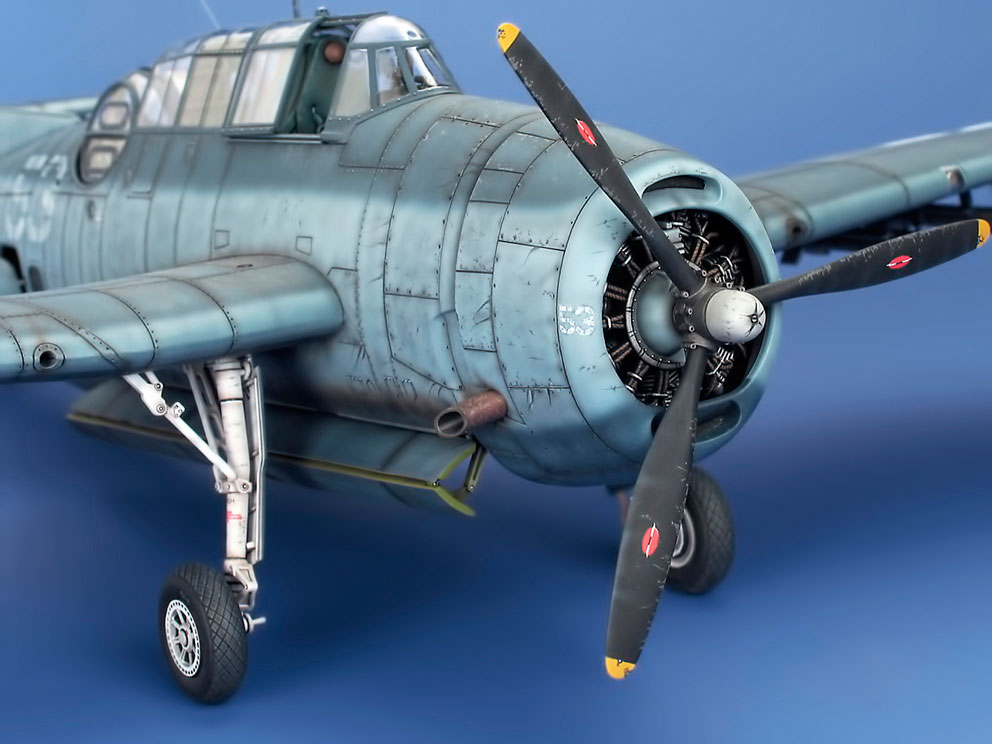
Gallery A
Galleries: A | B | B-2 | C | D-E | F | G | H | I-L | M | N-R | S | T-V | W-Z
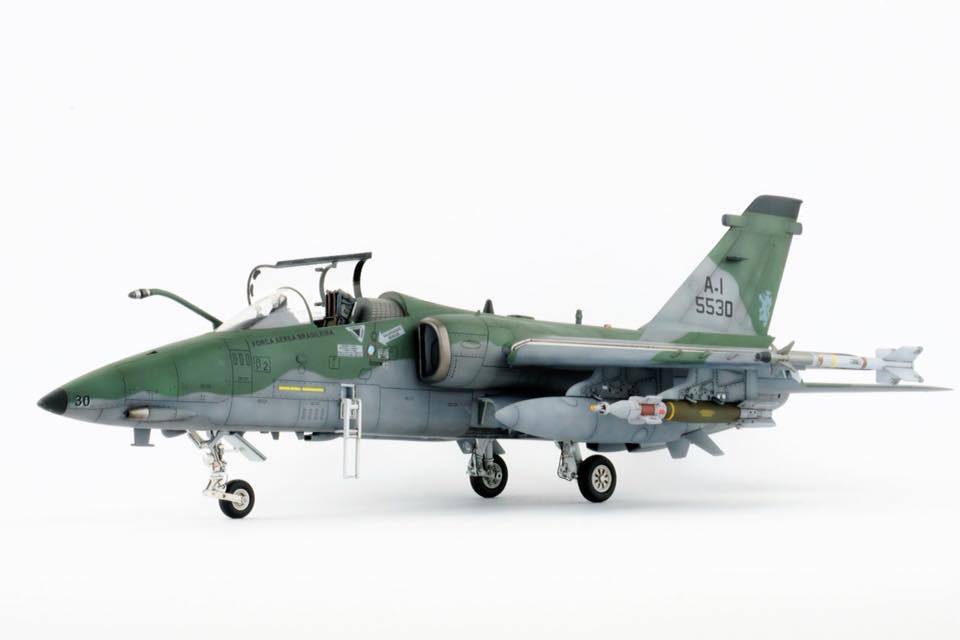
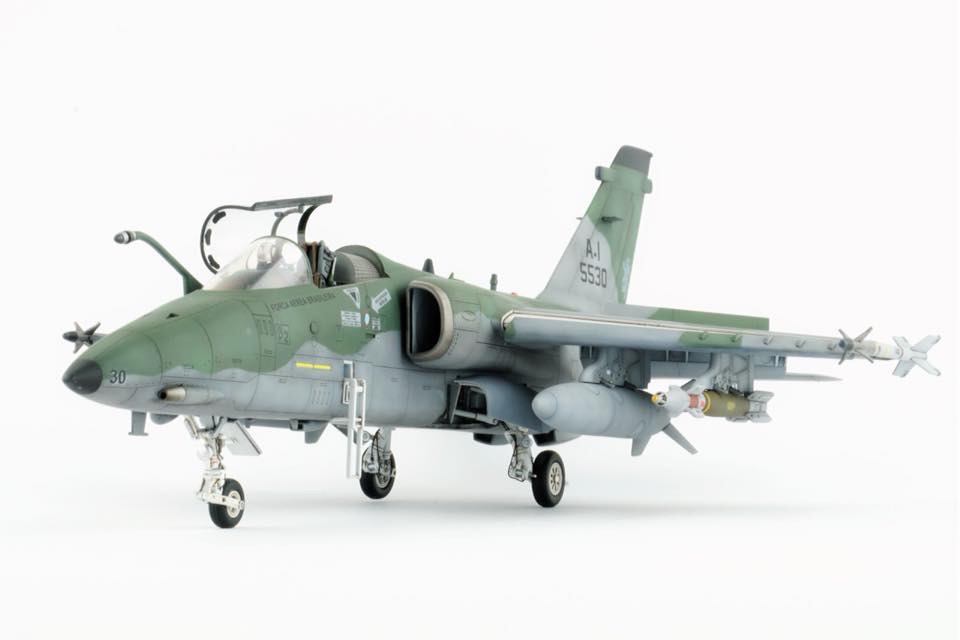
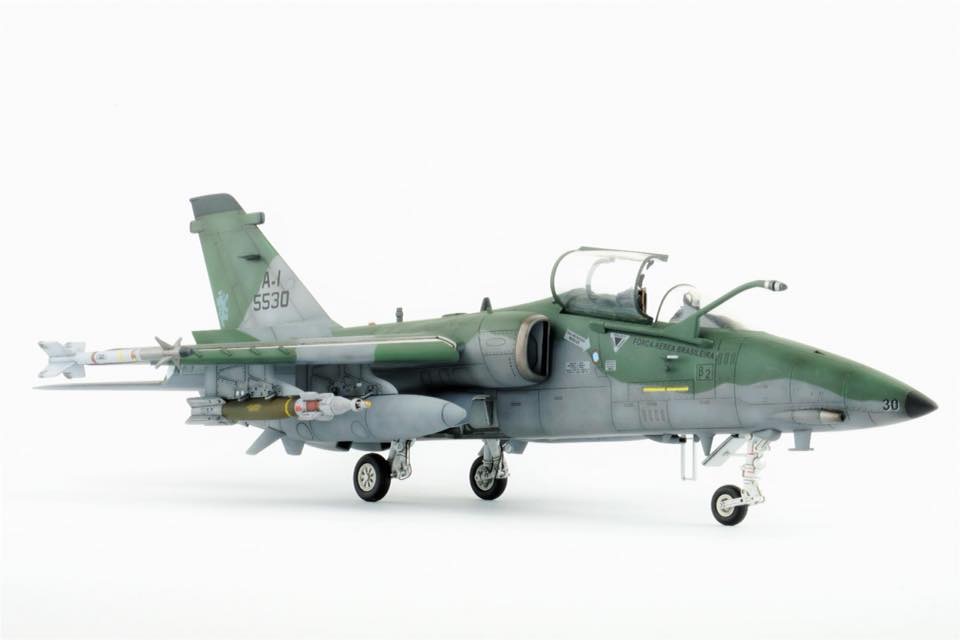
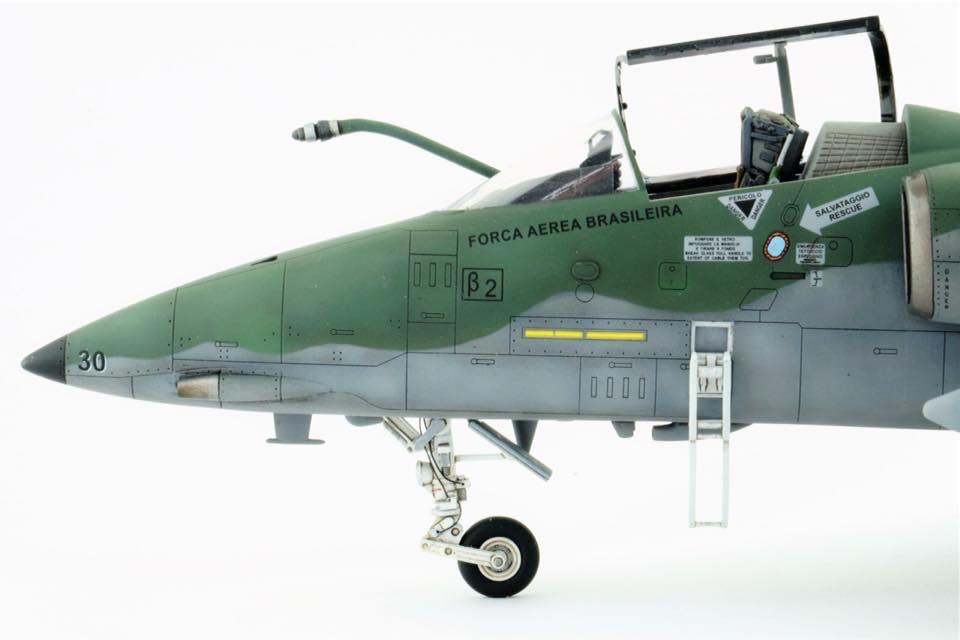
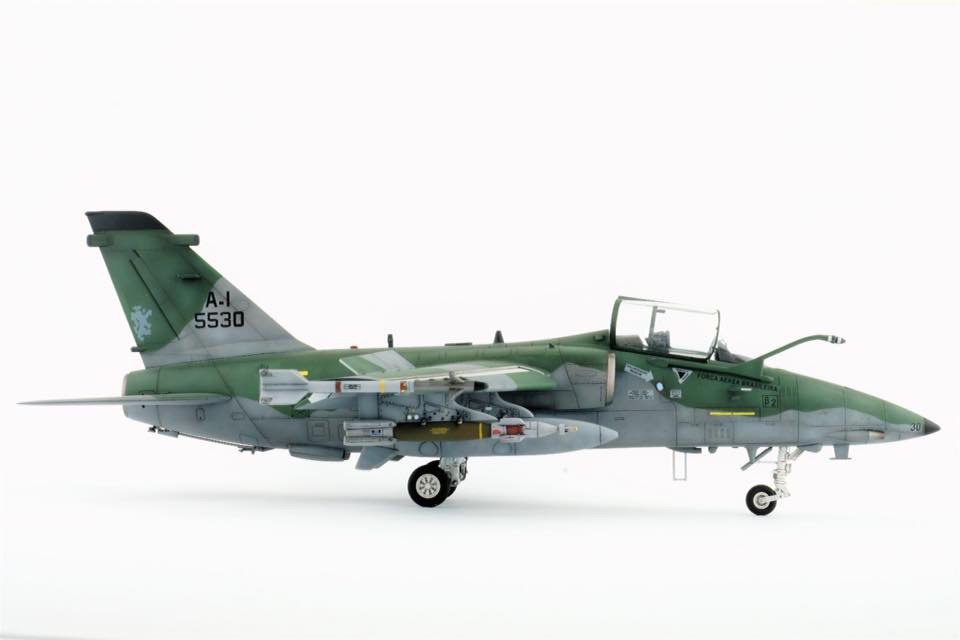
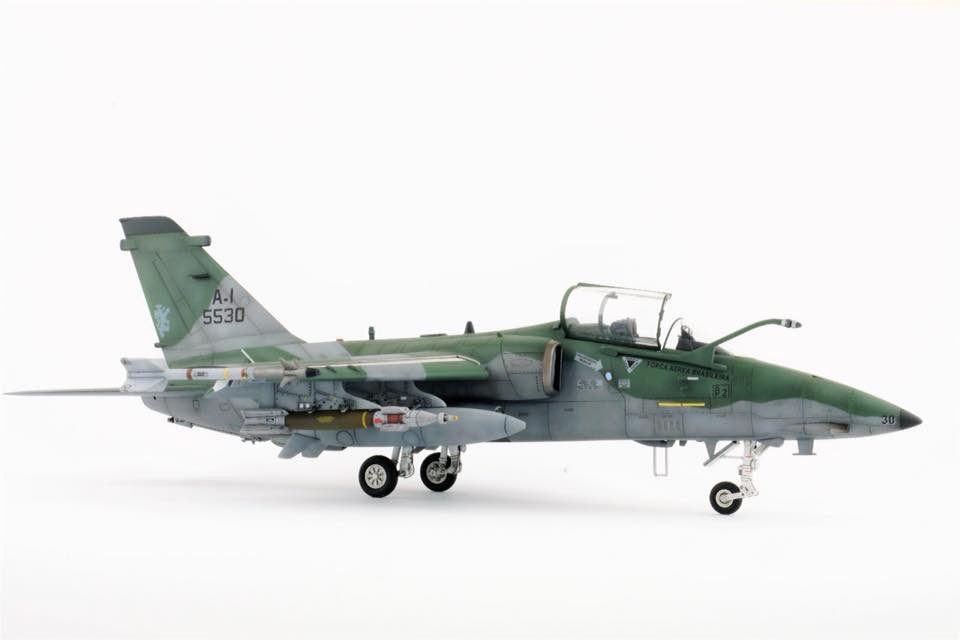
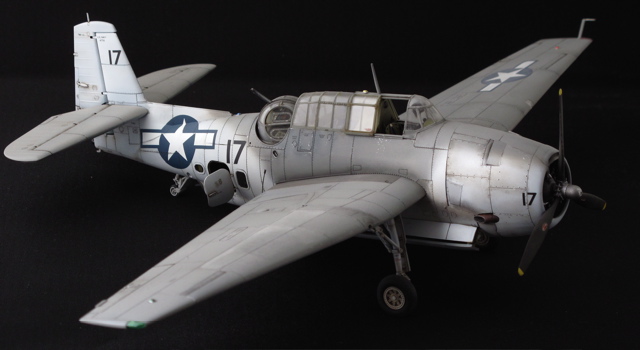
Another one for my portfolio.
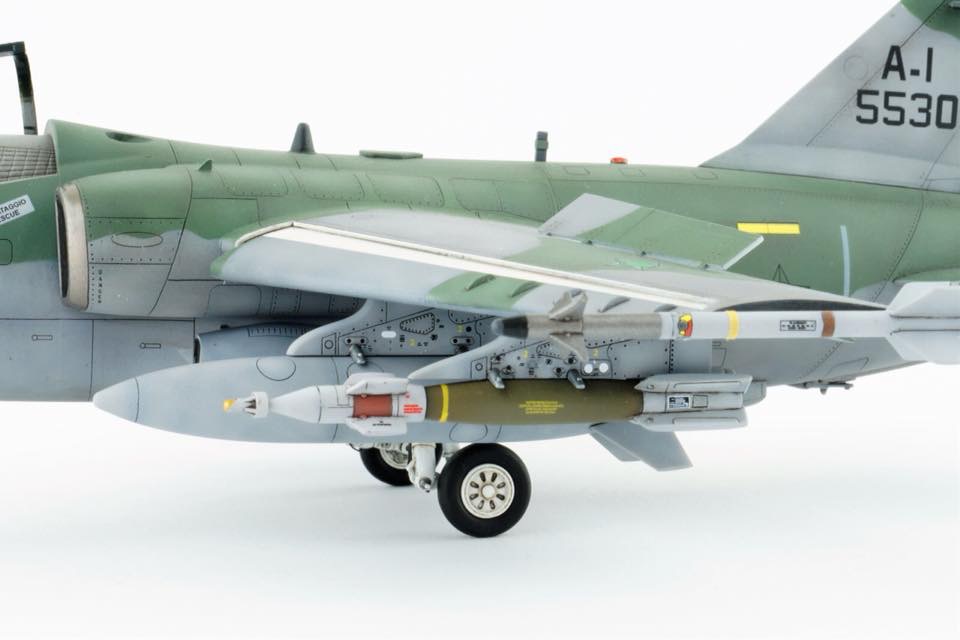
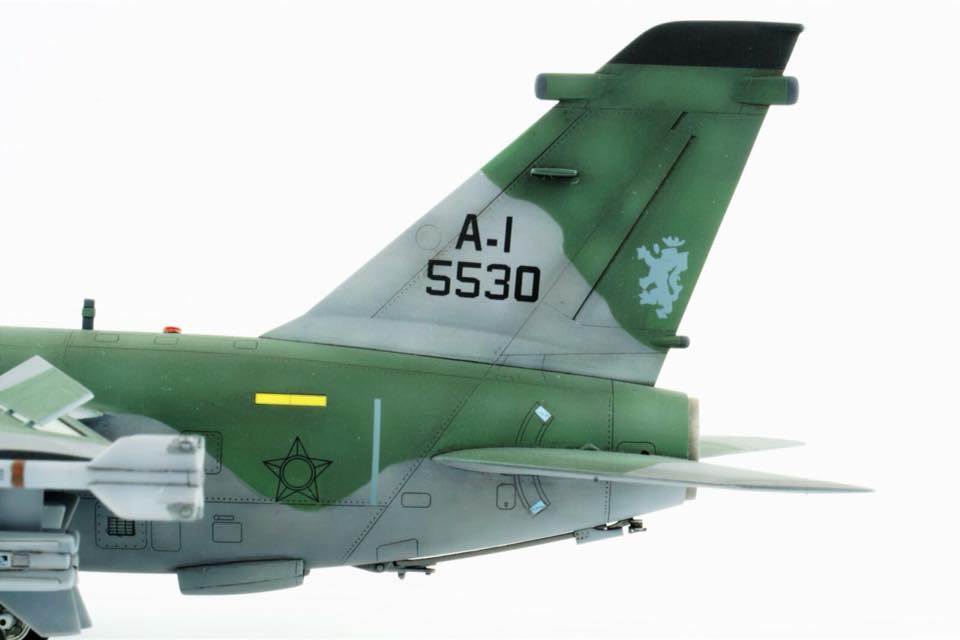
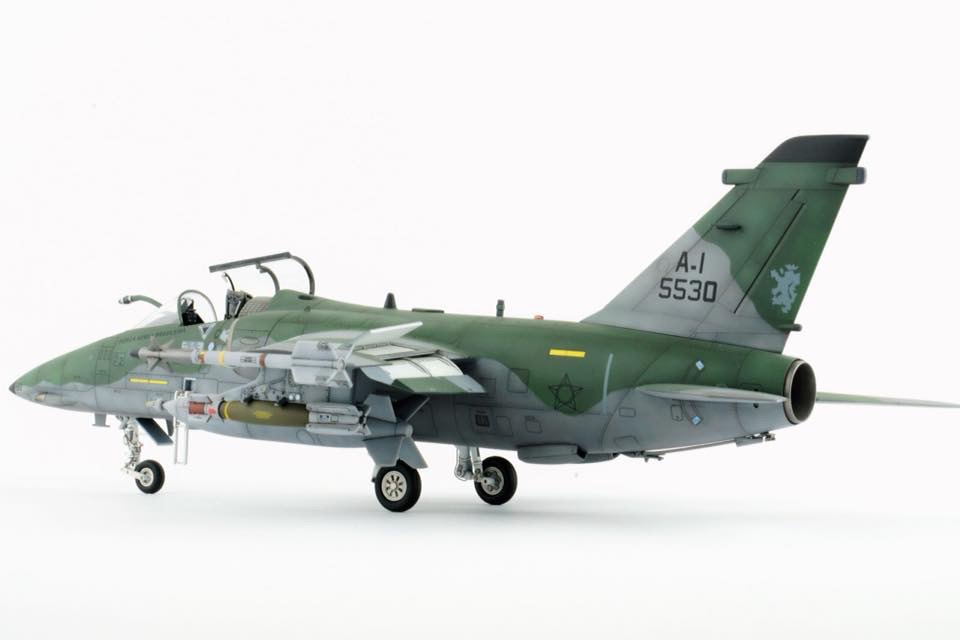
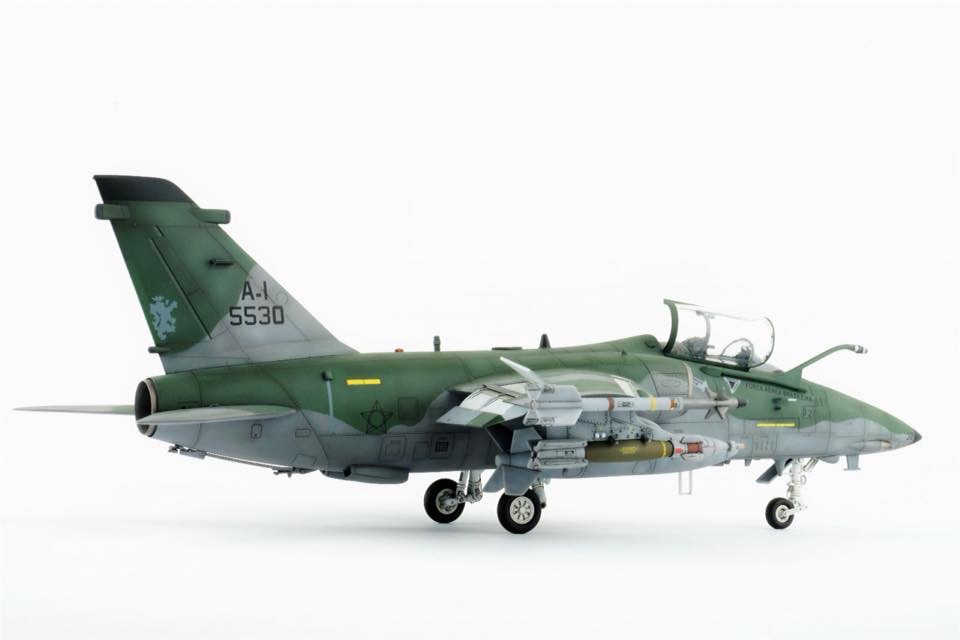
This is the HobbyBoss A-1A ground attack aircraft of the Brazil Airforce in 1:48 scale.
I found this kit a dream to build, it has no problems at all and it fits perfectly and the landing gear is excellent. I only added a resin bang seat.
I highly recommend this kit. :)
Jeroen B.
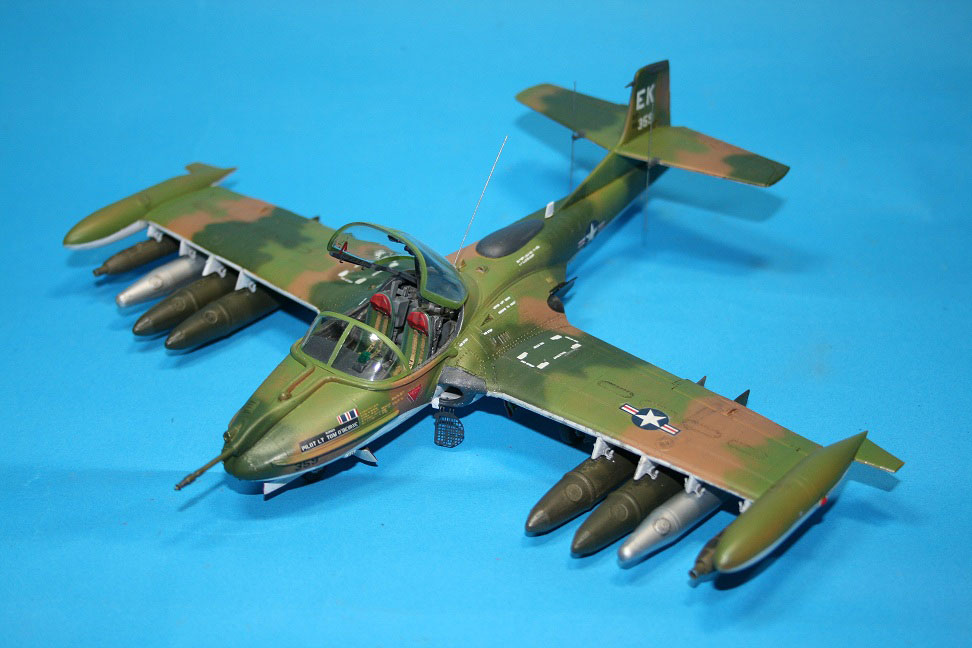
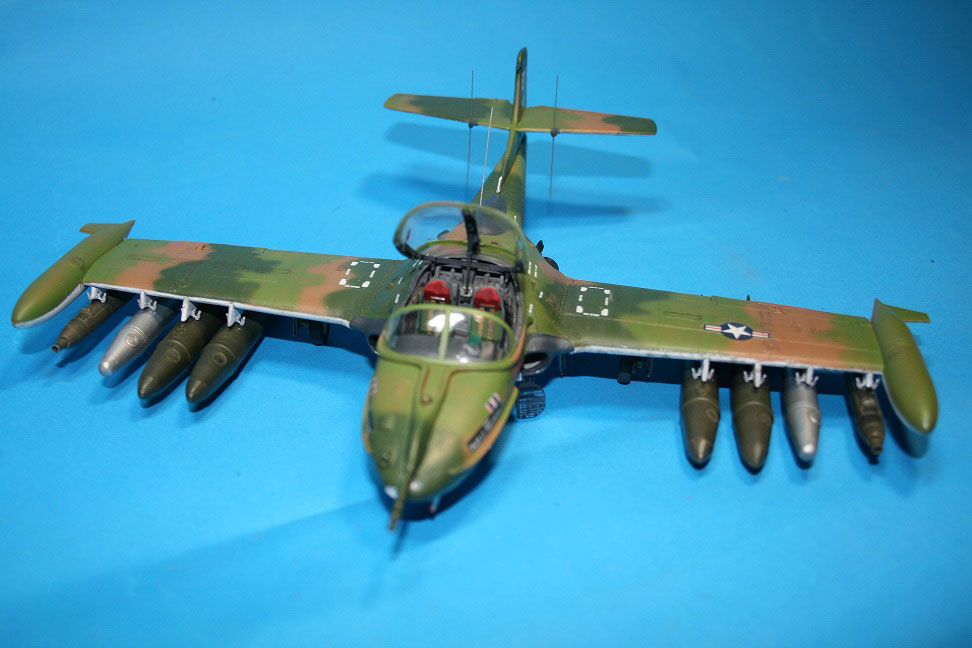
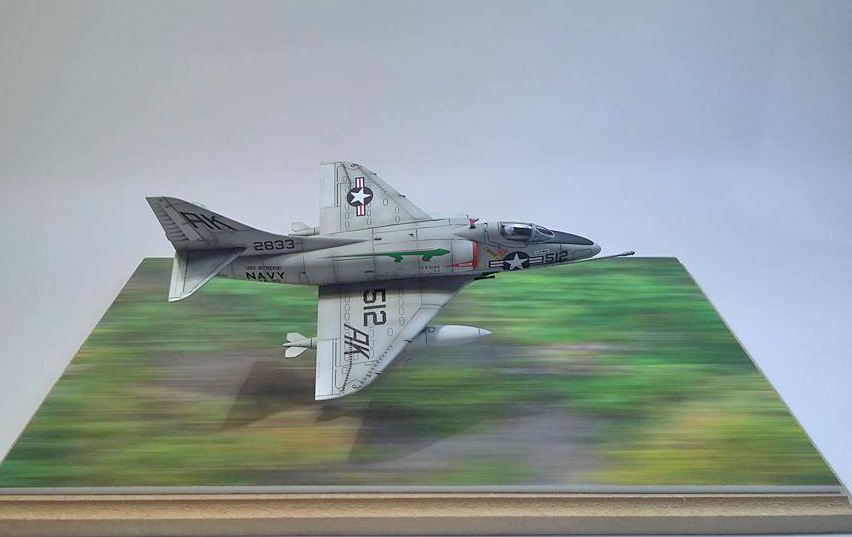
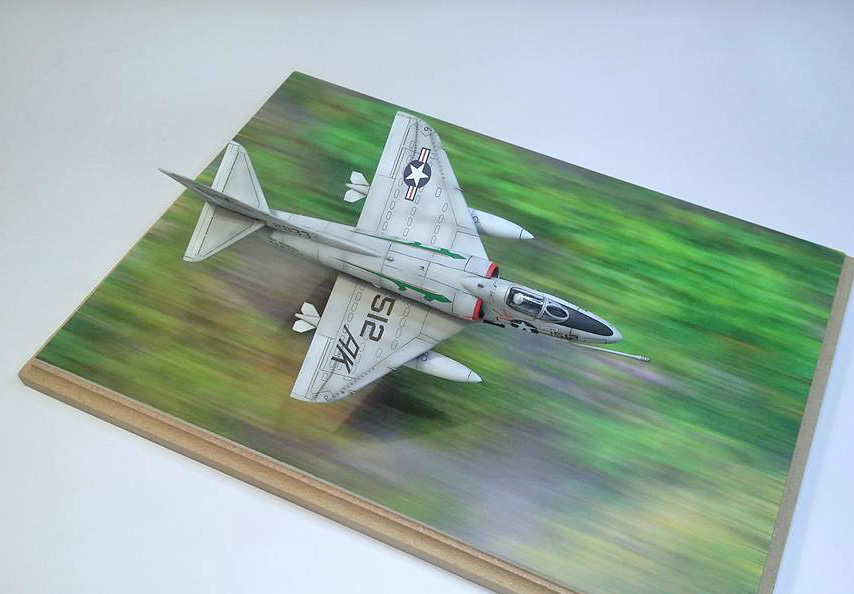
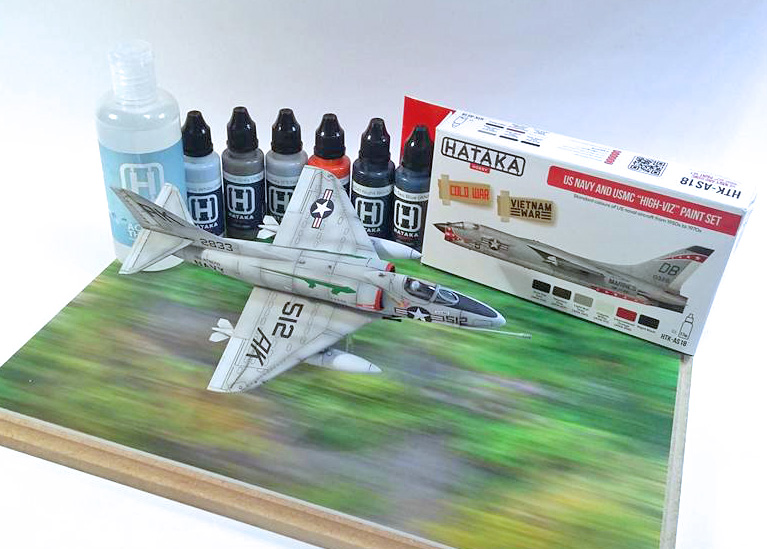
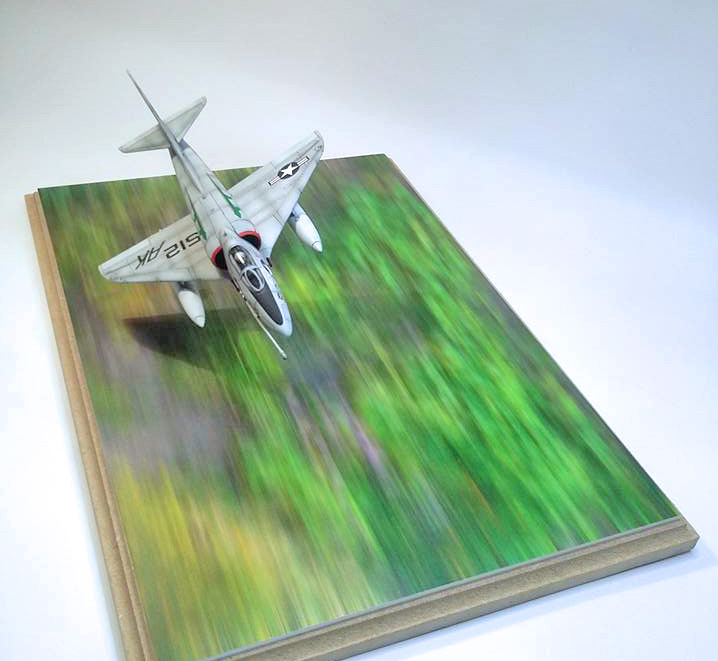
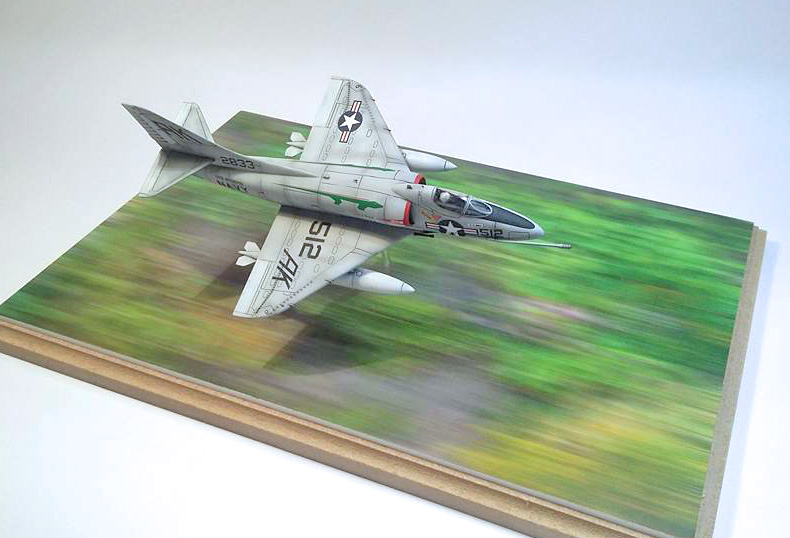
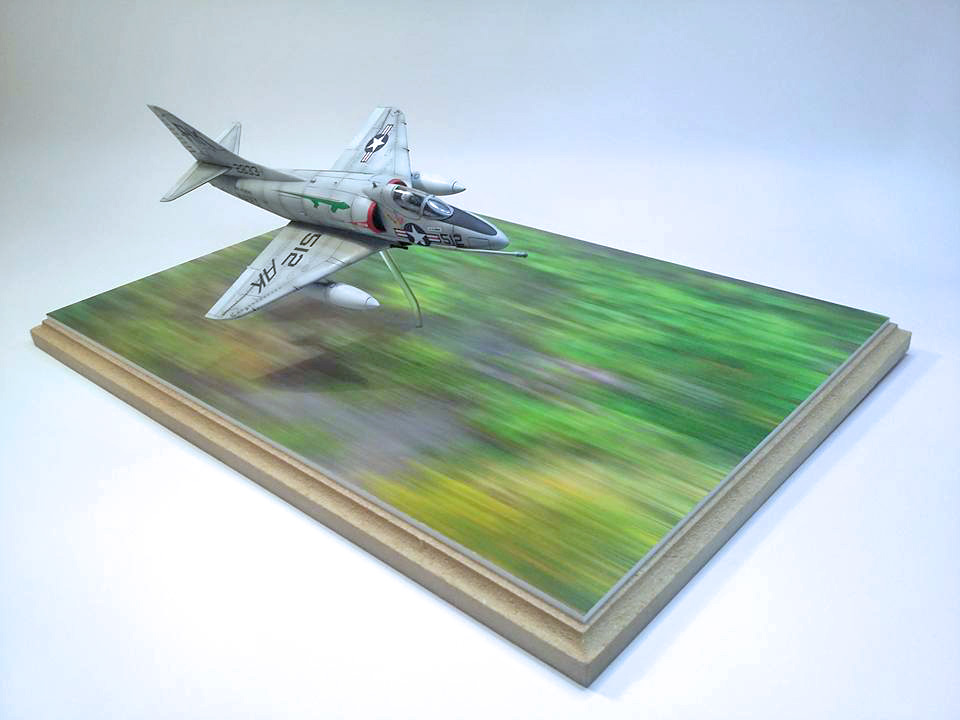
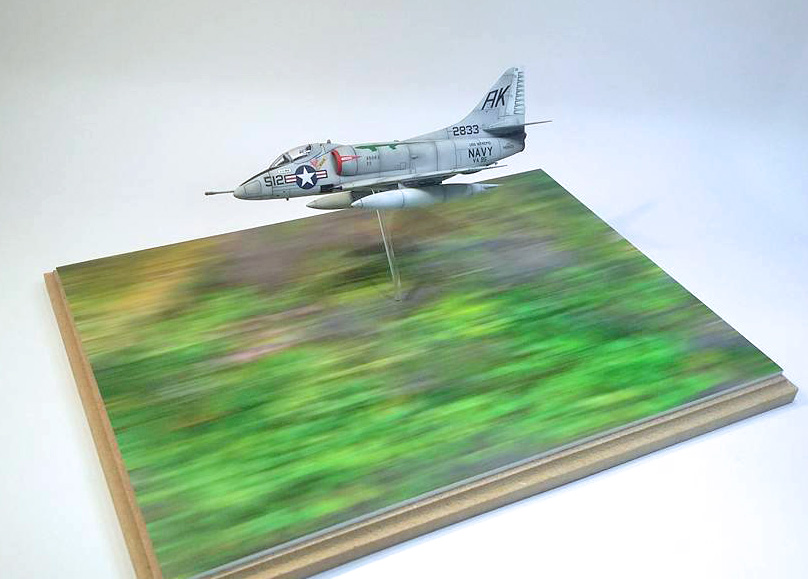
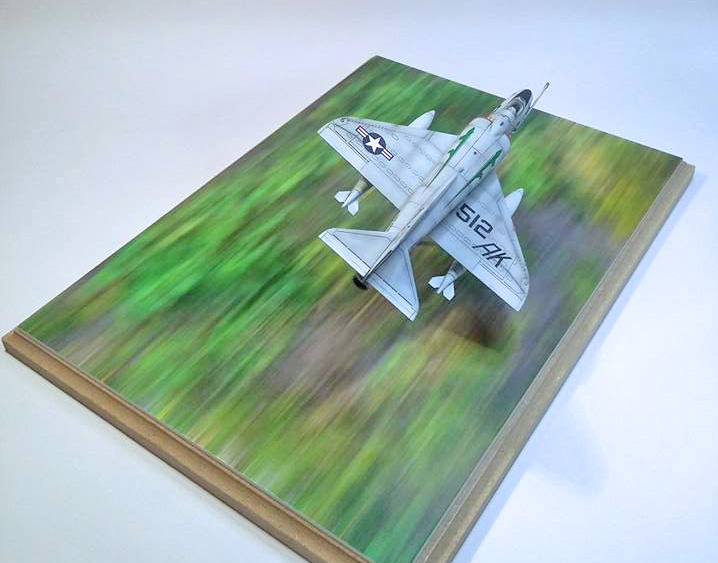
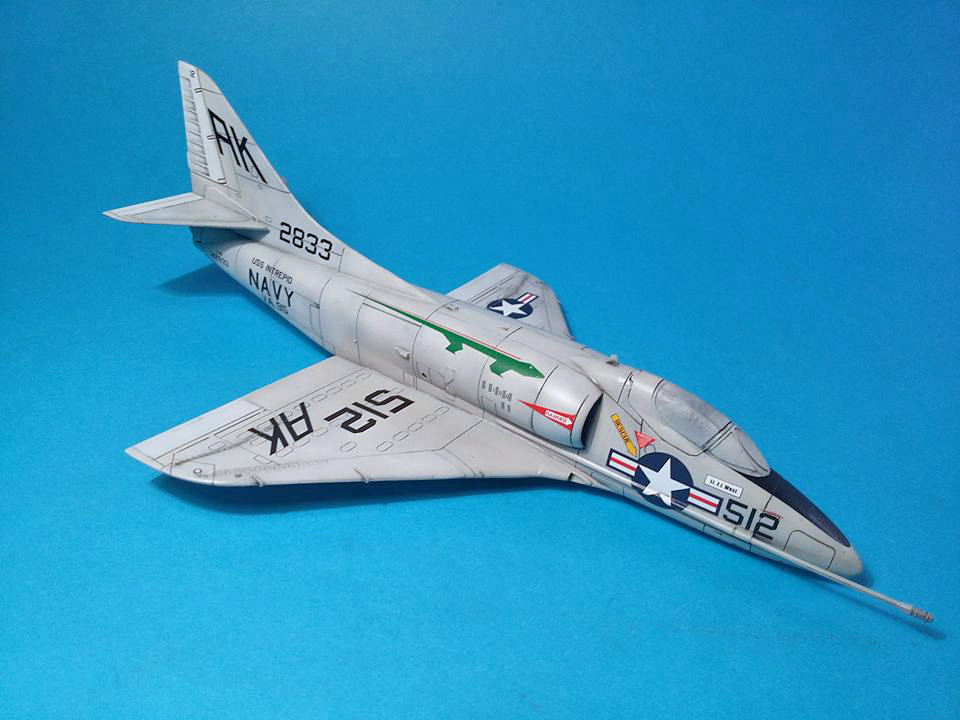
This is my Airfix 1:72 A4 Skyhawk in flight on blurred base.
“Going In Hot” she’s done painted using Hataka Red Line US Navy & USMC “HI VIZ” Paint Set mounted on a blurred base from www.coastalkits.co.uk what do you guys think?
Jezz C.
Hello and I thought I’d share another one of my builds here.
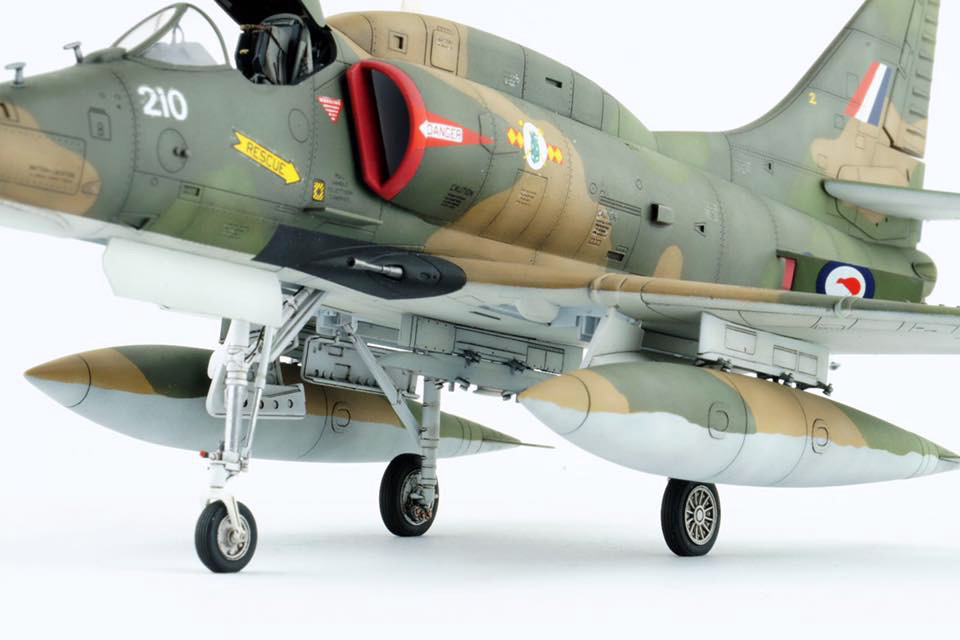
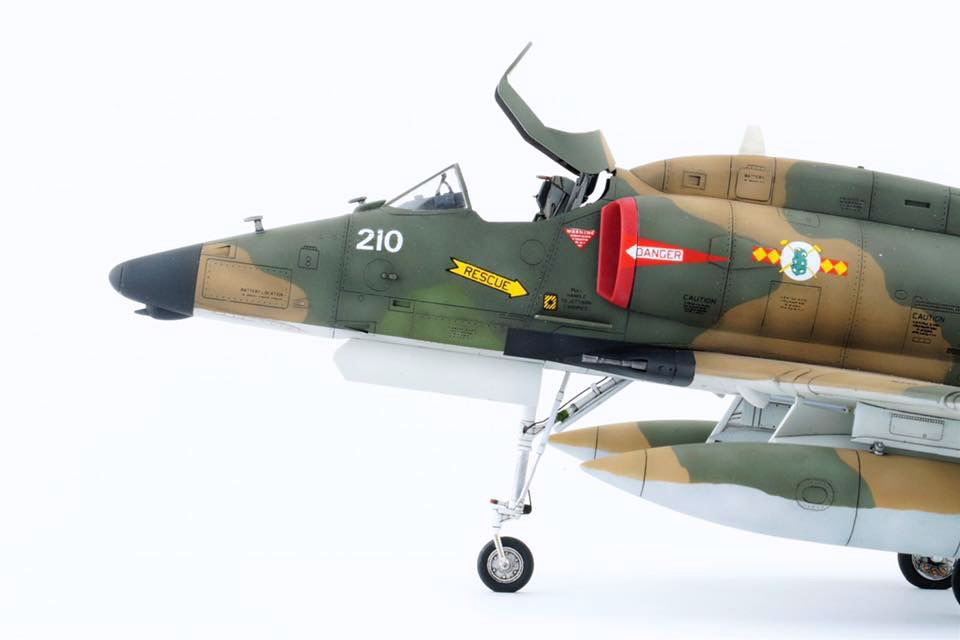
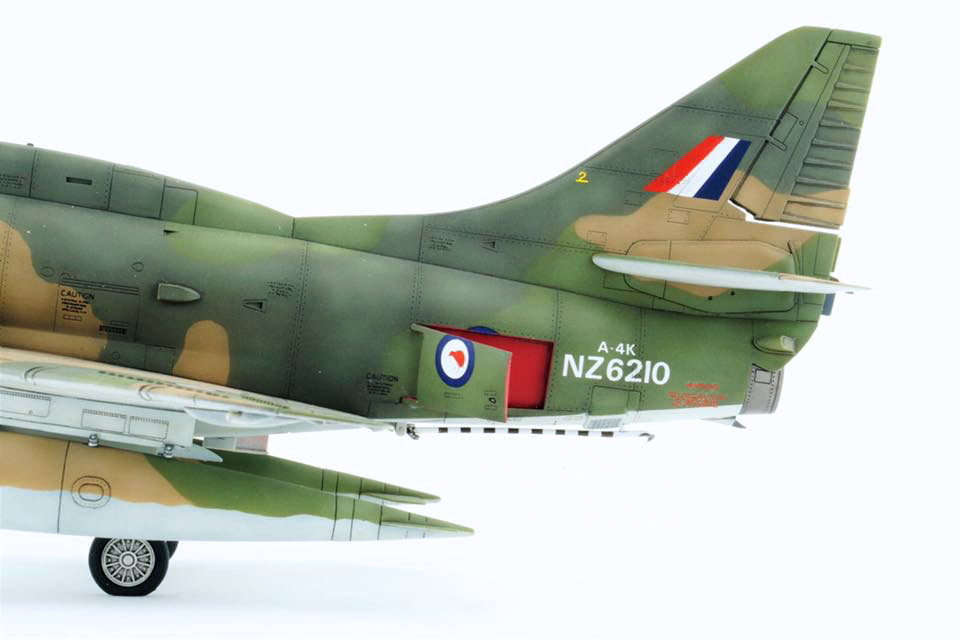
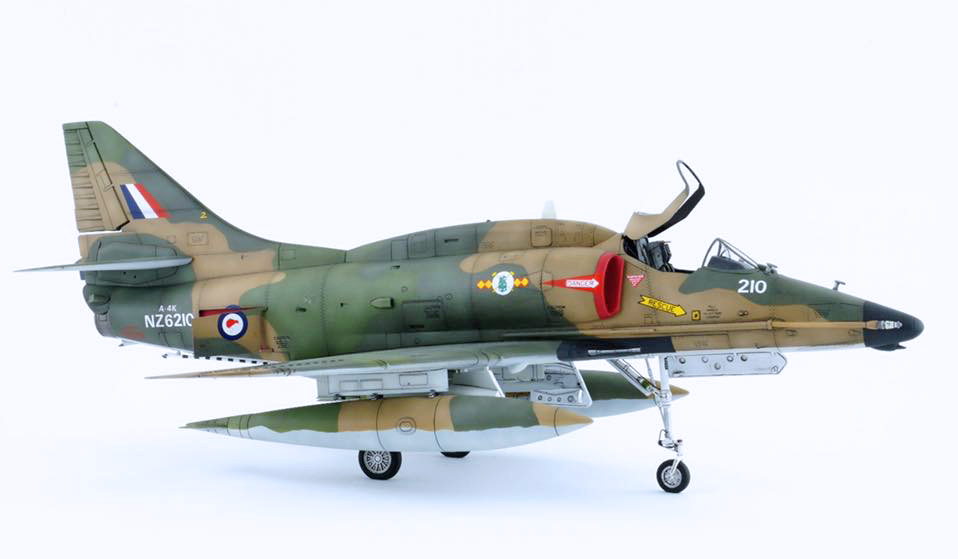
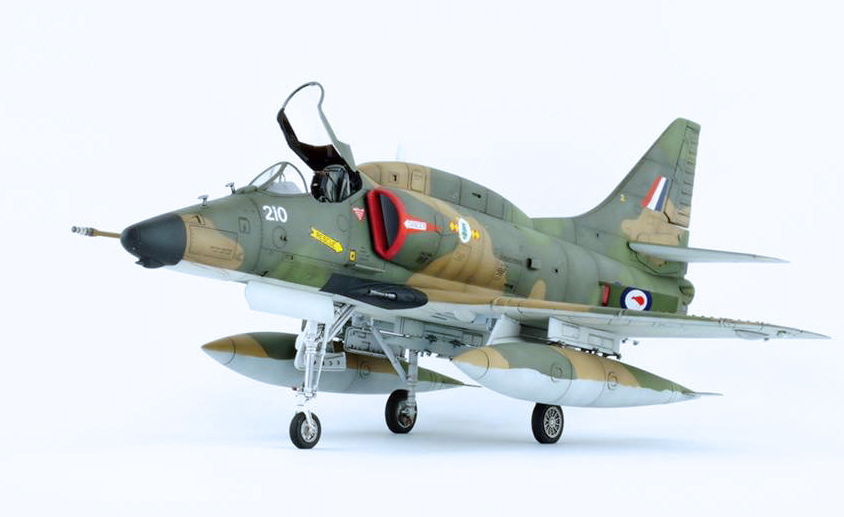
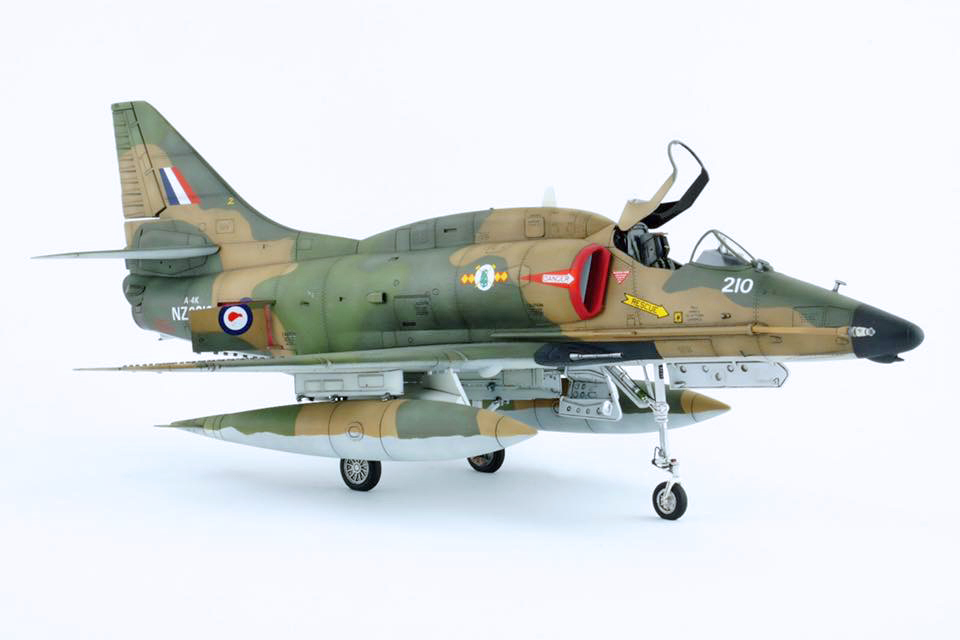
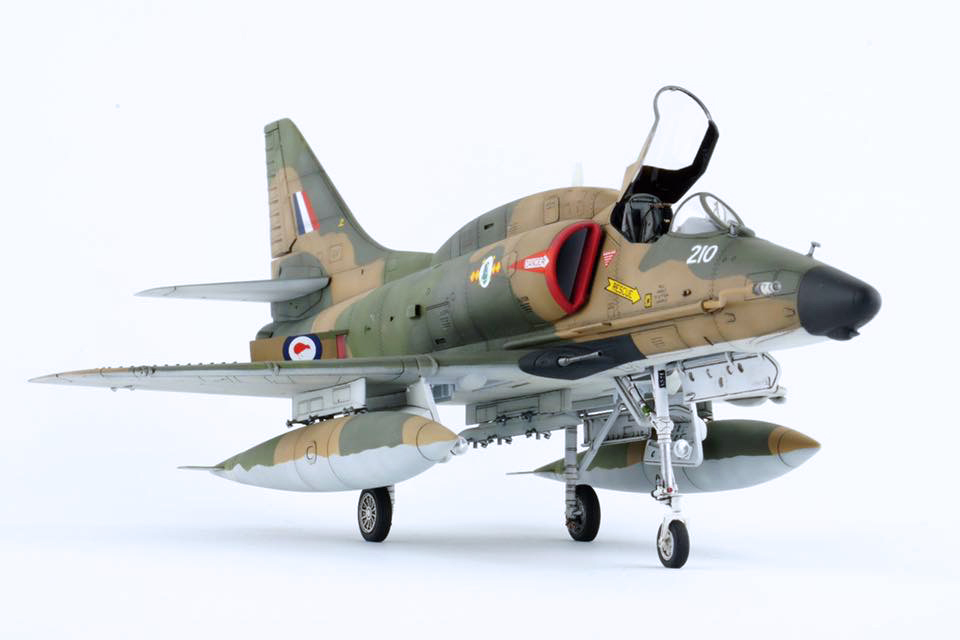
This is the 1:48 A-4E from HobbyBoss with a New Zealand jacket on. I really liked the Skyhawk in these colours so I just had to do it.
I fitted an Aires cockpit set in it which was originally meant for the Hasegawa kit but with a little trimming it fits perfectly. The nose wheel was moulded in the nose gear so I bought the separated set from Eduard to fix this. The rest is all oob.
The paints are the sea camo colours from Gunze (H303/H309/H310 and H311) and I used Alclad black primer and microfiller as a black base and Alclad2 Aquagloss and Klear Kote matt for gloss and matt coats. I must say that the stuff from Alclad2 is absolutely fantastic. Decals are from Superscale.
Have a good evening and see you next time!
Jeroen B.
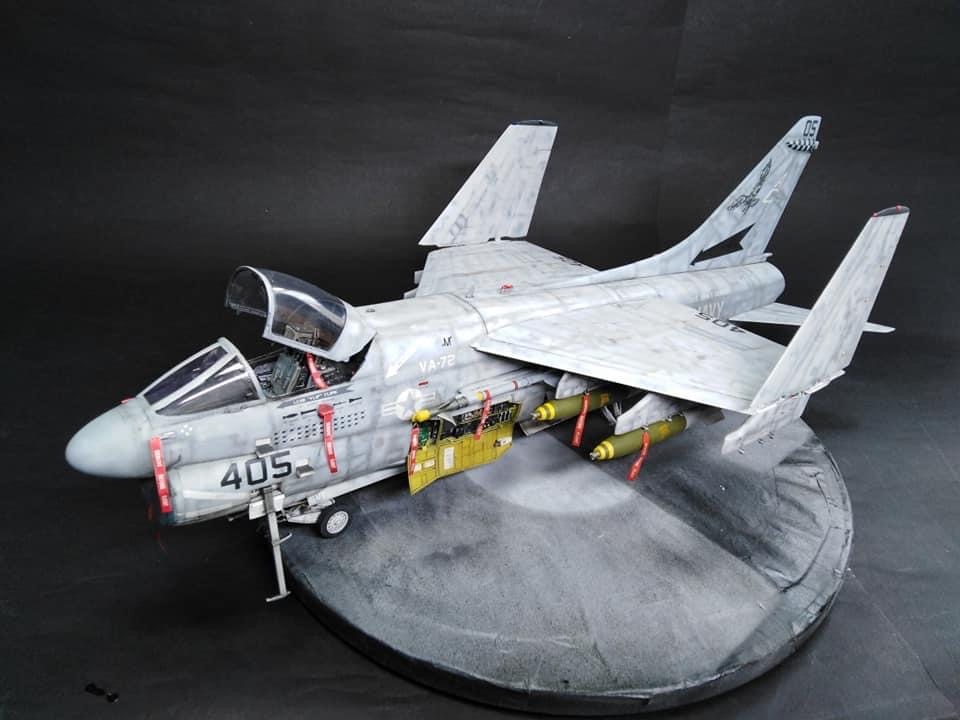
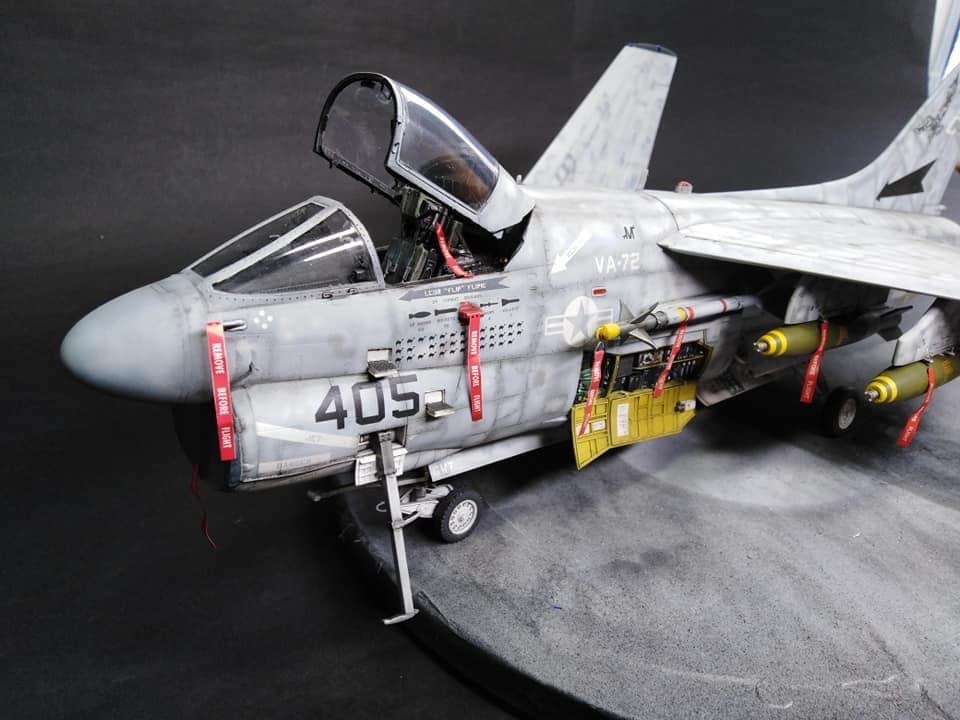

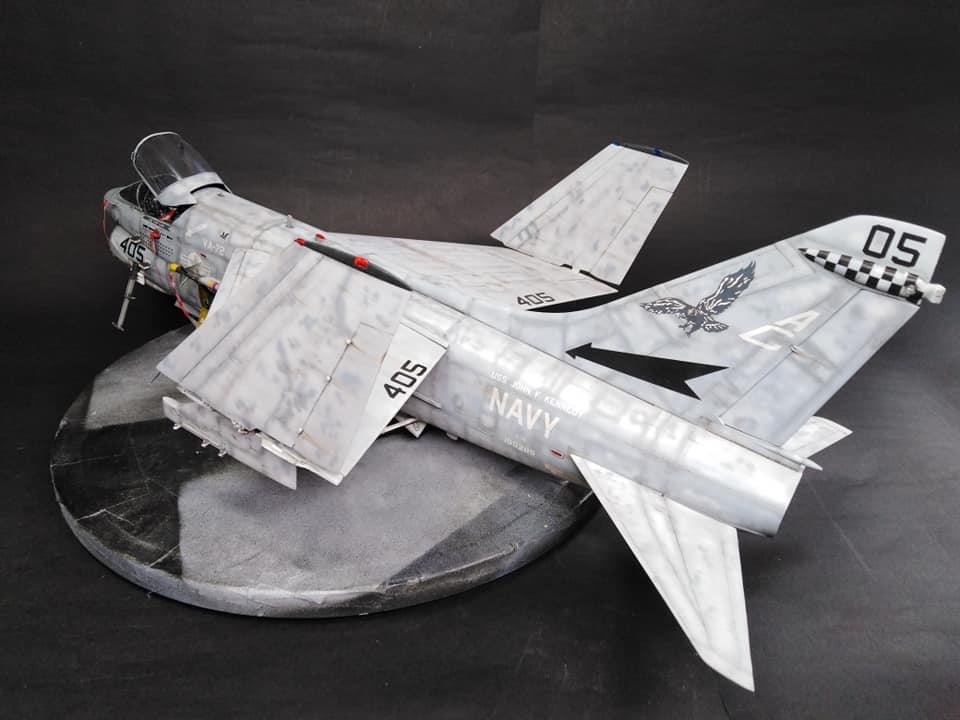
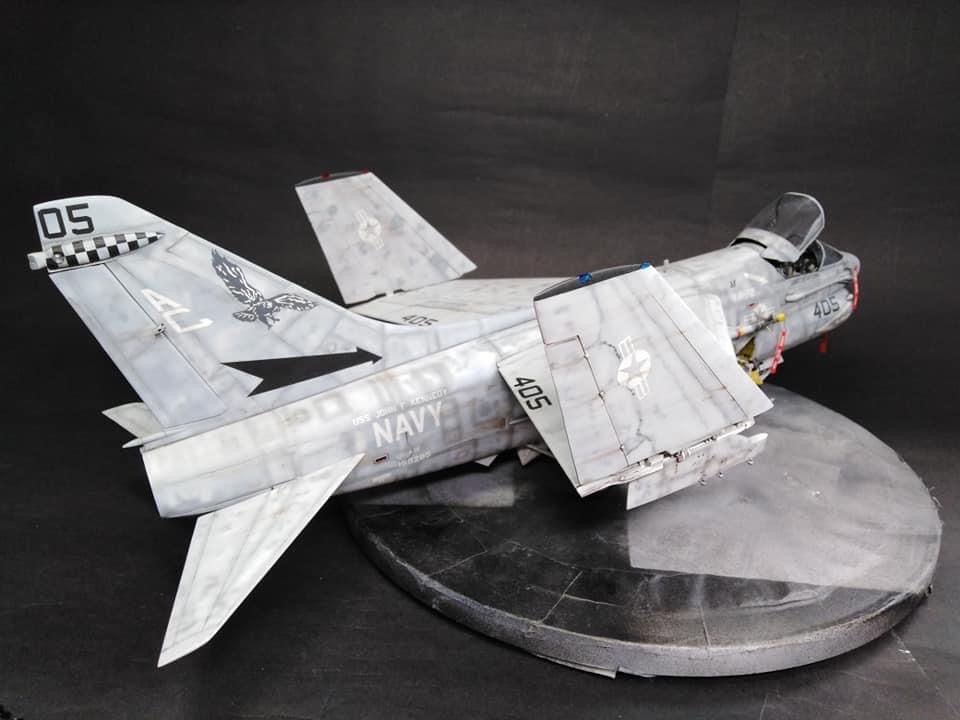
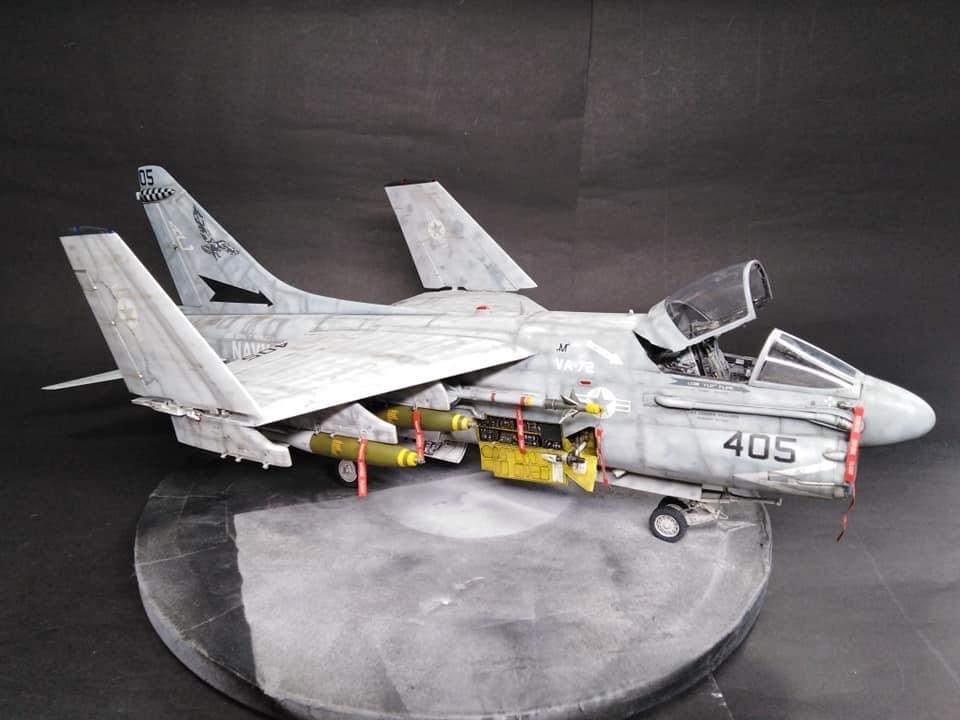
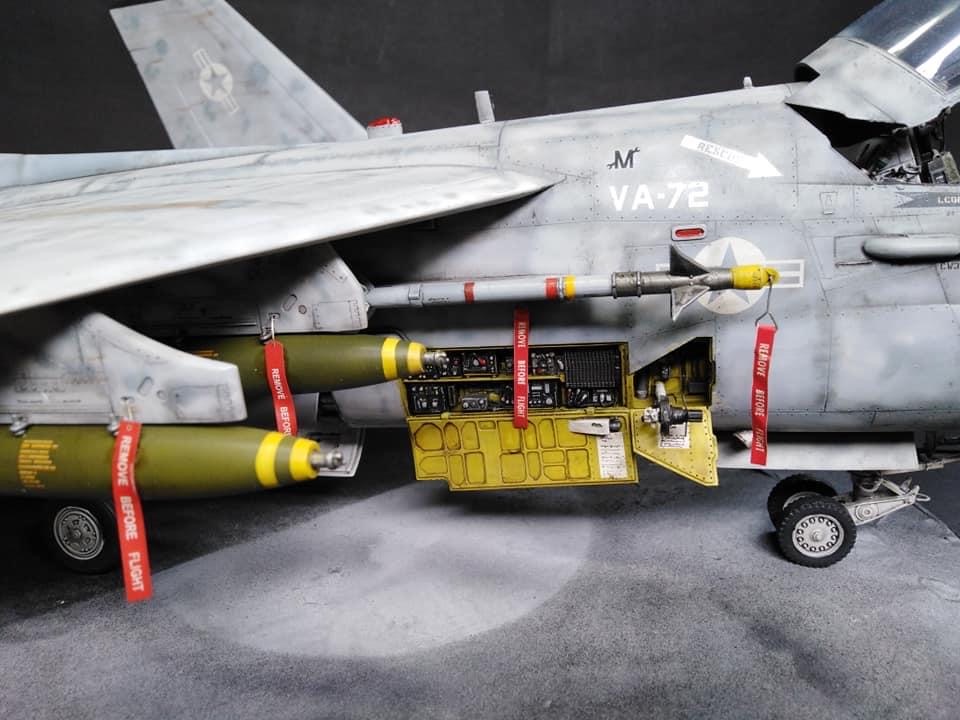

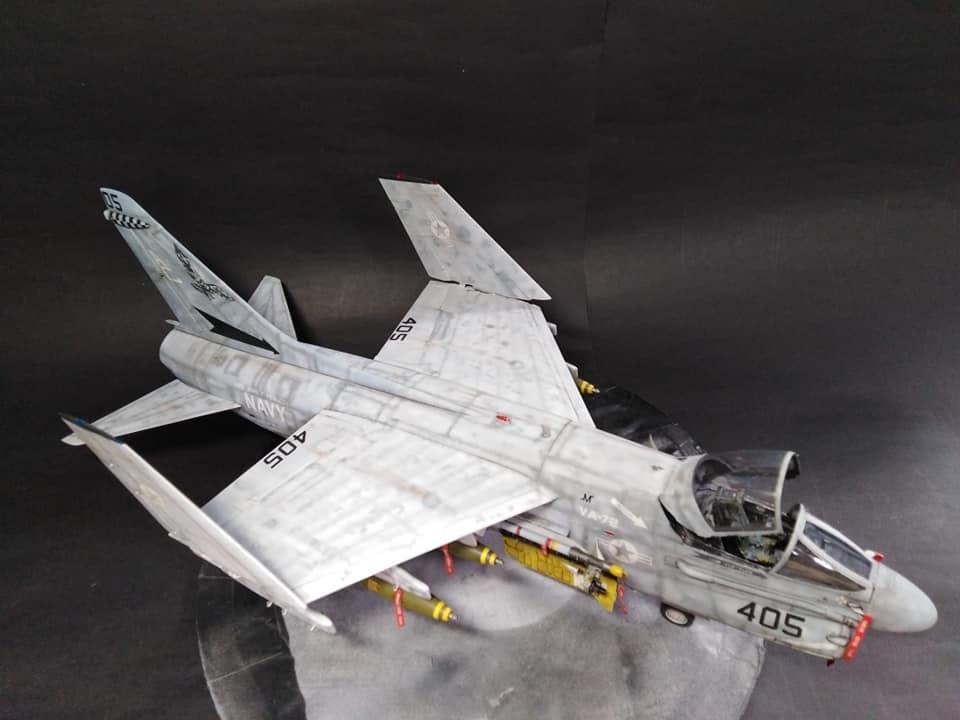
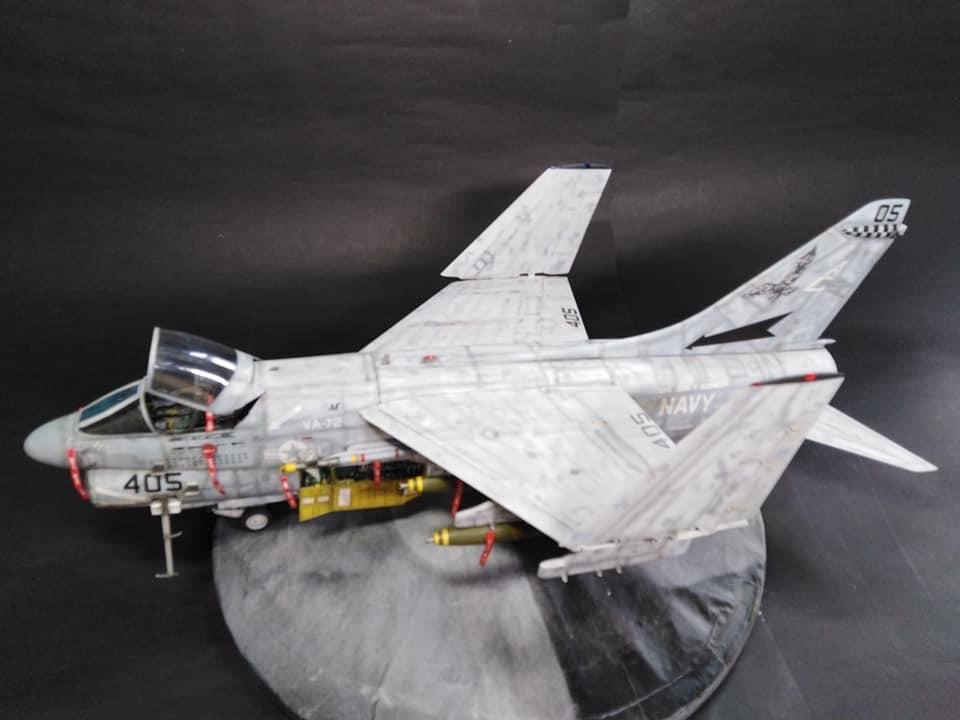
This is my Trumpeter 1:32nd scale A-7E Corsair.
Aircraft is complete, just need to finish figures then can mount everything into place on its base. The base has already been finished to look like a section of Flight deck on a carrier.
Ian R.
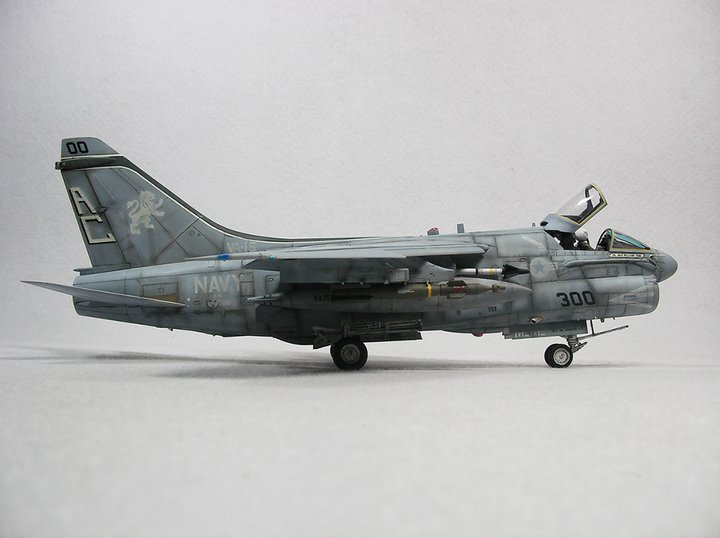
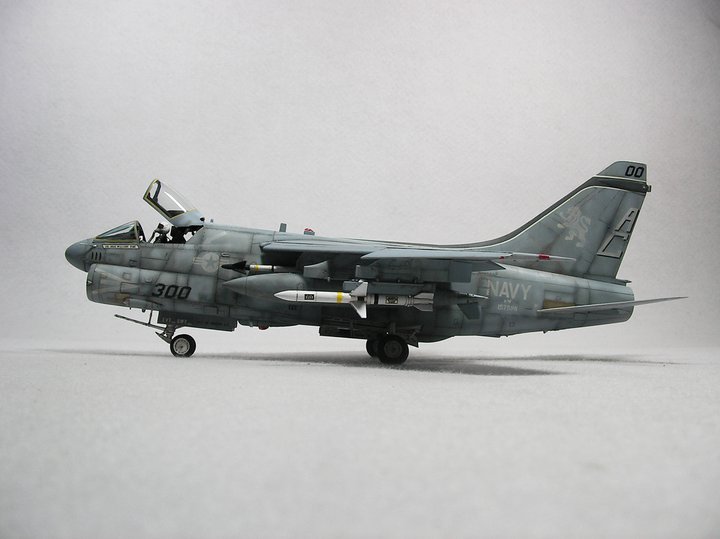
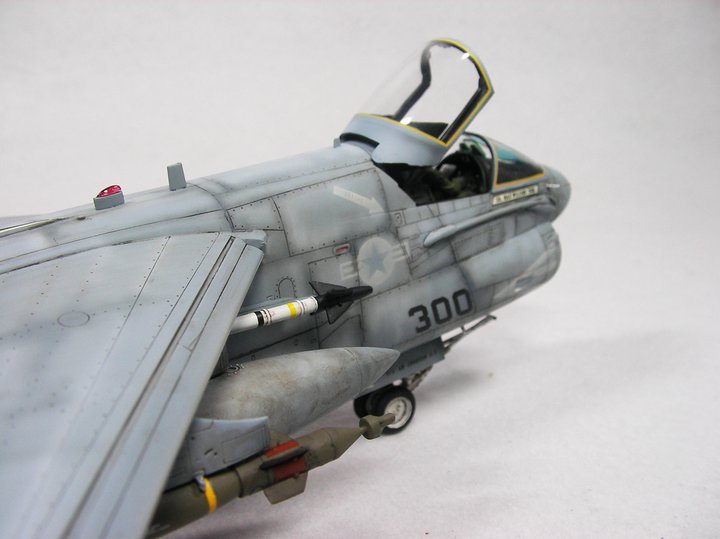
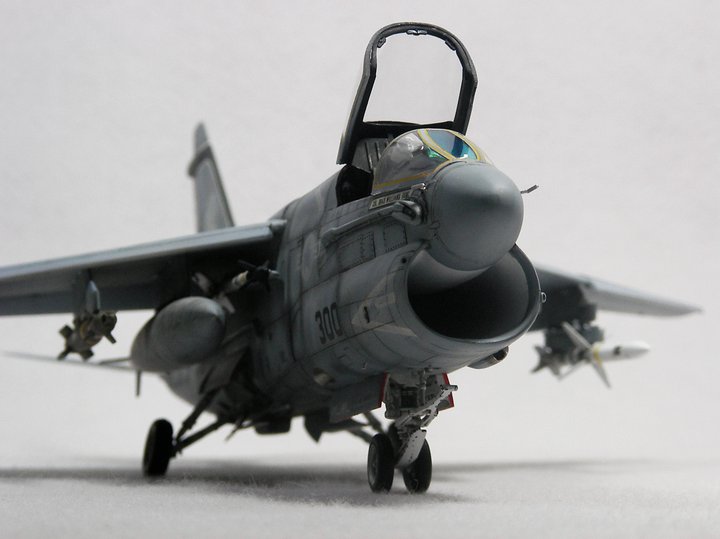
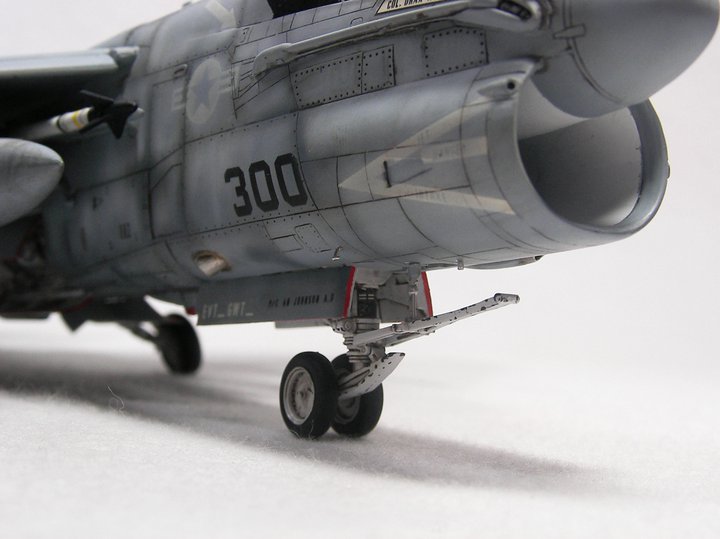
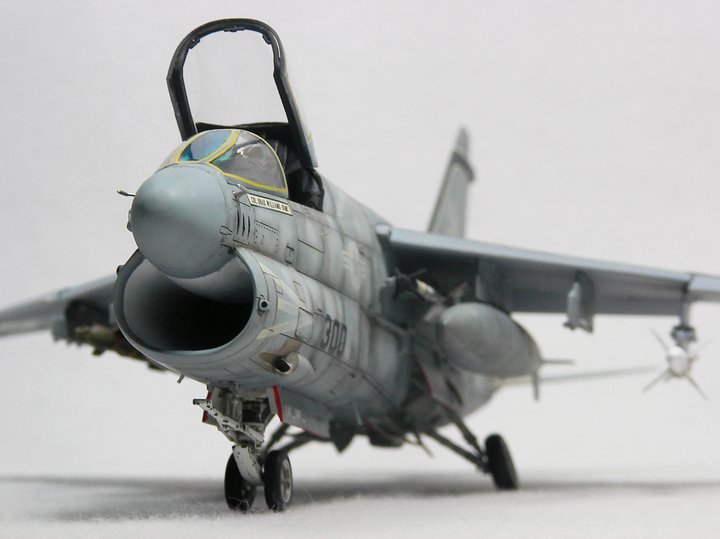
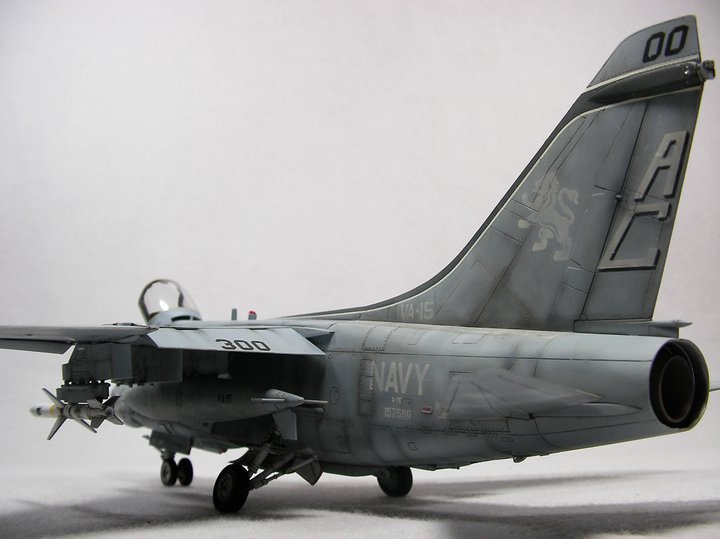
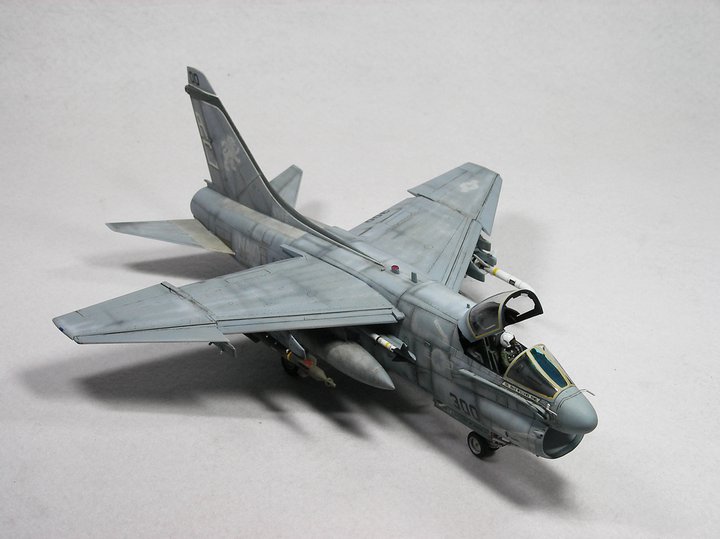
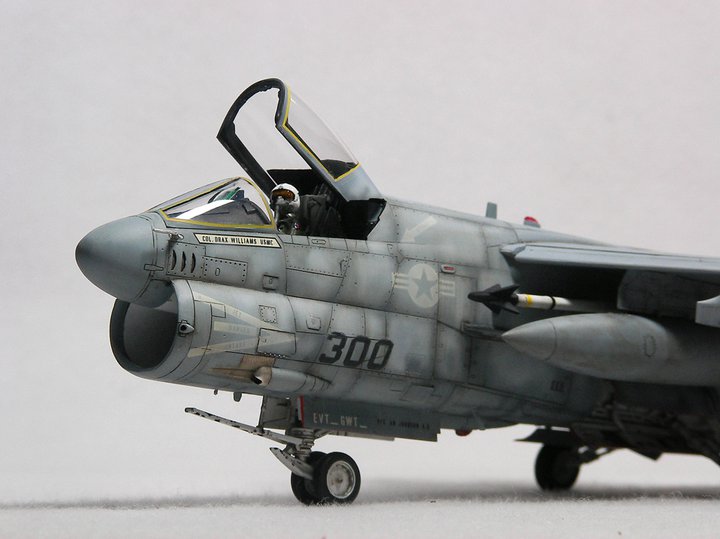
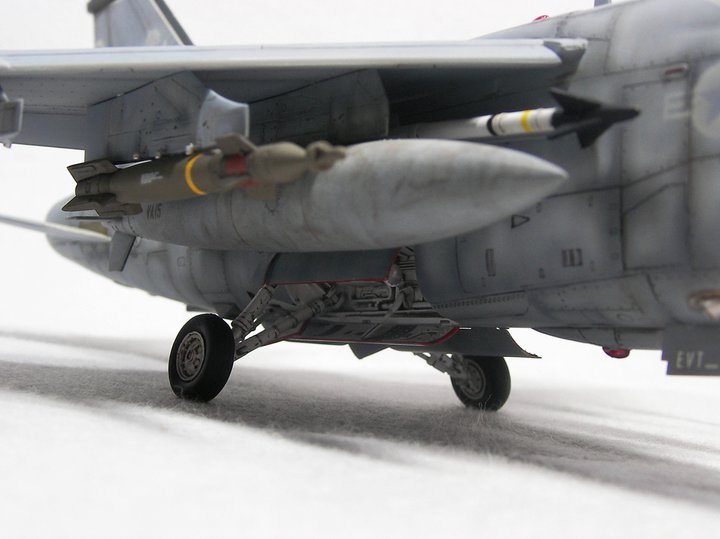
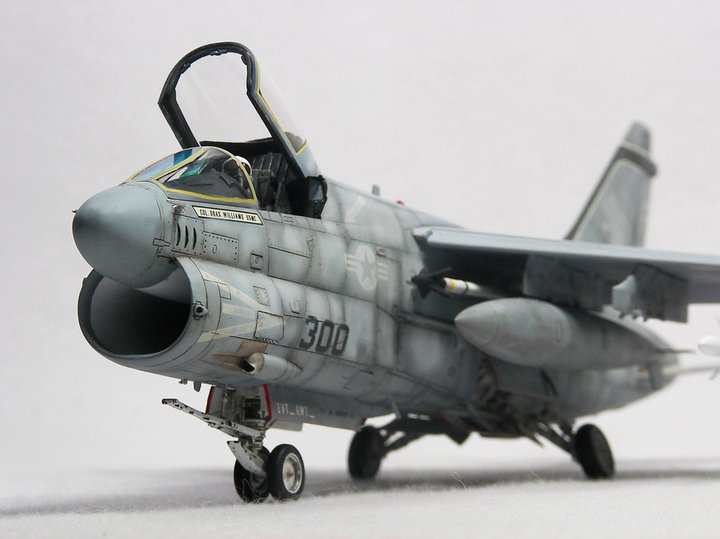
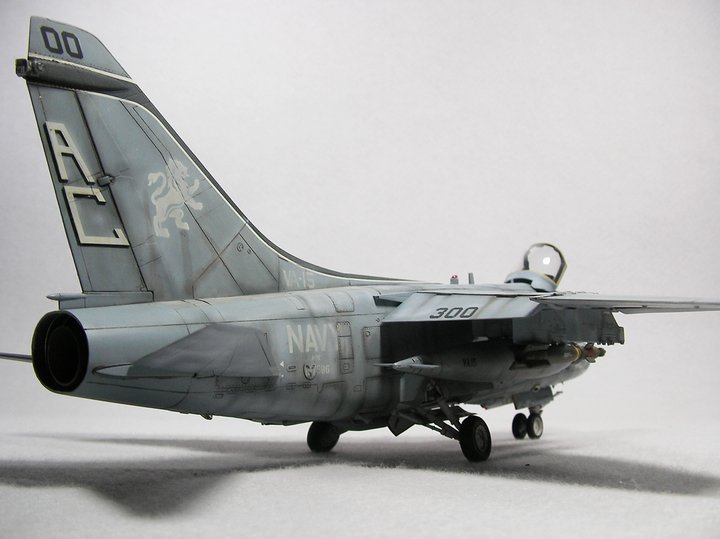
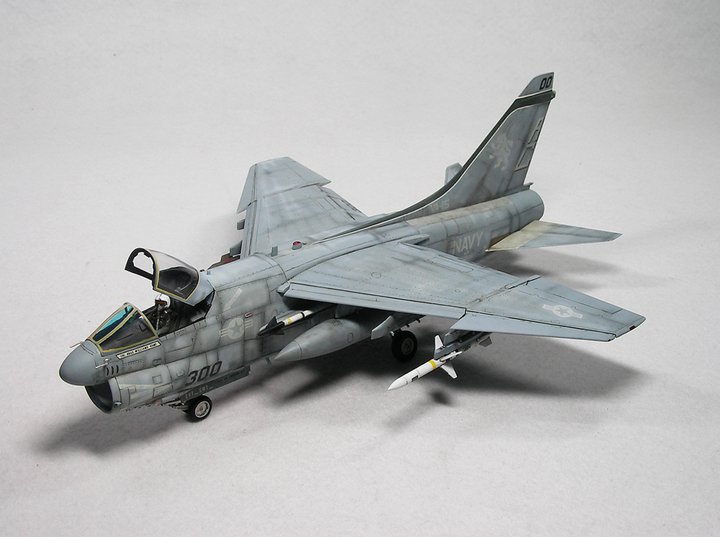

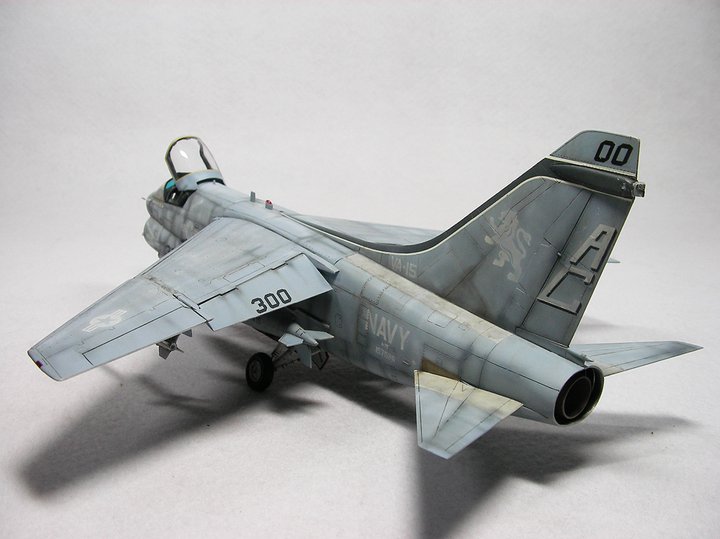

I used Vallejo paints, varnishes and washes to finish the plane.
Decals are again from the box as are the invasion stripes that are also decals. They are half an inch too short for the wrap around, so I was fortunate in having two kits so I could cut the spare ones to fit.
What a fantastic kit it was to build, I enjoyed every second of it.
Chris A.
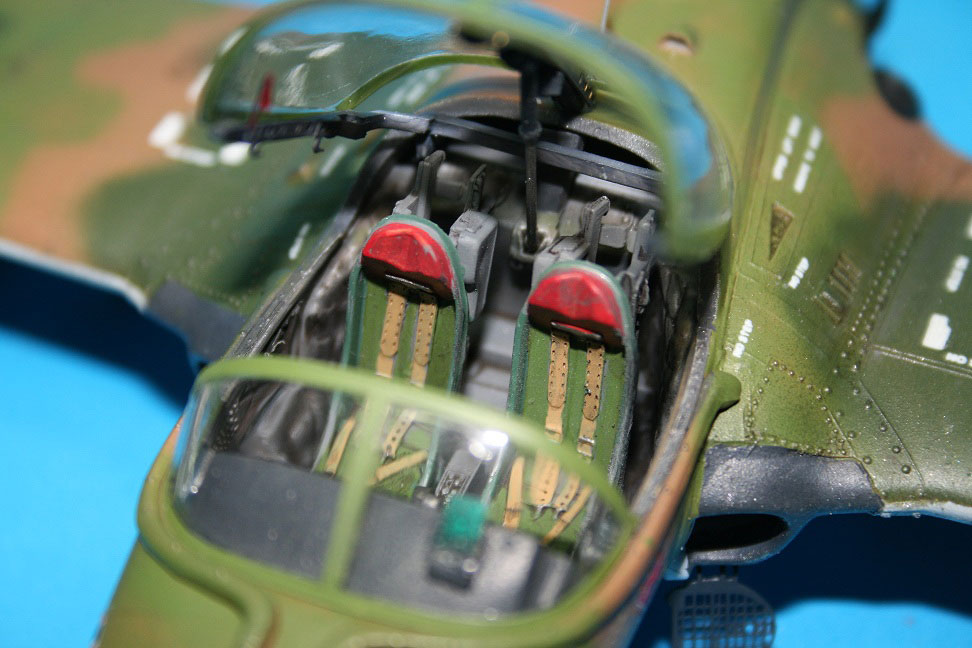
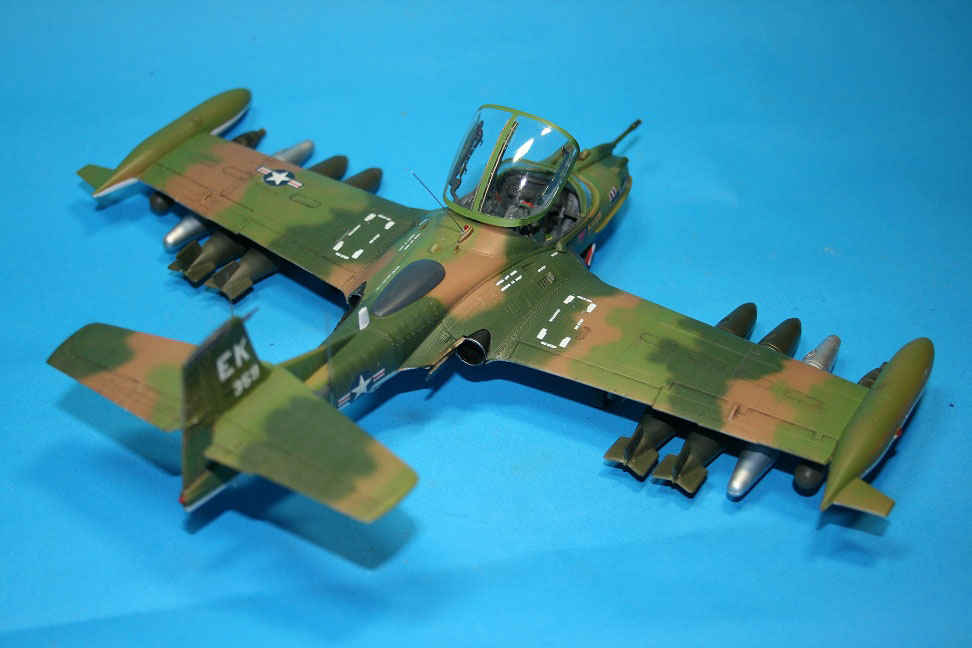
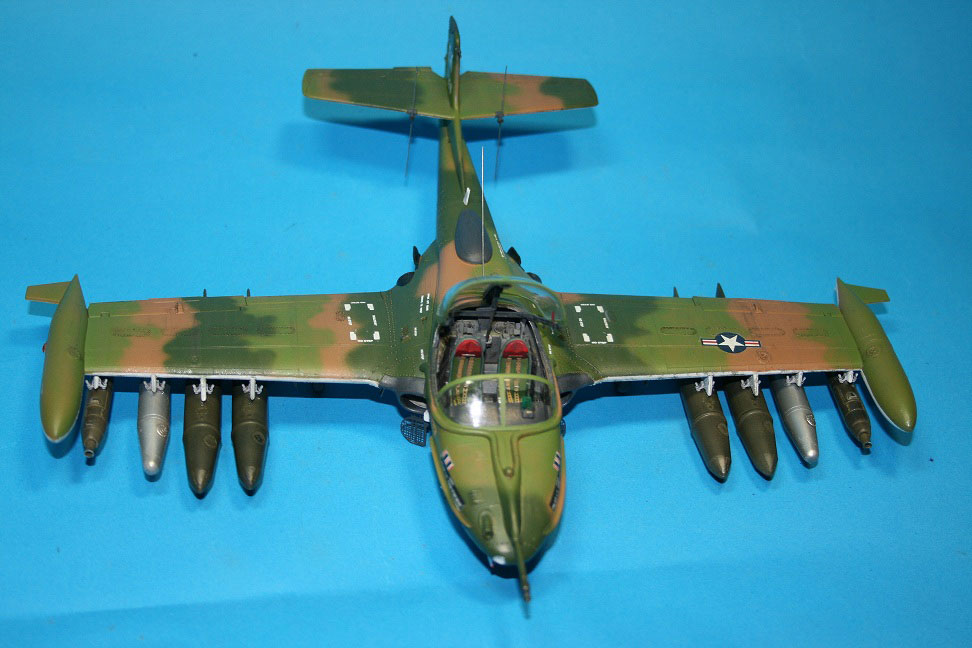
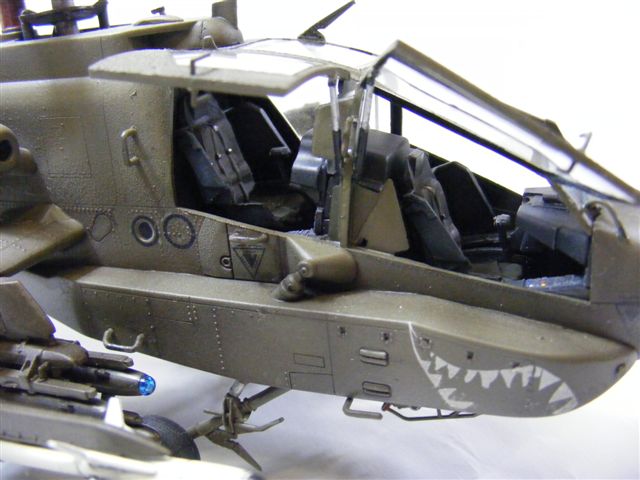
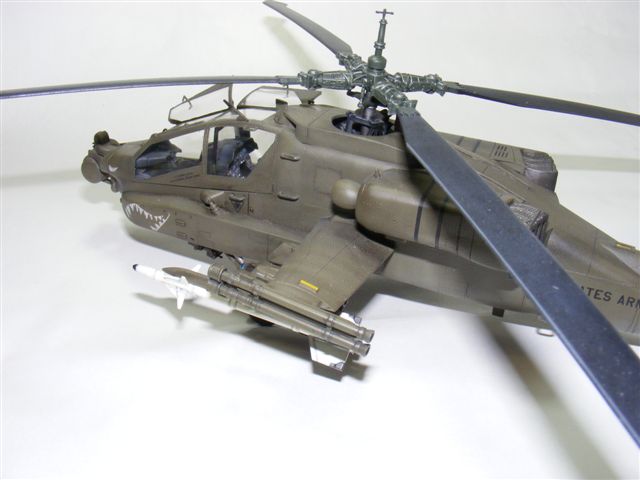
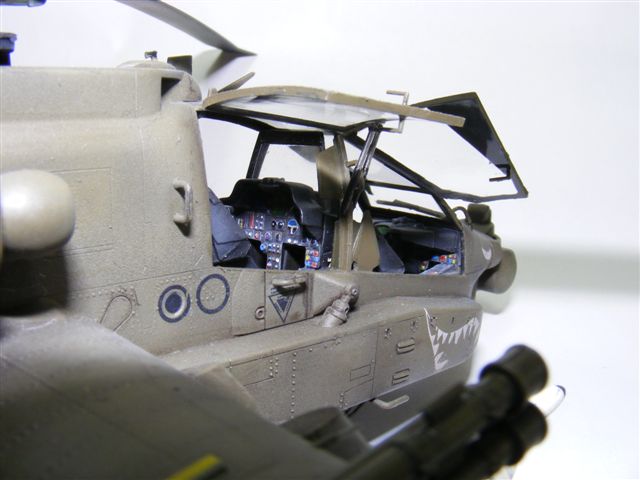
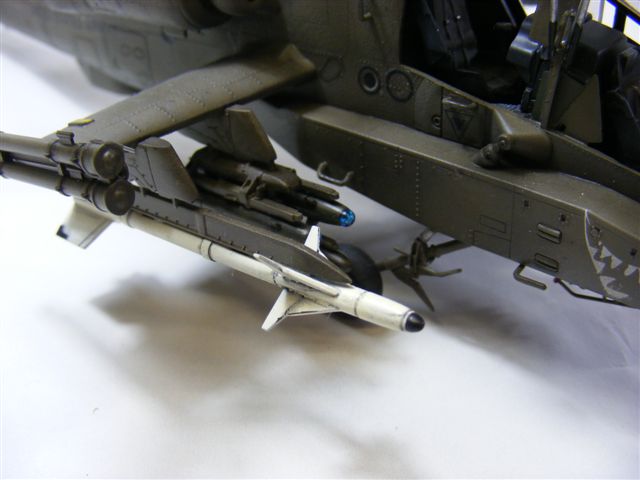
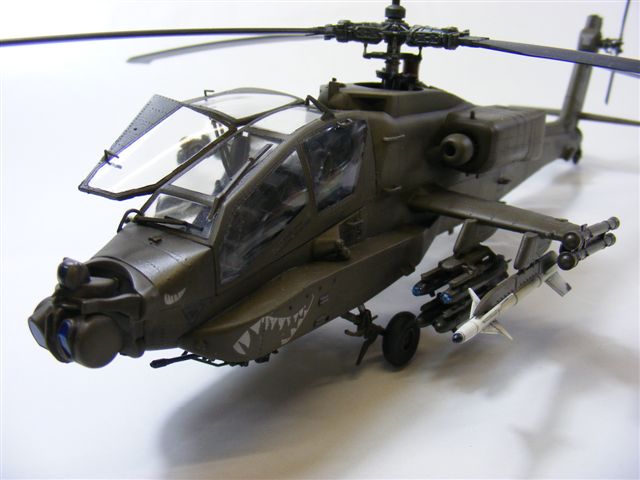
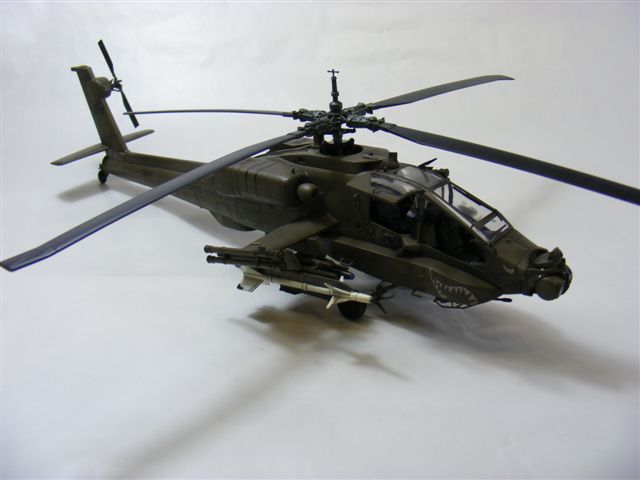
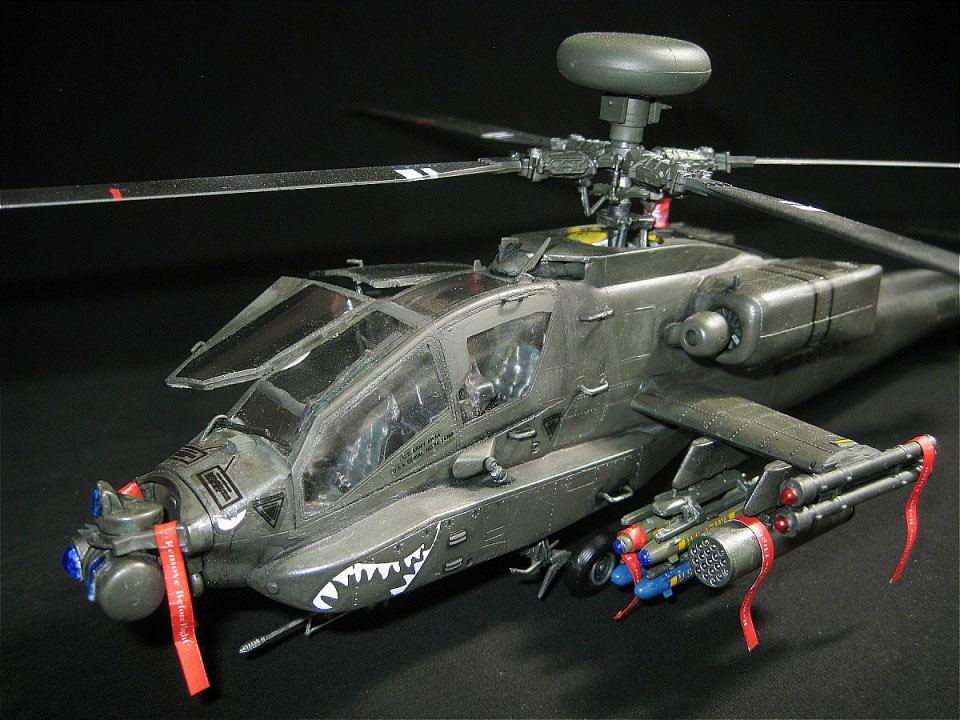
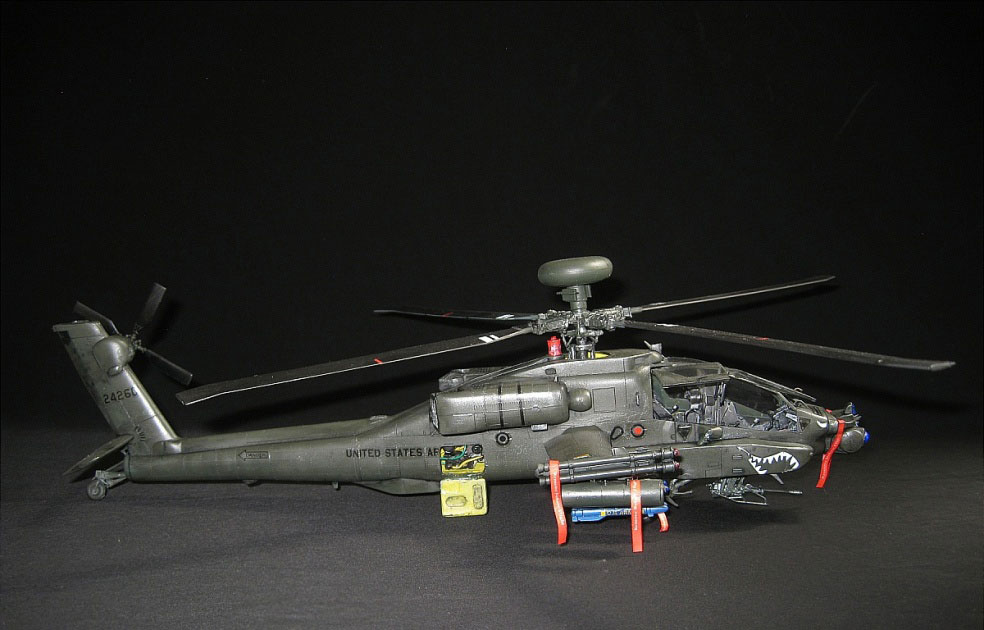
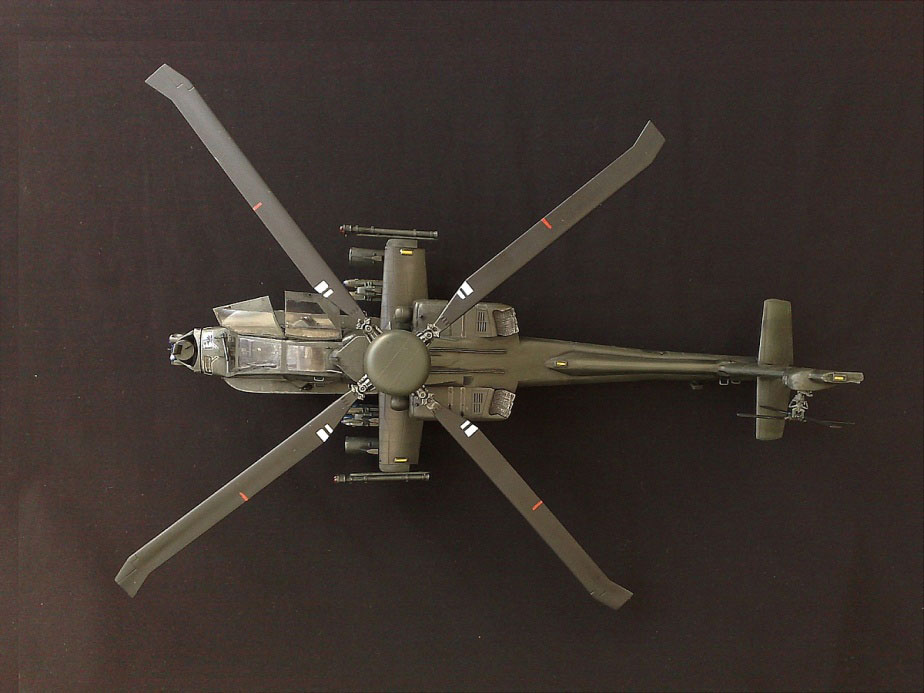
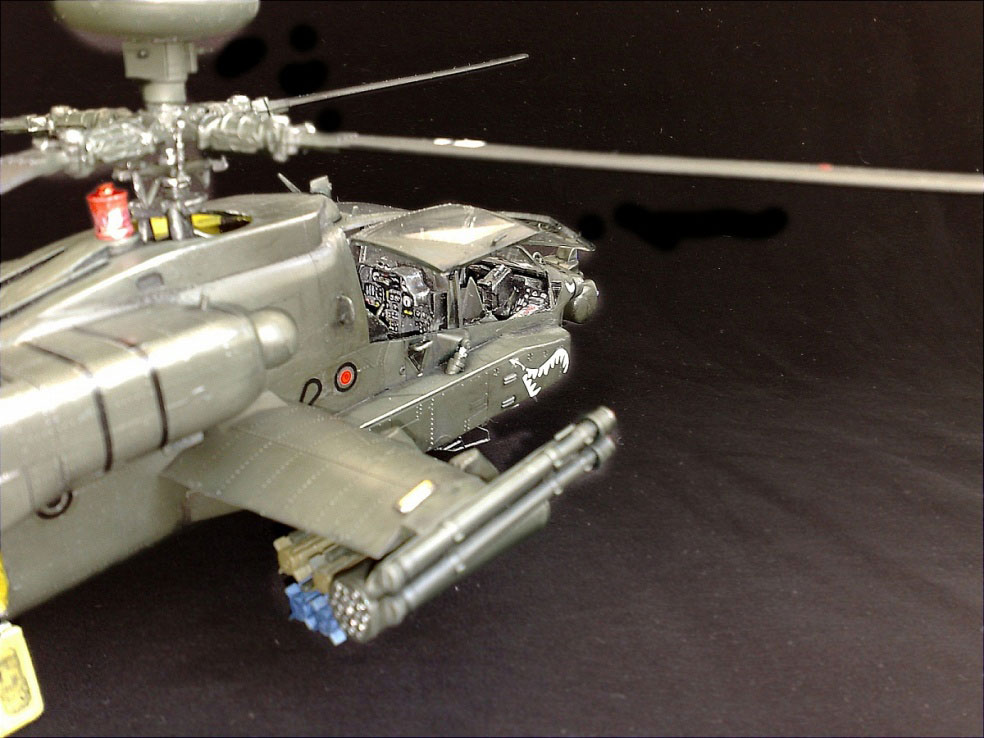
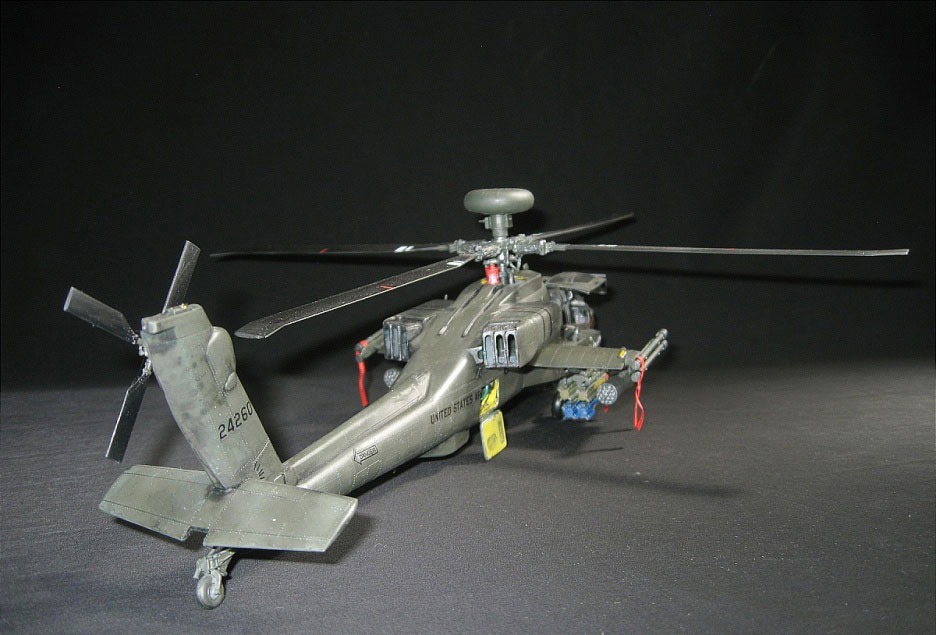
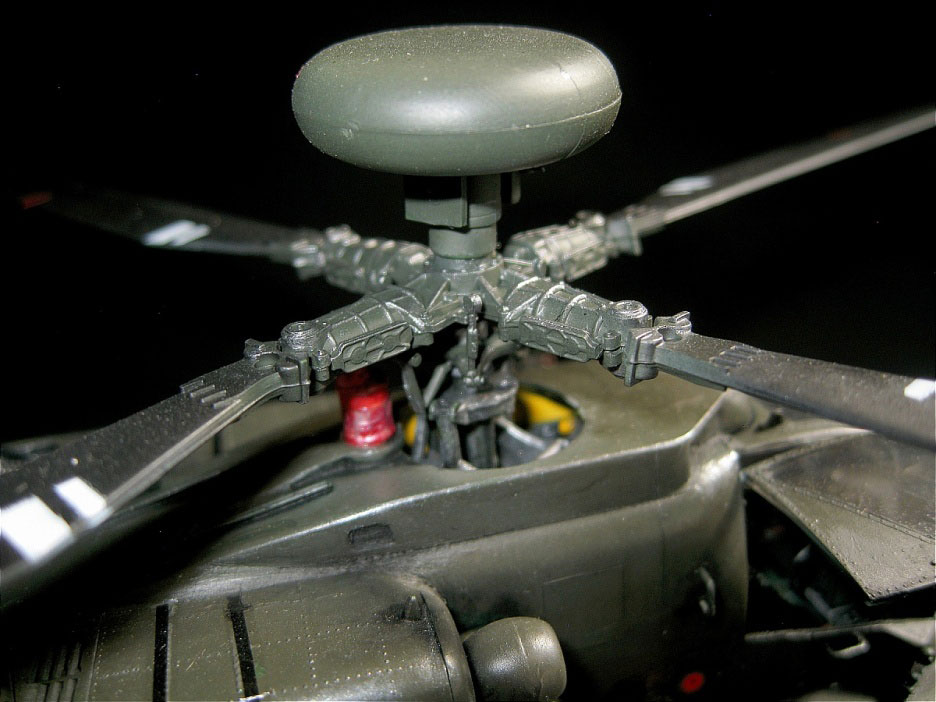
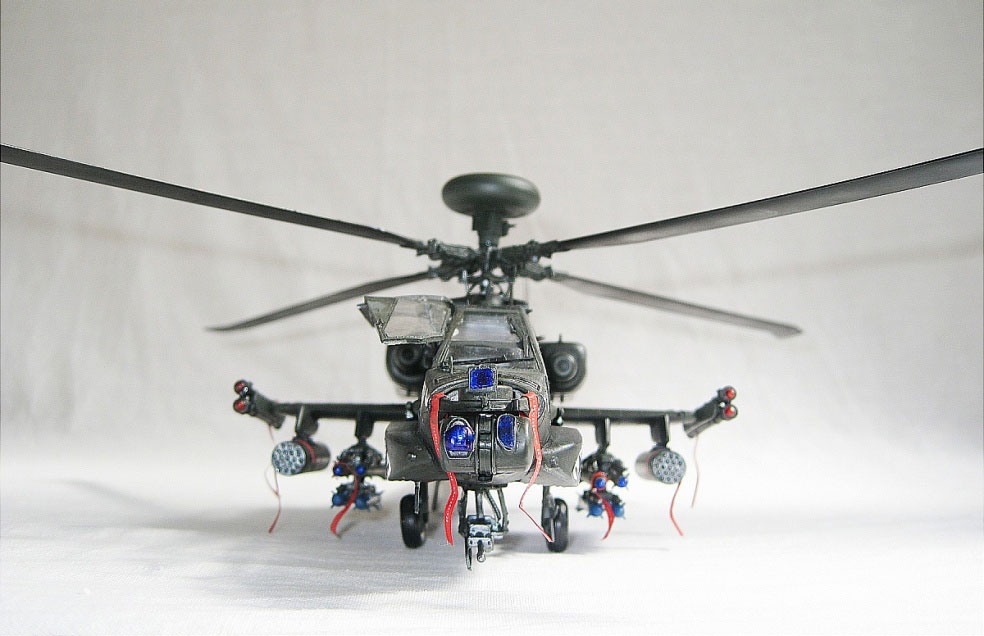
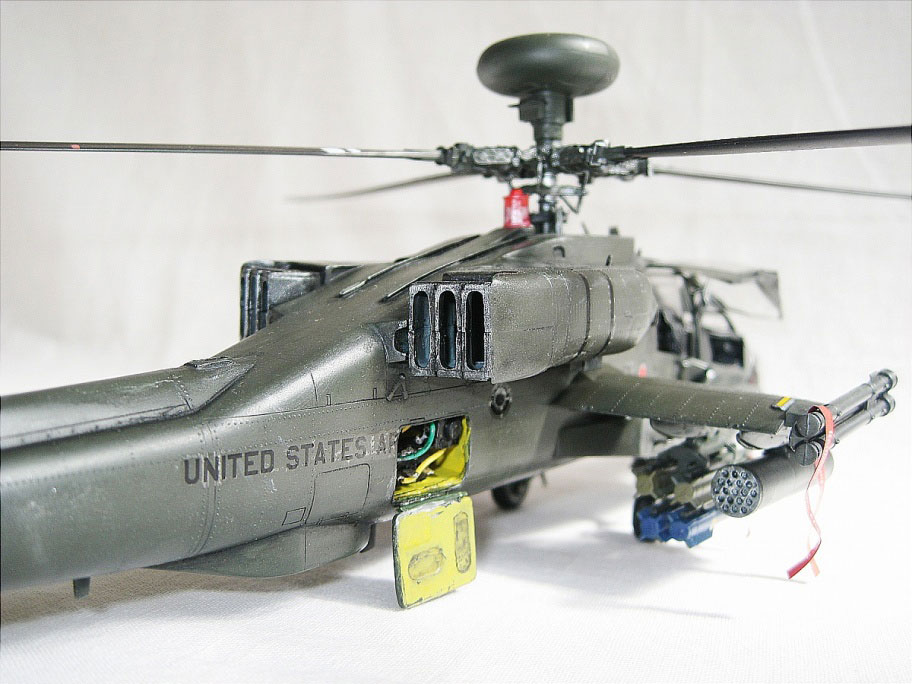
This is the Academy 1:48th Apache AH-64A. The kit was purchased at a local model show for the handsome price of £2.50, as it turned out a total bargain. After looking at the array of aftermarket add on that are available and the cost of purchasing them I decided to go for another “out of the box” build using extra materials I had lying around and some bits from the spares box.
As with most builds things started with the cockpit. I don’t know if any of you are familiar with the Apache cockpit, but to say that it is dull is an understatement! It’s basically black on black so the bring a little life to this area I indulged in a little “artistic” licence and used colour on the switches and instruments. The cockpit tub was sprayed Black grey and then highlighted with a dark grey mixed with a little light blue. The whole thing was then dry brushed with white to pop the detail and then the previously mentioned colours applied. The seats were painted in olive green and then an oil wash of lamp black was applied to show the creases. This was then put aside to dry and the next phase started.
My next task was to construct several sub-constructions, these being the engine nacelles, chain gun mounting platform, tail rotor hub (this contains 16 individual parts and is no bigger than your thumb nail!) and the main rotor. Once constructed one of the main flaws with the kit was discovered, the join on the engine nacelles. With a large amount of sanding, filling and more sanding the prominent seam was removed along with the entire lovely panel line detail and rivet pattern. I then had to consult reference material to re-scribe the panel lines and I then spend 2 hours punching the rivet detail into plastic softened with liquid poly. Once this was completed the cockpit was fitted into the fuselage and the 2 half test fitted. This revealed another major problem; the cock pit was over width and caused the fuselage to bulge. Not a great issue but lots of time spent trimming sanding and test fitting to get things right before committing to the final glue up. I am pleased to say that everything else went together well and the rest on construction went very smoothly.
One area that I did spend a little time on was the canopy. I removed this from the sprue with a hot knife as the plastic felt a little brittle and I was worried that the plastic would show crazing if too much pressure was applied. I then sanded the removal points flush with the wife’s nail file (she still thinks she lost it!!) and I then spent half an hour polishing the surfaces (in and out) with a polishing stick. Still being worried about the quality of the plastic I dipped all the clear parts in Johnsons Klear and left it to dry over night before masking with Tamiya tape. Once this was complete I then fitted the glazing to the fuselage with thin superglue and accelerator and addressed any joins that required attention.
Now the fun part, the painting stage. The whole kit was primed with Alclad micro primer and then base coated with Vallejo Model Air Olive Drab. I then highlighted the centre of all of the panels with the base coat lightened with about 10% sunny skin tone. Once this had been left overnight to dry I sprayed a highly diluted mix of the base coat over the entire model. I them applied a coat of Mig Filter ‘Tan’ for traditional camouflage, I find that this is best done now as the Vallejo Model Air paints I use give a nice semi gloss finish, a surface that the Mig filters seem to like. Once dry I then glossed the whole model with Klear and applied the decals with Micro set and Sol, I did however have to go back over the decals with Gunze Sangyo Mr Mark Softener (this is more aggressive than Micro Sol) before I was happy with the finish. I then applied another coat of Klear in preparation for the oil washes.
I used Mig’s Dark Wash for the pin wash on the upper surfaces and a mix of Payne’s grey and lamp black for the underside. Once dry the whole model was treated to 3 coats of Vallejo Model Air matt varnish. Job Done!!
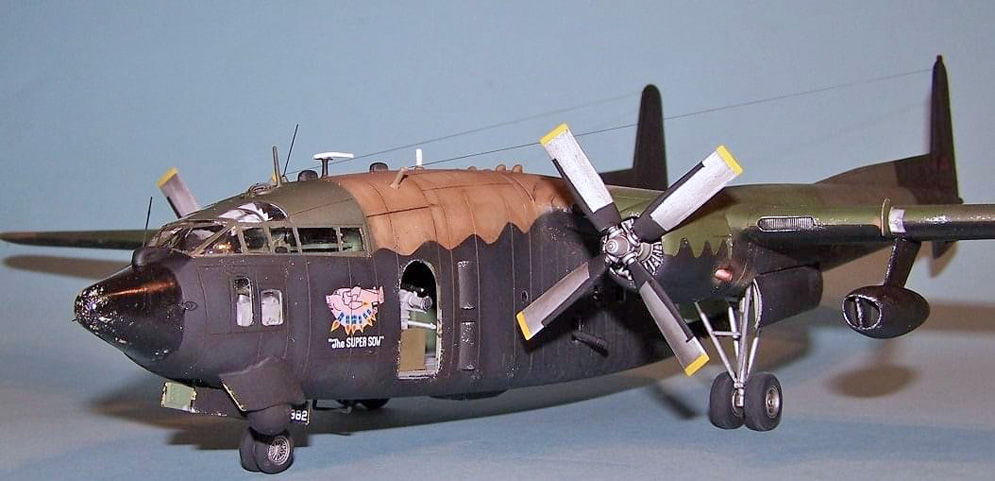

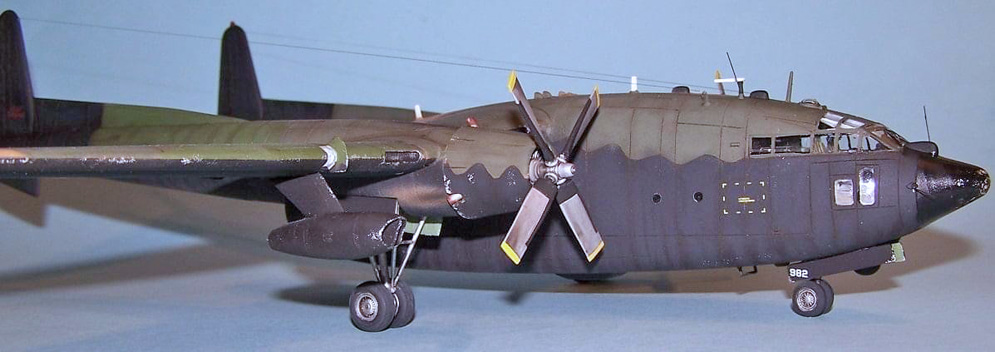
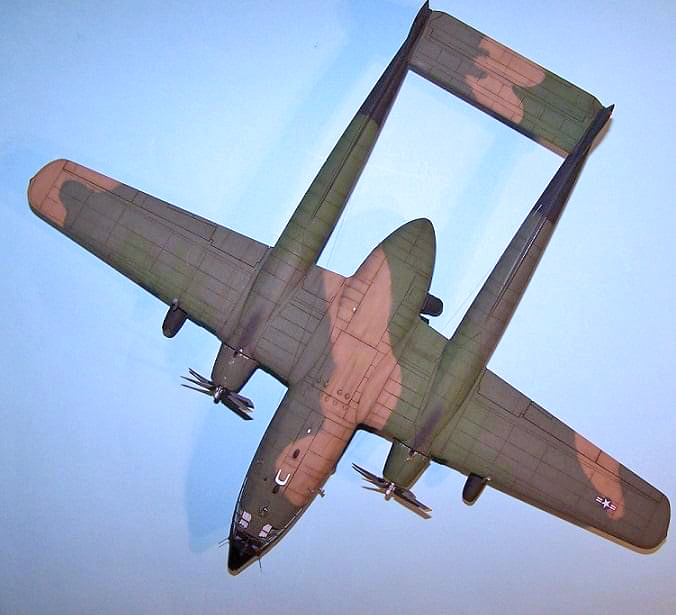
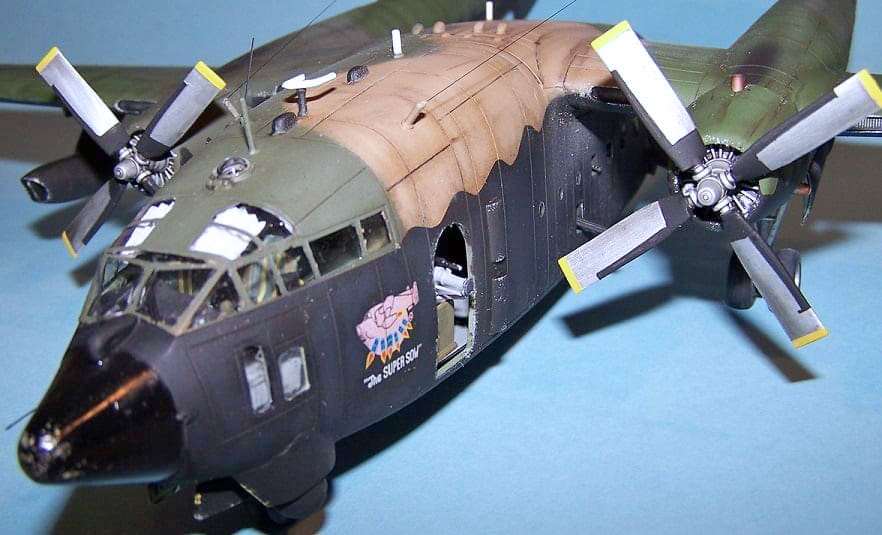
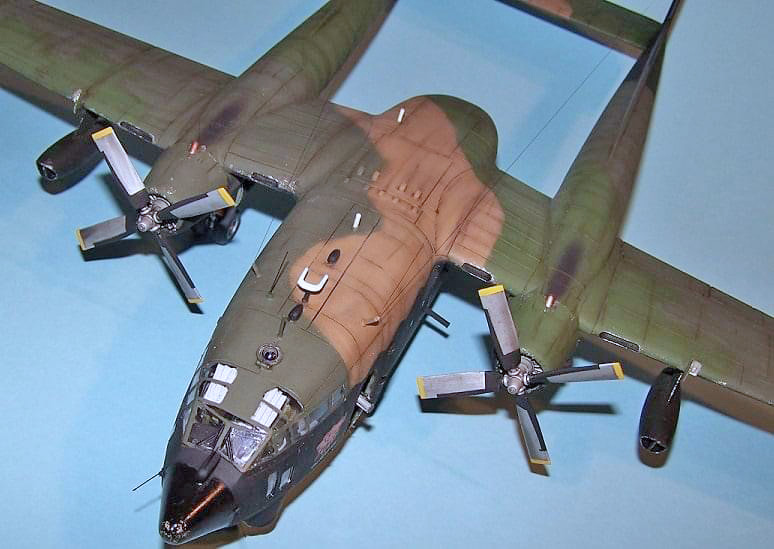
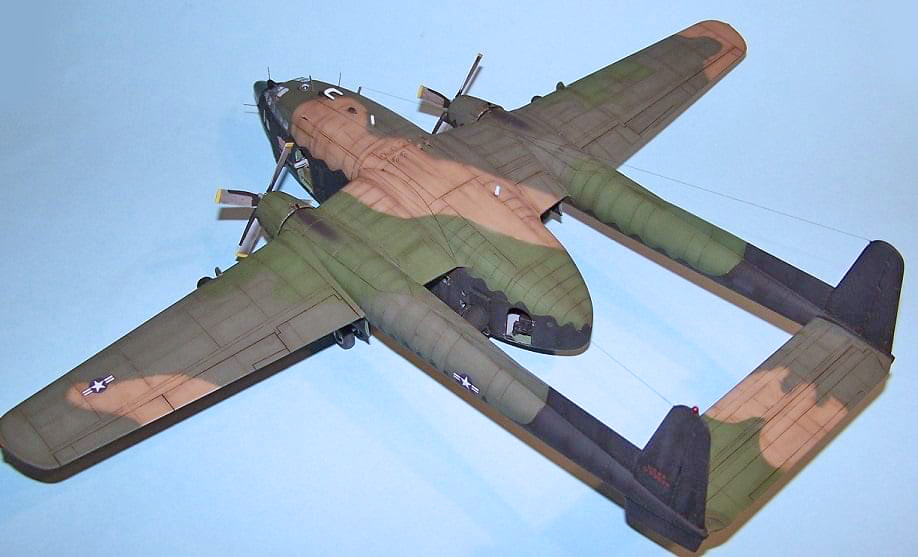
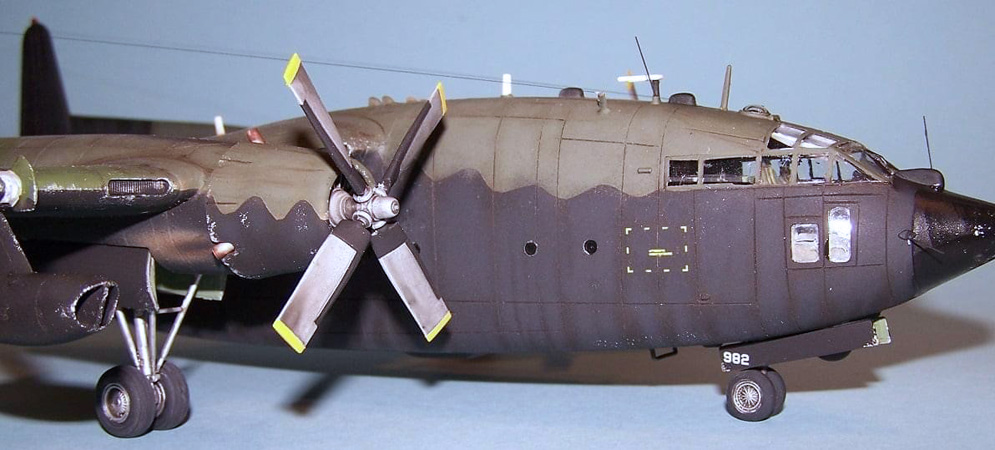
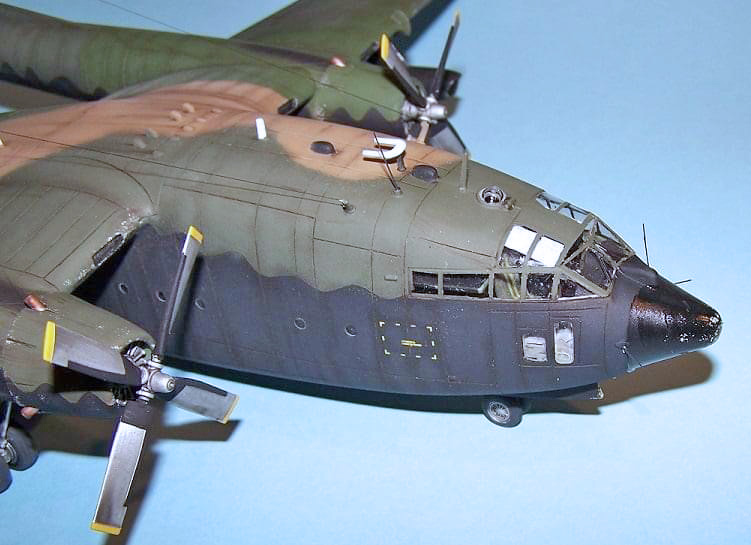
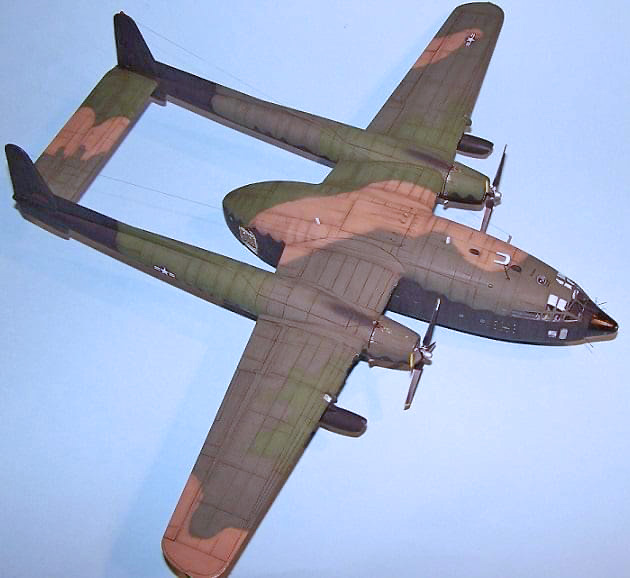
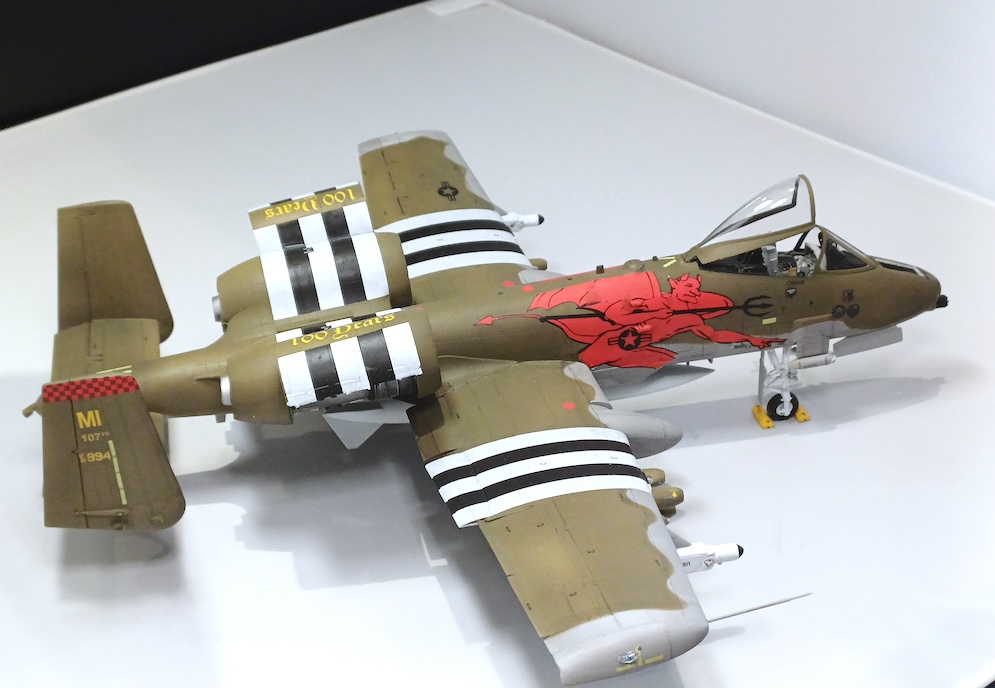
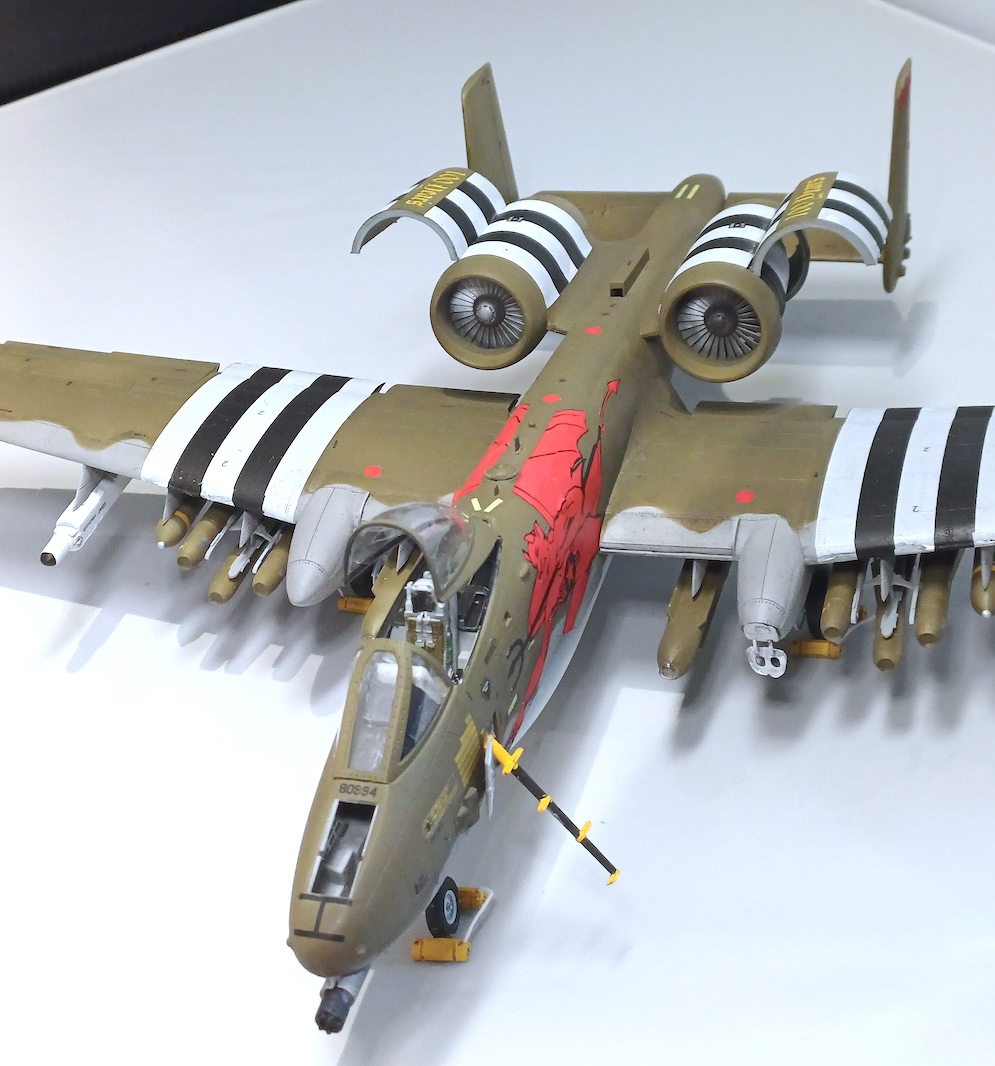
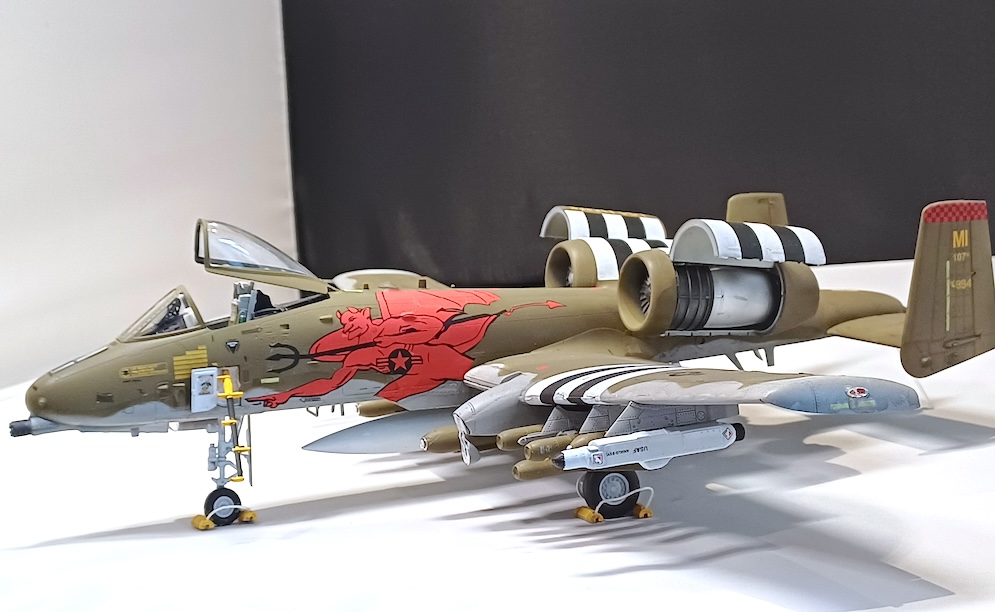
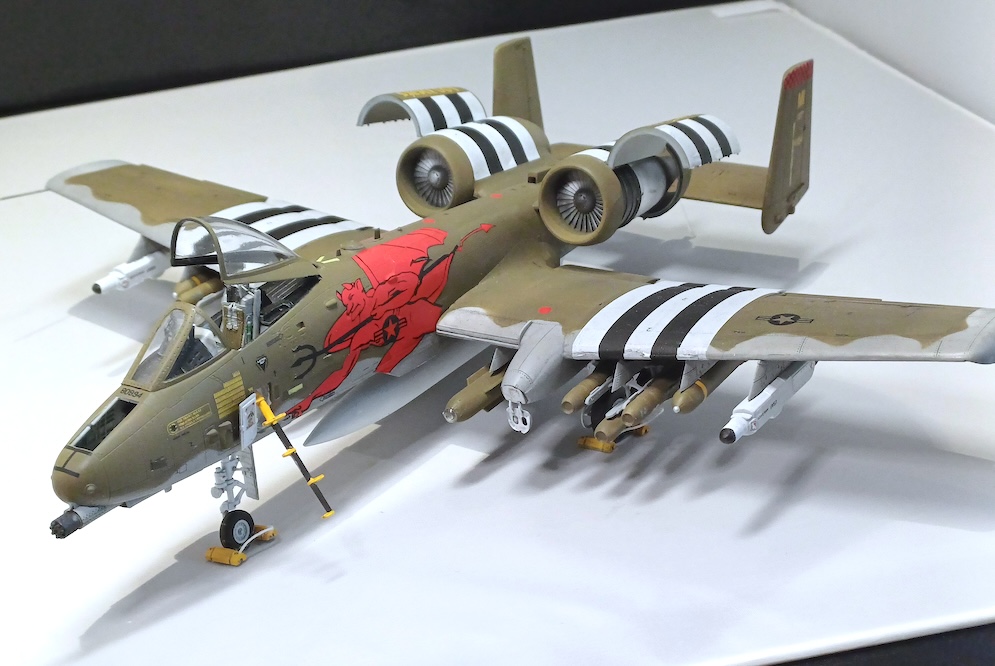
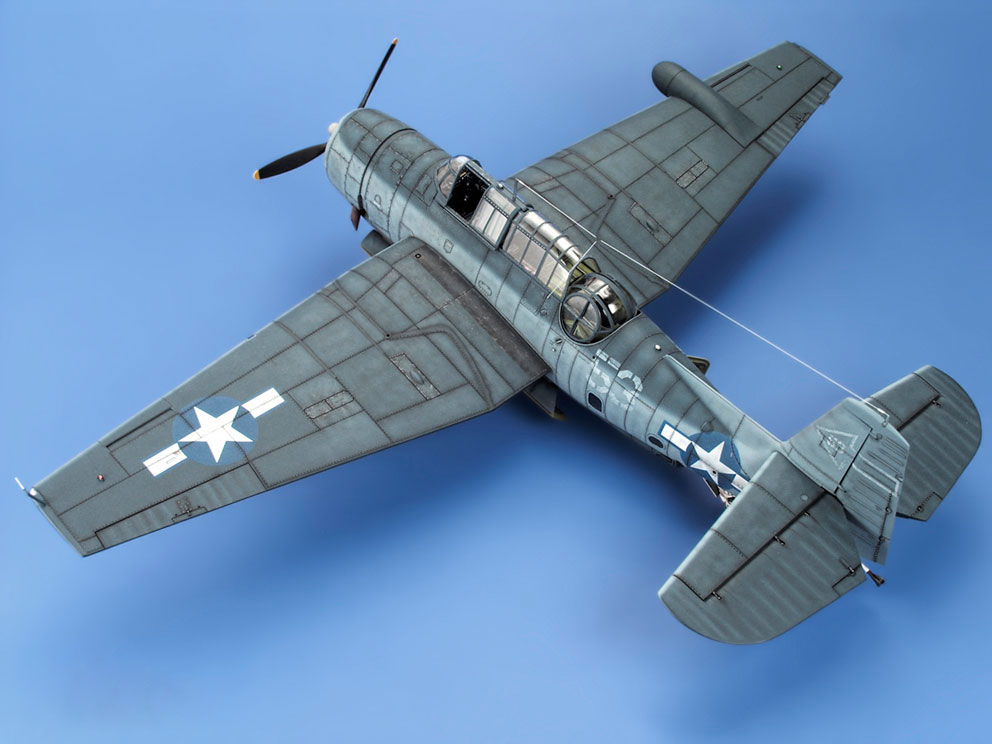
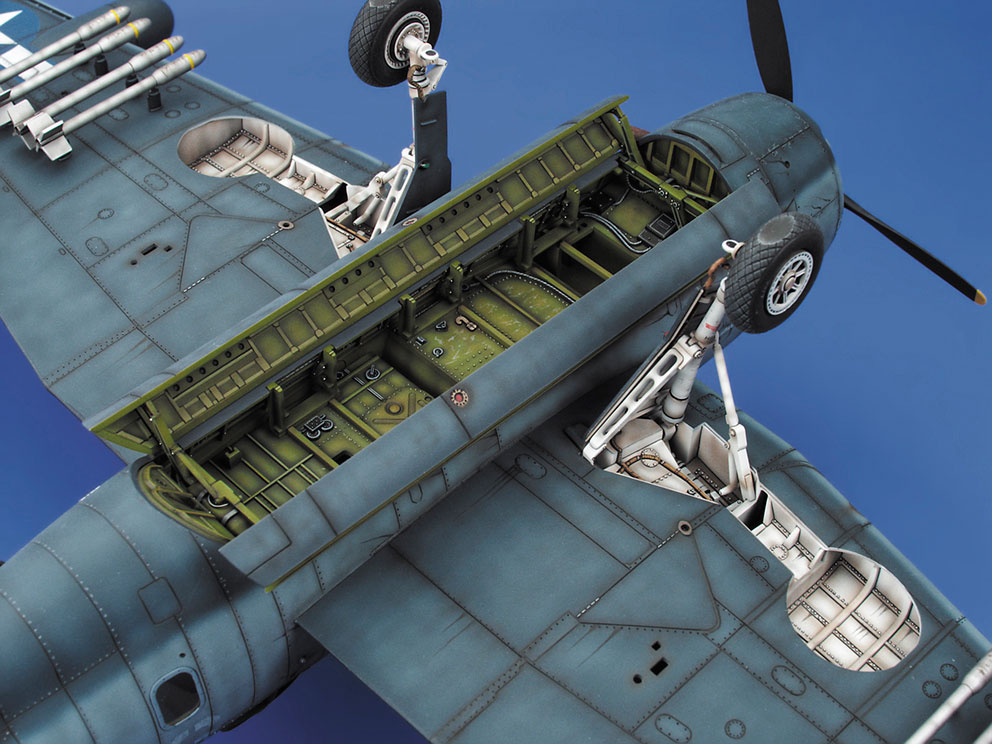
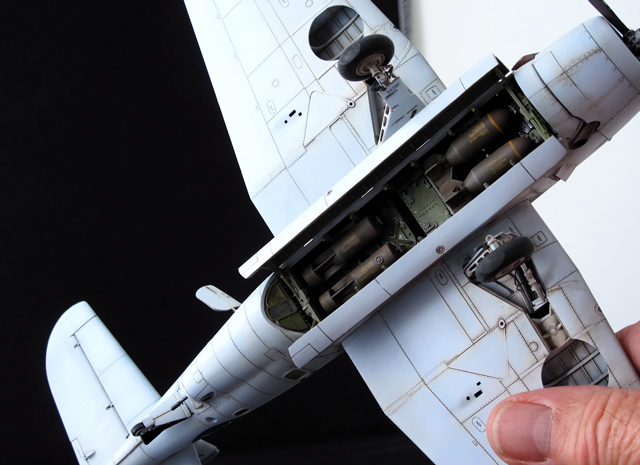
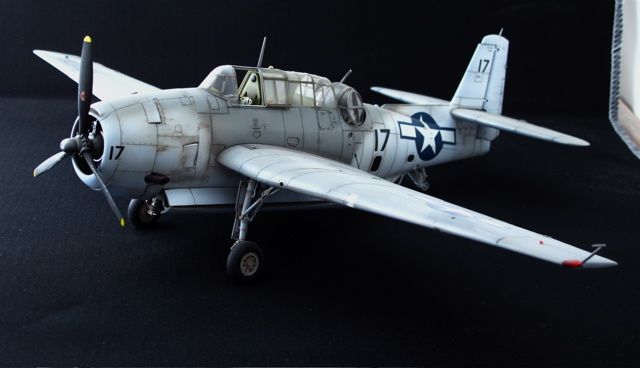
This is my Italeri AC-119G Shadow gunship in 1:72nd scale.
Panel lines were engraved, mini gun barrels replaced with finer resin aftermarket ones.
Painted with Humbrol enamels.
Hope you like it…
Angelo P.
This is my second model.
We have limited equipment in my country (Iran), for example I built the engine from waste. I made Remove Before Flight tags by print on paper.
- AH-64A Apache
- 1:48 Academy
- Paint from Italeri
- build in September 2012
- I made this model during about 10 days
Already here is embedded my model.
Best regards, Mohammad Adl from Iran
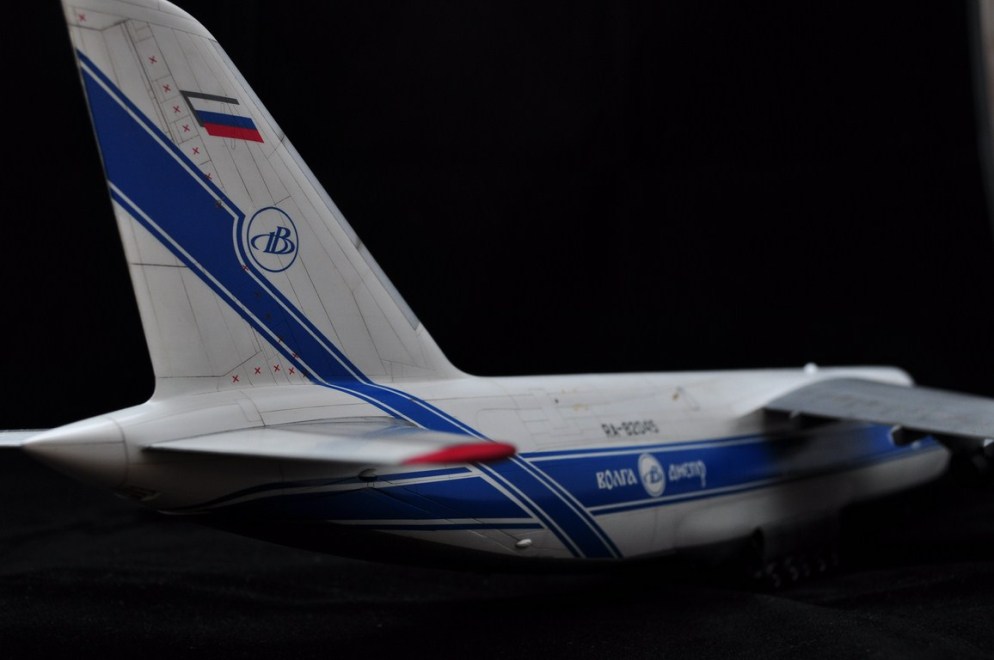
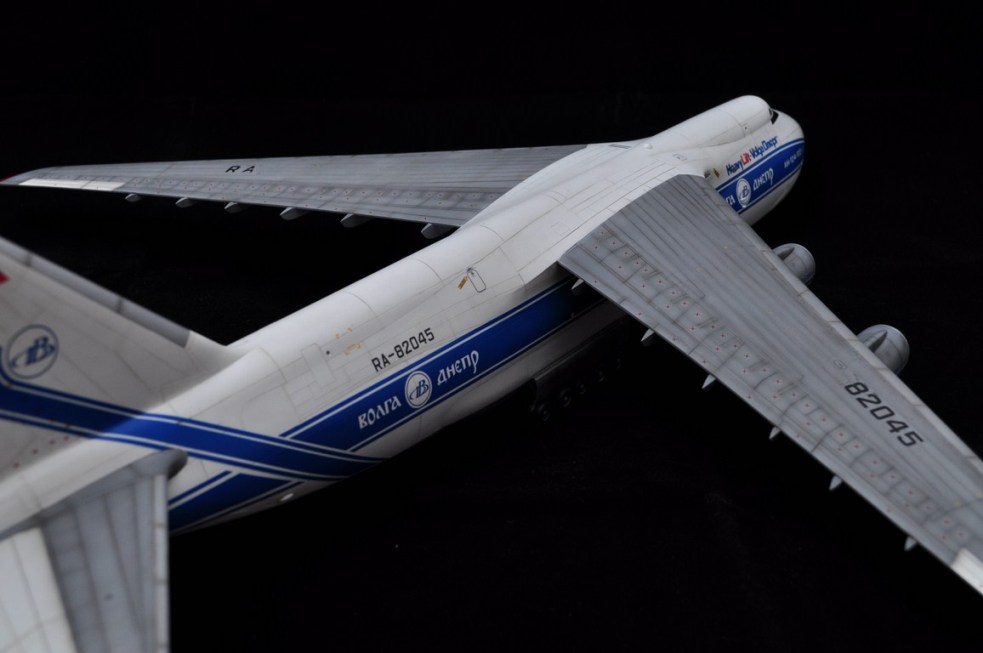
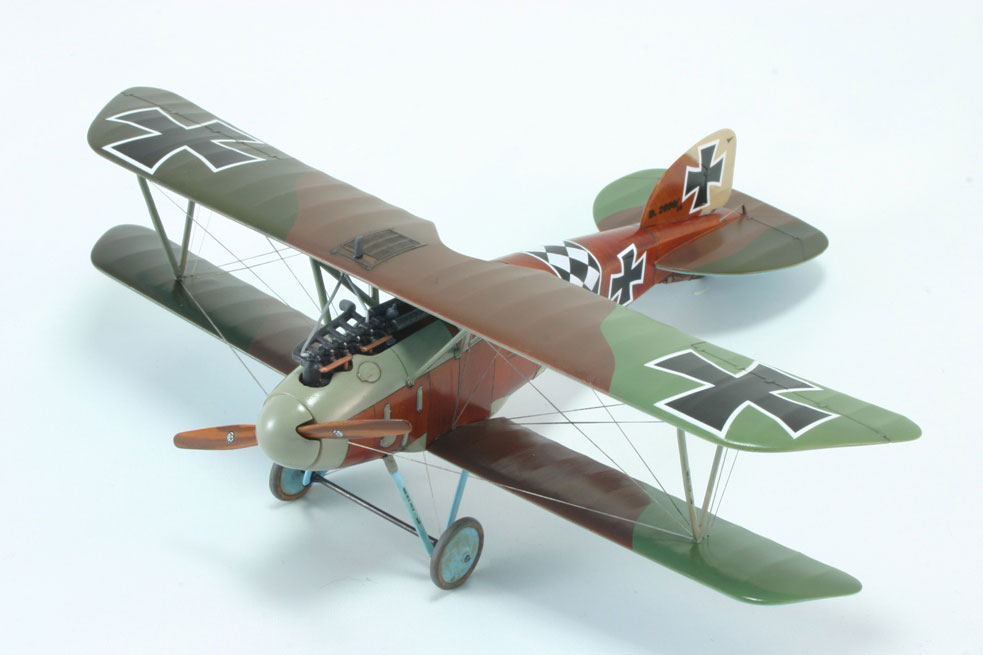
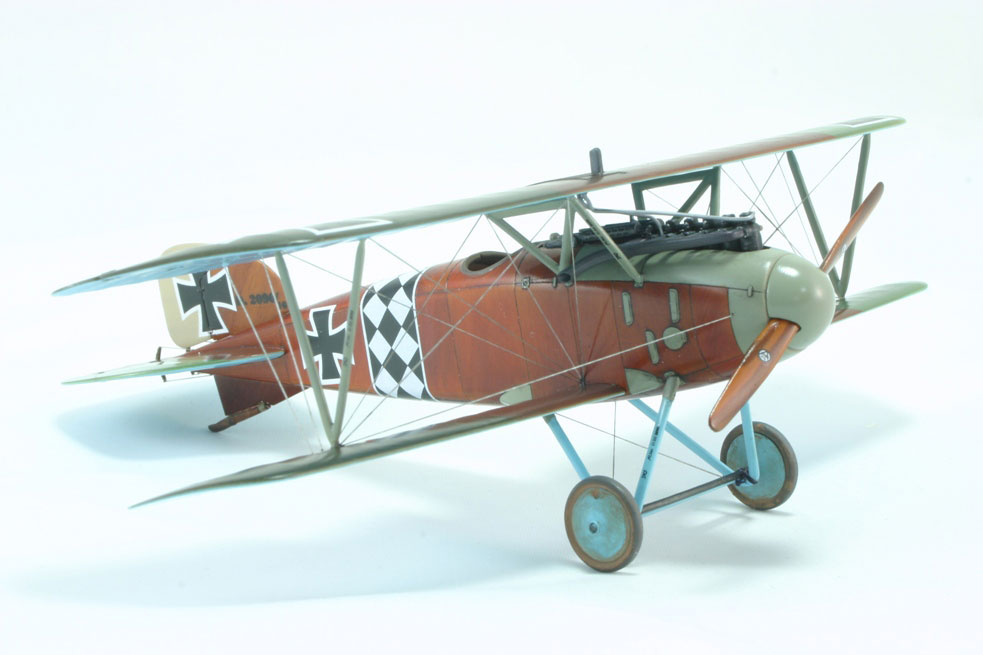
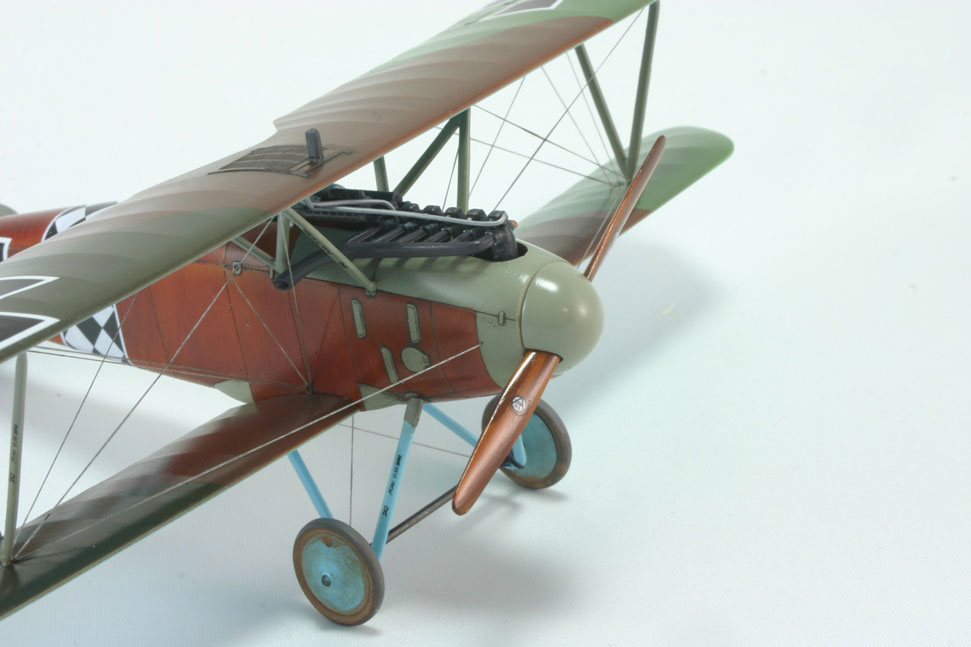
Best wishes, Alexander K.


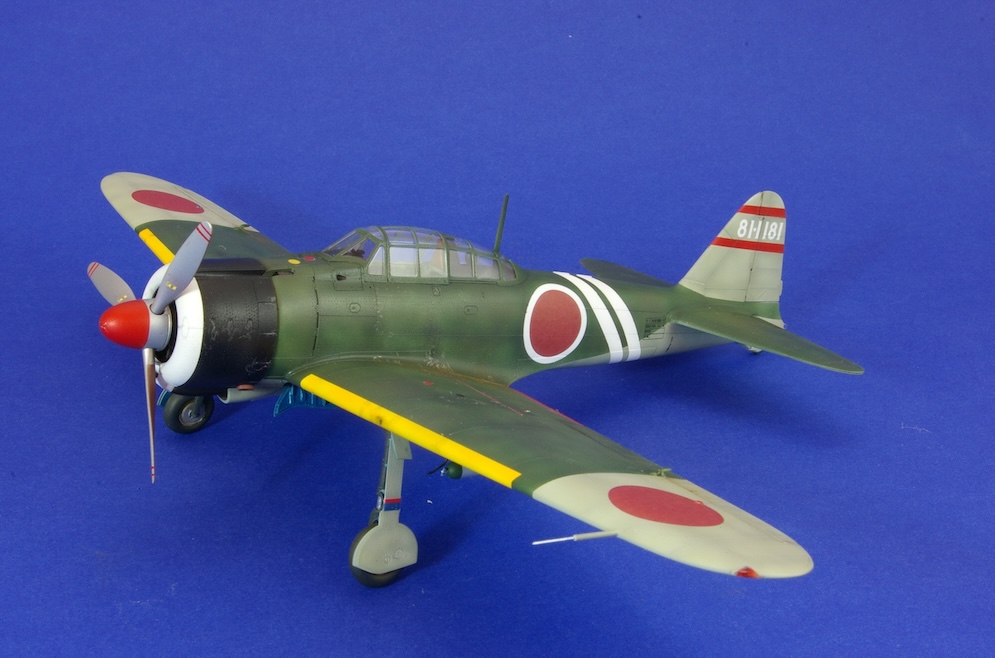
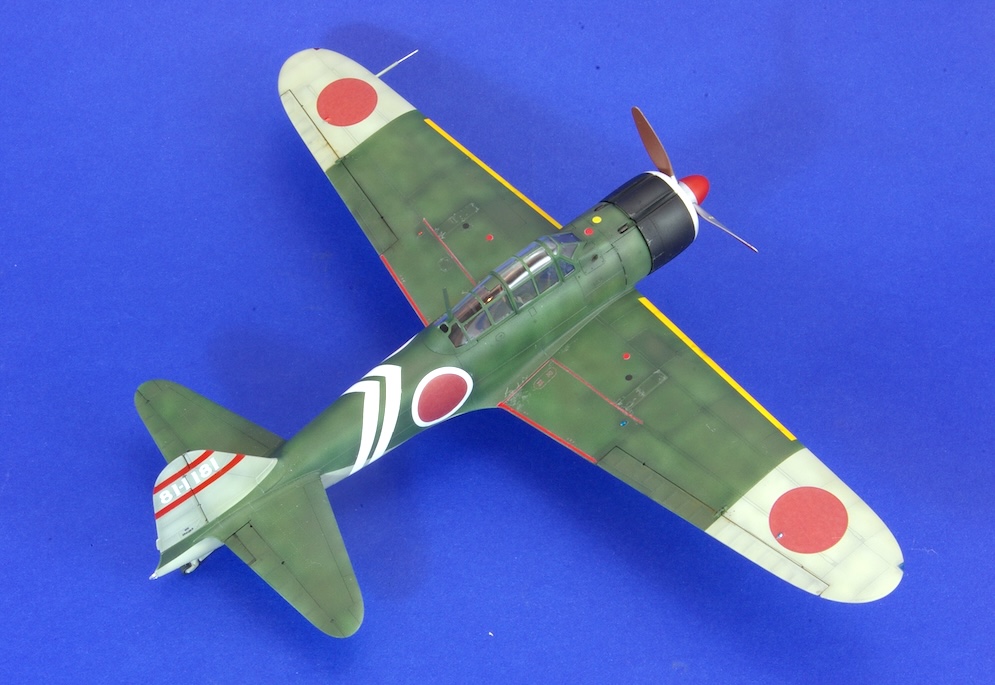
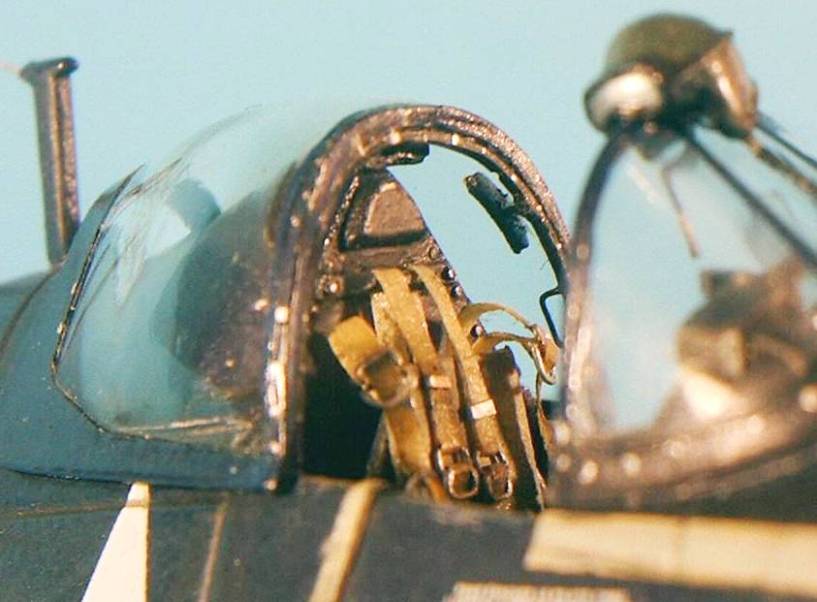
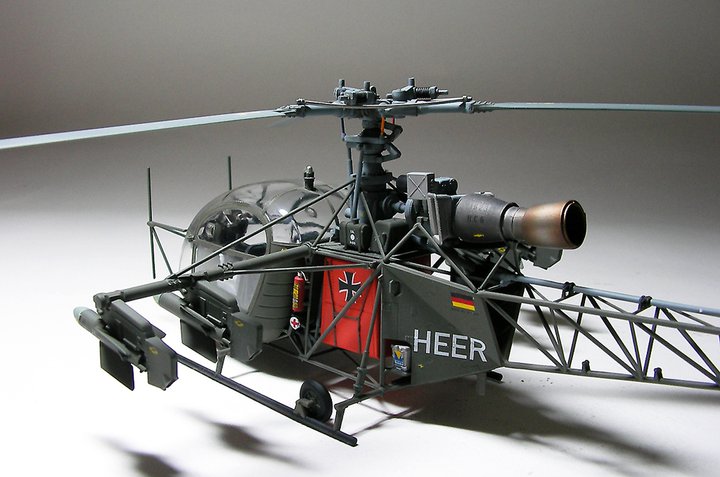
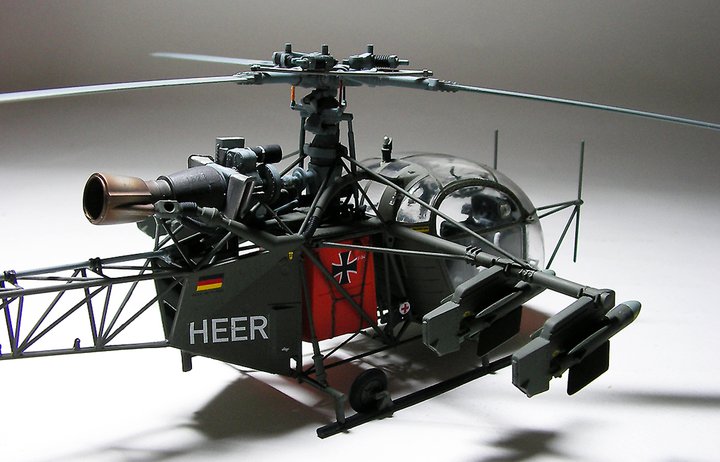
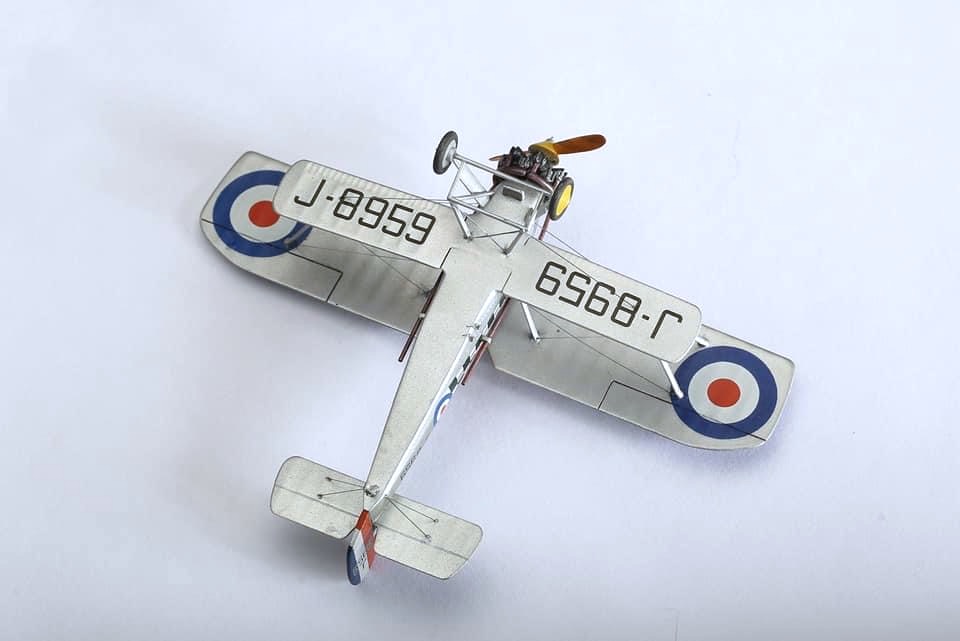
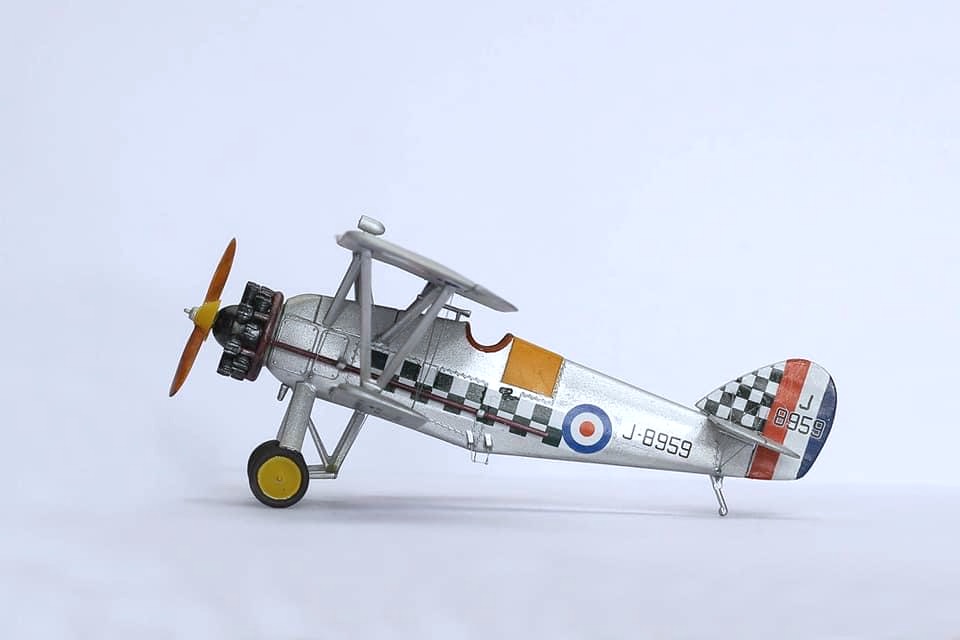
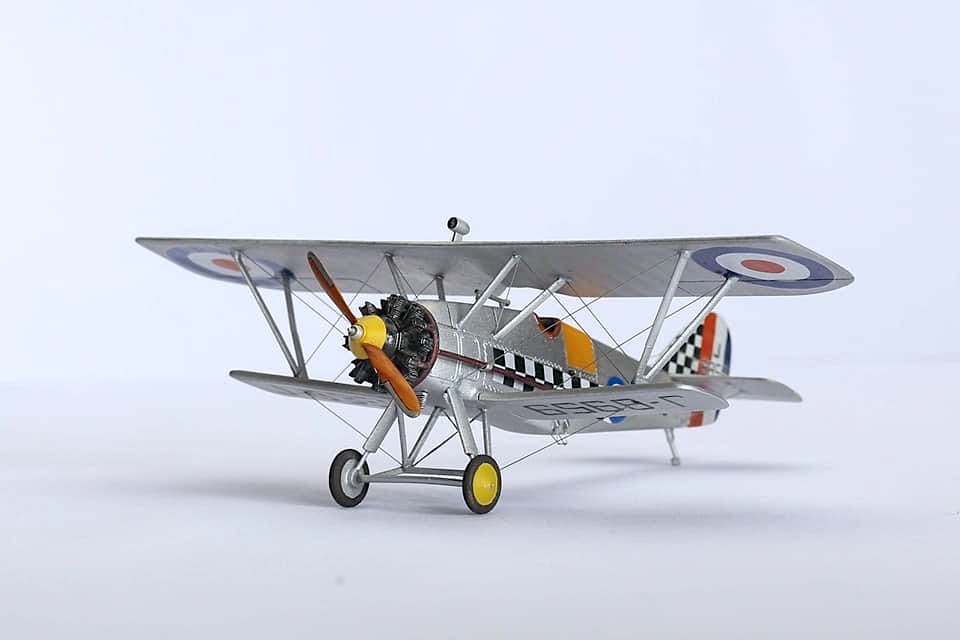
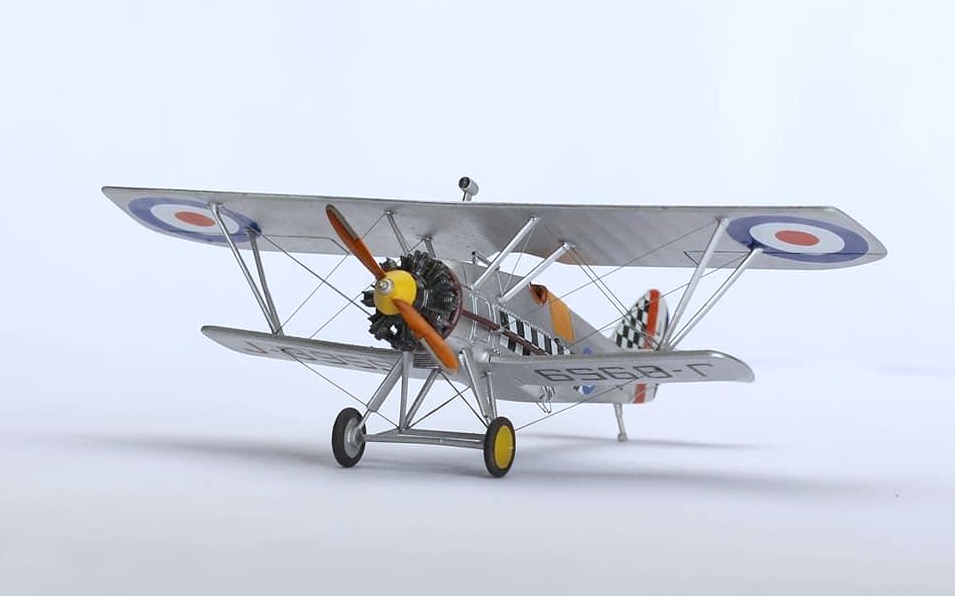
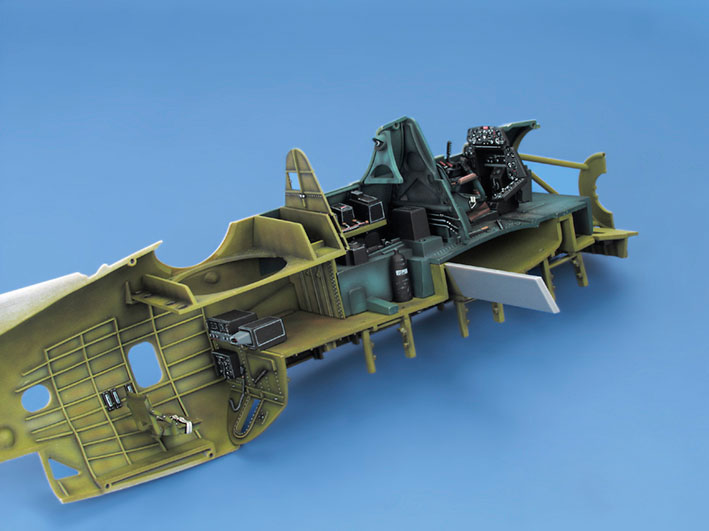
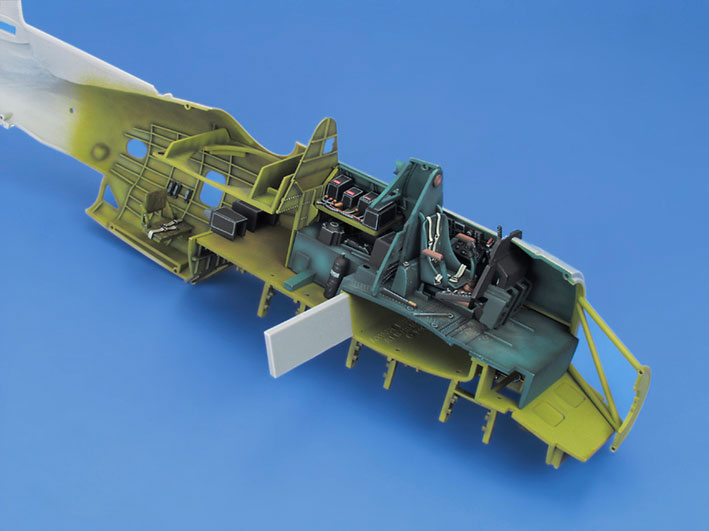
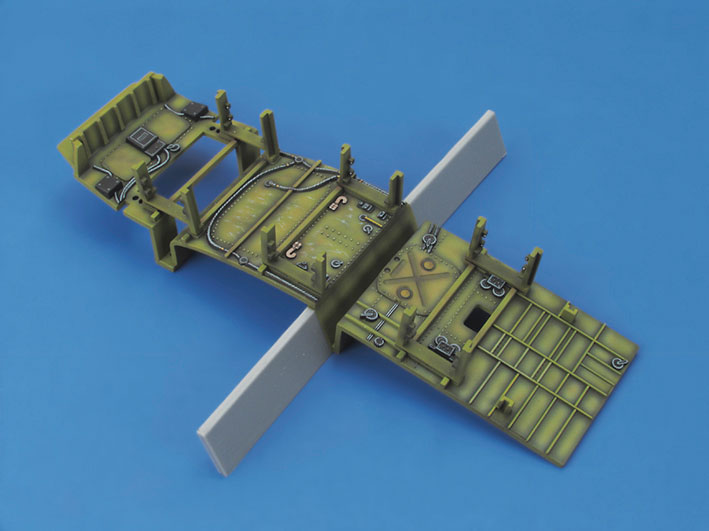
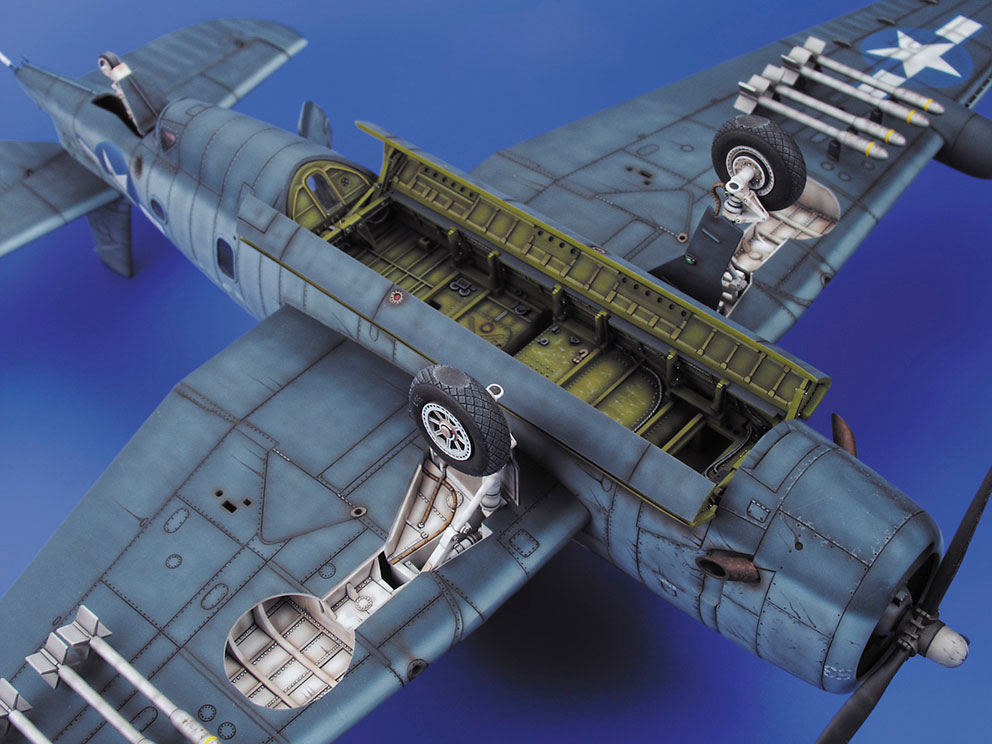
Along with a couple of kits of the floatplane version, eduard has produced several kits of the Mitsubishi Zero. This kit represents the Type 21 version of the aircraft that would have taken part in the attack on the American Naval Base at Pearl Harbour in 1941.
This is an excellent kit and a pleasure to build. The interior is very impressive needing only a few pieces of lead wire to be added to represent electrical wiring.
The kit contains eduard’s new transfers which (allegedly) allow the modeller to avoid the dreaded ‘silvering’ of the carrier film by peeling it off the images and removing it altogether.
This exercise worked reasonably well in this case, except that one of the underwing roundels was almost completely removed along with the film when I peeled it off. Luckily the roundel could be patched up with part of a spare transfer from the sheet. Following this little setback, I gave up on the whole film removal idea. If some of the other markings such as the lettering on the tail had been damaged, I would not have been able to replace them.
The transfer carrier film is quite thin however and if you don’t want to risk peeling it away it can easily be disguised with a coat of gloss varnish.
I sprayed most of the tactical markings rather than using the kit’s transfers and in future builds of different versions of this kit I will do so again – especially the thin red walkway markings on the wings where the carrier film is more noticeable.
Despite the setbacks with the transfers this was an enjoyable project. However, if you attempt to peel the transfer film away, hang on to the spare transfers on the sheet just in case things need to be patched up!
Dai W.
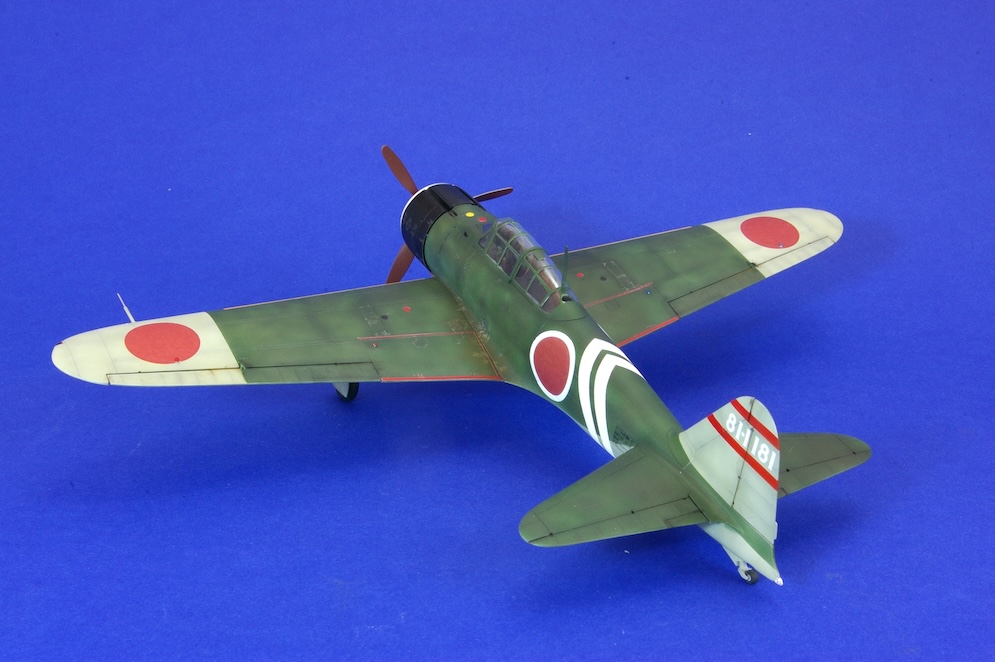
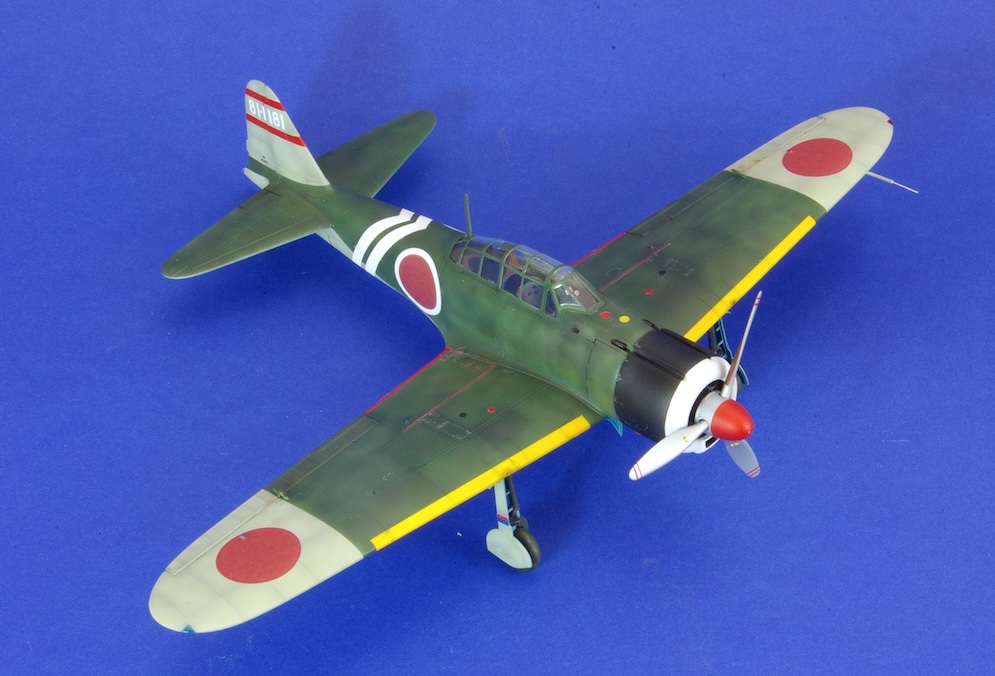
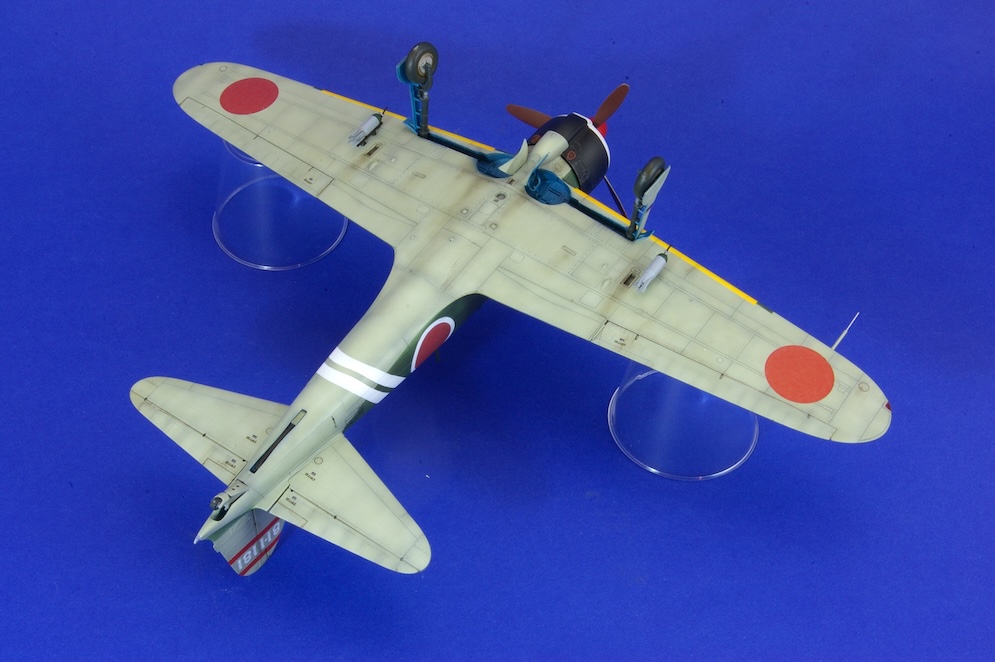
This is the Hasegawa 1:72 scale kit.


- It has been built out of the box with just the addition of Eduard seat belts from their IJN range
- The kit has superb detail and it fits!
- I used Xtracolor paints which consist of X354 IJN Grey and X353 IJN Green.
- The interior colour is Humbrol 78 which is about right
- I used the instrument panel decals which with plenty of Microscale Micro Sol, sink into the mouldings and look just fine
- Wing leading edges are yellow with a touch of red to give the correct colour
- The prop blades are Humbrol 70; the cowl colour is blue/black which I mixed from gloss black and gloss blue
- The Sakae engine was sprayed with Xtracolor Steel, push rods painted black and then given a wash with Tamiya Smoke (X-19)
- After spraying the topside IJN Green I faded the paint a little with some gloss white and sprayed this over in random patches for a faded look
- I used dark brown acrylic ink in the panel lines
- The kit decals were very good and with some Micro Sol went down over the raised detail and into the panel lines
- The kit comes with a canopy mask. The individual panels have to be cut out with a new scalpel blade but they do fit the canopy panels
- Also supplied are four pilot figures. I painted up three of them and use them with all of my Japanese aircraft collection.
All in all, a first class kit and a pleasure to build…
Cheers for now, Roger B.
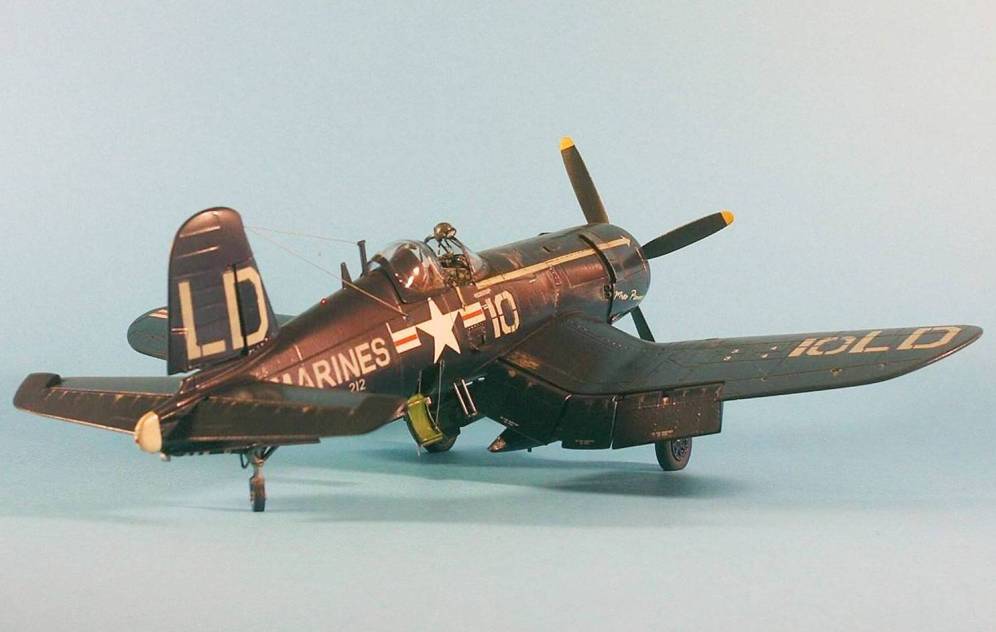

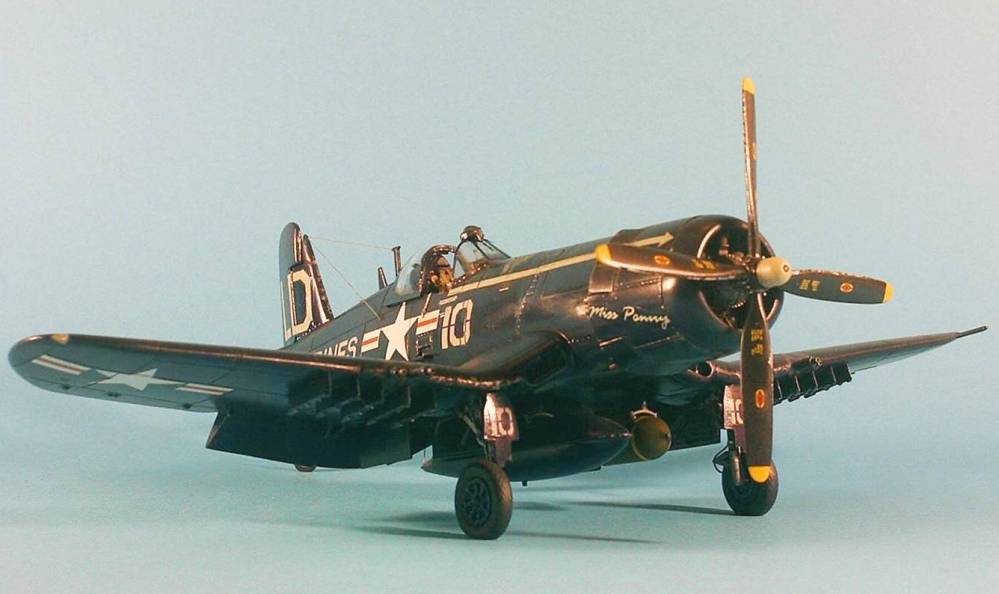
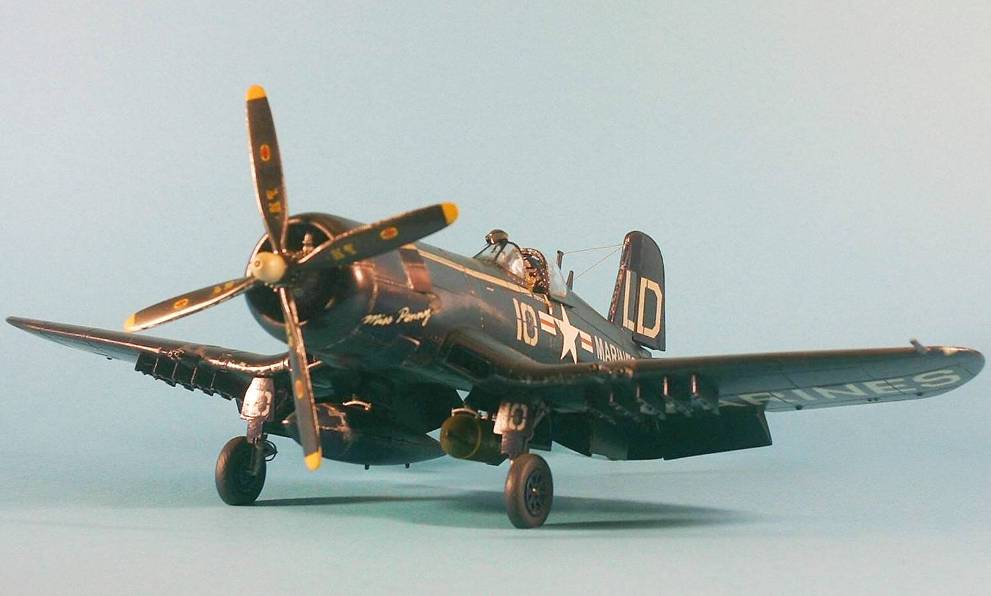
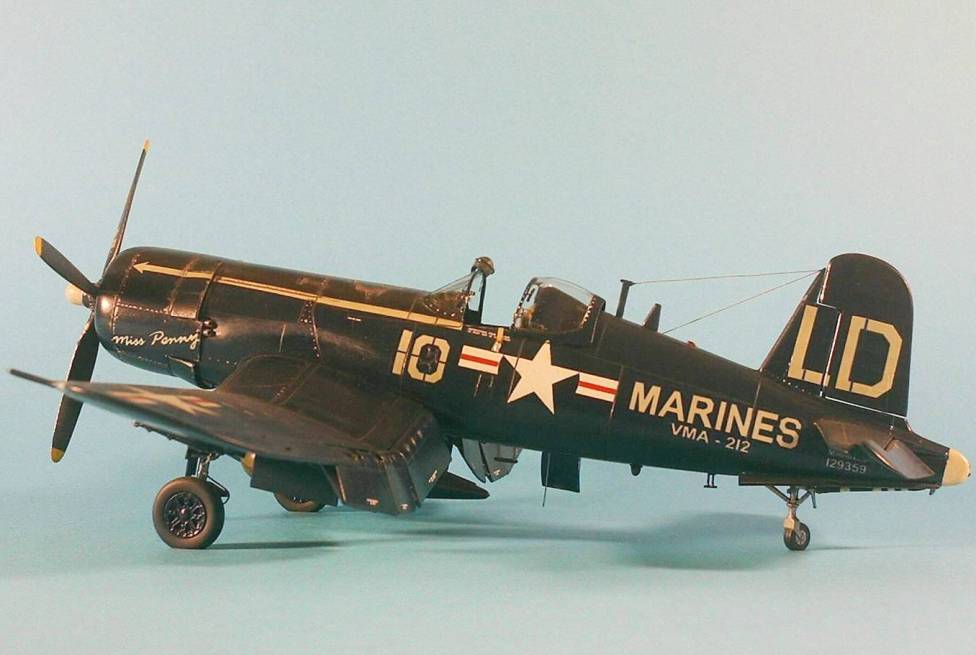
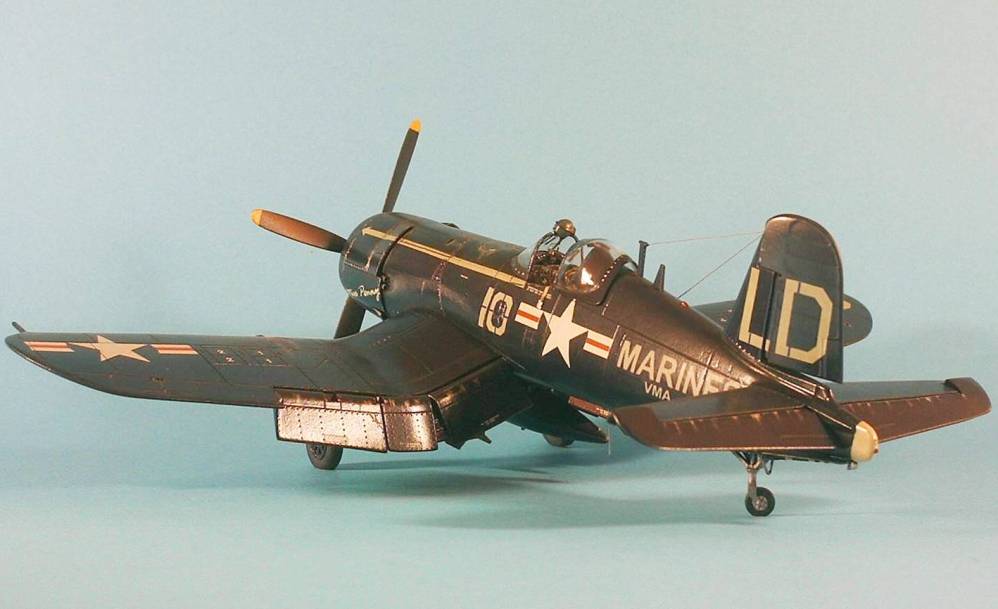
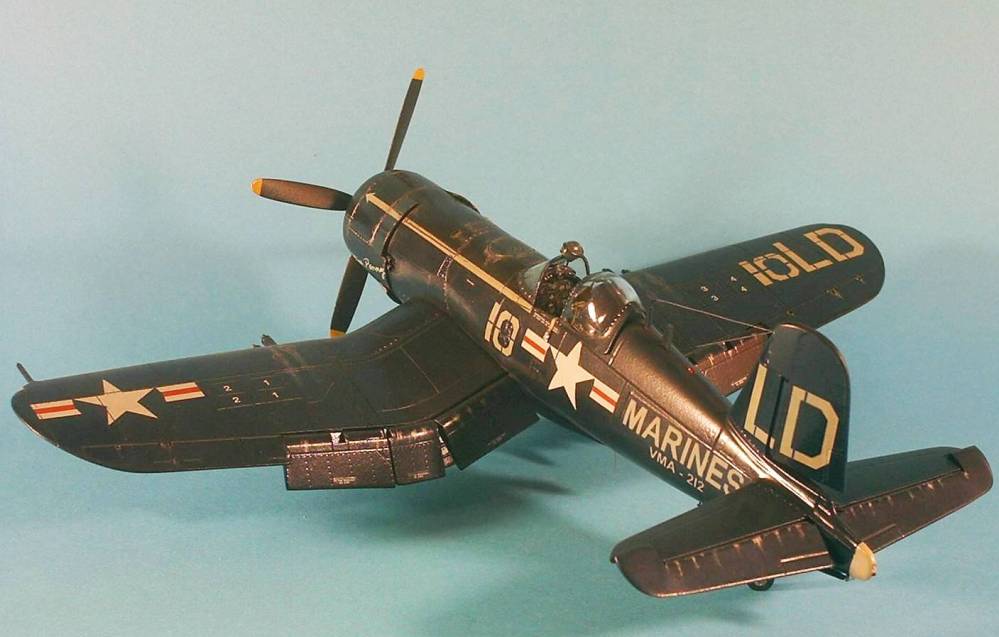
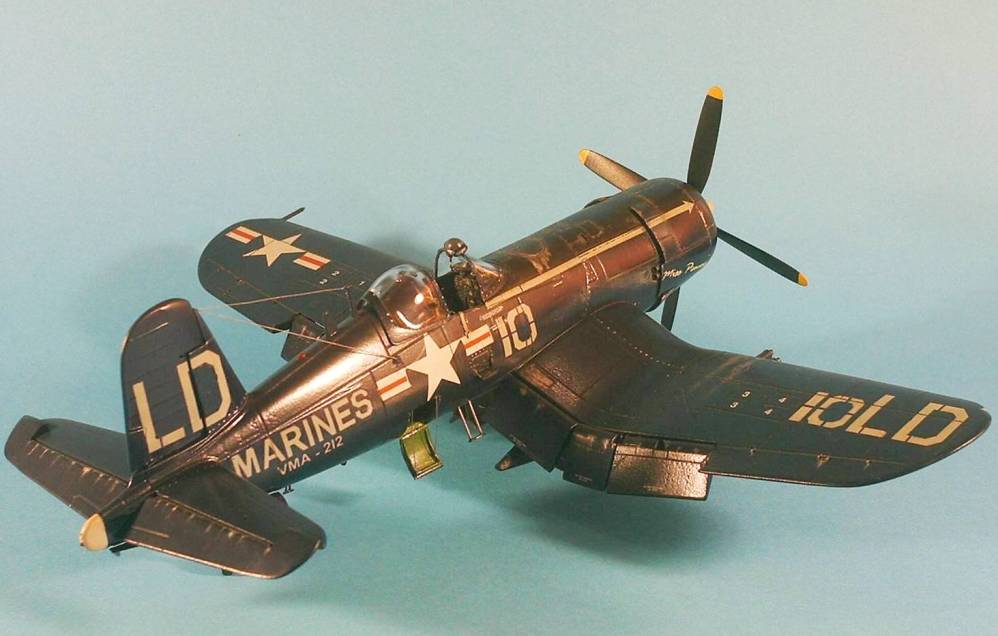
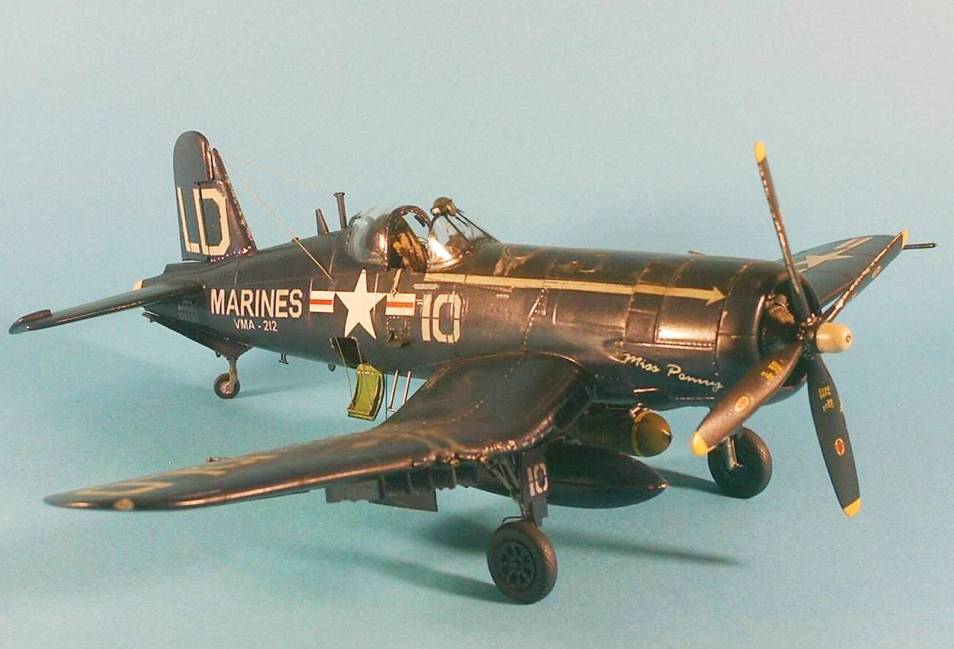
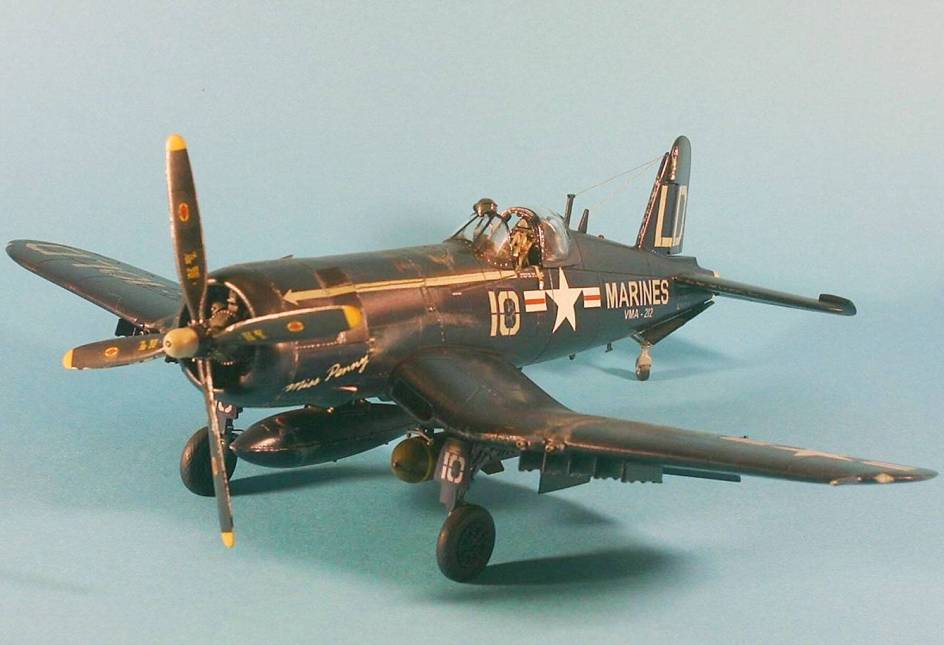
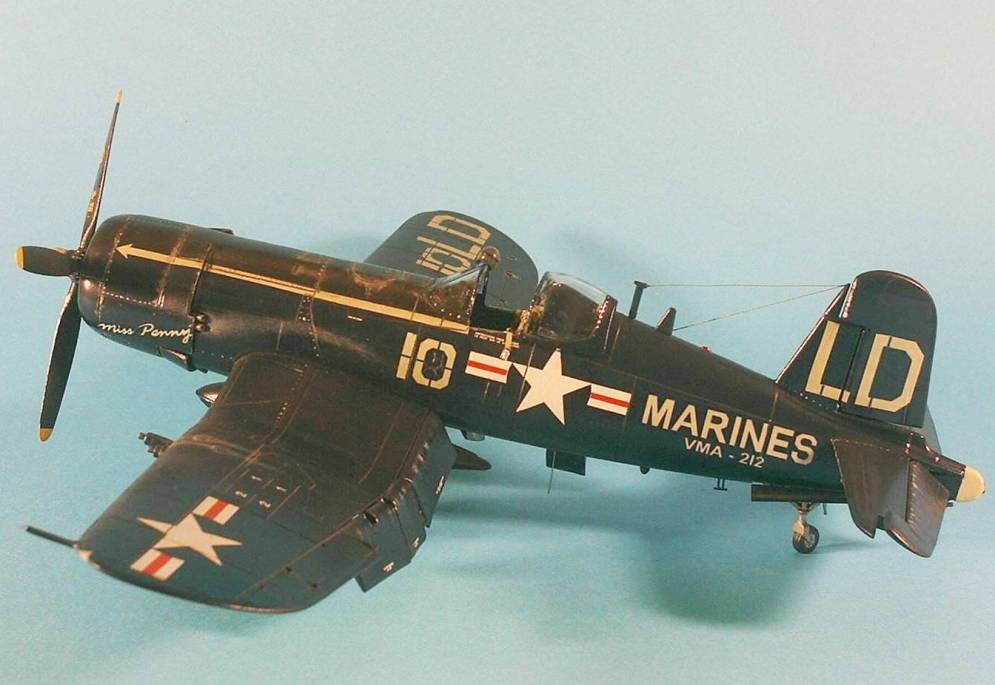
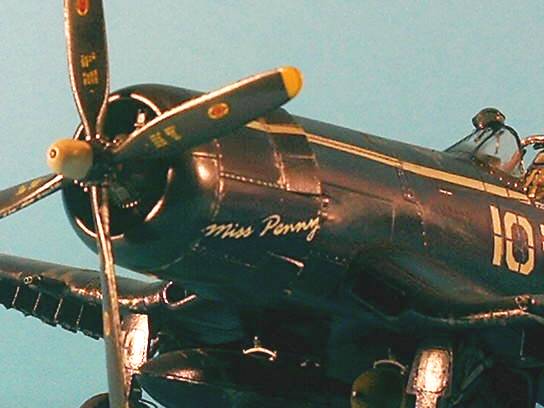
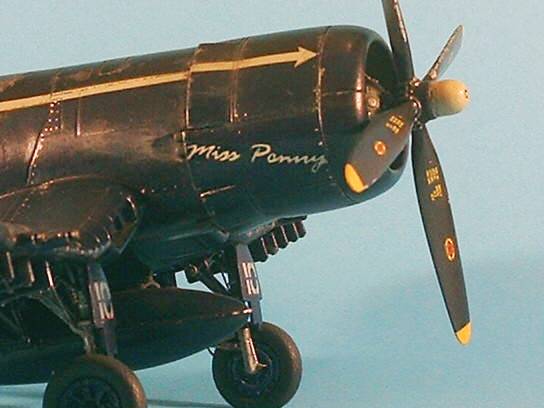
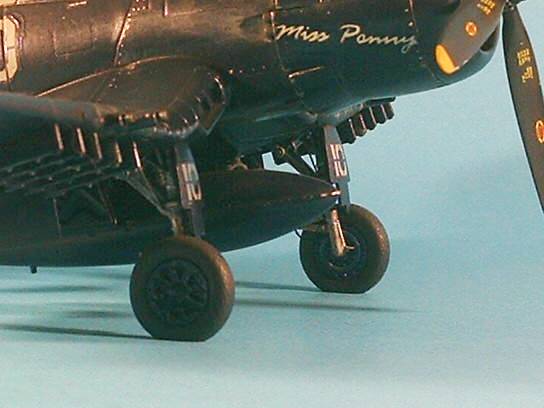
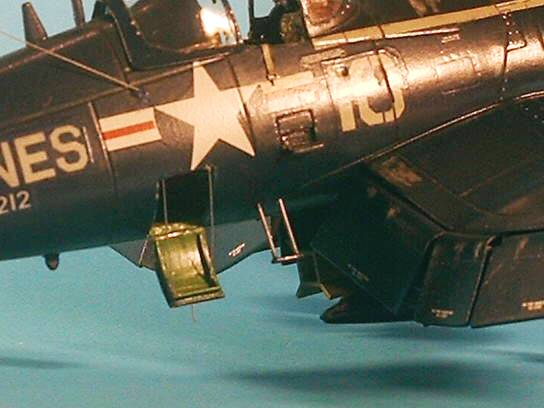
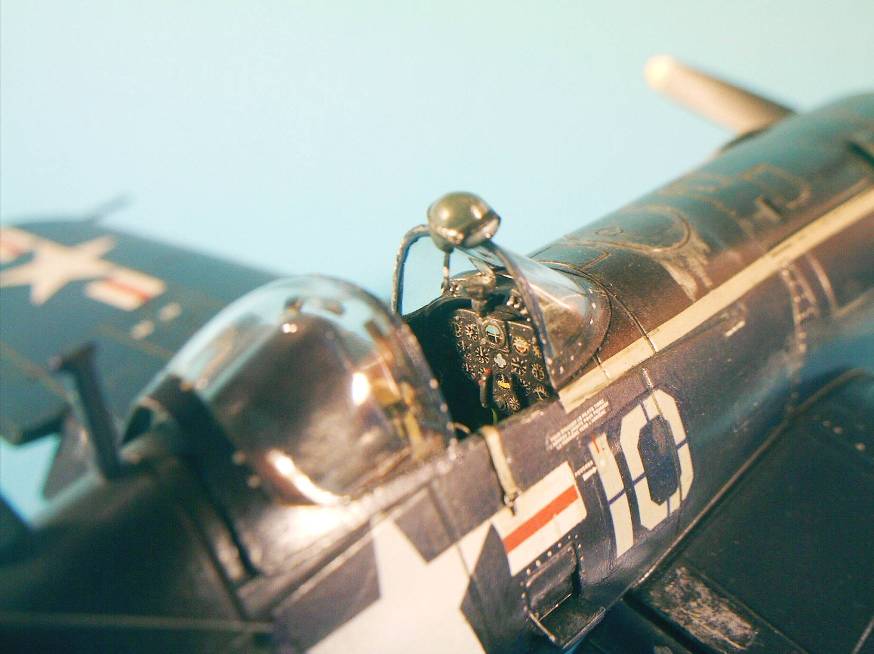
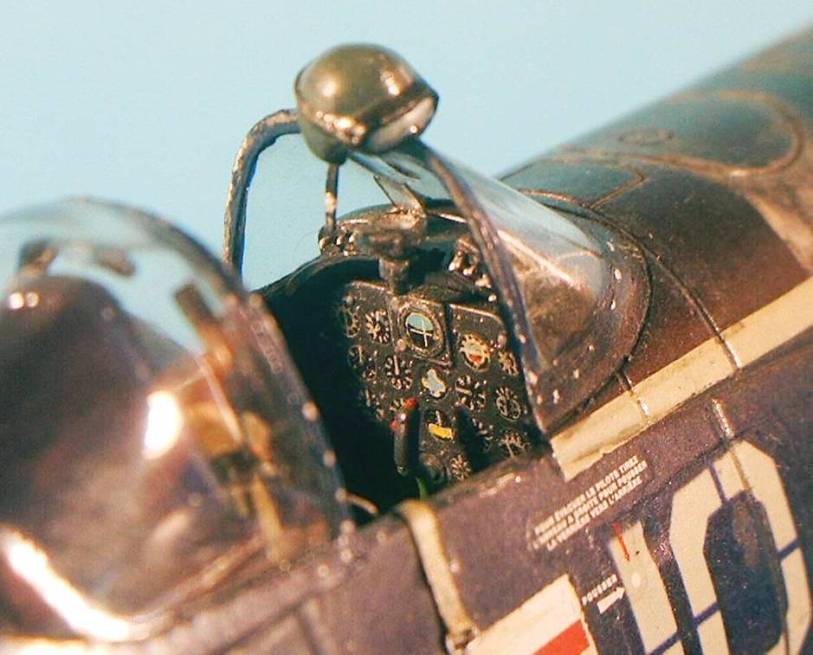

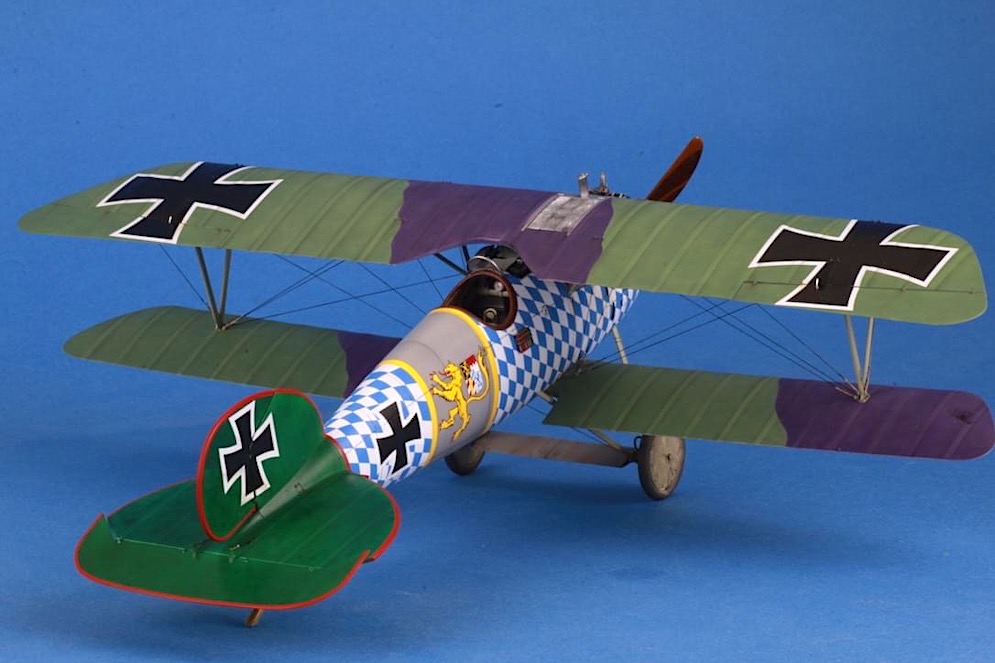
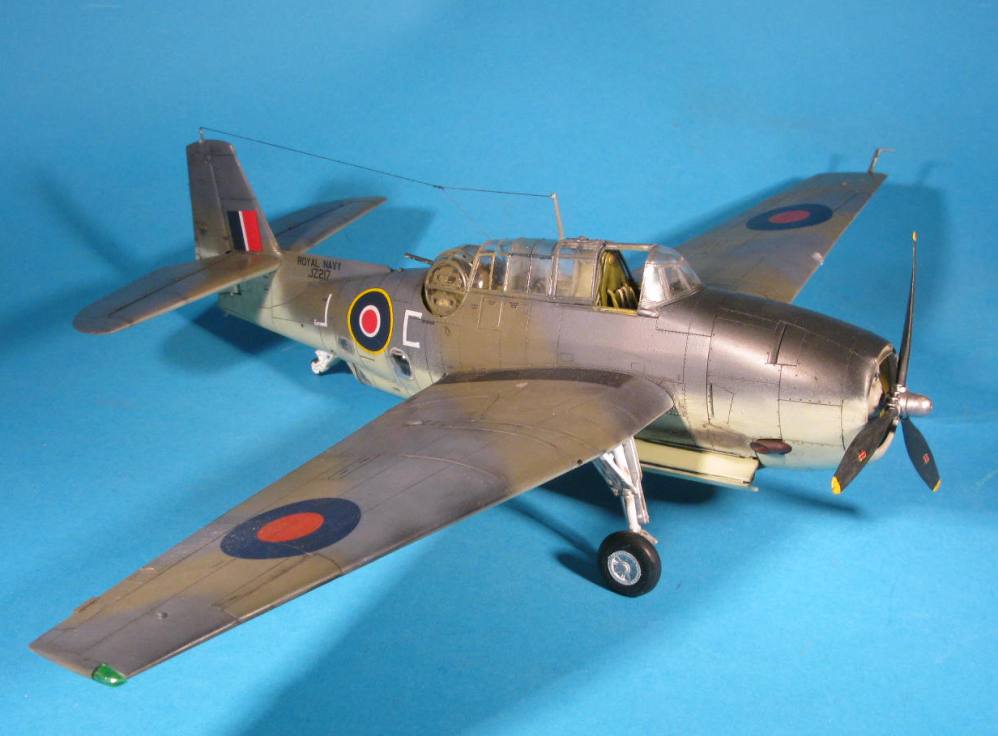
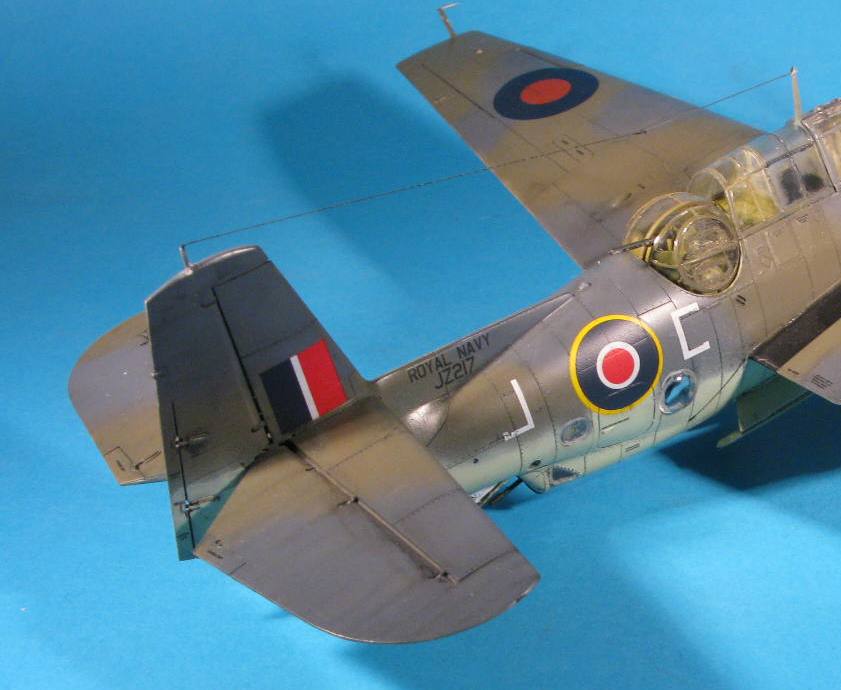
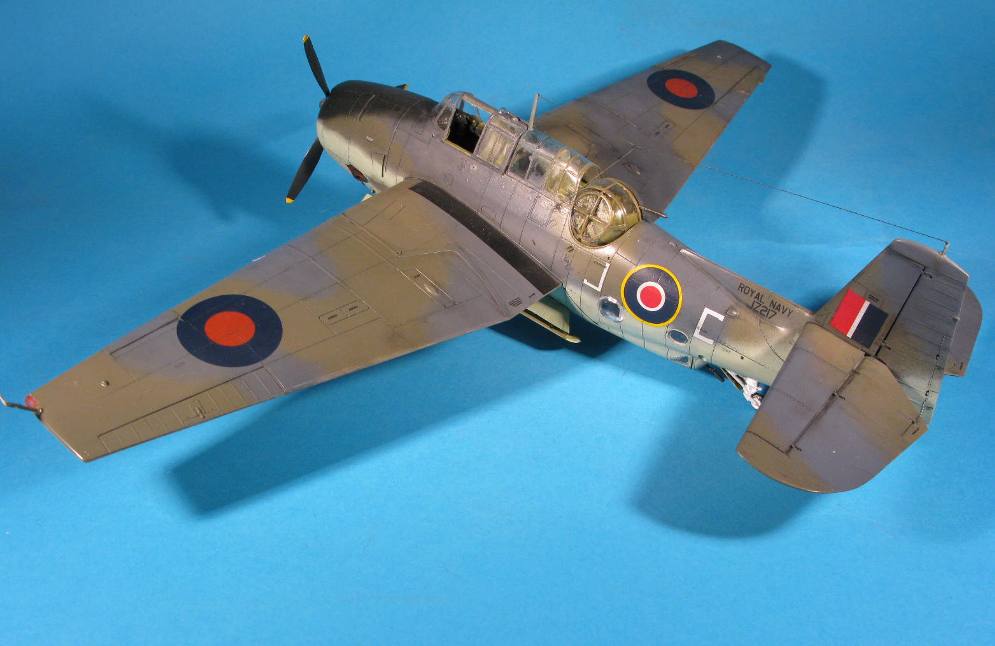
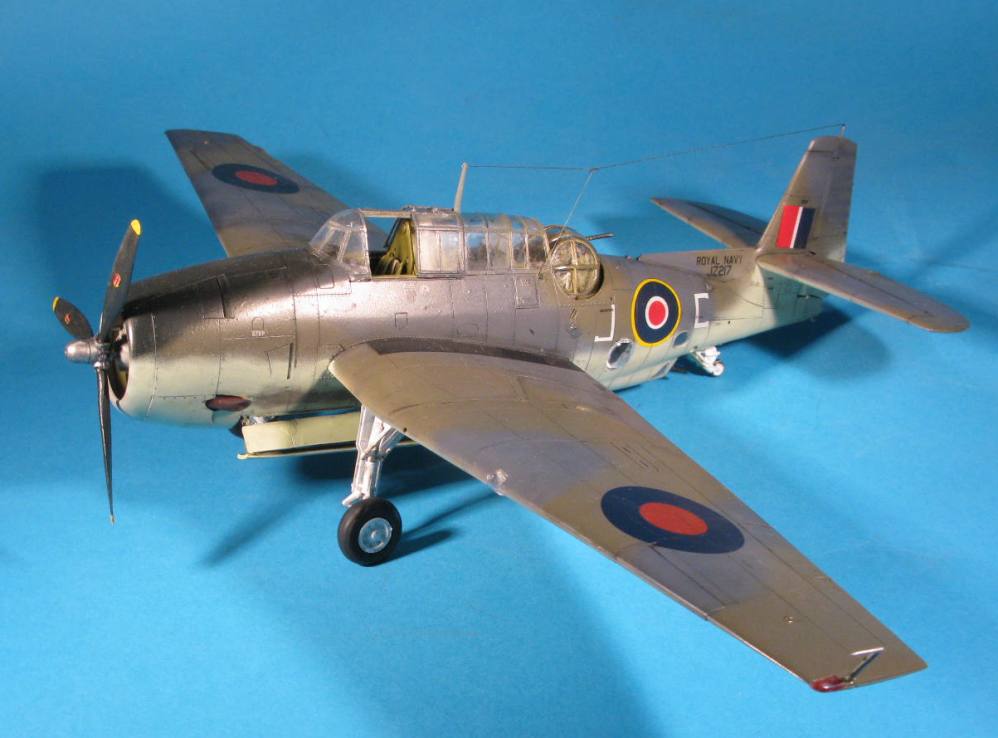
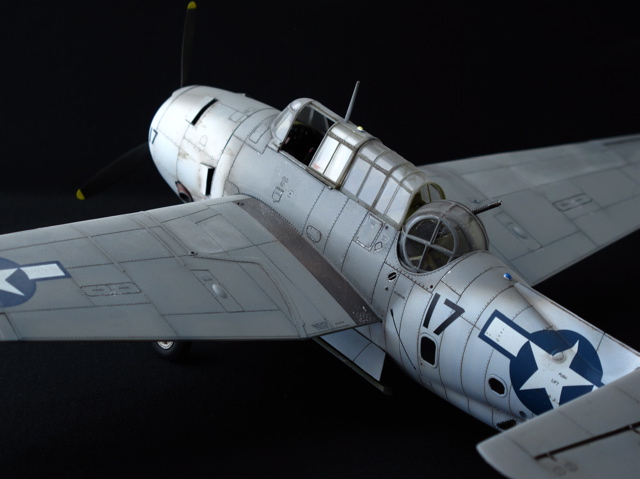
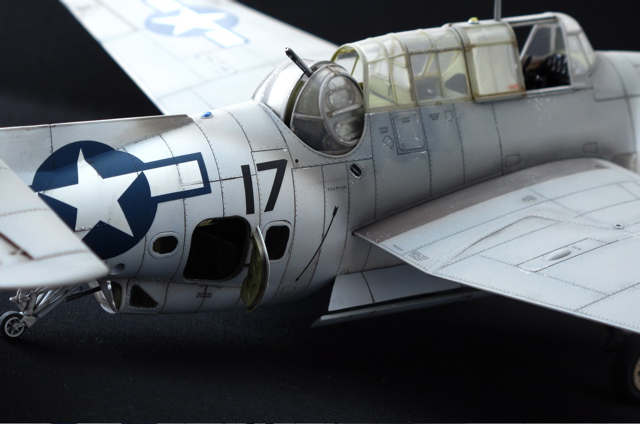
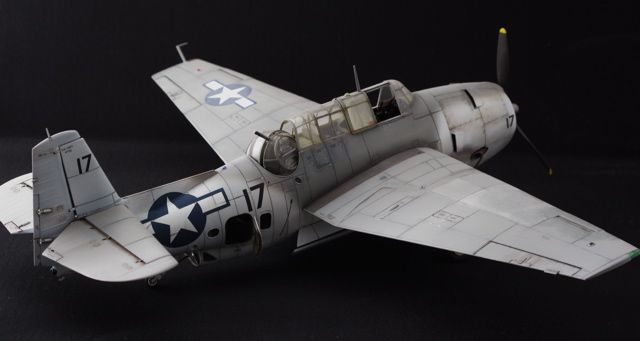
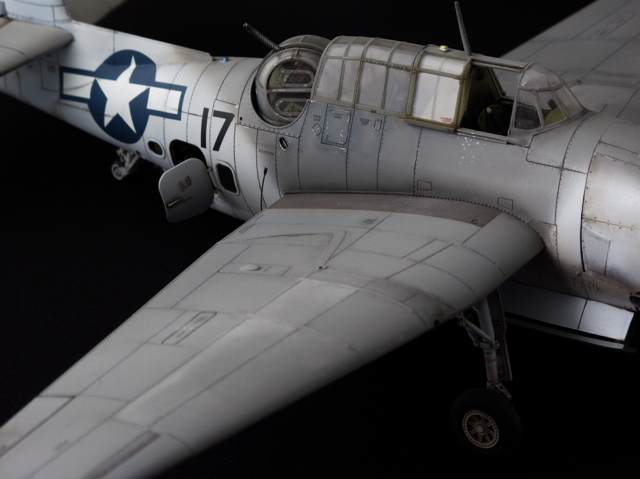
The pilot for this plane is (still alive) Mr. Colonel Dick Francisco a former Marine in Korea and he named his plane as Miss Penny in memory of the daughter of his wingman Colonel Forest Nelson who was MIA in Korea. After Mr. Nelson left his family to go on a mission he never returned back home and he was declared MIA. Miss Penelope Robichaux-Kunts “Miss Penny” Mr. Nelson´s daughter was three years old back then. Her mother could not support her after she lost her husband and the USS Miss Pillion support her family. I own the book written by Miss Penny about her life. She is now a friend of mine in FB.
In this case I did also detail the cockpit from scratch. The pilot´s harness and belts are made using masking tape and copper wire for the buckles. I used stretched sprue and plastic card to detail the instruments, lights and more controls into the cockpit, opened the fuselage hatch and detailed the interior with communications and aerials and the control stick bar-system. Detailed the engine and the landing gear as well.
Jose Alvarez ECM Hobbies
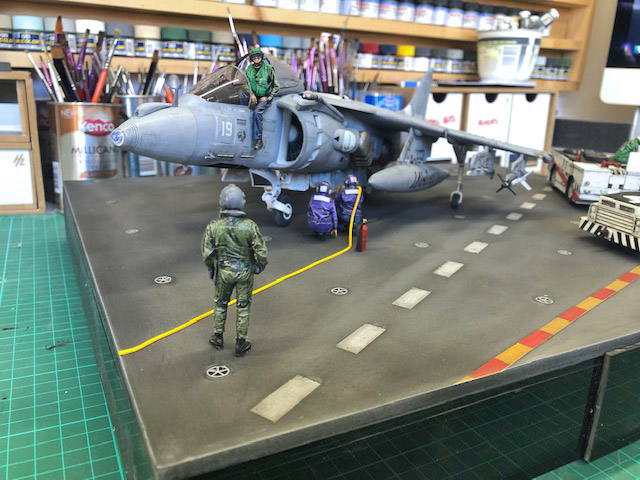

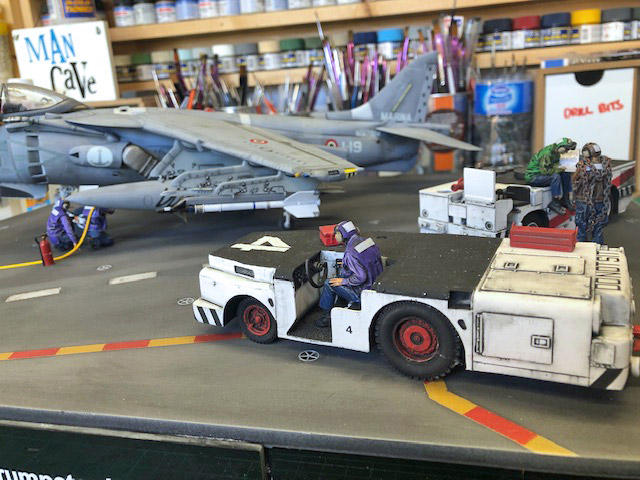
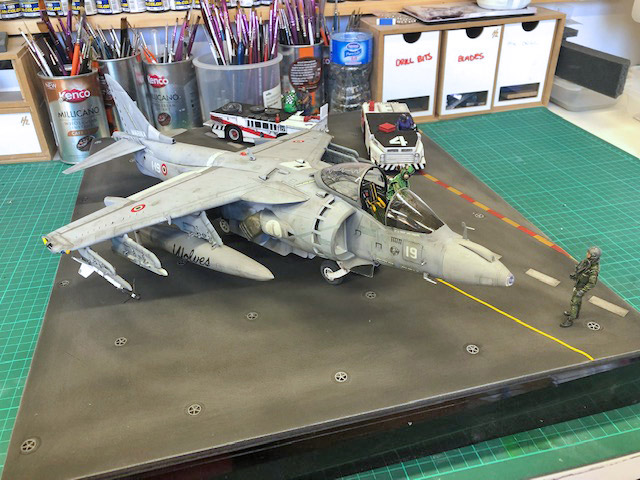
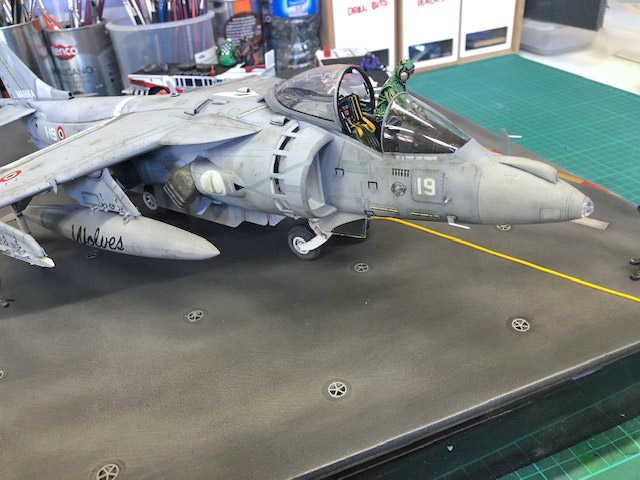
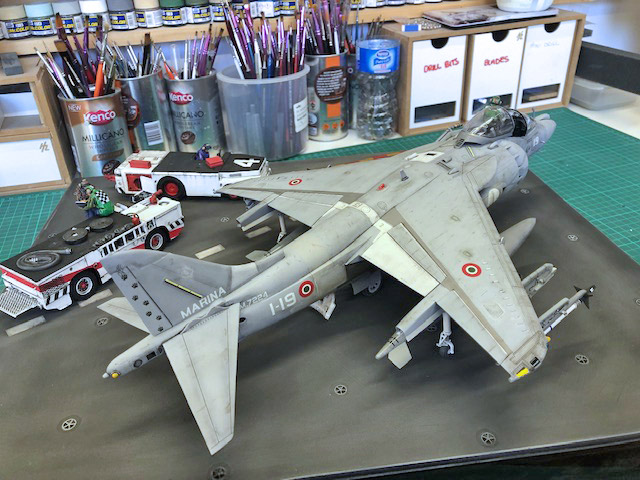
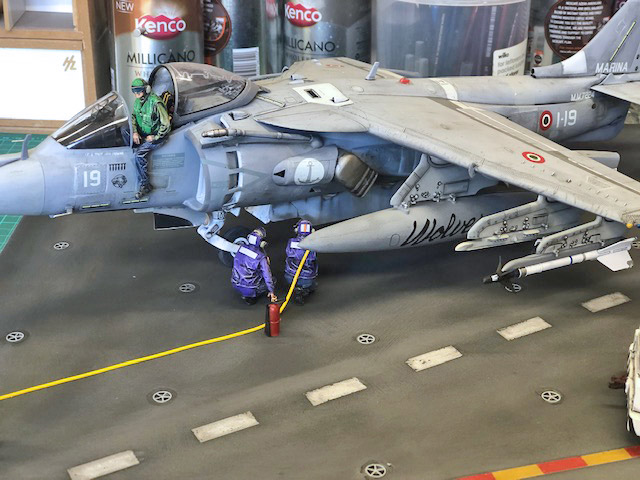
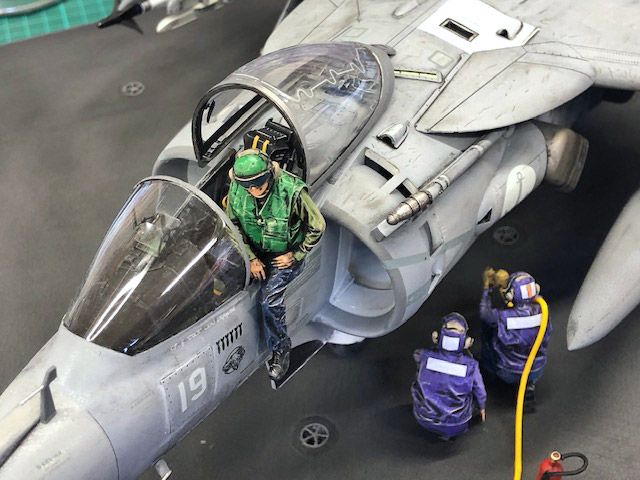
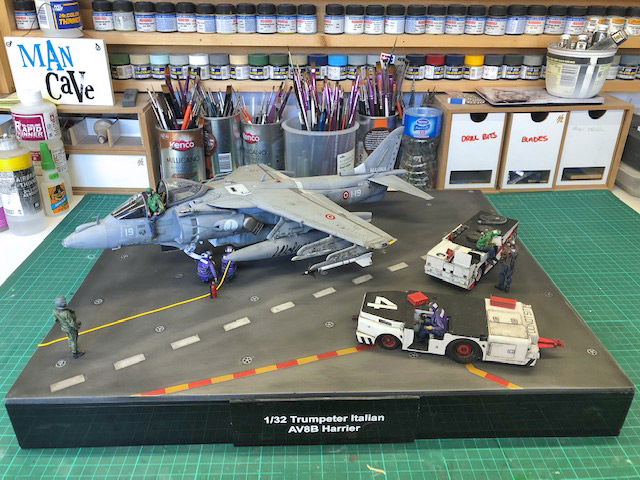

AV-8B Harrier II shown in its Italian markings. The Trumpeter kit is showing its age, but with a little TLC it can be turned in to a rather nice kit.
I used the Aires cockpit, and wheel wells, along with Reedoak figures, and Verlinden carrier deck trucks.
Below is the back story…
An Italian AV-8B Harrier hitched a ride home aboard Wasp-class amphibious assault ship USS Kearsarge (LHD 3) after six months of maintenance in the US.
The Italian aircraft, along with its flight crew, returned to Grottaglie Naval Base, Italy, on January 3, after the six months of scheduled maintenance at Marine Corps Air Station Cherry Point, North Carolina, and two weeks of final checks and training aboard Kearsarge.
Hope you enjoy!
Mike T.


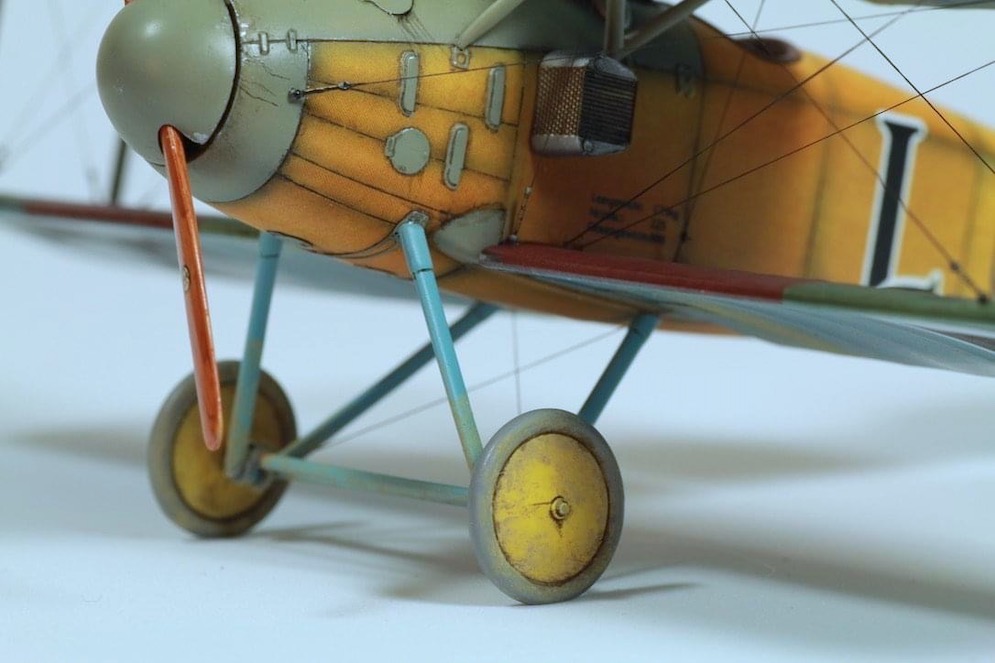
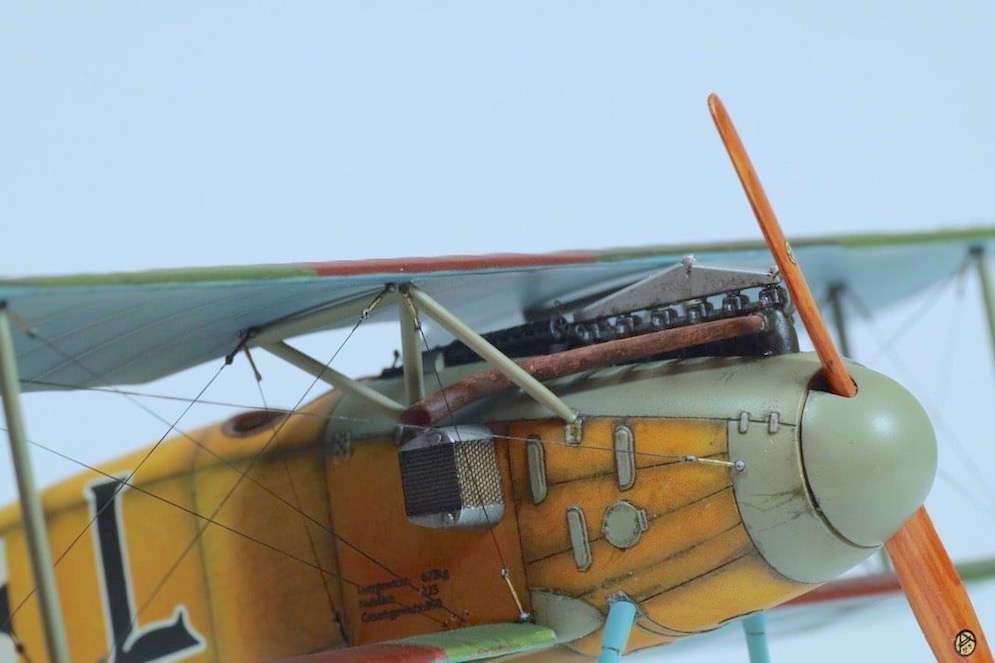
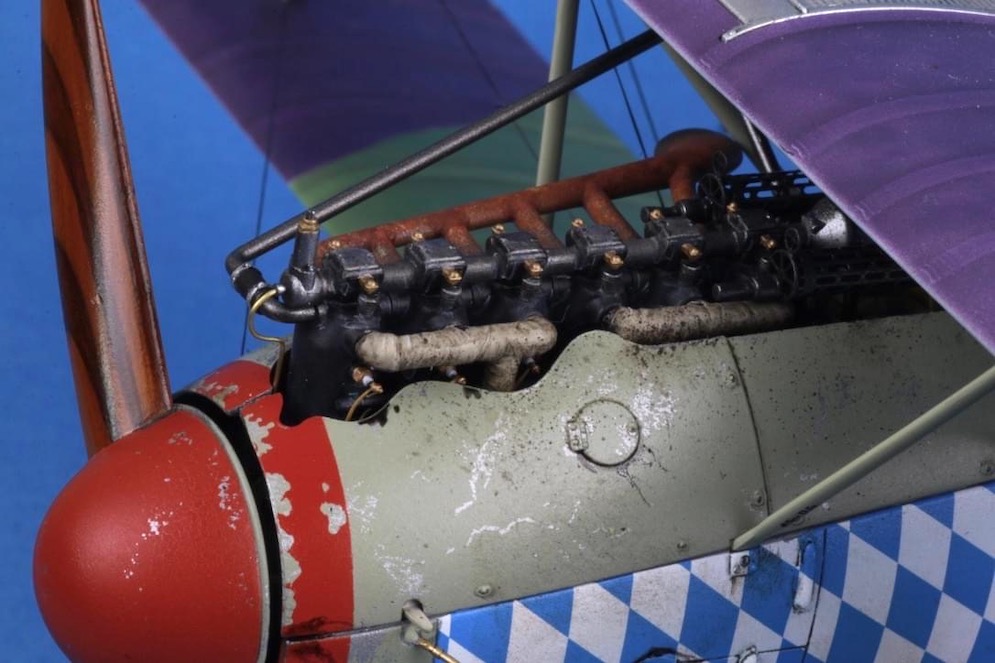
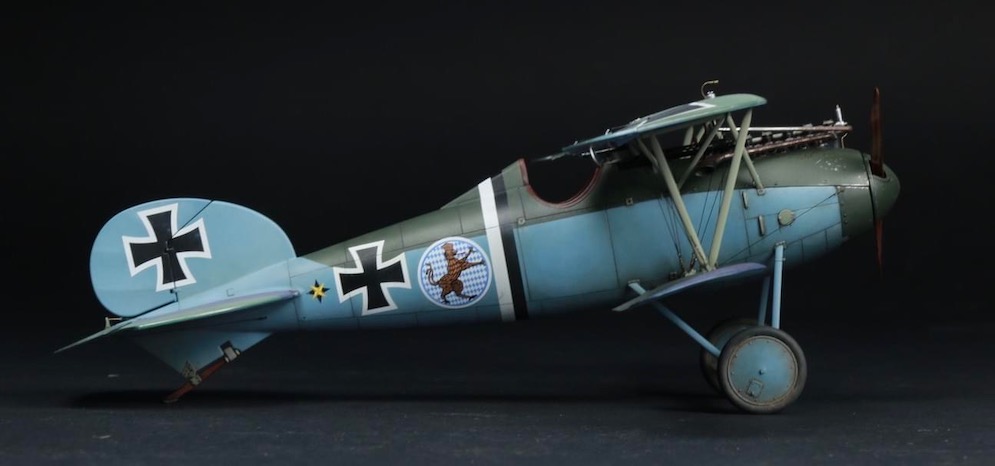
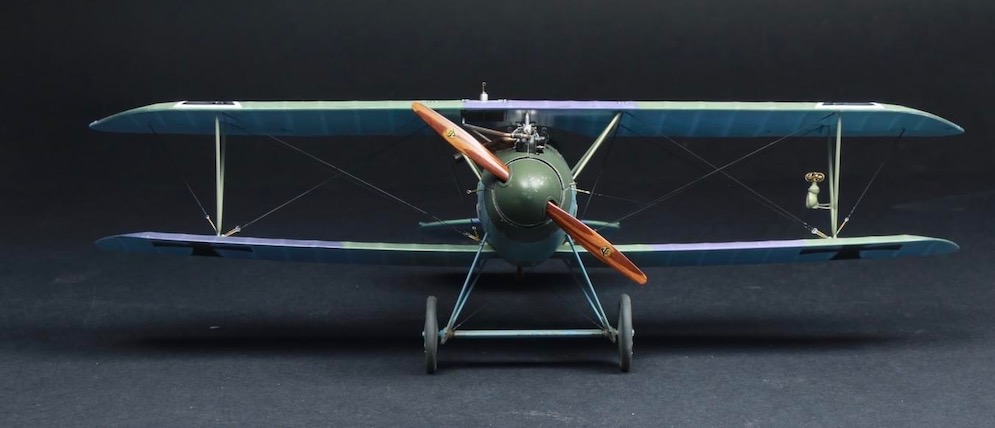
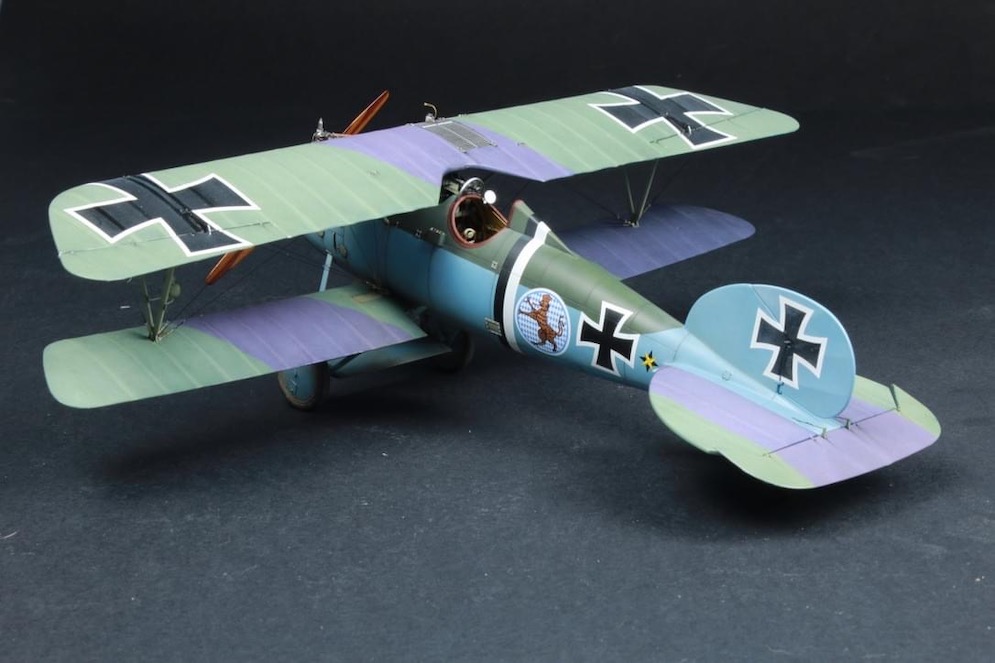
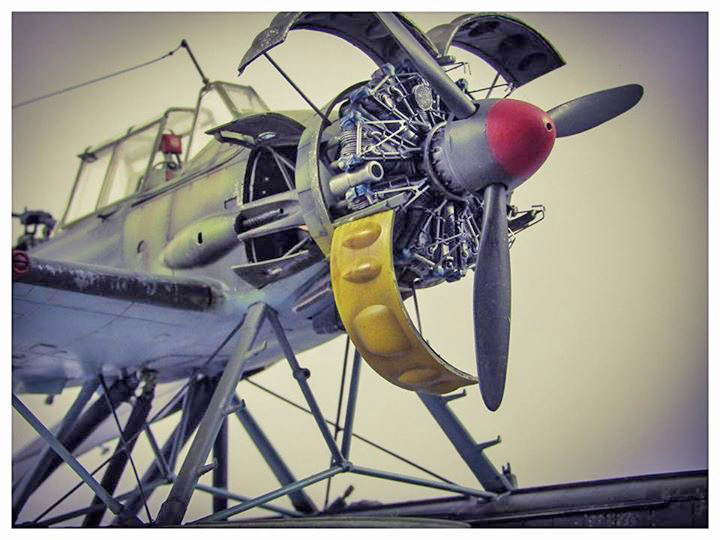
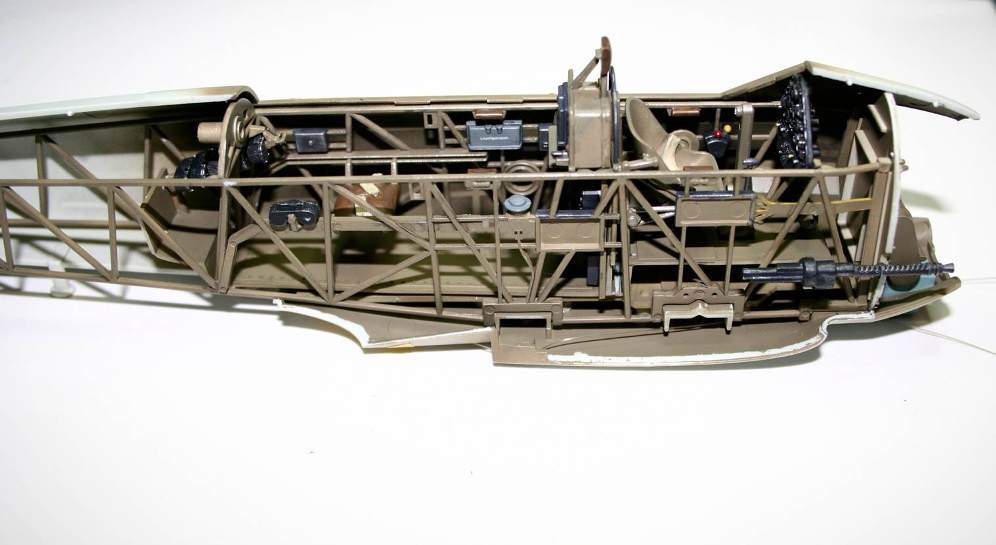
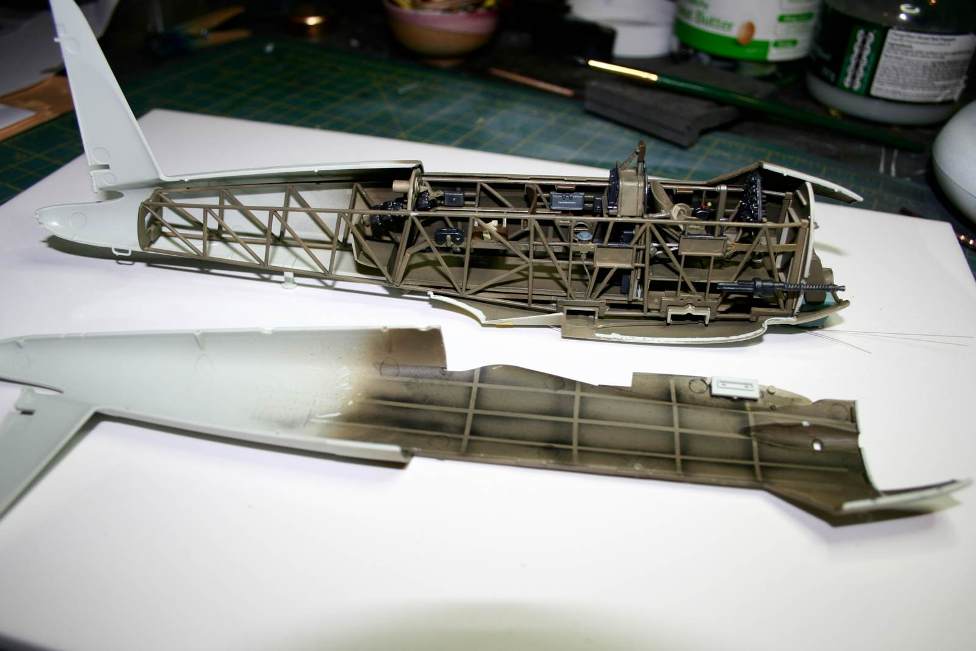
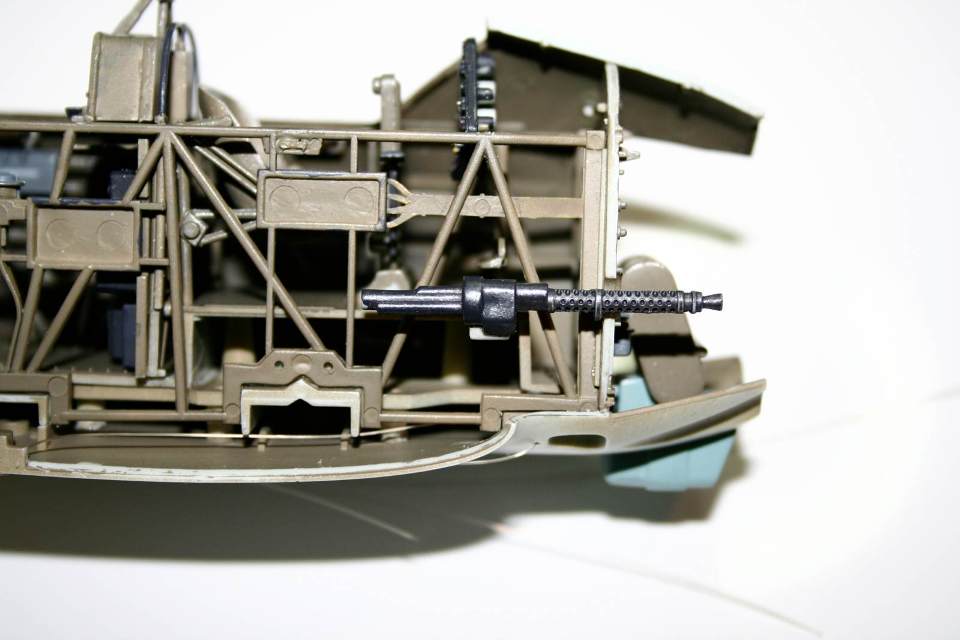
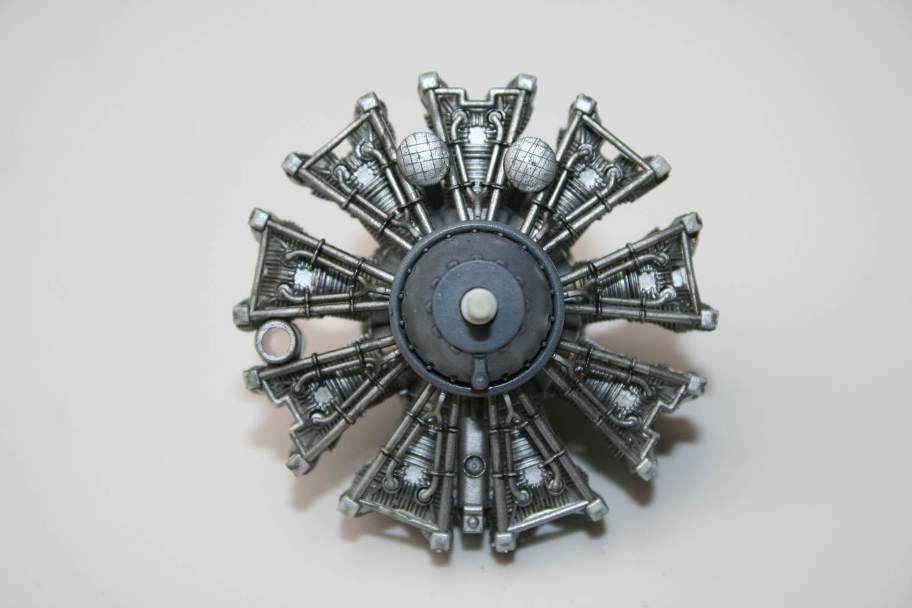
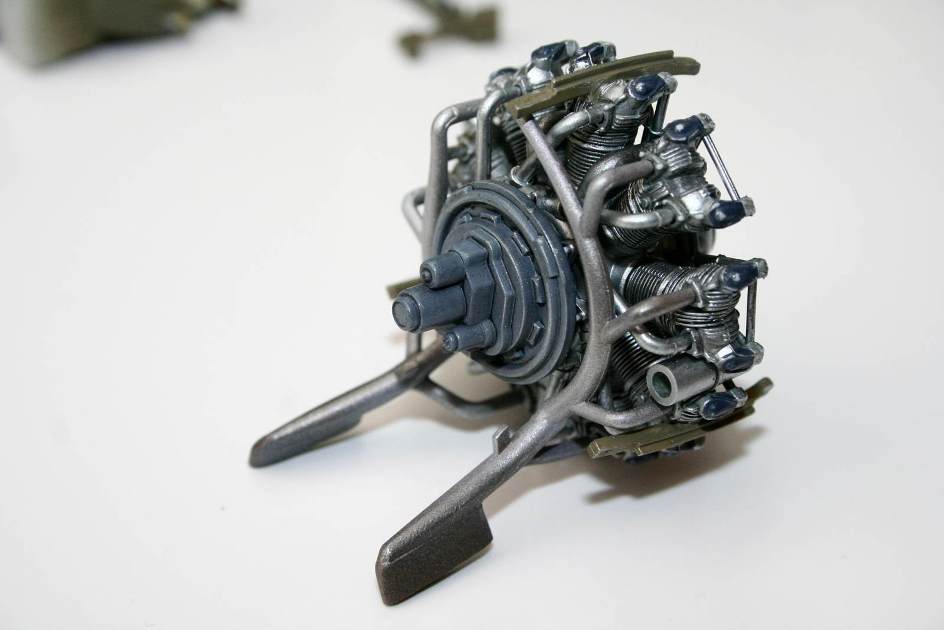
Here’s my AEG G.IV (Late) in 1:32 scale made from the Wingnut Wings kit. so completely out of box, no additional aftermarket sets used. I really like the size of this giant and especially nice detailed engines that add a lot of variety to overall uniform look.
This is how it can look like without rib-tapes pre-shading/post-shading. I separated those rib-tapes only by overpainting them with matt varnish and then applied global filter over the whole wing surfaces. And these filters have tendency to accumulate around those rib-tapes and create soft dust like visual separation.
Cheers, Zdenko
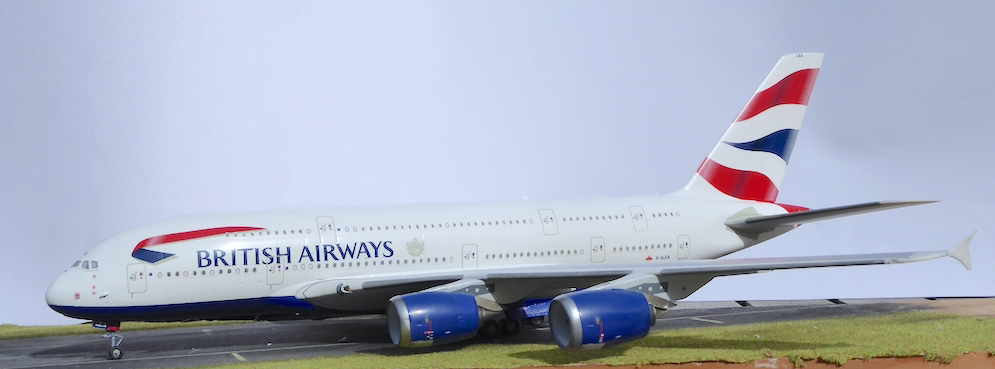
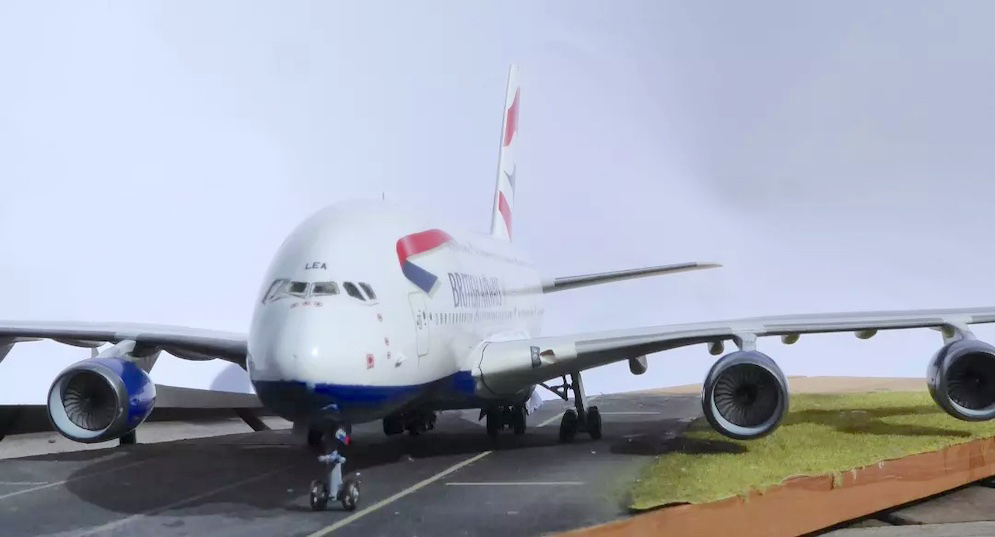

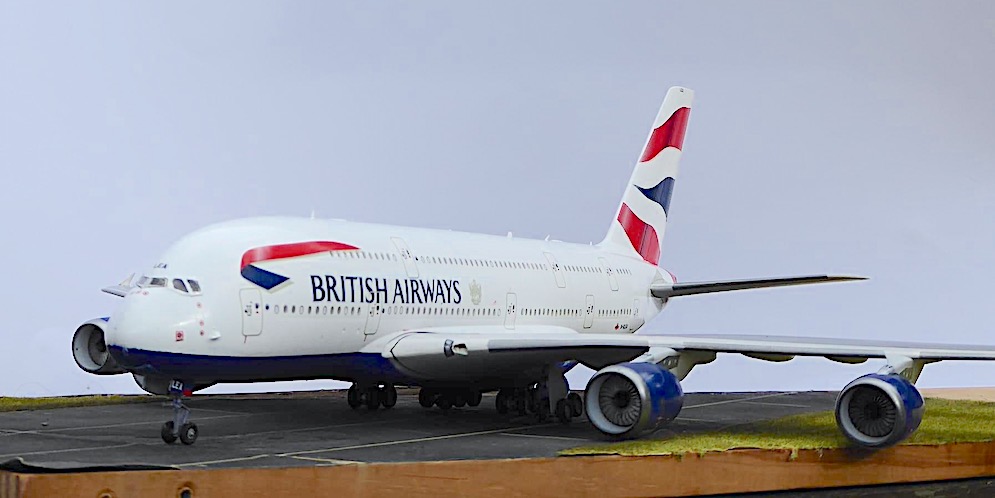

Revell 1:144 scale
It is a really nicely detailed kit. The detail on the wheels is incredible for an injection moulded model.
The undercarriage fixing is really poor, without any secure fixings and ridiculously weak.
The structure of the fuselage is laughable. The pieces are so huge without any internal support, getting anything to line up is a feat of engineering.
The decals, while beautifully thin are poorly considered. The spiral on the fan cone is a single decal. There is no way on earth you will get it to conform. Unfortunately, I screwed three up finding this out and didn’t have enough to fit them once I had figured out how to fit them. The tail and window decals are just too large and need cutting into smaller sections to make them easy to apply.
Would I build another? Maybe. Knowing what I know now it would be easier and I may enjoy it more.
Hope you enjoy some early photos. The light wasn’t how I wanted it and the model is just too darn big to take a ‘simple’ photo of it.
Shaun B.
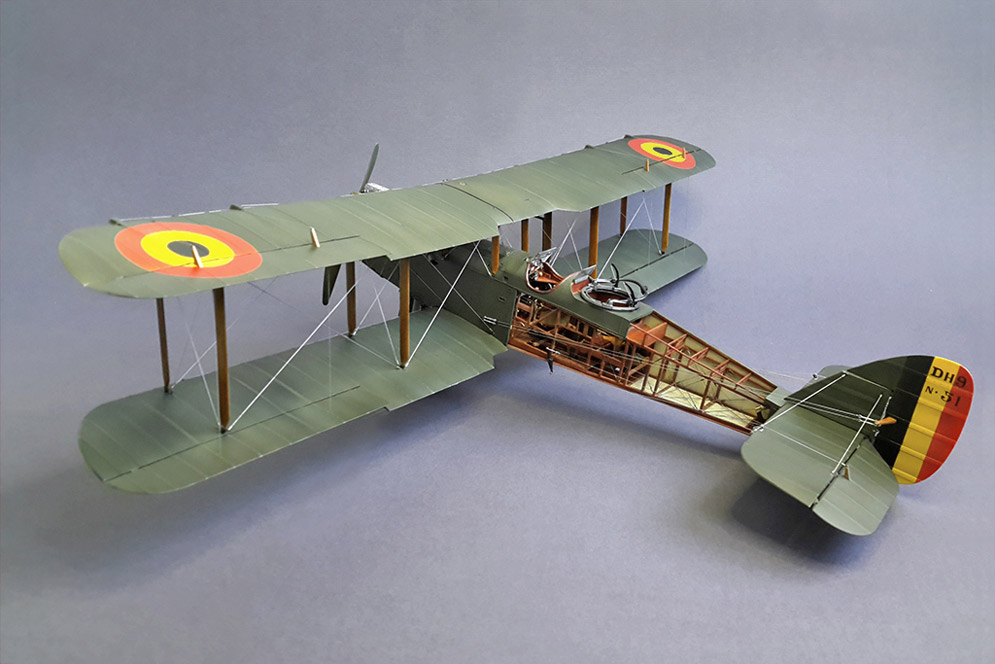
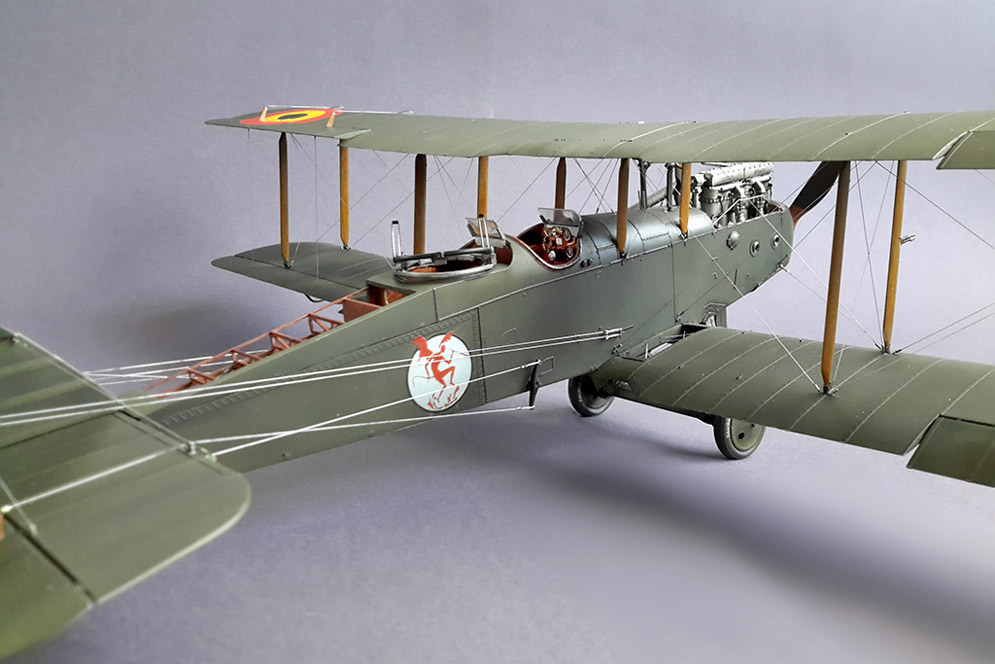
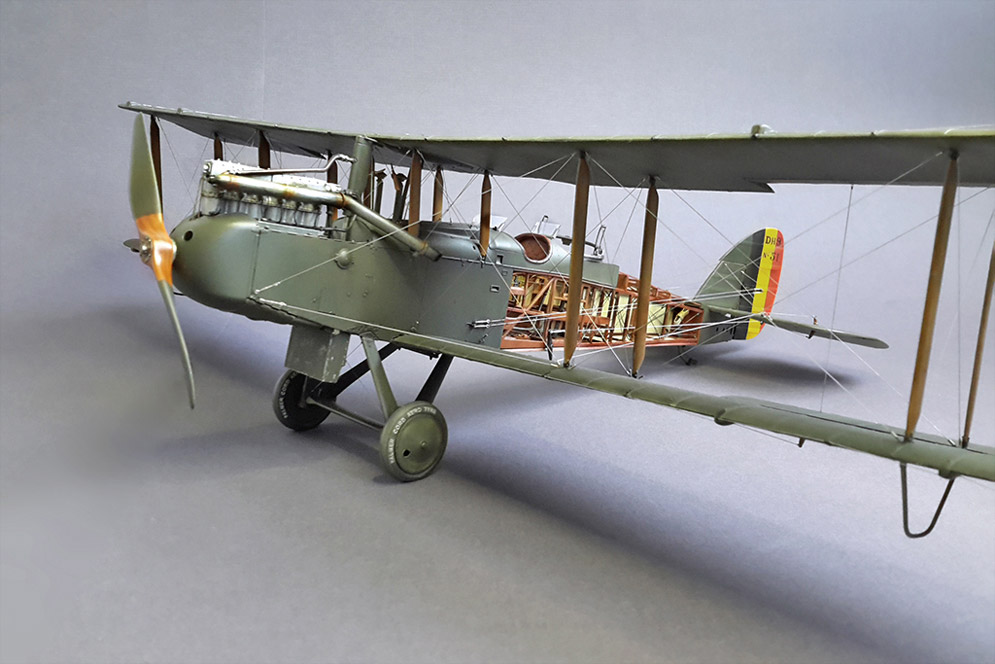
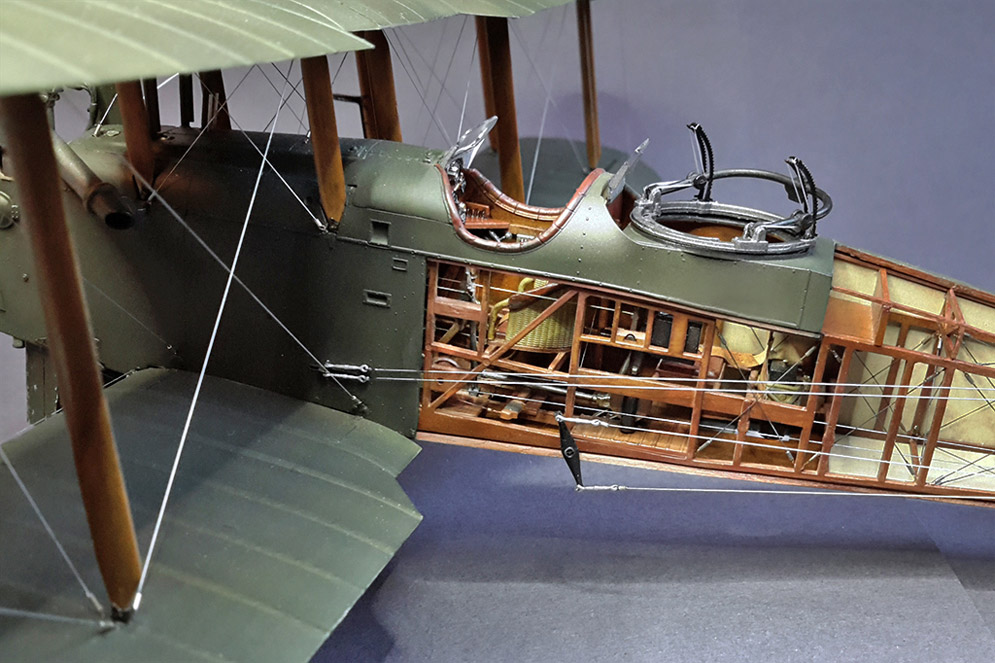
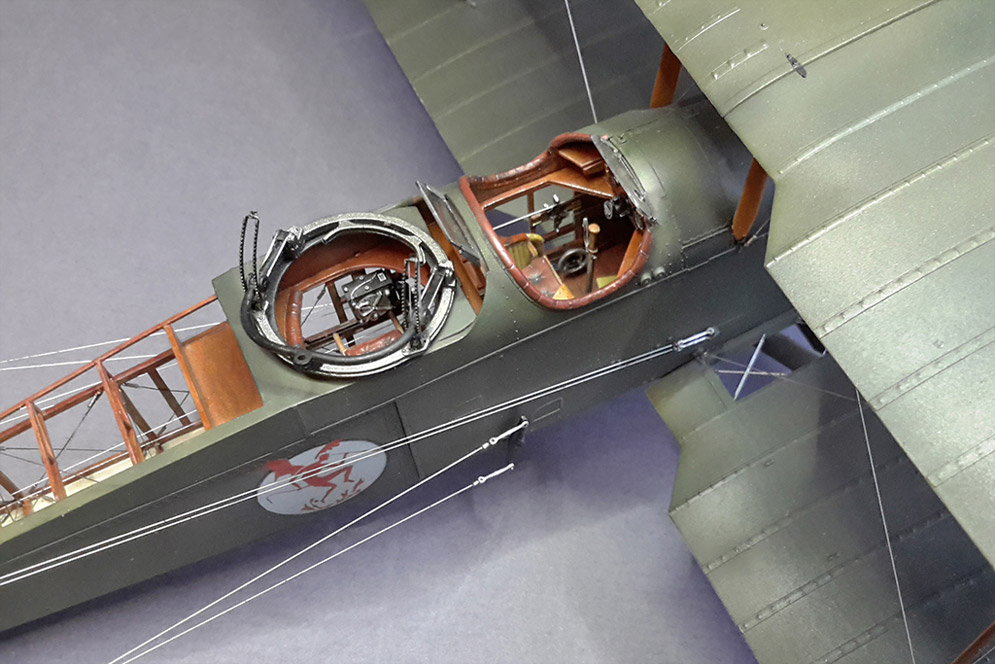
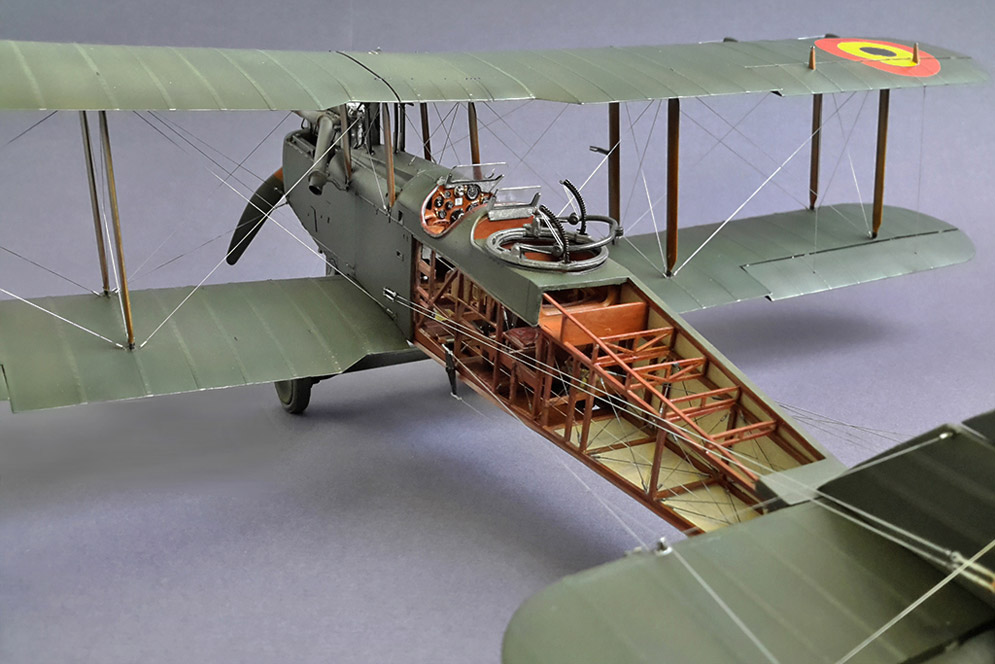


This kit is the Wingnut Wings 1:32.
During the first war, Belgium received at least twenty DH.9s from Great Britain and in 1922-23, the S.A.B.C.A. produced around thirty.
It is one of the latter which I am giving here an interpretation, representative of the 1st Mephisto squadron (Evere Circa, 1925). The D51 crashed near Gossoncourt in February 1930, injuring its pilot.
The rear fuselage structure in scratch (Evergreen, HGW decals for linen canvas). Rigging: mainly Modelkasten 0.13mm + EZ line or 0.12mm fishing line. Gaspatch Models turnbuckles. Tamiya and MRP paints.
Kind regards.
Christian Wéry
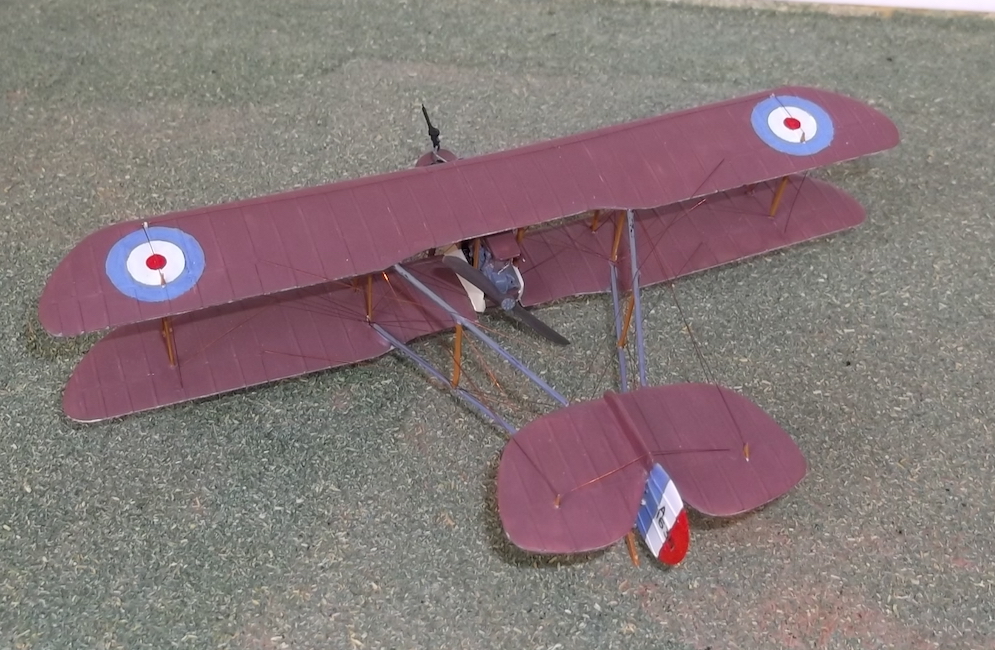
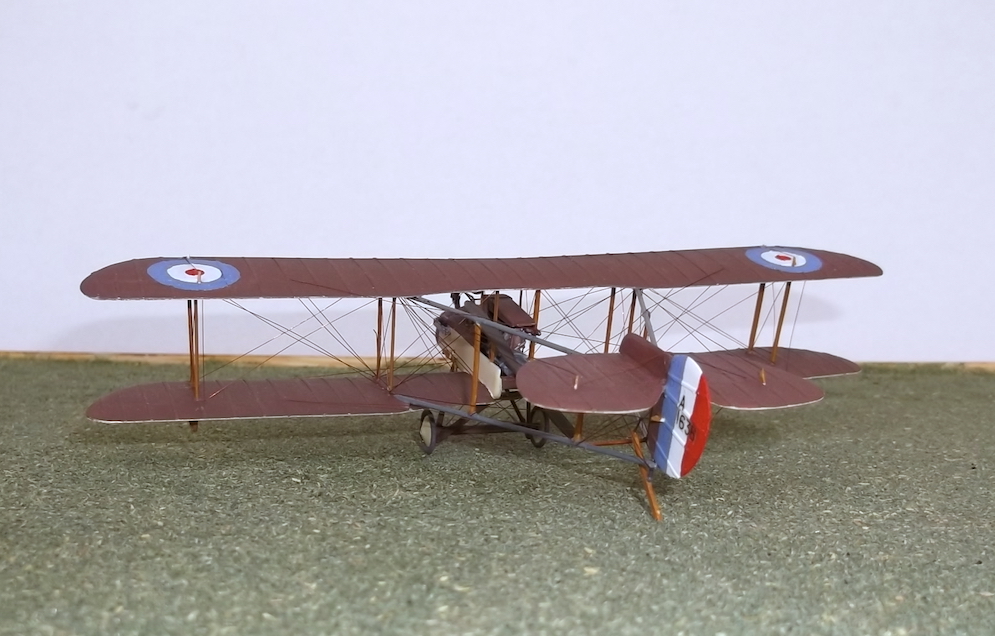
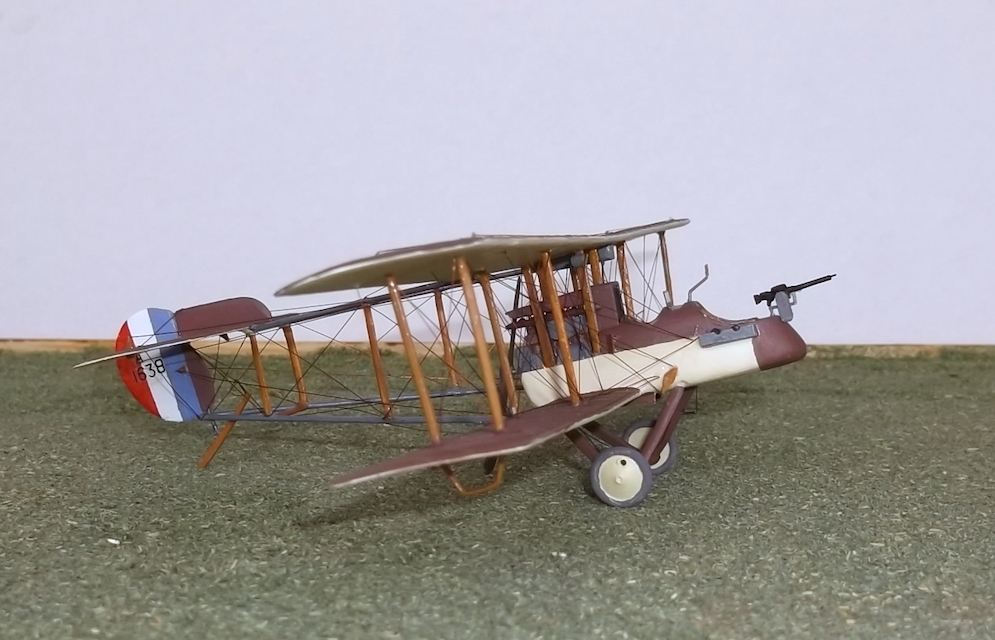
1:72 scale.
This was a conversion from the Airfix D.H.4: I modified the wings and used the wheels, gun and struts from the kit. The engine was from Aeroclub, the booms were made from florist’s wire: the remainder was scratch built.
The markings were hand painted and it was rigged with rolled copper wire. I made this over 10 years ago. The model represents a machine from No 14 Squadron RFC in Palestine in 1916-1917.
Best wishes
Stephen F.

1:32 scale
Kit decals for woodgrain with layers of varnish.
Tamiya, Alclad and printing ink paints.
Gaspatch and ProperPlane turnbuckles
Model Kasten rigging
Copper State Models printed wheels
This Garuda prop: oils over acrylic. It will soon have a ProperPlane Reiske prop.
David L.
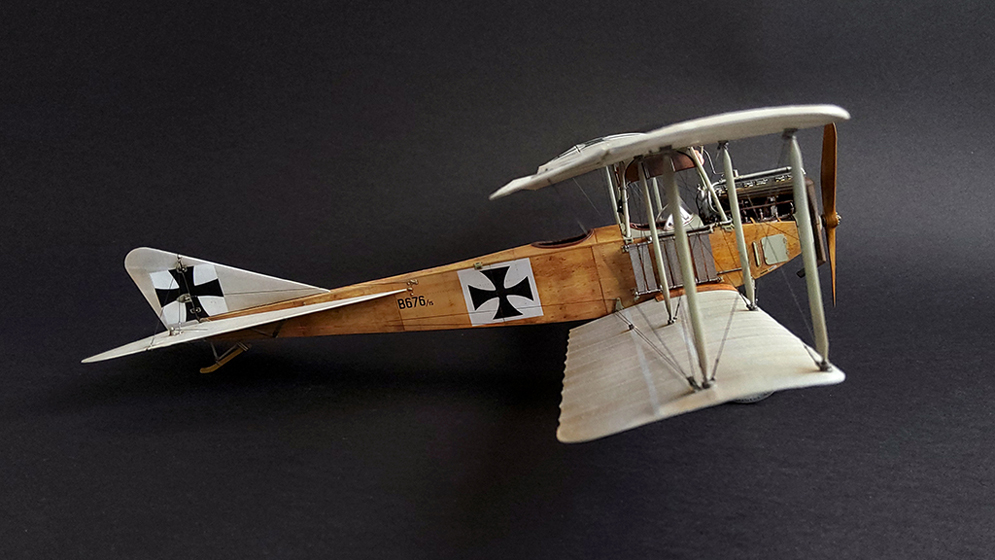
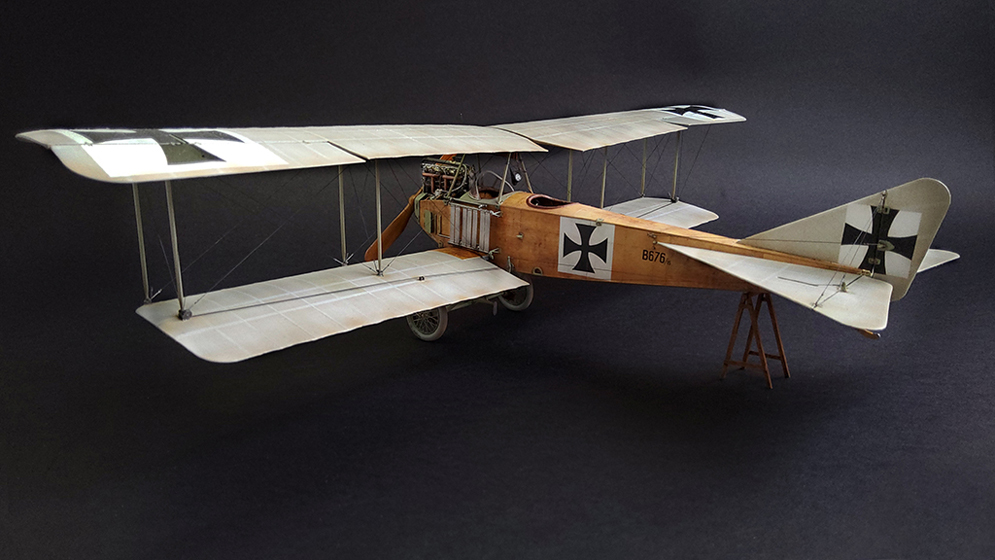
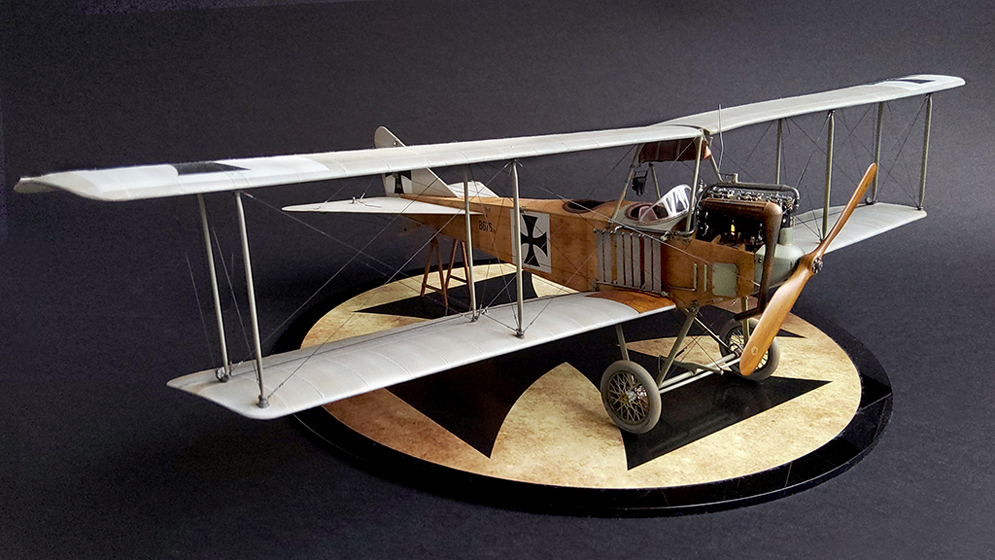

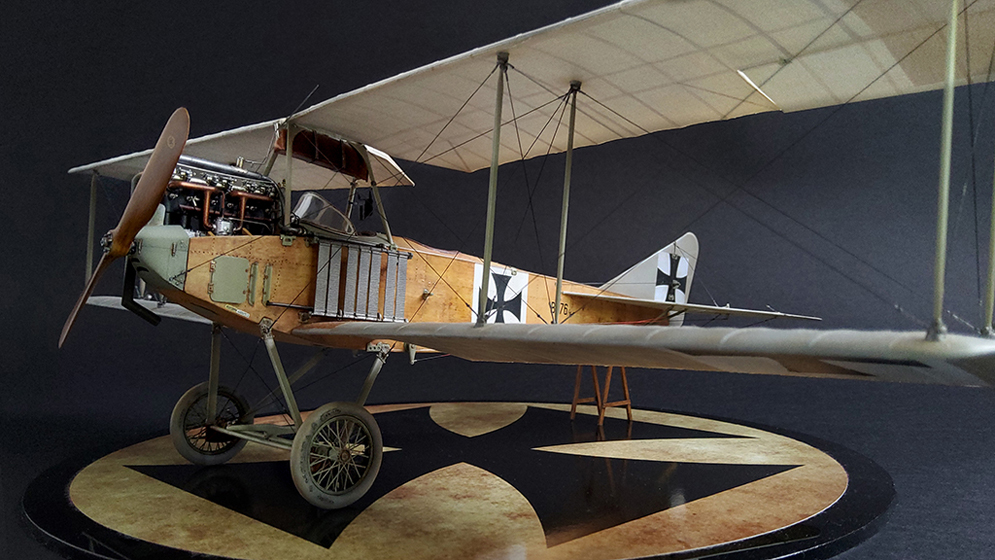
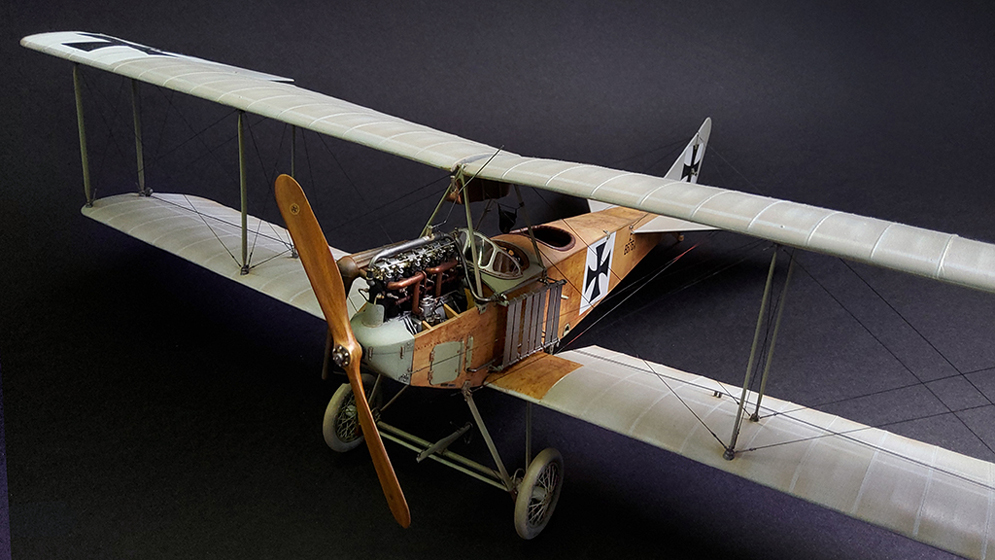
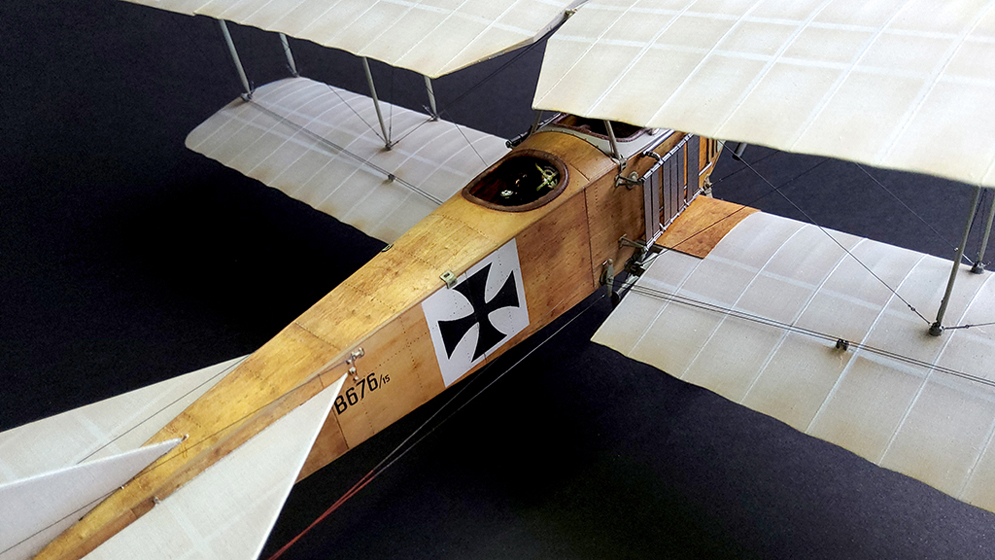
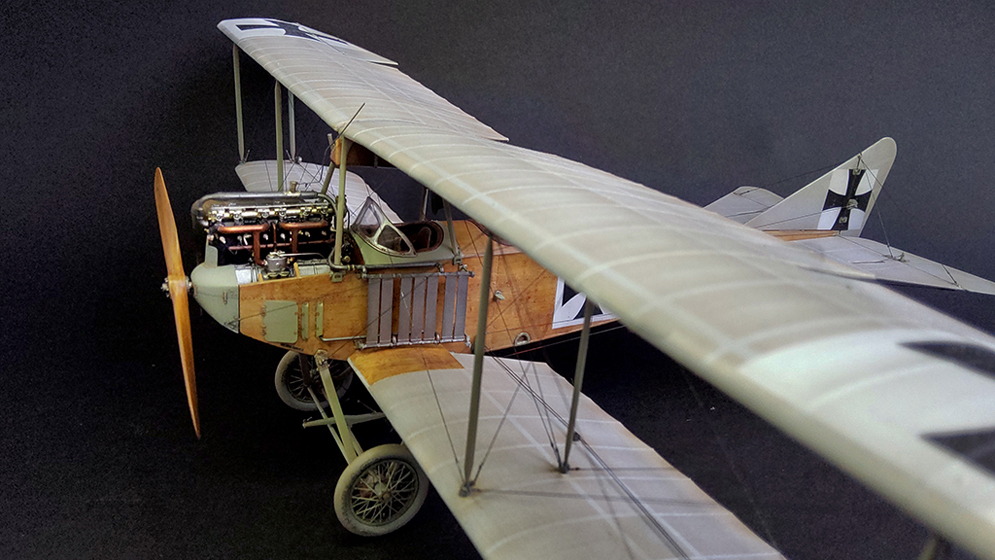
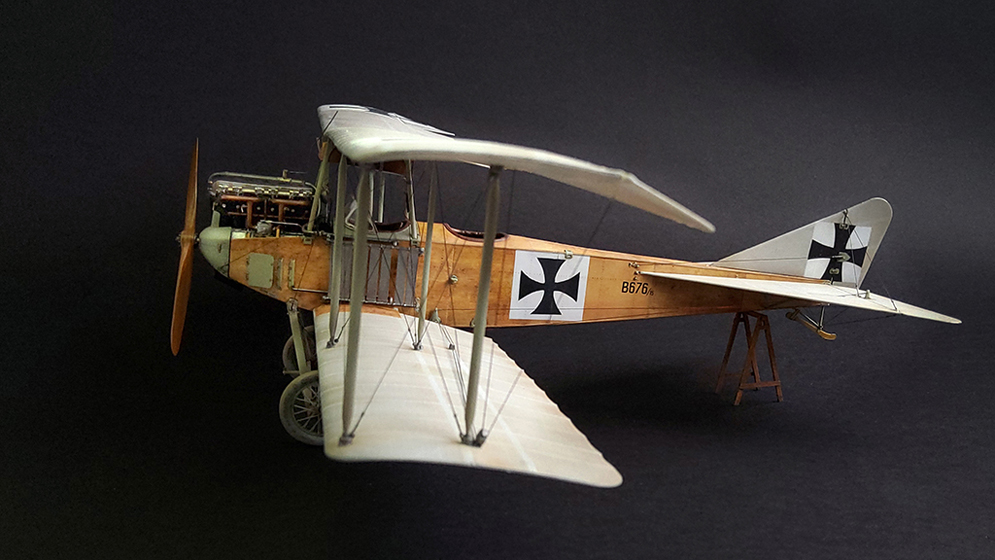
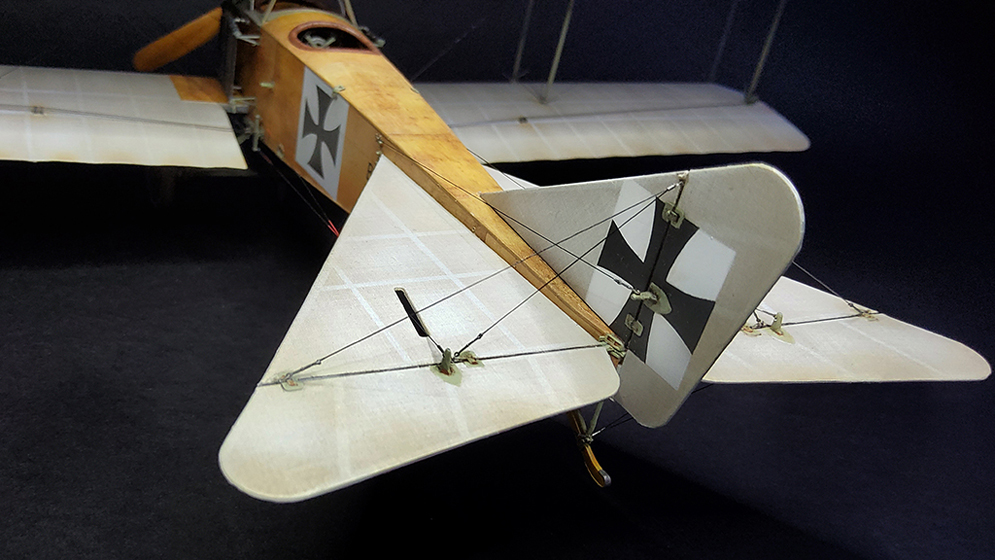
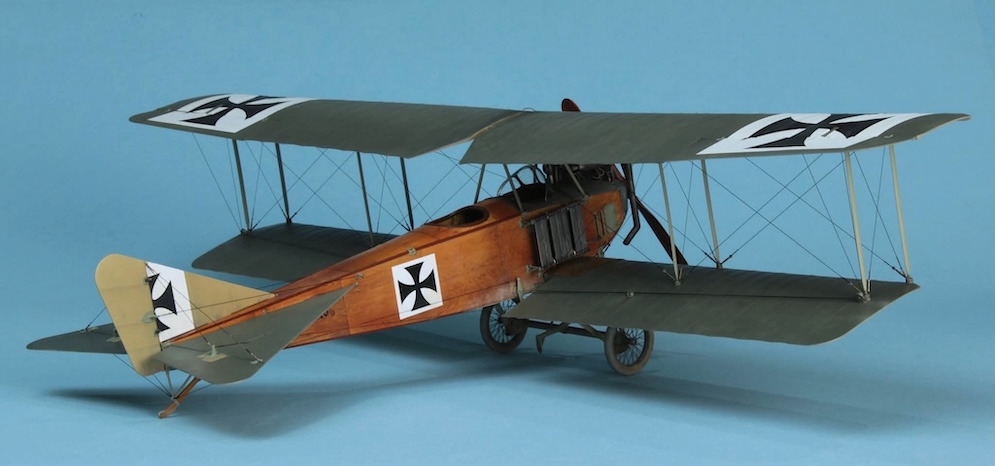
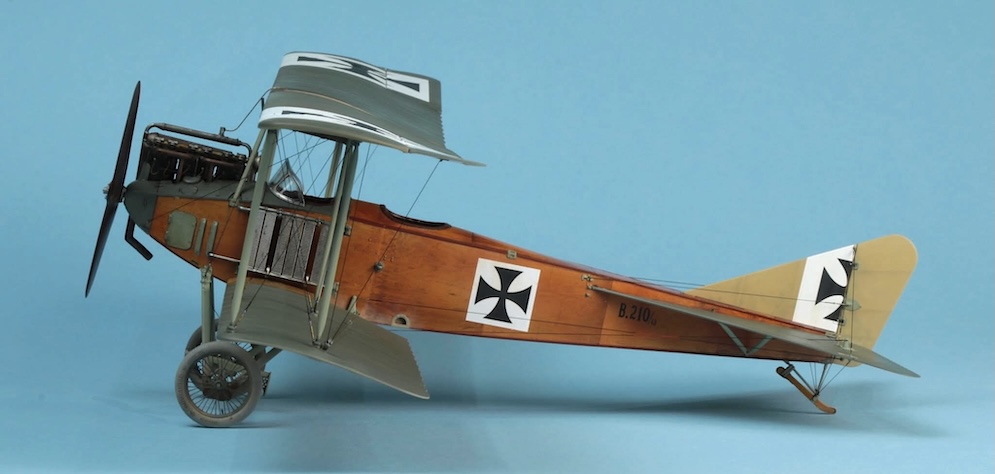
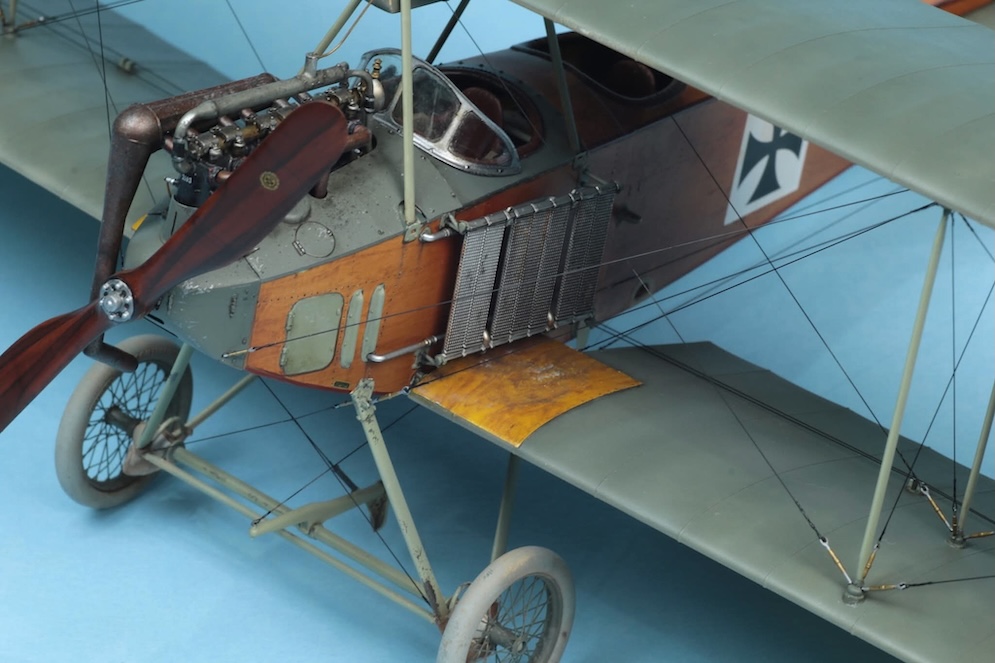
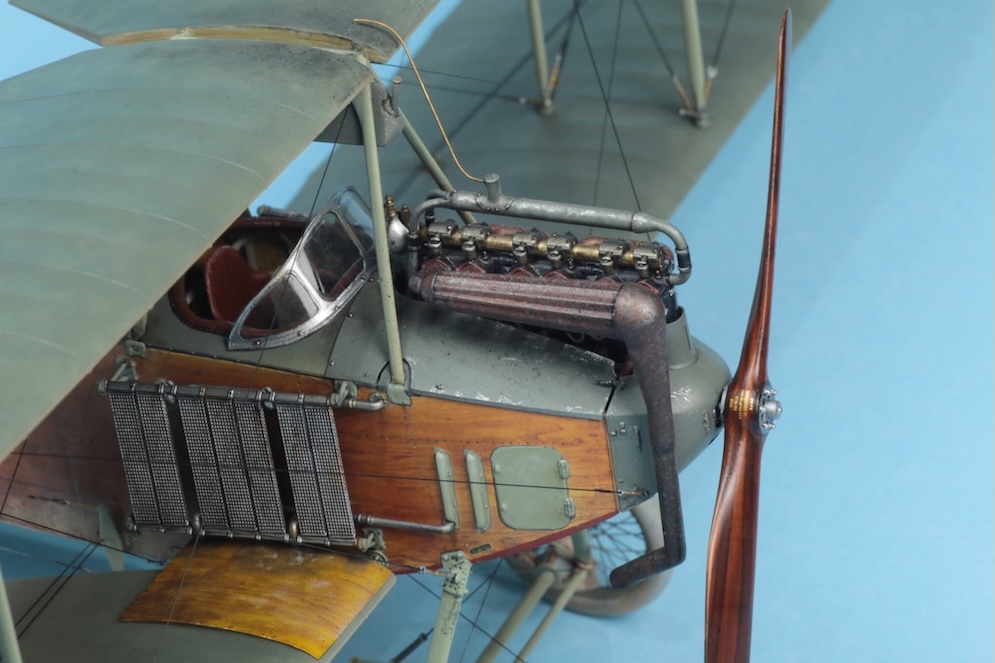
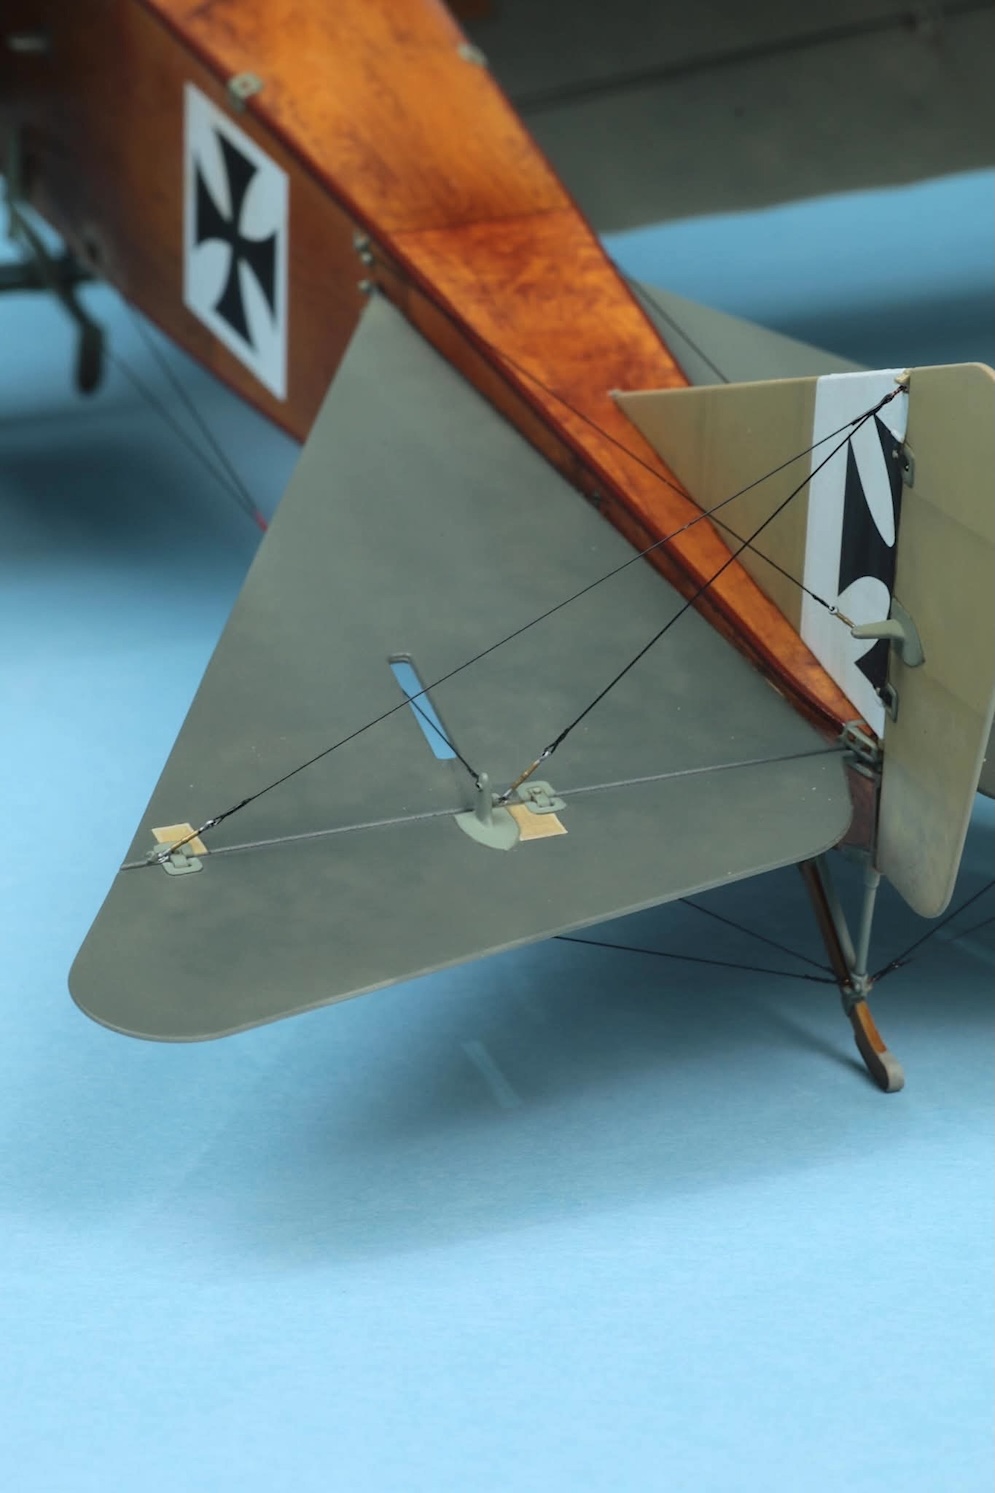
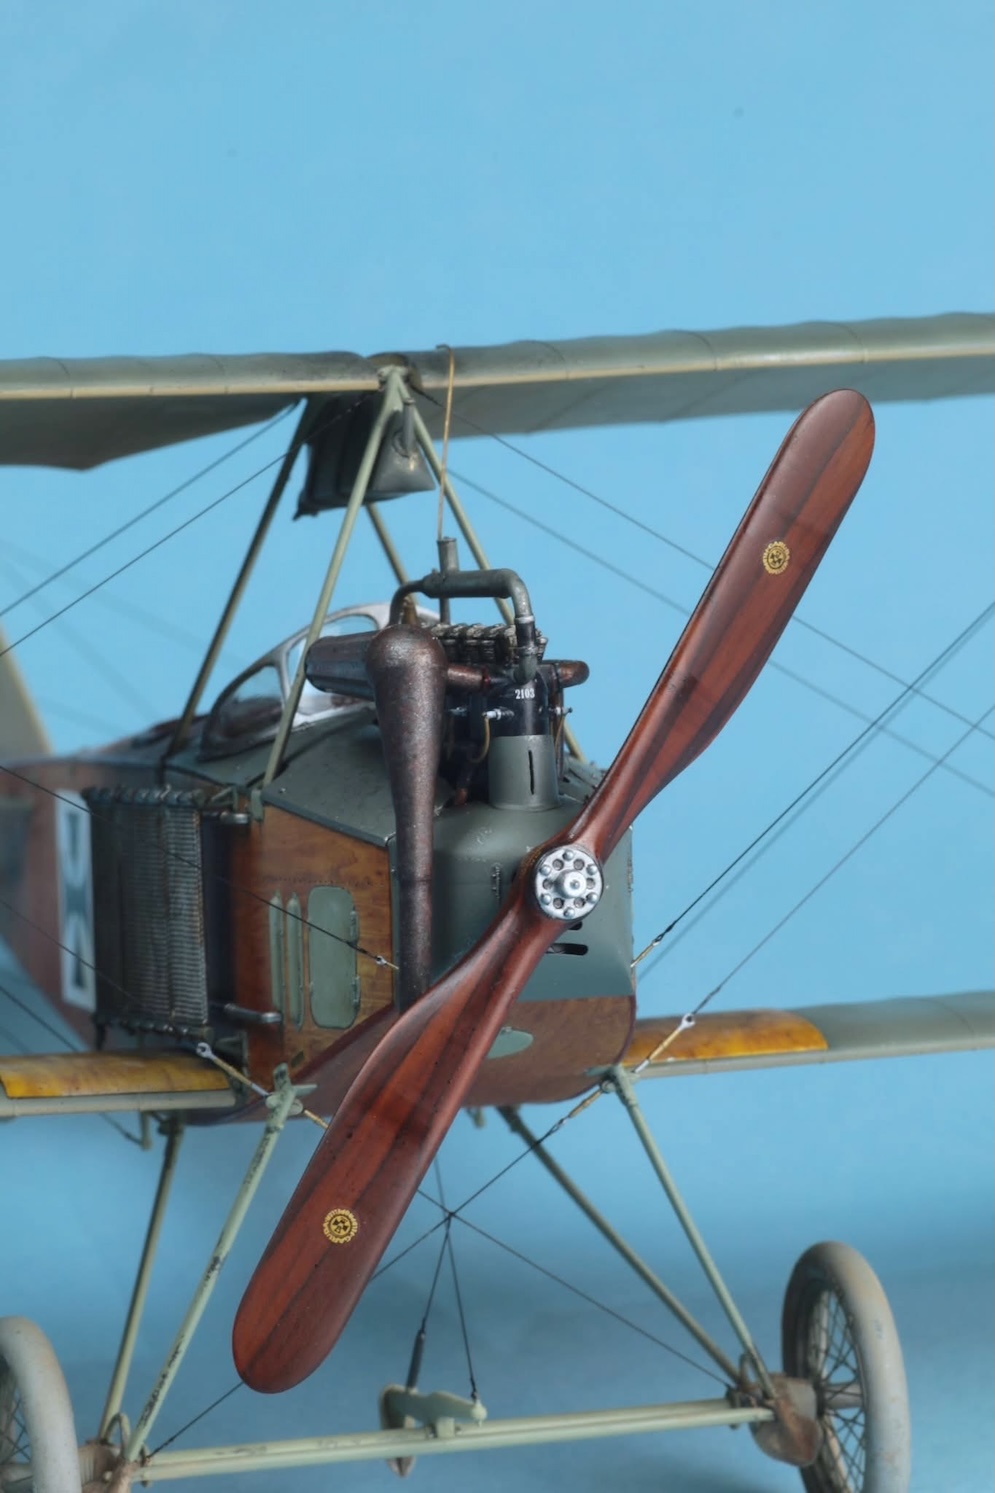
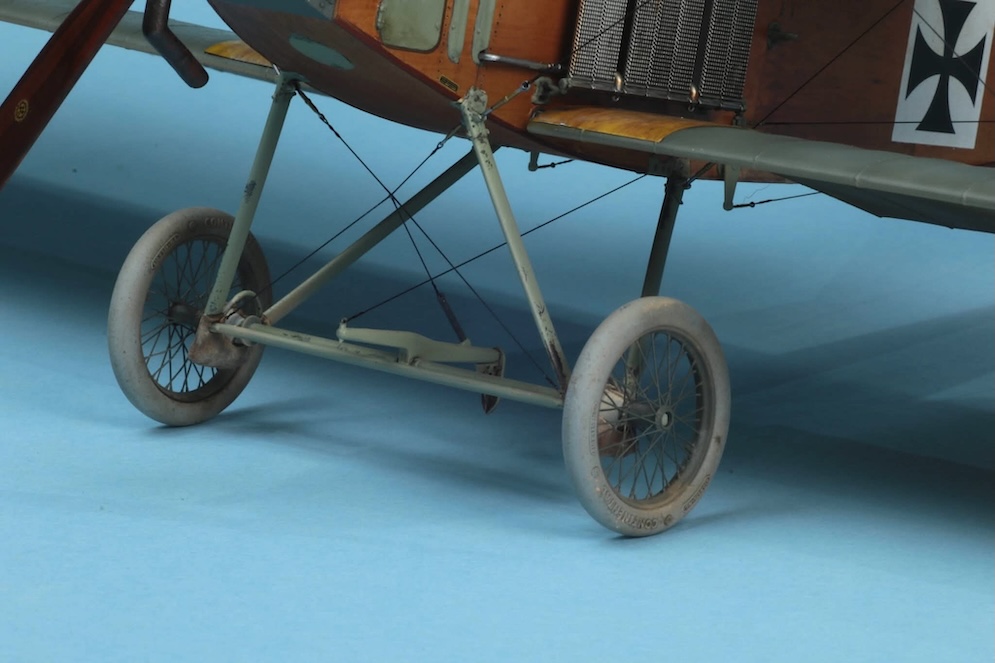
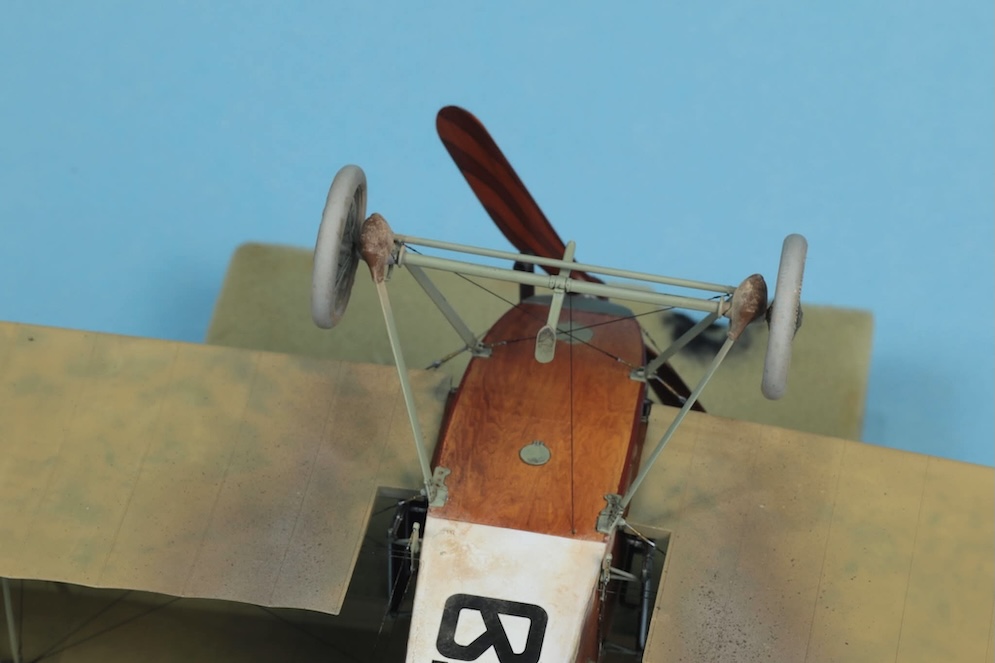
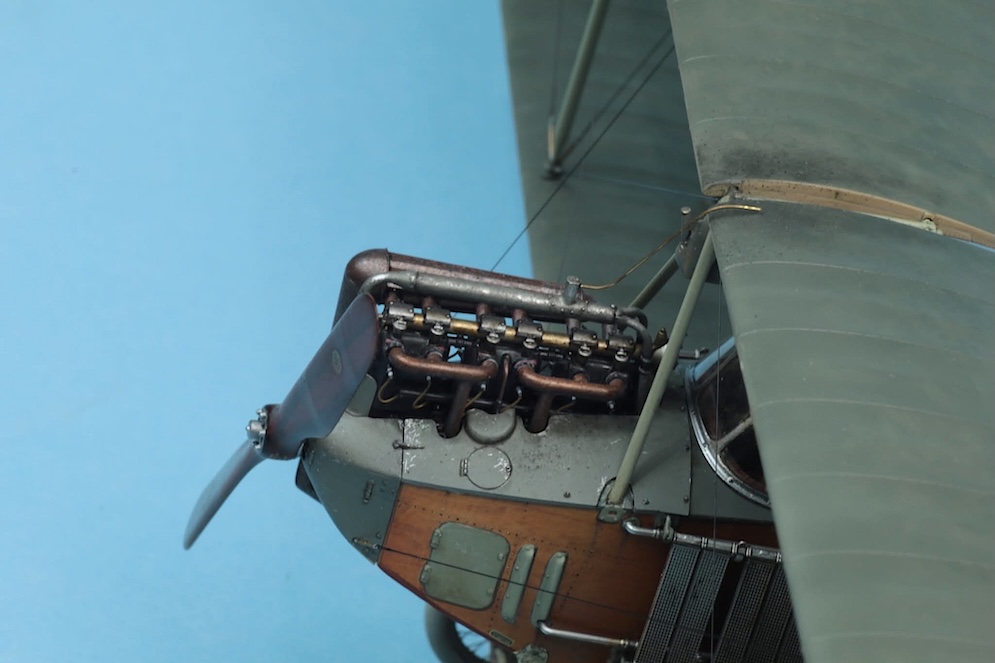
Here are photos of my Albatros BII Wingnut Wings, 1:32 scale
On the only photo of BII 676/15 (Windsock datafile 93), it appears to be equipped with a speedometer pitot (not shown here).
This aircraft from 1915 was therefore undoubtedly used for the purpose of testing flight instruments.
Building :
AVIATTIC decals (ATT32095) for wings fabric.
Mix of Proper Plane and Uschi decals for wood grain panels + oils.
Rigging: Modelkasten 0.13mm
Turnbuckles: Gaspatch 1/48
Propeller: watercolour pencil and oils.
Engine: Taurus Models resin details.
Tamiya colors.
Best regards.
Christian W.
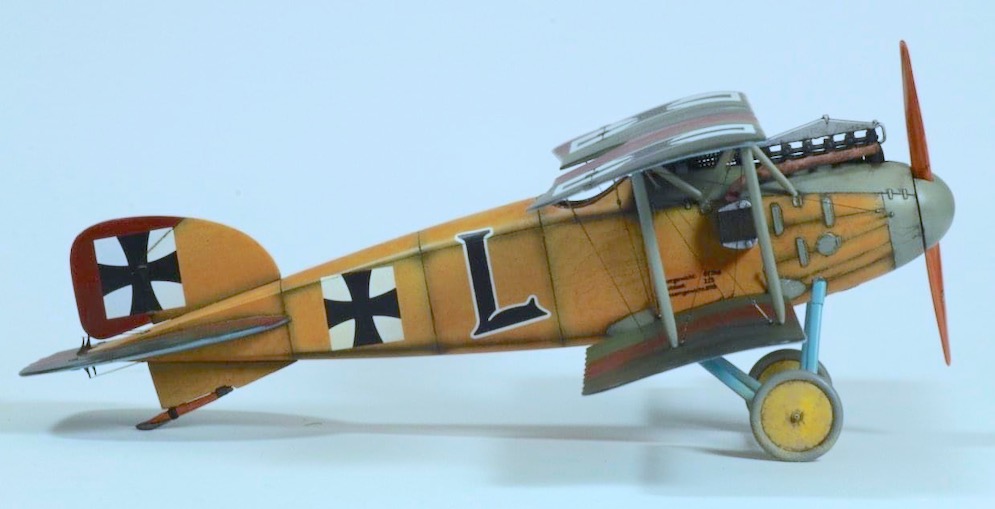
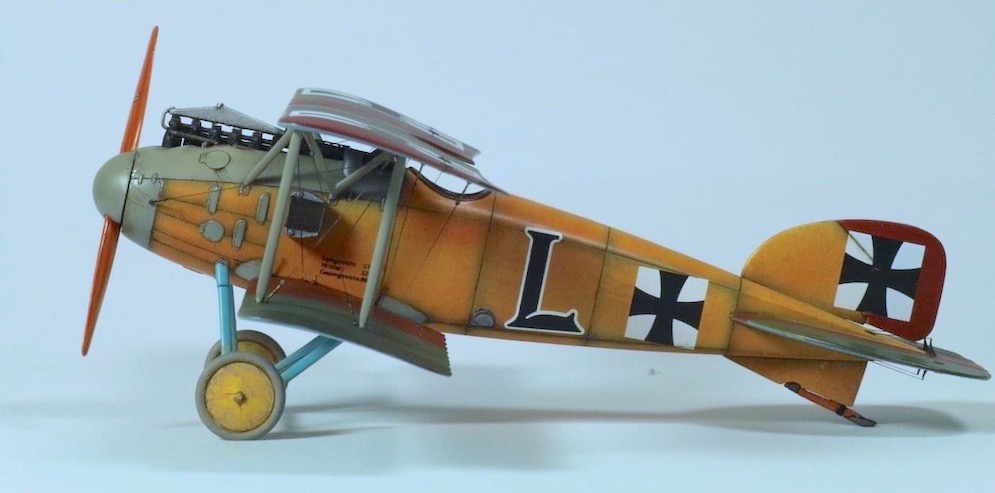
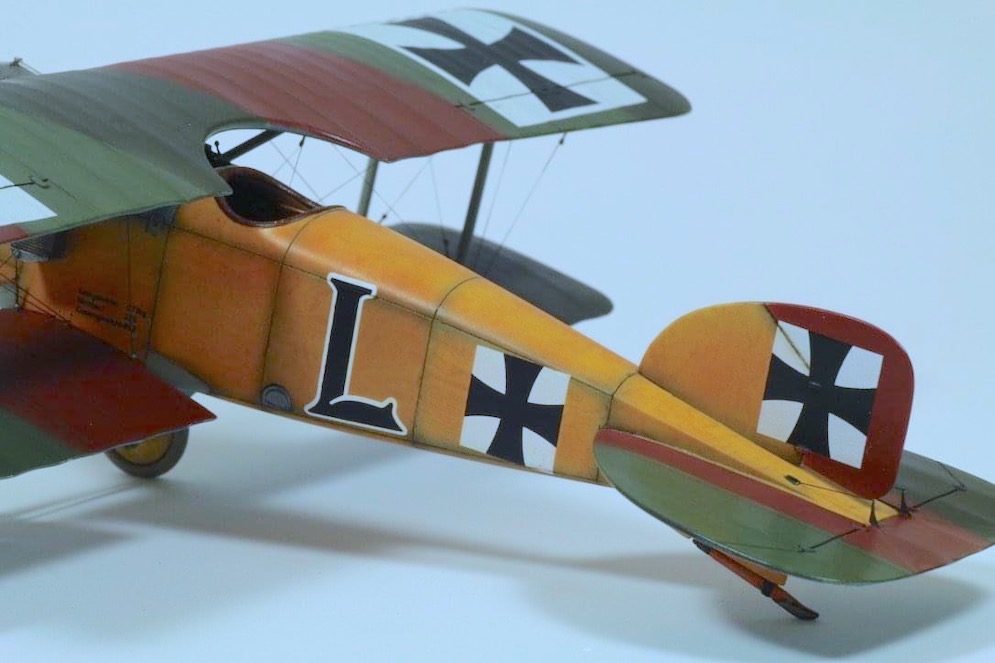
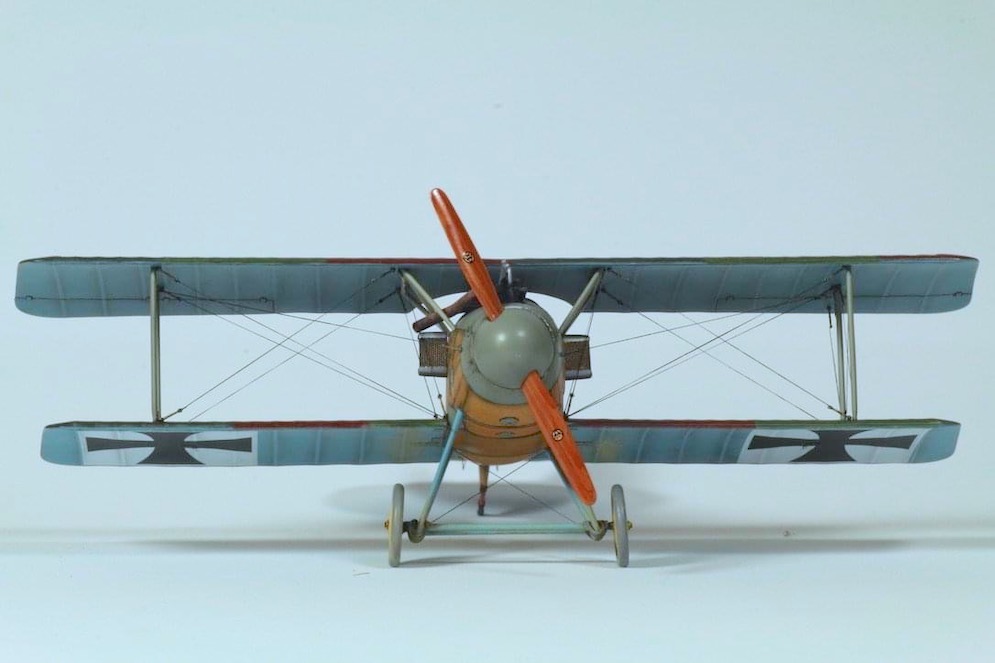
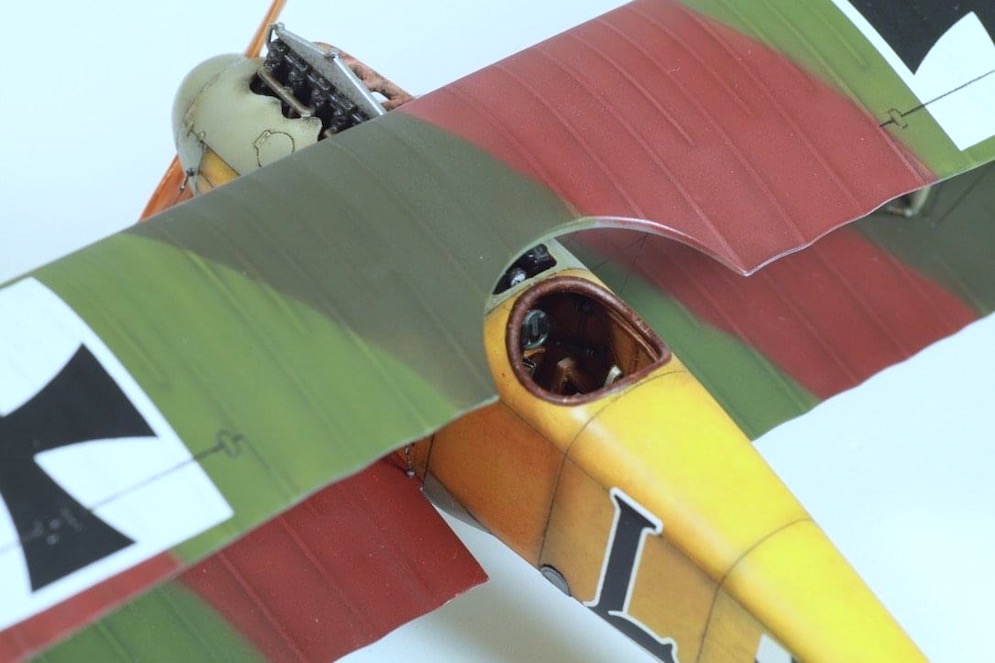
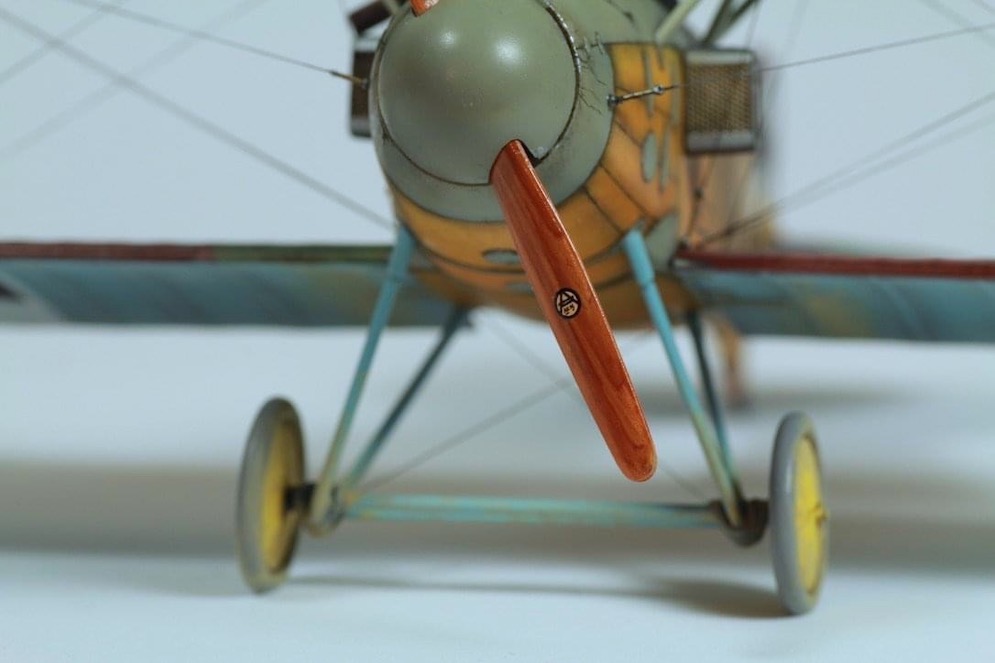
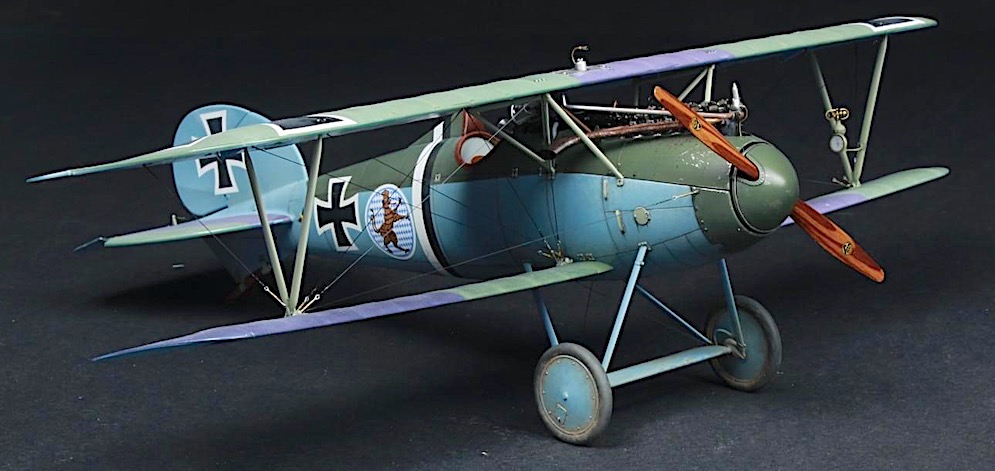
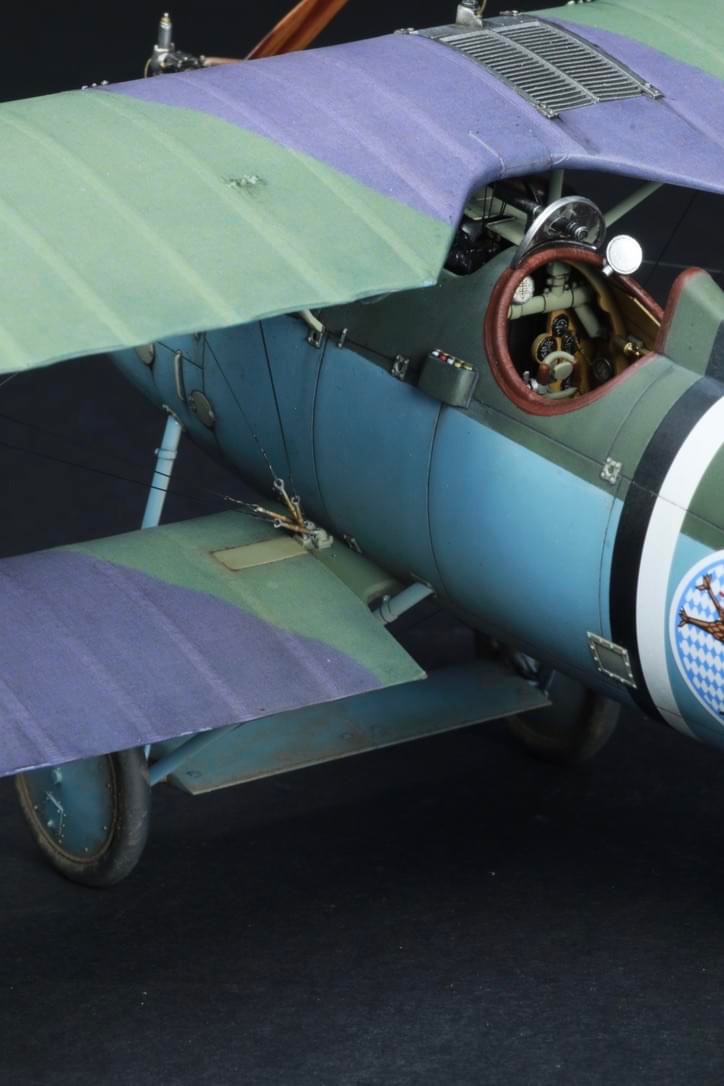
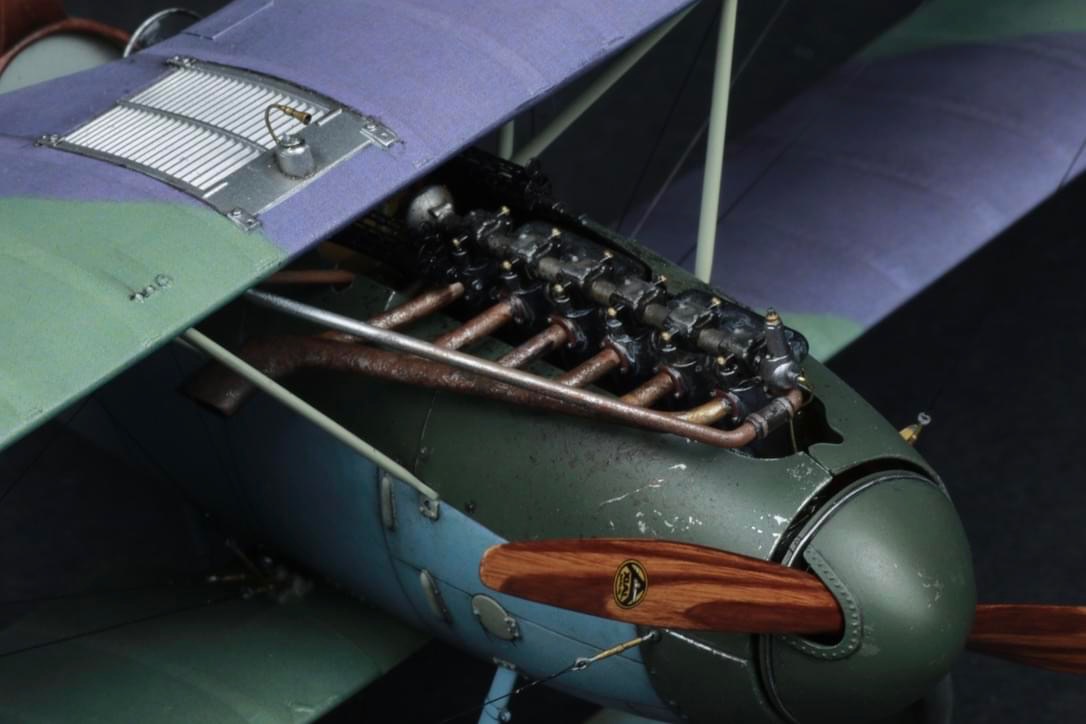
Wilhelm Leusch
eduard 1:48
Prop: oils over acrylic
Uschi woodgrain
David G Lane
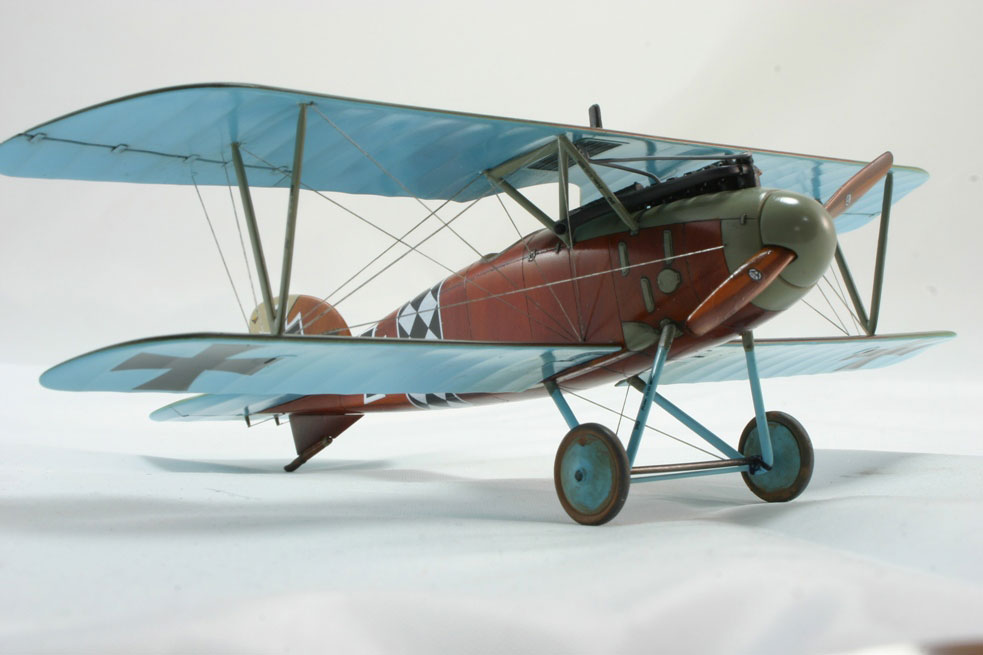
eduard 1:48 kit
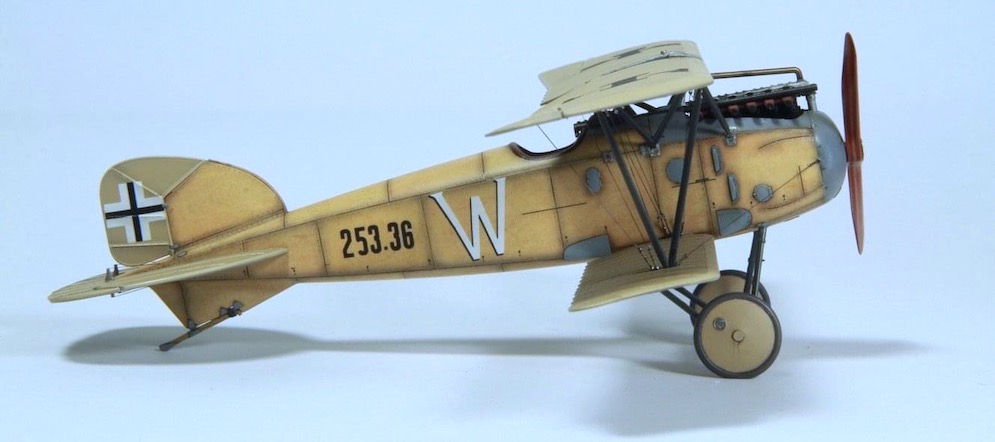
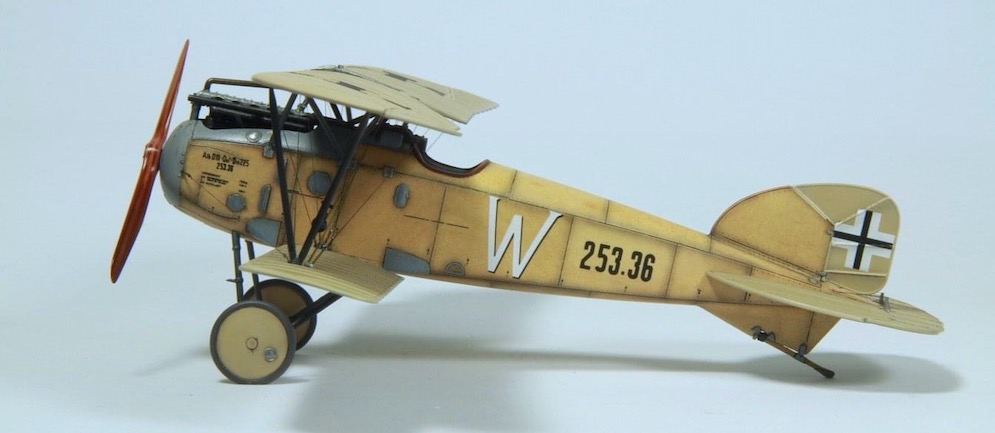
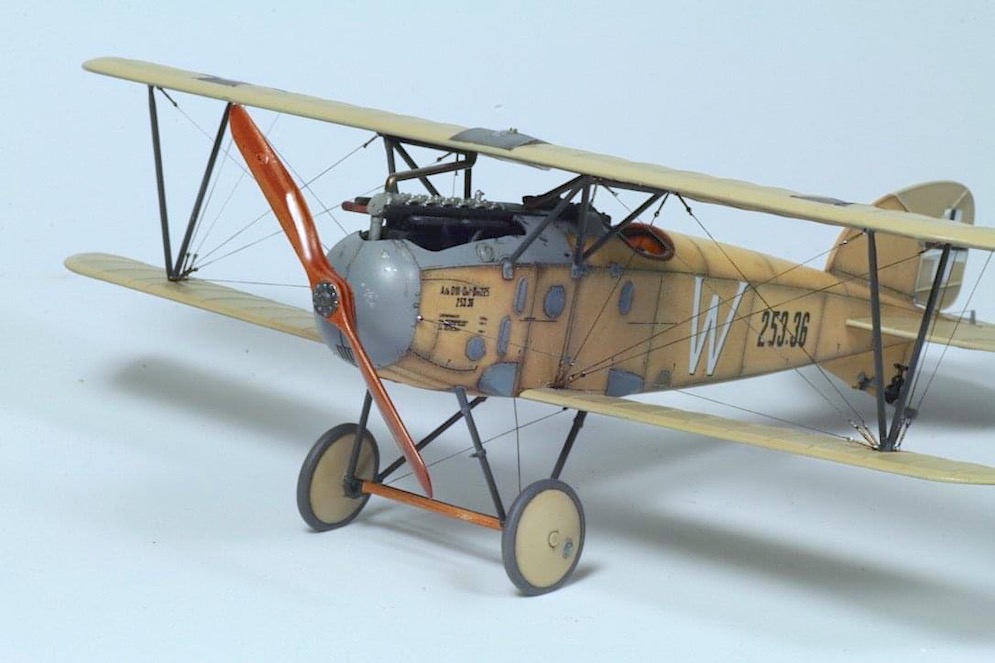
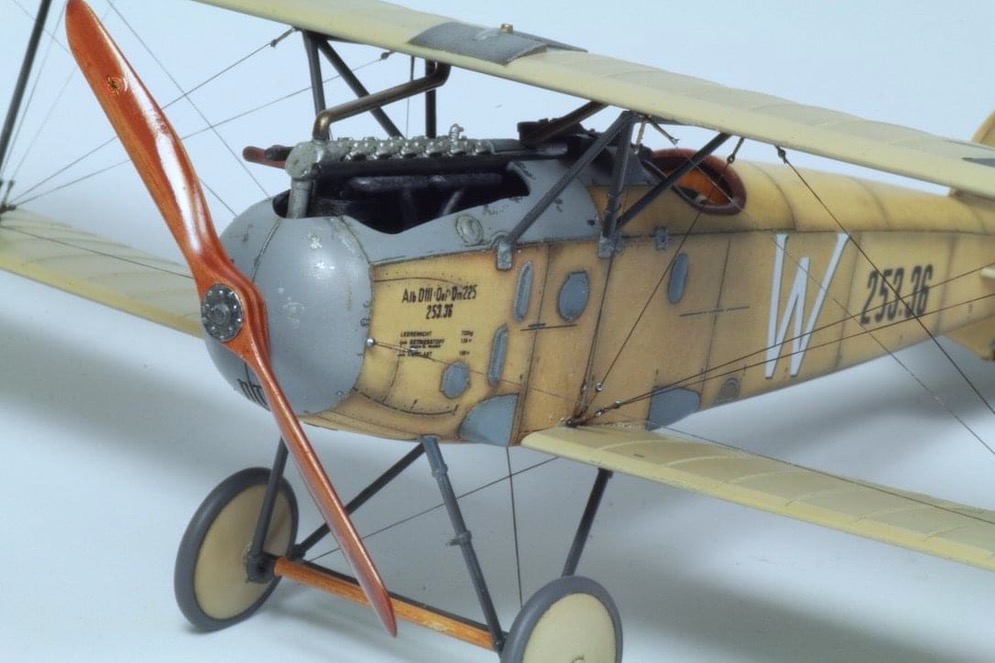
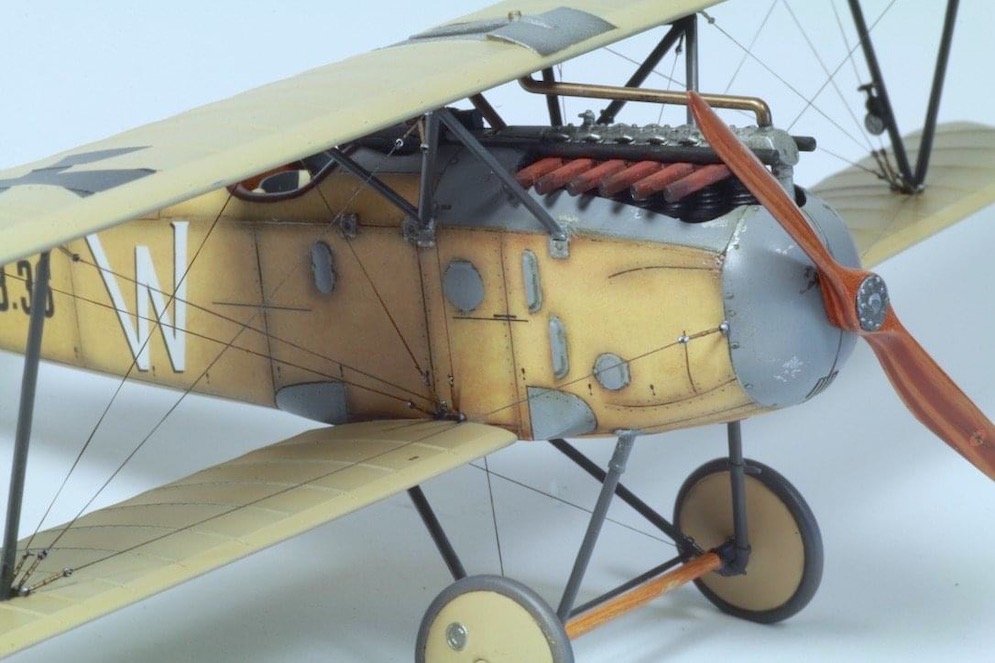
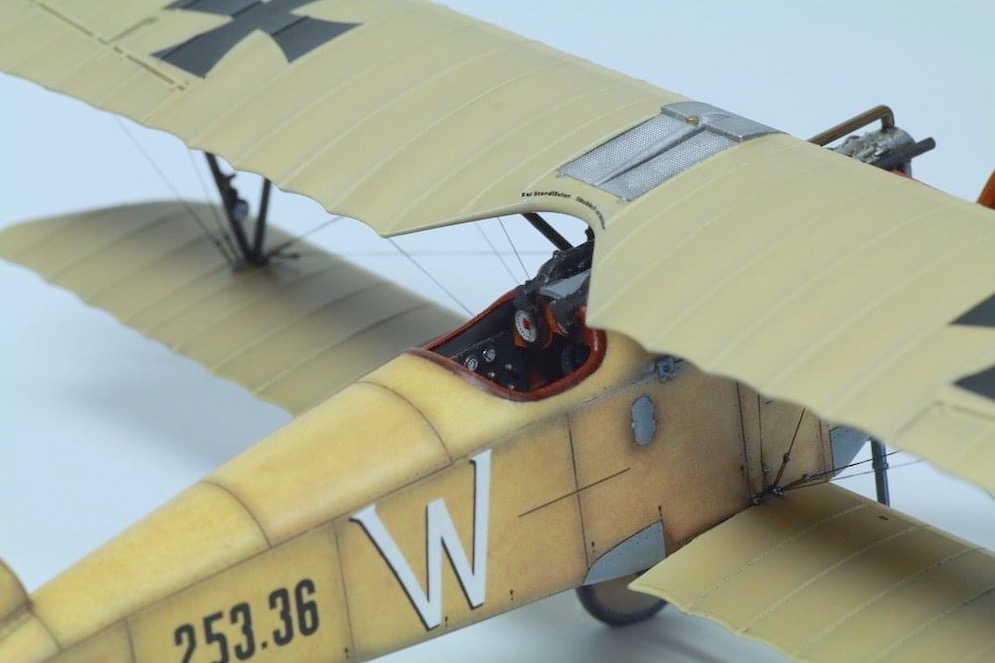
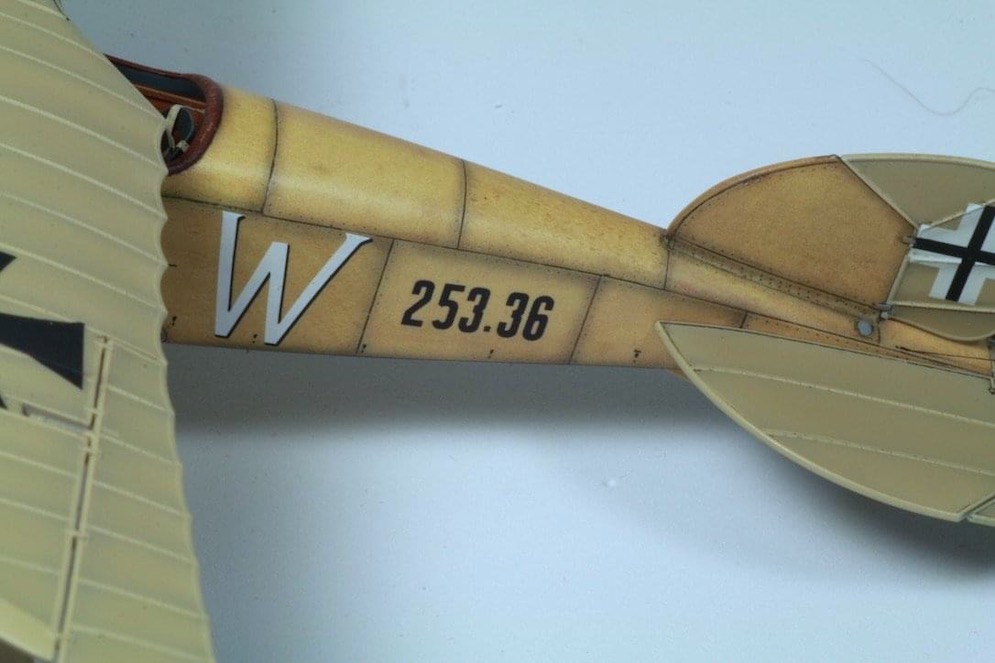
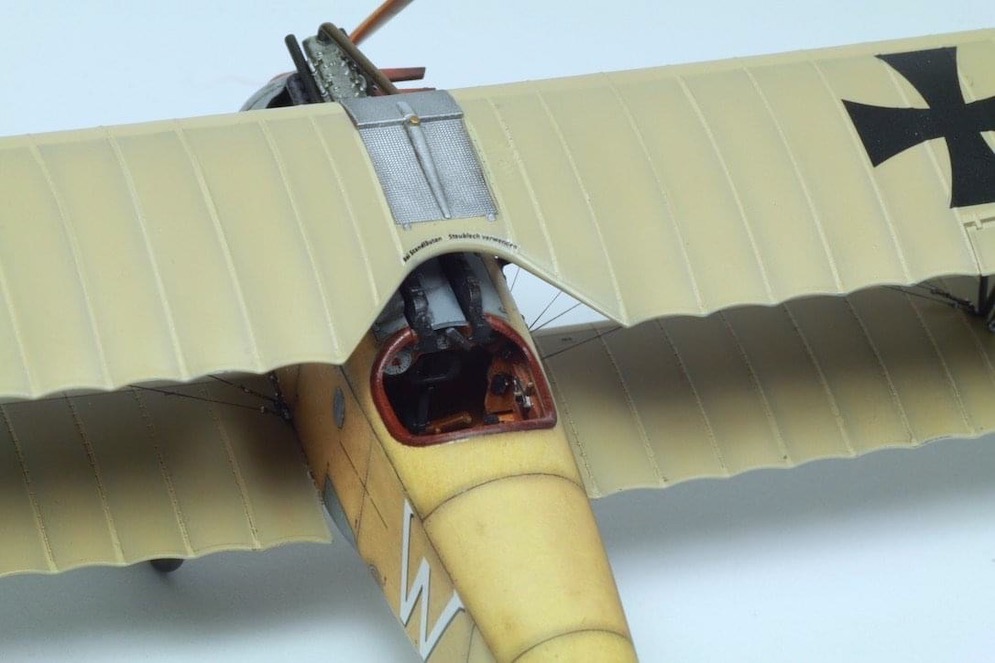
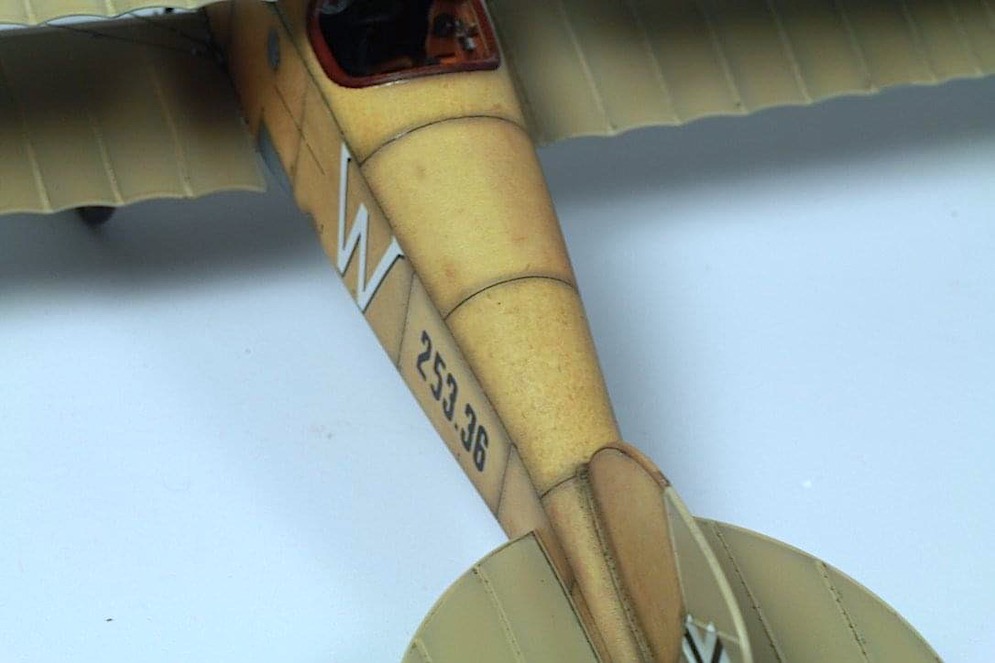
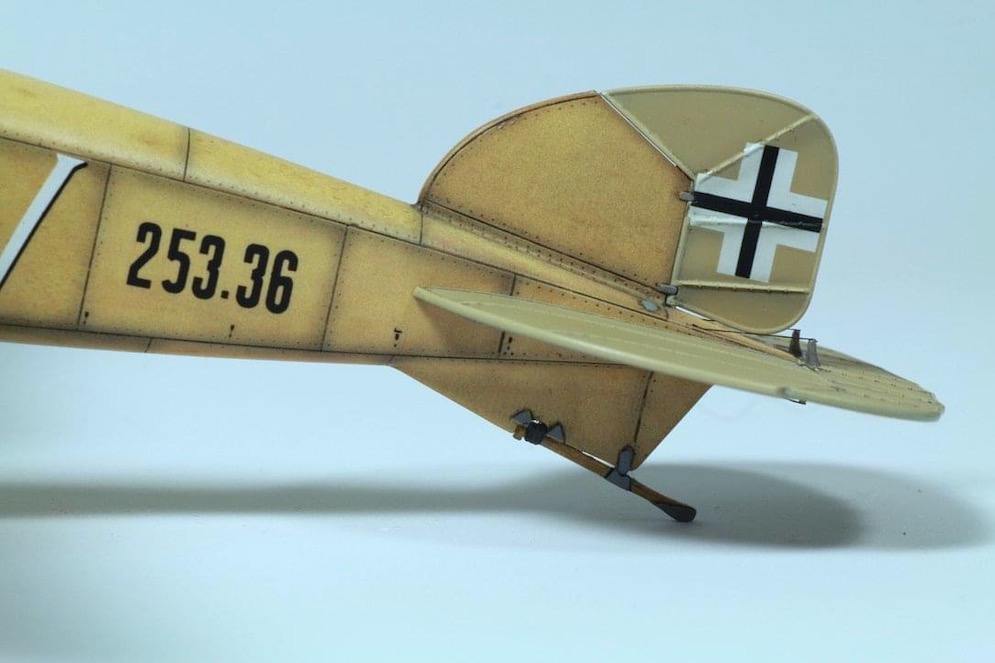
Albatros D.III OEFFAG 253 , Othmar Wolfan
Properplane woodgrain decals
David G Lane
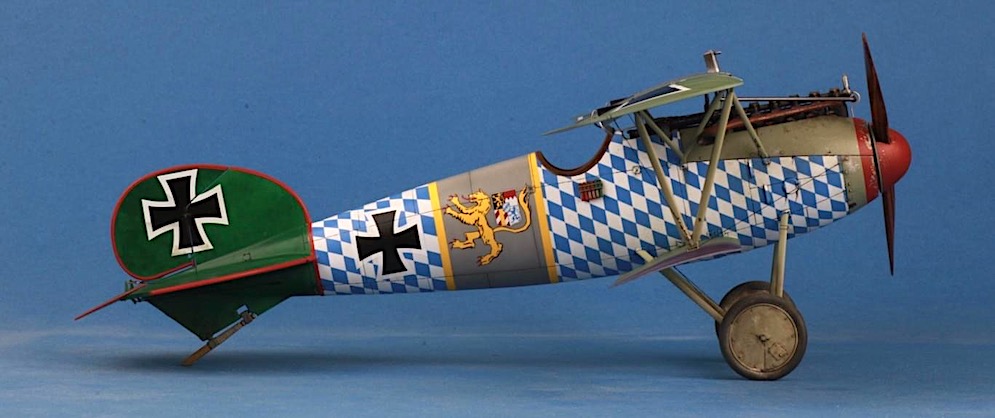
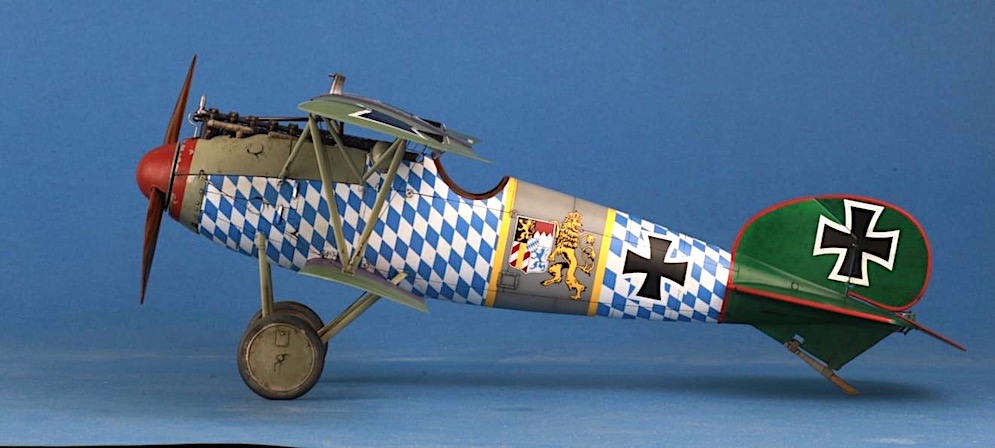


Albatros D.V 1:32 scale from the Wingnut Wings kit
Wolf
Tamiya paint
Prop: oils over acrylic
David L.


Tamiya paints, weathered with oils
Prop: oils over acrylic
Aviattic wing covered decals
ProperPlane spinner and backplate
Gaspatch turnbuckles ( One end, Albatros type, type B) and 1:32 anemometer, scratch support arms.
Model Kasten rigging
kit decals
Small amount of cockpit scratch building
David L.
Attached are some photos of the Albatros as requested. The model is built from the Eduard ‘Weekend Edition’ kit in 1:48, all OOB. Paints are Gunze, and oils for the wood panelling.
Cheers, Jen

I think that this model is simply stunning in terms of weathering and finishing – amongst the most realistic models I have seen to date – wonderful stuff!
See some of Zdenko’s other contributions in your SG like his DH.9a and Polikarpov R-1.
Thanks again to Zdenko for sharing his great work with us all – lots to learn from here just by careful study of his photographs that are equally very high quality.


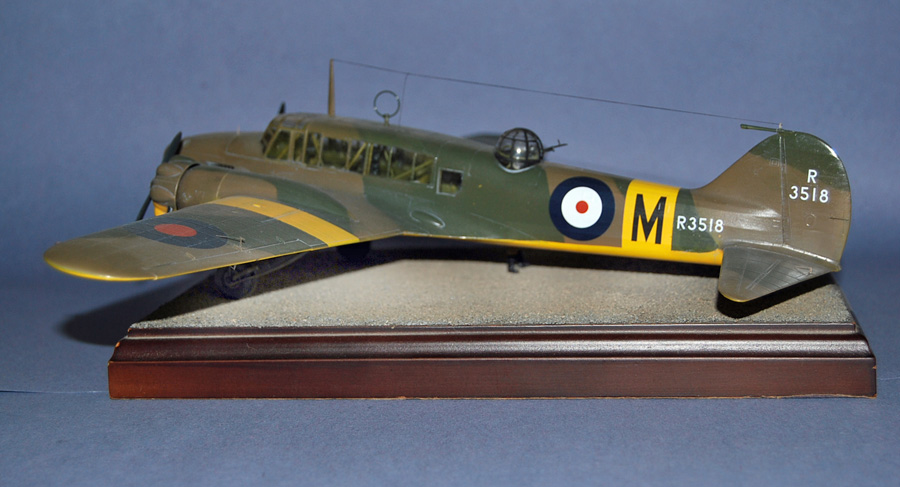
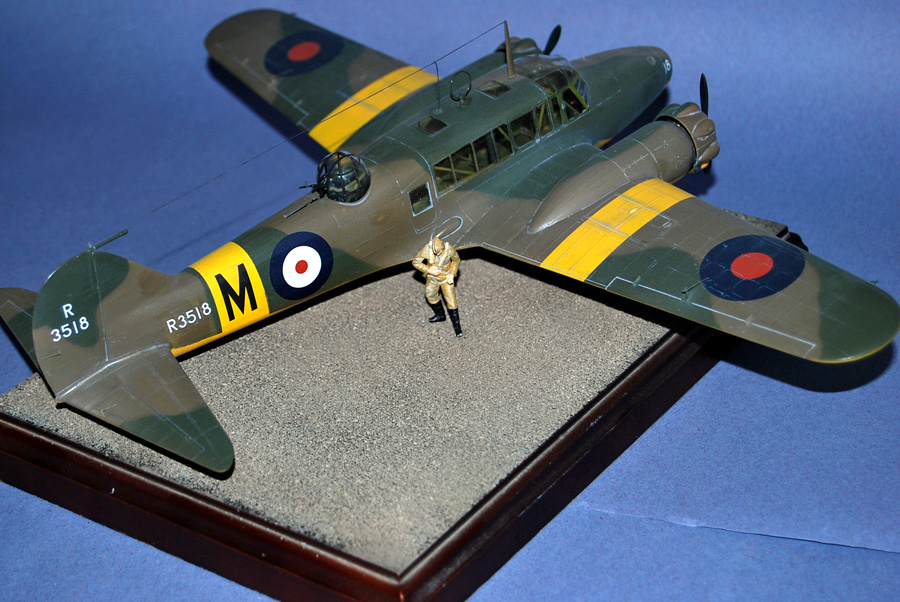
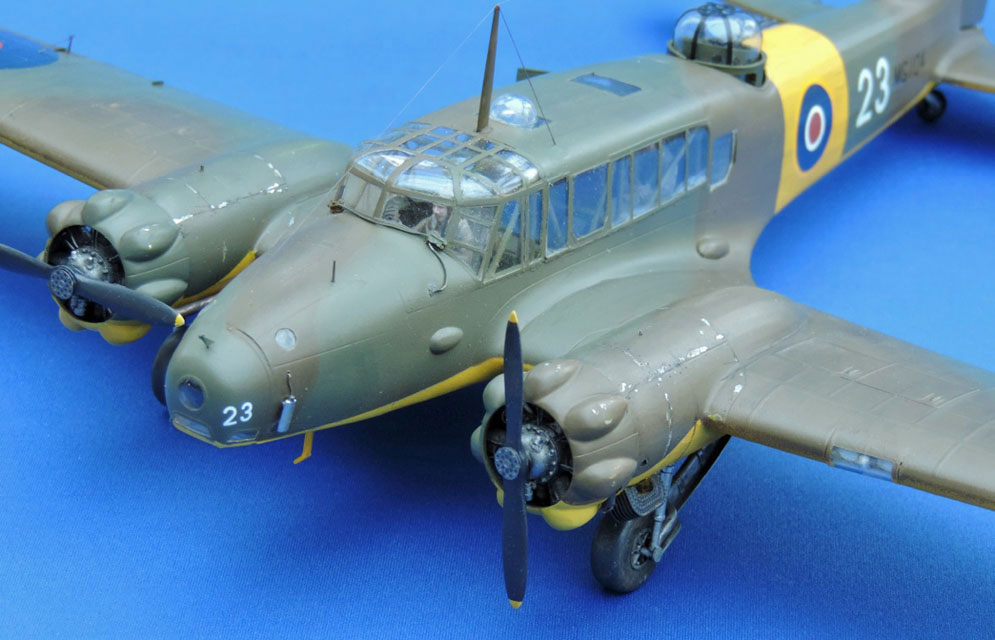
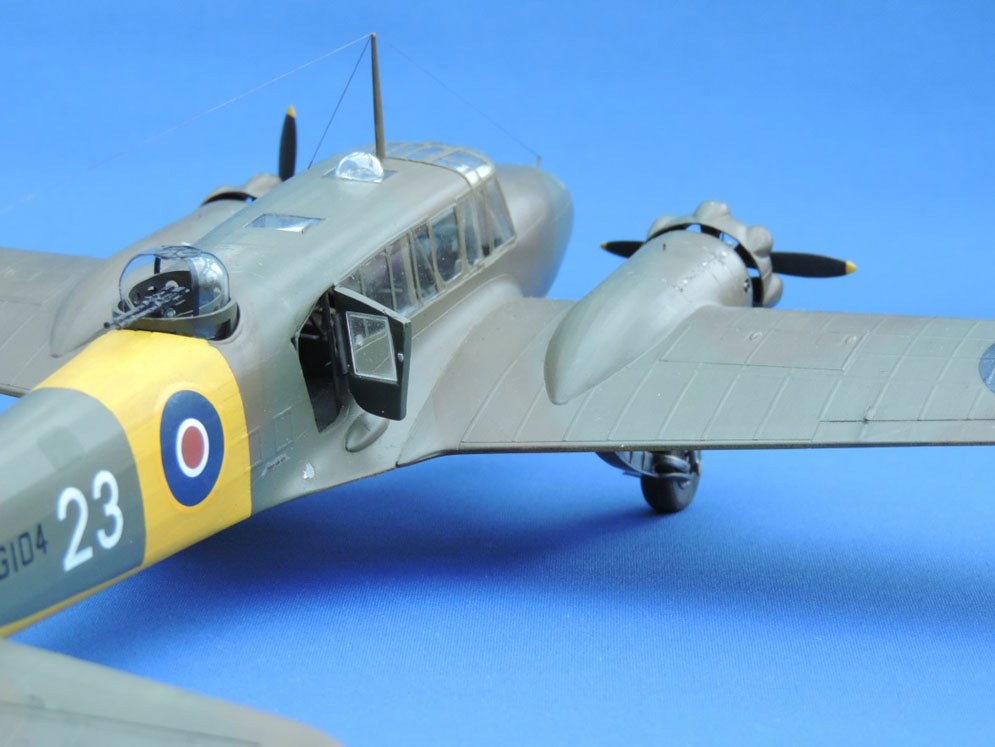
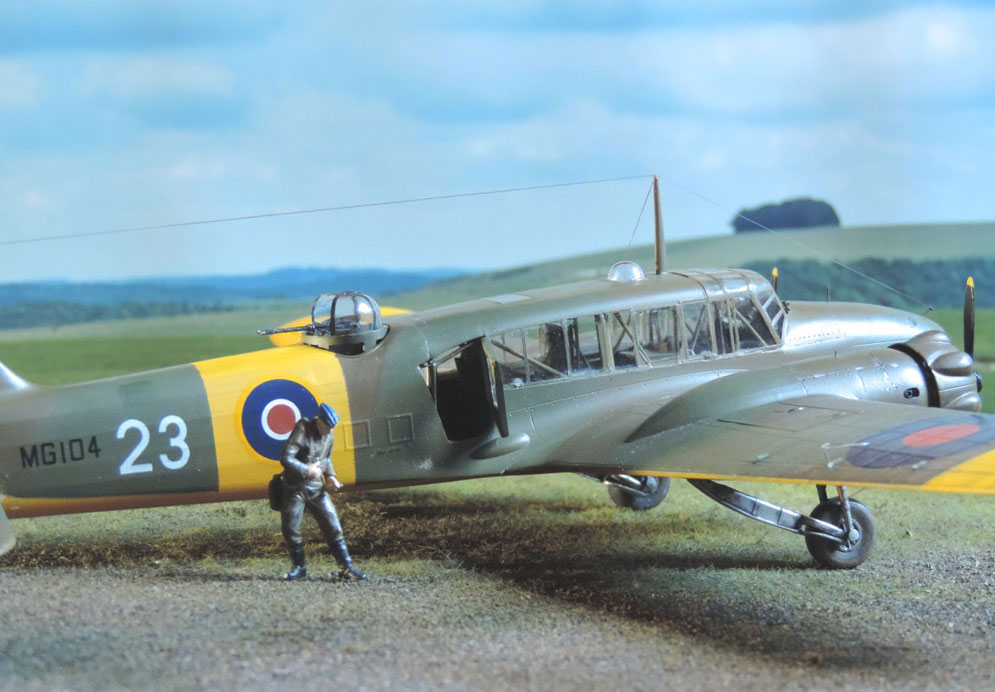
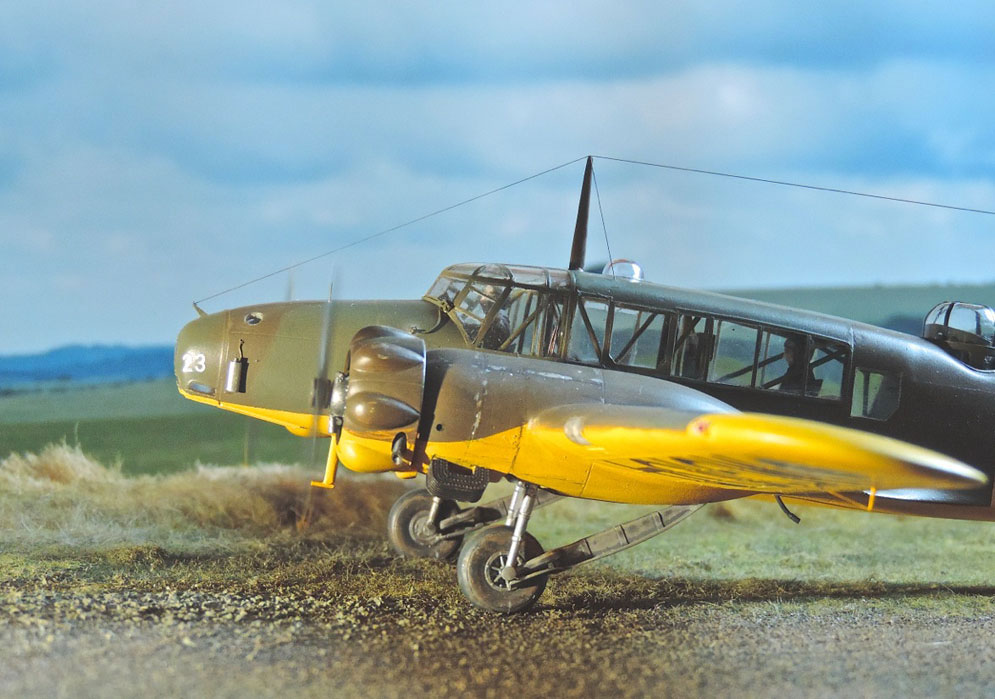
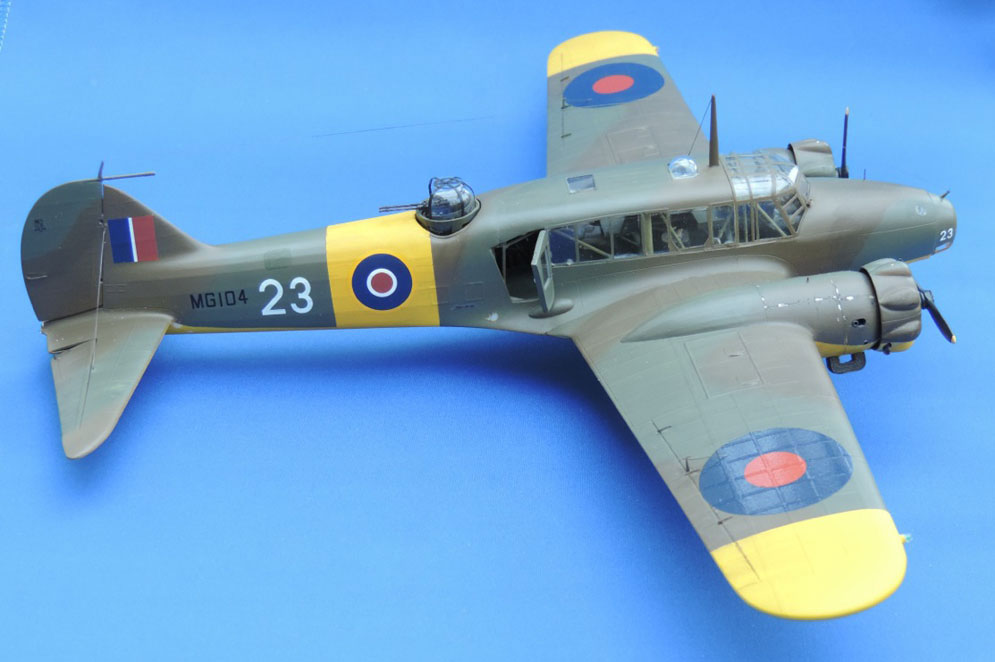
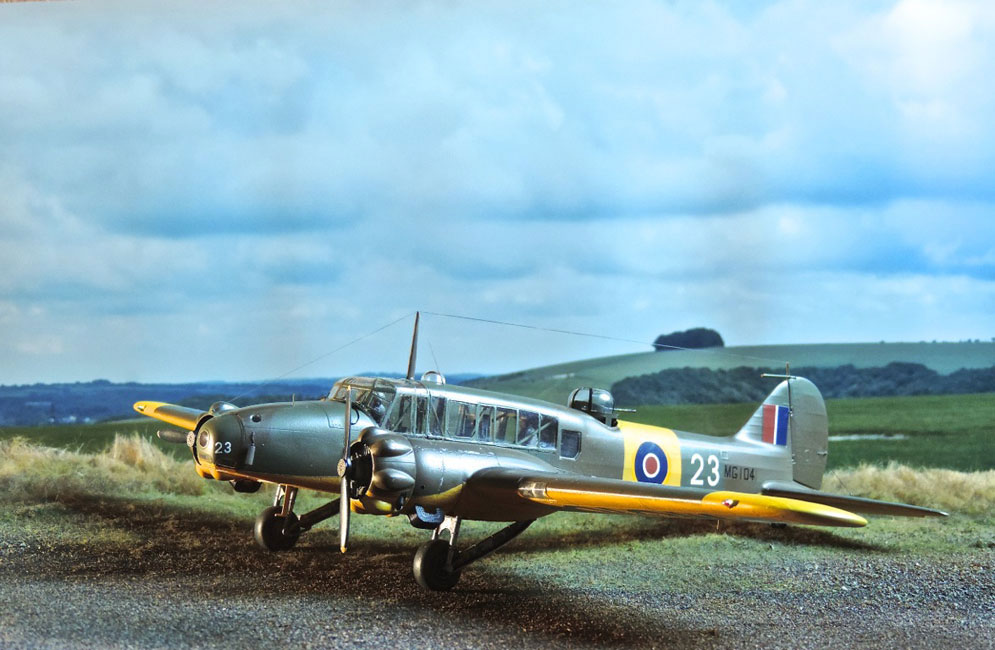
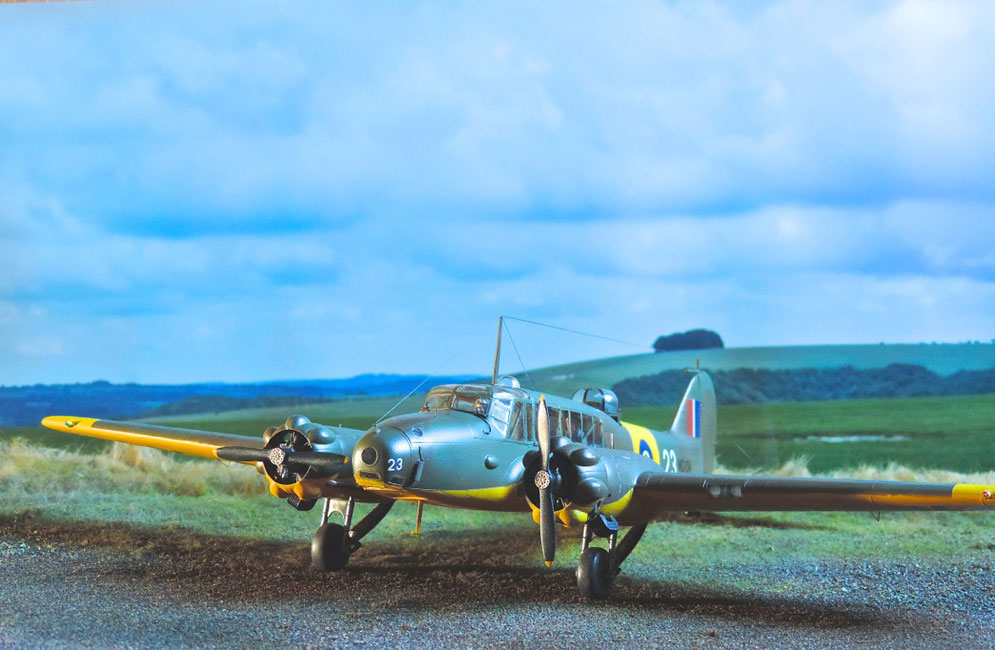
Anson “Colourful Annie” by Max Williams
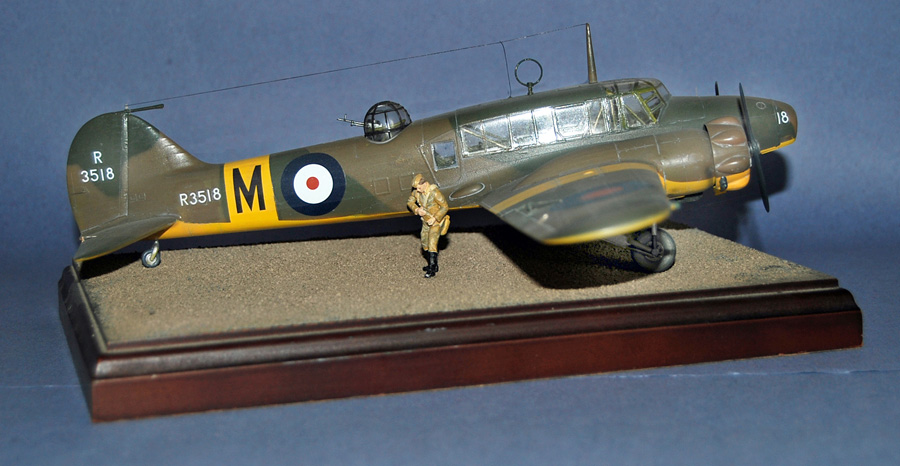
This is the Classic Airframes Anson “Colourful Annie” – it was the first one of its type that I had made and was quite challenging. The kit is a mixture of injection moulded plastic, photo-etch and resin. The instructions, as with many CA kits, were very vague, often ambiguous and sometimes wrong! I was helped in my build by a couple of articles in model magazines that I had spotted over the years, and by a Brett Green build feature on the Hyperscale site. The two most contentious areas of the kit are the positioning of the undercarriage in the nacelles – it’s easy to get them in the wrong place, and I strengthened mine with the addition of plasticard formers – and the resin cowlings. These have to be cut off some chunky mouldings, but what is not explained is that the inside diameter of the cowl also has to be increased. I had problems with some warped resin parts in the cockpit but I made some new bits out of plastic rod. Despite all of that, I enjoyed the build sufficiently to have another one ready soon!
This particular aircraft is painted in the markings of 6 SFTS Mallala, Victoria. R3518 actually crashed whilst being flown by a pupil pilot idoing a cross country solo in June 1943 – he became disorientated in cloud and dived into a hillside. He was killed and his plane written off.
Xtracrylics were used throughout, though I have to say I won’t be using these very often as they tend to clog the airbrush even, it seems, when thinned. Pro-Modellers “light dirt” was used to weather the model.

Here is the Aoshima 1:72 Ki-100. A nice kit but panel lines are a touch Airfix. By amazing luck there is a survivor which can be found at RAF Cosford in the UK.
I used the eduard PE set advertised for the Tamiya Ki-61 Tei. Kawasaki had developed their Ki-61 to accept the improved Ha-140 inline that was hoped to be something like the DB605 found in the Bf109G. But the engine was not a success, and then B-29s ruined the engine plant. At the prompting of the Army they fitted the radial engine Mitsubishi Ha-115 to the airframe. These were plentiful and were powering the uncatchable Ki-46III ‘Dinah’. They were struggling to figure out how to do this, but fortunately they could study an imported FW190A-5 and hey presto! The resulting fighter was a success, but in a couple of months the war was over.
Andrew J.
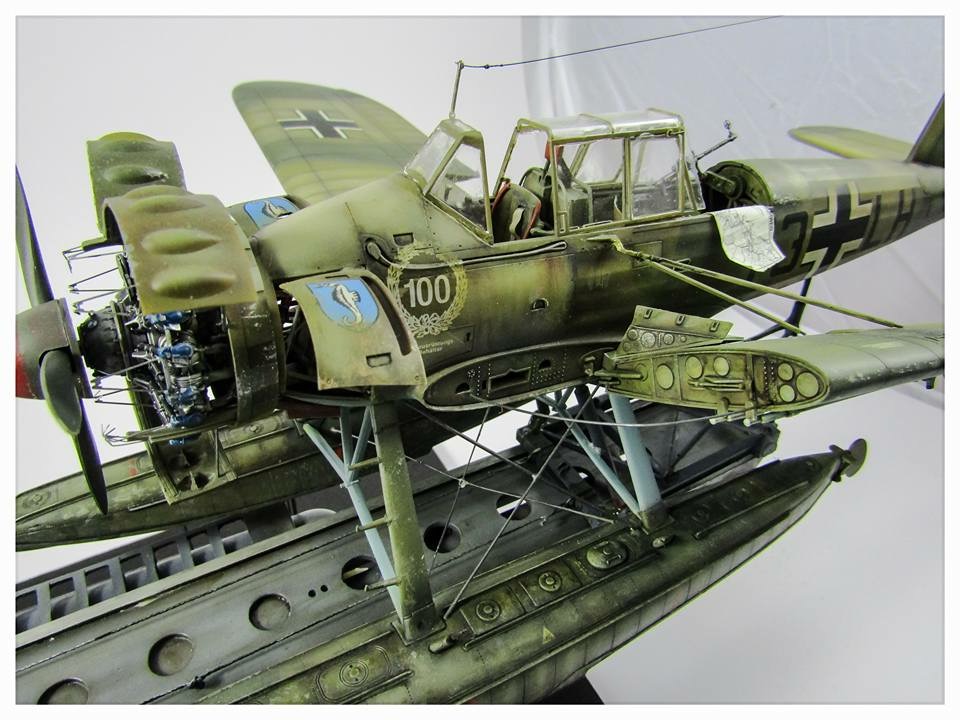
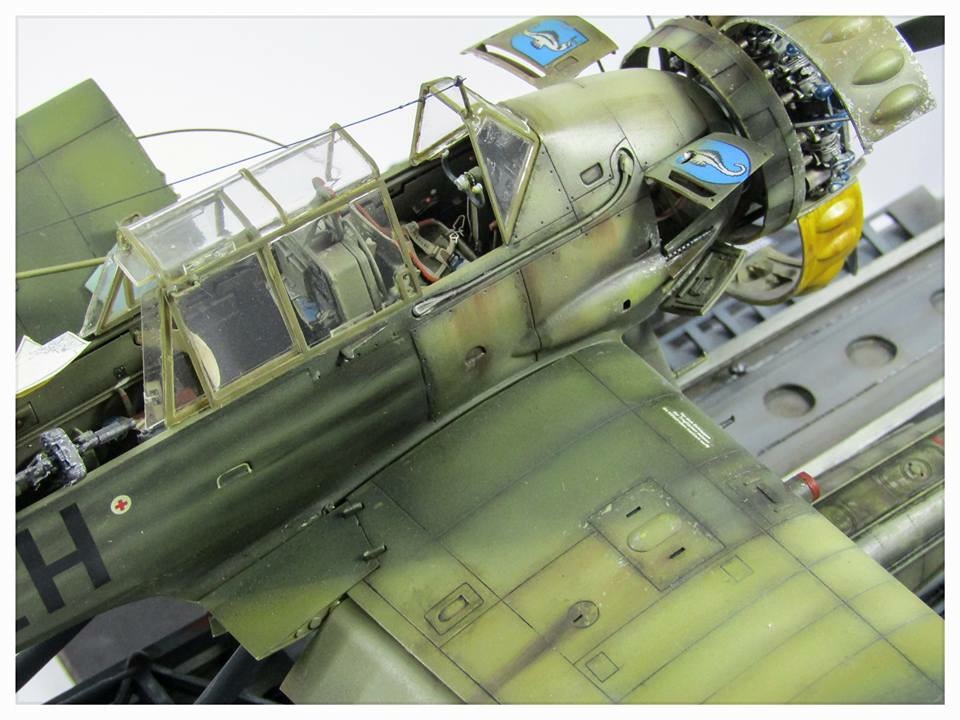
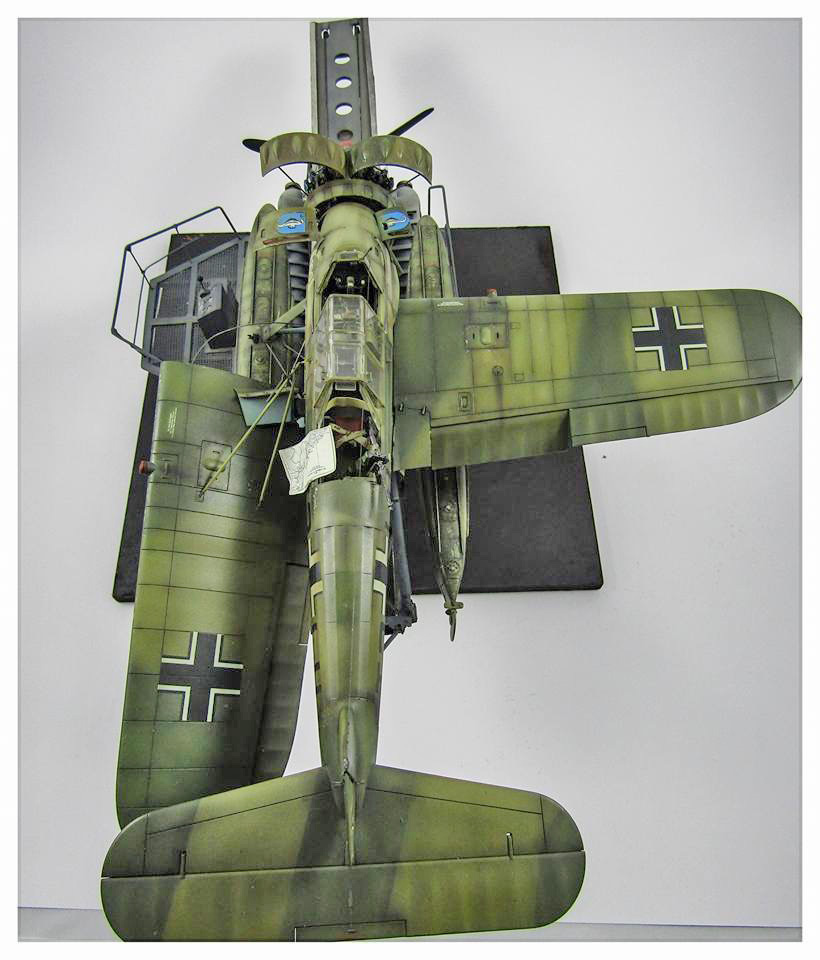
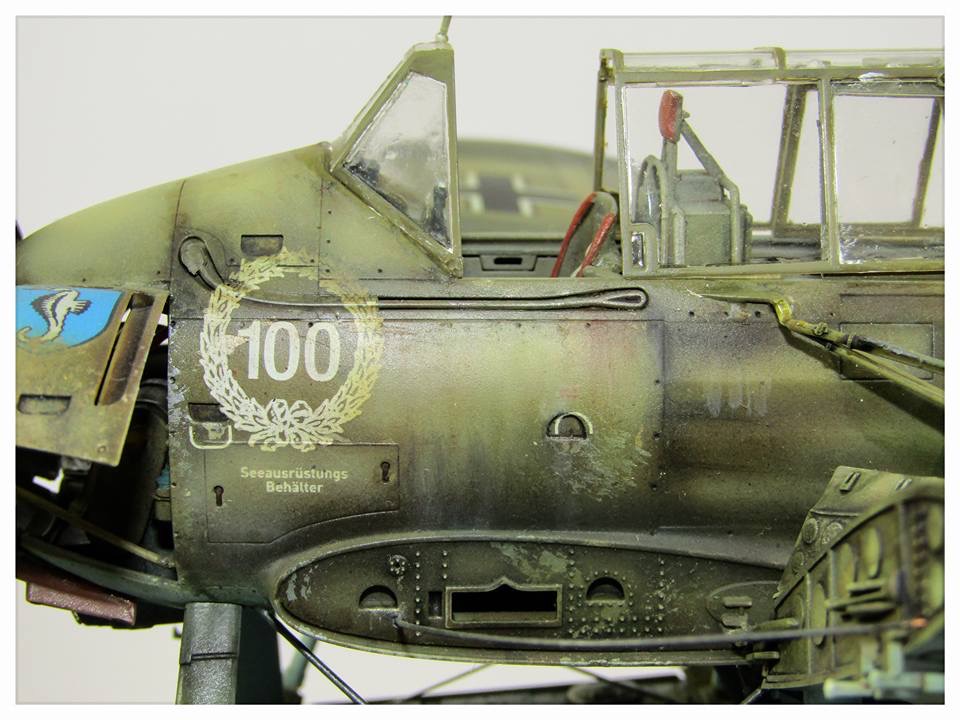
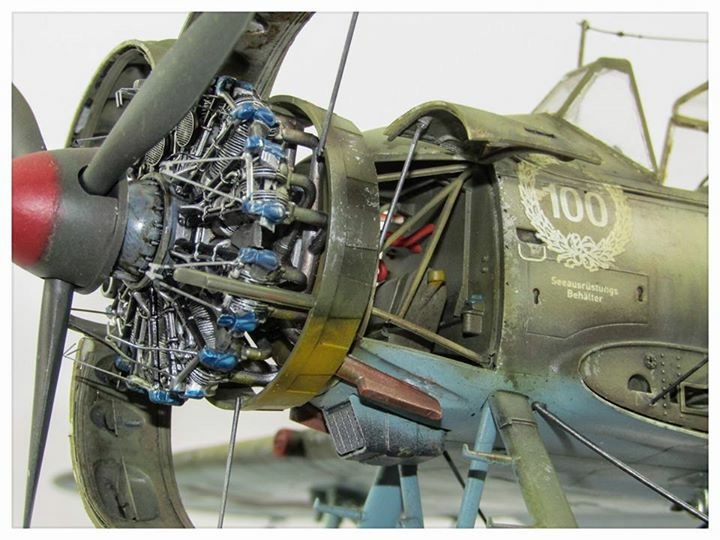
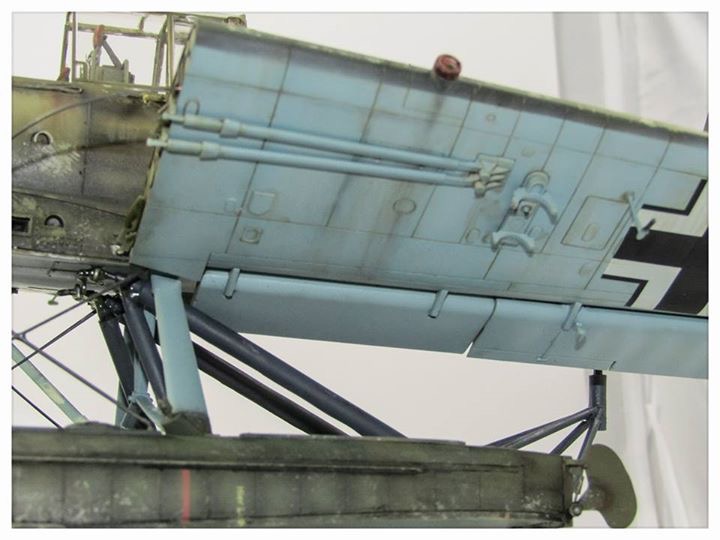

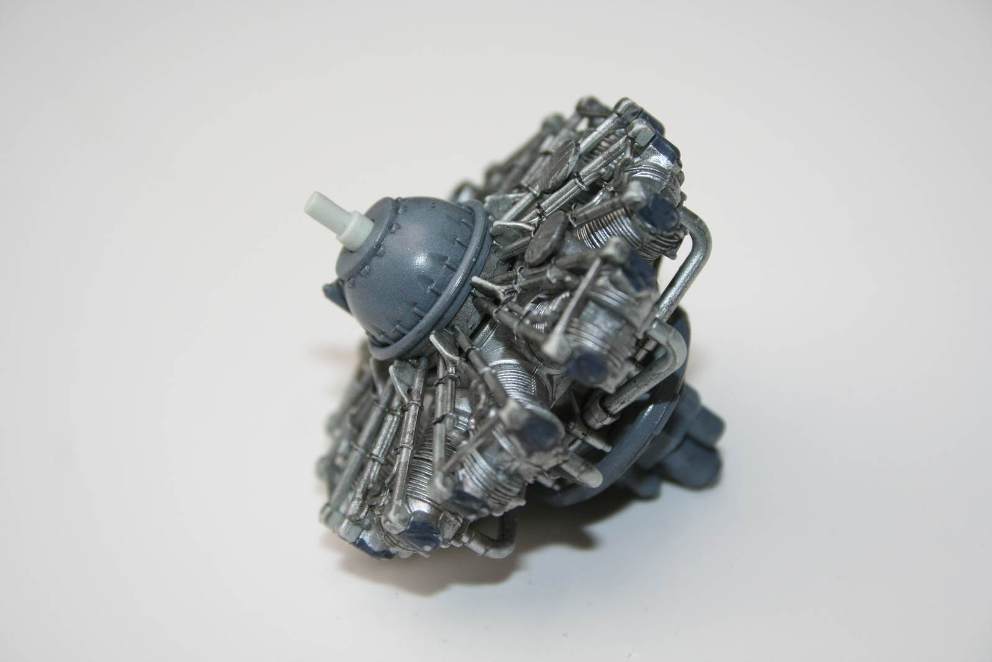
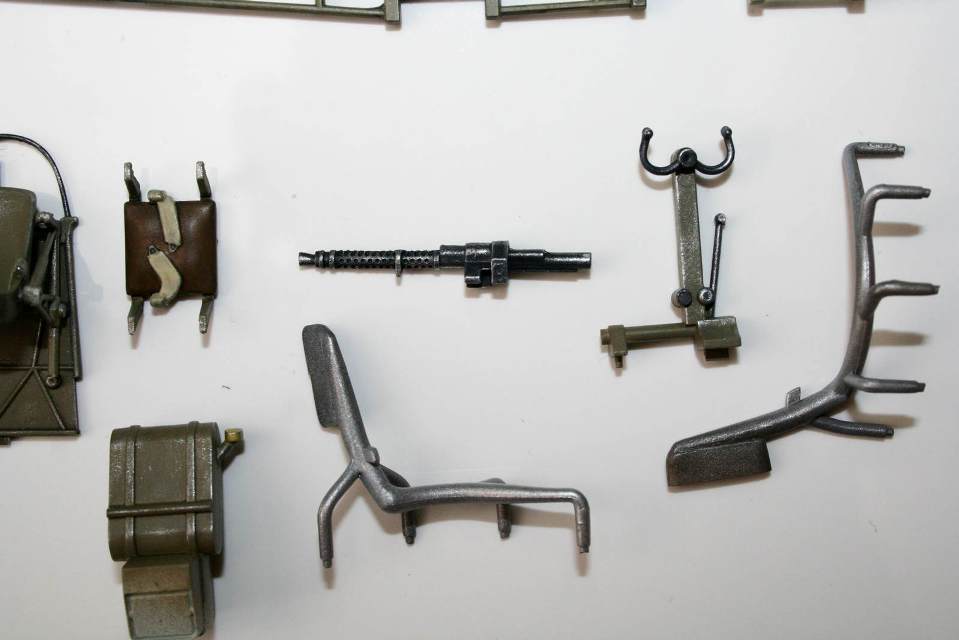
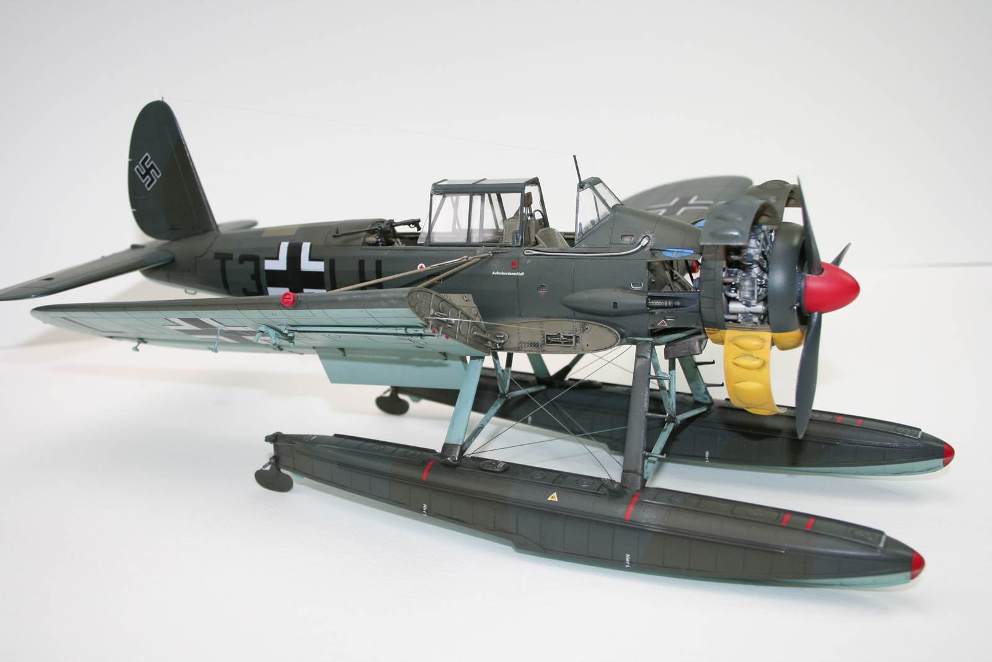
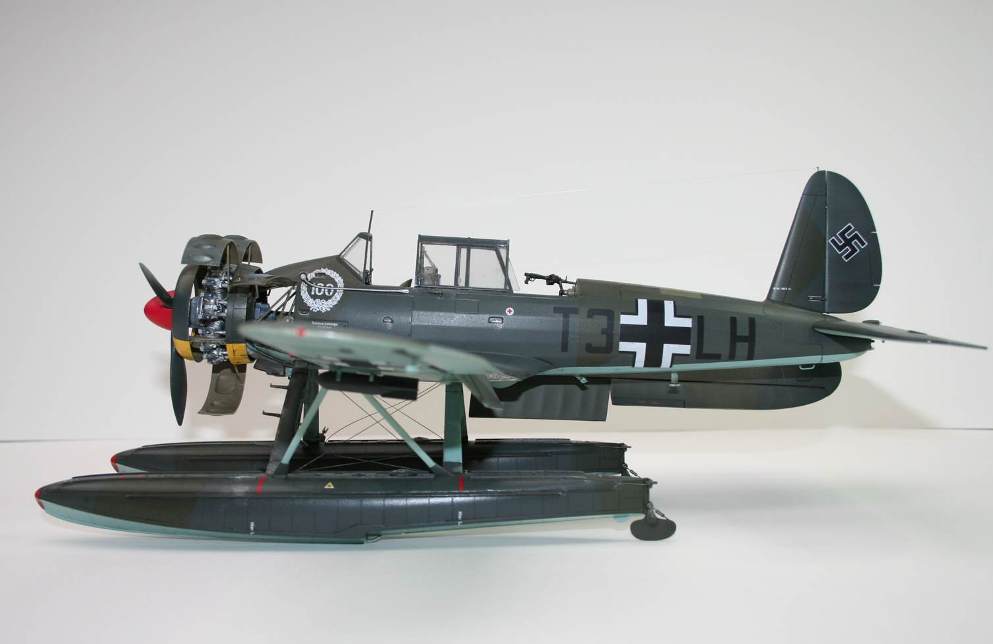
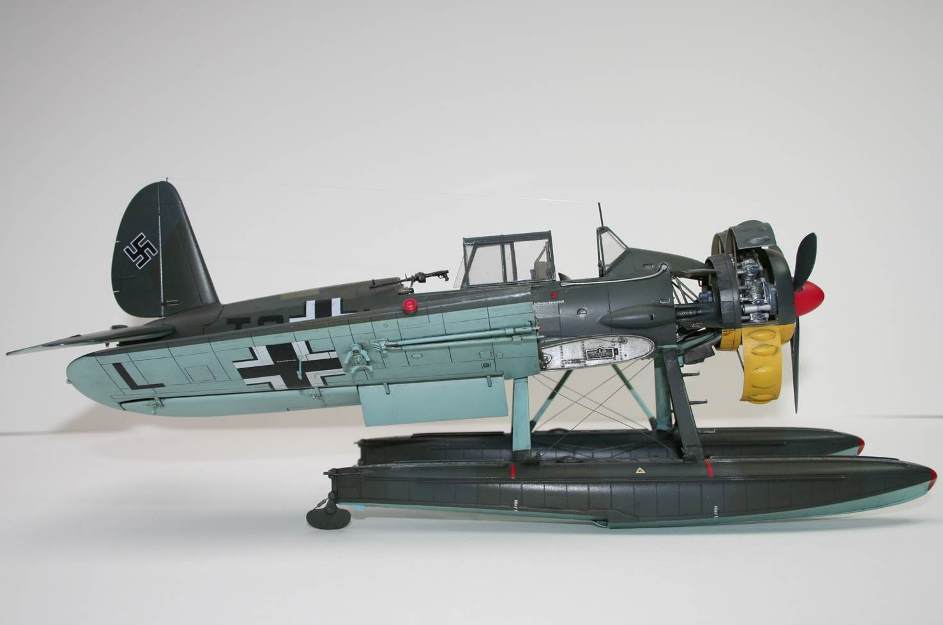
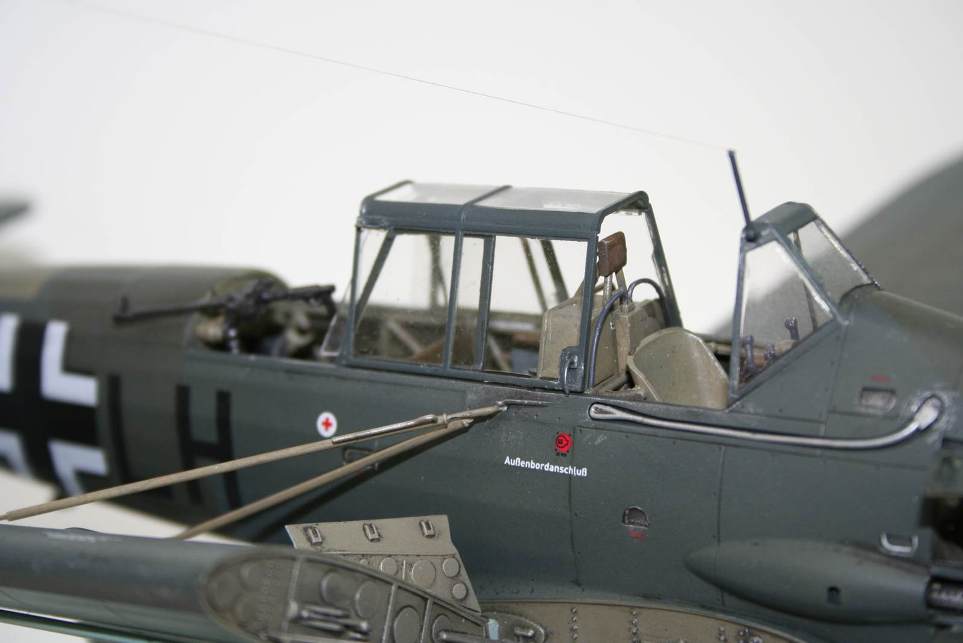
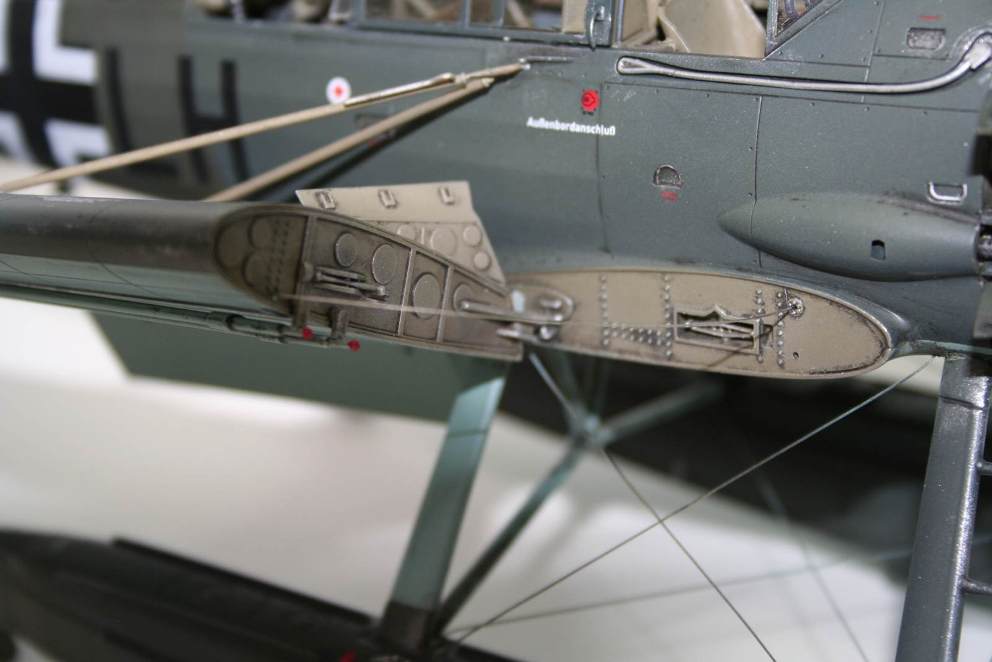
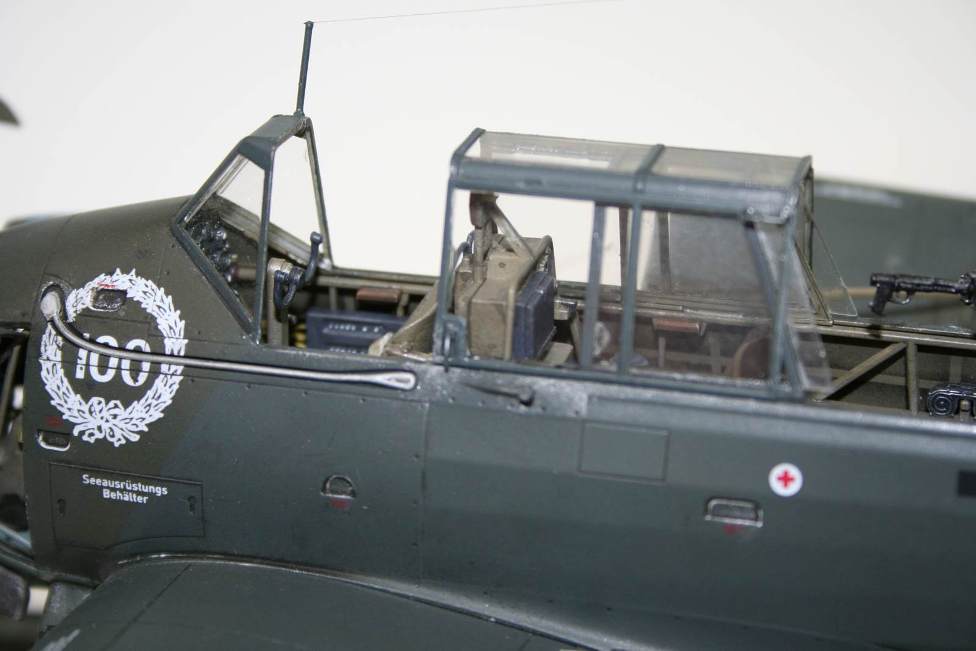
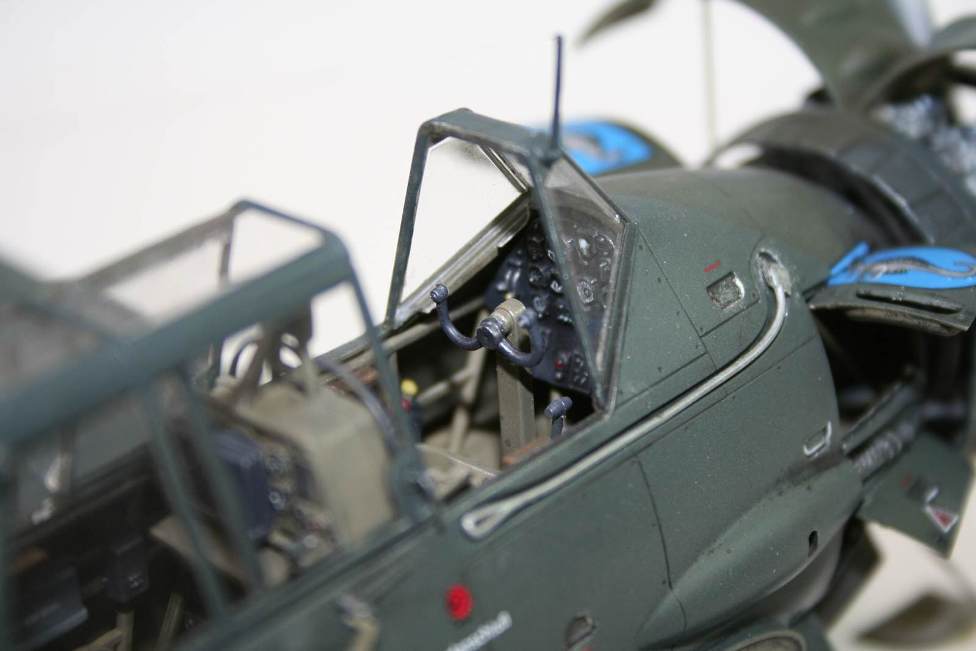
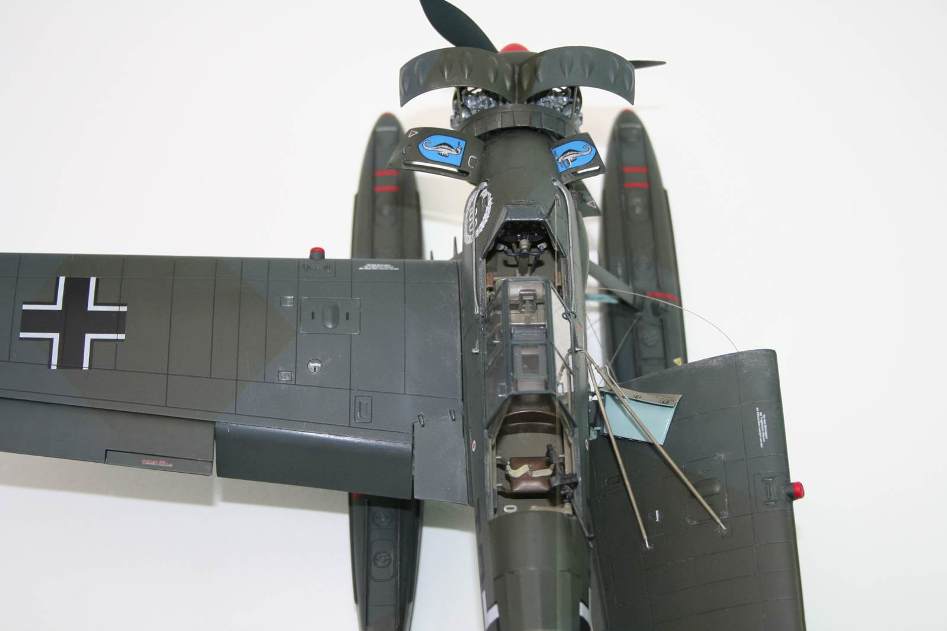
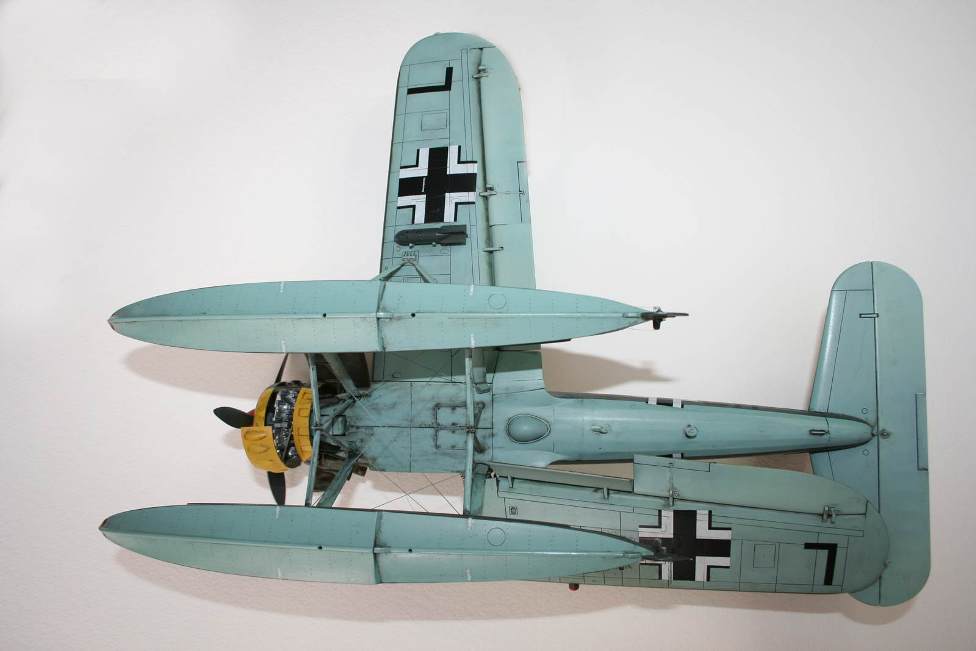
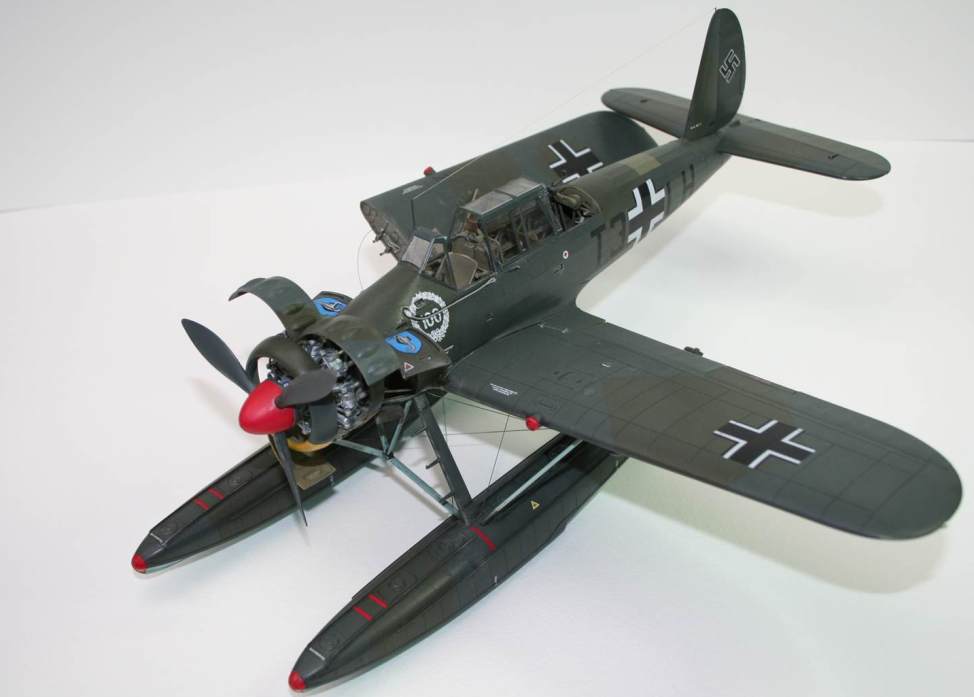
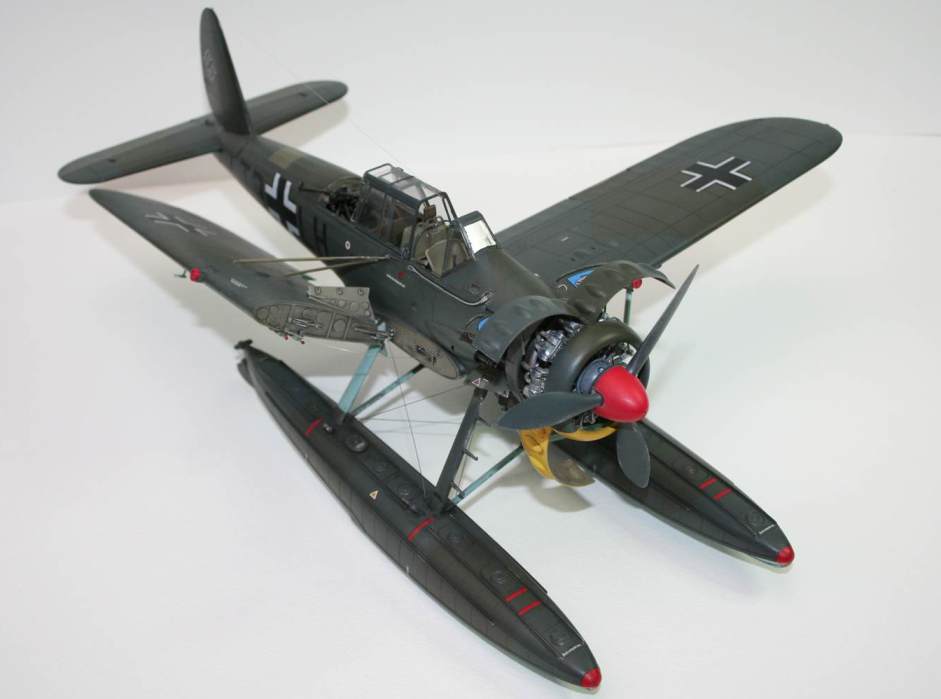
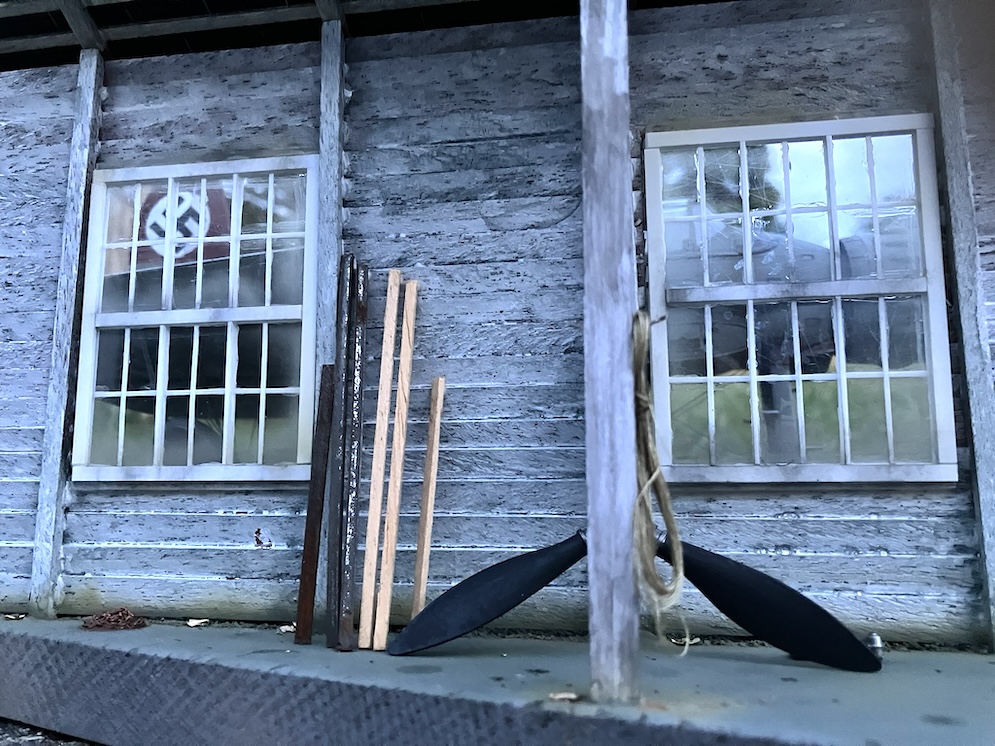
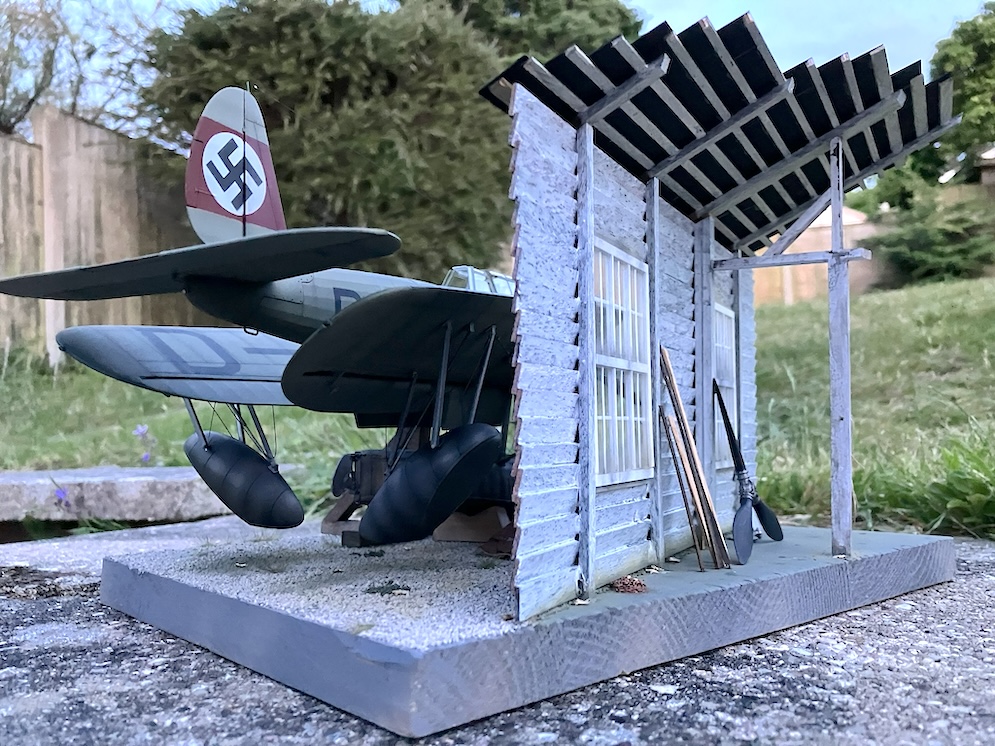
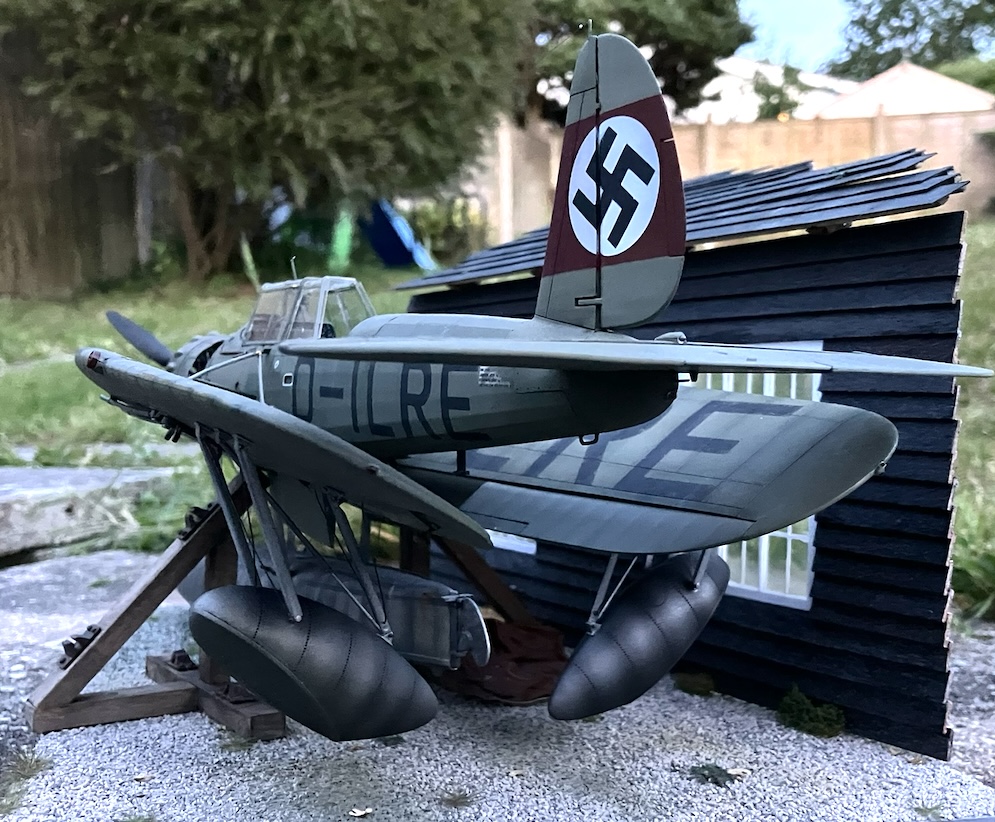
Here’s my 1:32 Arado Ar196 floatplane made from the very nice Revell kit.
As is usual, I have gone for a weathered look and added some scratch built items – hope you all like it!
Nat P.
Gallery 1

Gallery 2


Here’s a build that I completed back in January (2012) taking 4 months to build. A fantastic model with some very nice detail and at the incredible price of only £24.99. The only issues I had were with trying to close the fuselage at the wing roots. Masking and spraying around the floats was a bit of a challenge but being able to fit the wings afterwards was a great help. I’ve included some build detail as well.
Vaughan P.
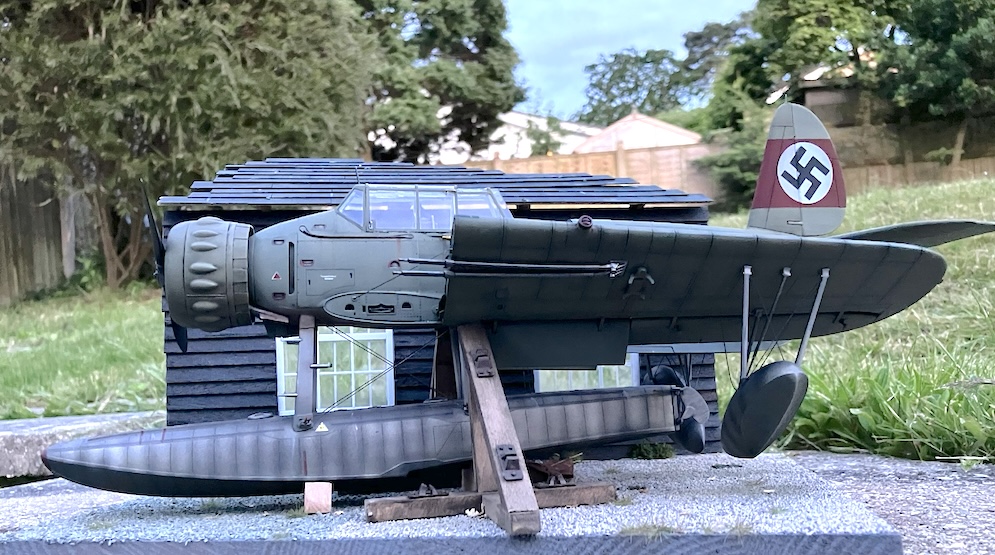
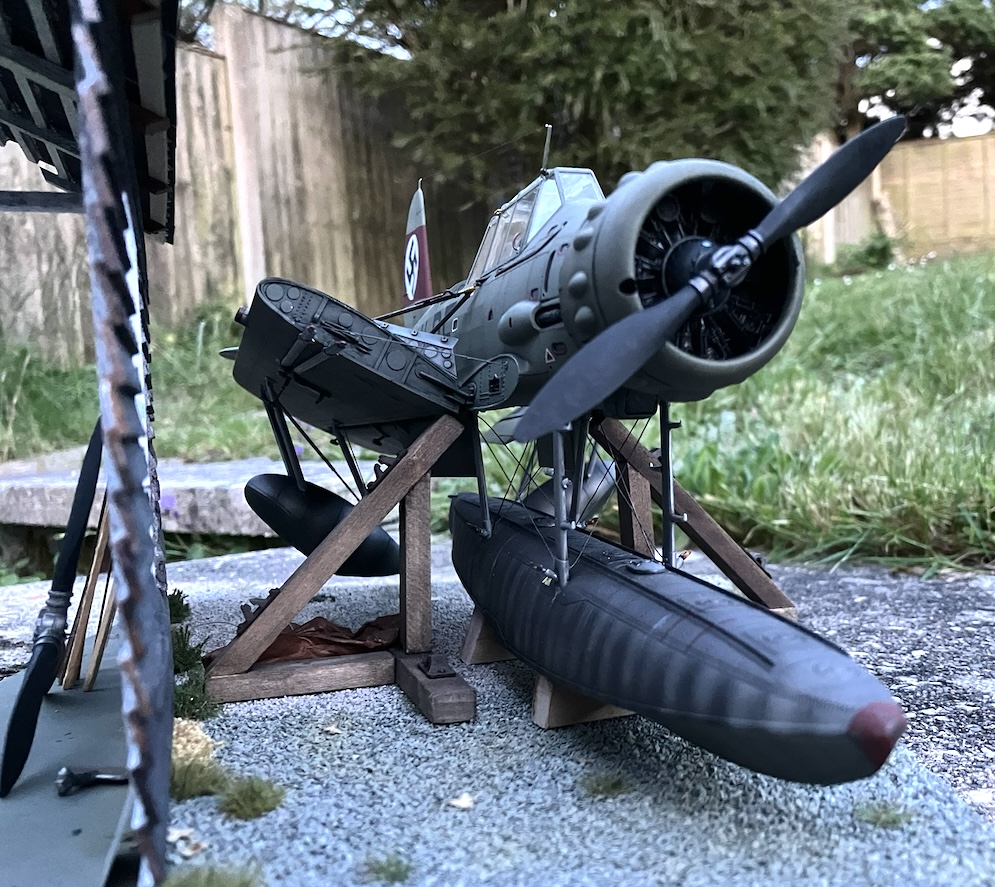

This was an enjoyable build, although the ability to split the model into sub-assemblies didn’t simplify things as much as I had expected. In terms of build I should also point out that I couldn’t afford to replace the frankly bizarre Revell canopy. And this is my first successful attempt at rigging, although it leaves something to be desired. As stated before I hate decals so only a few of the stencils are decals and everything else was masked and sprayed, but even with this approach you can still see the silvering on the placard on the port side towards the tail, grr. This approach did, however allow me to represent a different prototype to the kit aircraft. The colour I went for was Hellgrau L40/50 for which I used XF22:1 + XF60:1, ultimately this came out slightly more green than my intended brown, but I think is a good match all the same.
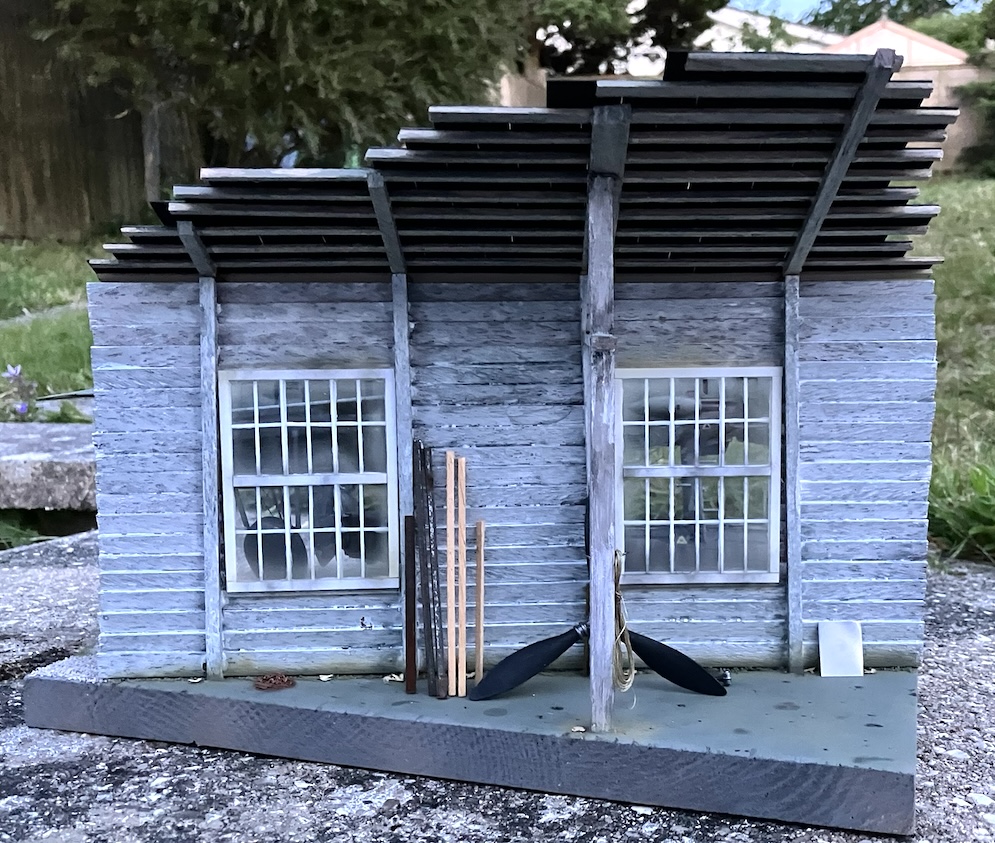
The scene is a bit of a ‘what if’. I don’t know what happened to this aircraft but I’m imagining it being left forgotten, perhaps on one of the Friesland Islands later in the war. I attempted to put it on a launching trolley, but gave up trying to both build one and work out what one for a mono-float aircraft would have looked like. My general theme for the scene was ‘down’, it isn’t often that you get to do rust runs on aircraft, and I think it came out moderately well.
The building was obviously rather a rickety one, this was purely the result of rushing/attempting to entertain small children and model at the same time…
Craig W.
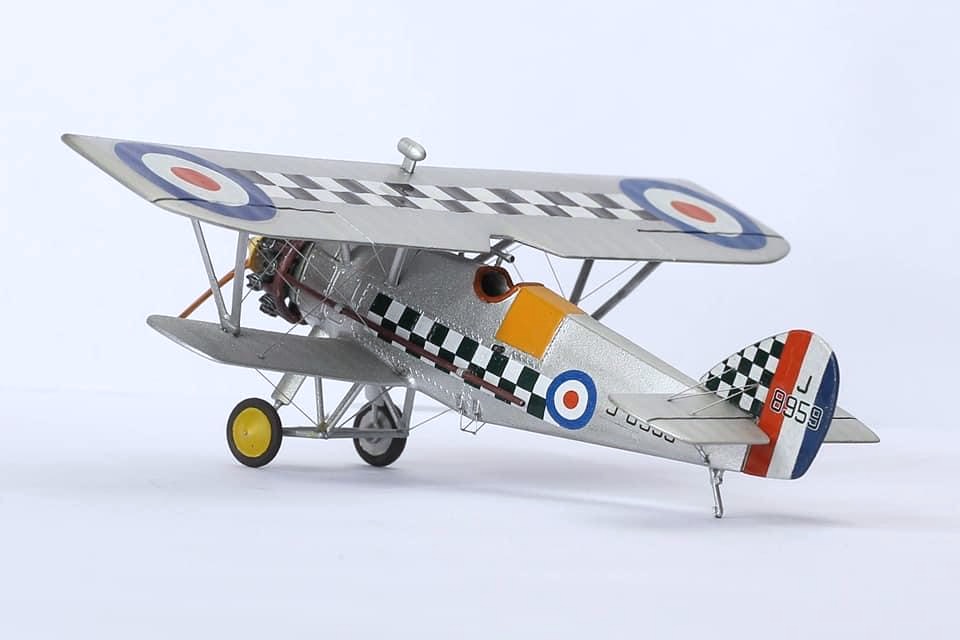
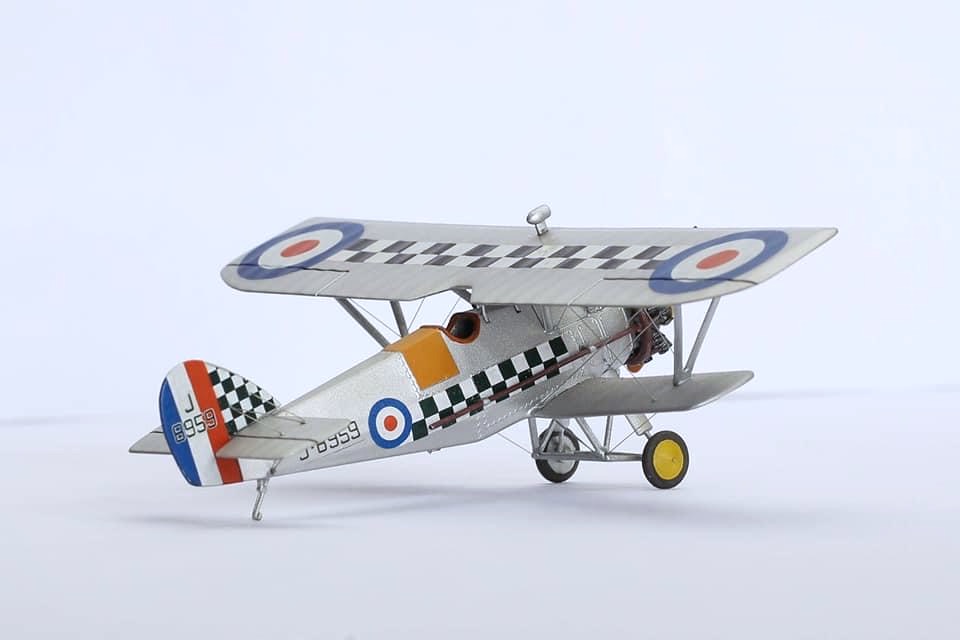
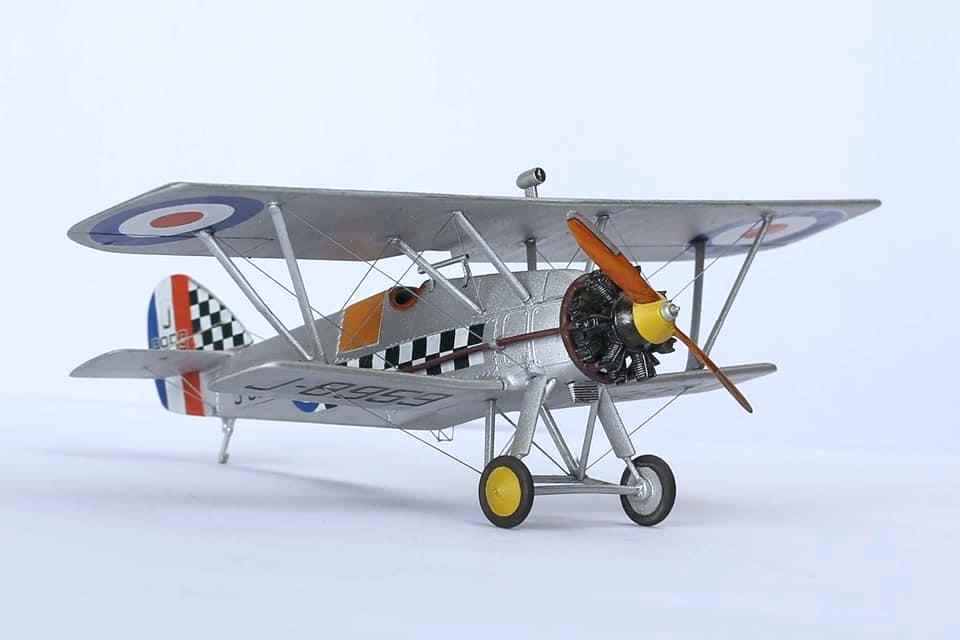
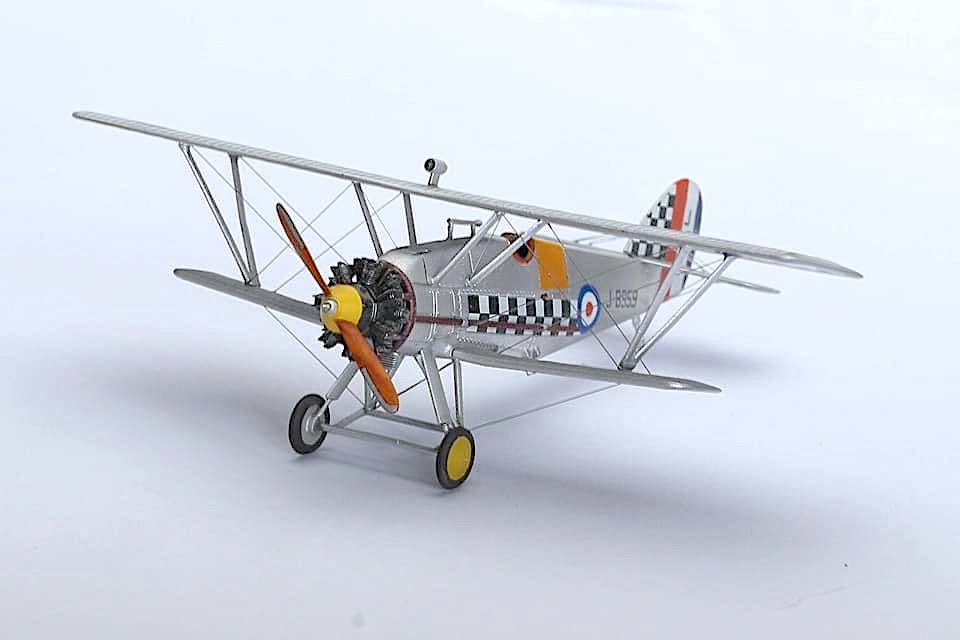
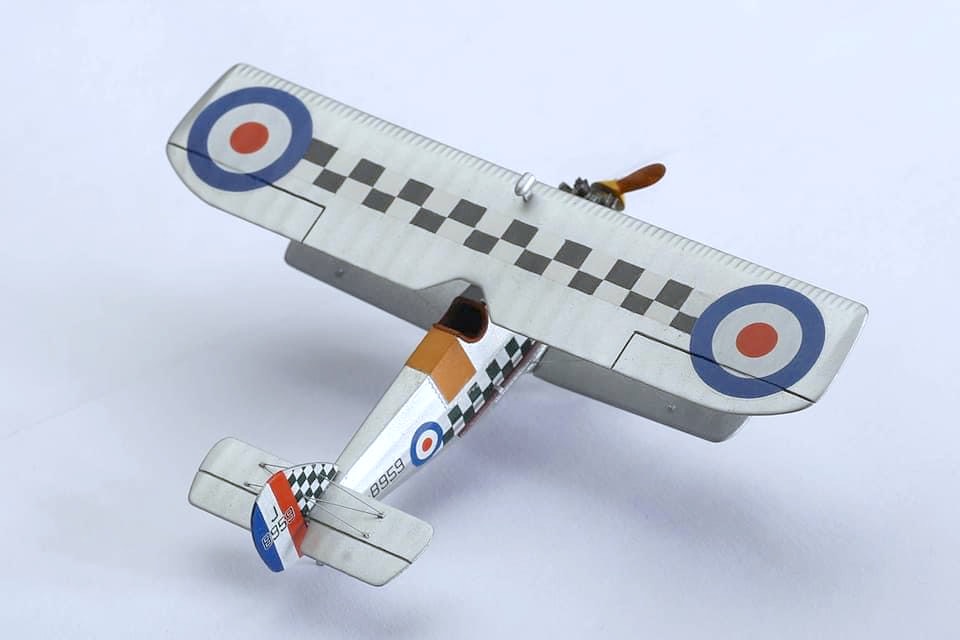

This is my Armstrong Whitworth Siskin IIIA in 1:72 made from the old Matchbox kit.
Alexander P.
Paints: Tamiya, Citadel
No aftermarket extras, but scratch built the FAA navigator’s compartment behind the pilot.
Thanks, Mish E.


Accurate Miniatures 1:48 scale
It was made such a long time ago now I really can’t remember what I used but there was a small pack of brass and the exhausts. I think I jazzed up the engine but it disappeared into the body work! The original kit itself was very good and went together without problems. The markings were from the box.

Other small additions to the basic kit includes windscreen wipers and motors, undercarriage up/down indicators in the upper nacelles, detailed Cheetah engines with con-rods and plug leads and of course the door in the open position.
Max W.
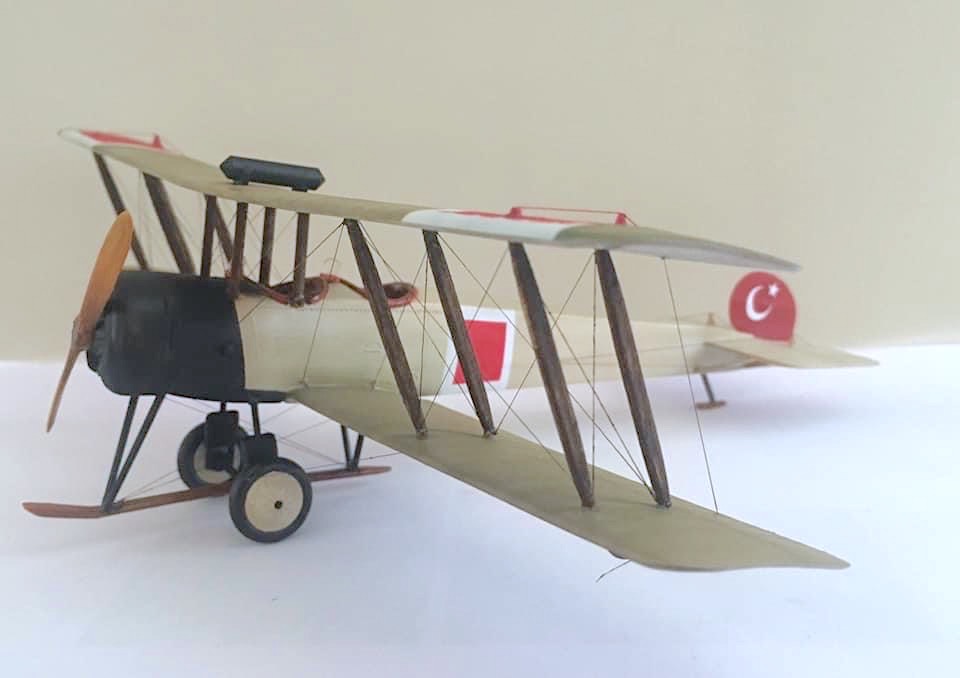
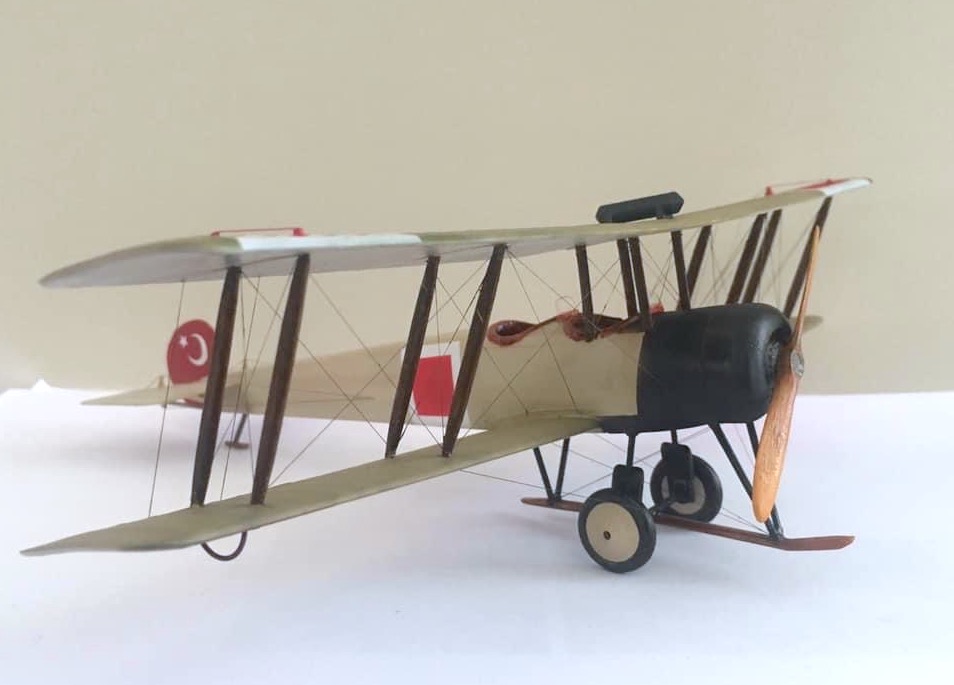
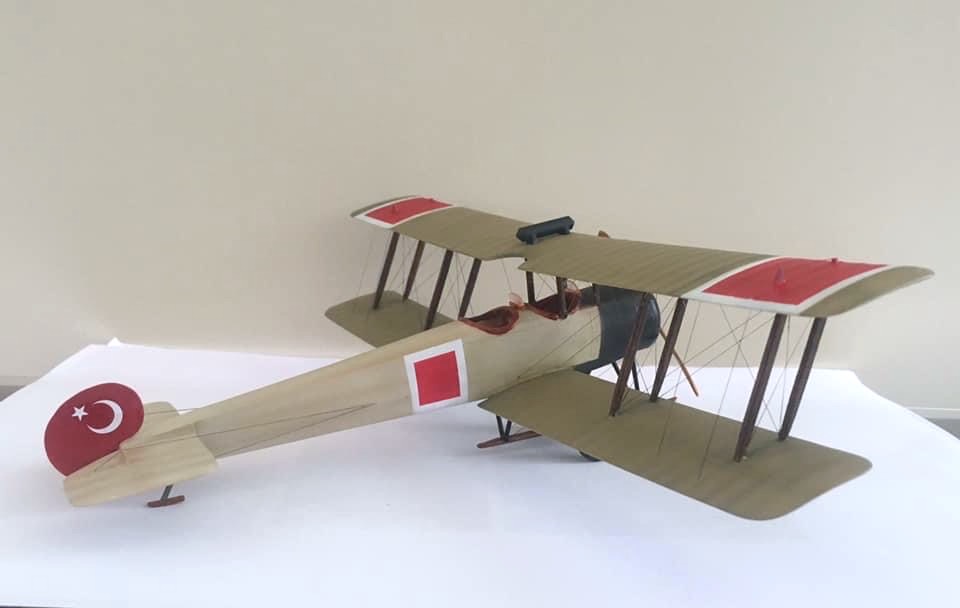
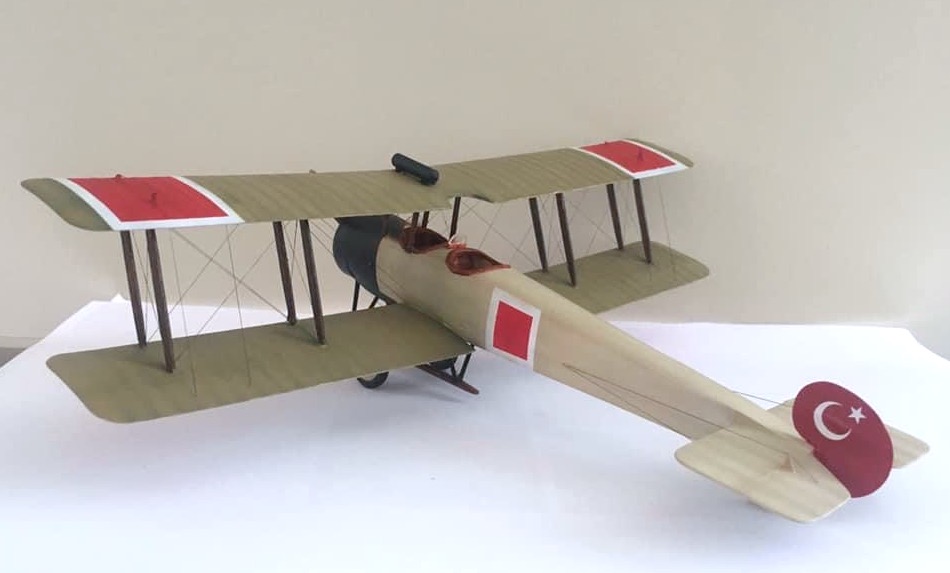
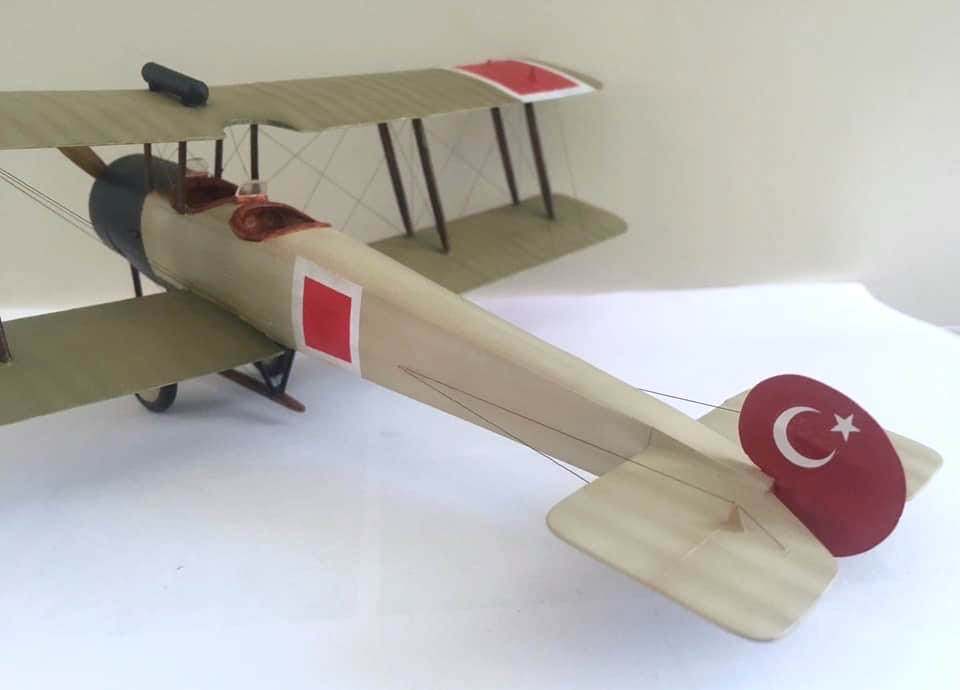

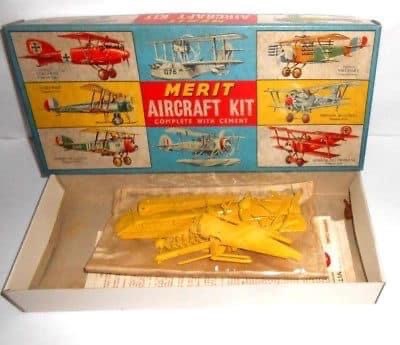

Merit Kit scale:1:48
A model from a long time ago. When it comes to Turkish Air Force, we said the rest is a matter of detail… we have begun the venture…….
First of all, there is one person who contributed to the completion of this model. I would like to express my endless gratitude to my dear ÇETIN TUNA teacher who helped me with his vast experience and valuable archive…. thank you and thank you…. you are great my dear Cetin.
So far, I have made models of some of the aircrafts that have entered the Turkish Air Force inventory. I am having the pleasure of finishing another model today, as we add another Turkish horse model to our collection.
Izzet C.
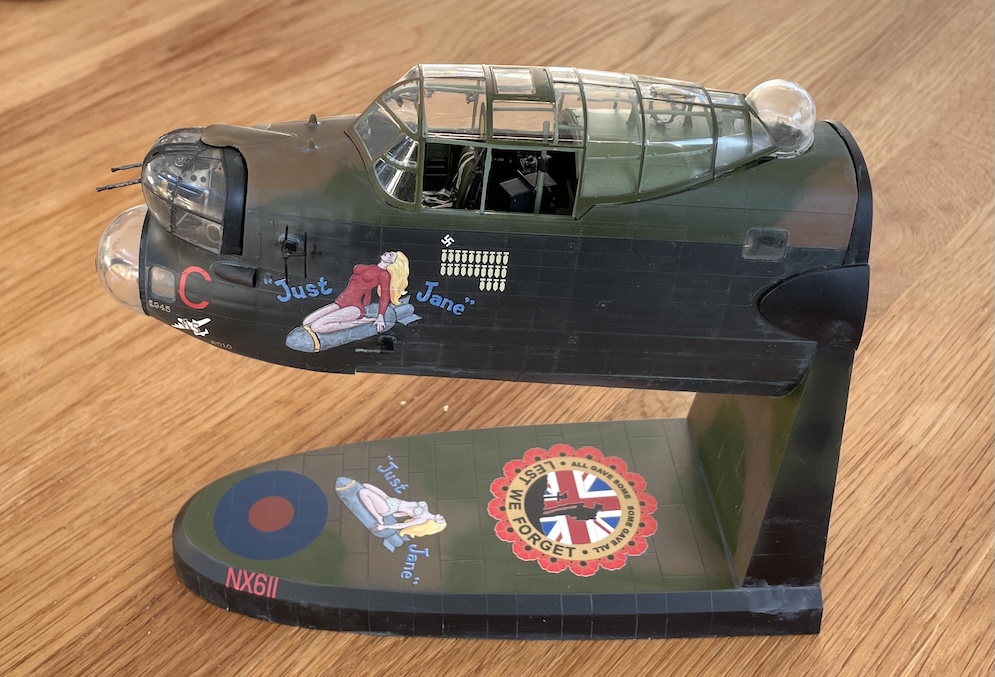
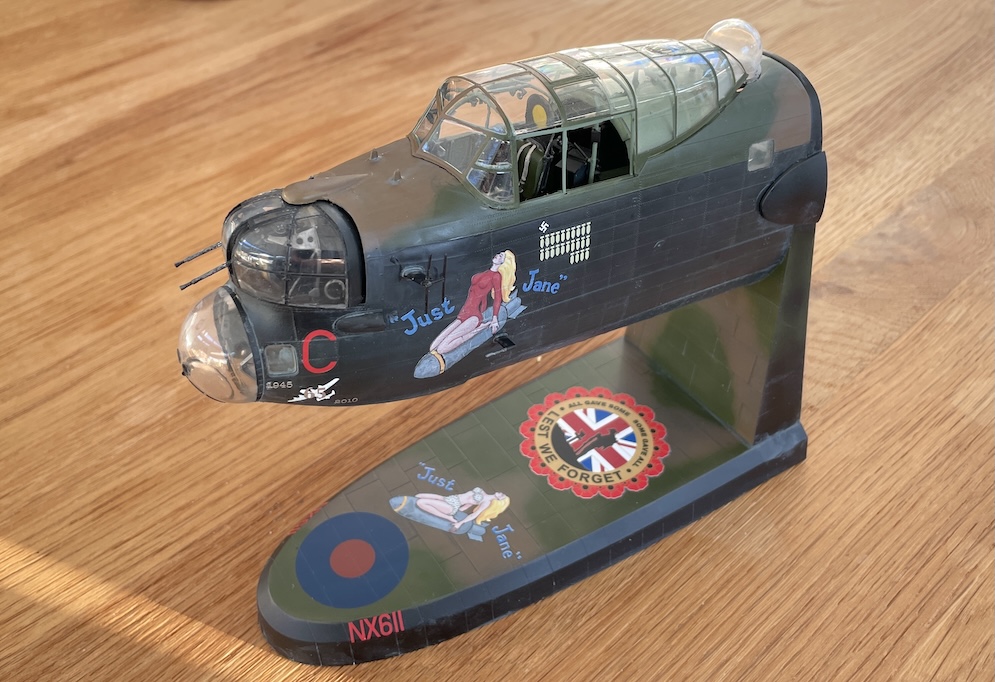
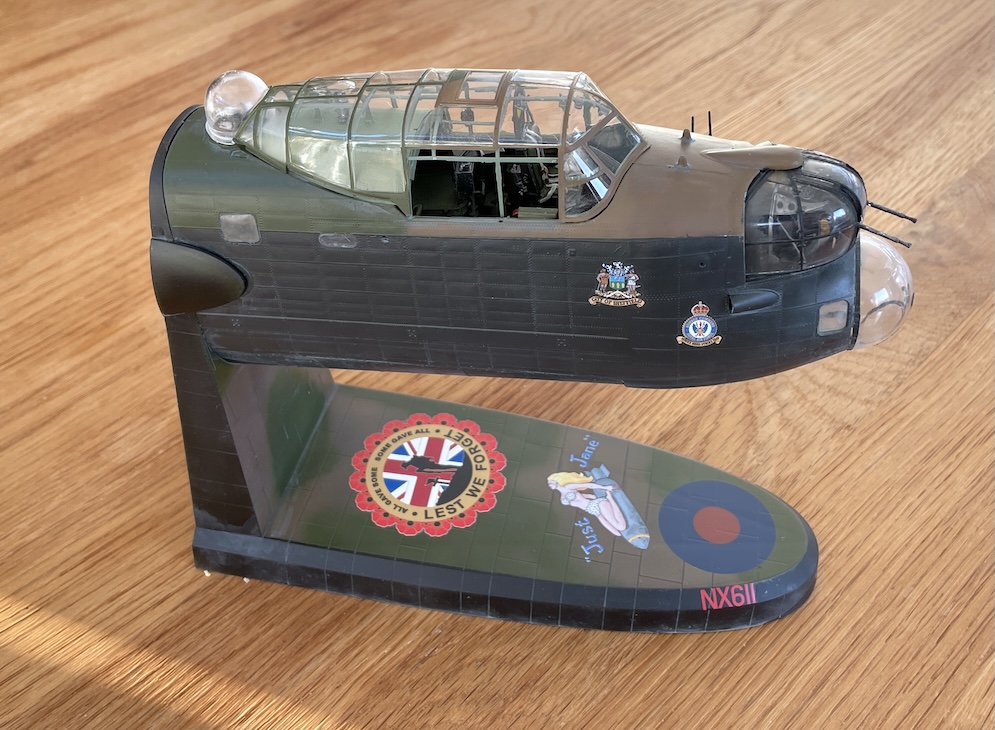
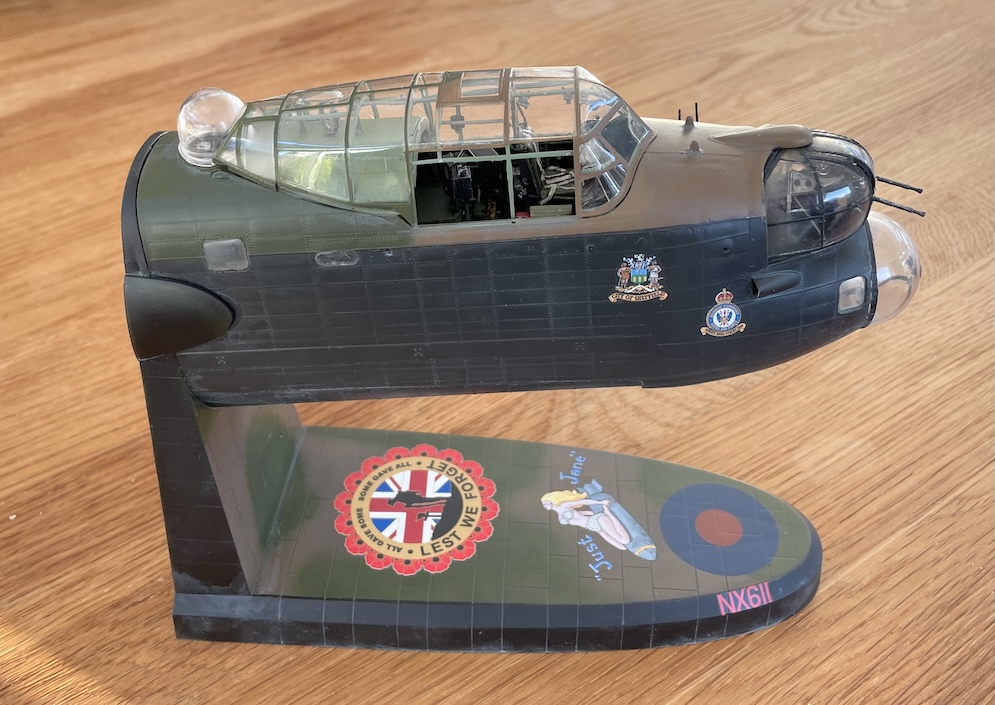
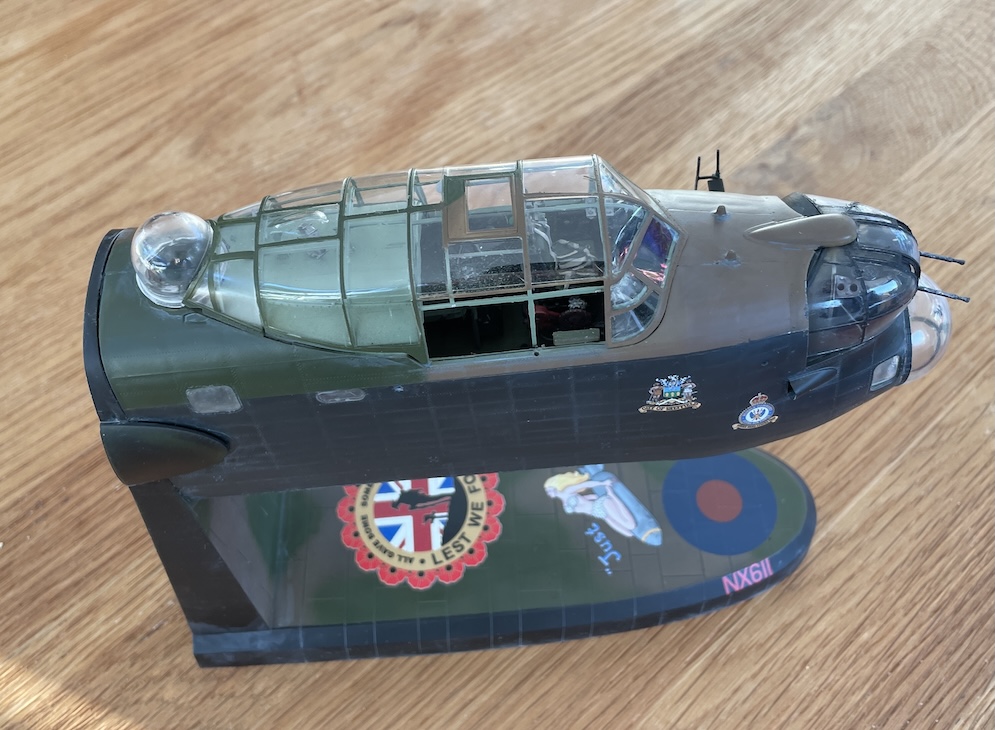
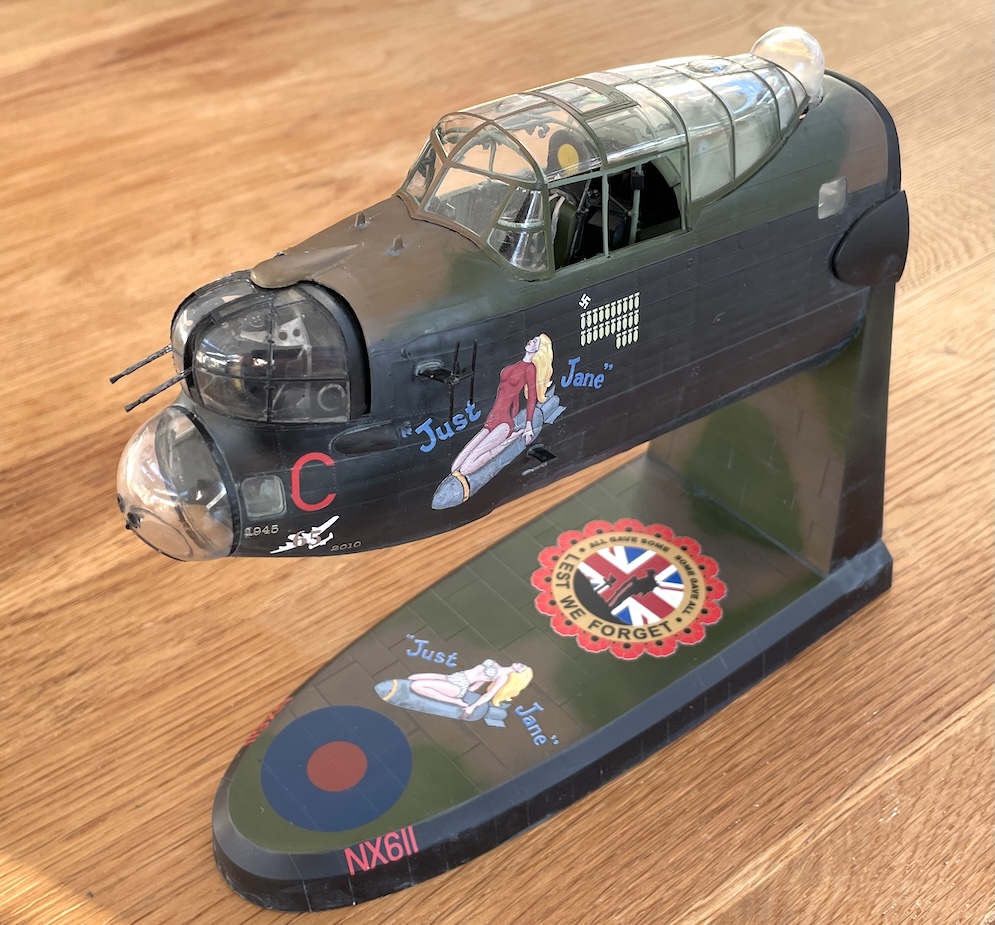
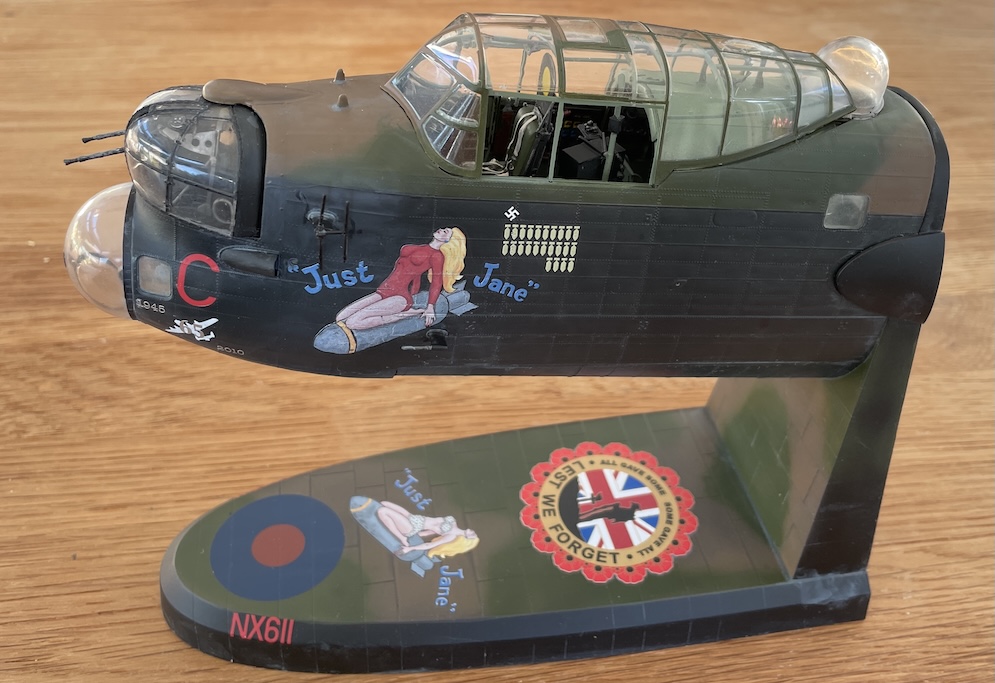
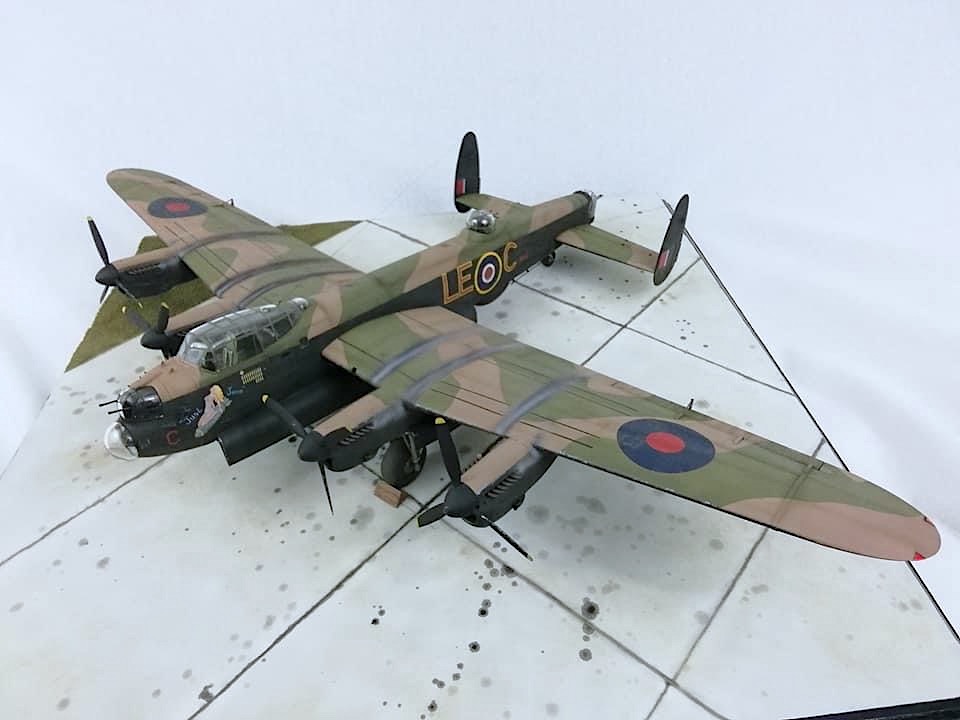
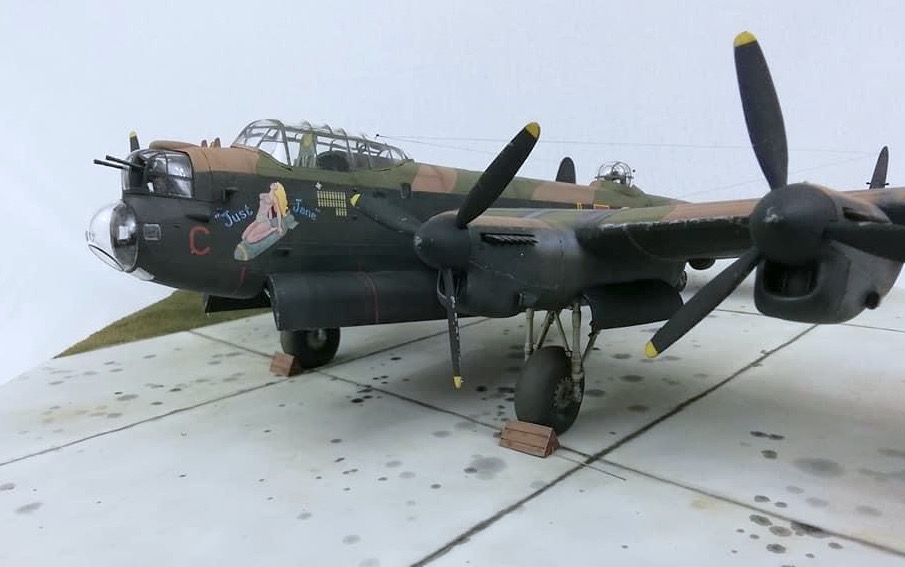
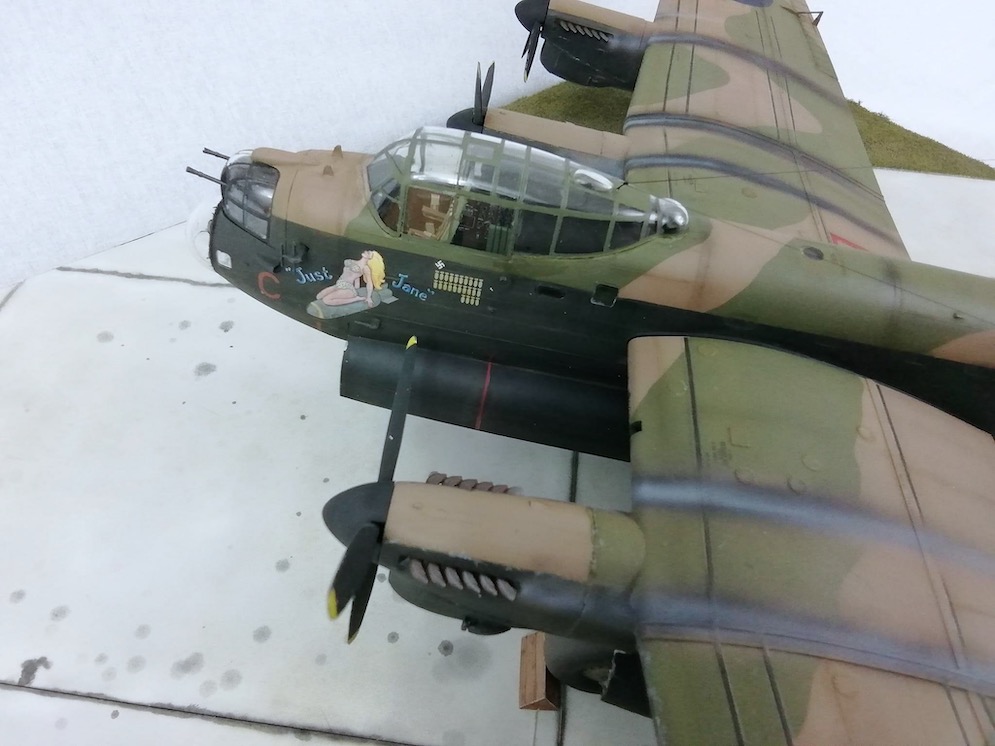
From Border Models
‘Just Jane’ decals from kits World
Built as a Remembrance Day special project and mounted on her stand that has been suitably marked up. Side windows removed so that you can see inside the very well detailed cockpit.
Les V.
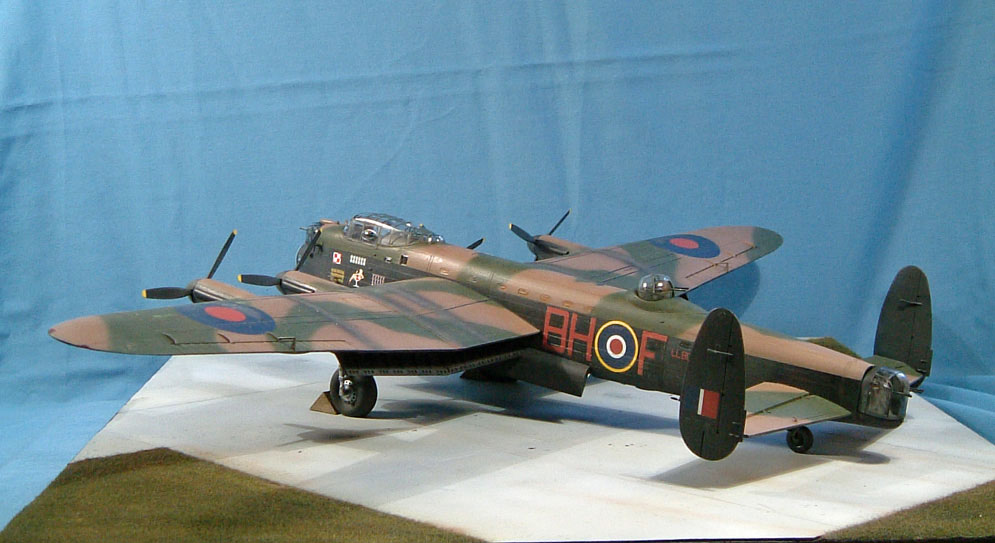
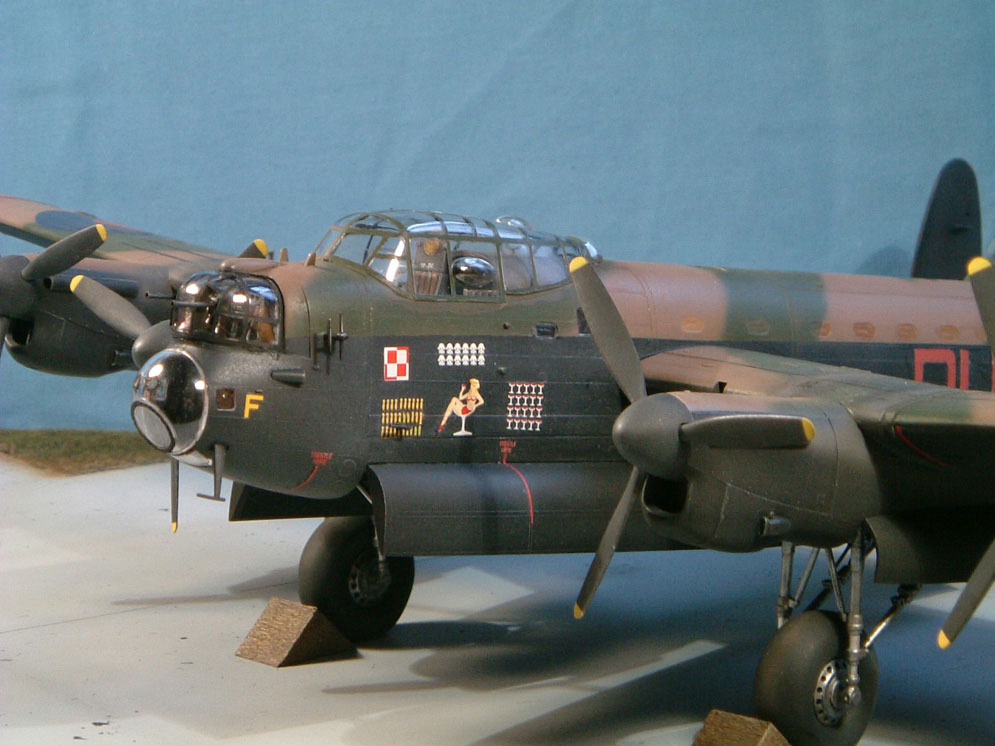
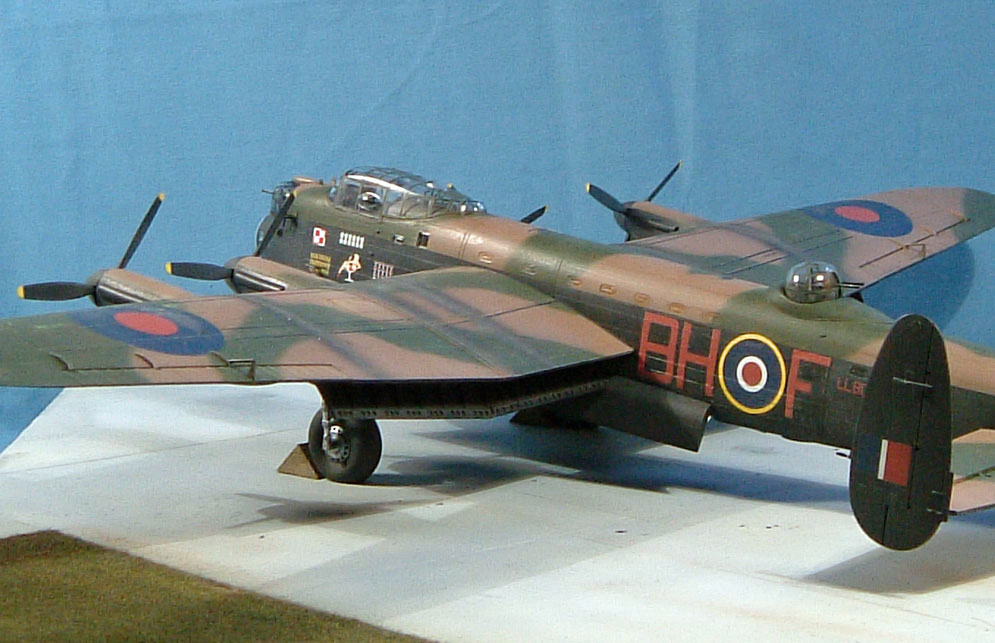
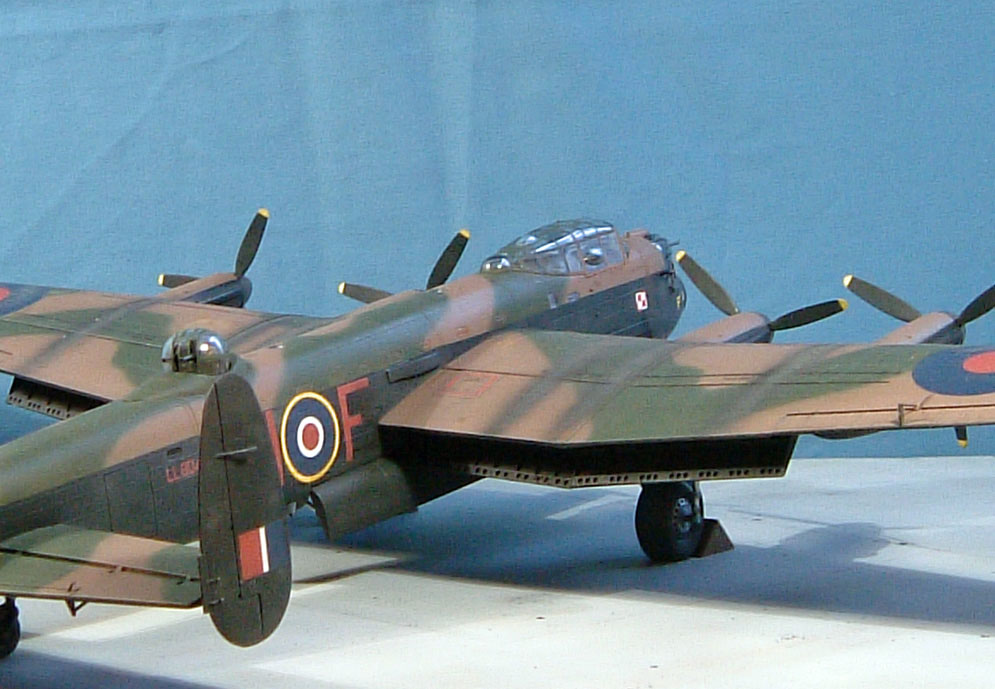
The model is the Tamiya B.I/B.III kit in 1:48th scale and builds into a 30 x 29 inch model of this famous British bomber (a personal favourite alongside the Mosquito).
This kit is the older version of the kit and was updated using the Flightpath updates, before being given an appropriately weathered paint scheme, the markings were from an aftermarket set.
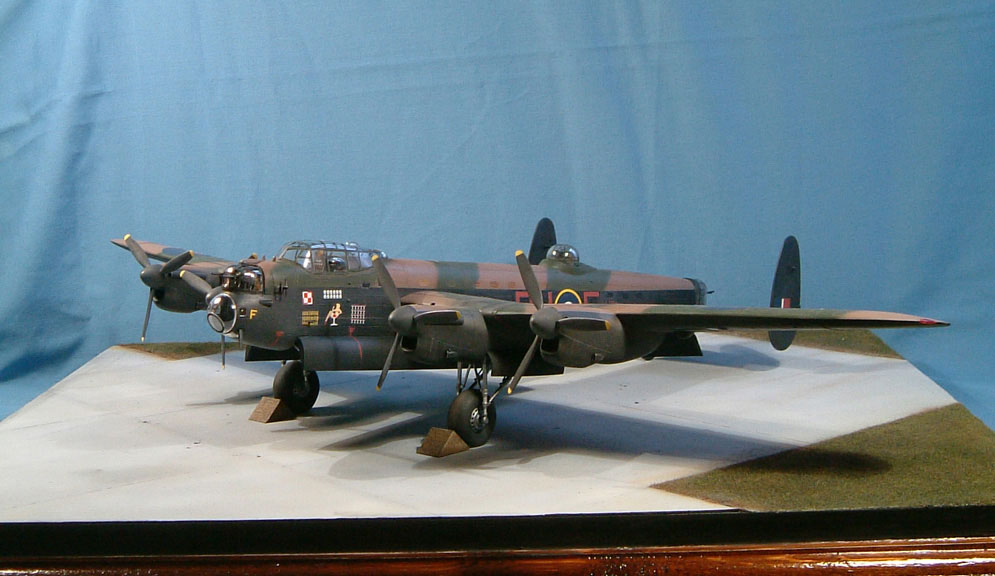


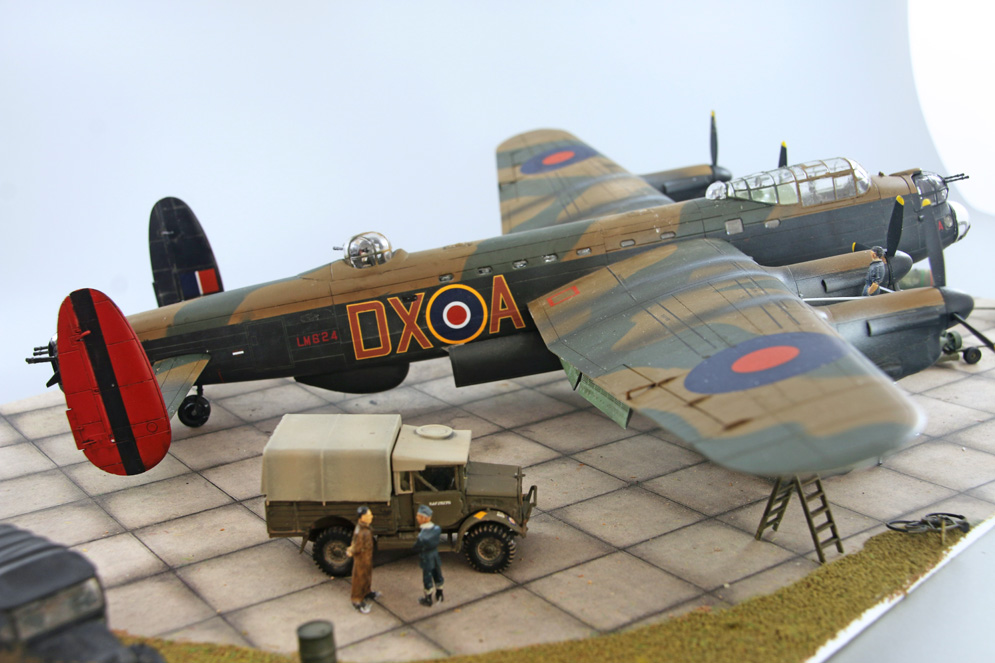
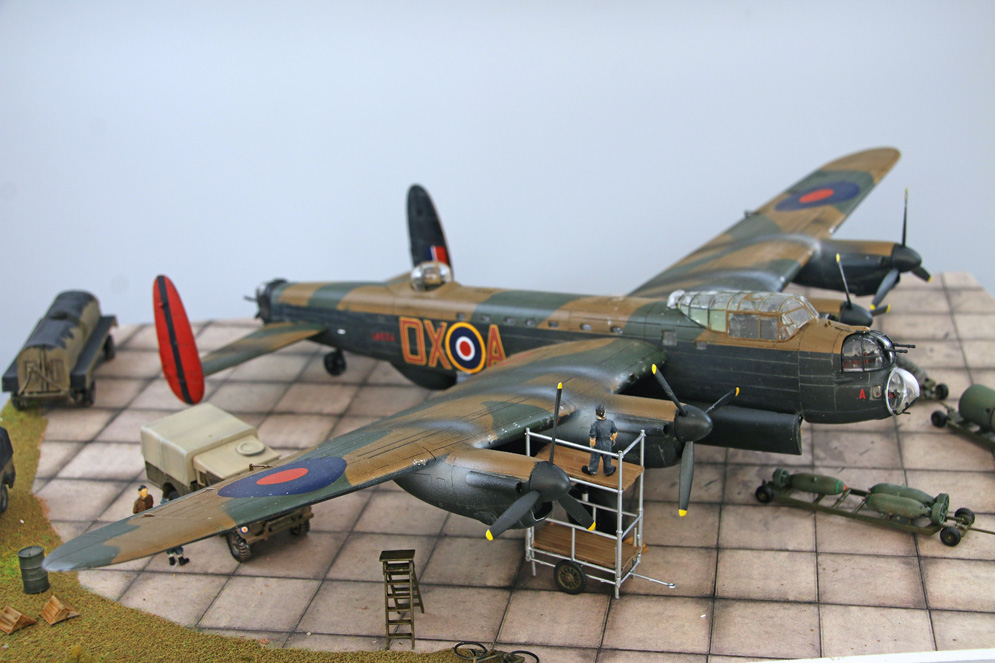
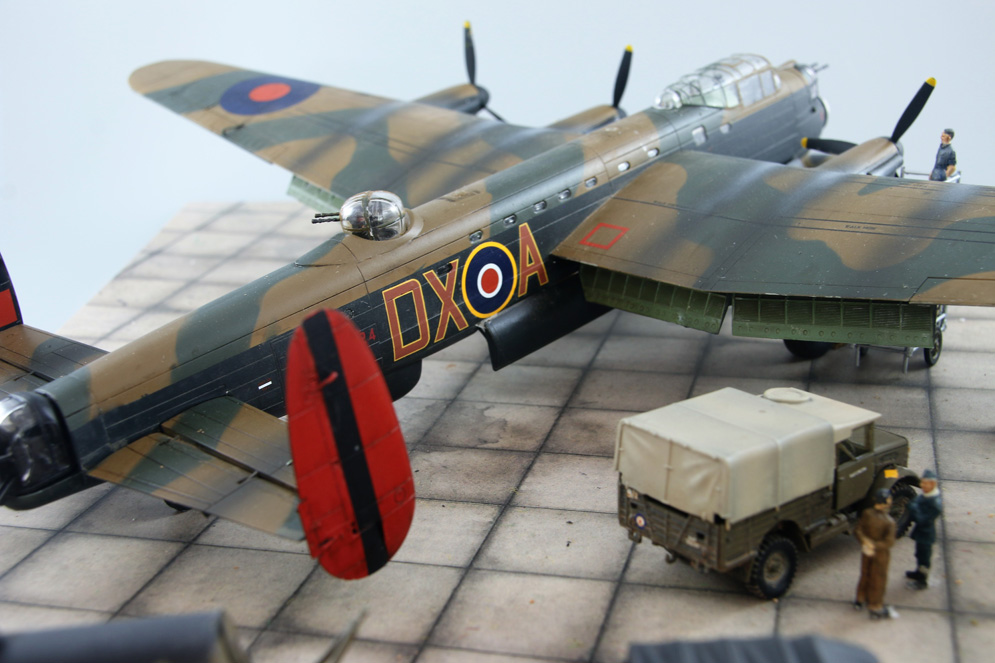
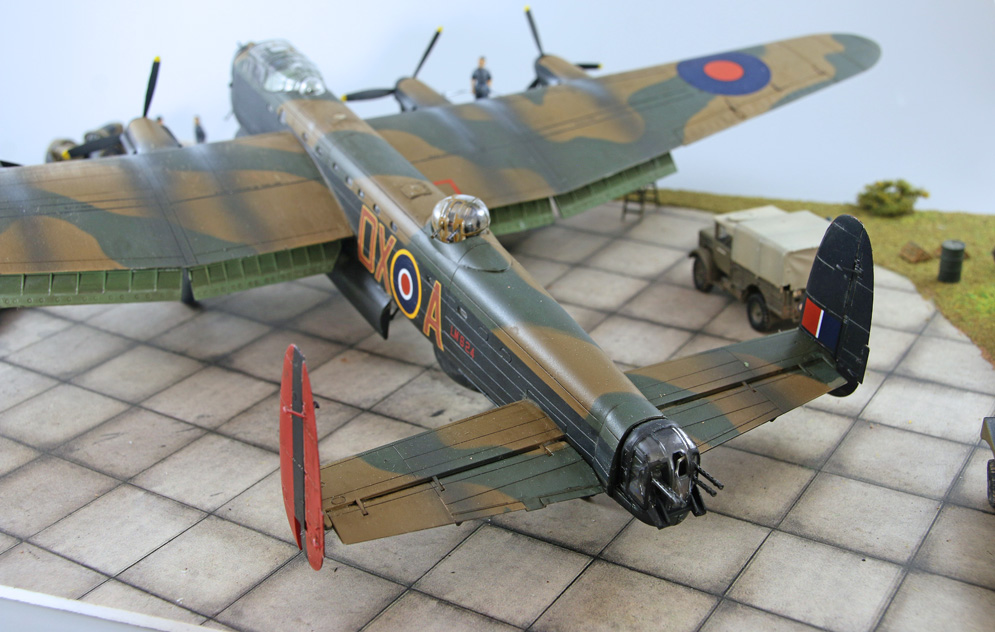
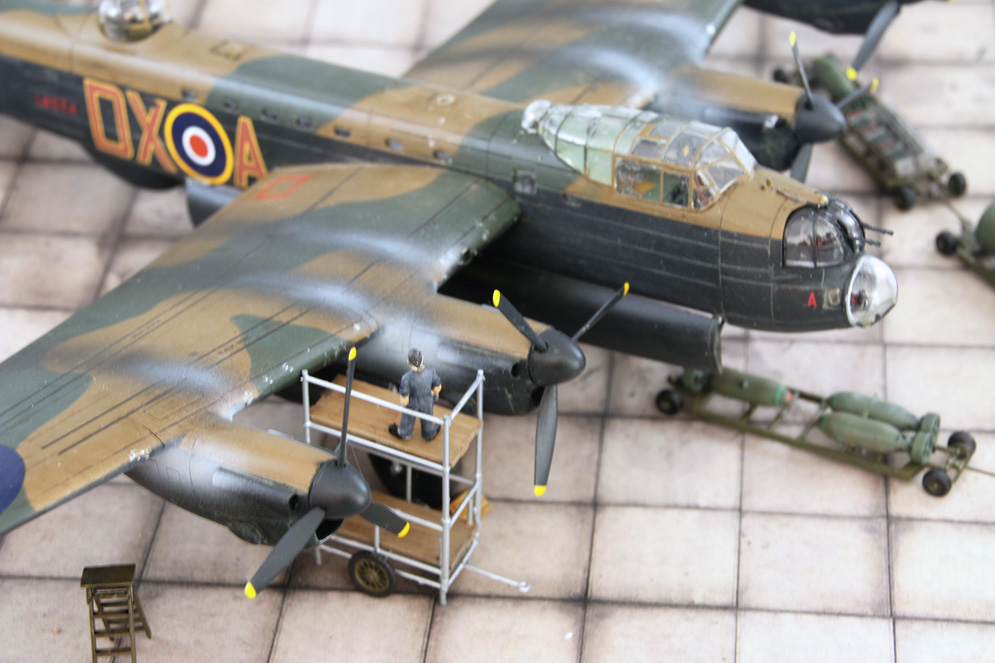

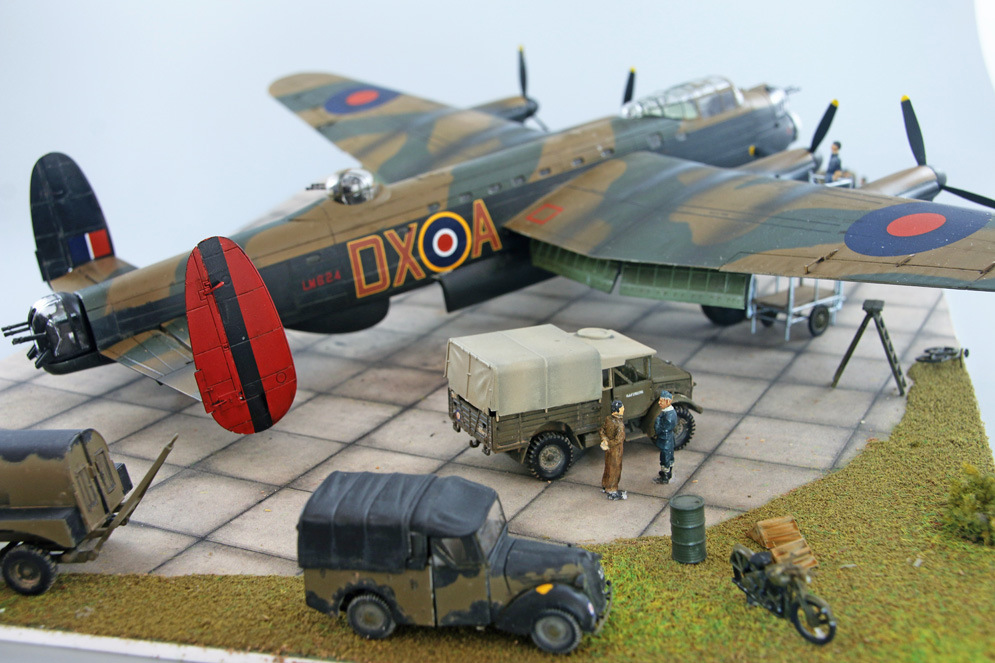
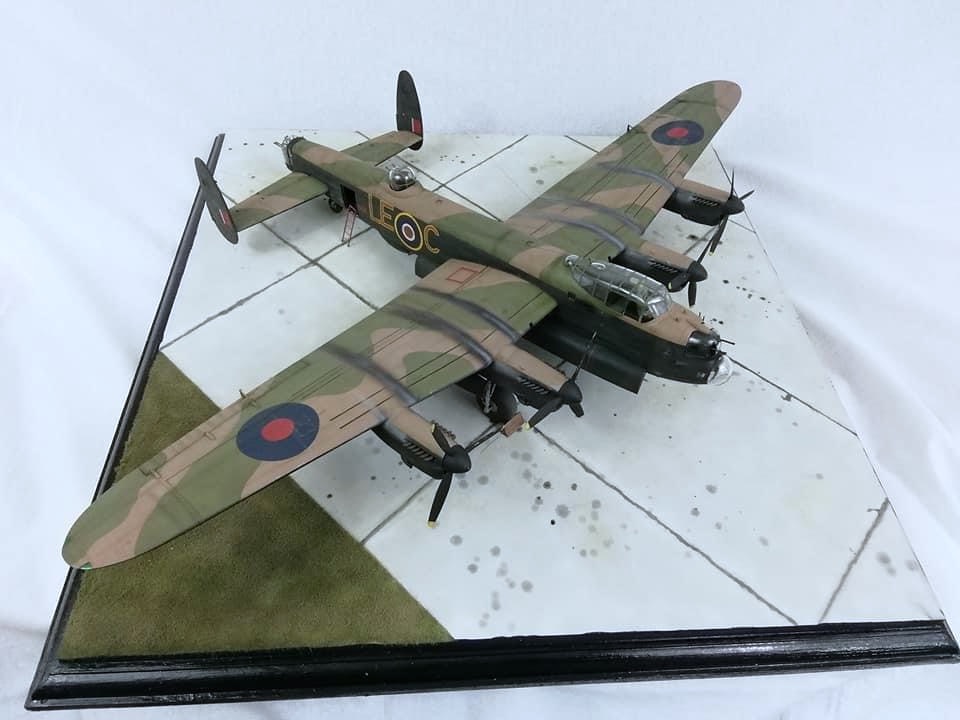
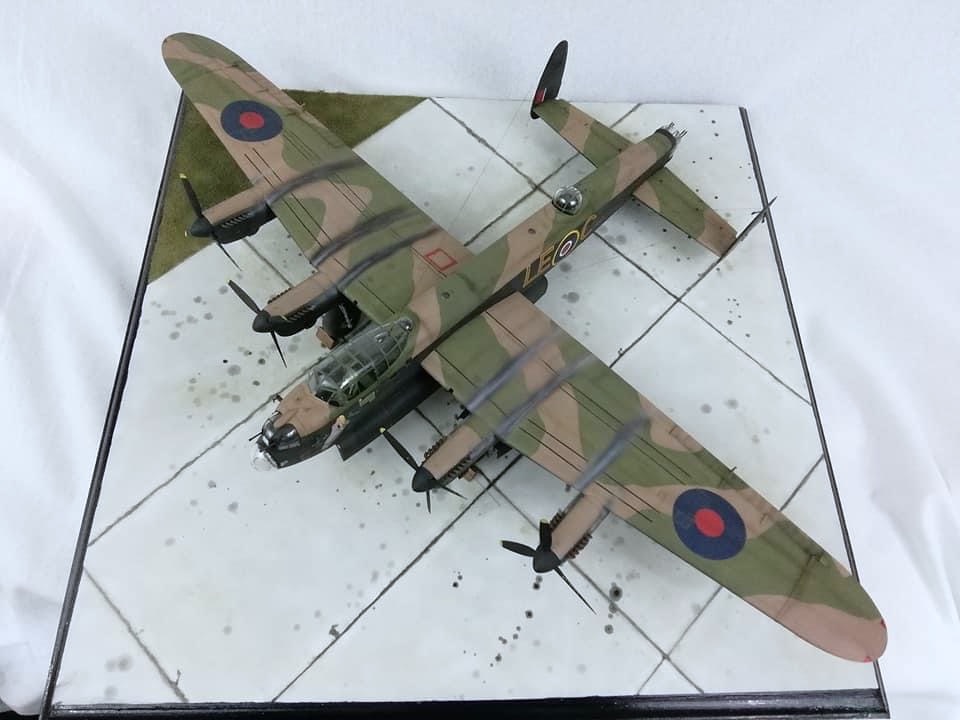
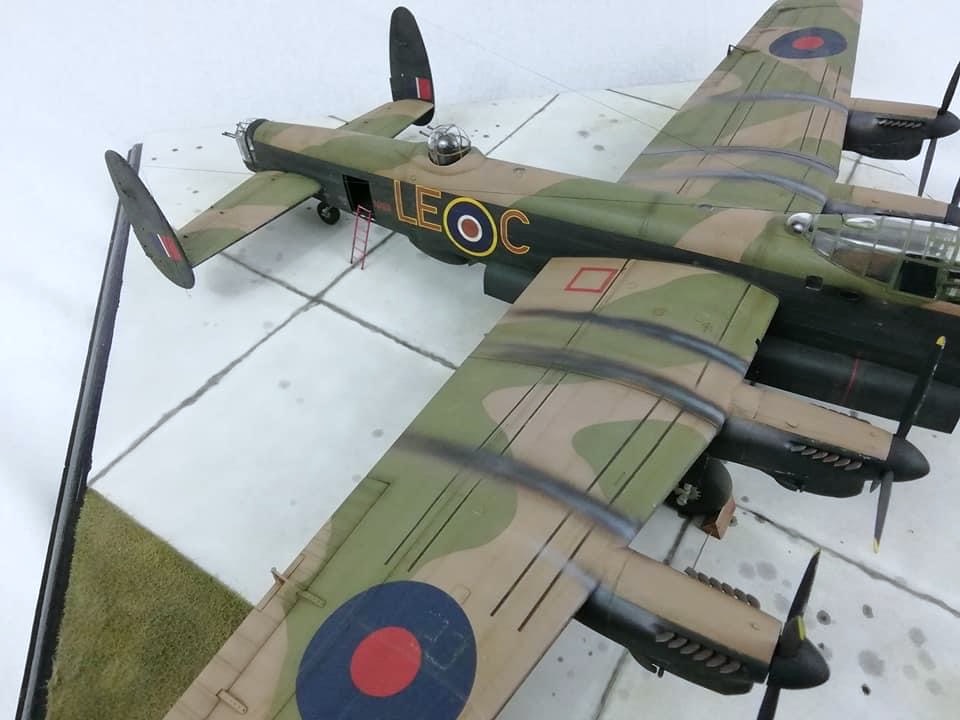
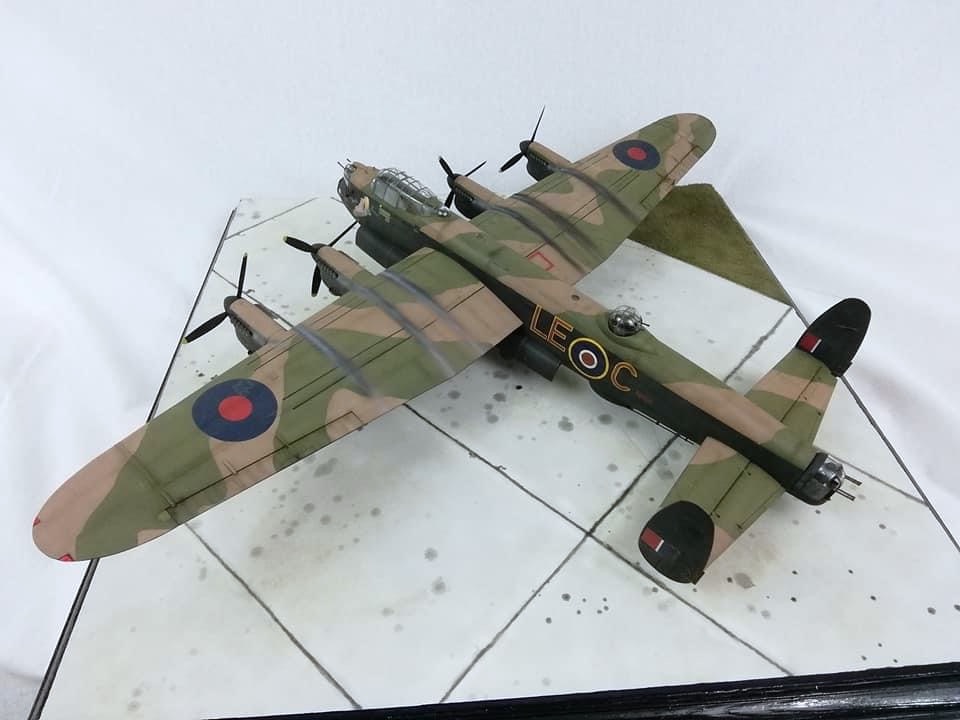
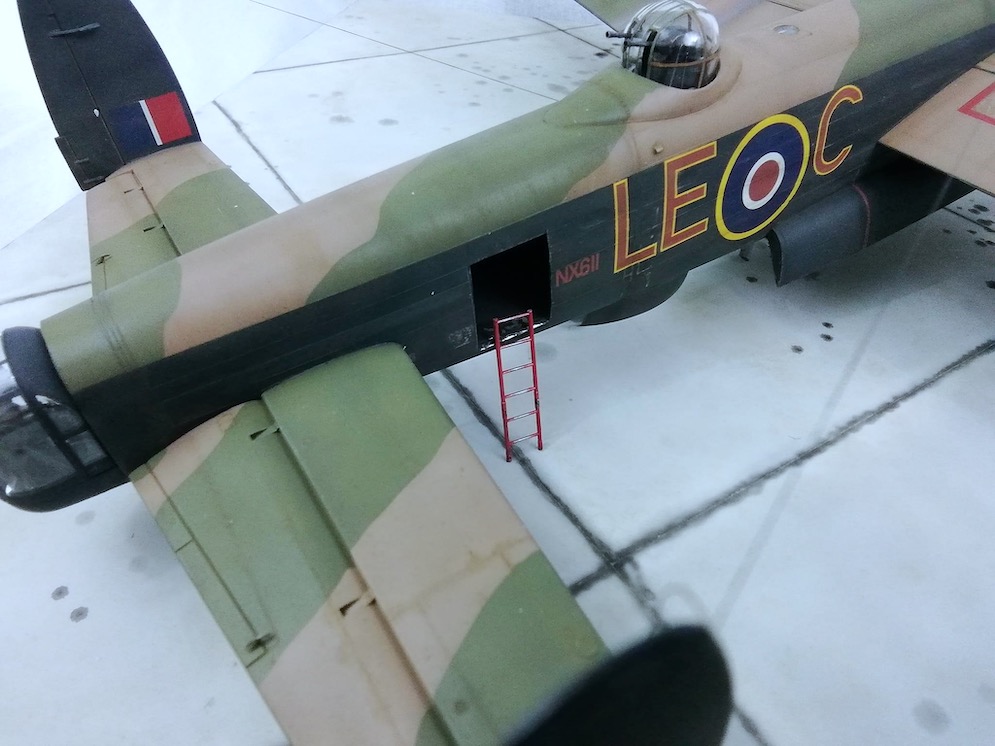
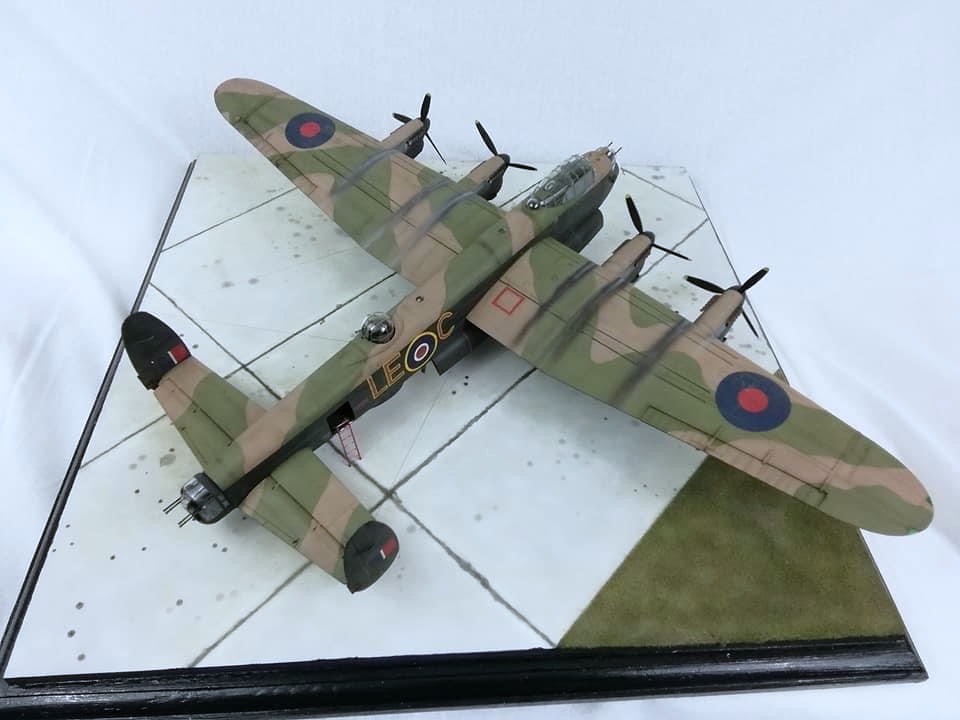
This is the Airfix 1:72 Avro Lancaster built as a 57 Squadron machine based at East Kirkby, Lincolnshire.
Built out of the box apart from eduard cockpit detail and mask sets. Xtradecal provided the squadron codes. Vehicles are from the Airfix bomber resupply and refuelling sets. The base is from Coastal Kits.
This was built in memory of my wife’s uncle who was killed at East Kirkby on 17 April 1945, along with three others, when two 1,000 pound bombs exploded on loading. The resulting conflagration set off a 4,000 pound ‘cookie’ and ended in six Lancasters being destroyed and 17 damaged. He had survived the whole war only to fall 3 weeks before its end.
Graham L.

This is the Tamiya kit virtually built out of the box although I opened the access hatch at the rear and consequently had to build a partial interior.
The base measures 21.5 inches X 22 inches so this isn’t small! It’s a commission build so I haven’t got to worry about storing it longterm.
Ian R.

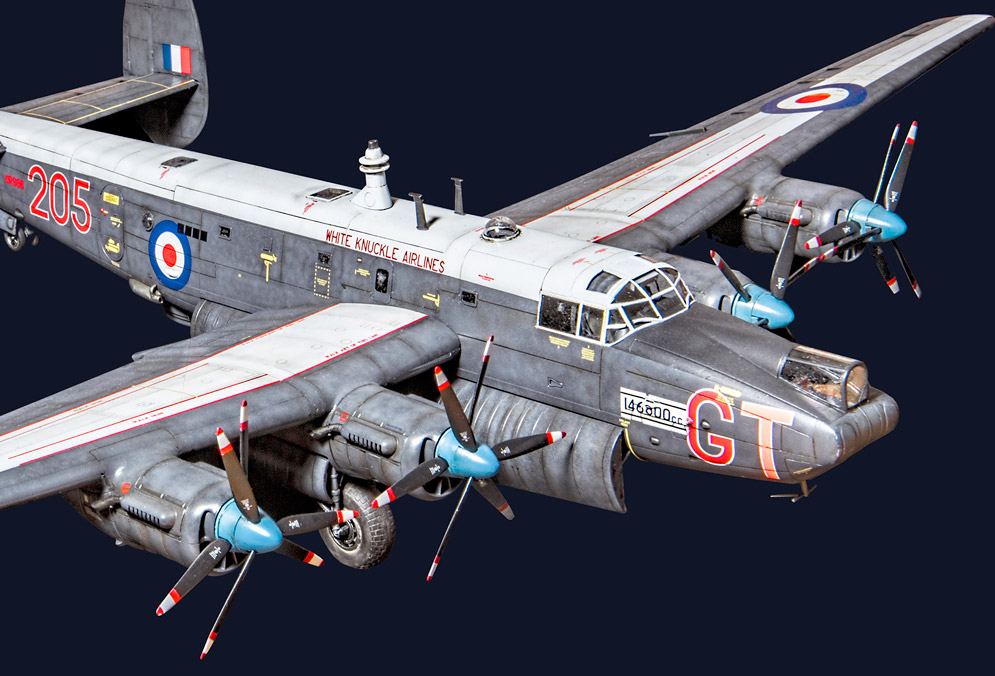
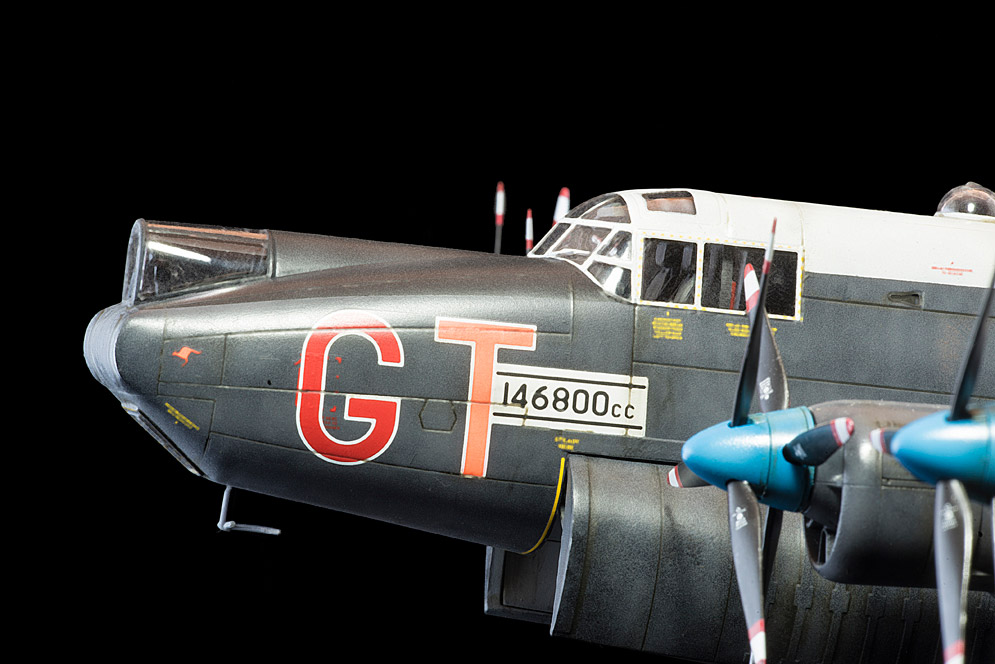
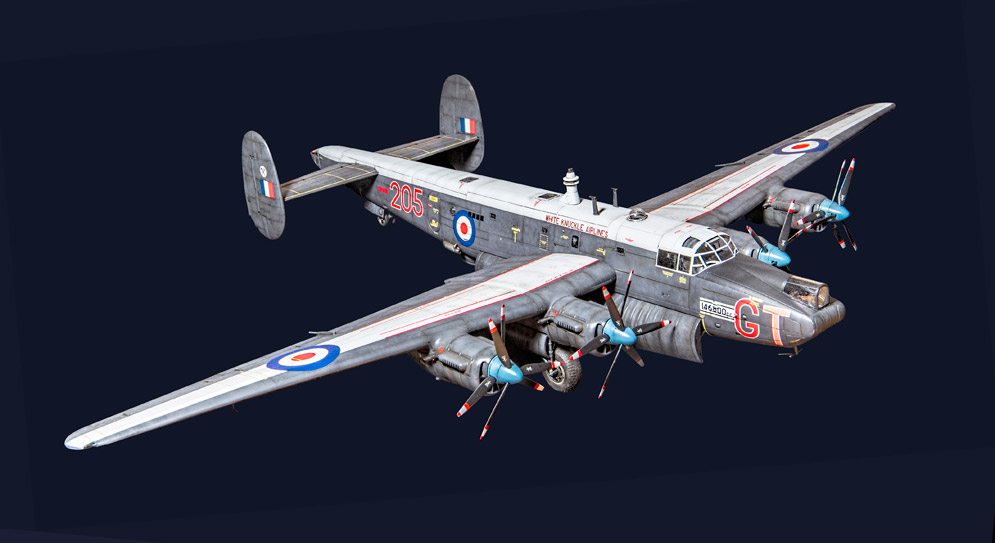
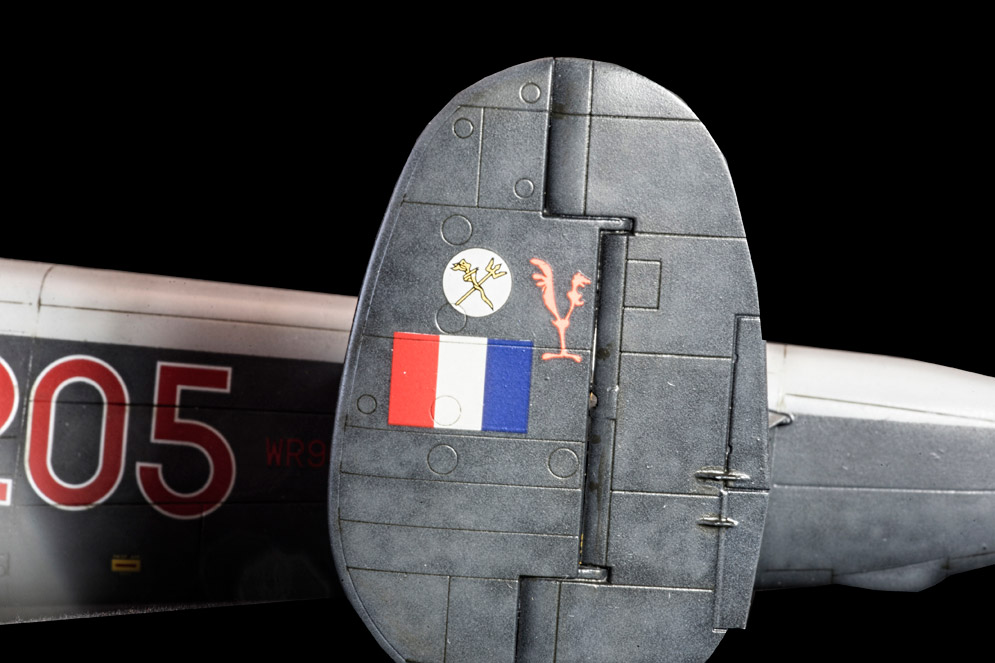
Just a few of the Airfix 1:72 scale Shackleton – first completion of 2018. It had its moments but got there in the end.
It’s a nice kit overall and good to have the ‘Shack’ available in different variants.
Hope you like it!
Andy B.
Galleries: A | B | B-2 | C | D-E | F | G | H | I-L | M | N-R | S | T-V | W-Z