Whether you’re a seasoned modeller or just getting started, this gallery is a place to share your work, appreciate the craftsmanship of others, and draw inspiration for your next project.
Each submission has a ‘gallery’ of thumbnails which you can click on to see an enlarged image and read the short text describing the model – enjoy!
Our Aircraft Scale Model Galleries
Focke-Wulf and Fokker Scale Model Gallery
Messerschmitt Aircraft Scale Model Gallery
Supermarine Spitfire Scale Model Gallery
A | B | B-2 | C | D-E | F | G | H | I-L | M | N-R | S | T-V | W-Z


A straightforward build out of the box.
Dave Coward had been tinkering with the AI and had sent me some pictures over our WhatsApp group, then when I read your tutorial I decided to give it a bash myself (see the final in-flight image).
Wasn’t until the fuselage was sealed up I realised I had forgotten the nose weight, hence the stand, 3D printed from eBay. I now have another in the stash for a near future build alongside the E-7 Wedgetail, instructions already highlighted on the nose weight step!!
Paul M.
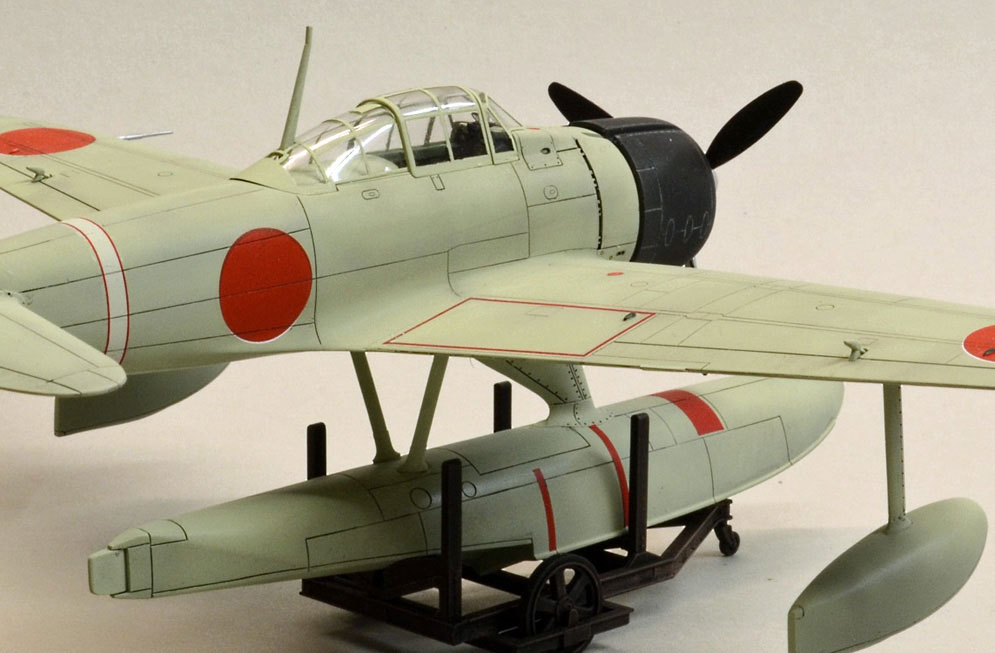
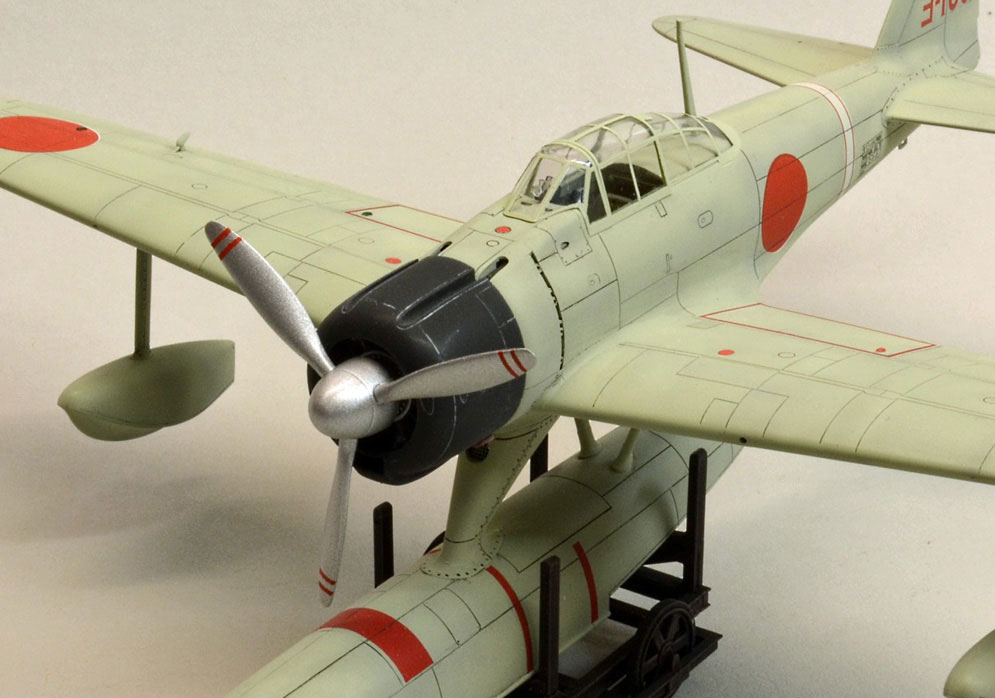
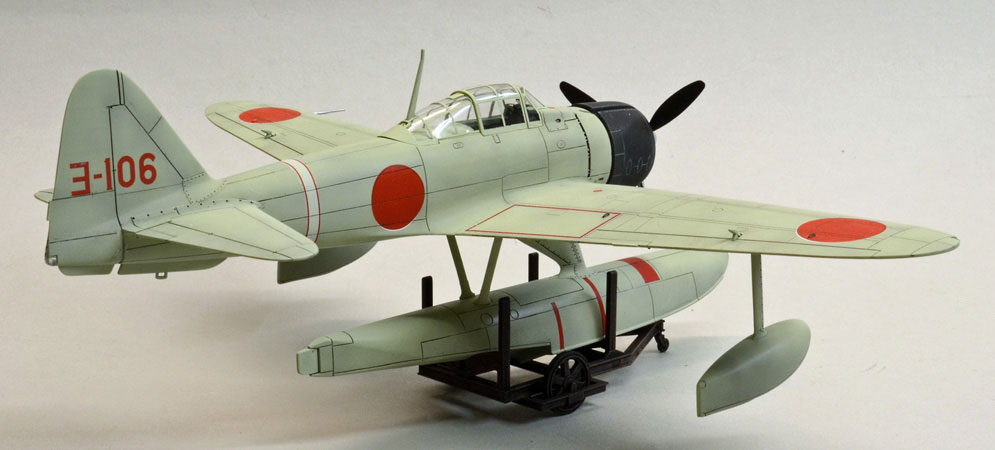
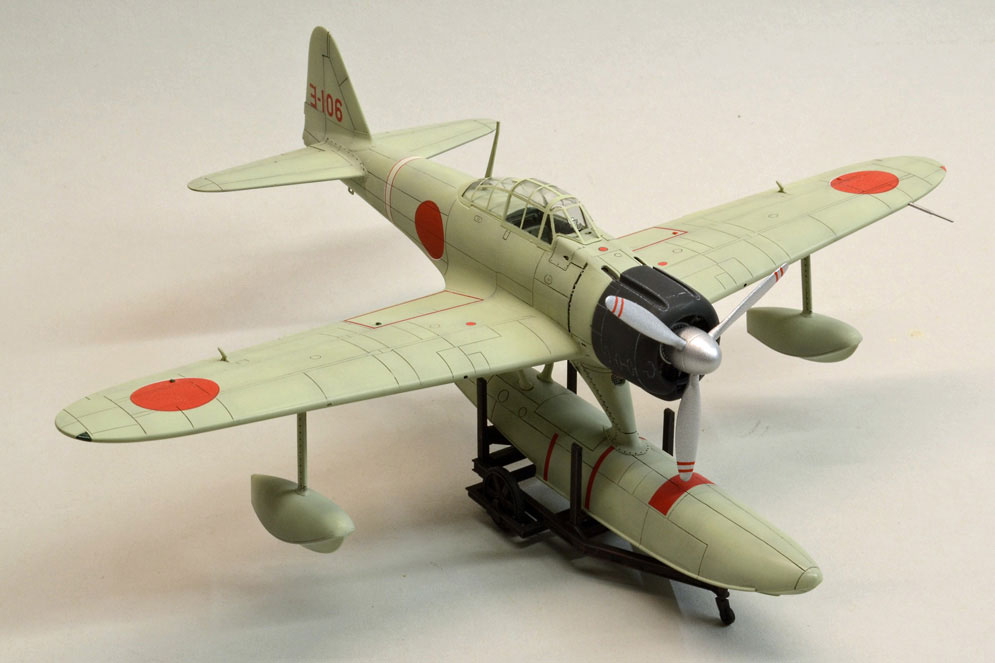
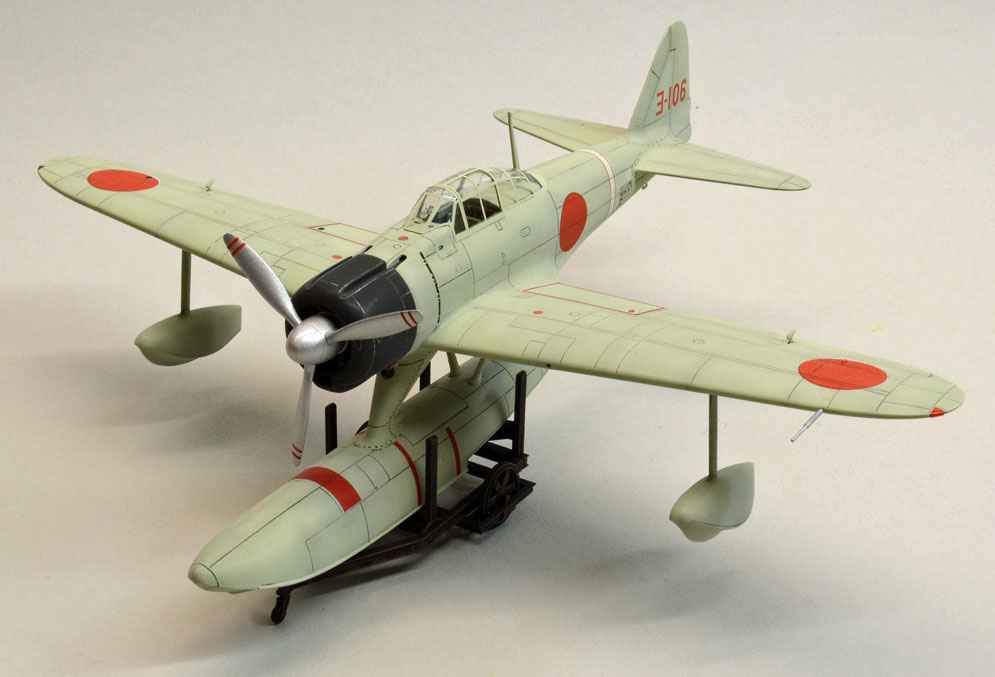
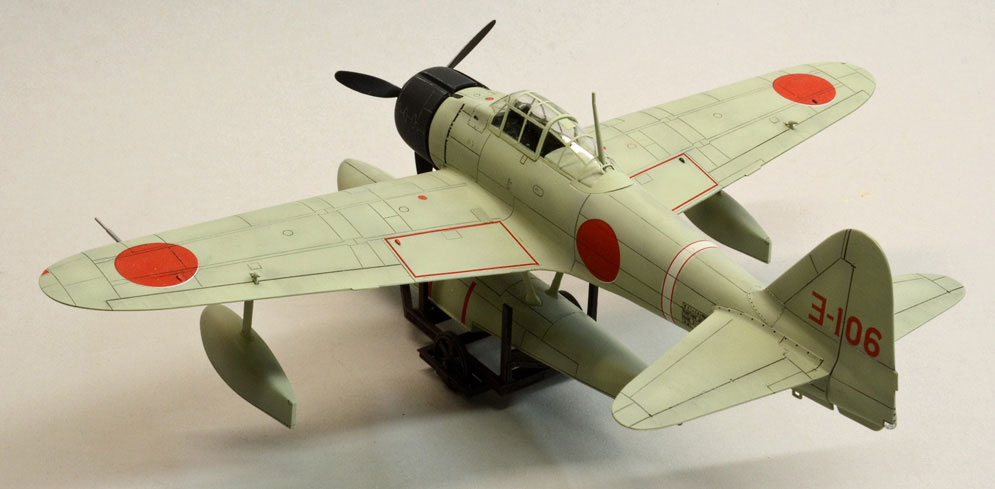
This is my Hasegawa 1:48 Nakajima A6M2-N Rufe which I have built out of the box.
The kit makes up very well, as do all Hasegawa Zeros; I just added seat belts from the Eduard Japanese Navy set.
The aircraft was sprayed using Xtracolor IJN green/grey and the panel lines were post-shaded with a darker tint. A mixture of gloss black and gloss blue were used on the engine cowl. I used a dark brown acrylic ink in the panel lines.
An Eduard masking set was used for the canopies which makes life a lot easier and after applying the decals the entire aircraft was sprayed with Humbrol matt cote.
Roger B.
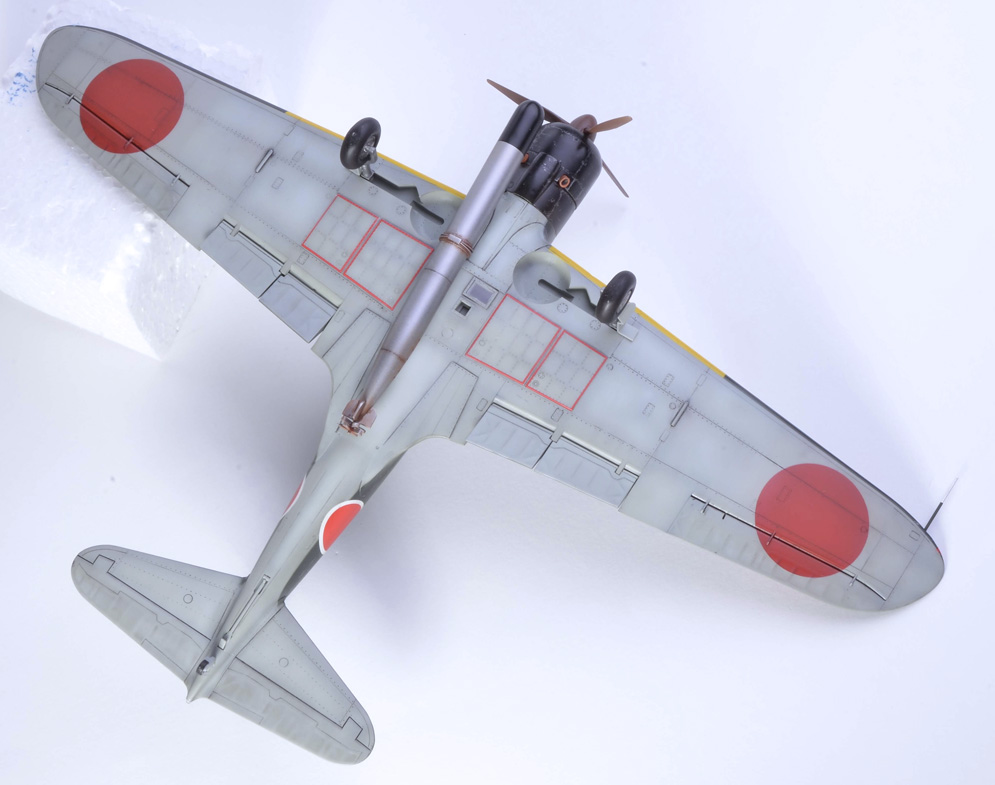
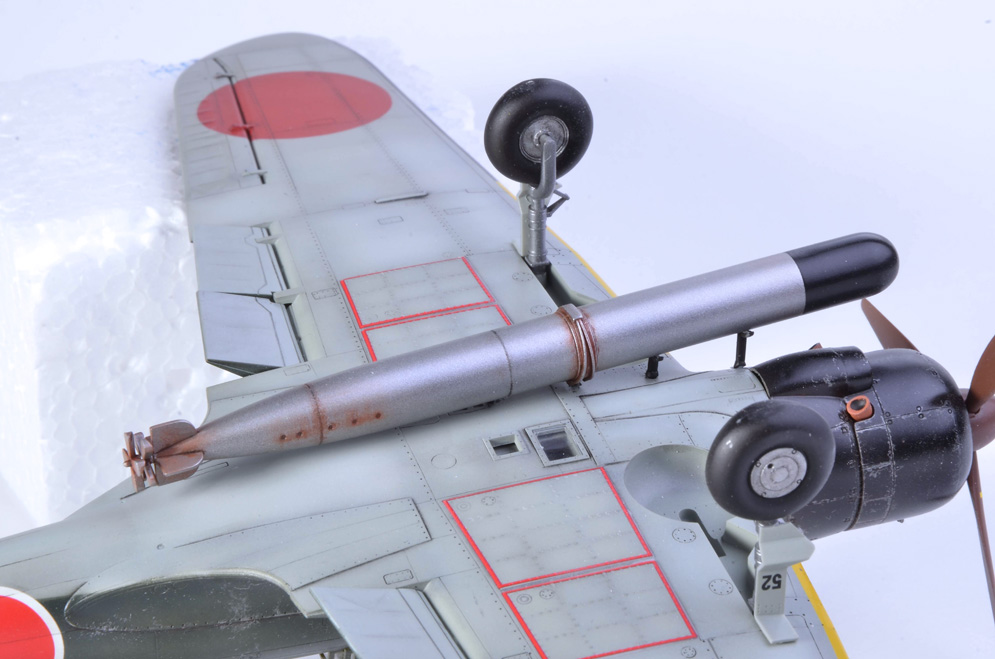
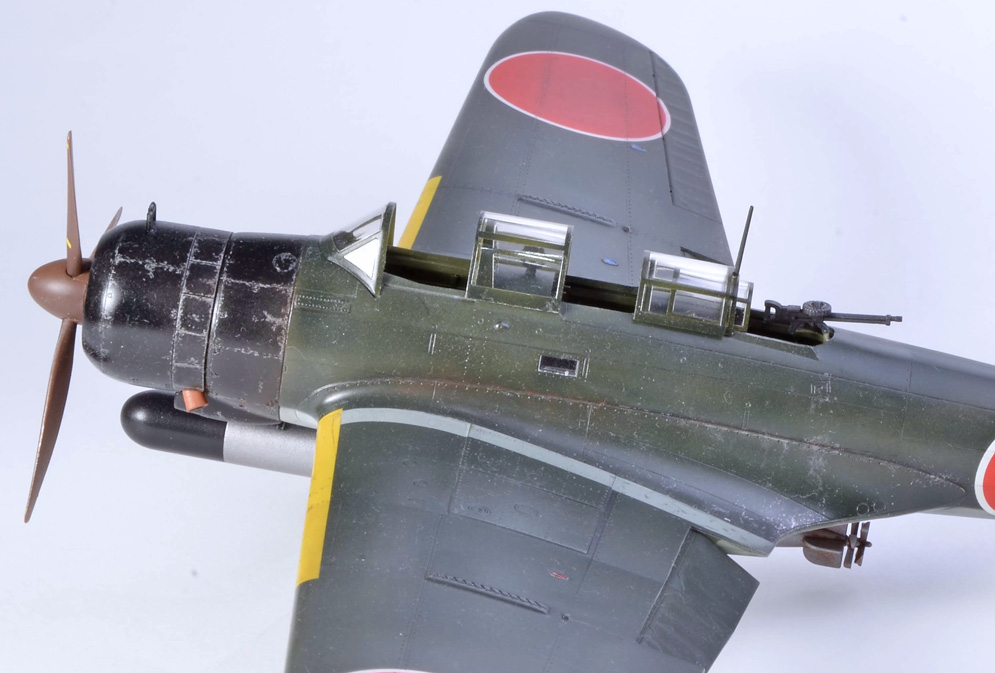
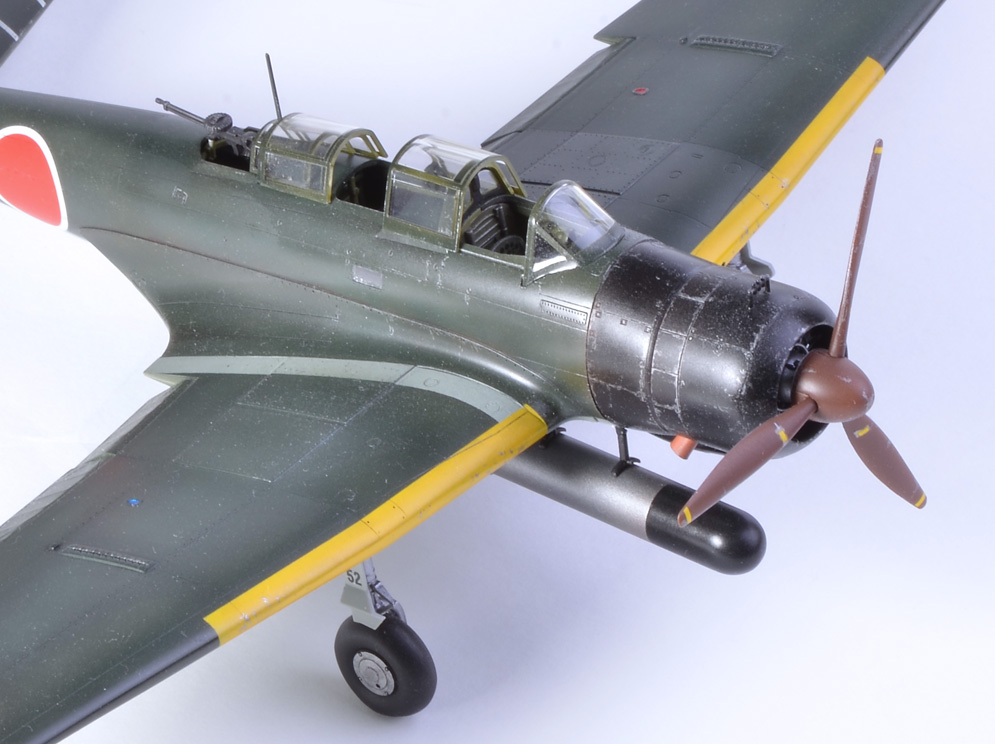

This is my 1:48 Hasegawa Nakajima B5N2 Kate from the 601st Naval Flying Group based on the IJN carrier Zuikaku in Spring ’44.
A really fun build with the addition of an eduard canopy mask set. It would have been much less fun without all that glazing!
Tamiya and Mr Hobby paints with silver pencil chipping.
Love the torpedo designed offset to miss the oil cooler.
Rick G.
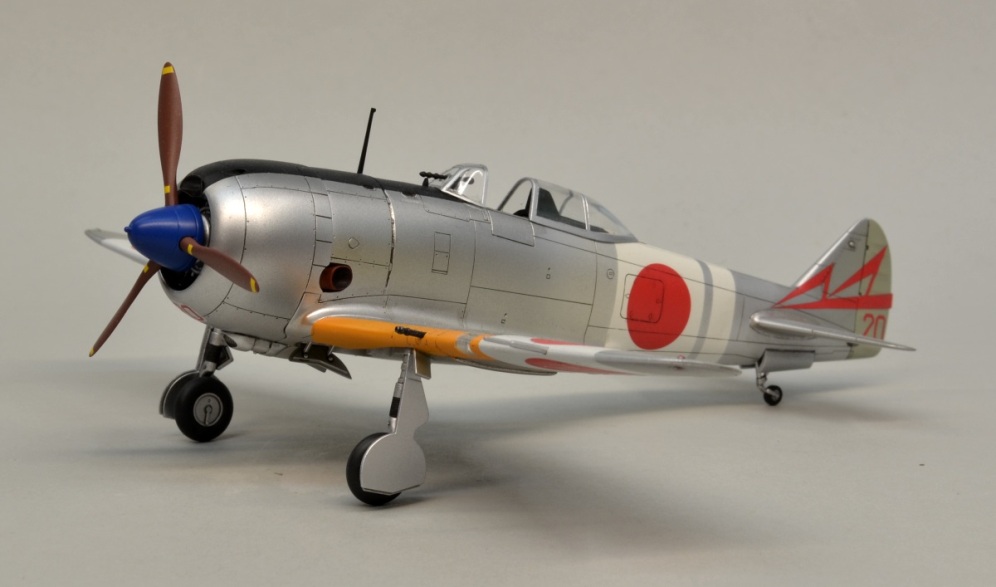
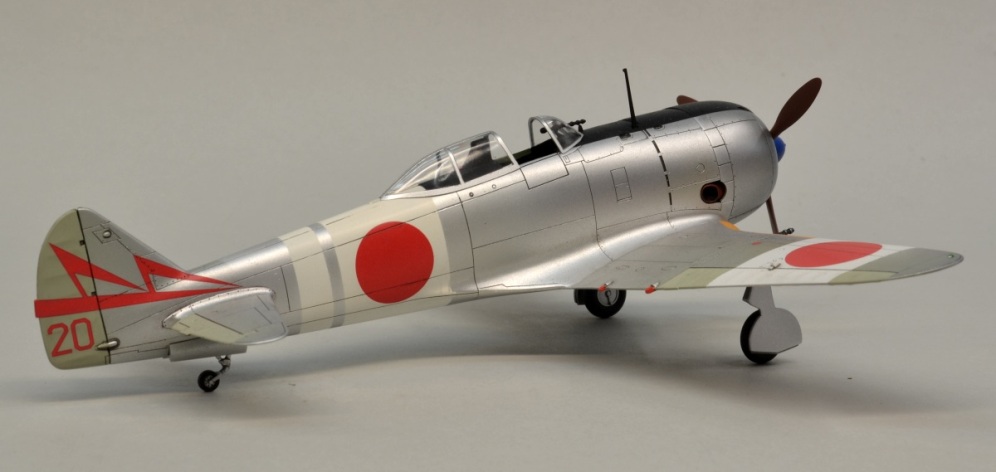
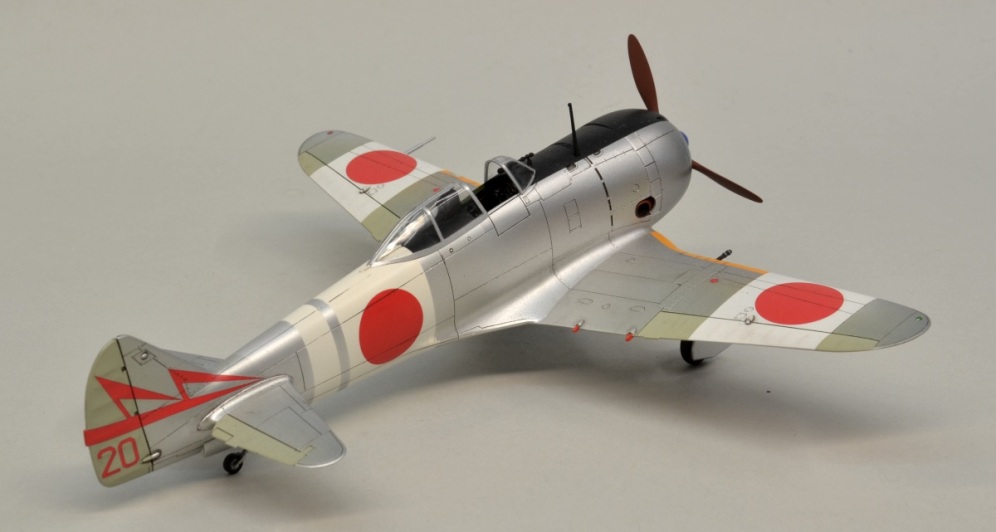
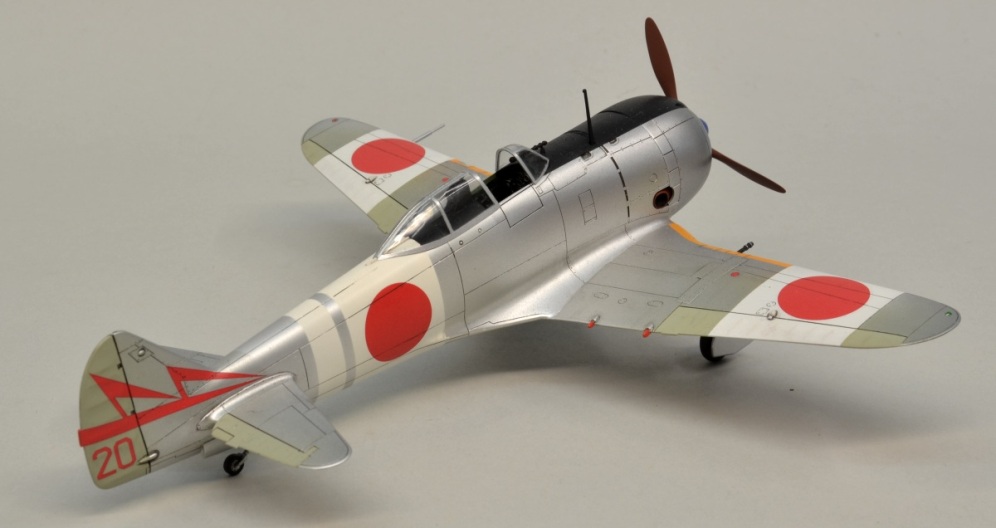
- The kit was built from the box and using the kit decals
- Eduard seat belts were the only parts added
Painting the model involved a lot of masking. First the control surfaces were sprayed with Xtracolor IJA grey. These were then masked off and the leading edge yellow/orange was sprayed. This was then masked off and the white areas under the hinomarus sprayed, together with the fuselage band. The white areas were masked off and the remainder of the aircraft sprayed with Humbrol 11, thinned 1 part paint 4 parts thinners. When completely dry the anti-glare panel along the top of the engine cowl and fuselage was masked off and sprayed satin black.
The Ki44 was a very small, powerful interceptor with a wing span of 9.45m compared to that of a Spitfire with a wing span of 11.23m. The tail area was also unconventional with the tail plane set well forwards of the fin. The Nakajima Ha-109 14 cylinder double row radial was originally intended for bomber aircraft and produced 1520 hp. This large engine was successfully incorporated into a much smaller narrow cross section fuselage.
The Ki44 is a very interesting and unusual aircraft which is one of the reasons I built it!
All the best, Roger


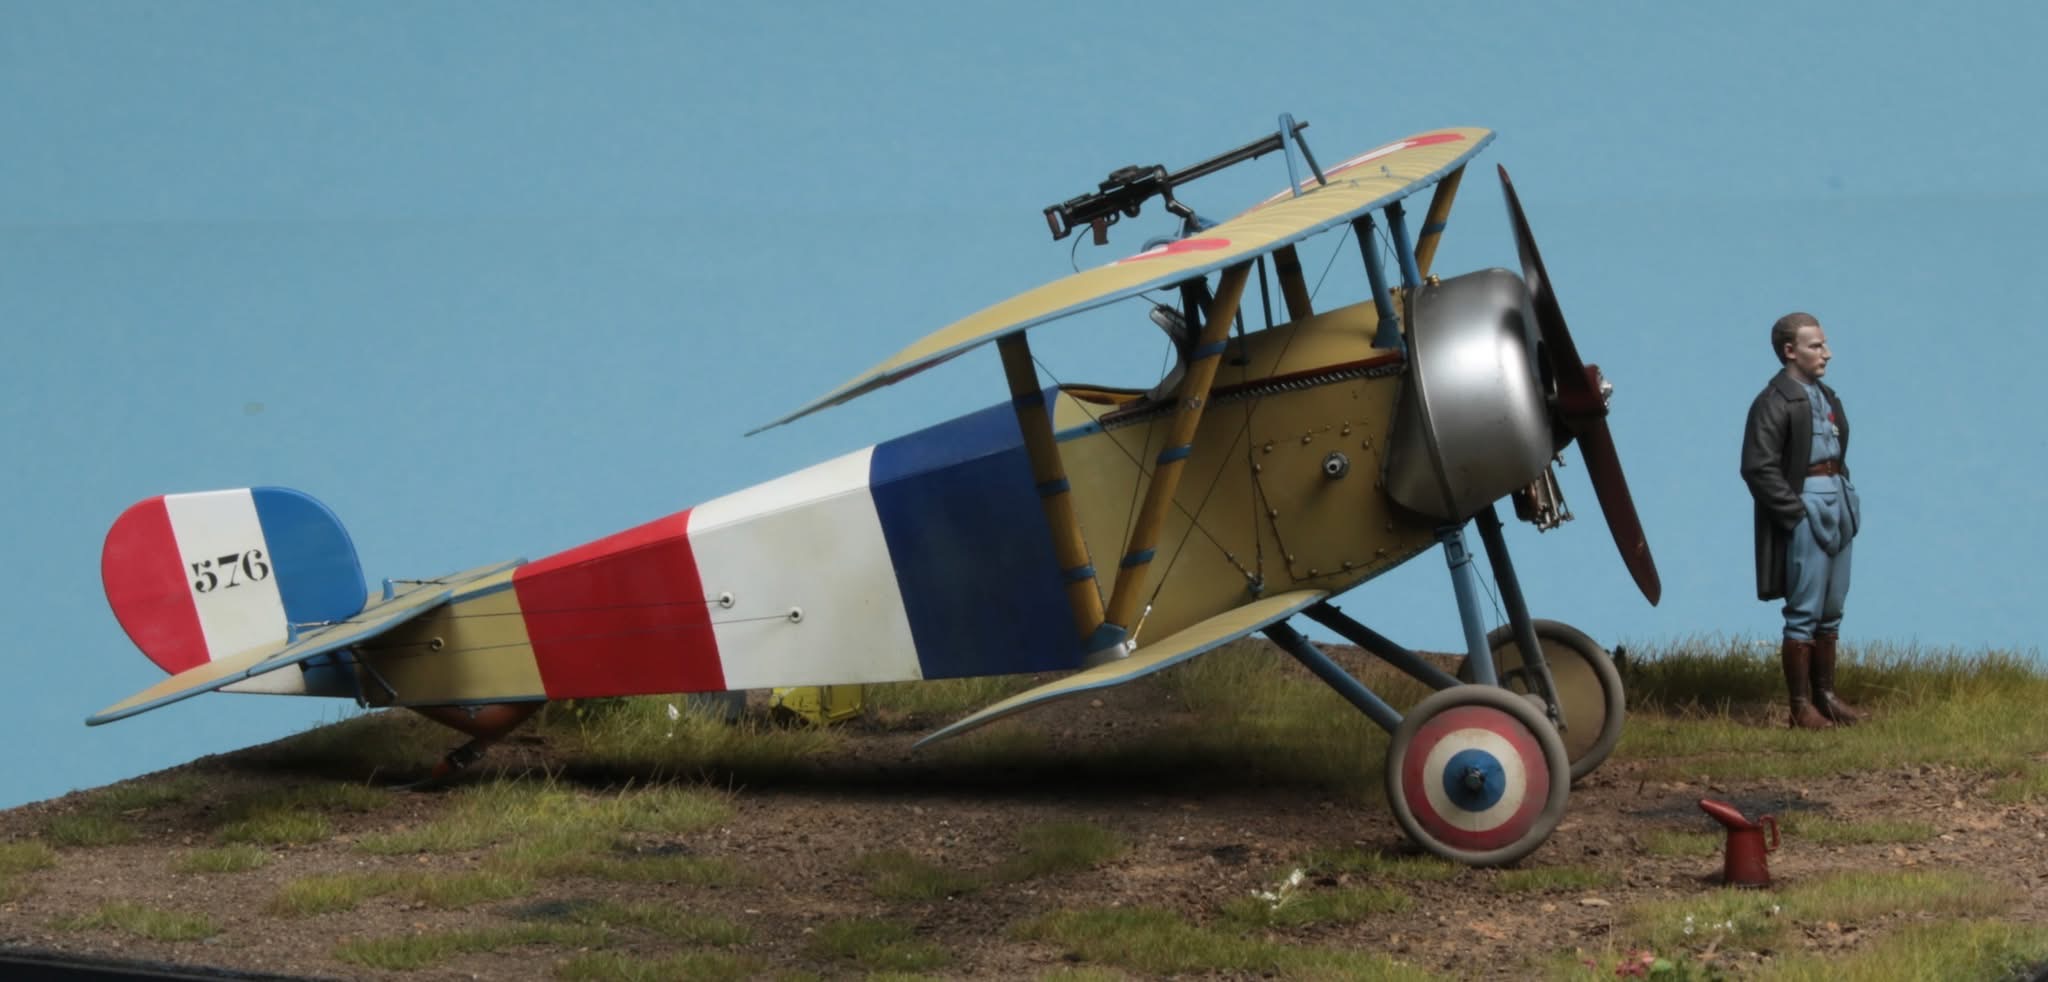
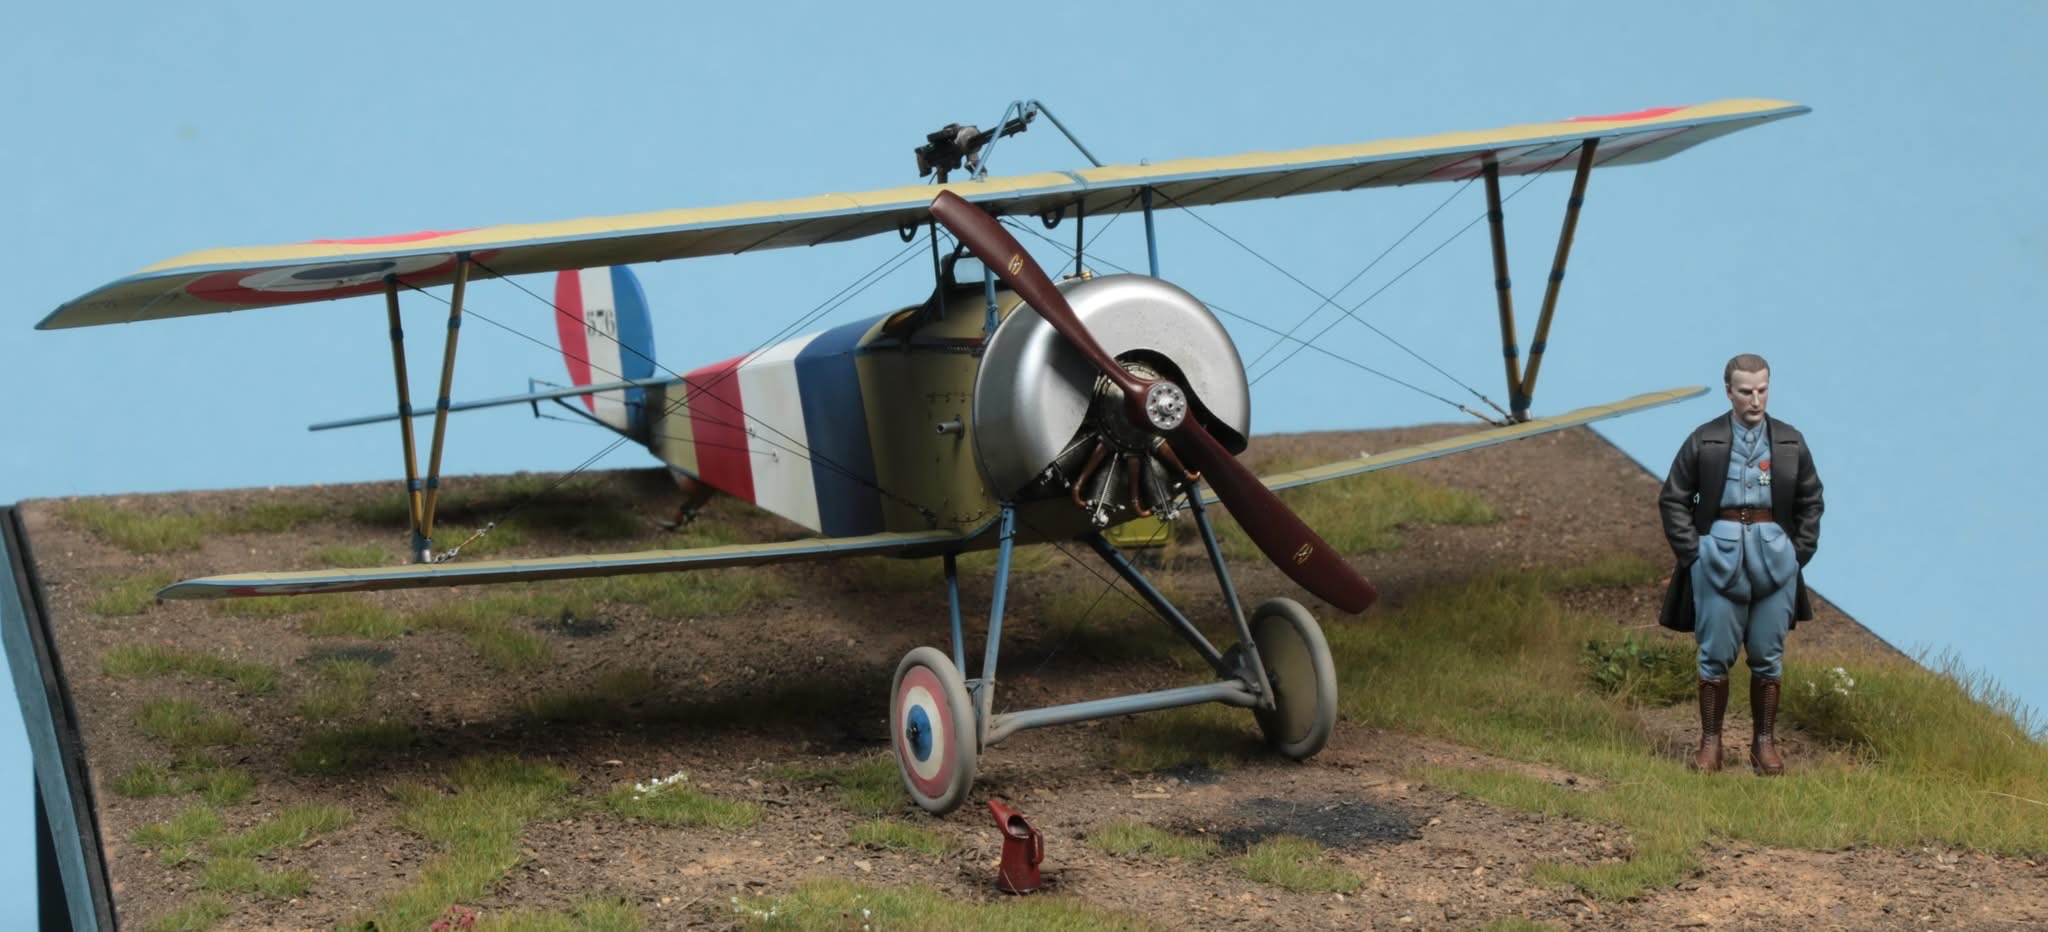
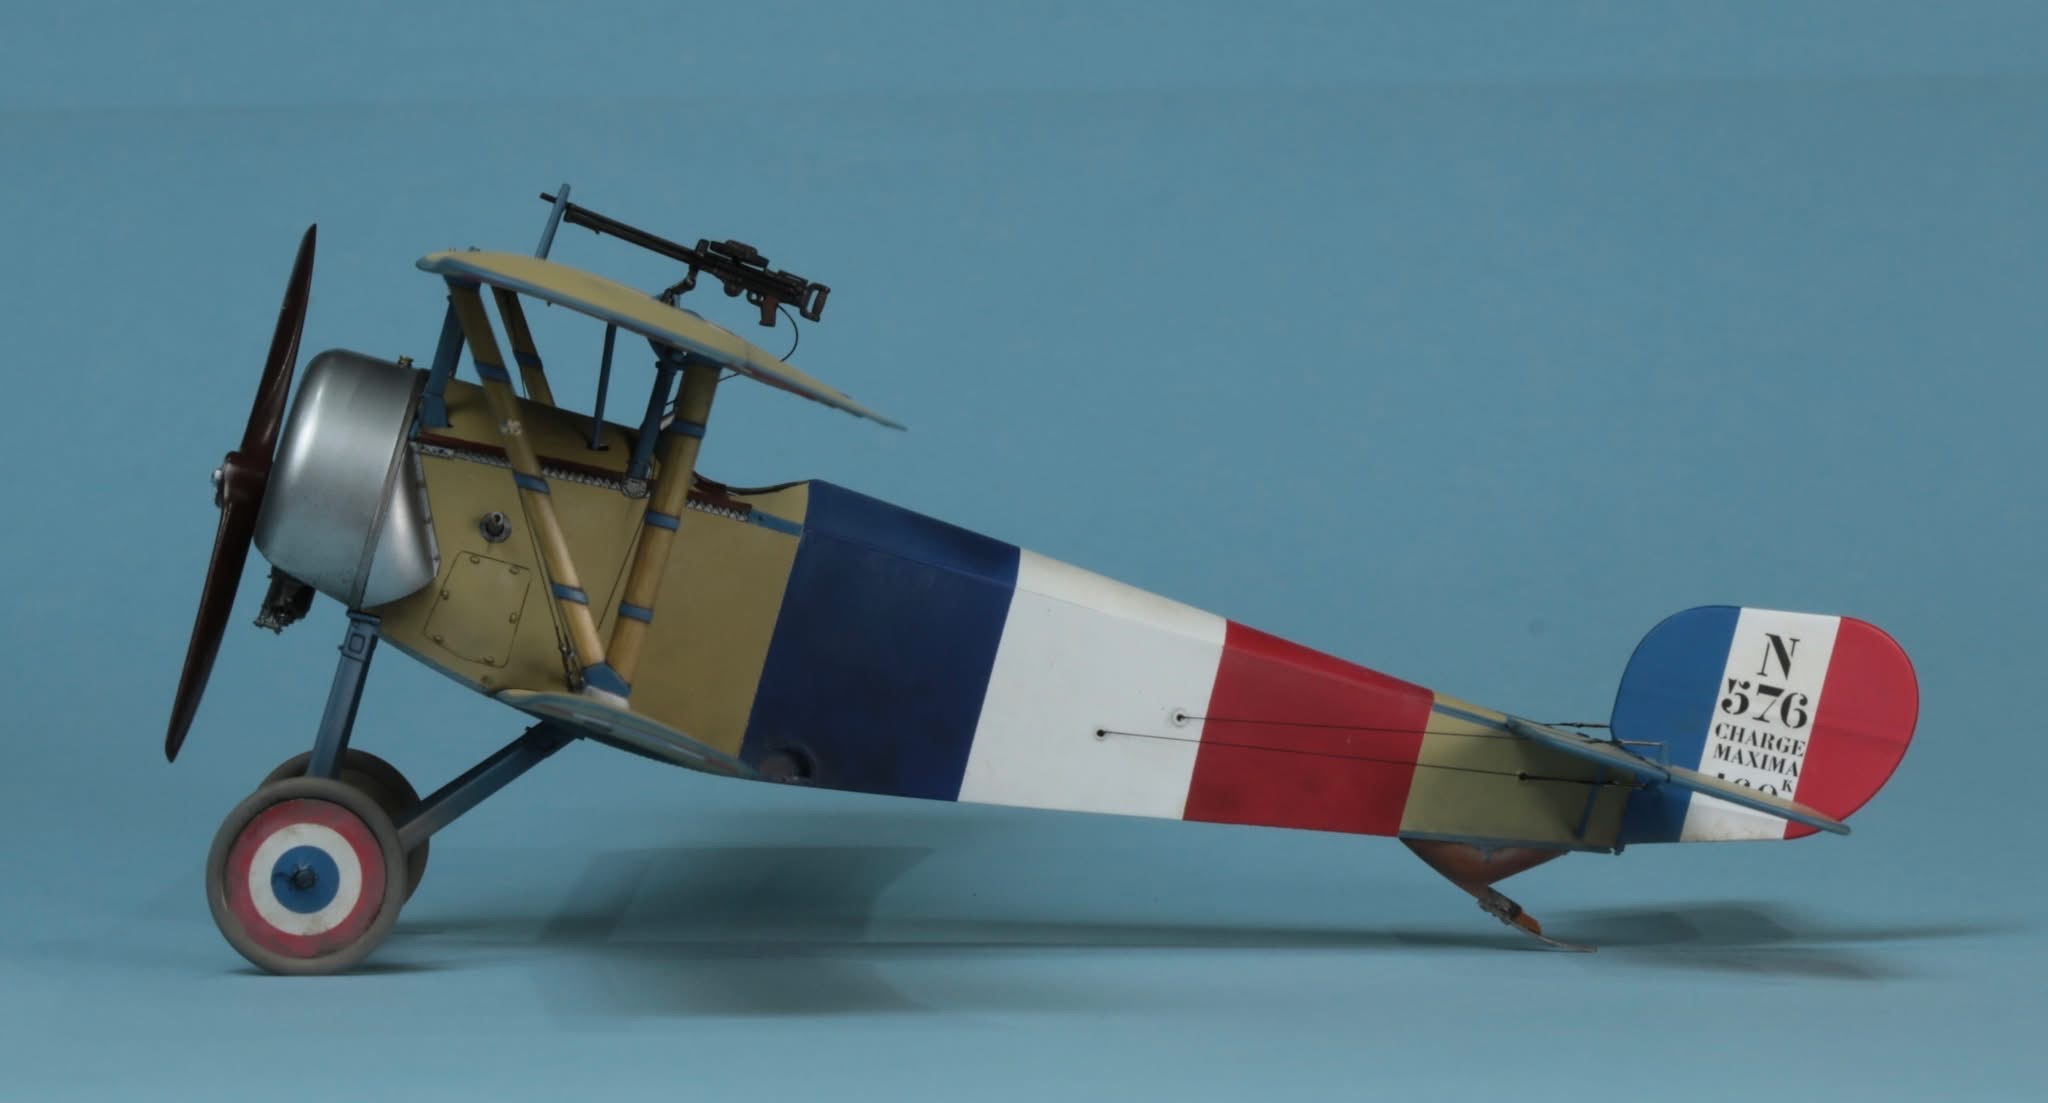
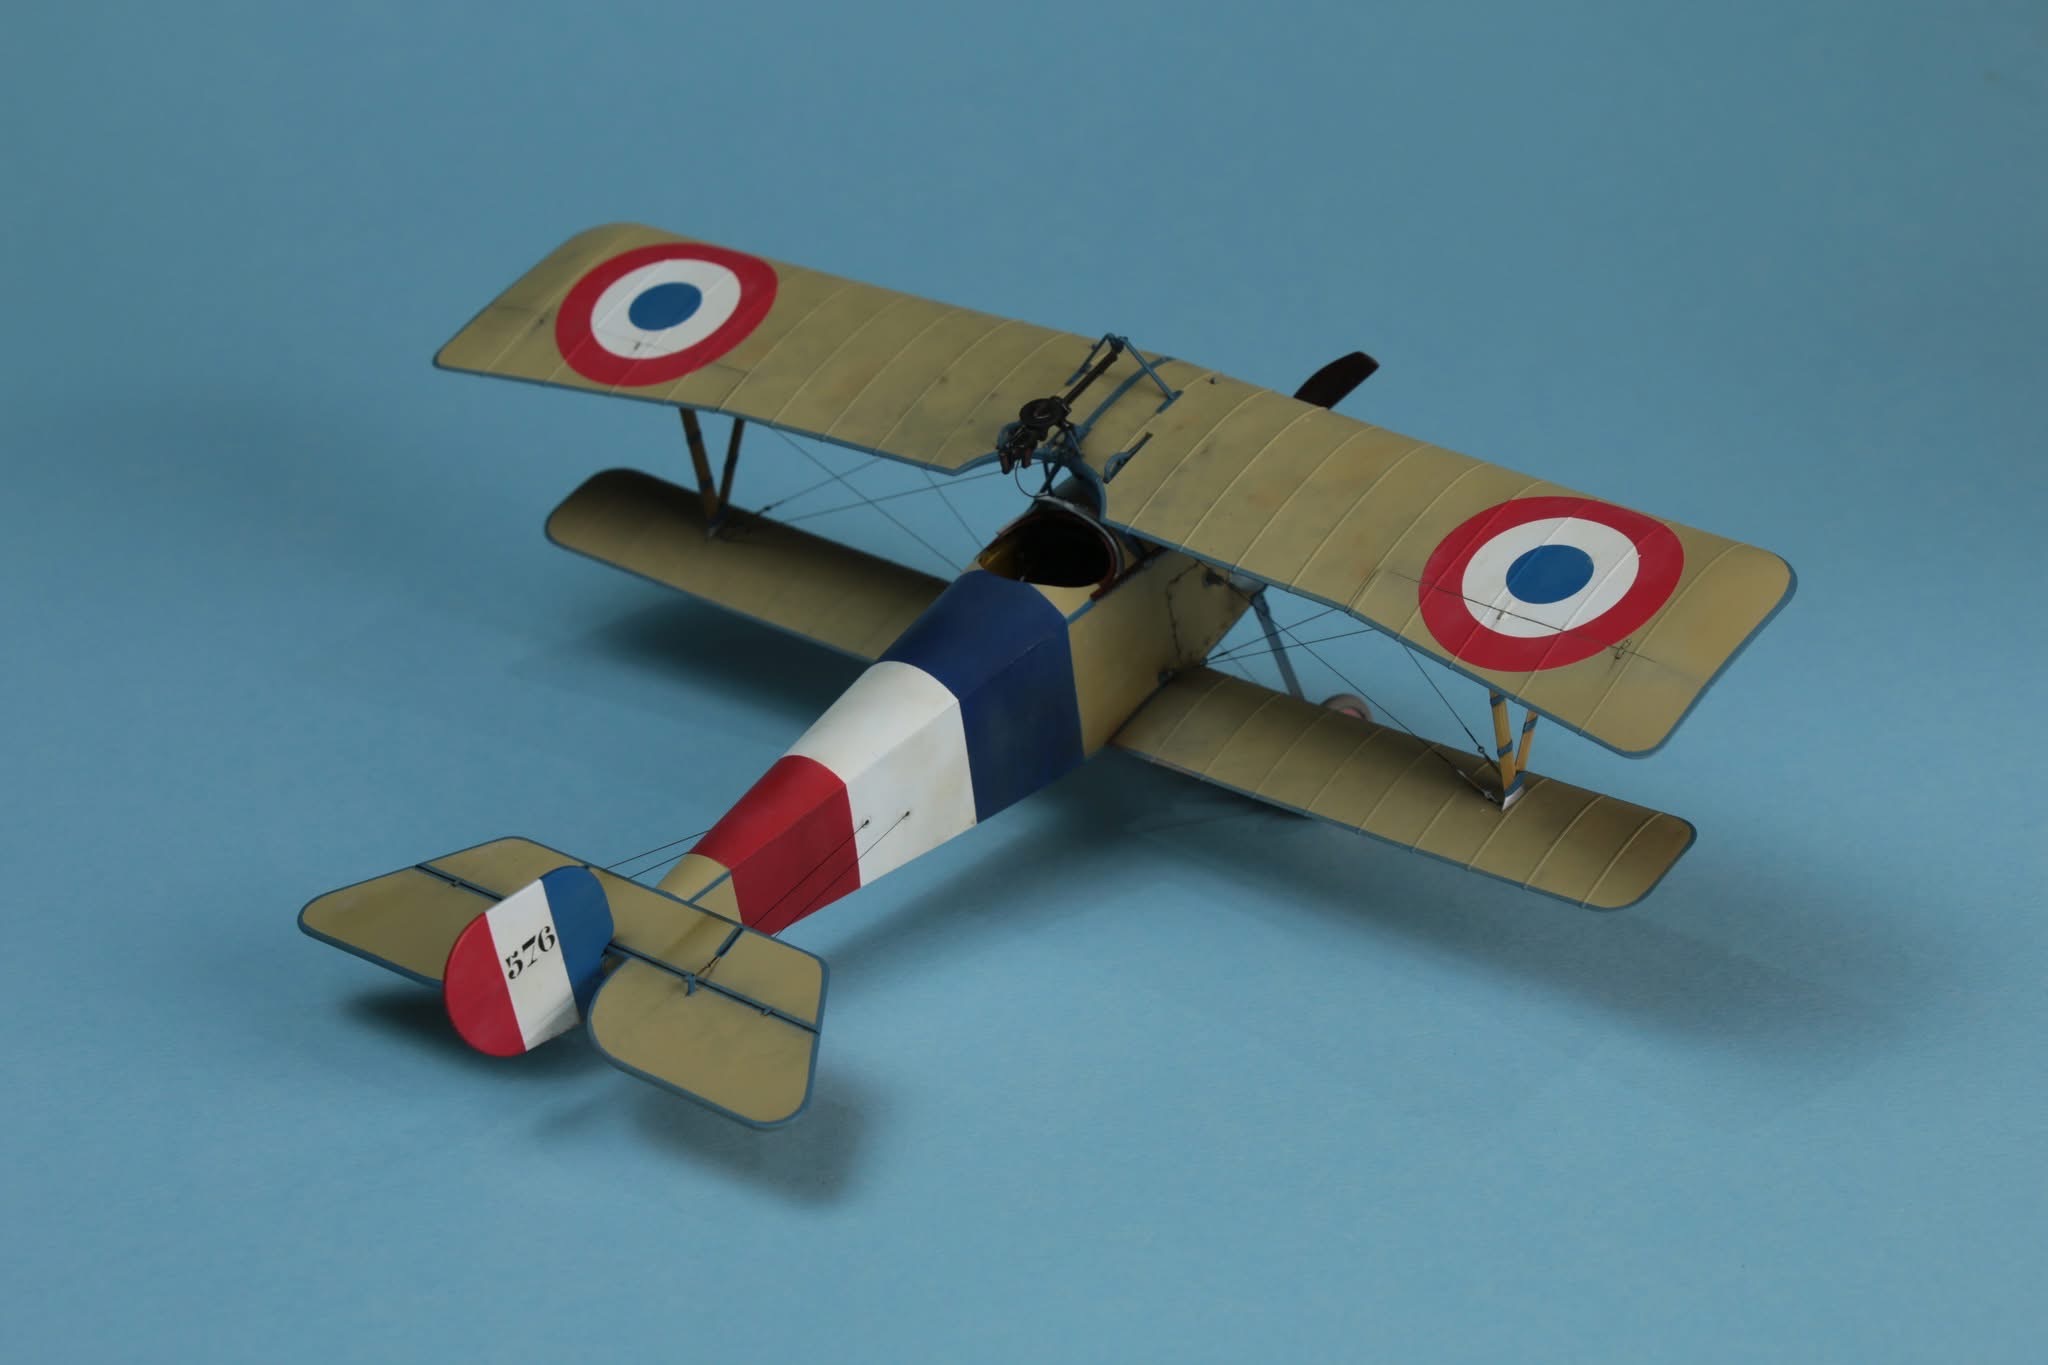
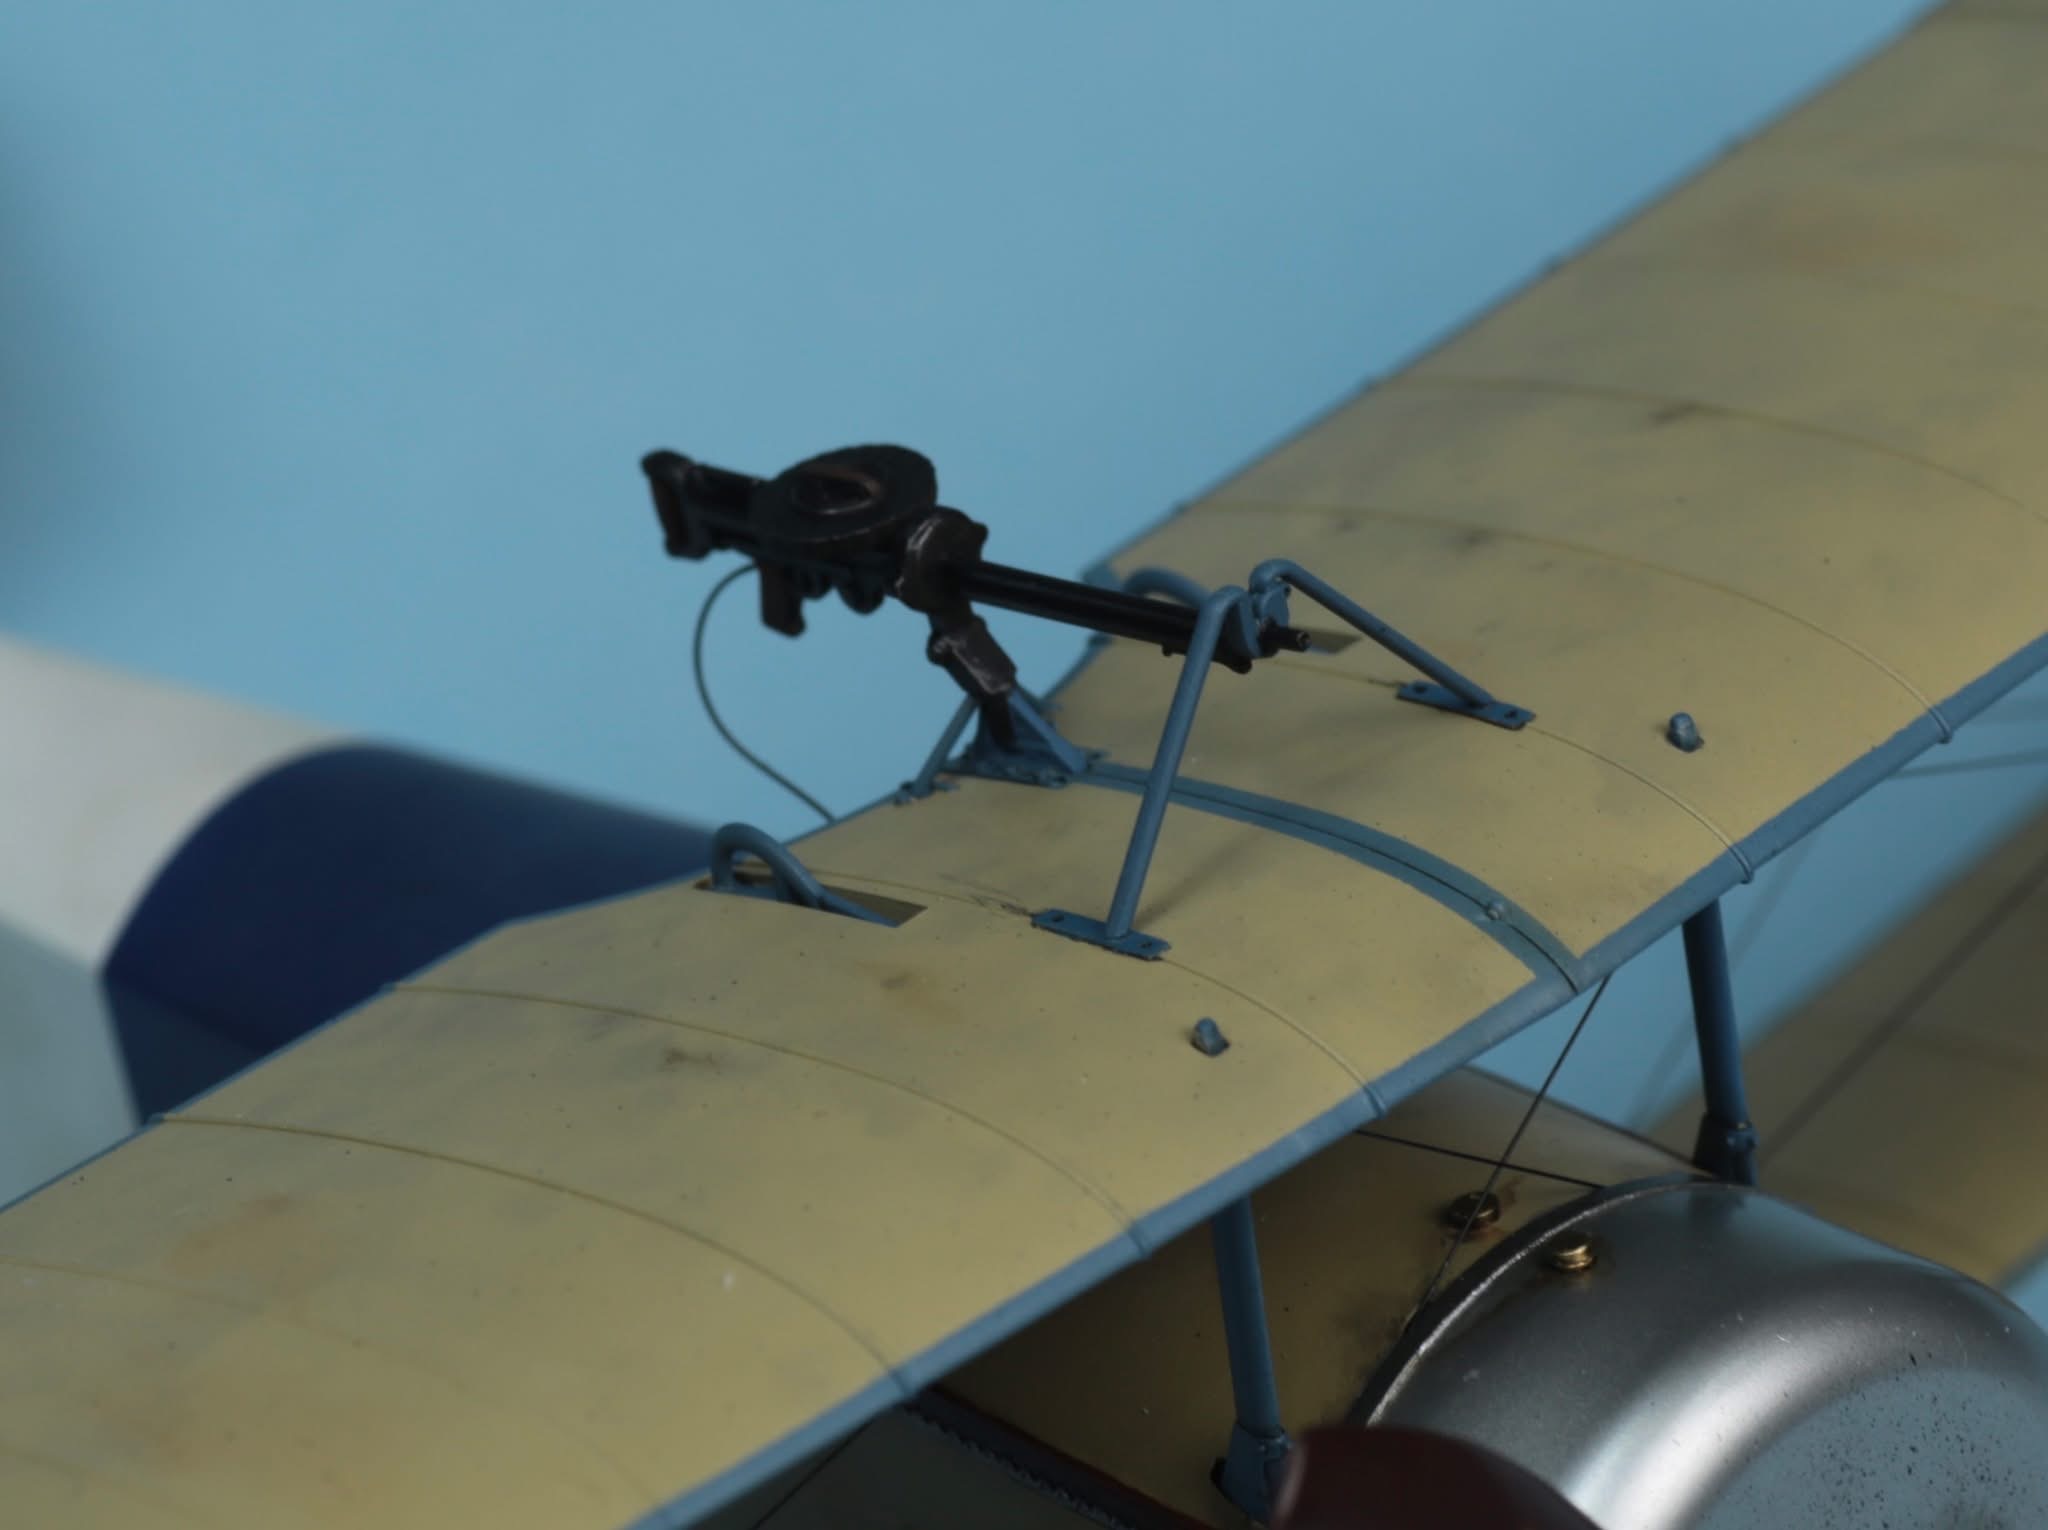
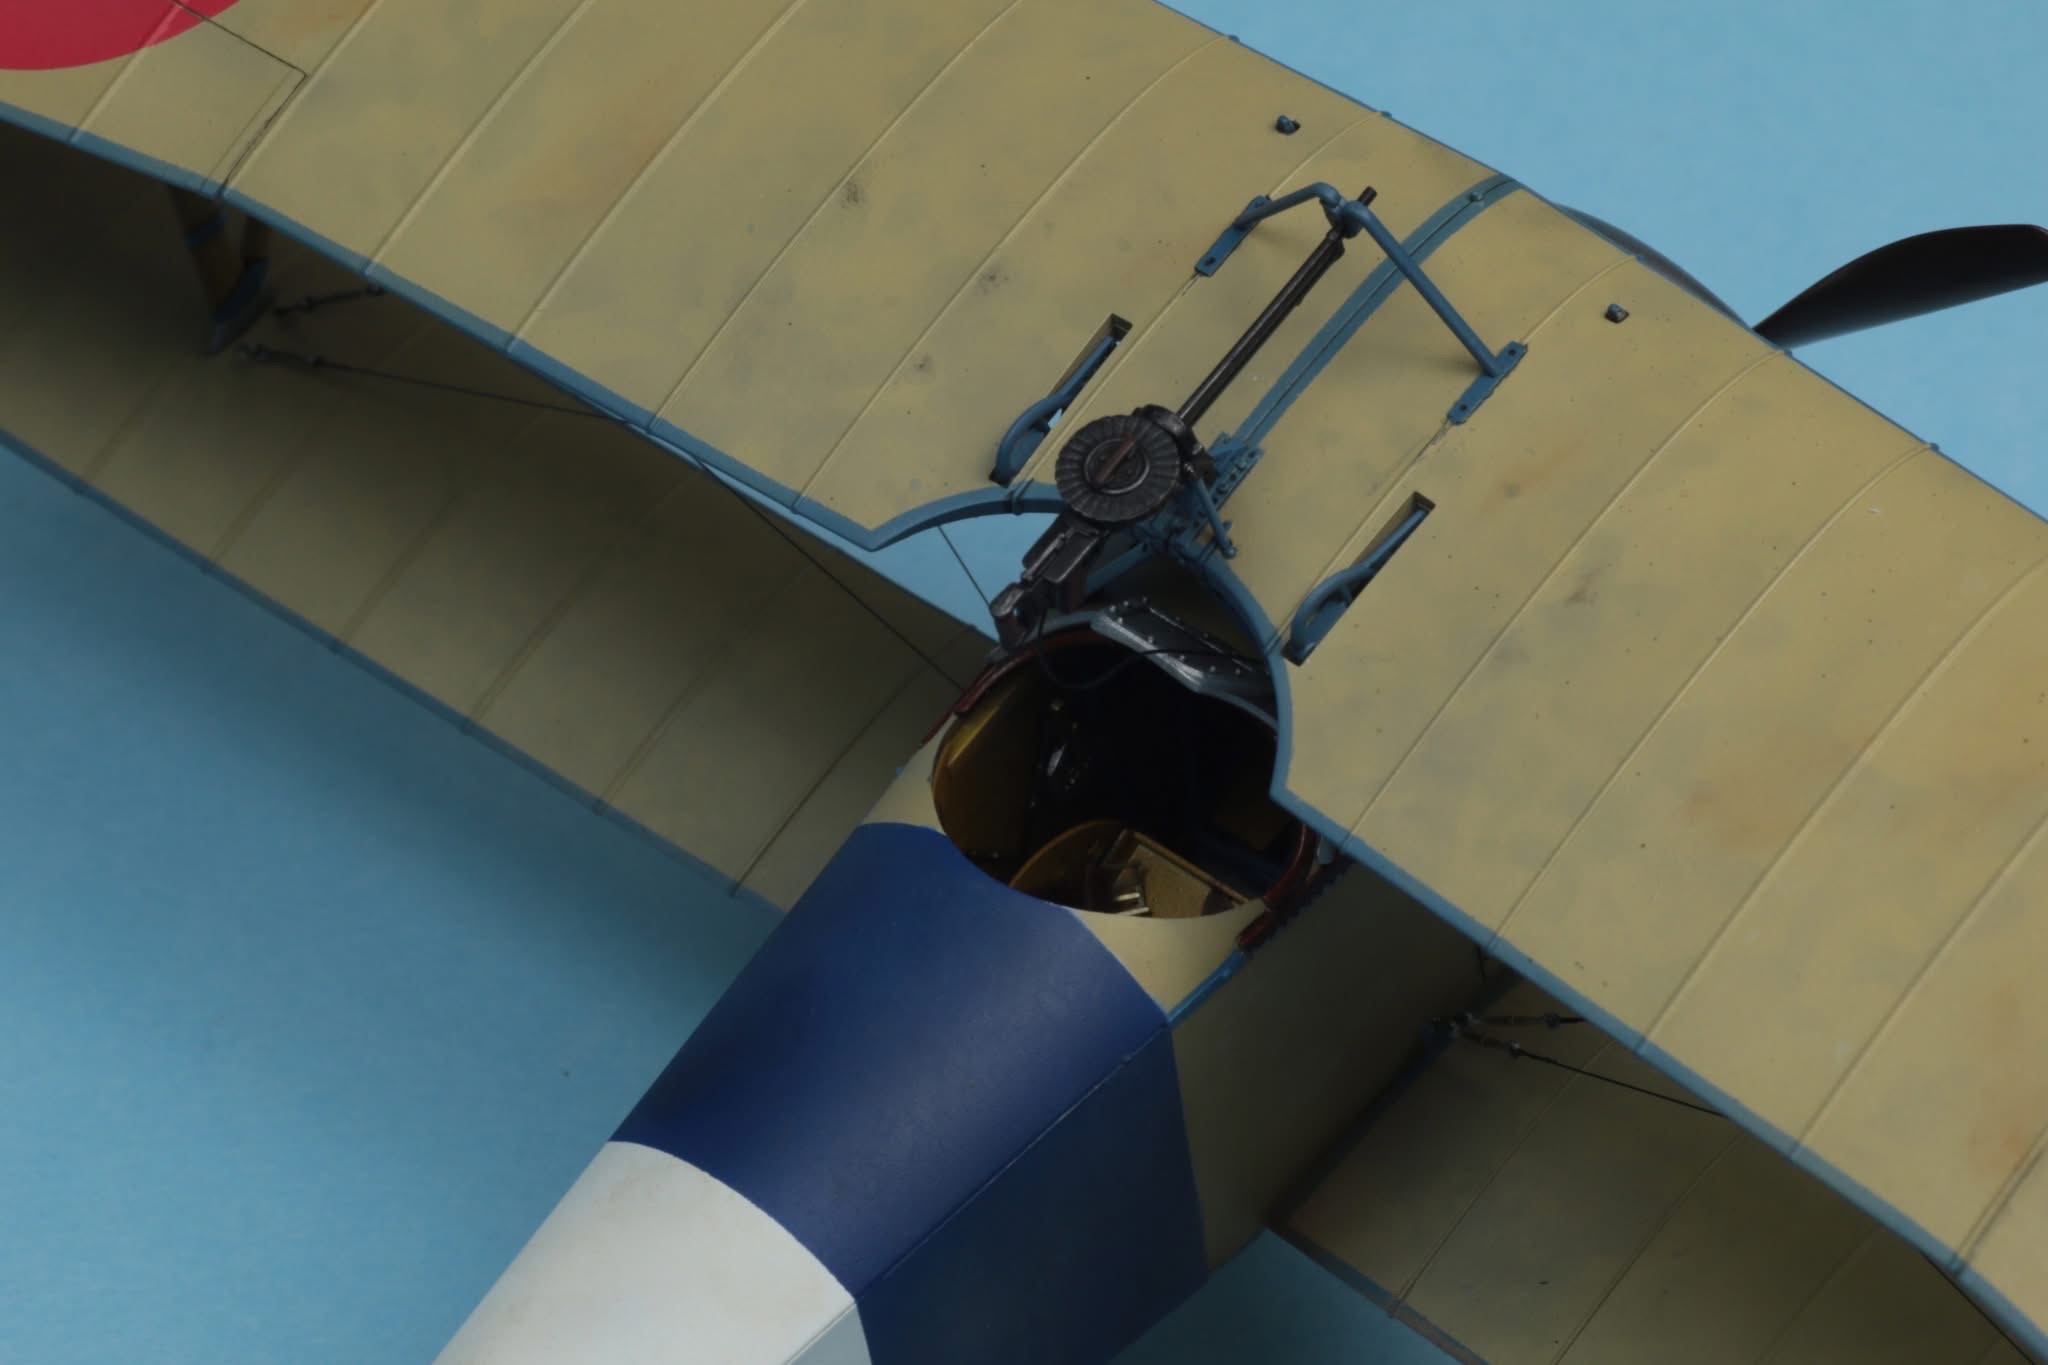
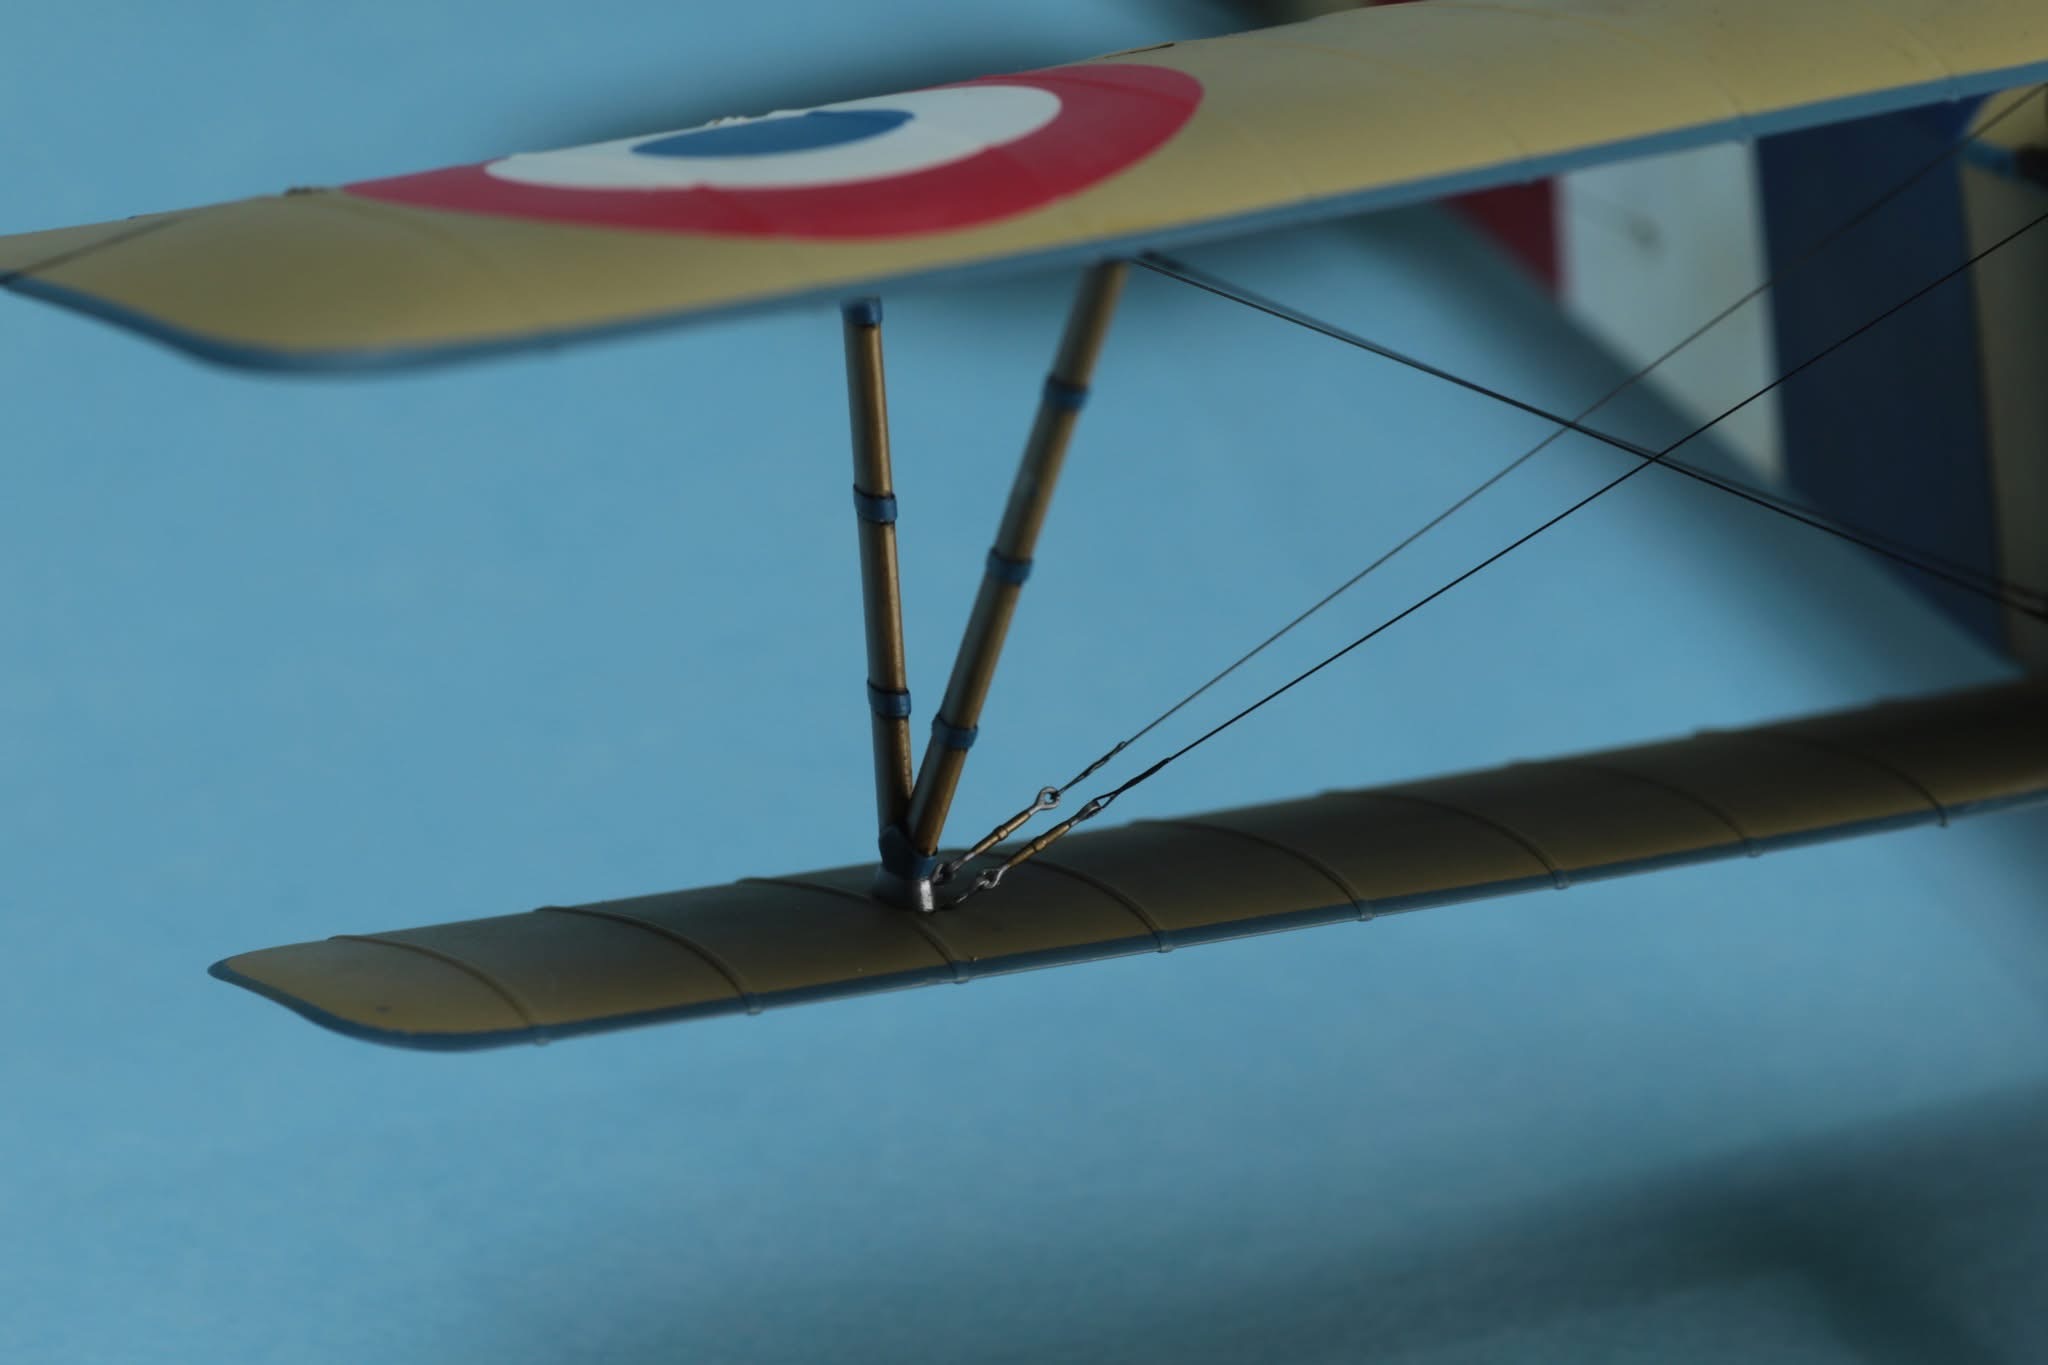
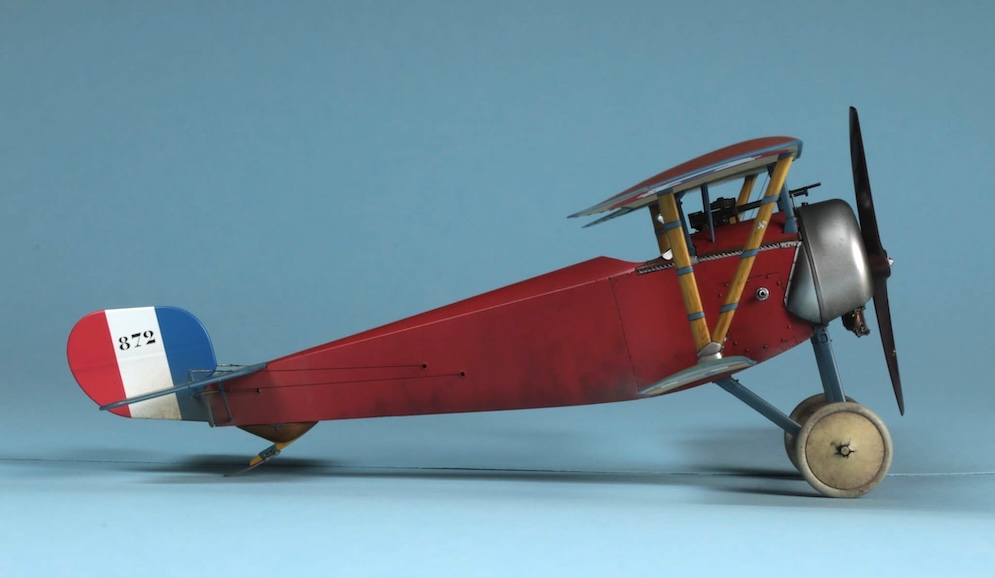
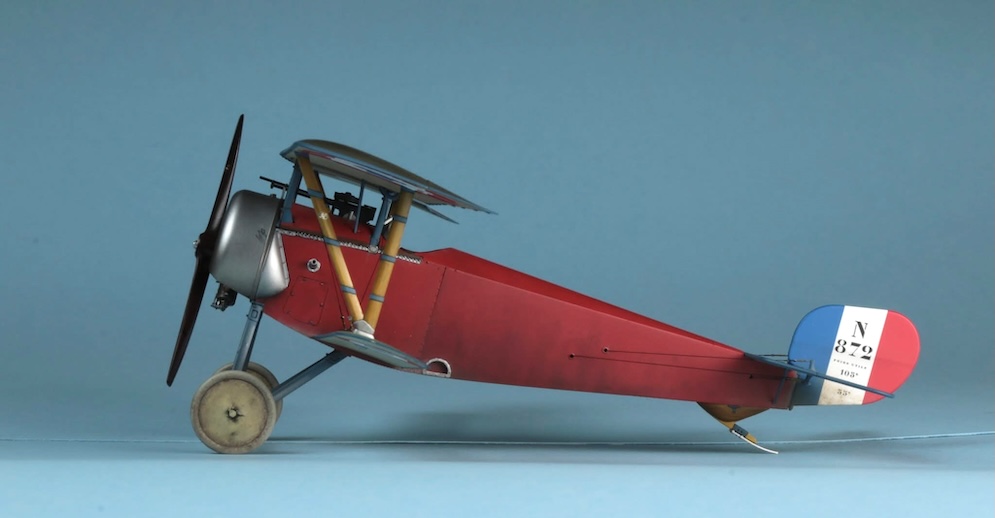
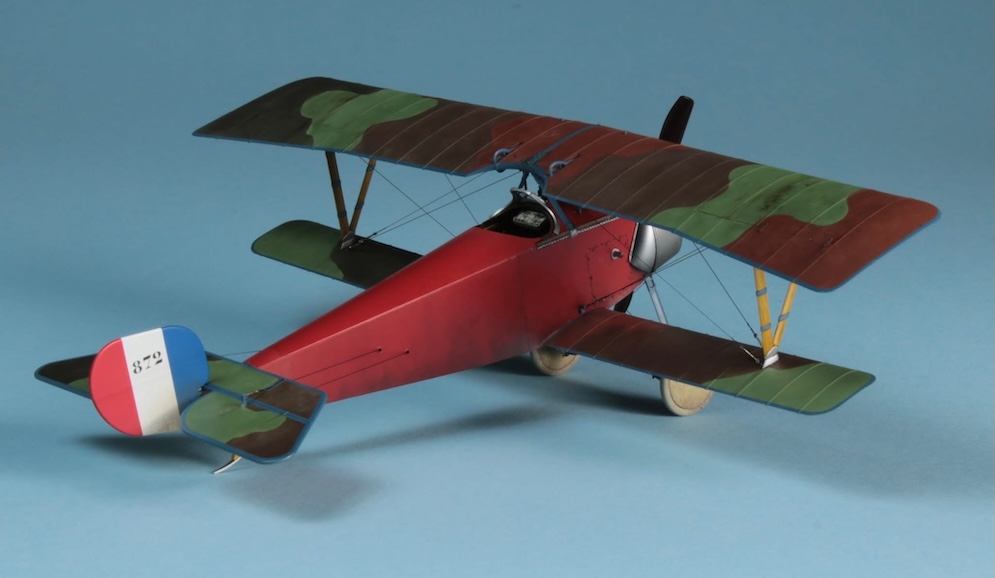
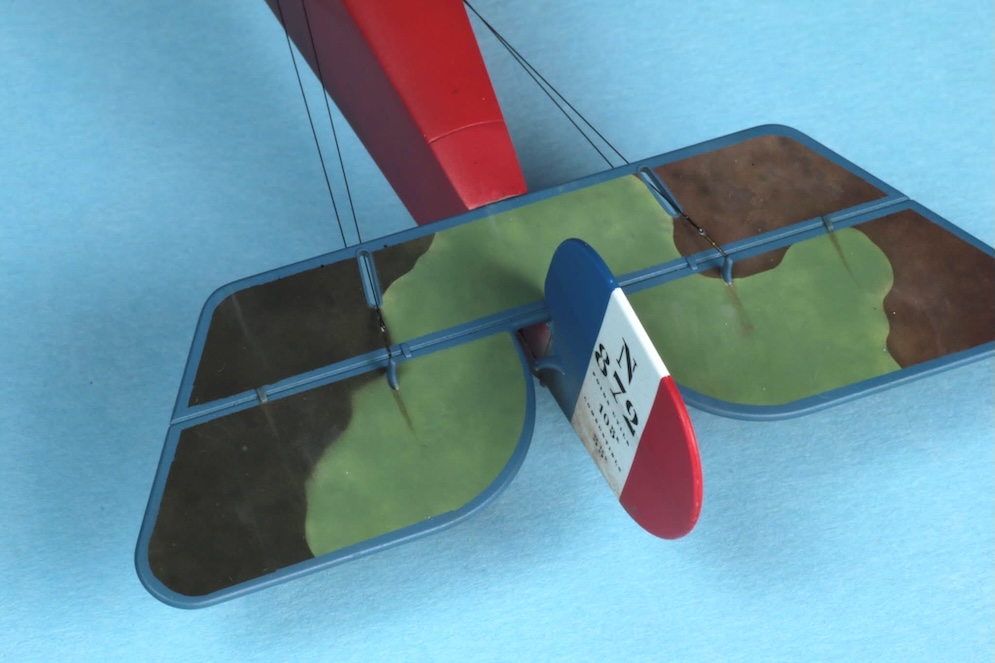
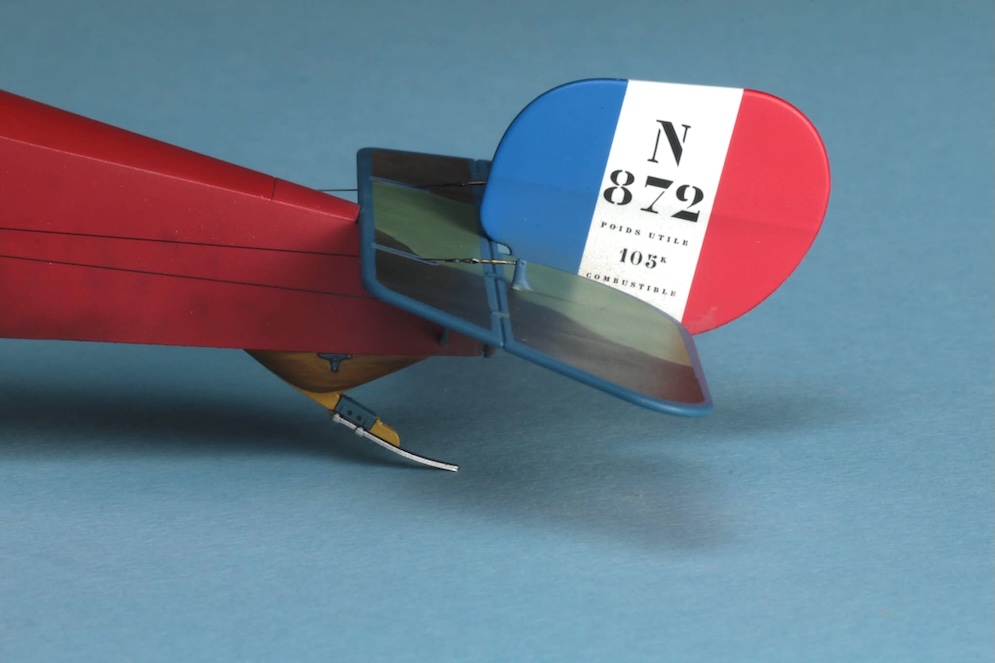
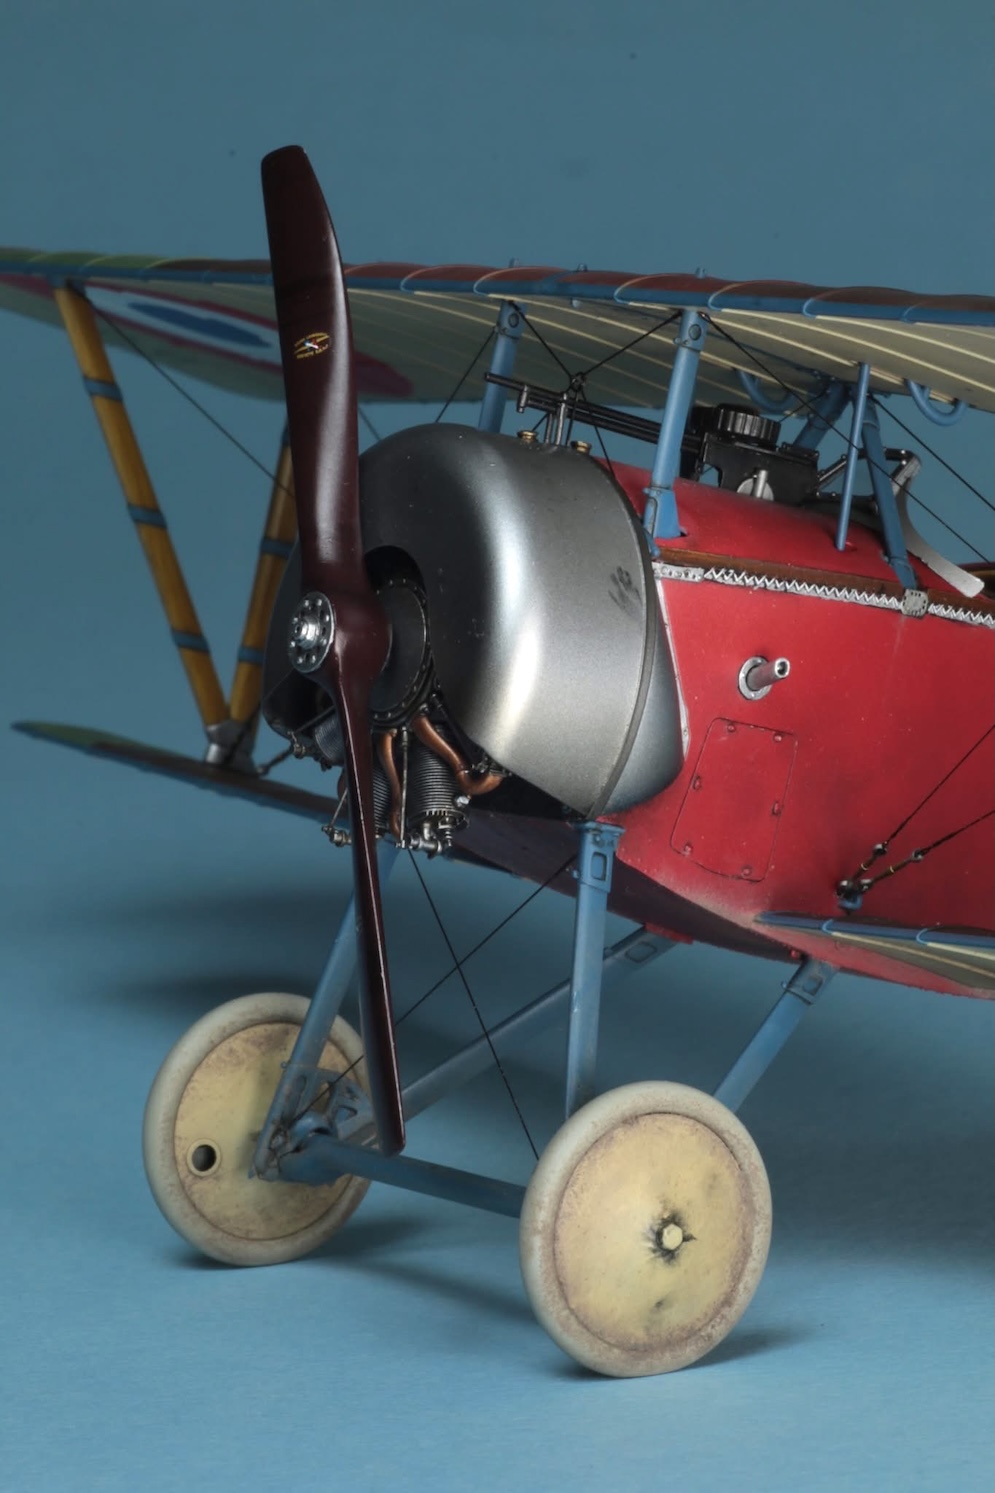
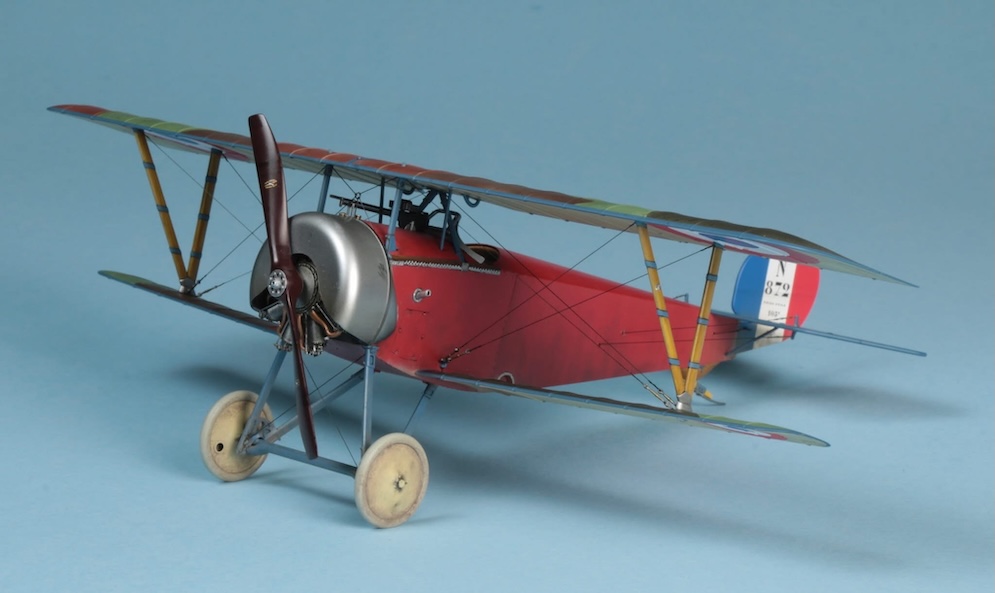
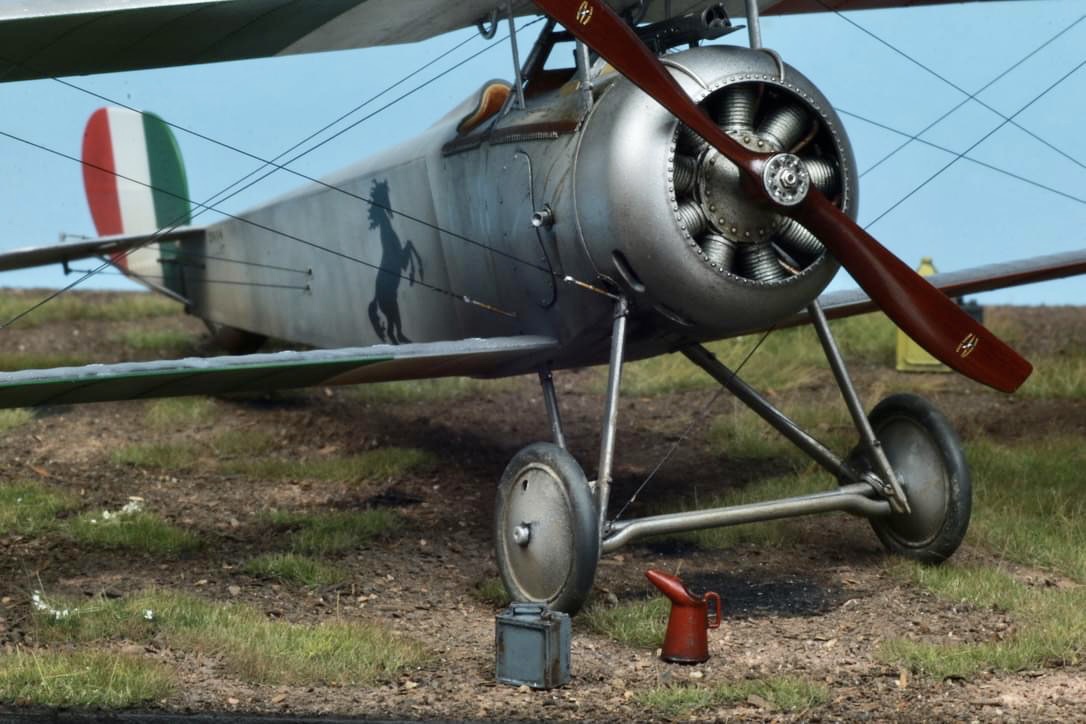
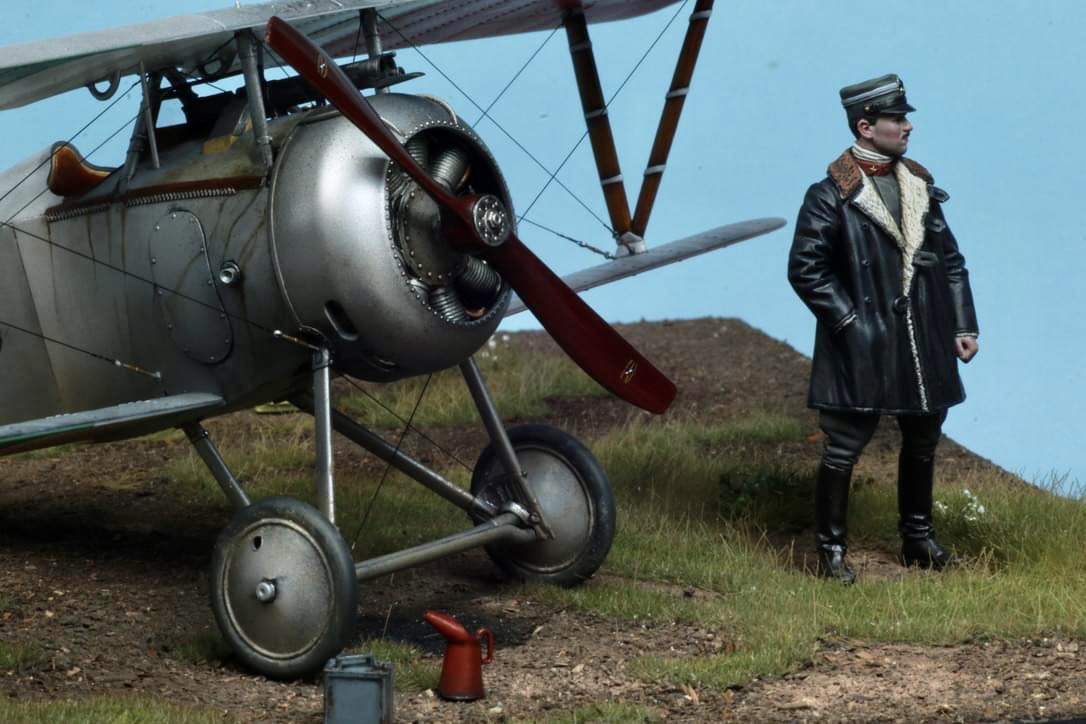
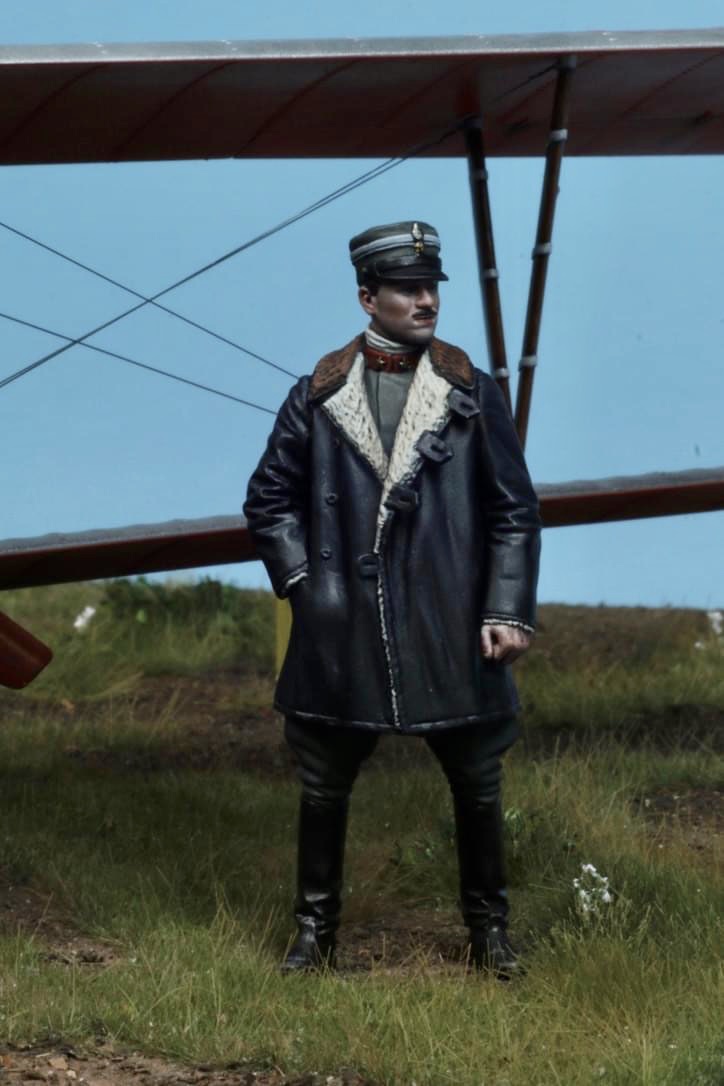
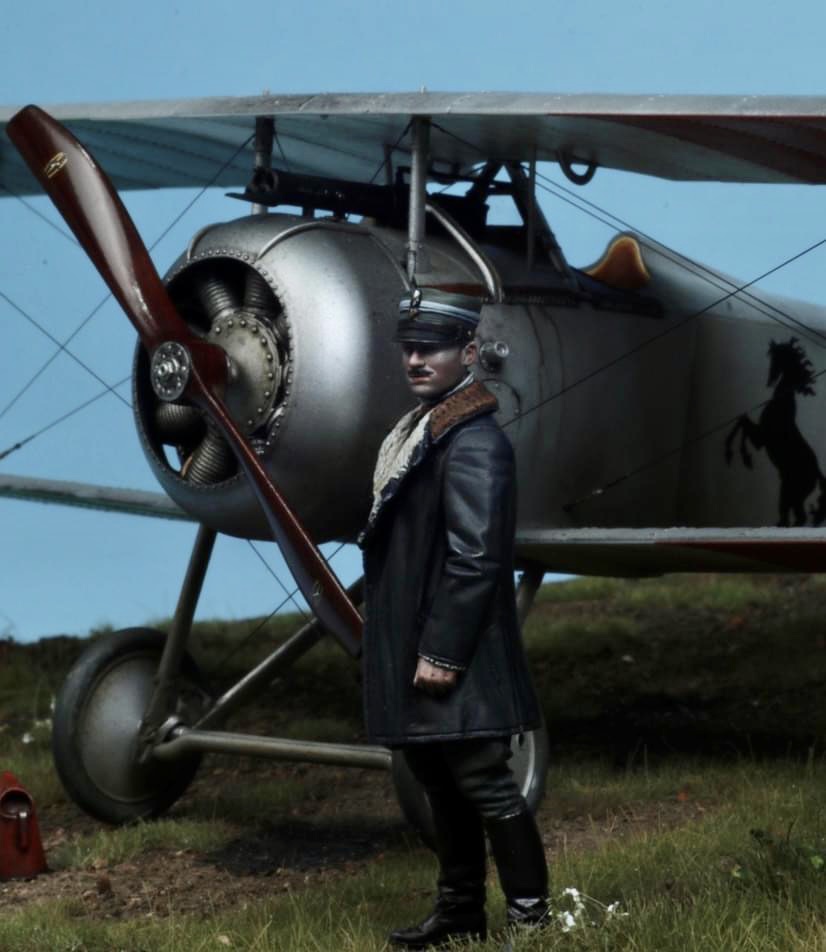
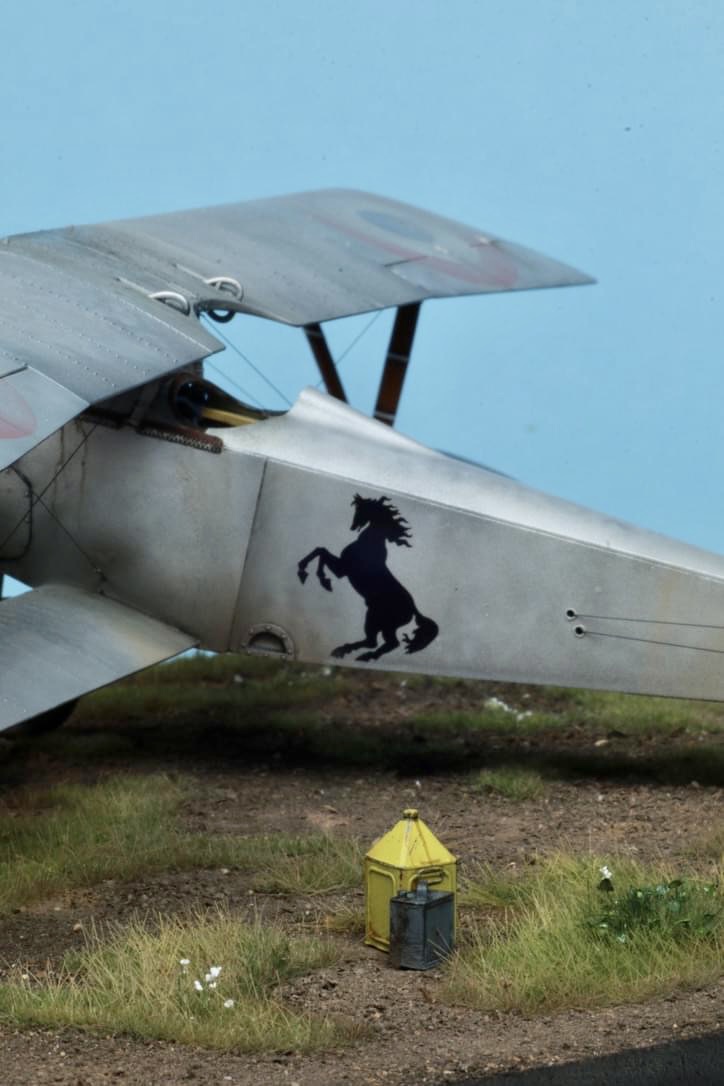
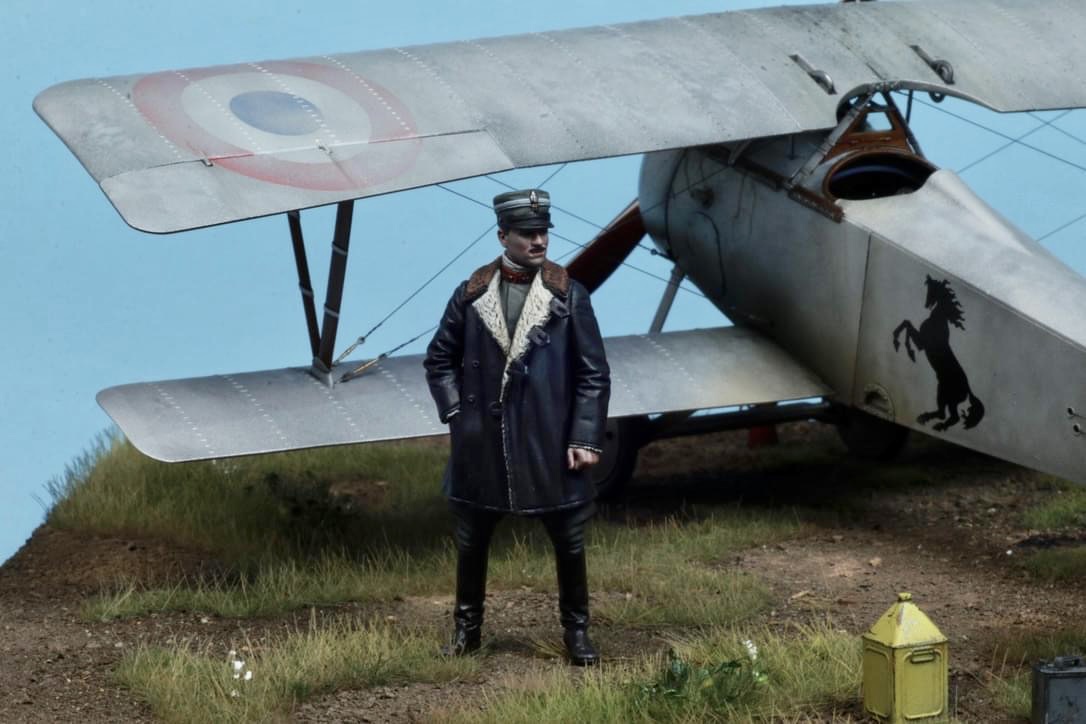
CSM 1:32 Nieuport 11 and 1:32 CSM figure in oils
Jean M Navarre 1916
(photos on pale blue background)
Tamiya, Alclad and printing ink paints.
Gaspatch turn buckles
Model Kasten rigging
David L.
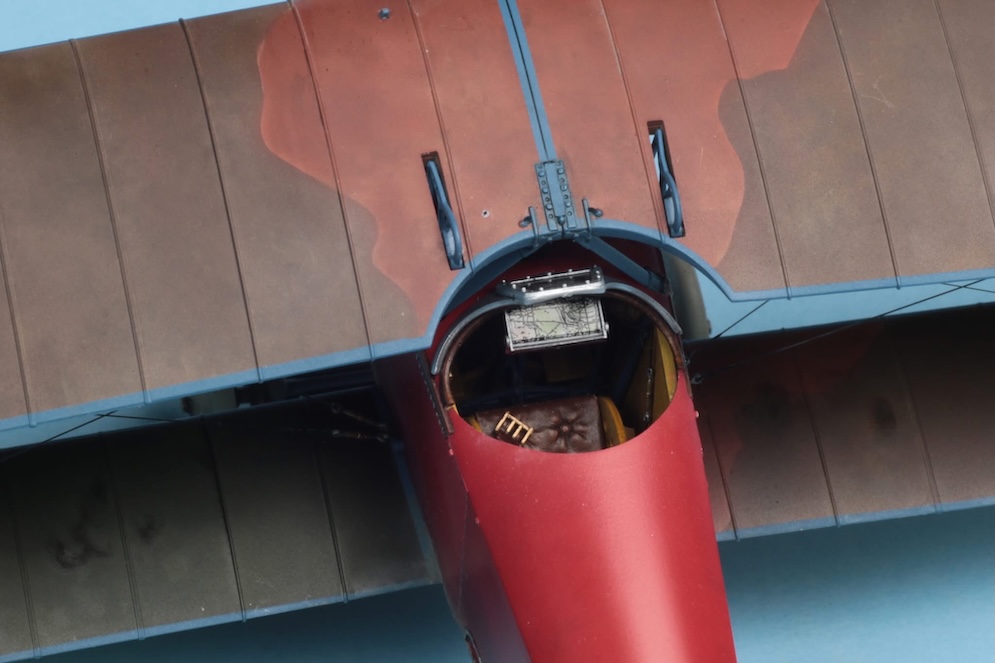
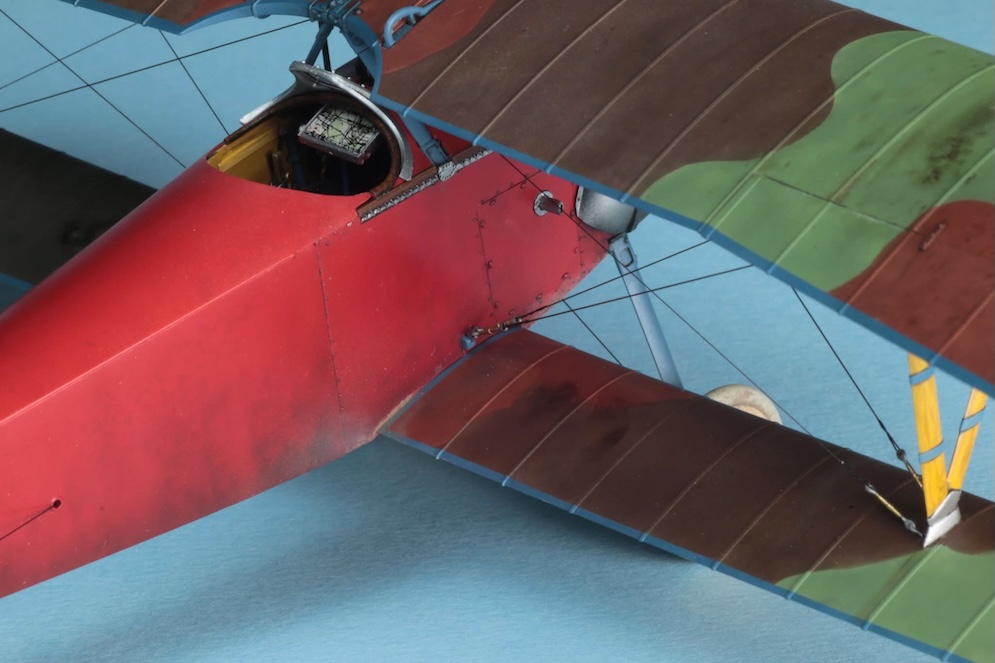

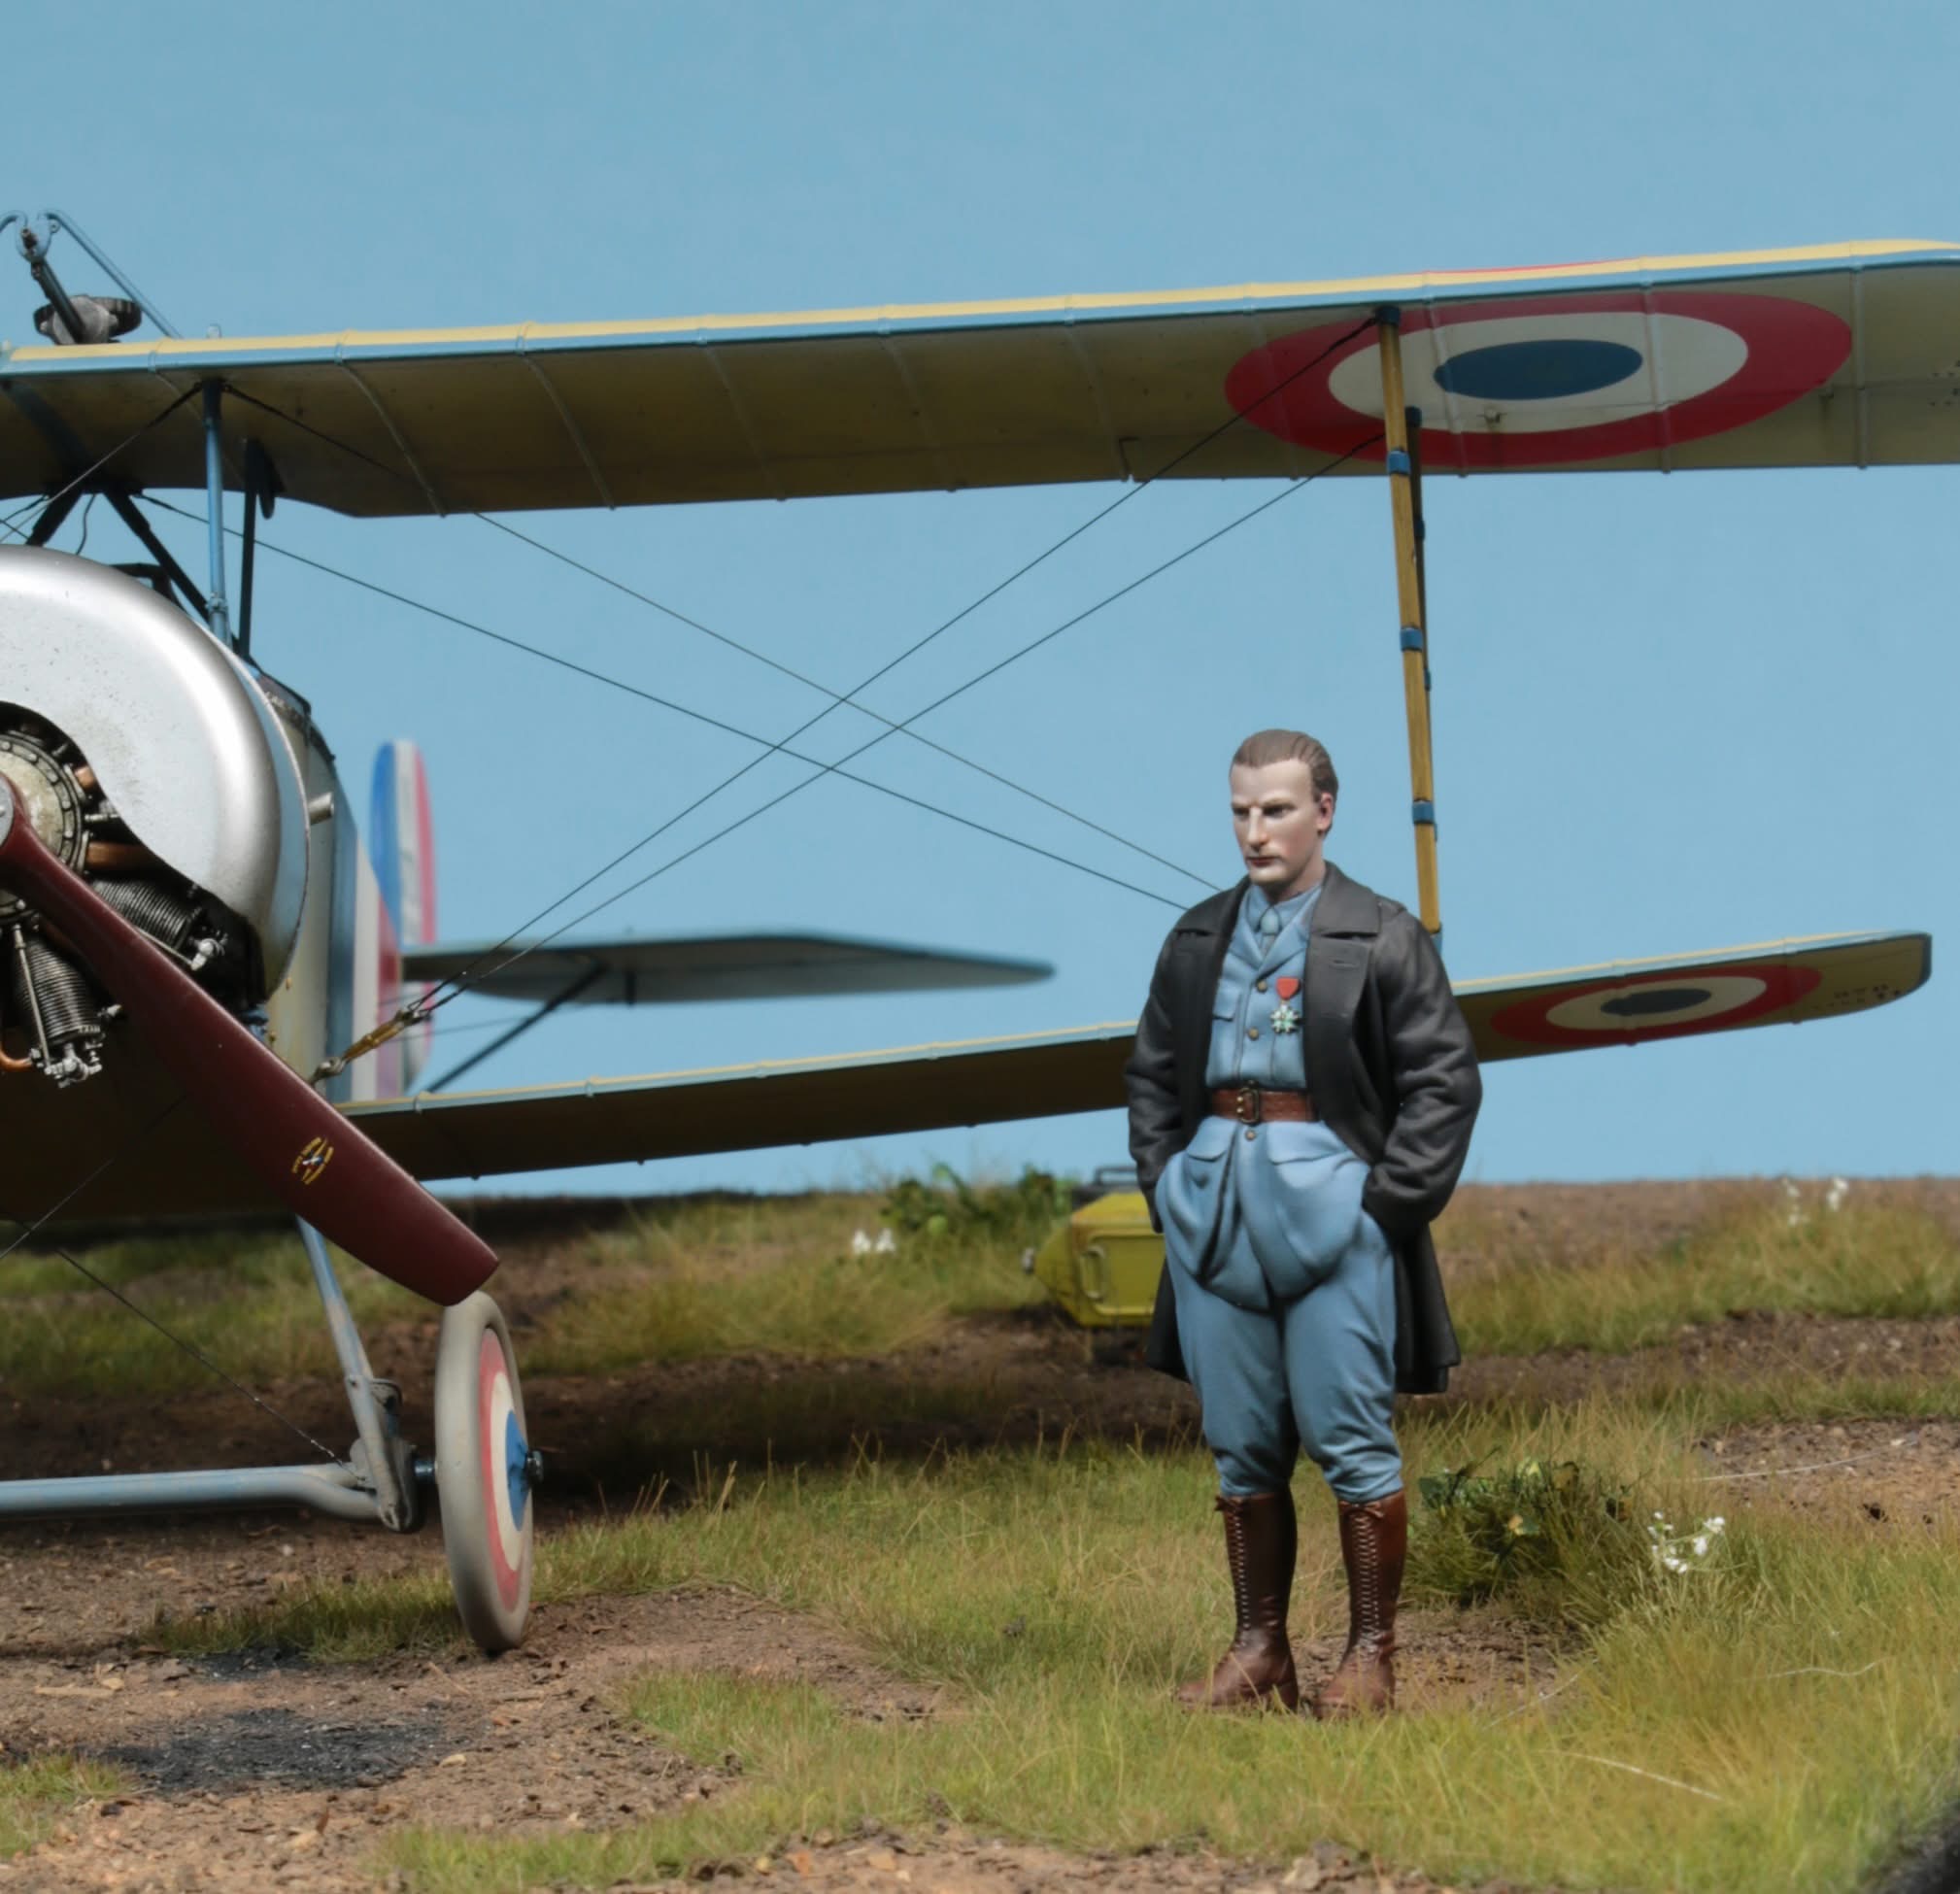
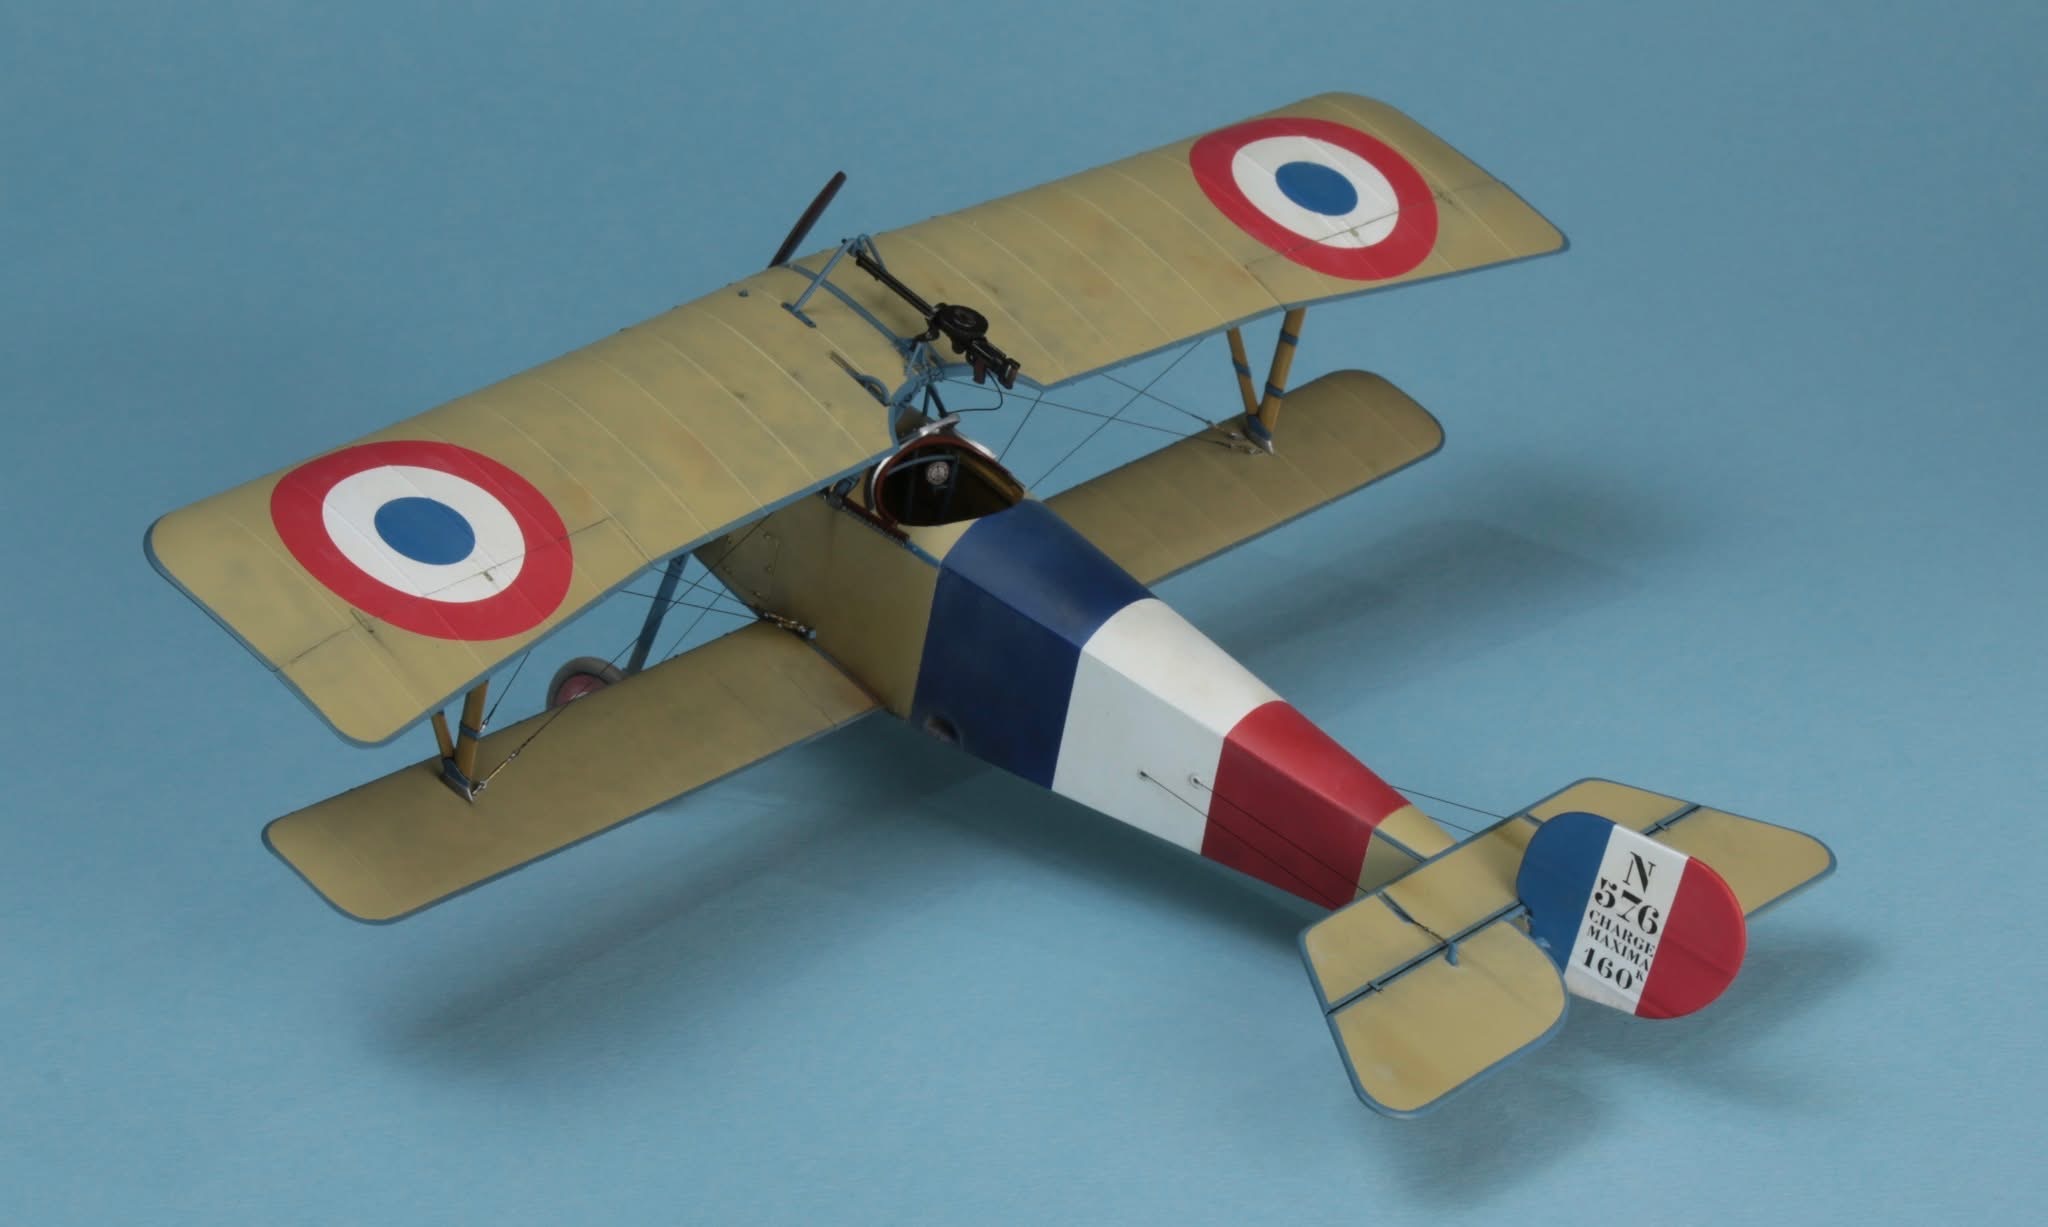
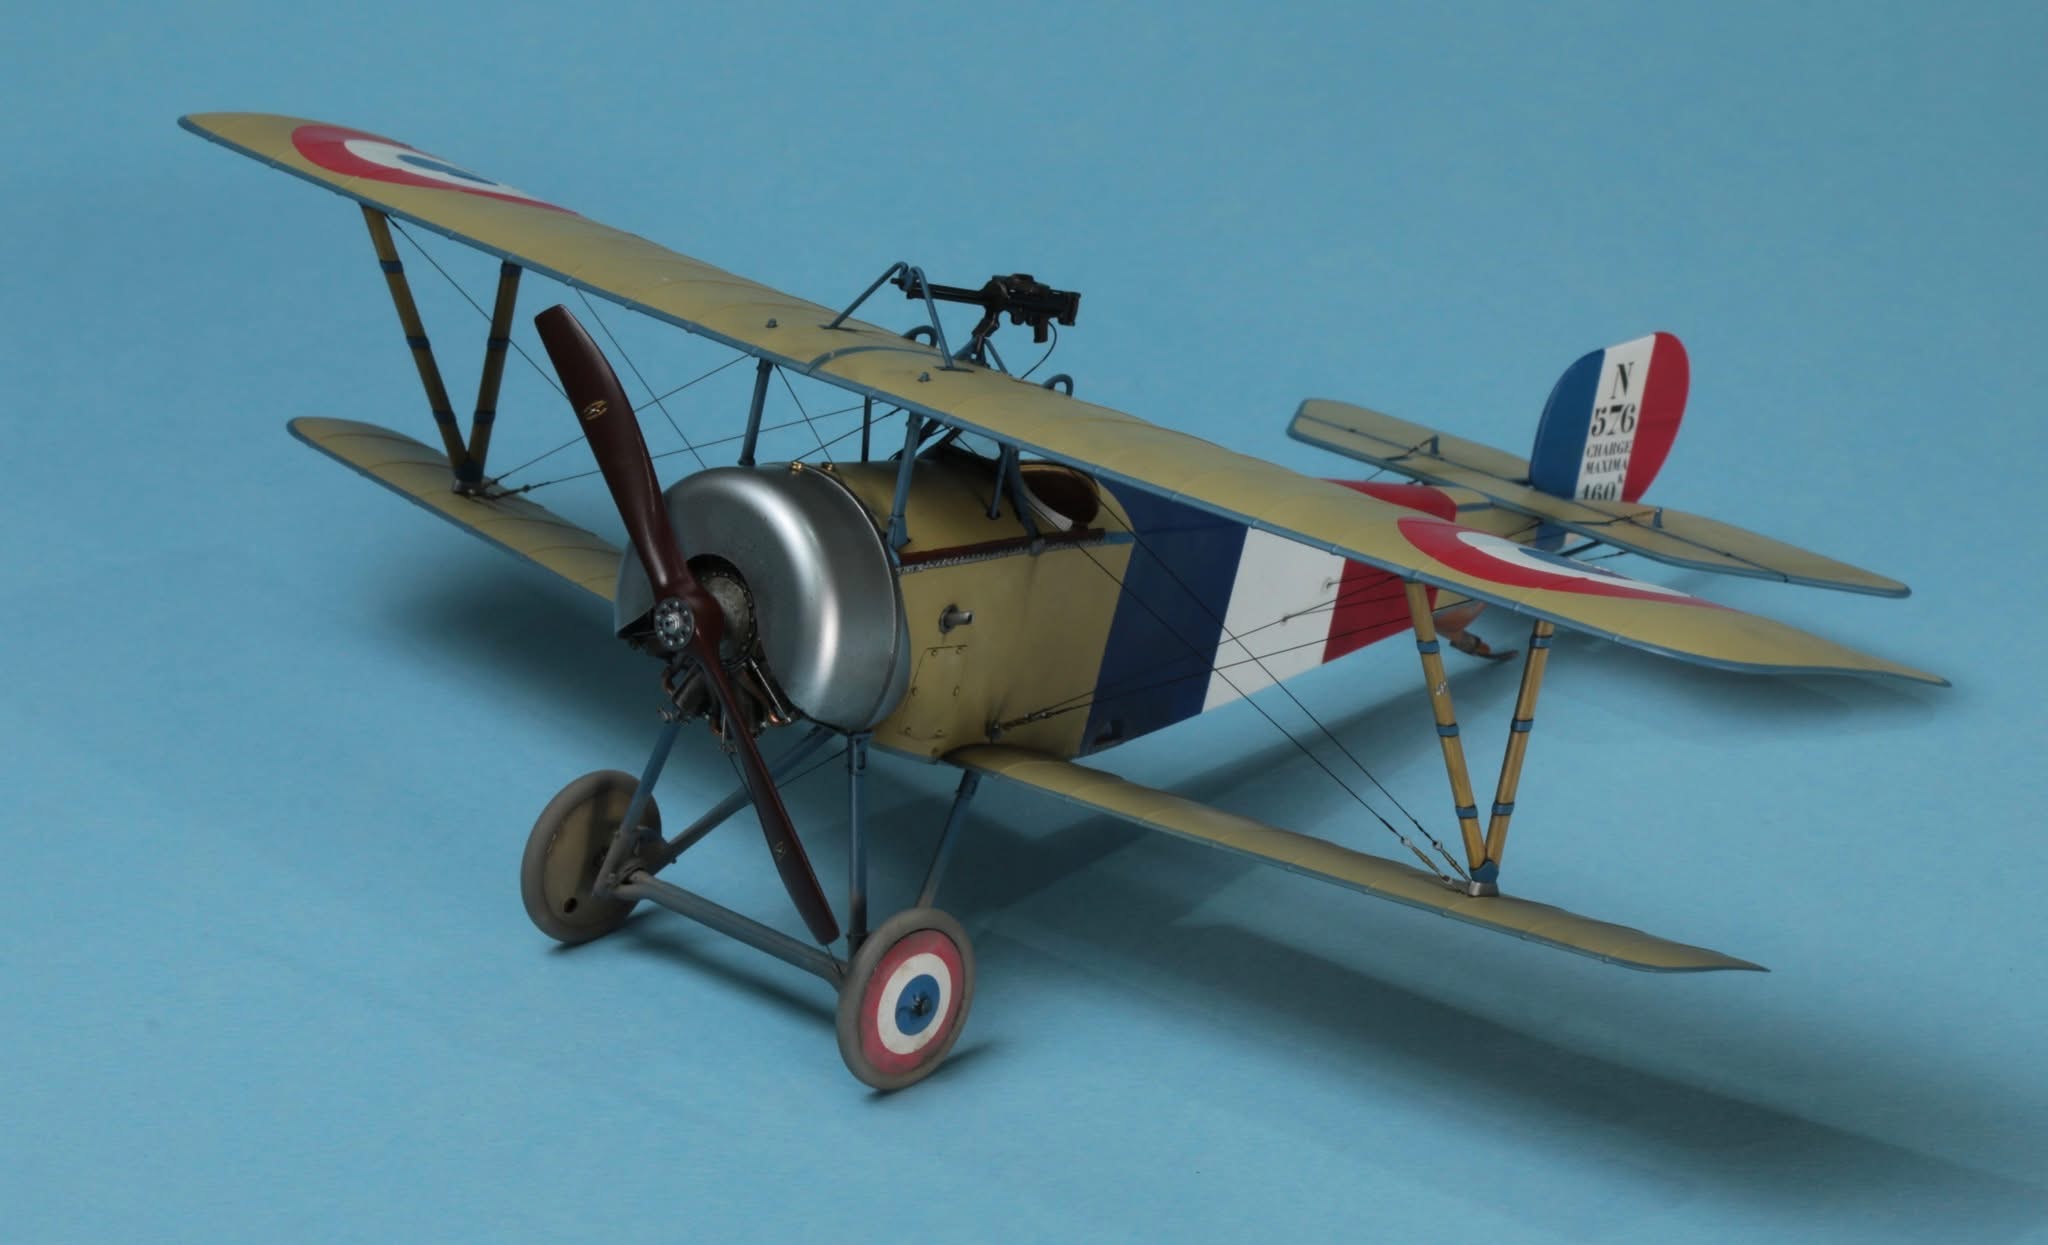
CSM 1:32
Tamiya, Mr Hobby, MRP and printing ink paints, weathered with oils
Gasapatch turnbuckles Model Kasten rigging
Stained fuselage based on old B&W photos
David L.


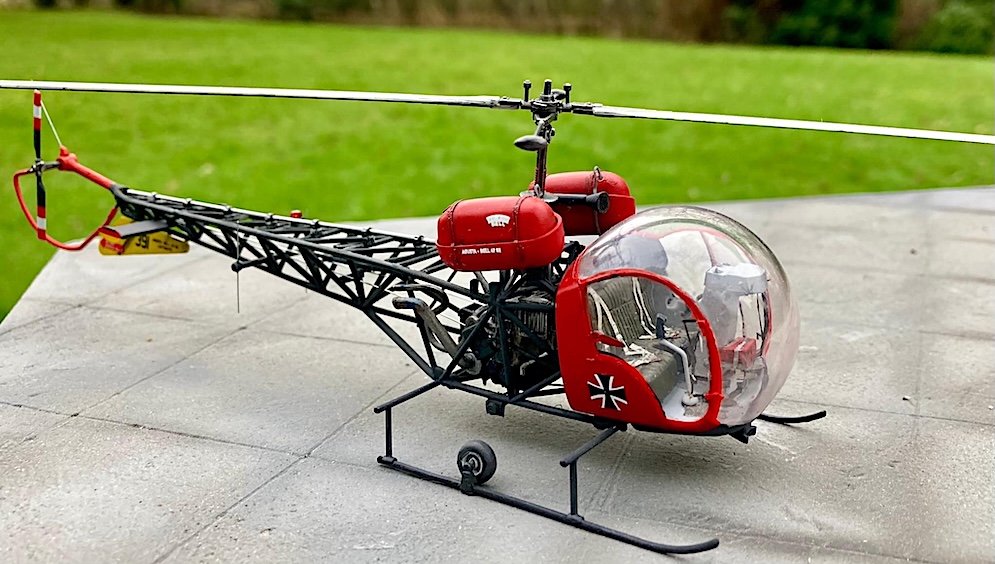
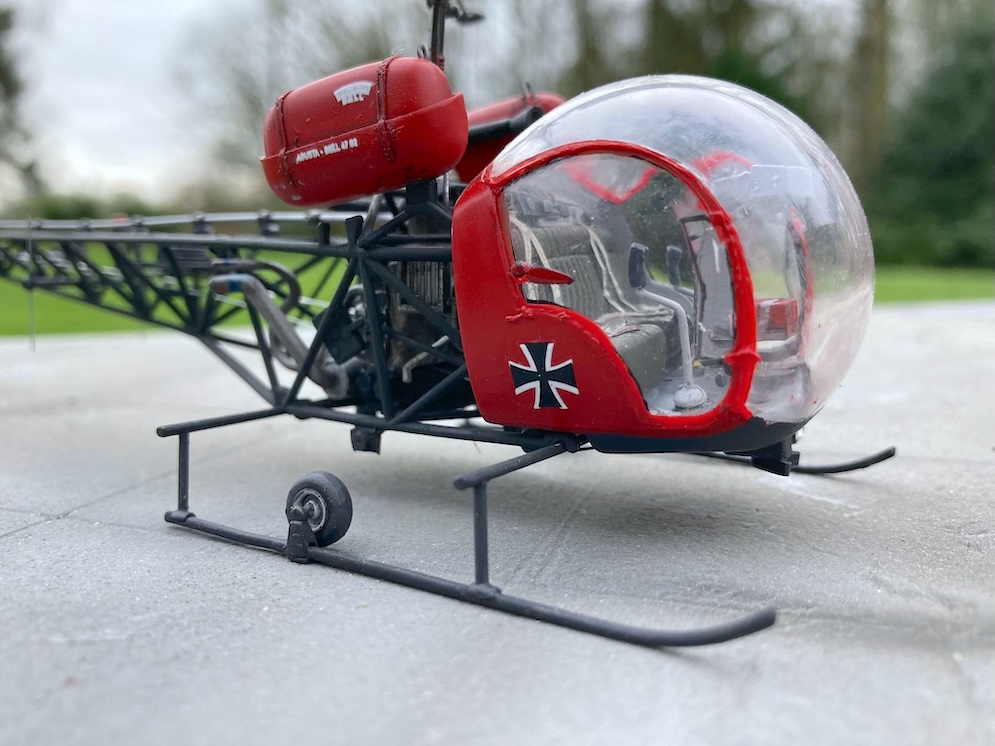
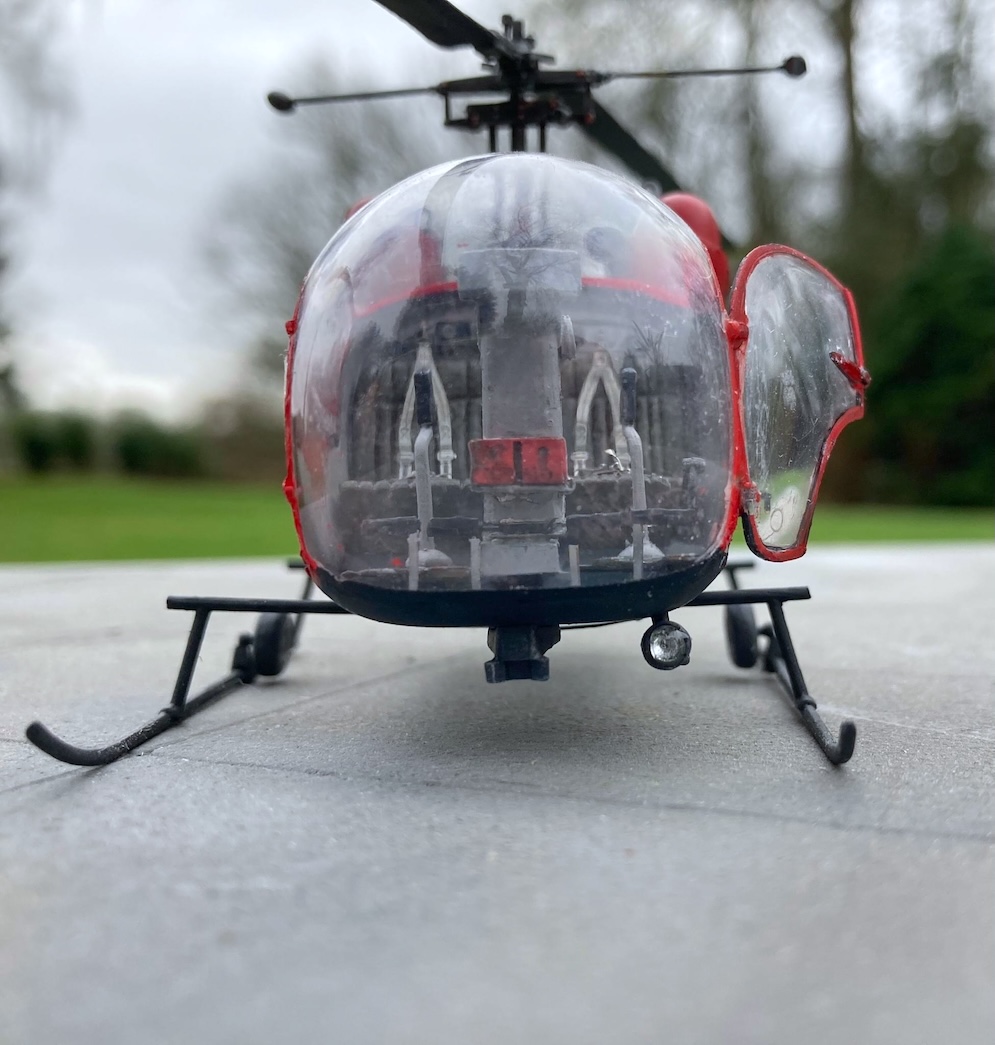
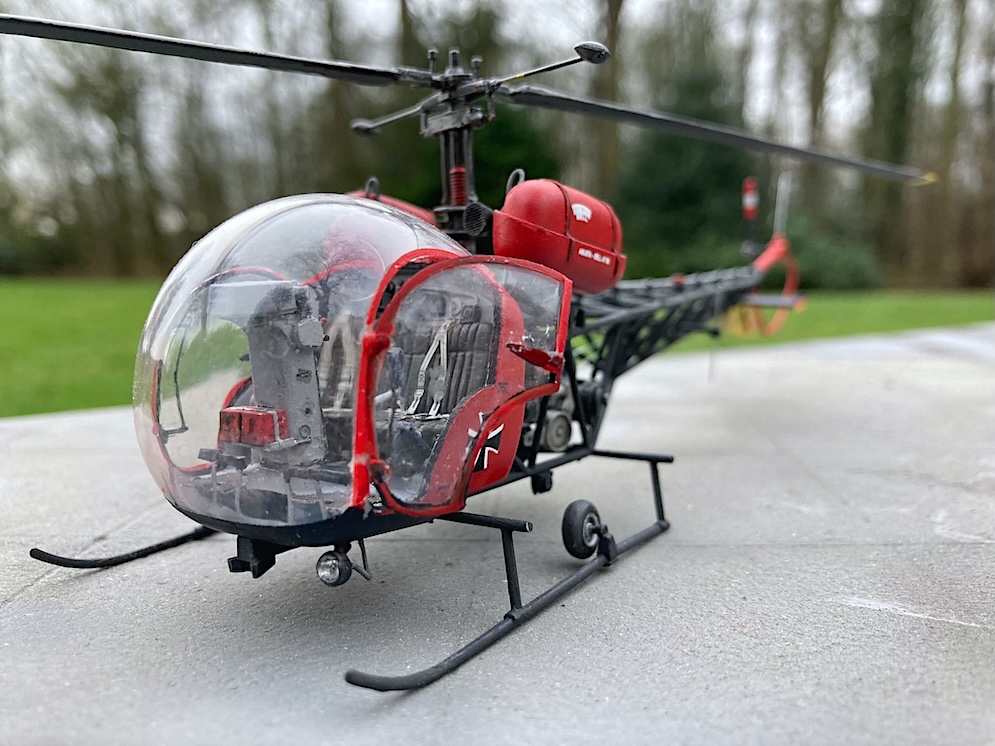
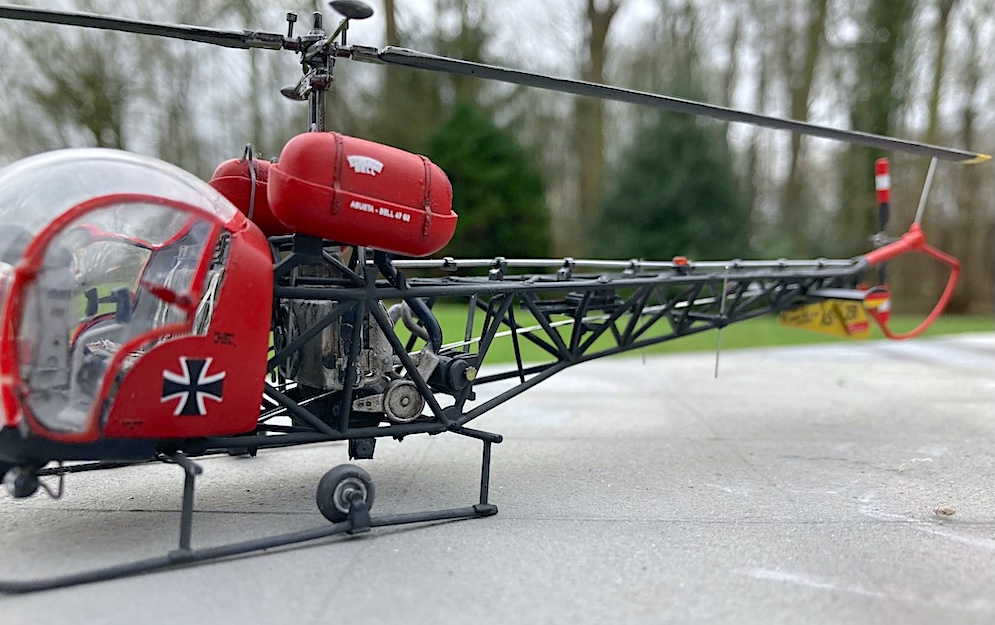

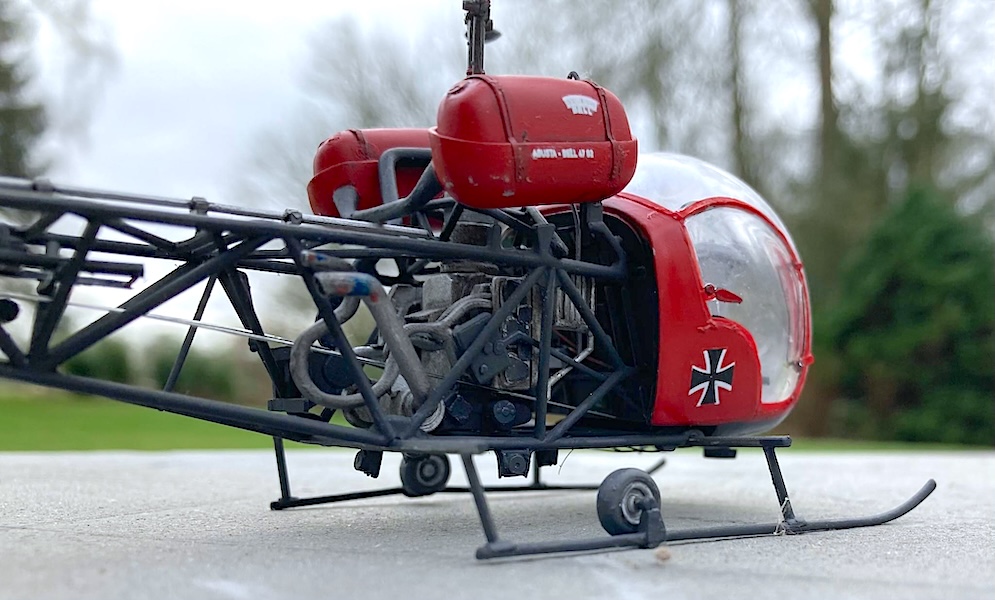
Italeri 1:48 Sioux finished with Tamiya XF’s and weathered with pastels.
Kevin R.

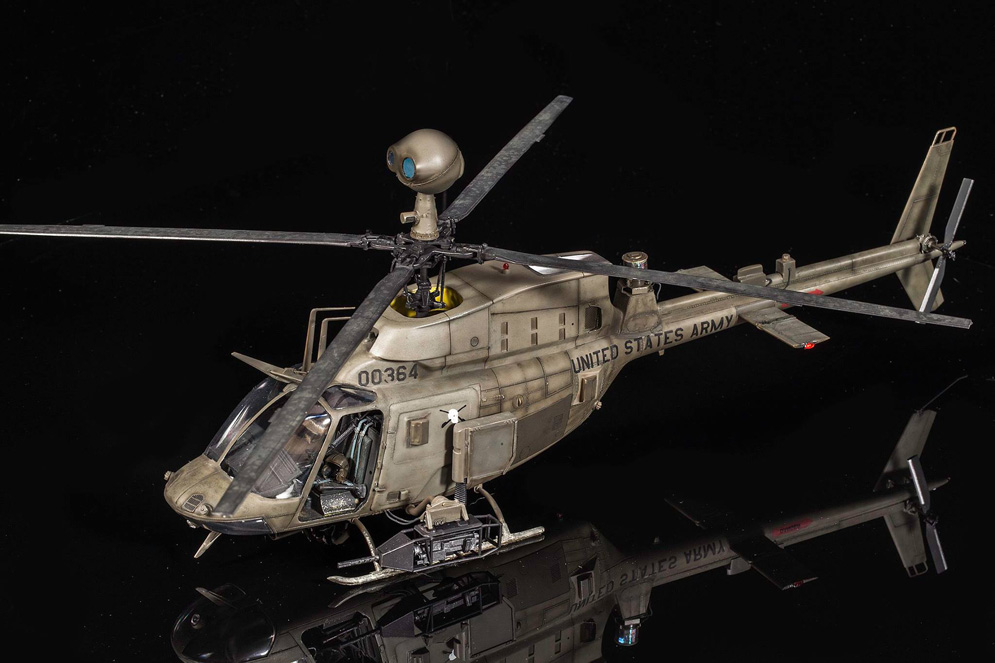


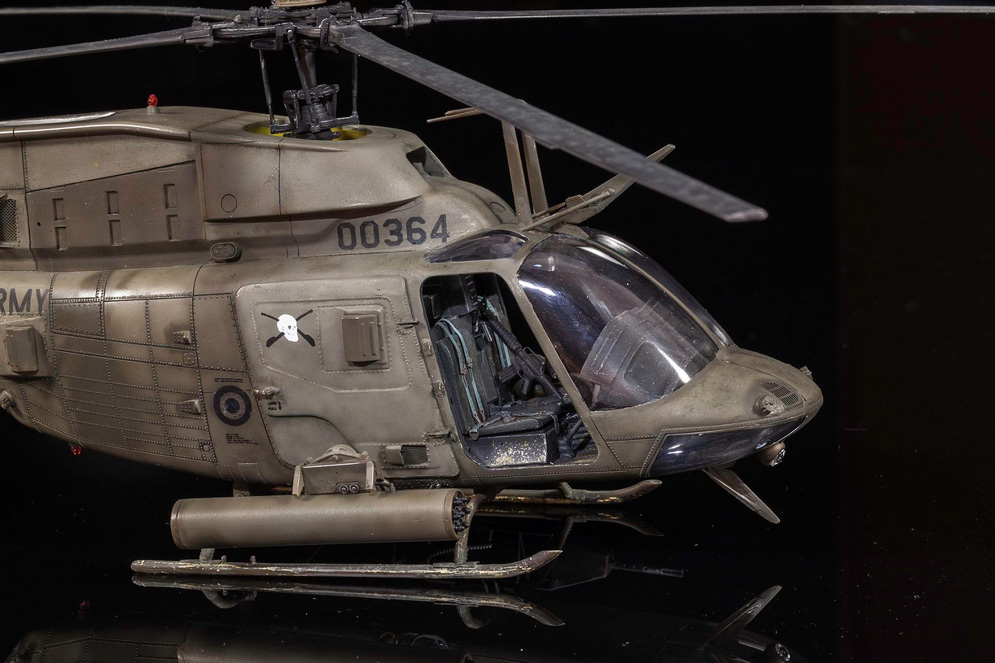

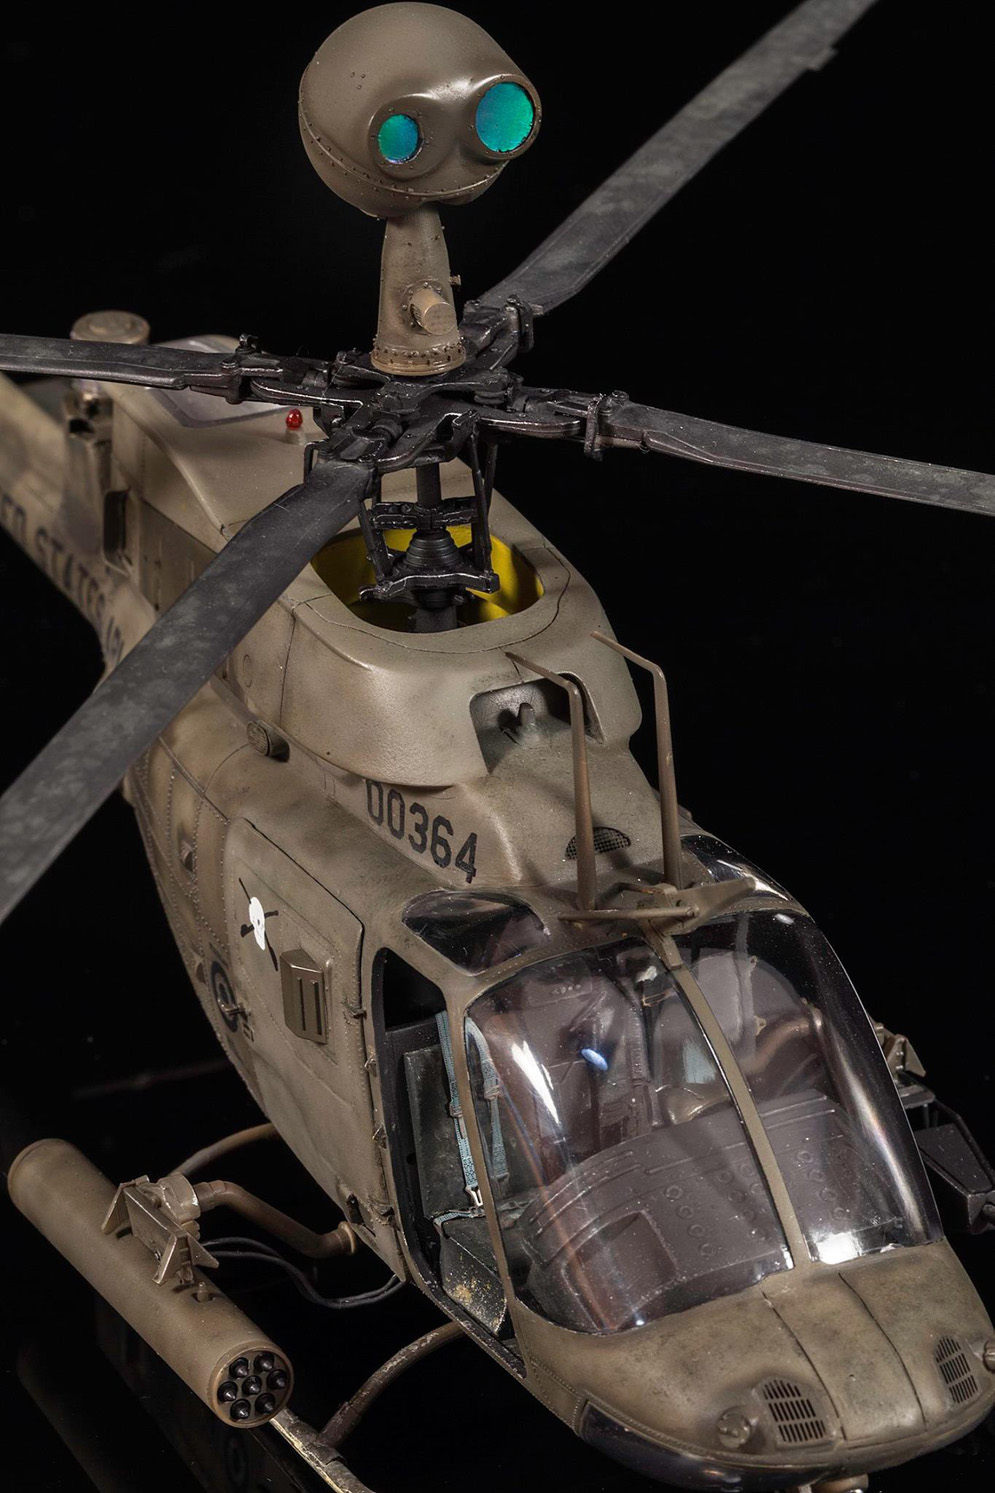
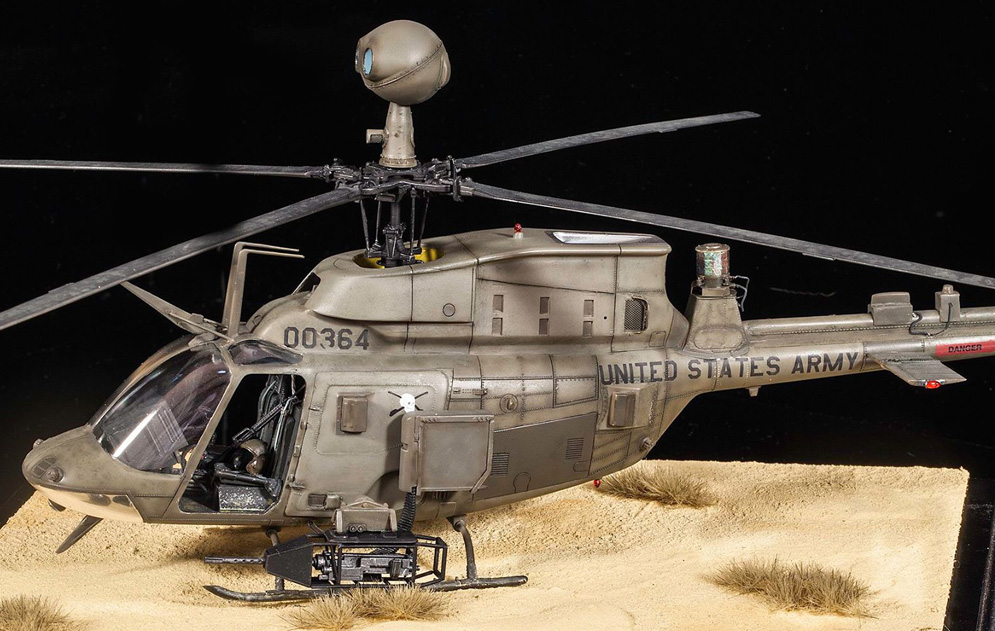
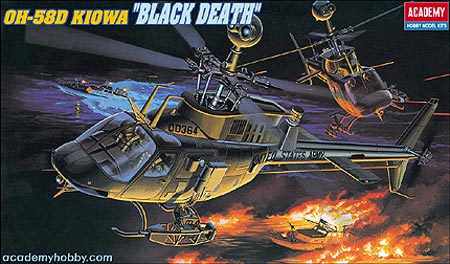
Here’s my recently finished OH-58D Kiowa Warrior in 1:35 made from the Academy kit.
Glad you like it!


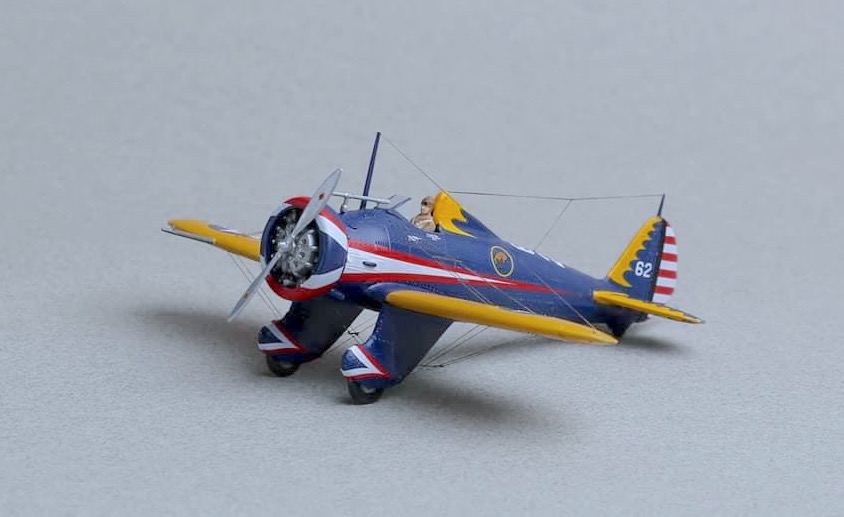
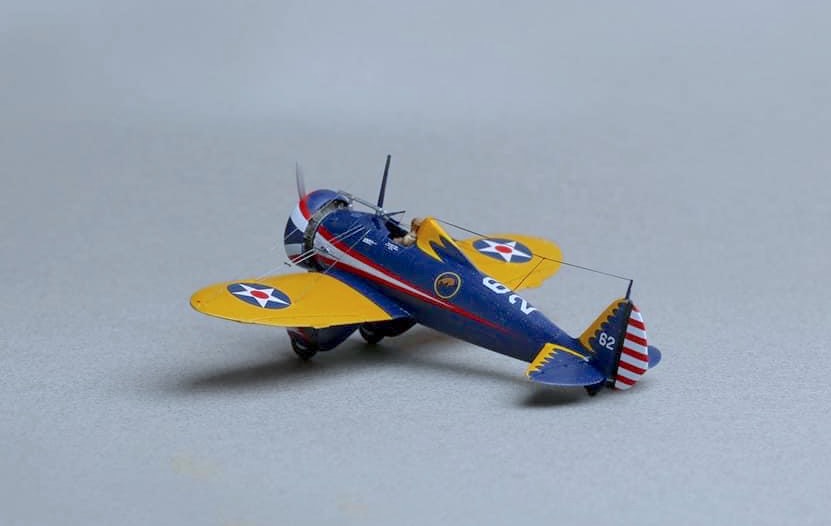
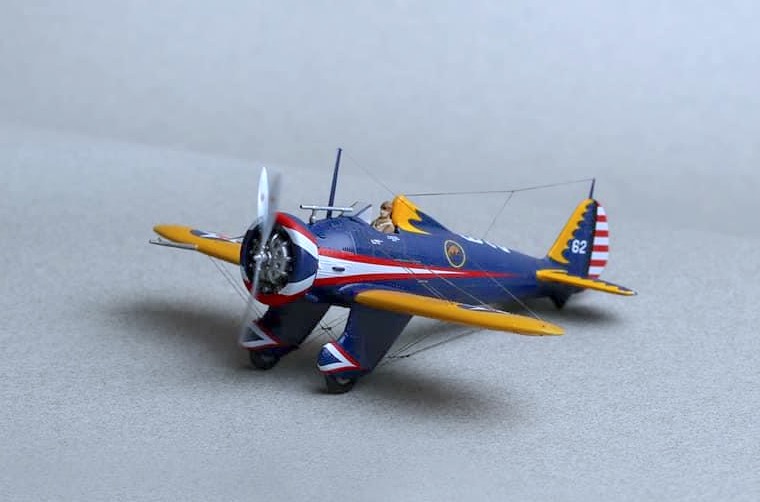
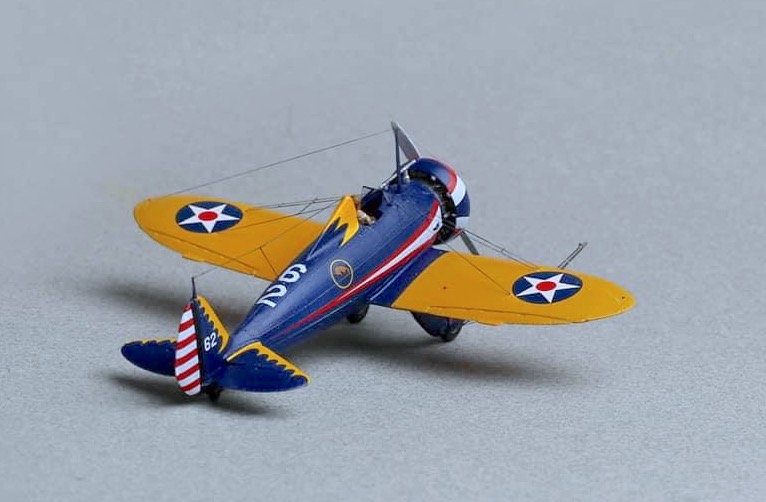
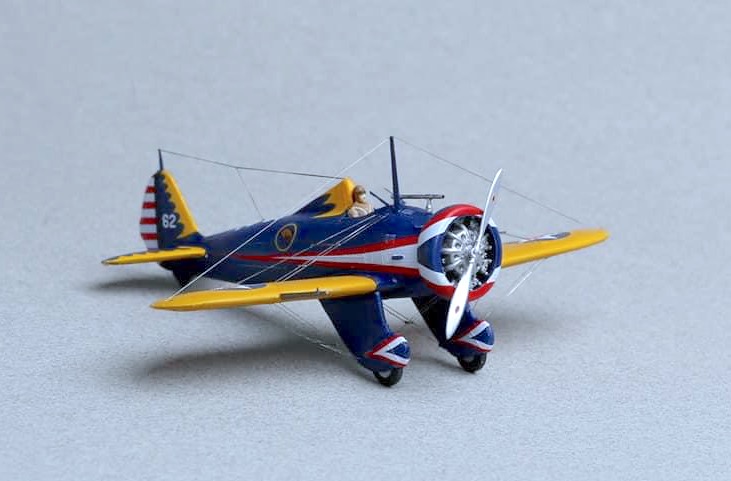
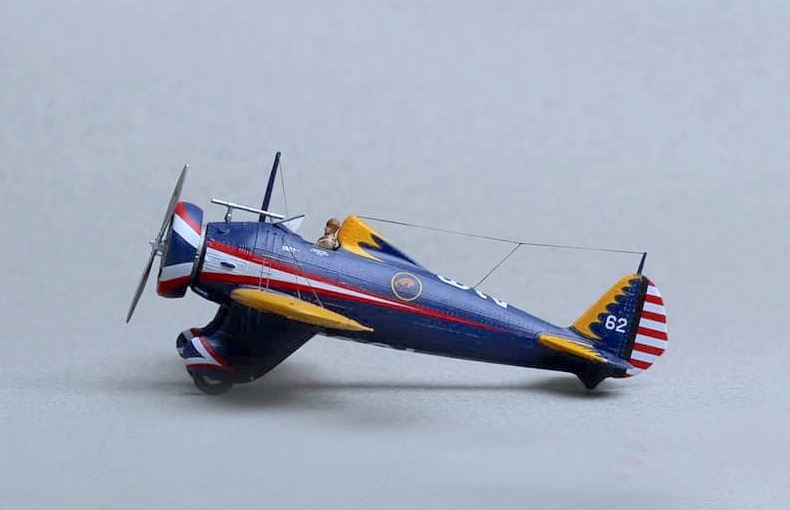
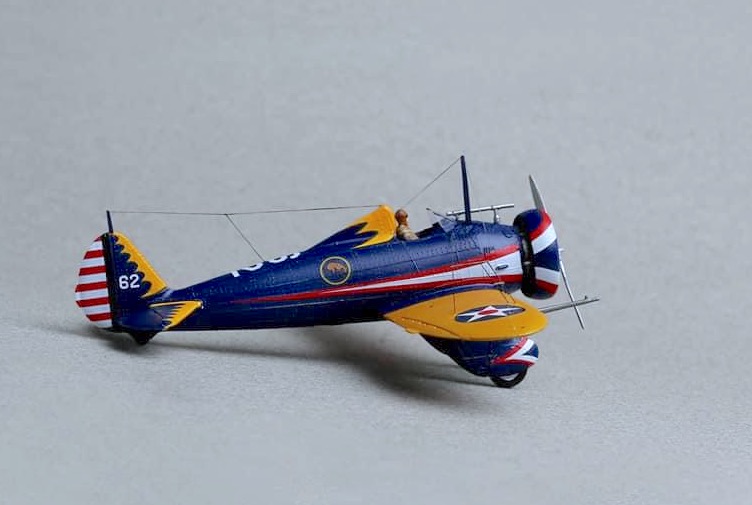
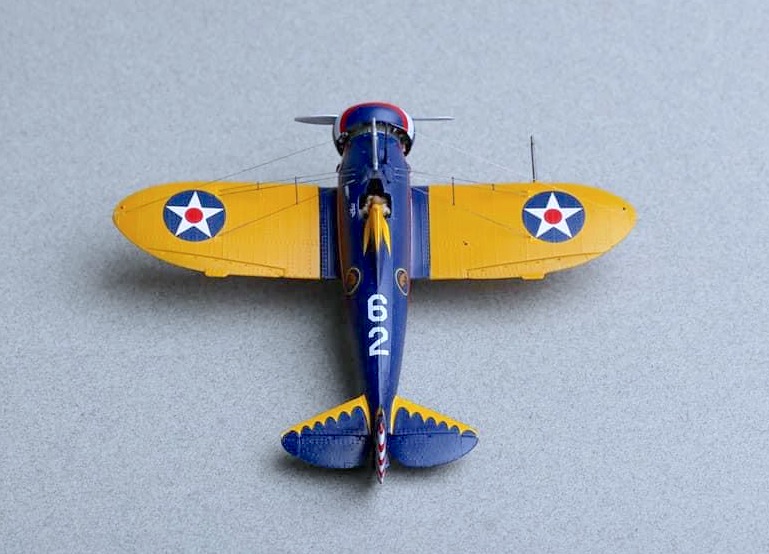
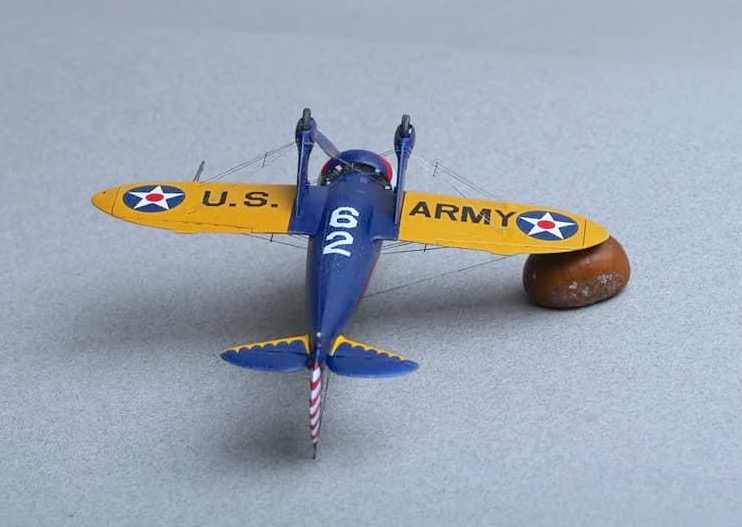
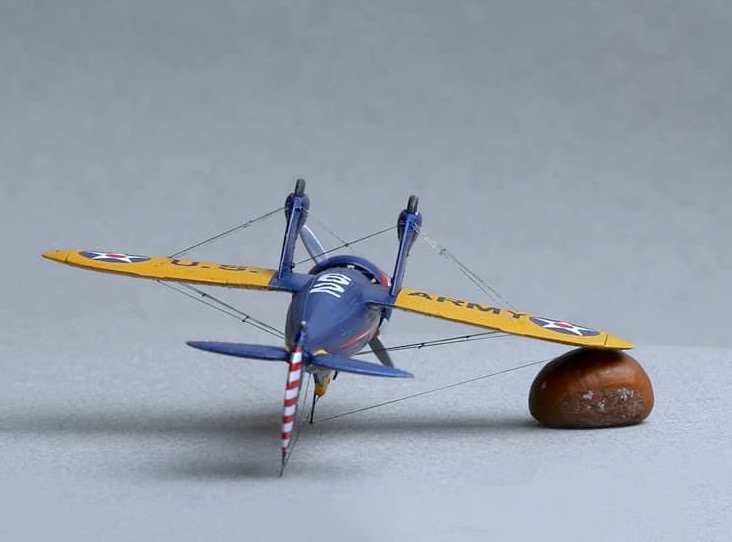
This is my P-26 Peashooter in 1:72 made from the Revell kit.
It’s definitely Retro-assembling. Convex panel lines have been preserved and restored at the glue seams. The raised rivets have also been preserved and restored. Thin line stretch marks.
Alexander P.
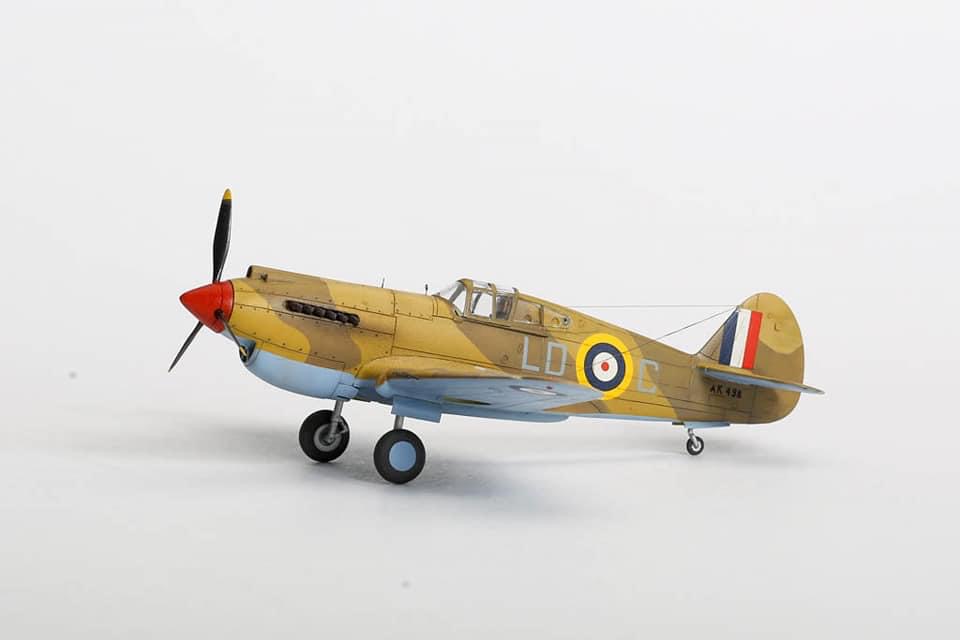
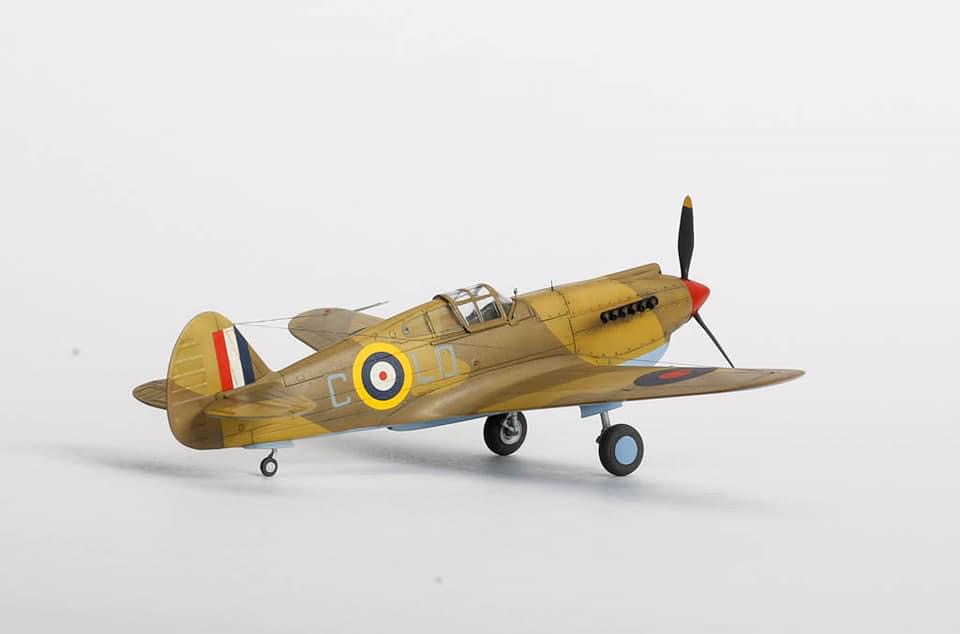

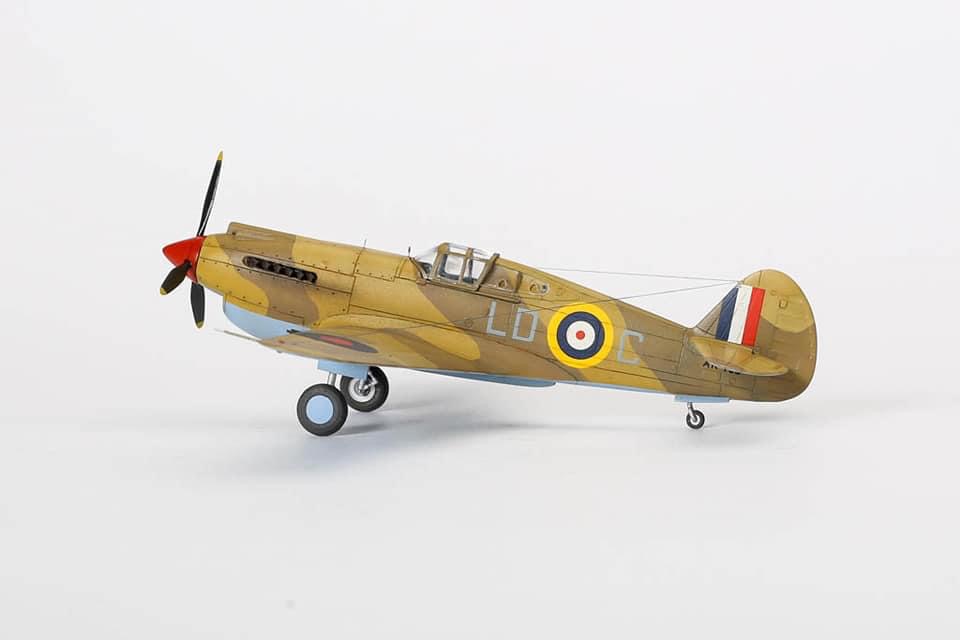
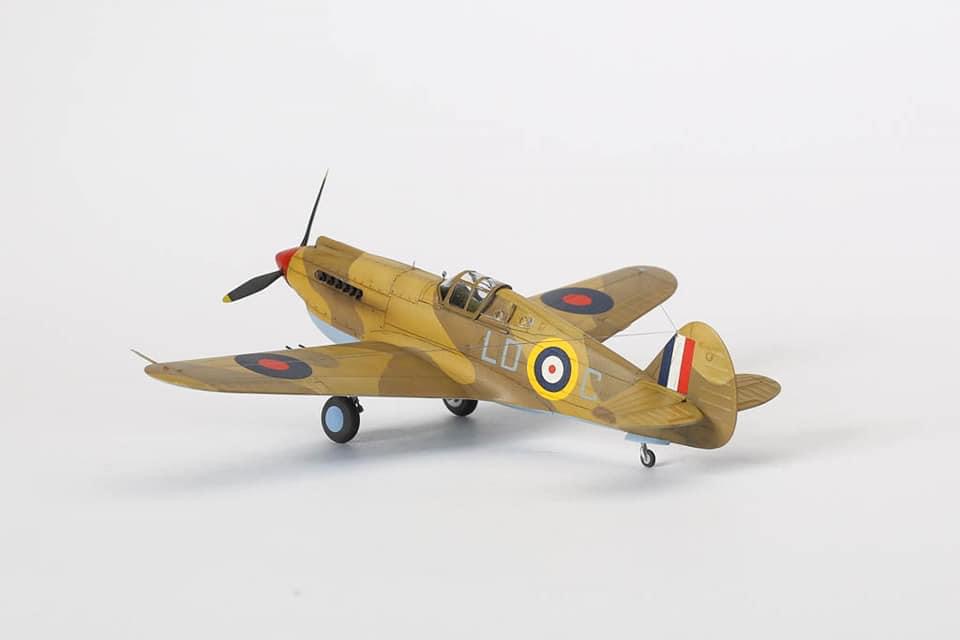
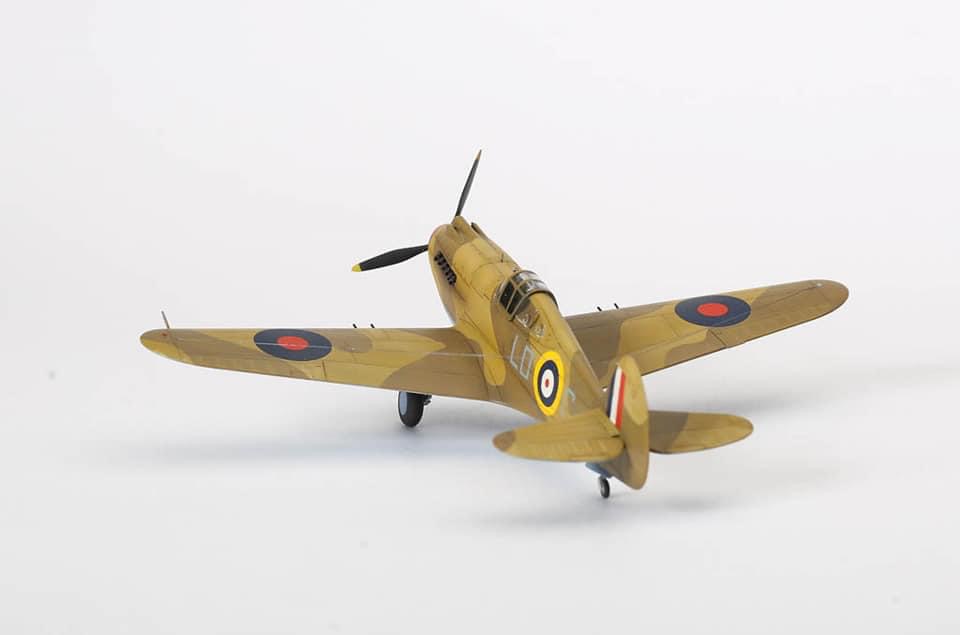
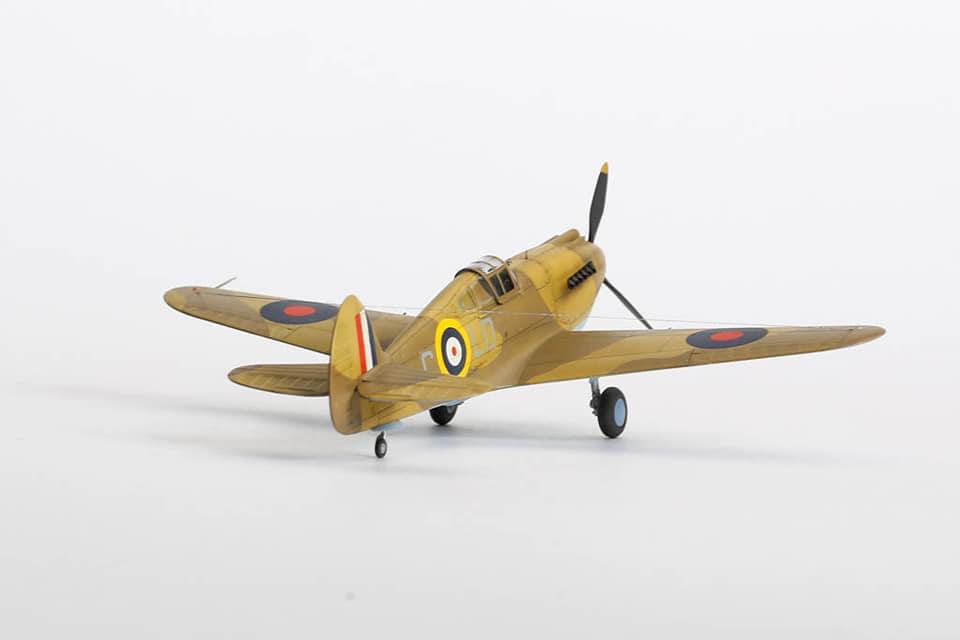
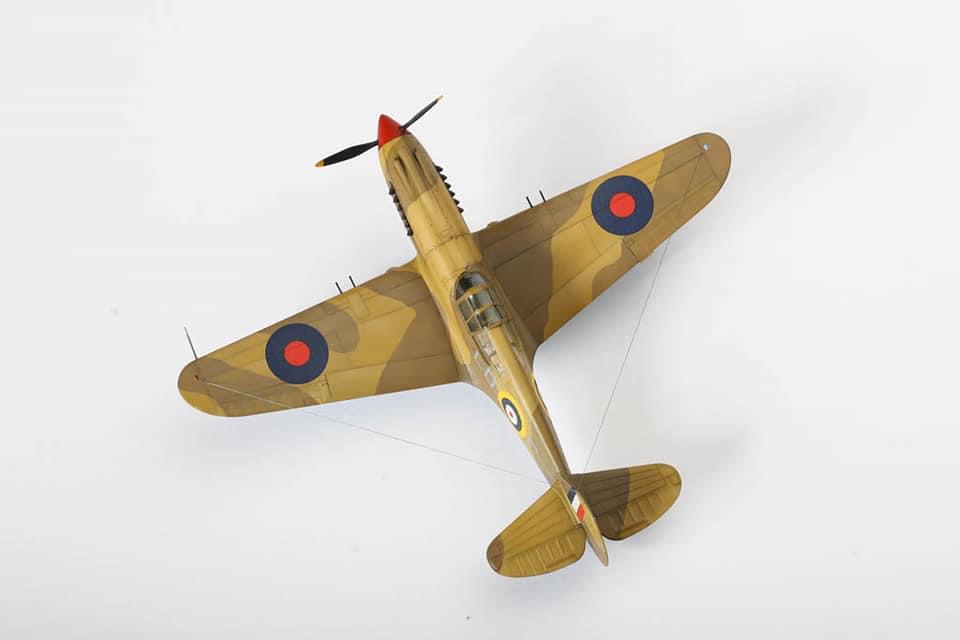

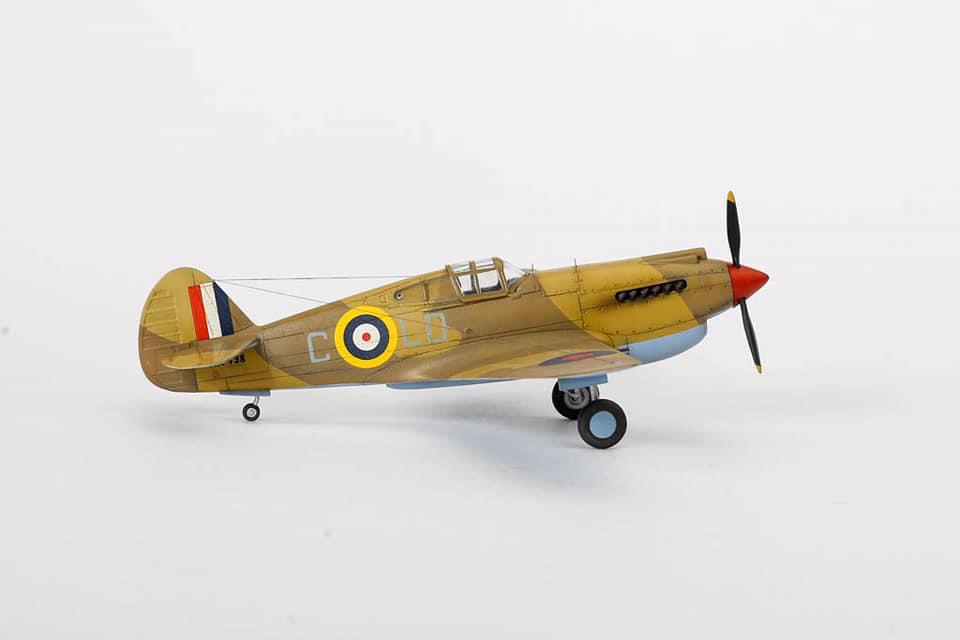
Here’s my P-40B/C, 1:72 scale made from the HobbyBoss kit.
Hope you like it…
Alexander P.
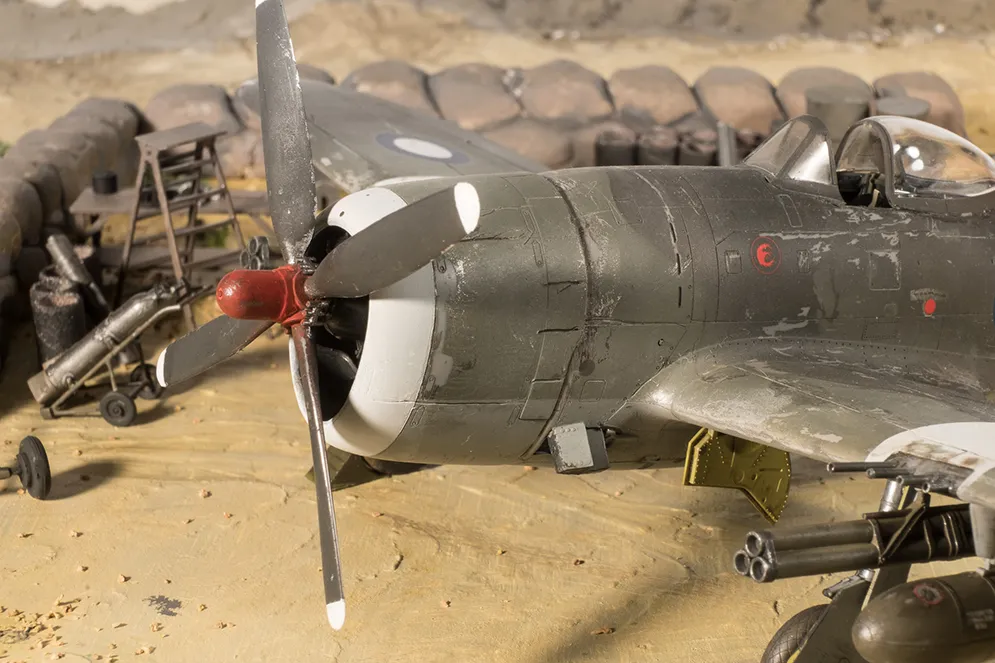
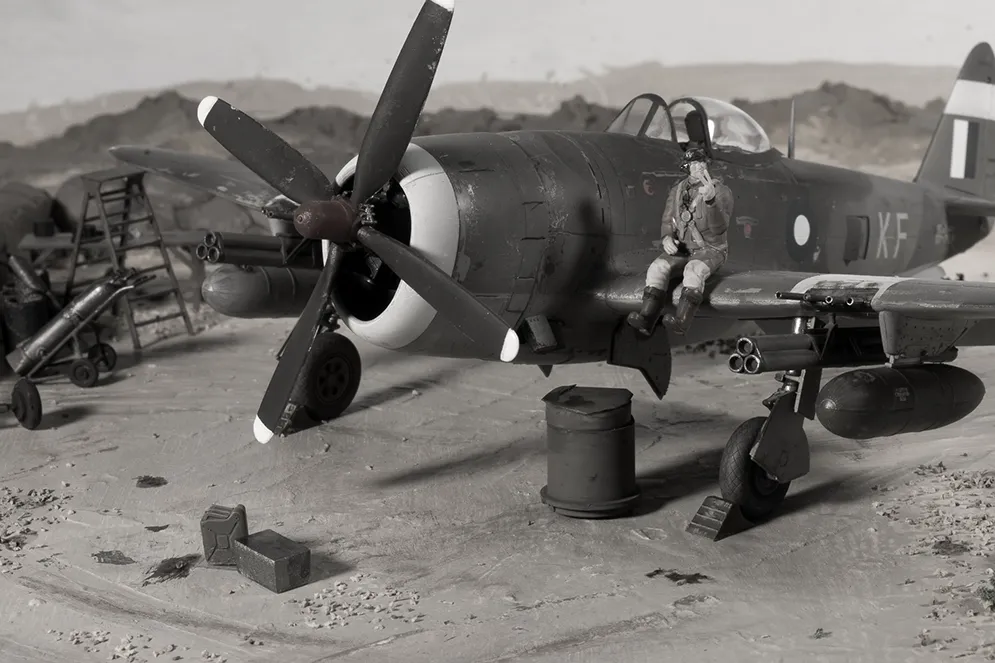

From hopeless mess to decent job!
My Tamiya 1/48 P47 Thunderbolt suffered a session of abject incompetence when I added the white stripes to the airframe. My total lack of attention to smoothing down the masking tape led to the white leaking out under the tape on every stripe! The close ups show the resulting mess.
I had to reapply the camo colours locally, then MASK IT PROPERLY as per my usual level of basic competence. Easy really.
I then finished the job in Far East Air Force roundels (scrounged from my decals stash). Placing it on a ready made diorama featuring bought figures and some scratch built equipment, including home made sandbags to form a protective revetment. These were cobbled together out of B&Q home filler (roughly cut into suitable size lumps, shaped and put together as a sandbag wall. It was allowed to dry with some encouragement against its natural propensity to ‘slump’ out of shape.)
I completed the project by then photographing it with camera and twin flash setup producing the end result you see here.
So finally modelling honour and self respect was satisfied!
Thanks, Dave
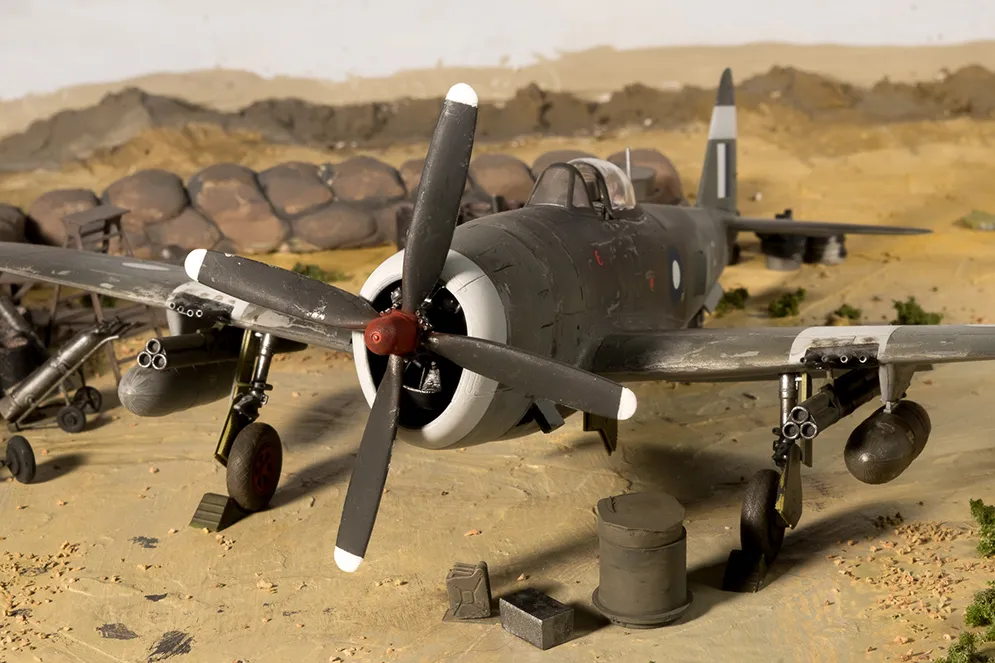
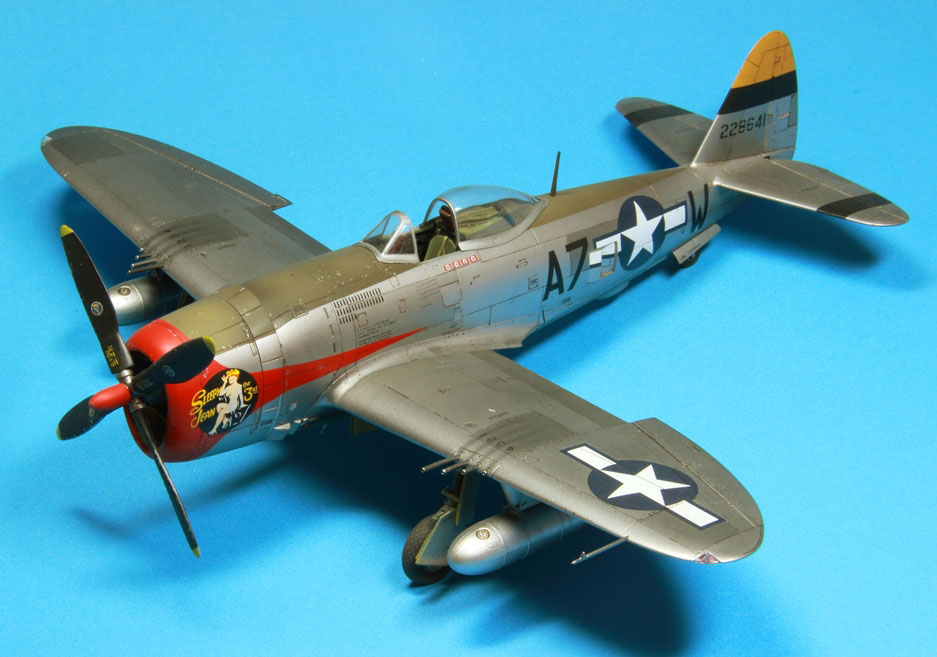
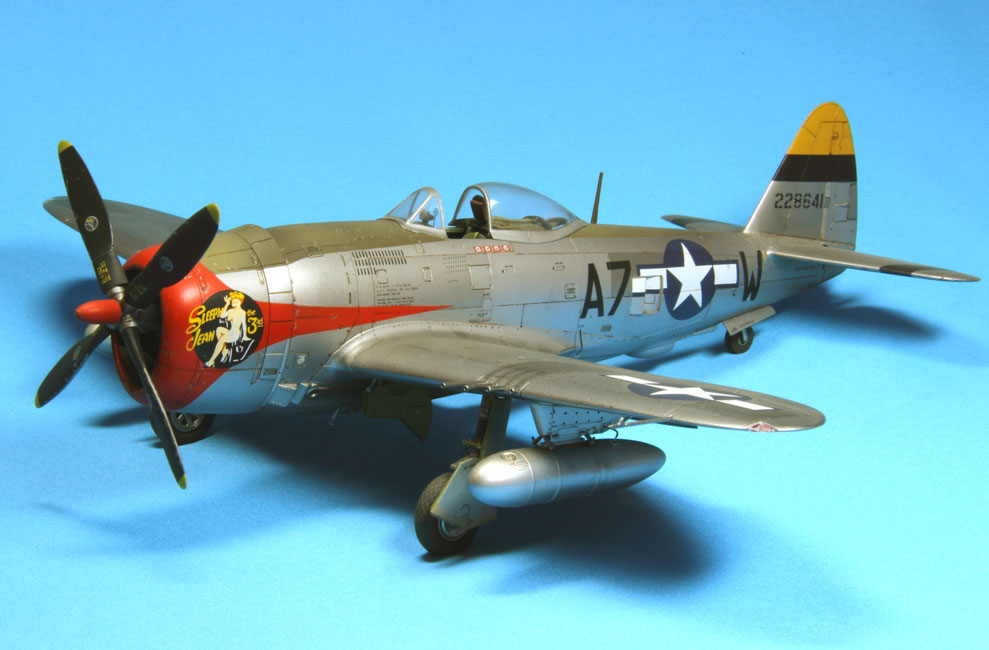
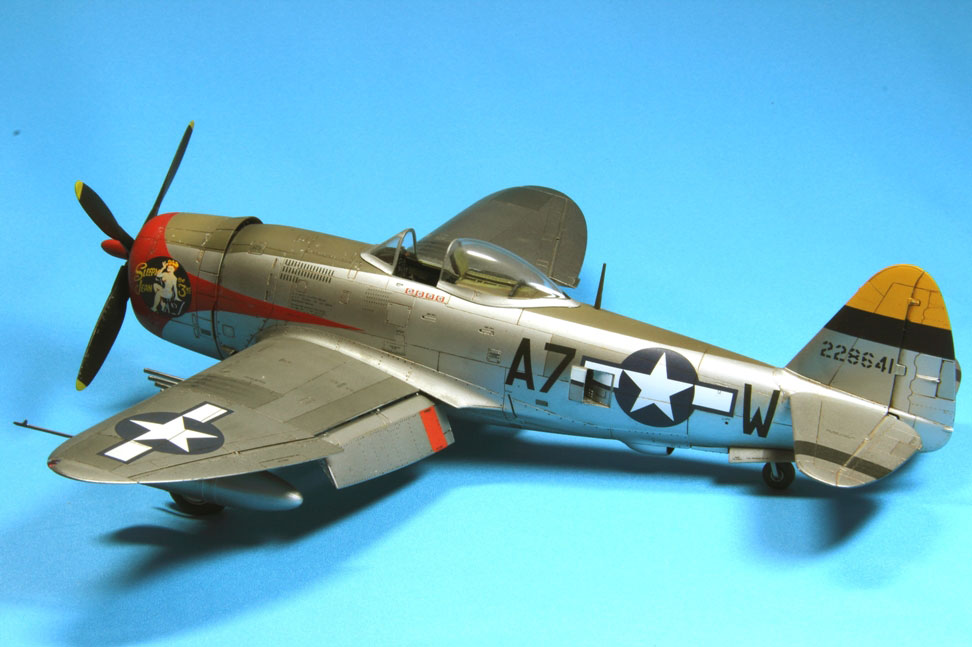
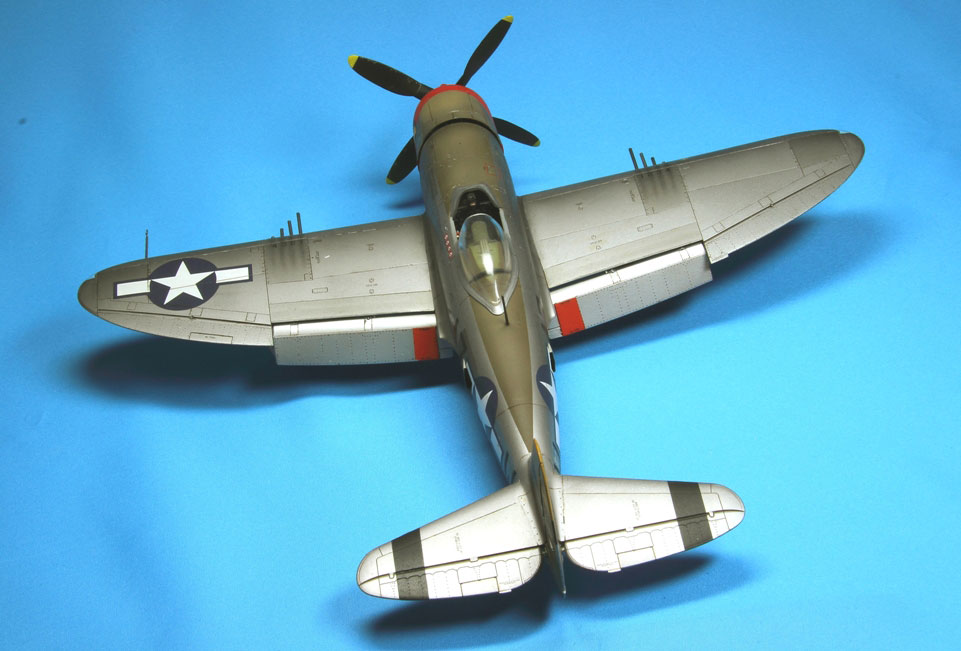
Additional extras used: Model Design Construction (MDC) P-47 cockpit, again painted with Tamiya/Vallejo acrylics and weathered with Tamiya weathering pigments. Engine painted with various Alclad2 metal shades and detailed with fine fuse wire (A first for me!).
3 years on and off to finish, one more off the shelf of shame.


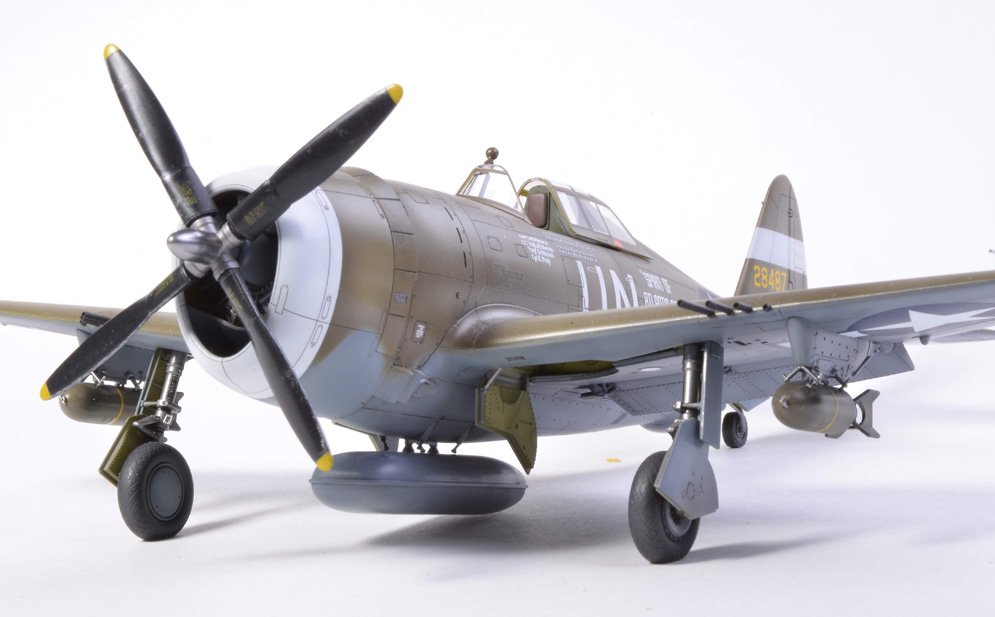
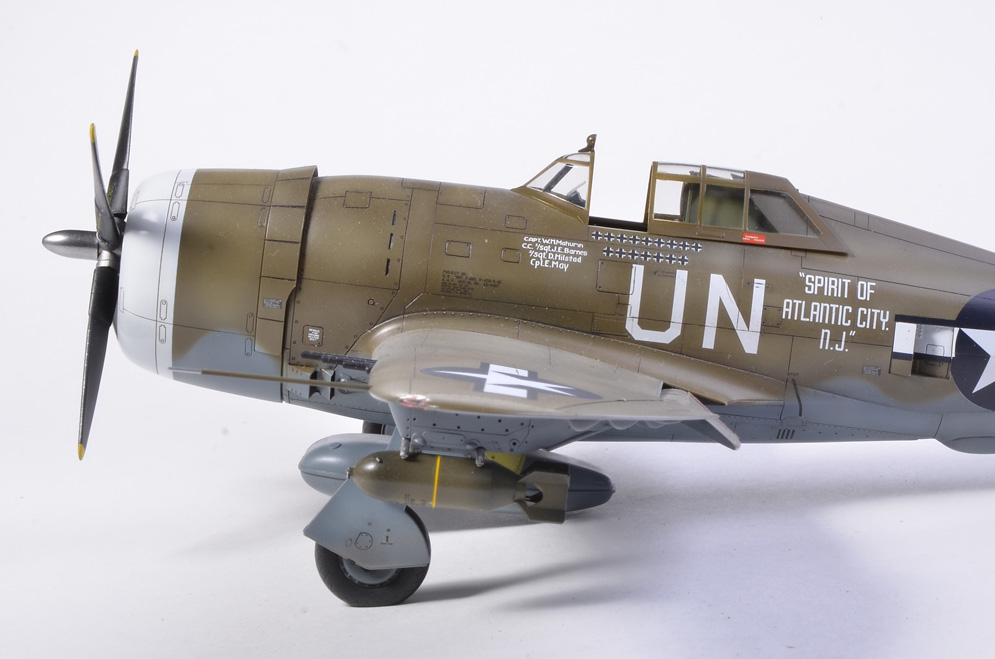

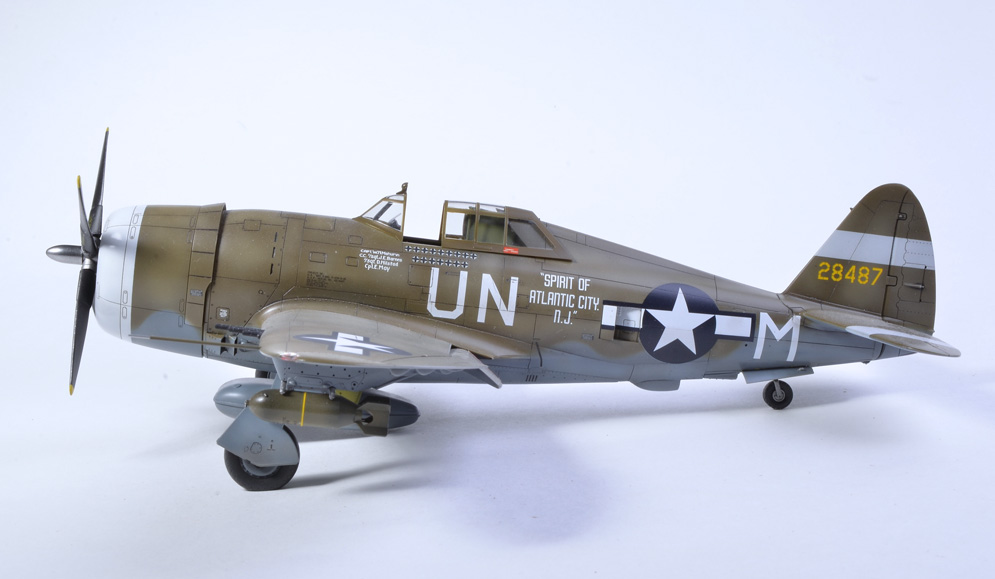

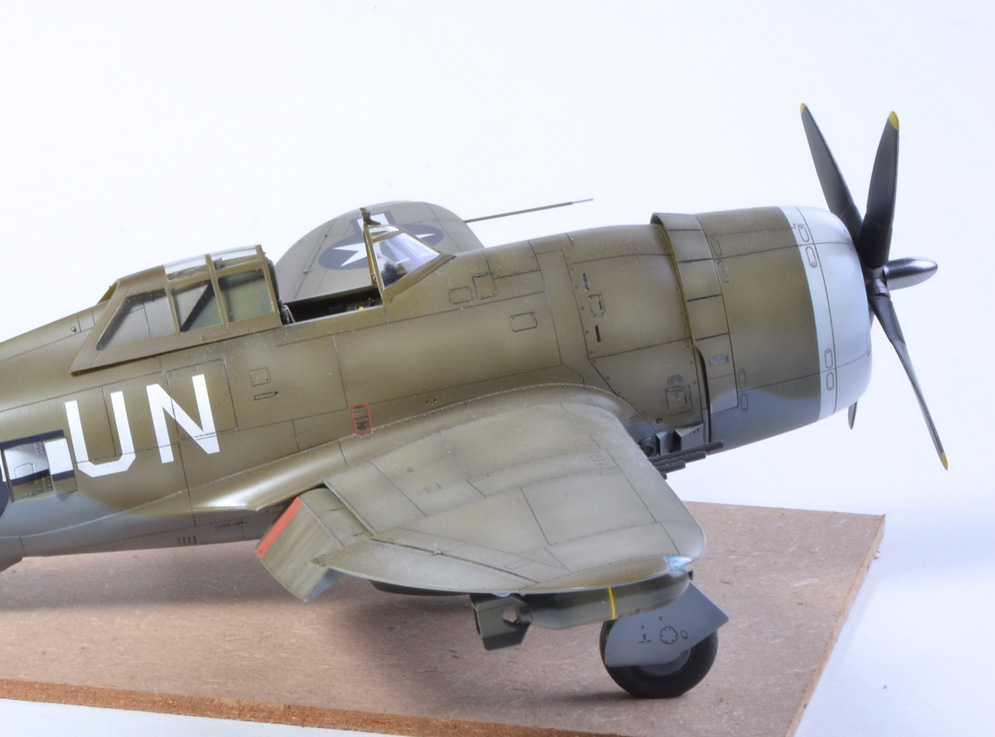
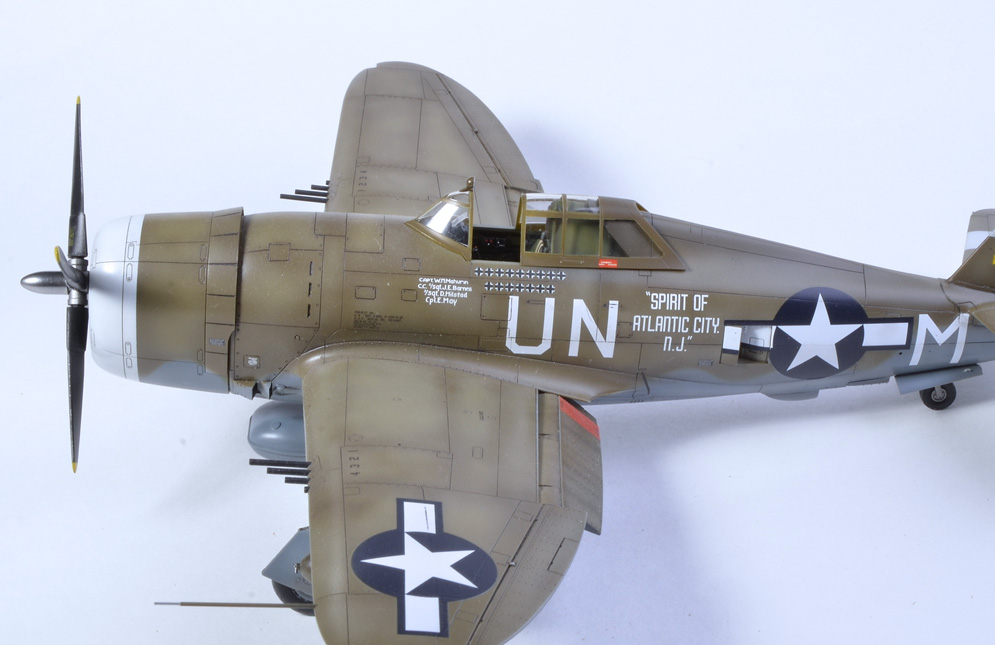
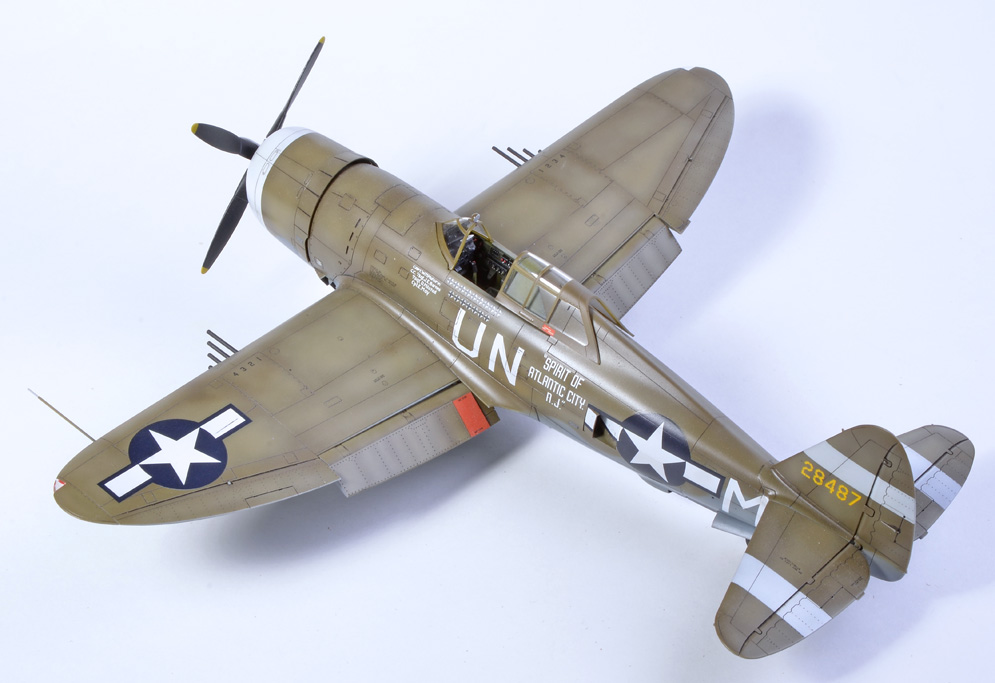
This is my Tamiya P-47D Razorback built OOB other than an Eduard harness and Albion Alloys slide fit pitot.
The main camo colours are from the Gunze Aqueous and Tamiya ranges with Vallejo for internal detail. I left her in a soft sheen finish as I found a full Matt coat kills the effect of the delicate shading. I flatted the tyres and gave the spinner a polished aluminium Alclad2 topcoat over Tamiya Gloss Black. The drop tank was an early effort at marbling. Not entirely successful but less boring than monotone.
The Tamiya P-47D is a truly exceptional kit with precise detail and no fit issues whatsoever. The wings are almost snap fit. I really enjoyed this build and have done others since.
Rick G.
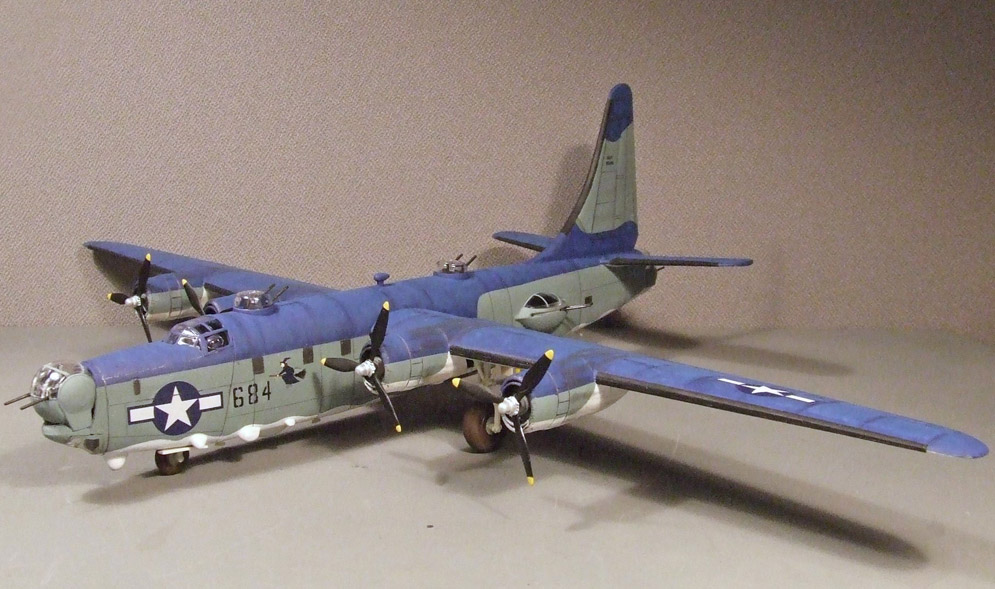
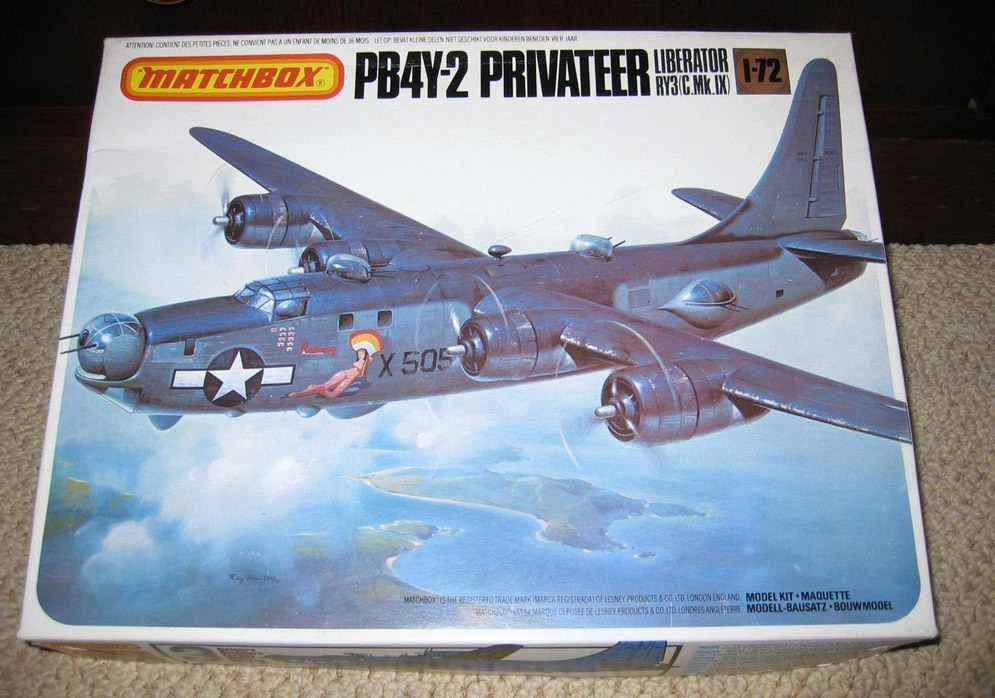

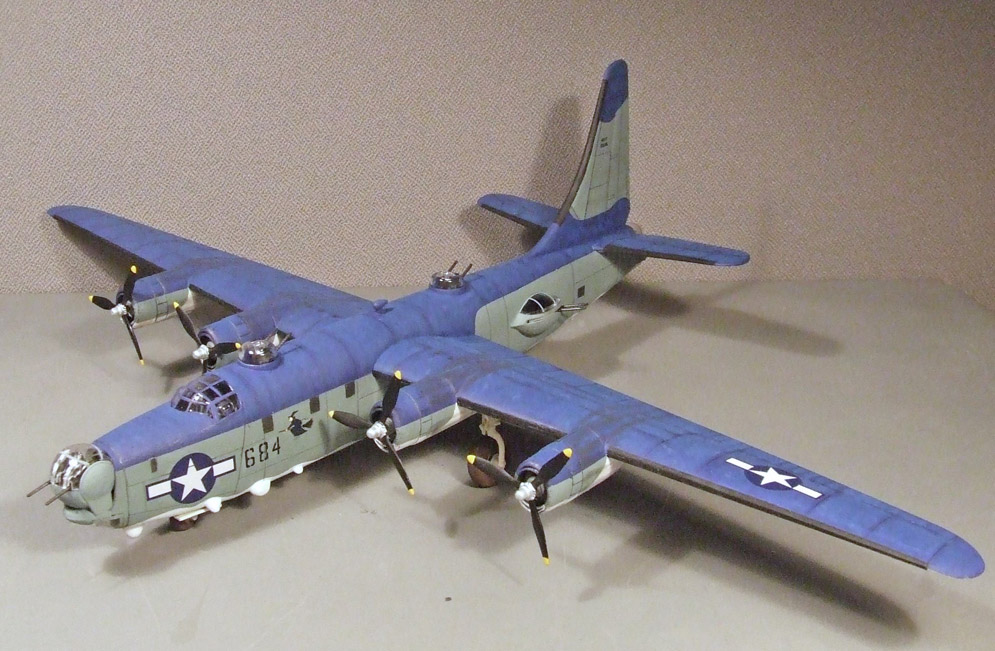
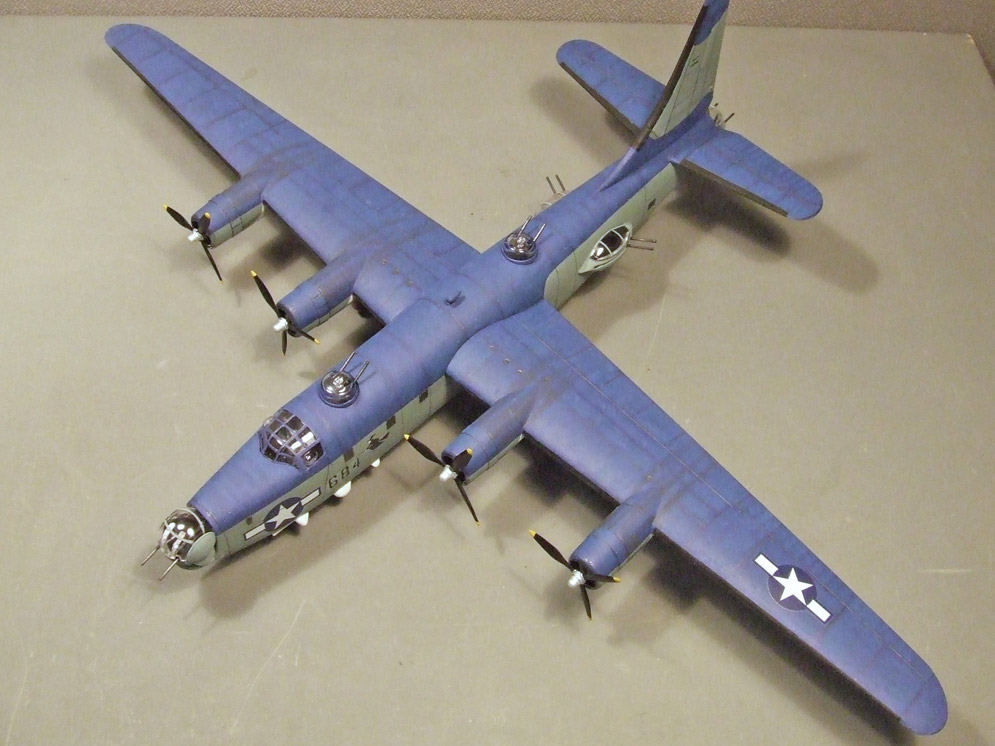
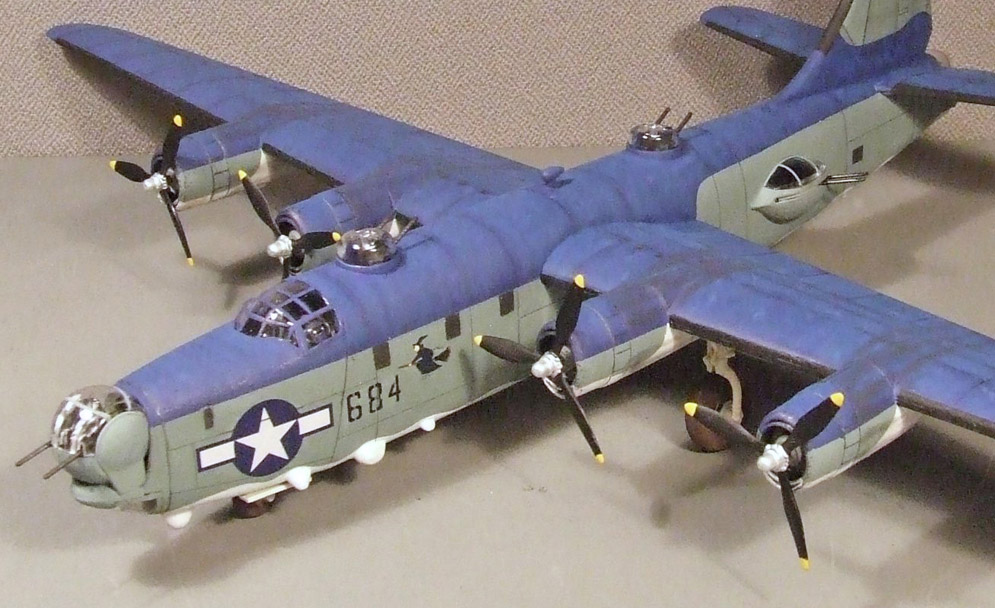
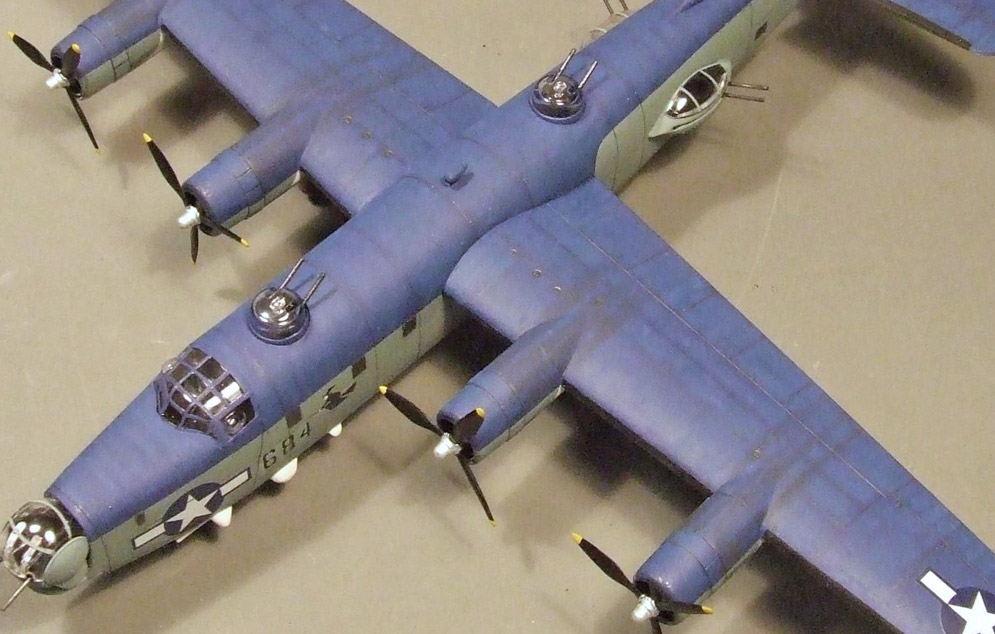
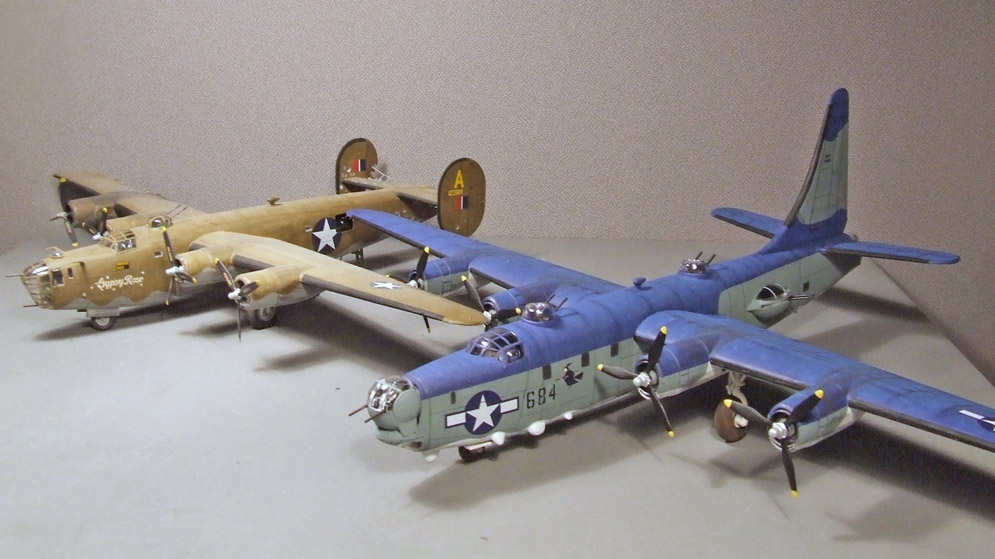
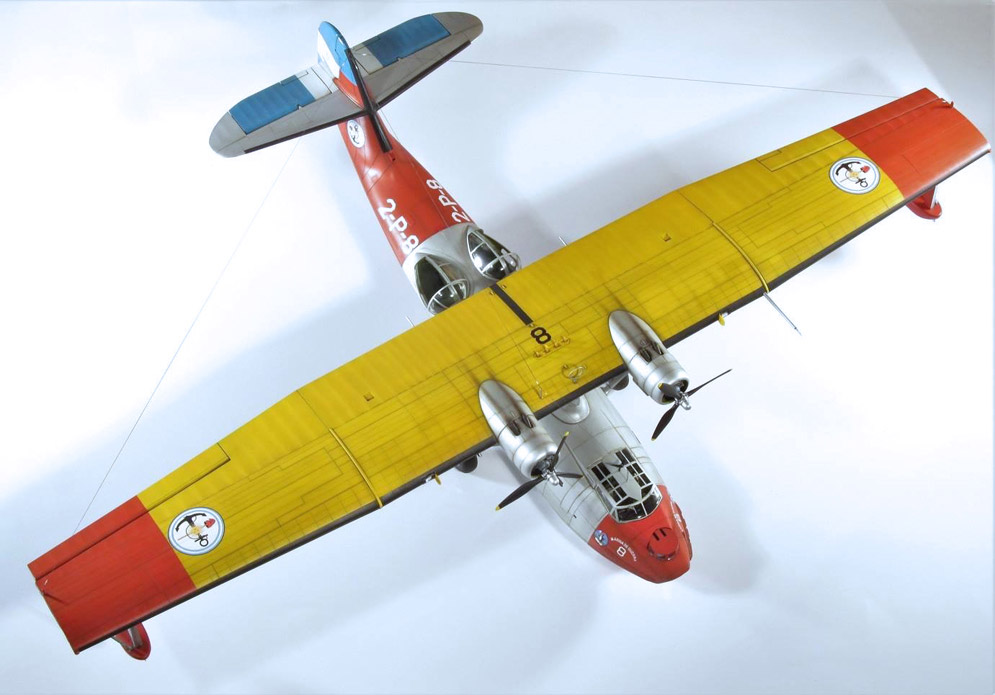
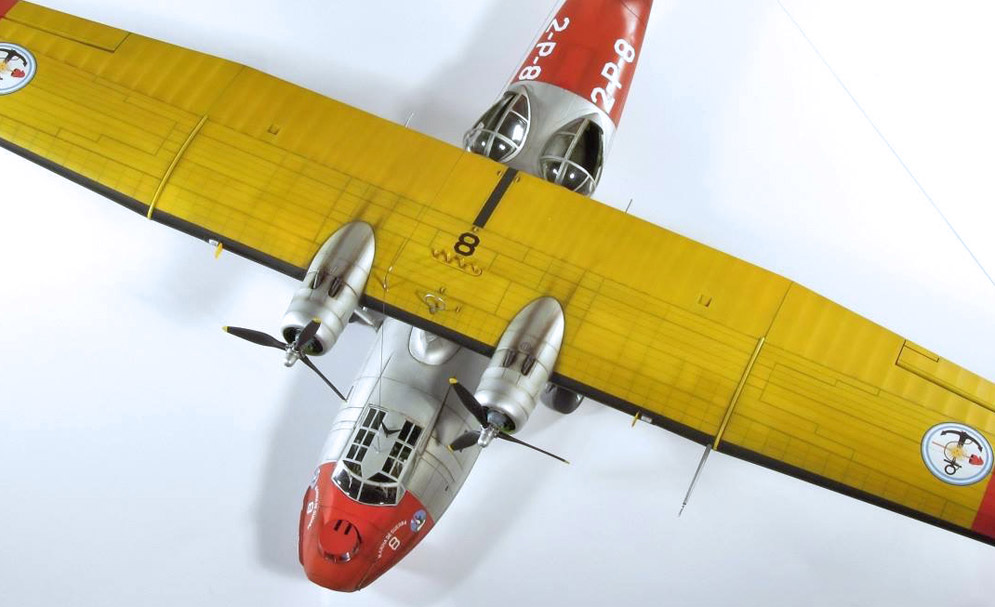
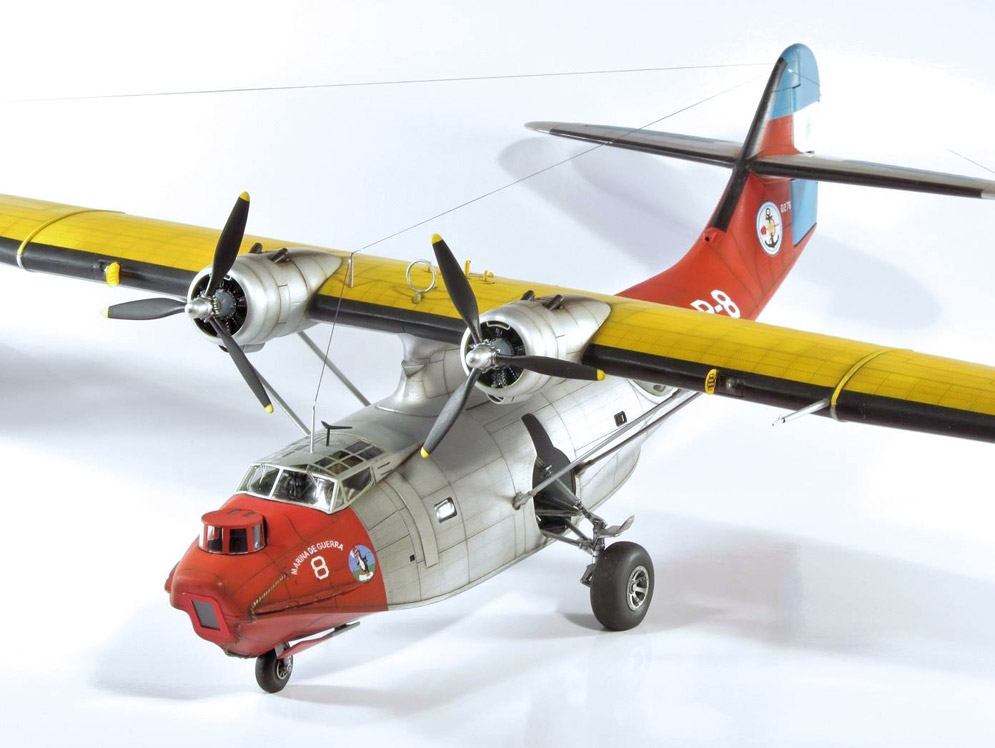
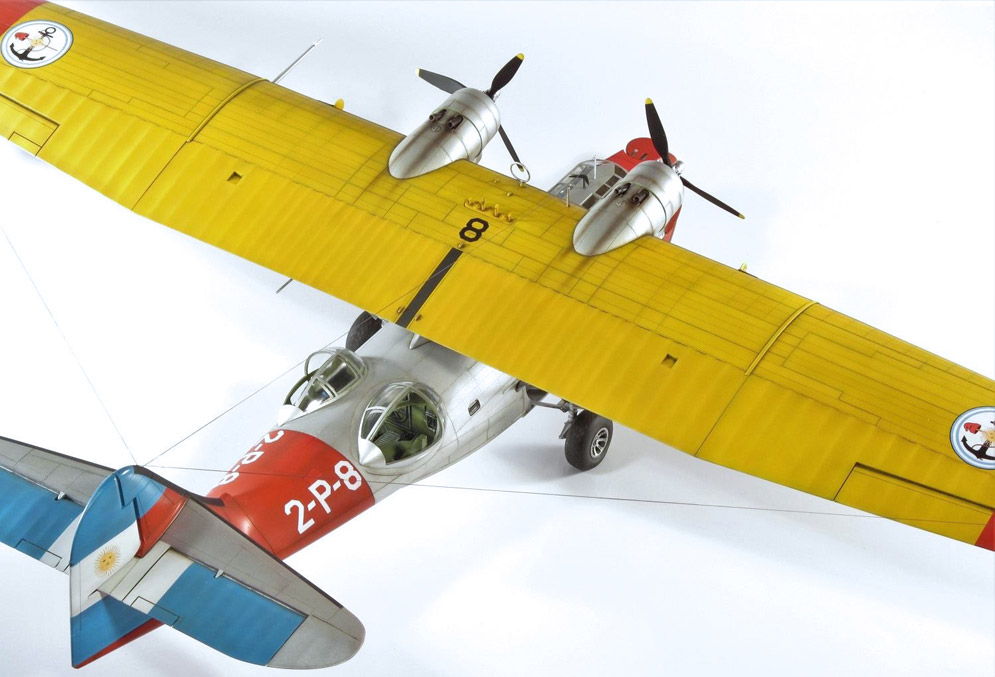
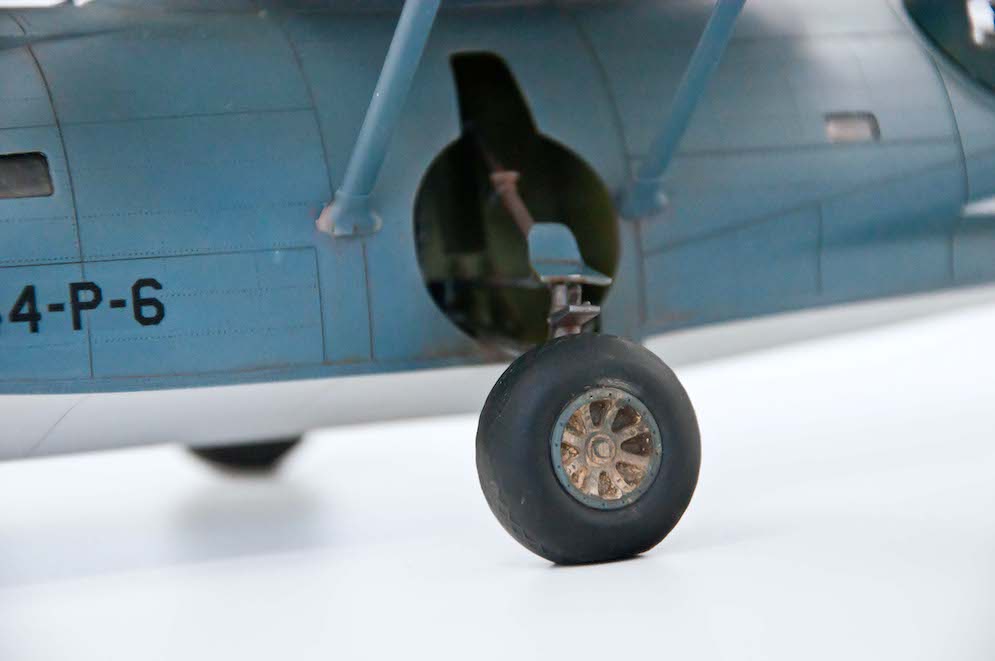
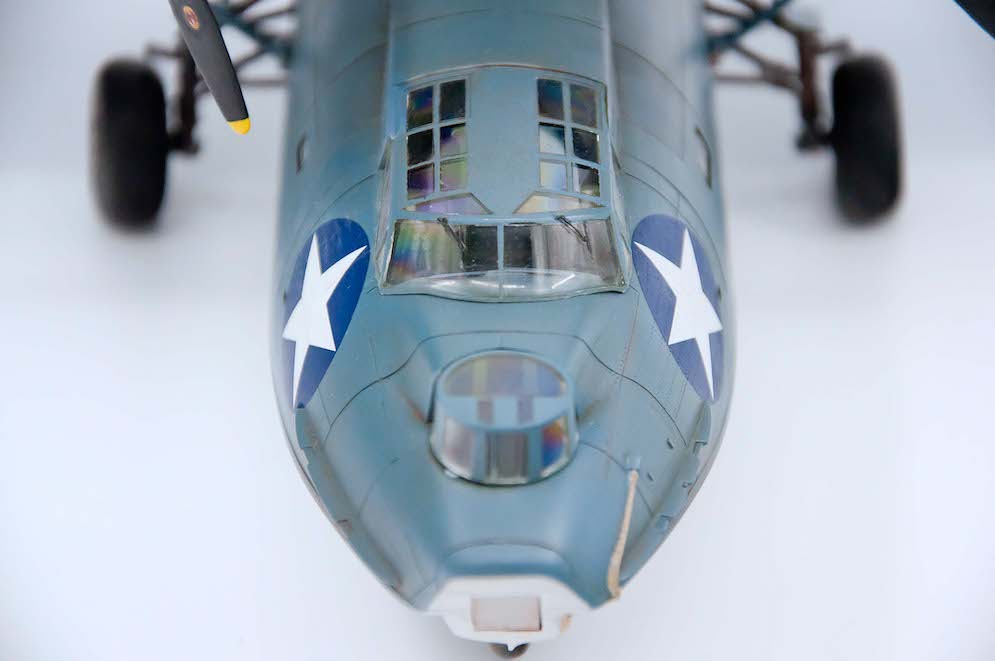
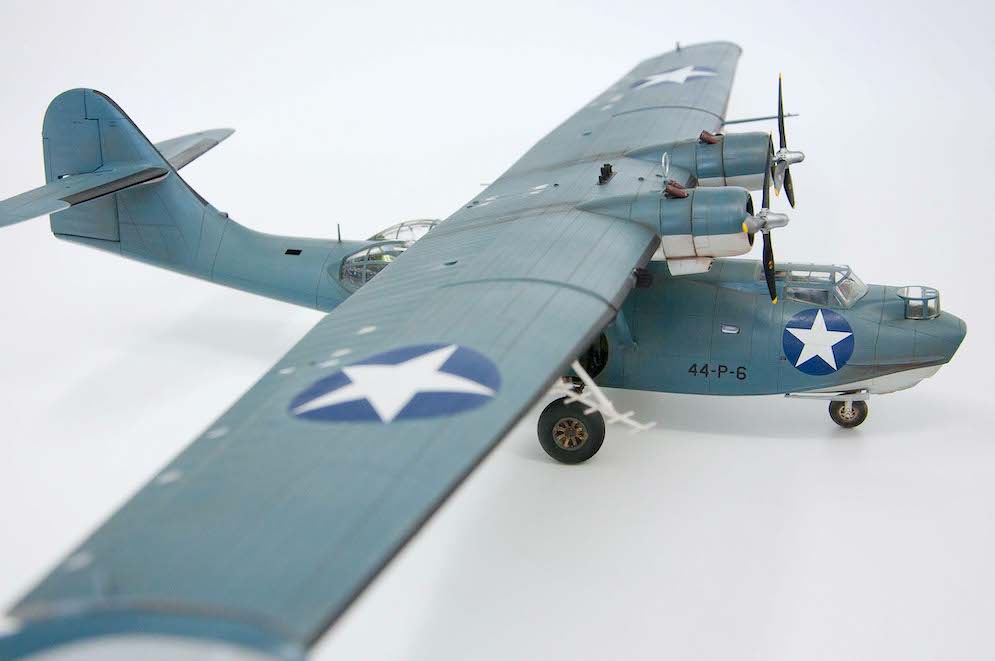
Here’s my 1:72 scale PB4Y-2 Privateer – old Matchbox kit. In that last photo you can compare Privateer’s size to B-24 Liberator.
Raimo Leino
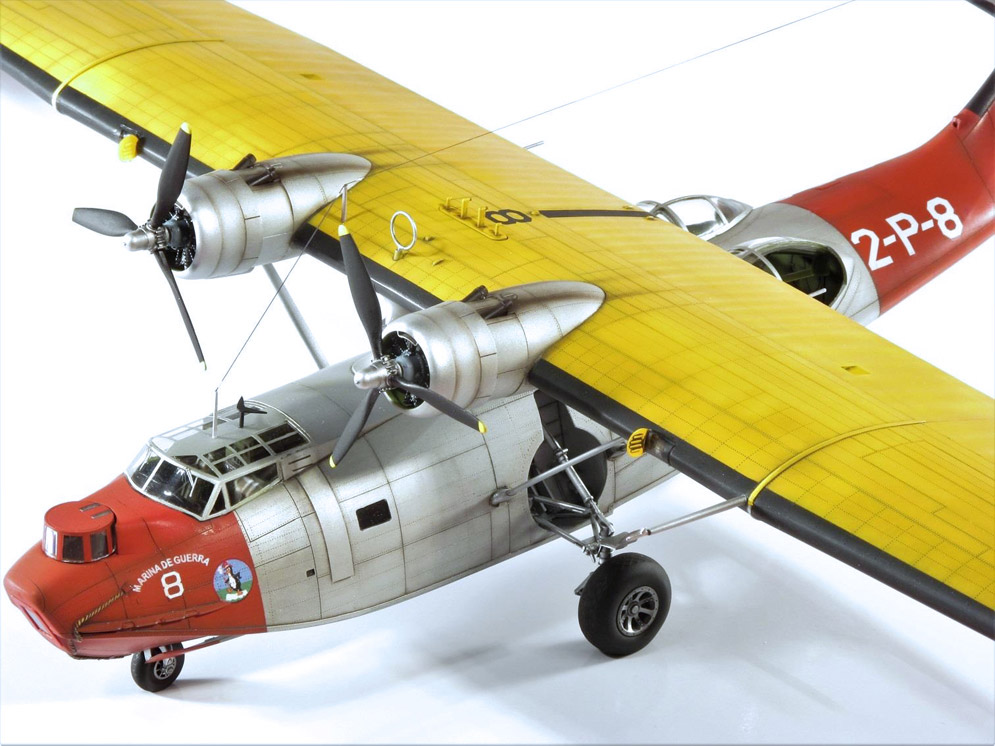
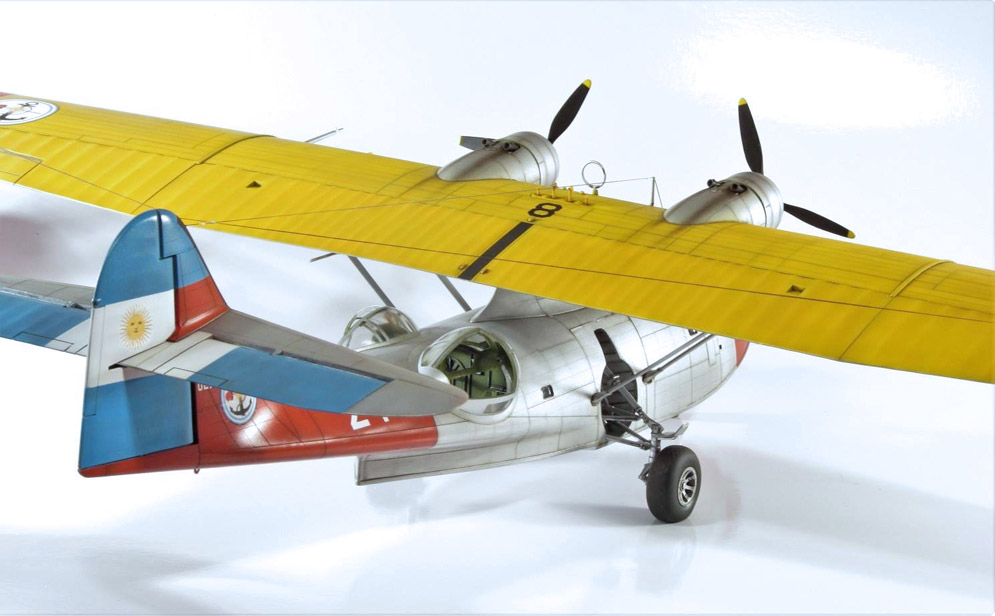

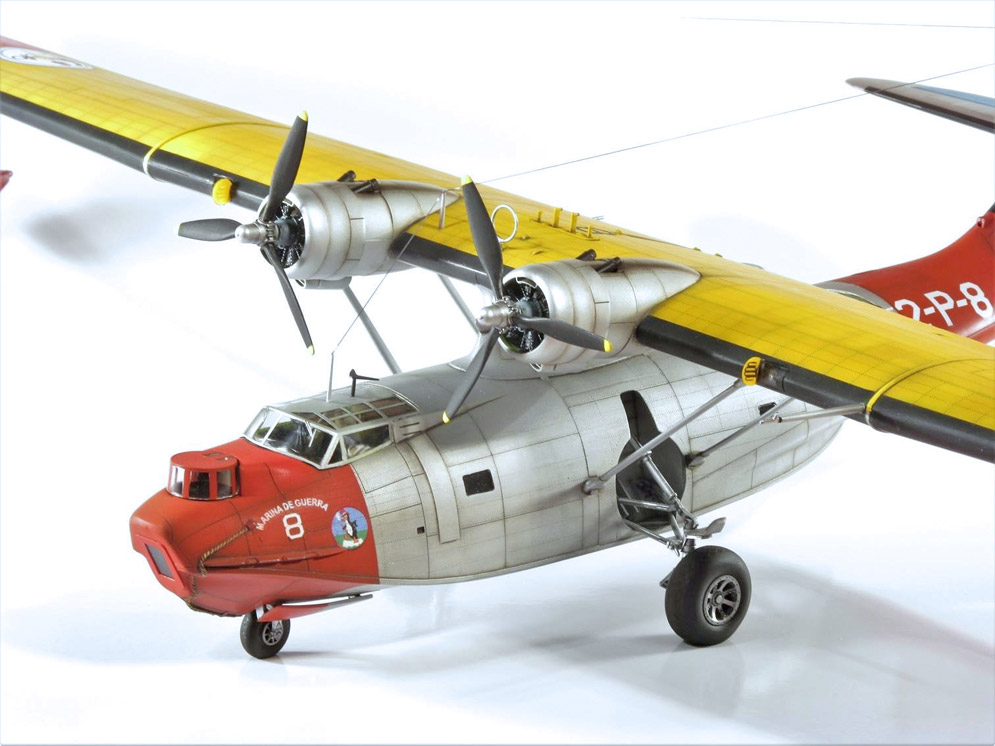
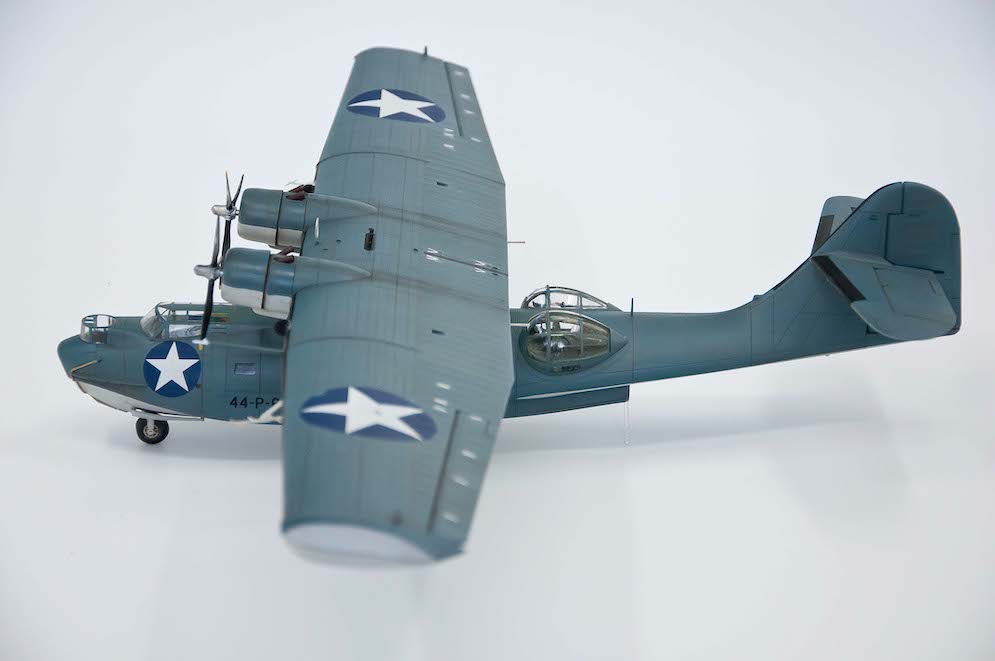
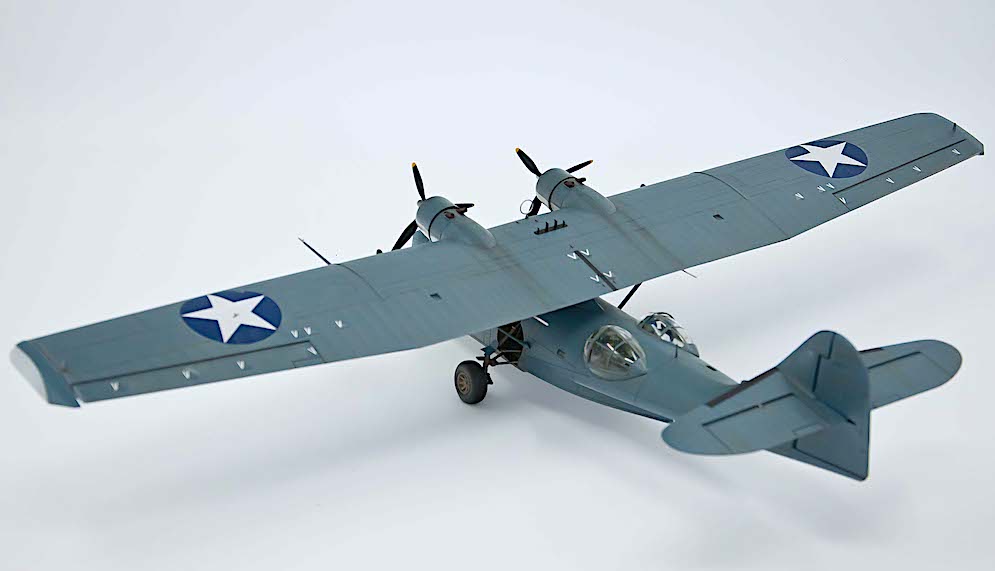
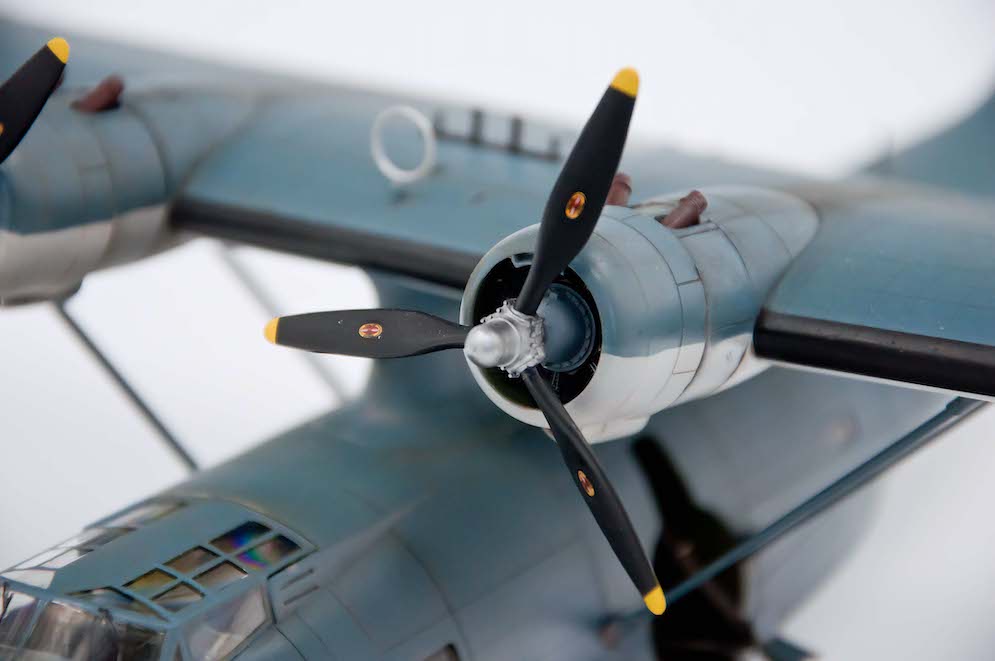
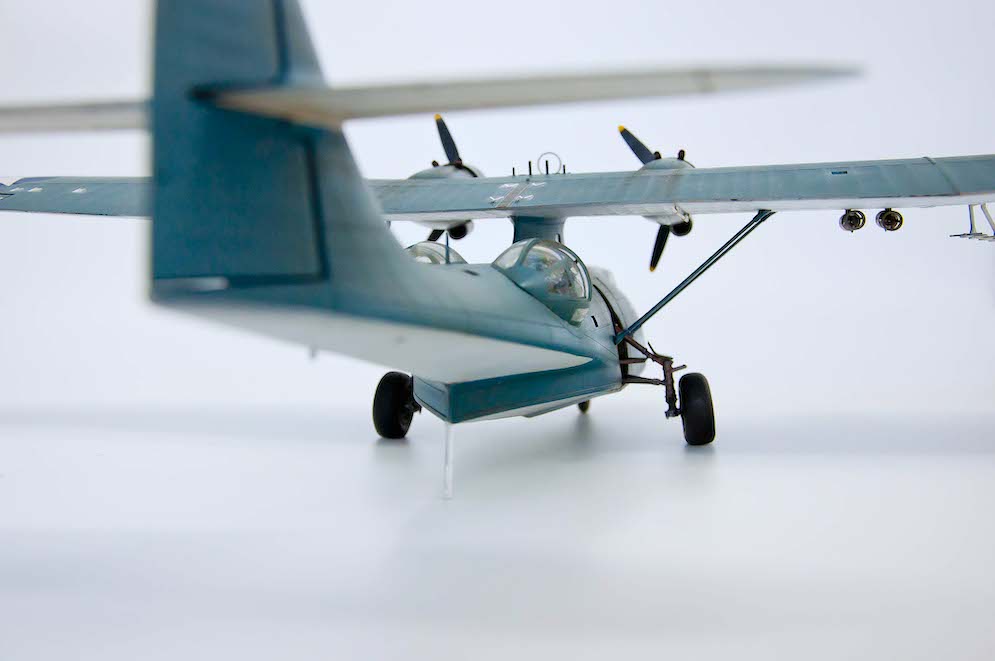
Wrapped up the 1:48 Revell/Monogram Catalina. Special thanks to Javier Ruberto for all of the help with the graphics necessary for me to make the custom decals.
Hope you all like it!
Flying S Models.

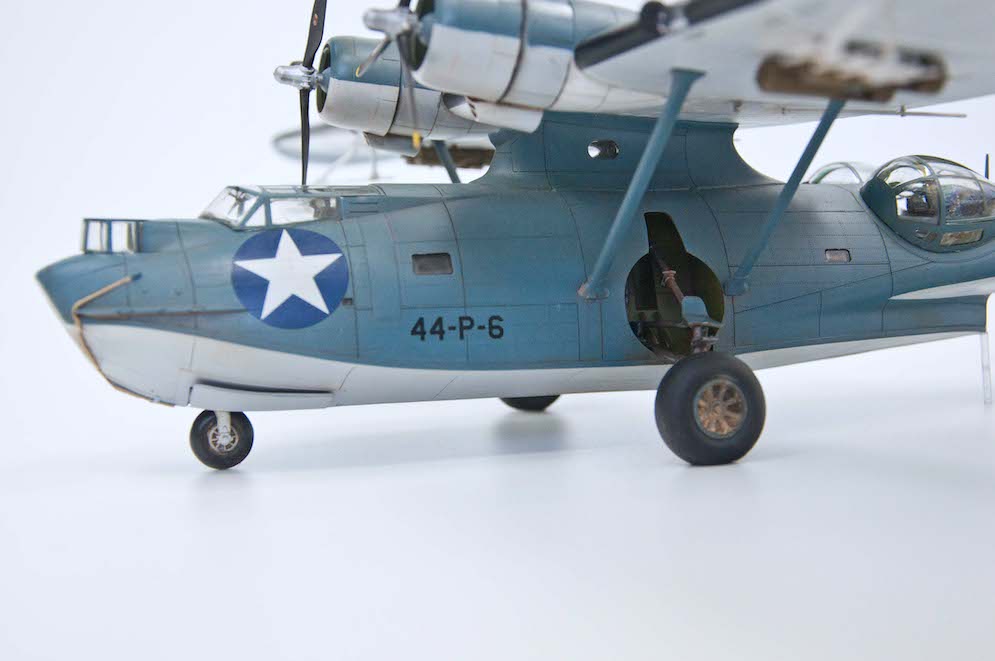
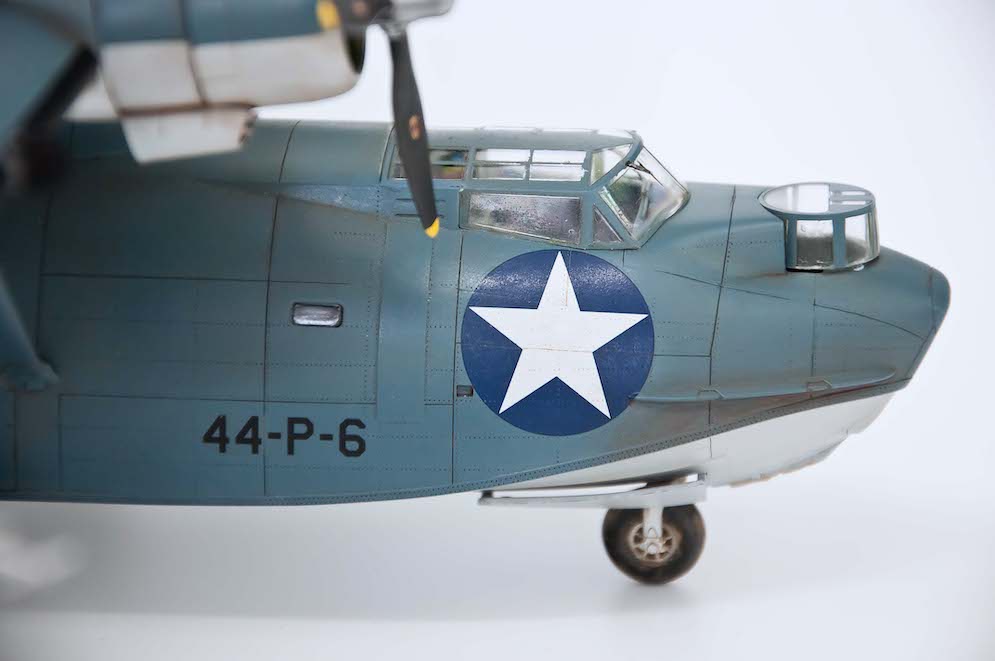
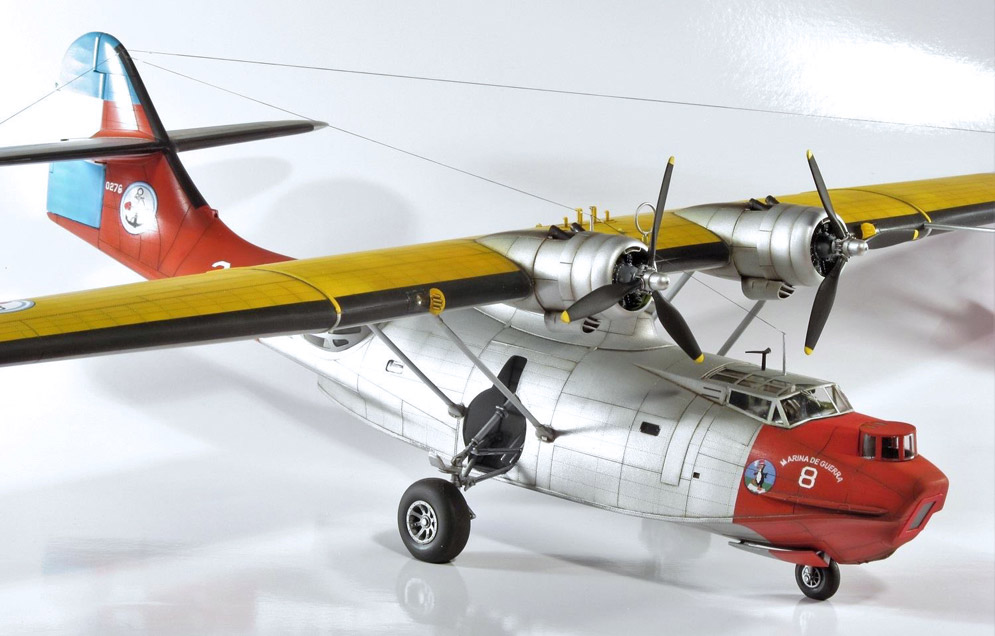
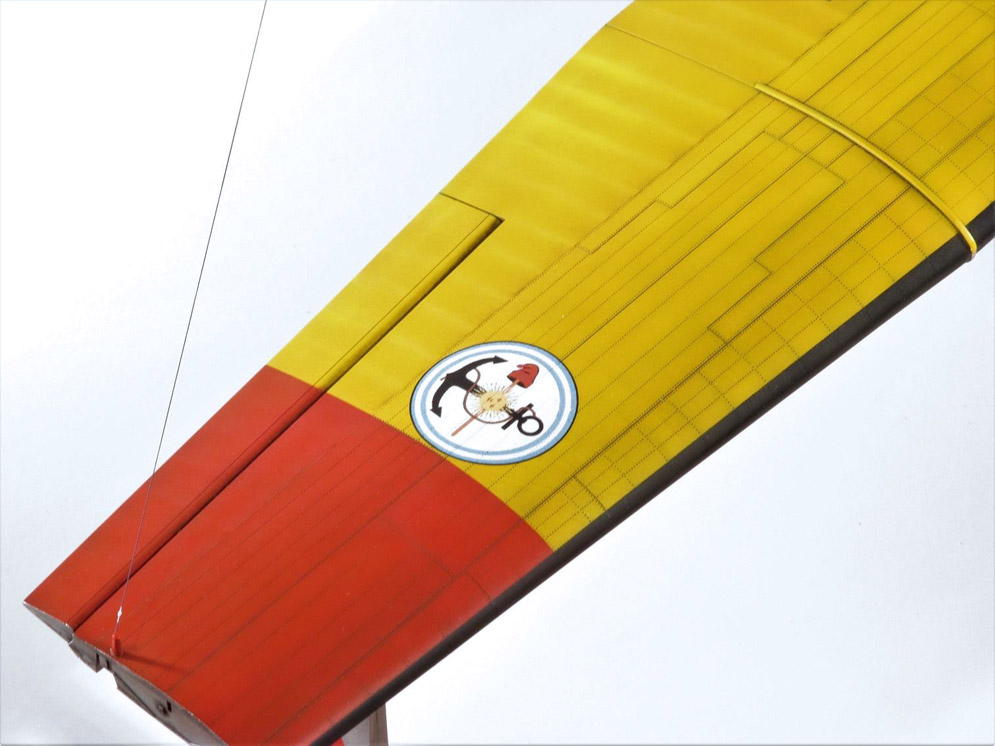
Here is my completed Revell 1:48 PBY-5A Catalina. Everything is out of the box, except for the decals and colour scheme, which are from Wolfpack and depict a Pacific theatre scheme from the Midway Islands circa 1942.
Weathering was done by a mixture of an oil wash and then weathering pencils.”
David P.
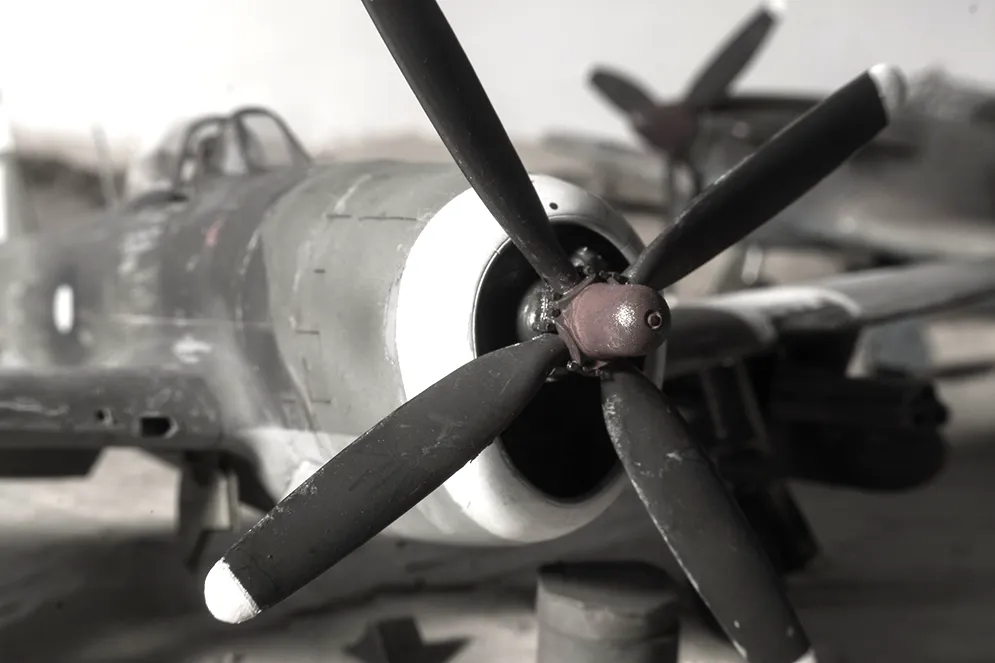
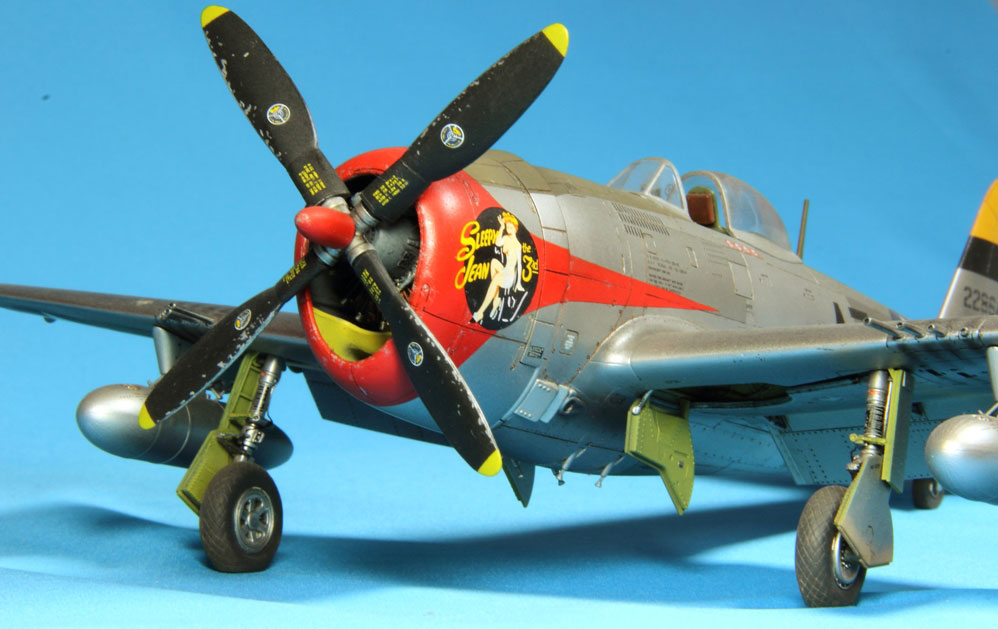
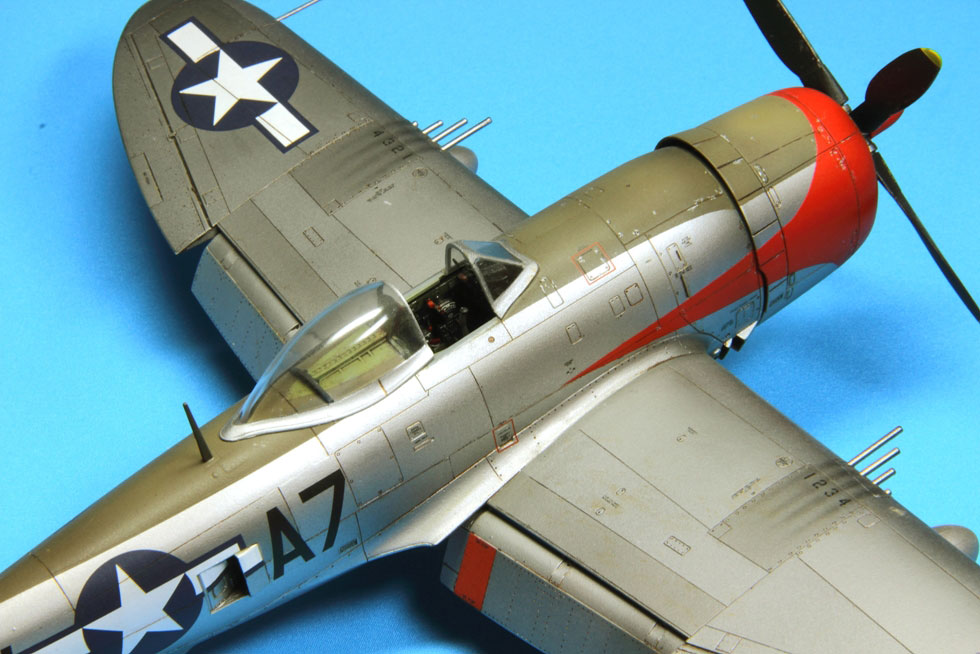
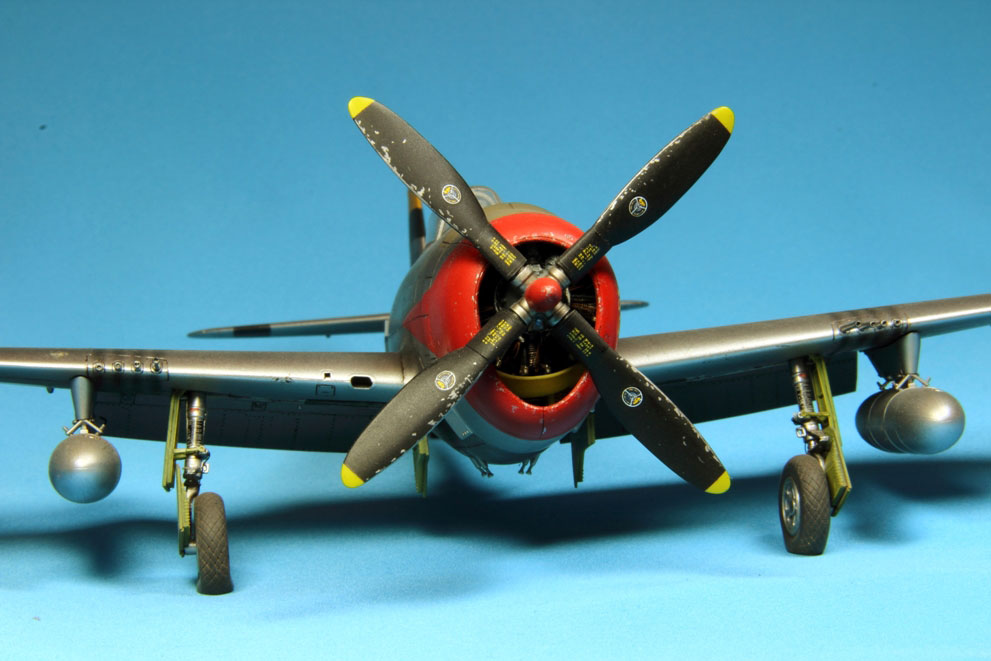
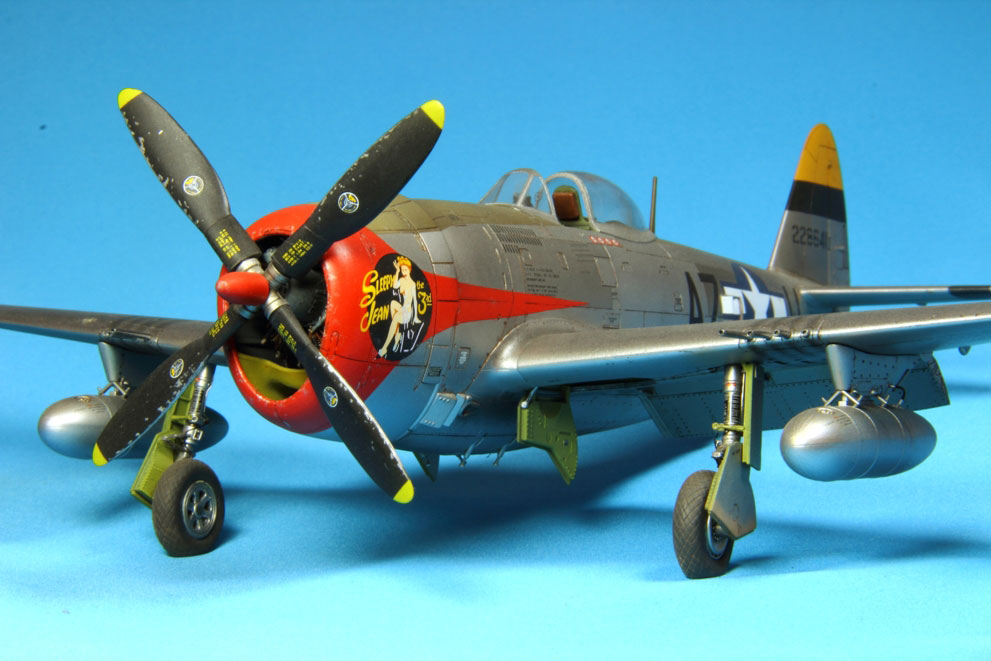
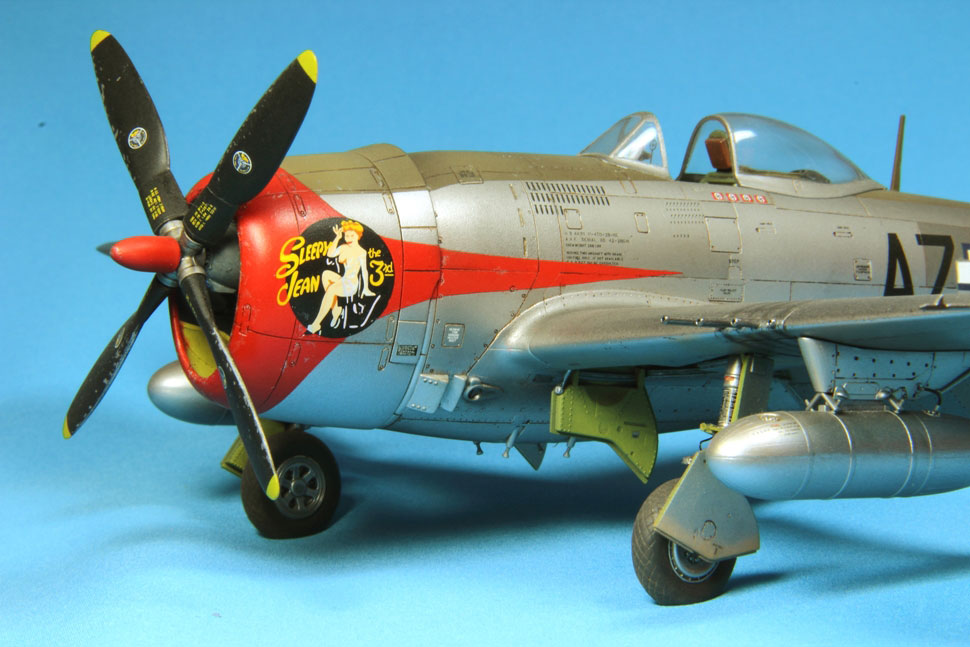
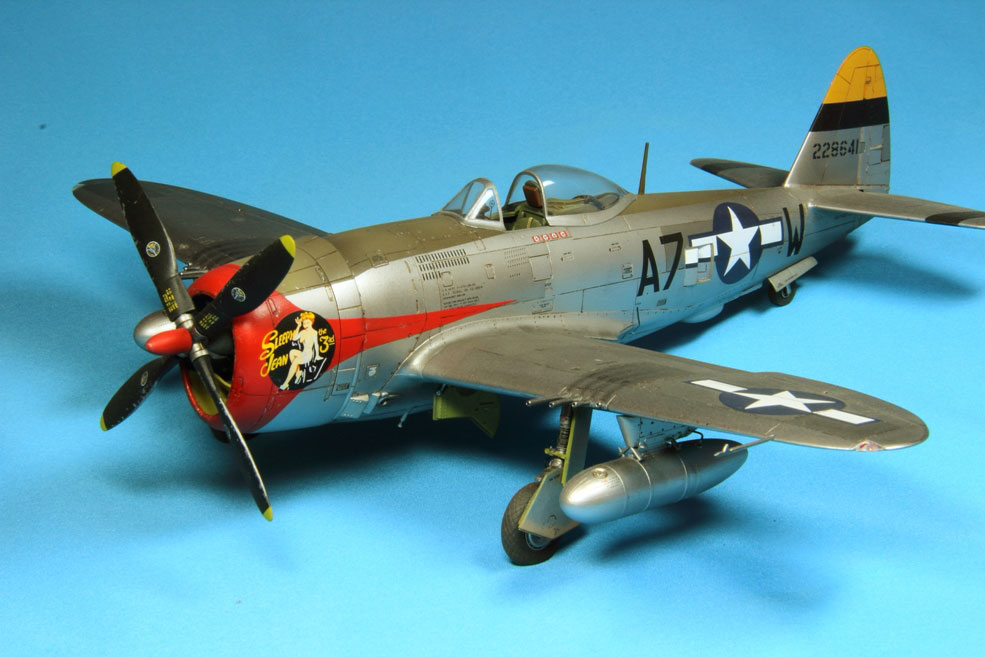
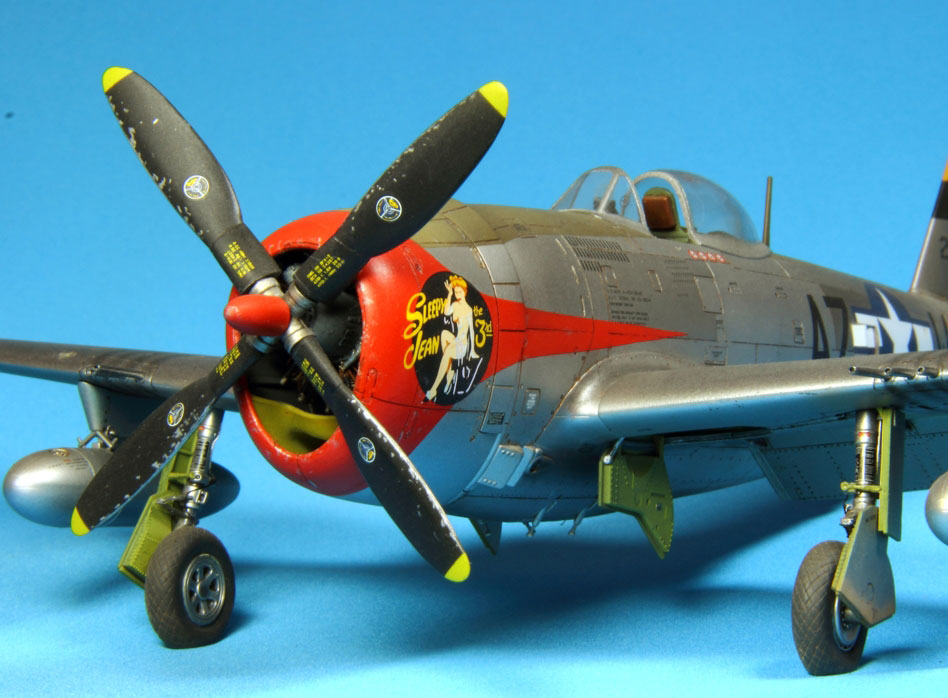
This is the Trumpeter 1/32nd scale kit and is not only the best P-47 kit on the market but in my view the best kit I have ever built, up to now! It’s packed with detail, fits beautifully and has great decals too. I built it straight from the box except the engine which I ‘wired up’ using copper and brass wire. I will be building many more of these and the ‘Bubbletop’ will be next. Superb in every way.


The painting was done with Alclad and Tamiya paints. The decals come from Eagle Strike productions sheet American Jabos Part 2. This sheet supplies the black ID markings and also the red markings for the engine cowlings and fuselage. However, I decided to mask and apply these markings with an airbrush. The painting decaling and light weathering was brought together with a coat of Humbrol semi-gloss.
Mark Rooks


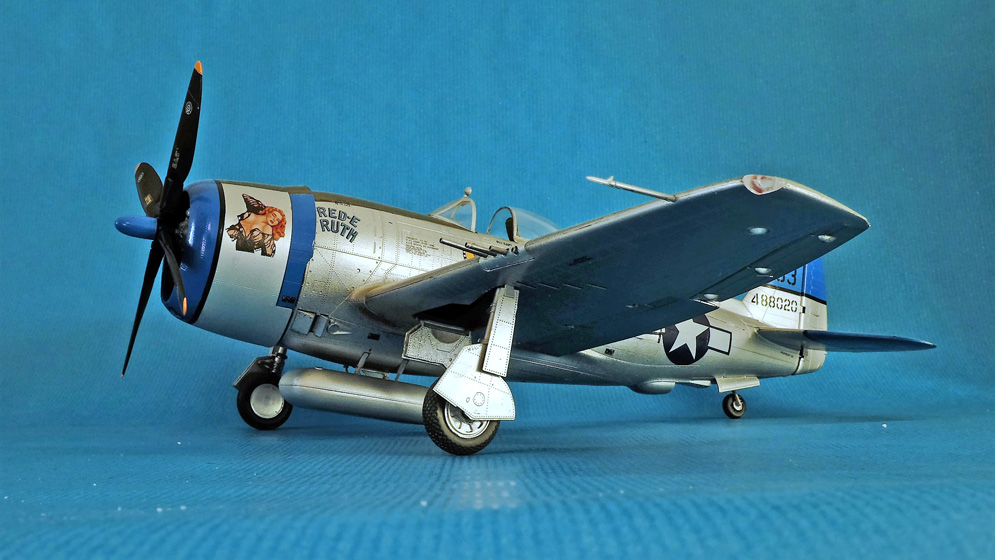
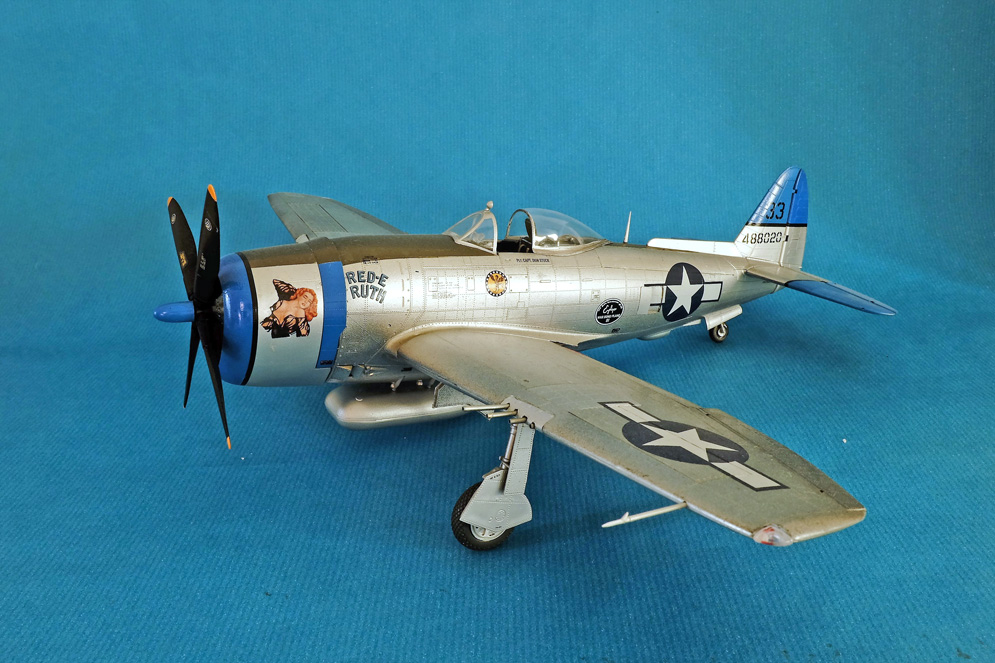
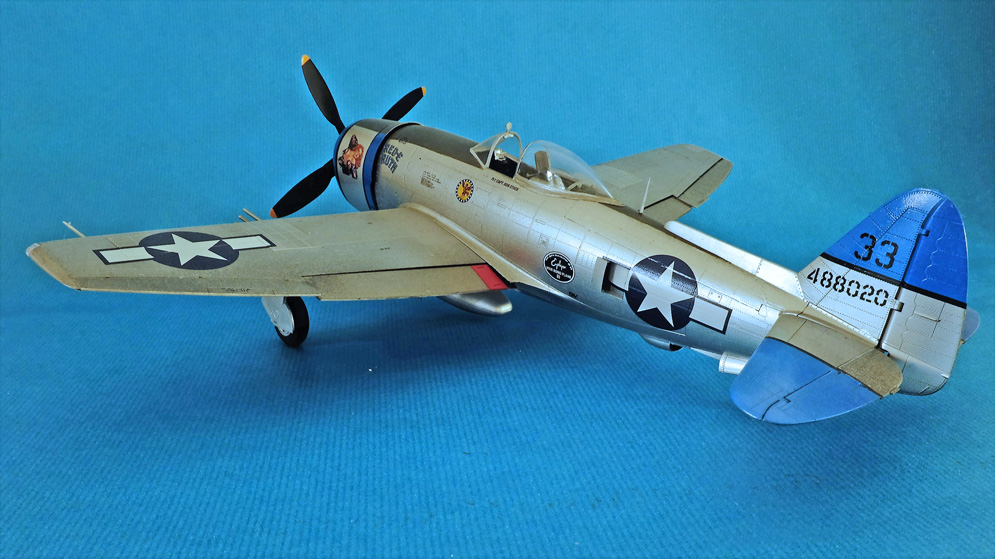
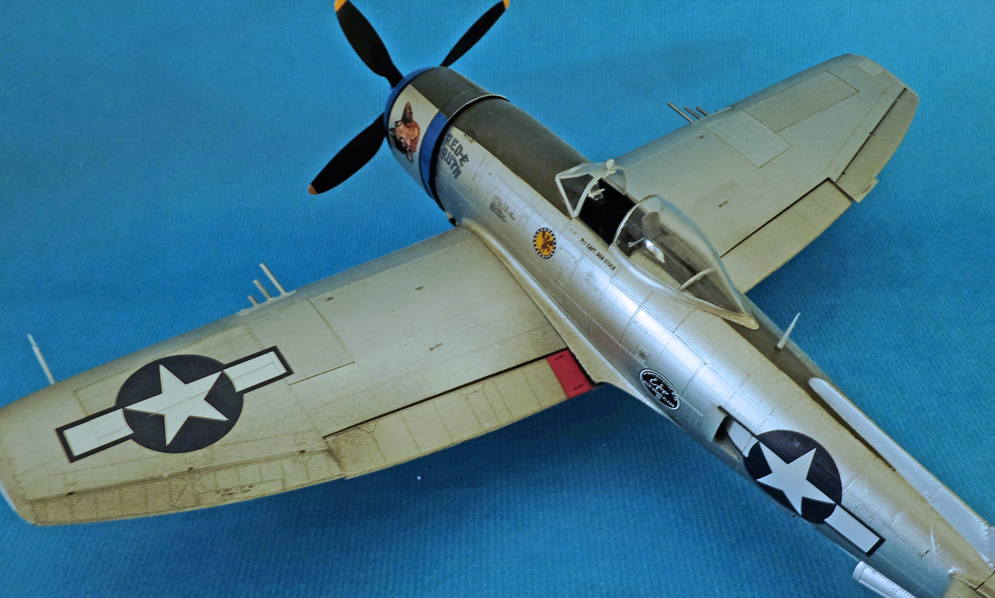
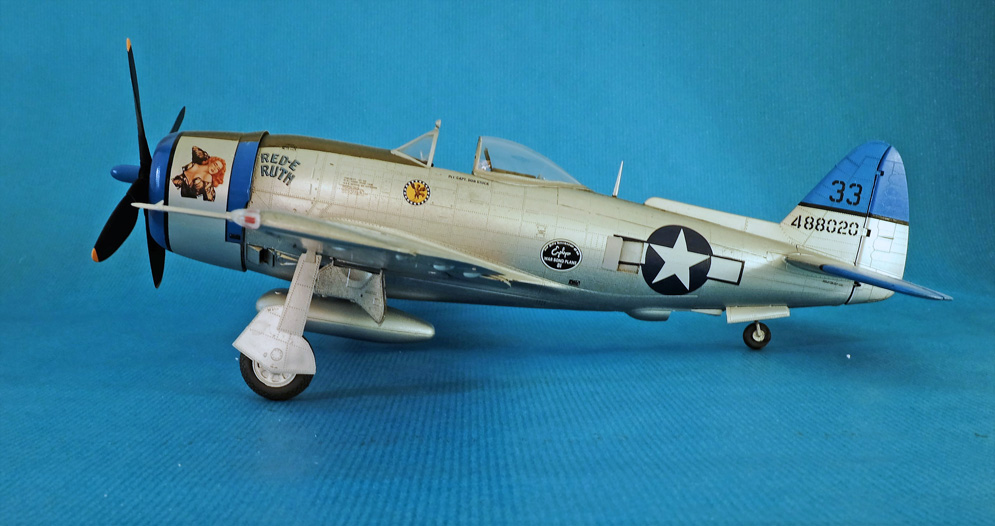
This is my Trumpeter 1:32 scale P47N “Red e Ruth”. Pretty much out of the box with addition of gun barrels from Master and decals from Kits World. Paints used from Mr Hobby and Vallejo, with a mix of various Vallejo Aluminium, principally the new Metal Colors but with some of the standard Model Air range to get a varied metal effect between specific panels.
A massive kit for your money! The power and technology of the real aircraft is really emphasised when contrasted with P26 Peashooter on my display shelf.
Alan R.
Trumpeter 1:32
Here it is some two years in the making!!
“This is the Trumpeter 1:32nd P 38. This was not unfortunately made out of the box! If I had I think it would have been a straightforward build. But as I never seem to be able to resist the aftermarket….? As a result I had numerous fit problems which resulted my “putting it down(nearly literally)” for a long while. It stood on the shelf staring sadly at me and in the end I relented and put some decals on, resting again afterwards.
The cockpit was from Grand Phoenix and was actually very good looking but it was too low and despite trimming and trimming it and the wheel wells, were still out of place when I assembled it all together. Now something of this size is not the easiest thing to fiddle around with and I felt it was going to lose its wings every time I handled it. In the end I blame myself for not following the pre fit all the way through.
Otherwise I used the Big Ed metal and masks – these were very satisfactory.
As a result of my taking so long it was painted (gloss black first) in stages. The black was not easy to polish because of the handling problems. As a result the metal finish was far from pristine. So weathering was the answer! I looked at masses of reference and it is clear that these aircraft were often very weathered operating as they were, out of muddy fields. I used grey oils over the metal to accent wear. Then lots of blending of oils – black brown and grey – to create the (canvas).”


The Hasegawa model was made OOB with the addition of Eduard seat belts. Vallejo ModelAir paints were used throughout and post shaded with pro-modeller Dark Dirt clay wash. Klear was used at the decal stage and then a satin coat.
The only issues I had was the separate tail section which required quite a bit of work to make it blend in.
All in all a very nice kit to build… Vaughan P.


Regards, Vaughan
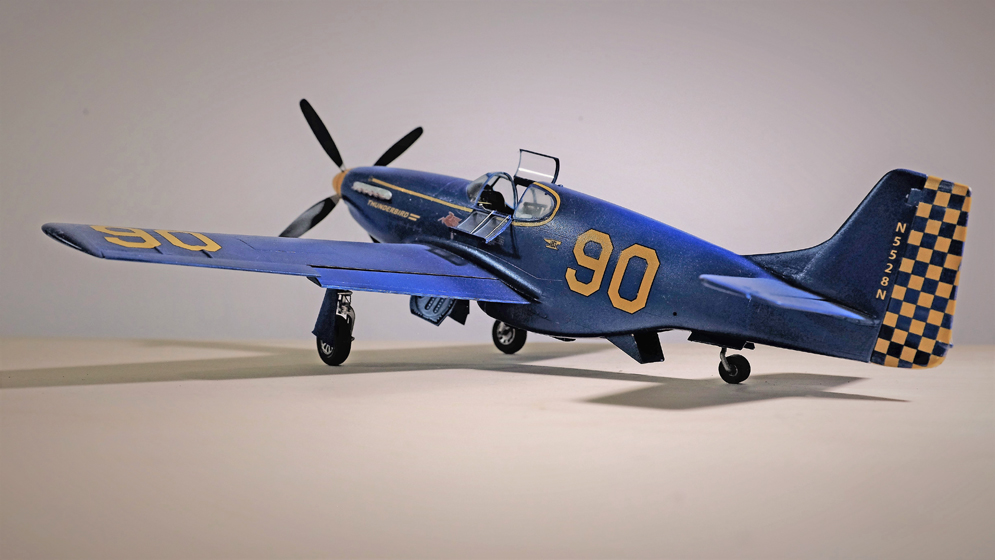


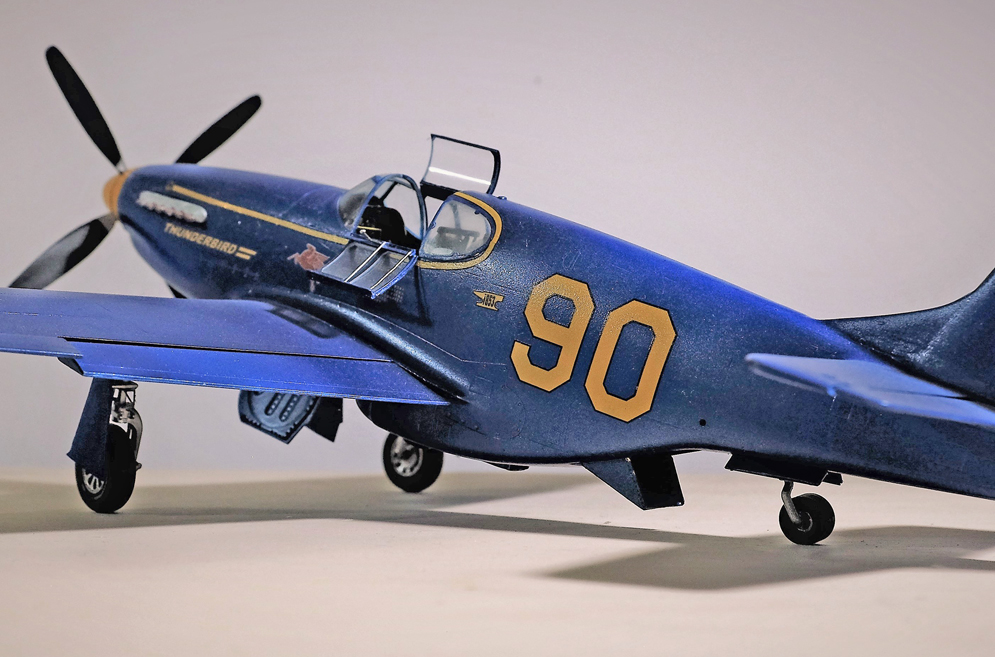
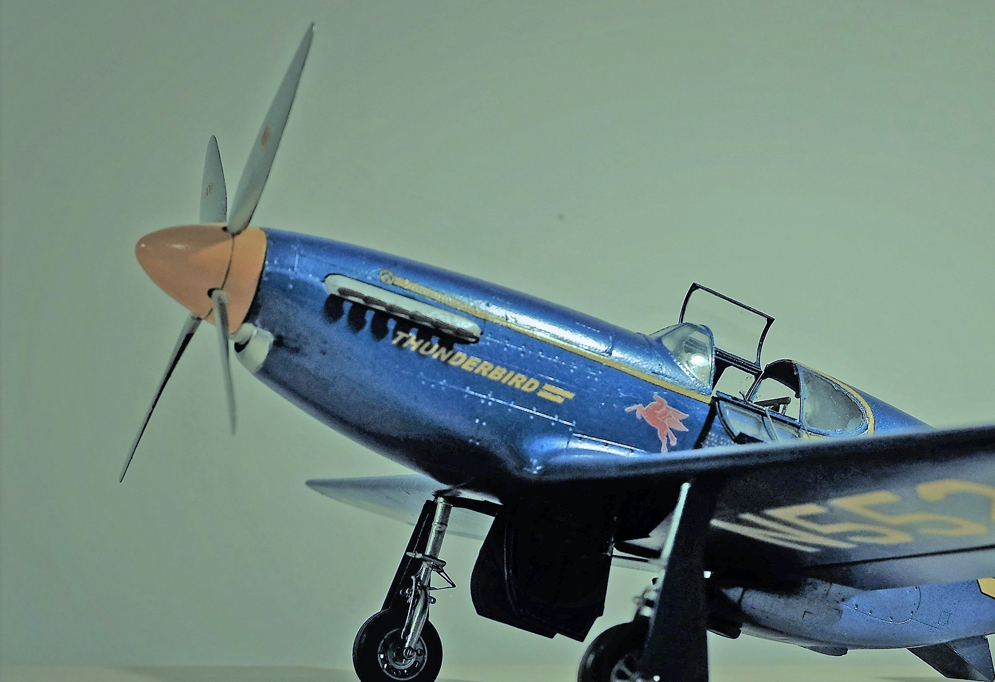
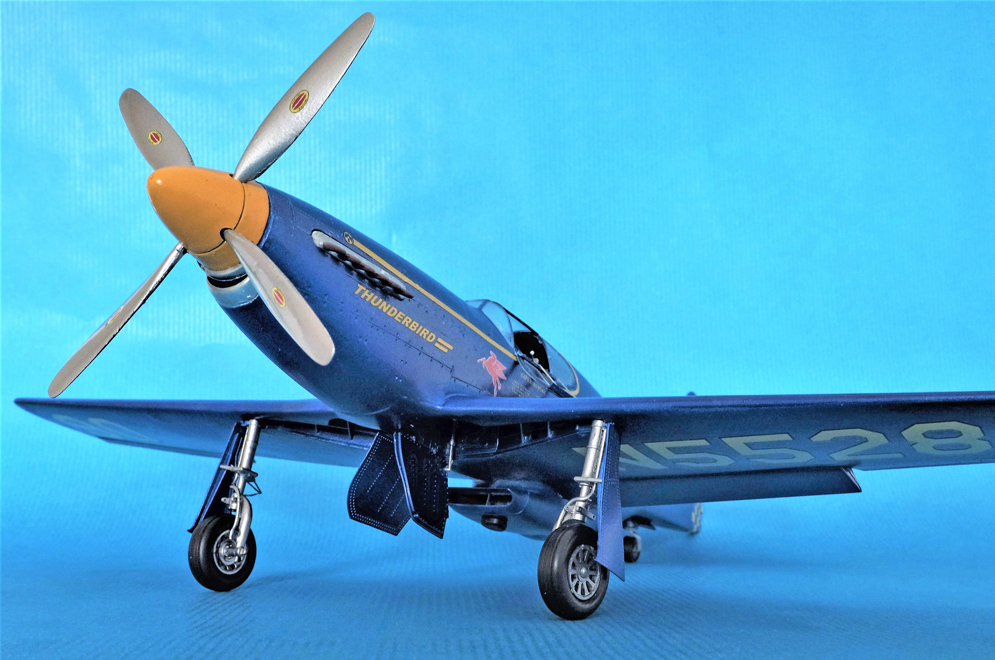
Modified 1:32 Trumpeter kit using Draw Decals and Tamiya / Vallejo paints. The prototype was sponsored by Hollywood actor and air force Brigadier General Jimmy Stewart to enable Joe Debona to win the 1949 Bendix air race.
Kind Regards
Alan R.
Eduard 1:48 P-51B.
The kit was some kind of “Easter special edition”, I bought it at the Moson Show last year (2024).
It has squeaky fit on certain places and vanishing rivets/panel lines around the edges, but the build was enjoyable. At least I could hone my modelling skills a little bit.
My other weak points are the masking on 3D surfaces and painting natural metal surfaces, so I could practice them as well :-D
Nagy Z.
The base kit is the Tamiya 1:48 P-51B Mustang offering and nice as that is, just look at what is achievable in terms of reality when you apply the effective weathering techniques that have become a bit of a trademark with Károly.
I really do think that this kit is finished in the best ‘silver’ scheme I have ever seen on a model – simply stunning!
Keep an eye on your SMN Techniques Bank – Model Weathering and Finishing Techniques area for some weathering tutorials by Károly.
Thanks Bera Károly ☺


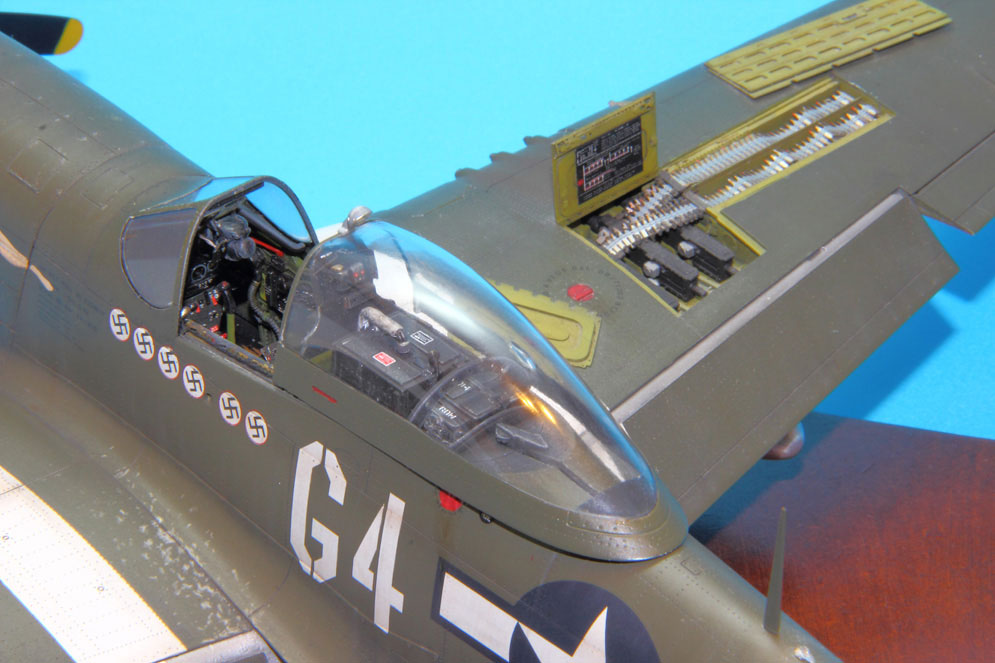
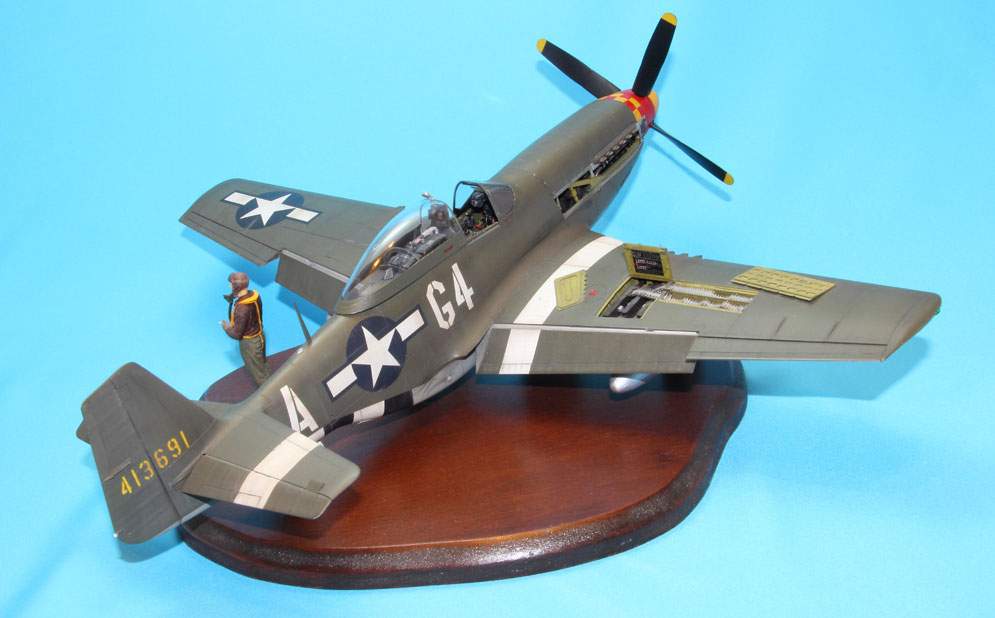
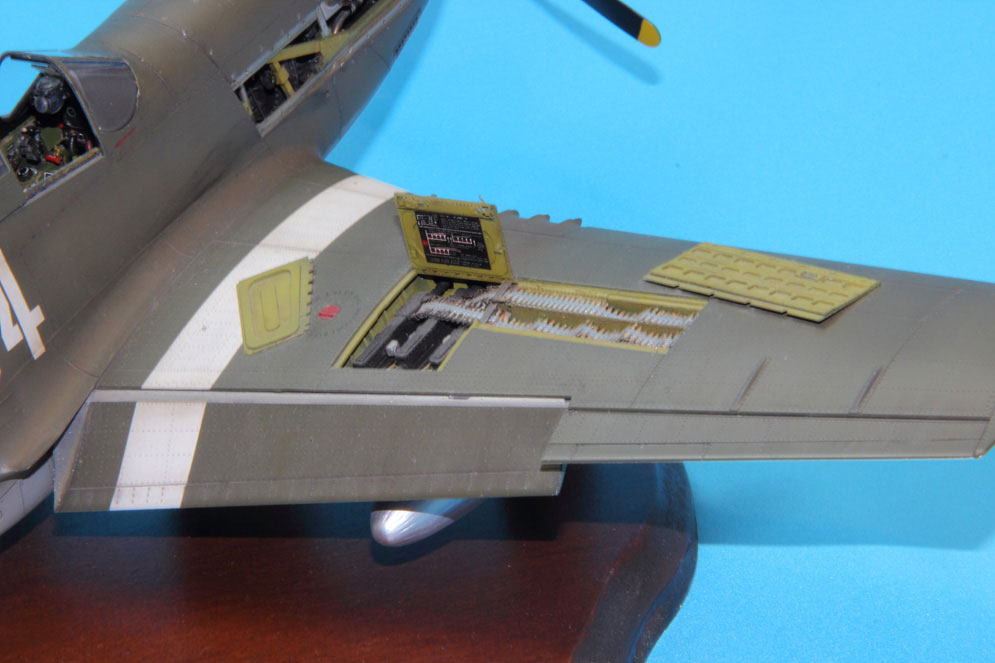
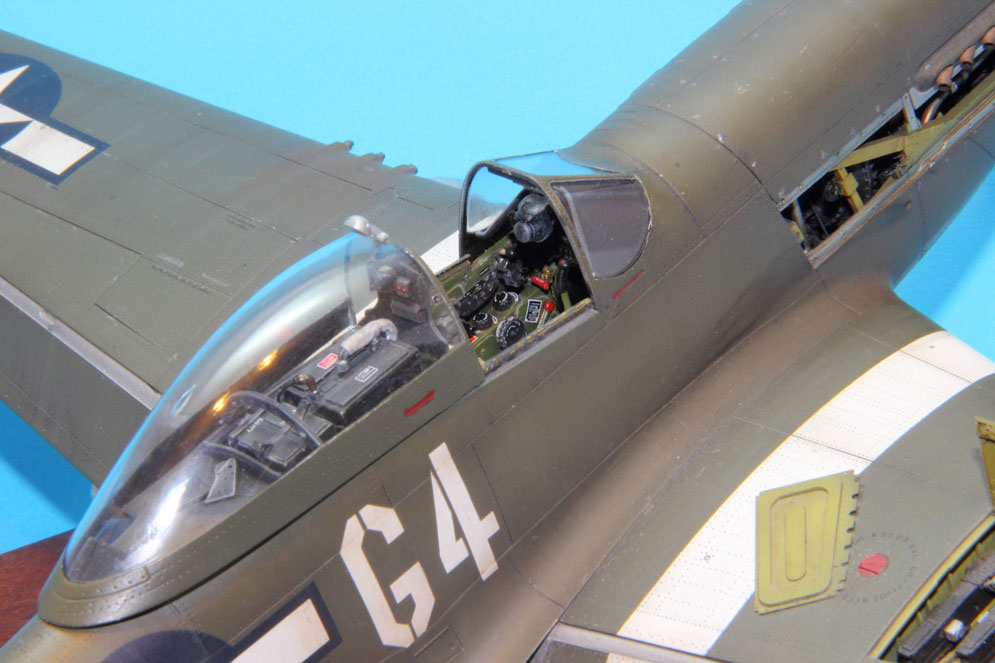
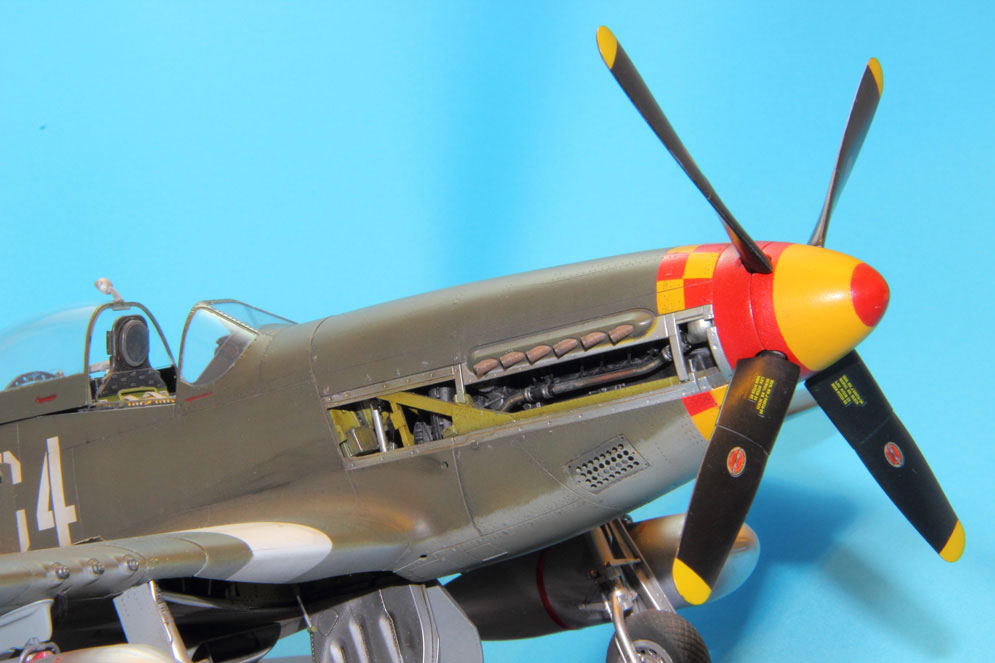
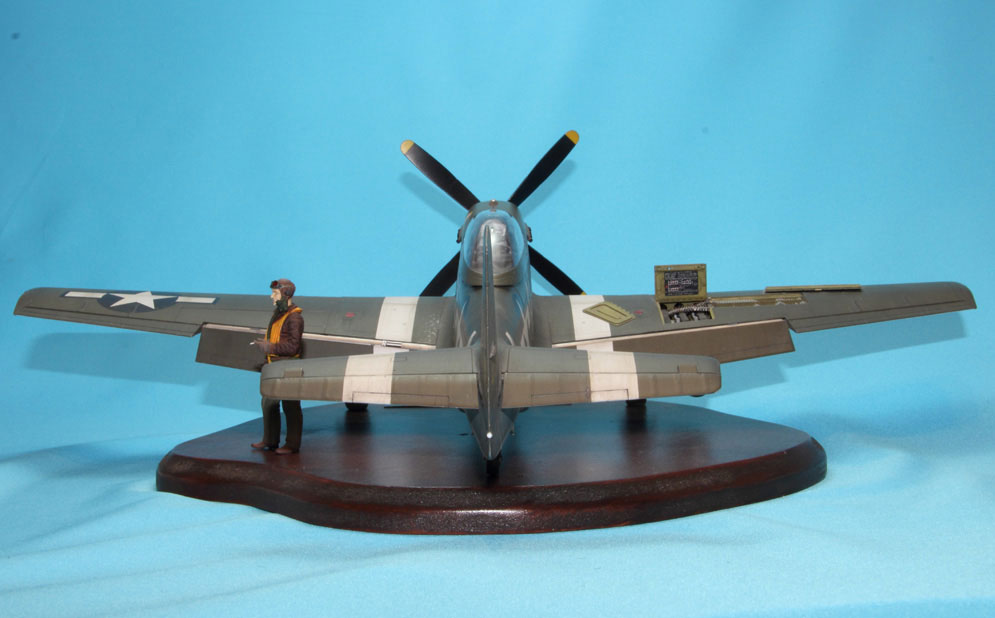
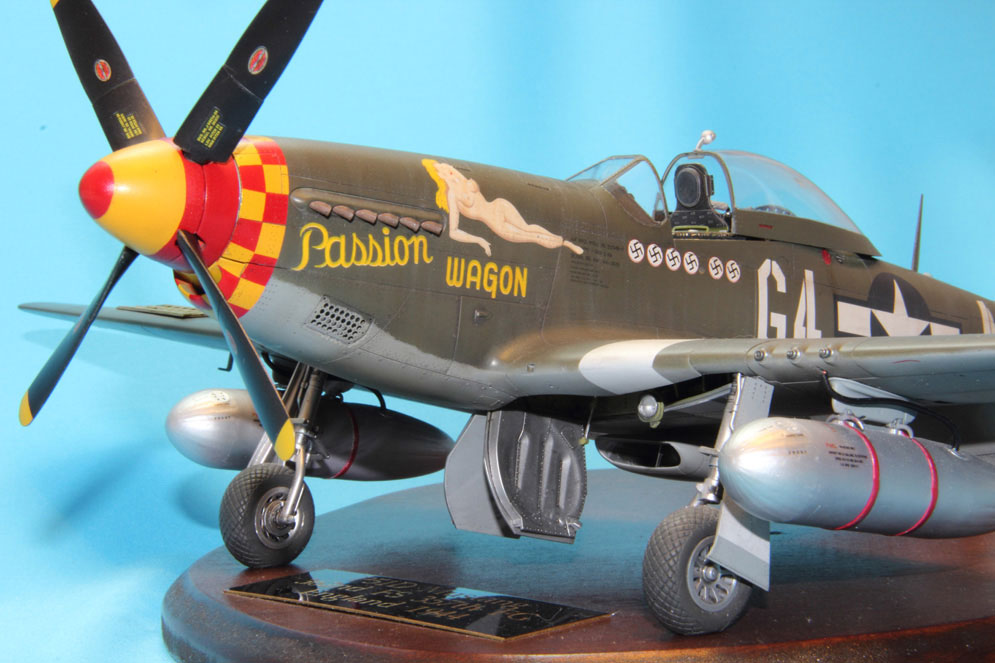
I wanted the model to be shown with the panels off and the Packard Merlin on show, this was a very straightforward task, by removing the forward section of fuselage halves along the desired panel lines. The Packard Merlin kit is an Aires resin product as the Tamiya kit does not offer this option, and if you follow the instructions for build from them you should have no problems with the assembly.
All paints used during the build were Tamiya Acrylics, Tamiya weathering packs for exhaust stains and 50.cal stains; the overall model had a coat of Matt varnish from Vallejo, and panel lines flushed through with Mig wash.
The chosen scheme has been based on Lt Ralph ” Kid ” Hofer’s P-51C 42-106924 QP-L of the 4th FG / 334FS 8th AF, Debden 1944. Lifelike Decals have a sheet of just that very aircraft of which I do recommend.
Martyn C.

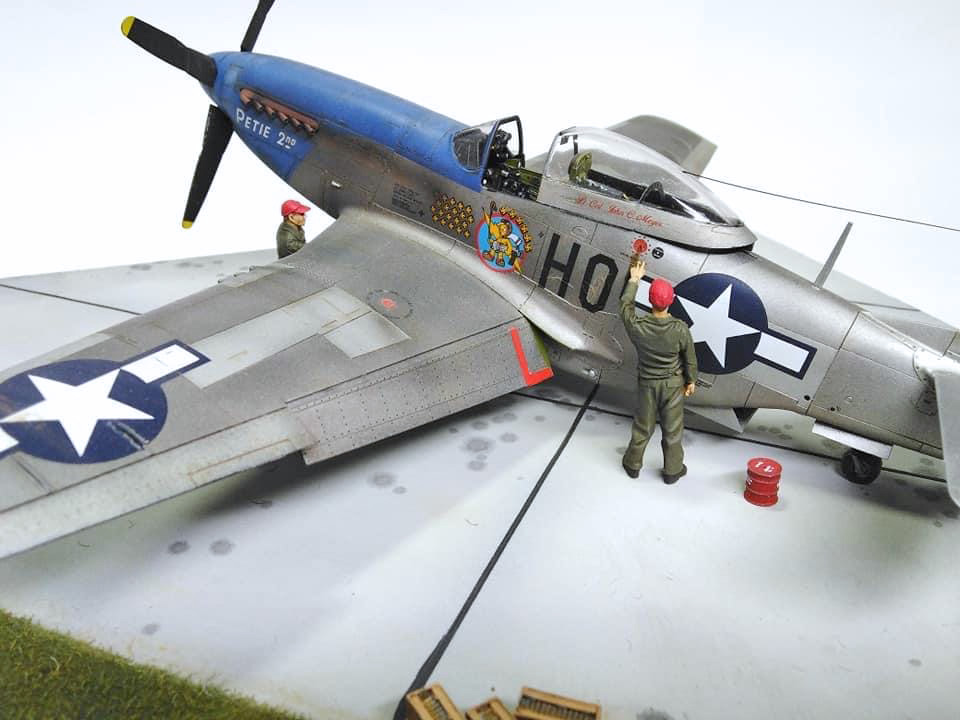
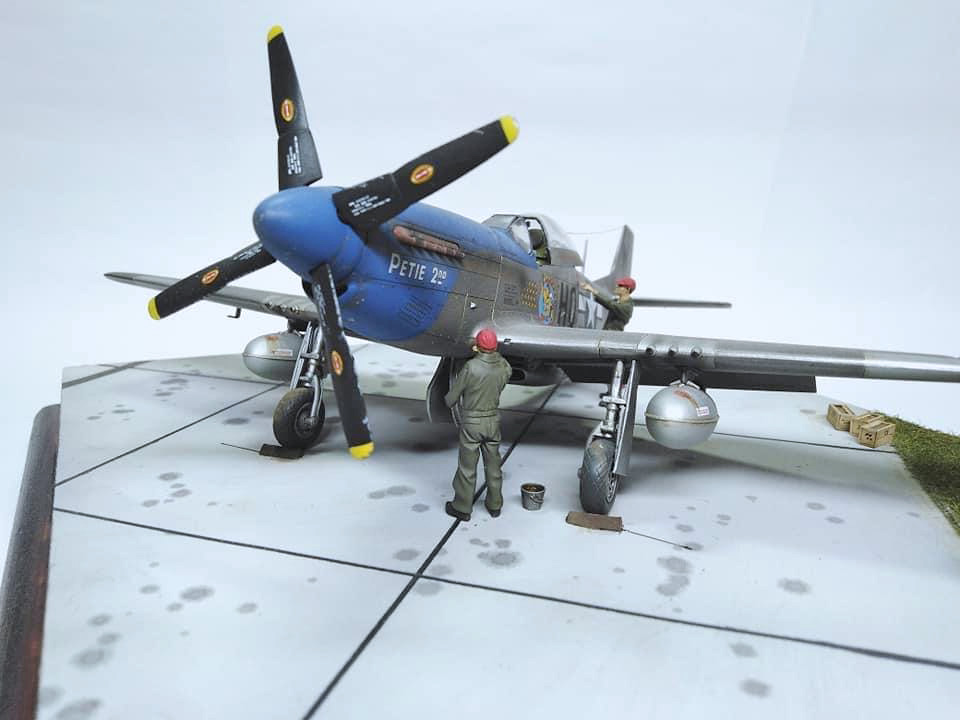

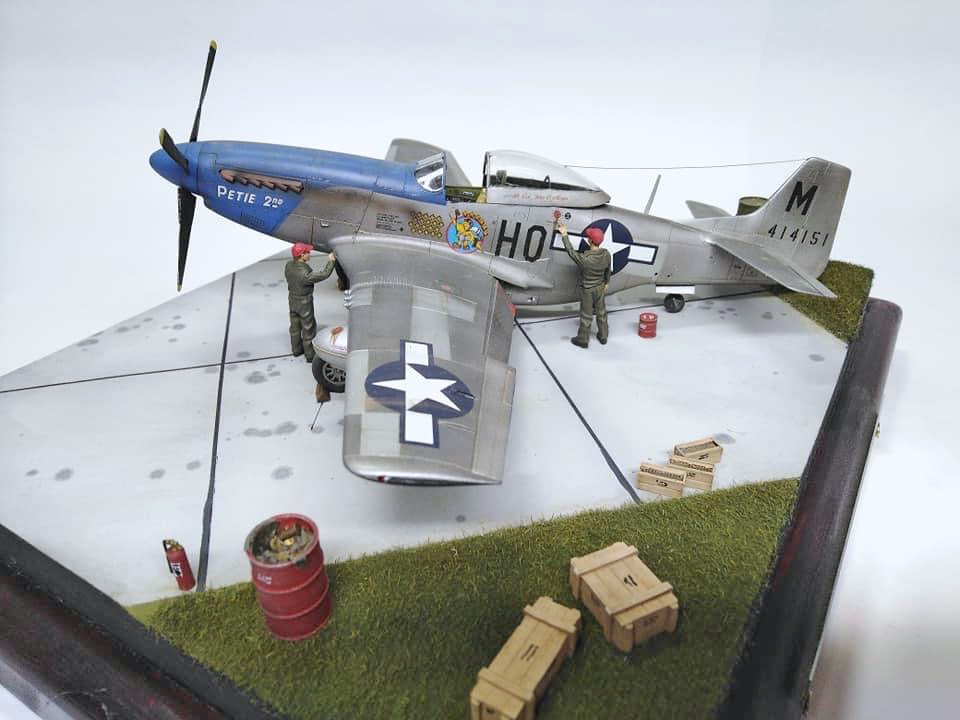
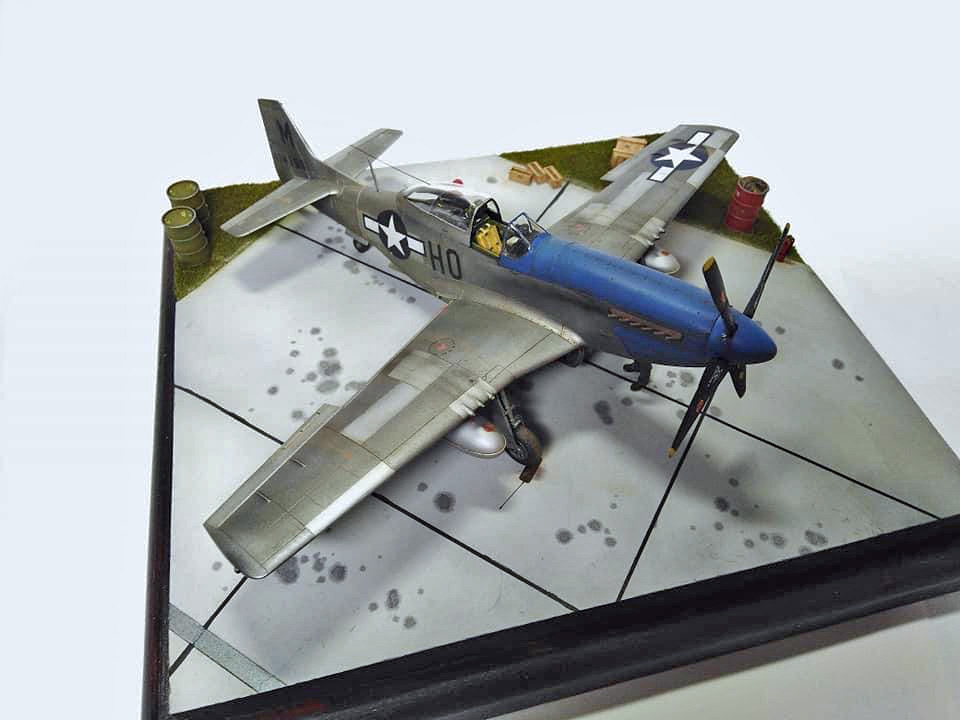
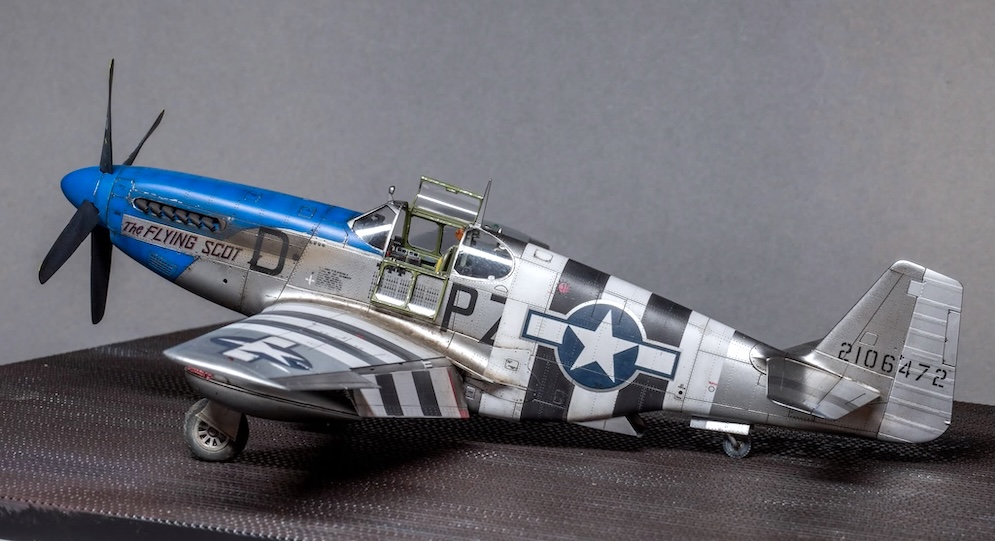
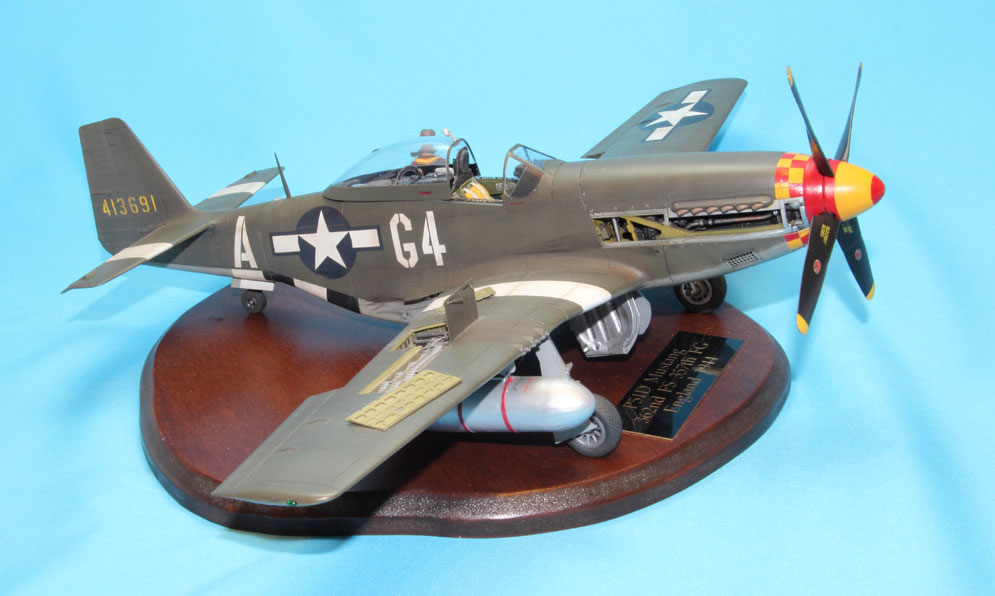
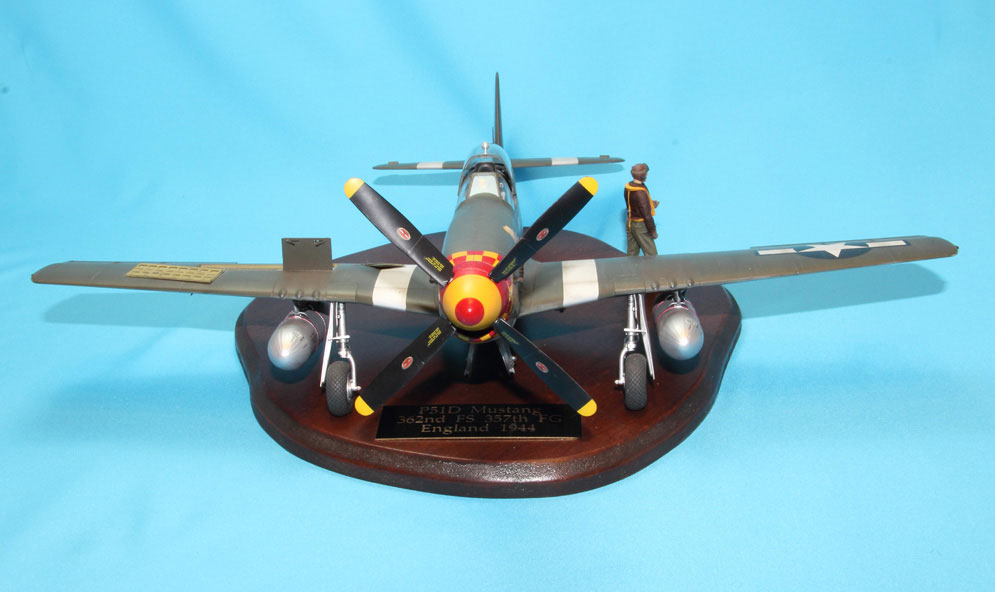
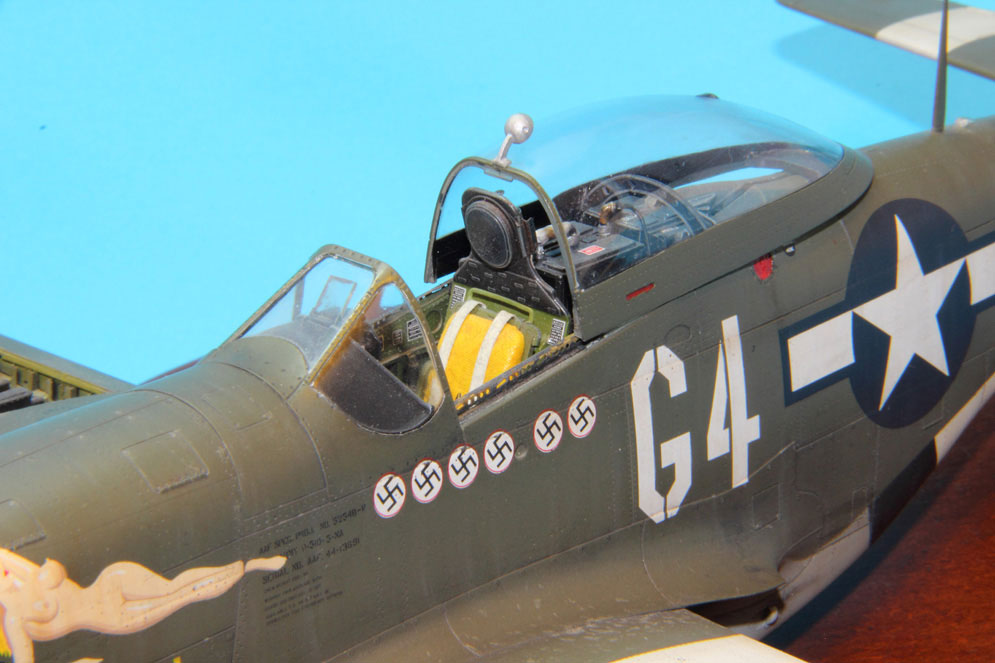
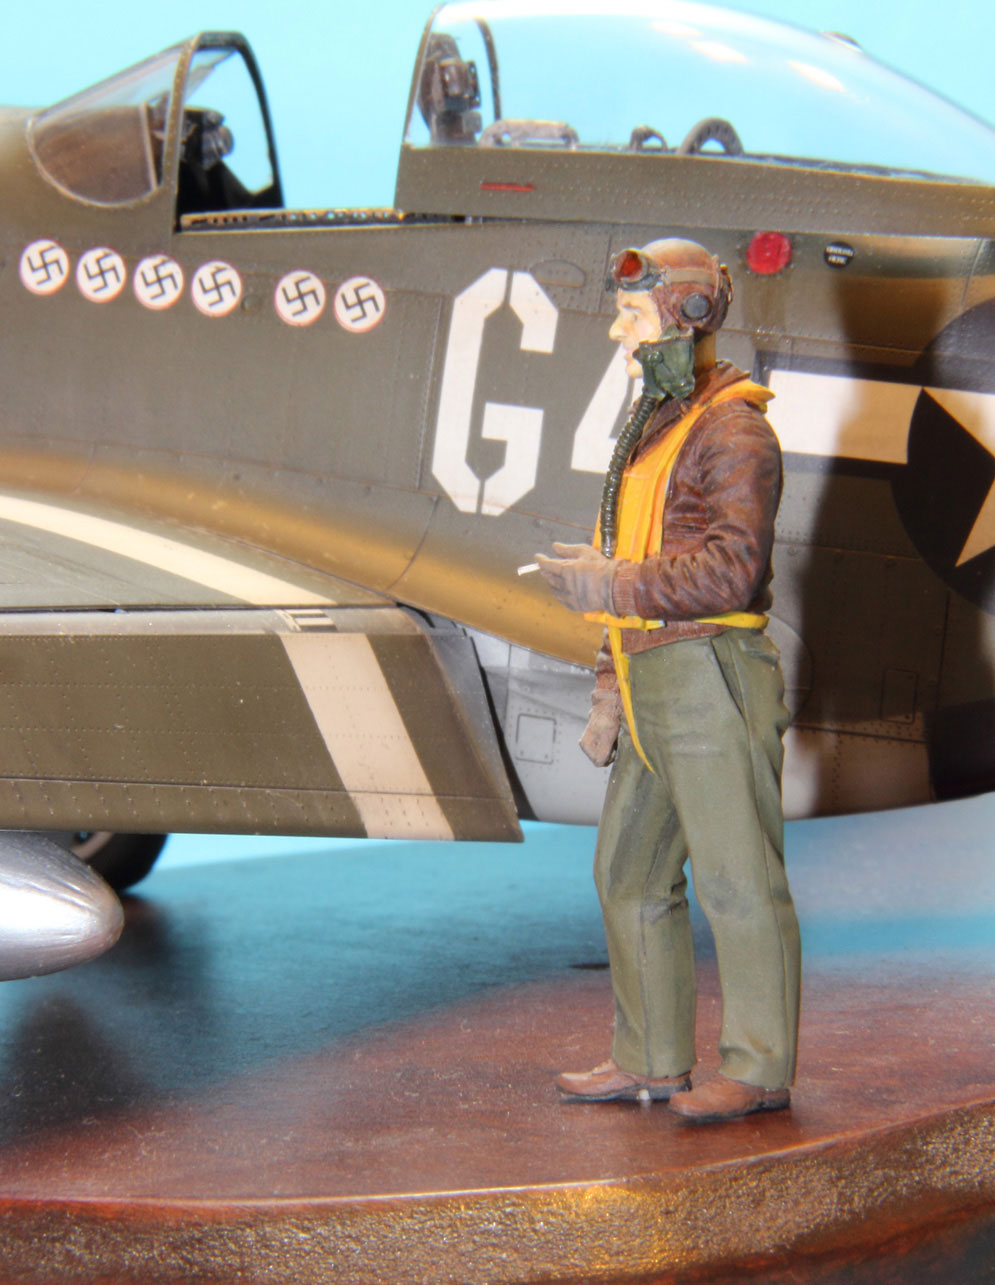
Here’s my P-51D “Pettie 2nd”.
I built this a few years ago using the Tamiya 1:48th scale boxing.
The only addition to the aircraft was a set for the seat harness.
The groundwork I built myself and figures/equipment came from a Verlinden set.
Hope you like it?
Ian R.
The decals are made by Cartograf, and of superb quality.
I built my model in the markings of “Big Beautiful Doll” flown by Mustang Ace, Lt. Col. John D Landers.
I used various shades of Alclad2 on the model, with Aeromaster Acrylics for the other colours used. The decals went on with no problem. The nose markings are in four parts, and lined up so well it’s hard to notice the join line. I painted the figures with acrylic paints, and gave them a wash with gouache.
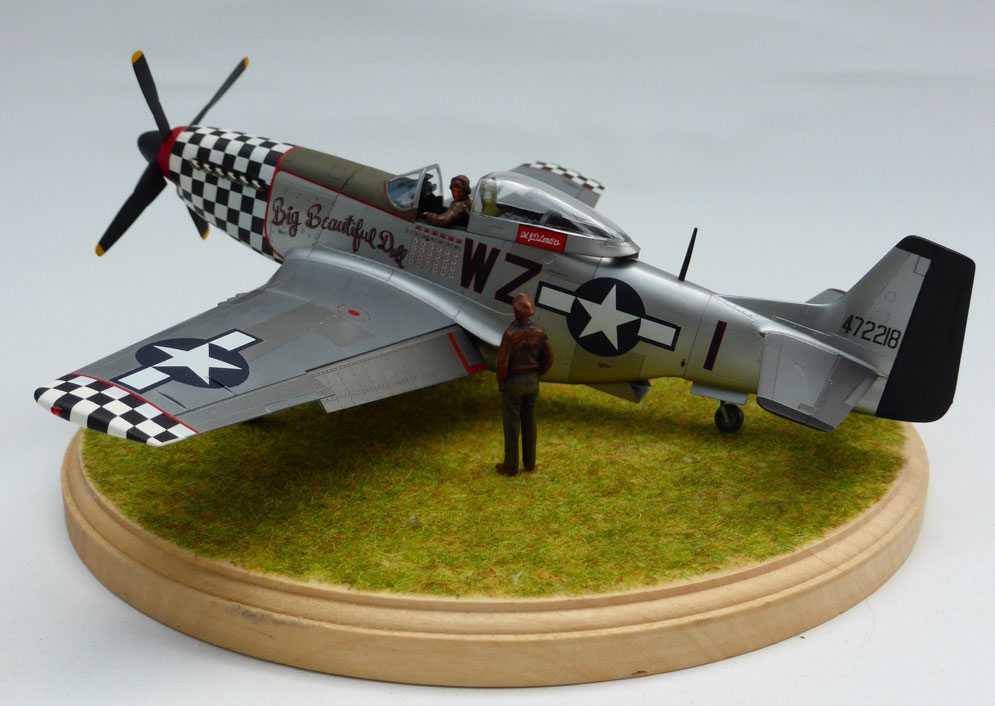
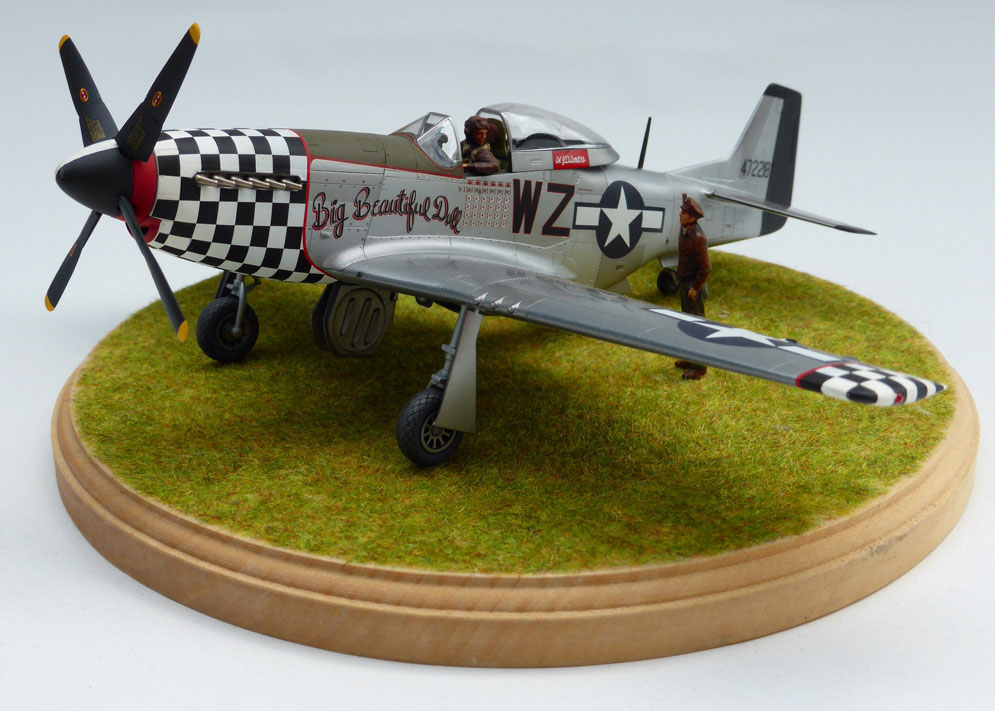
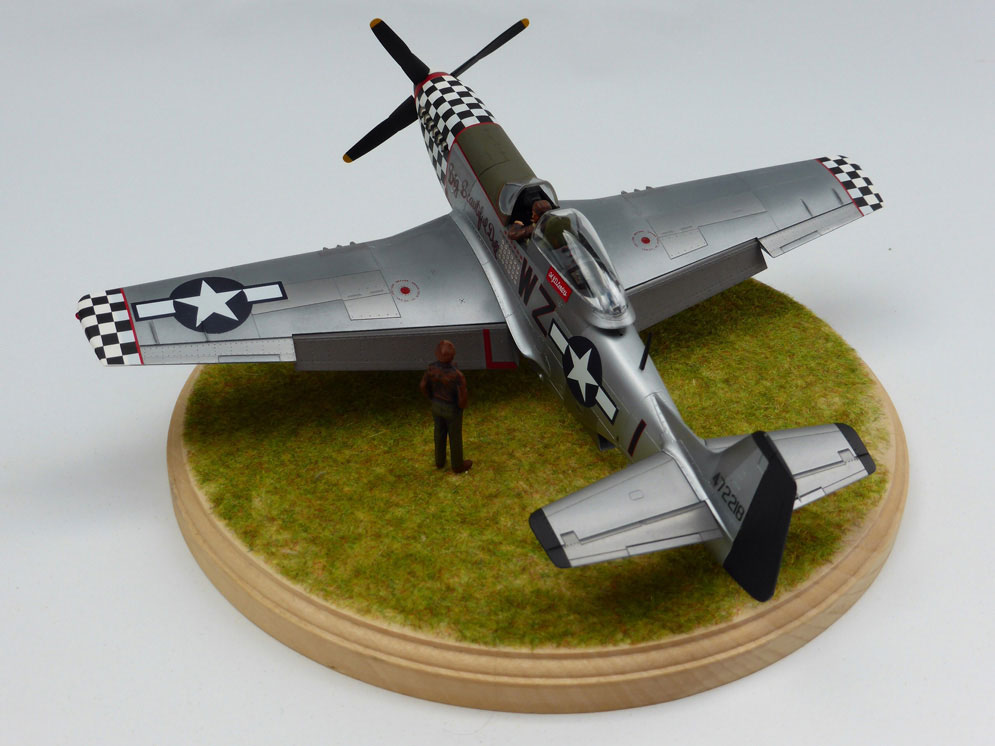
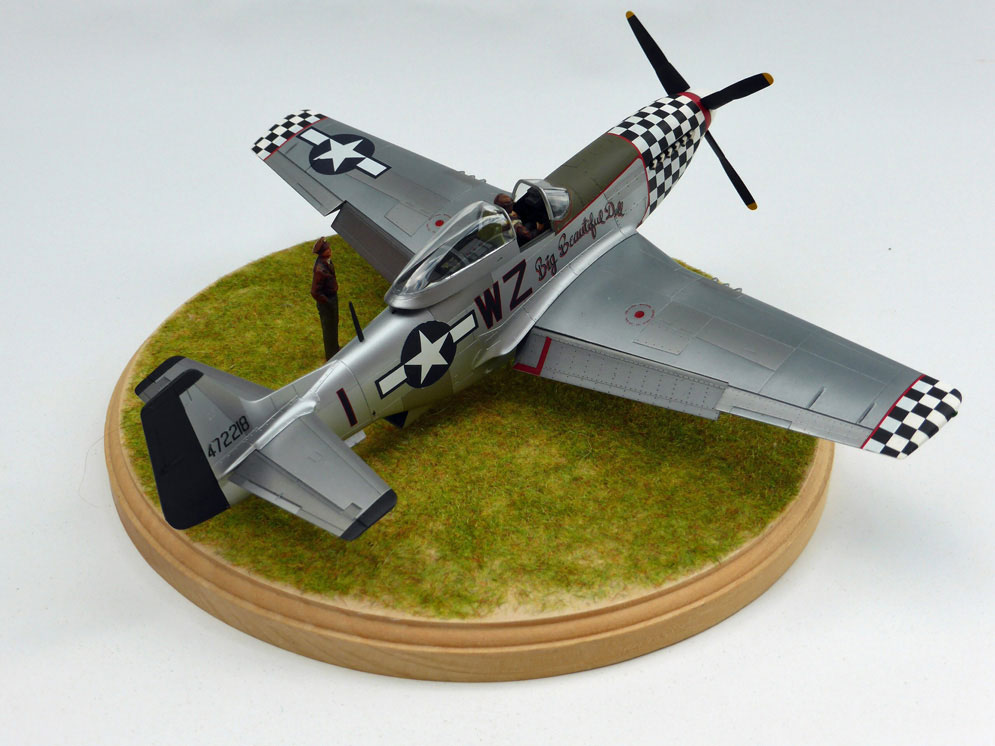
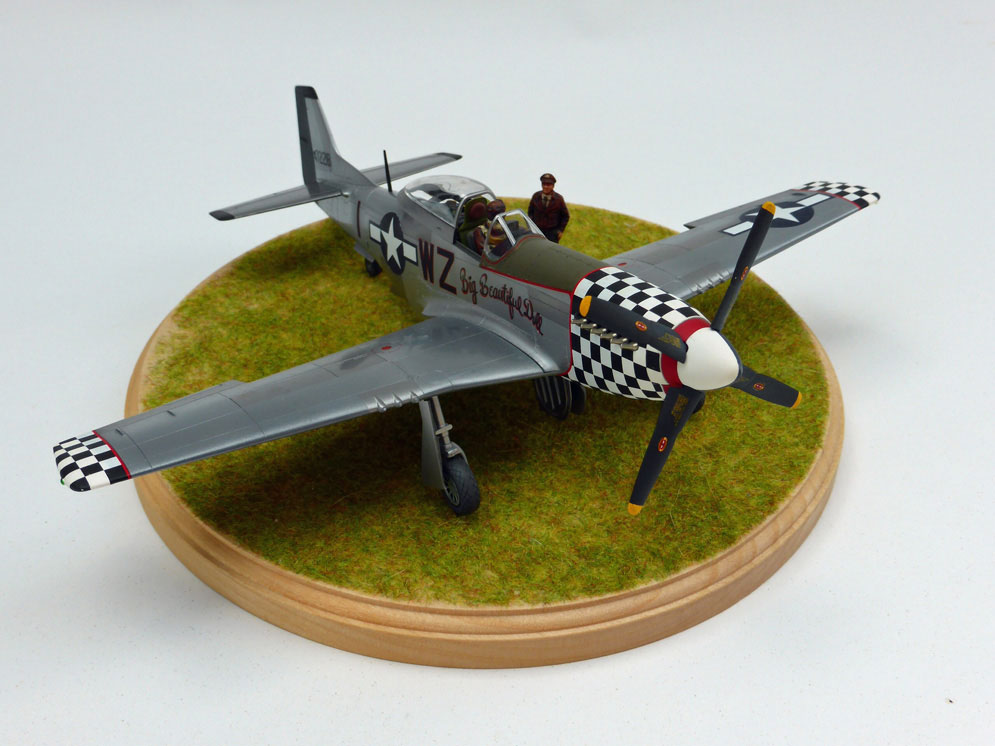
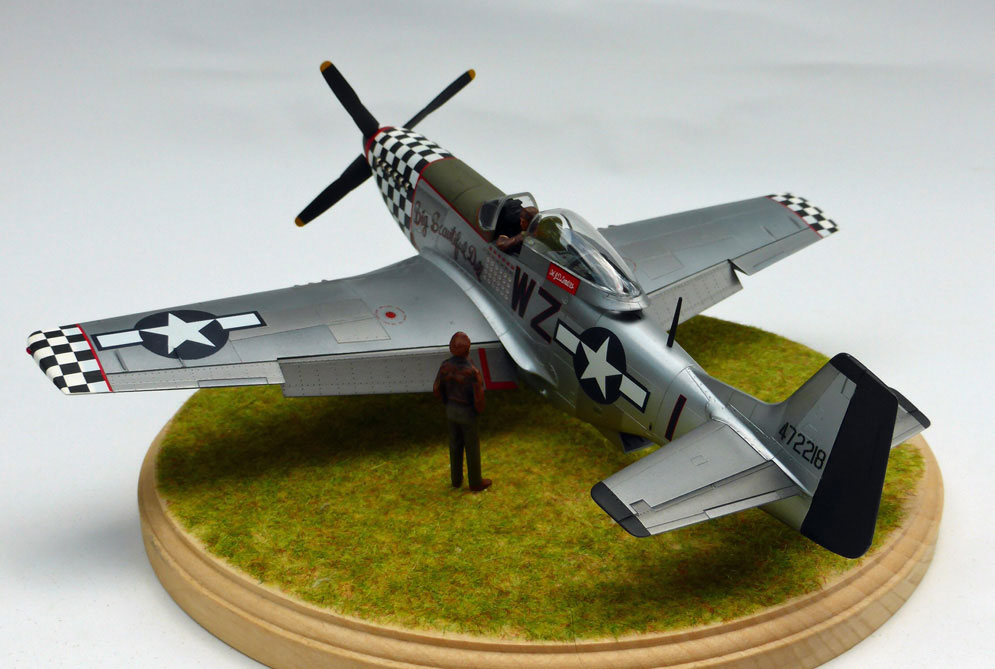
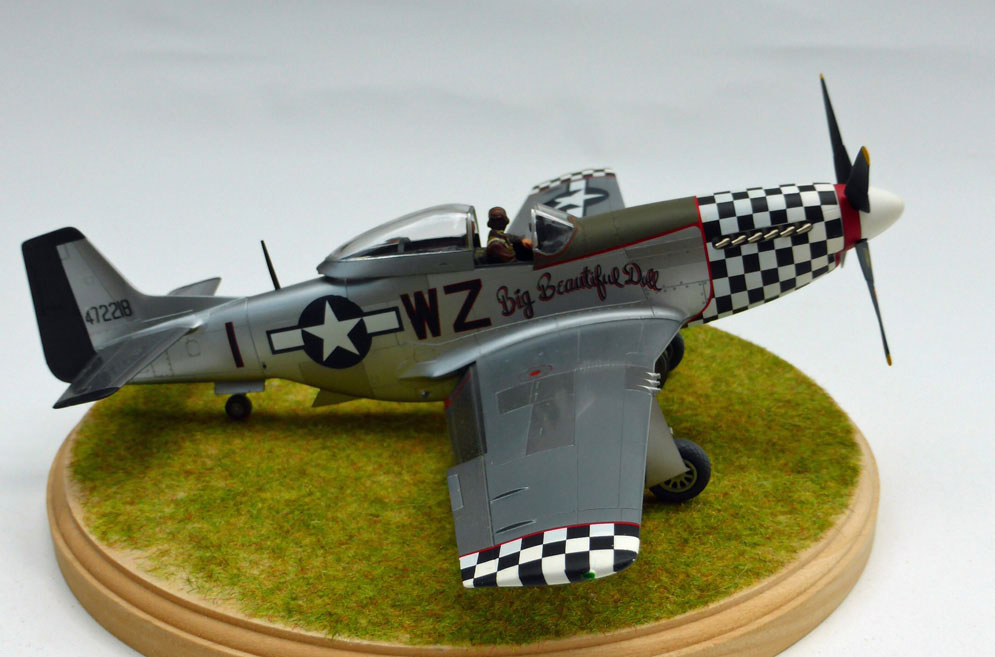
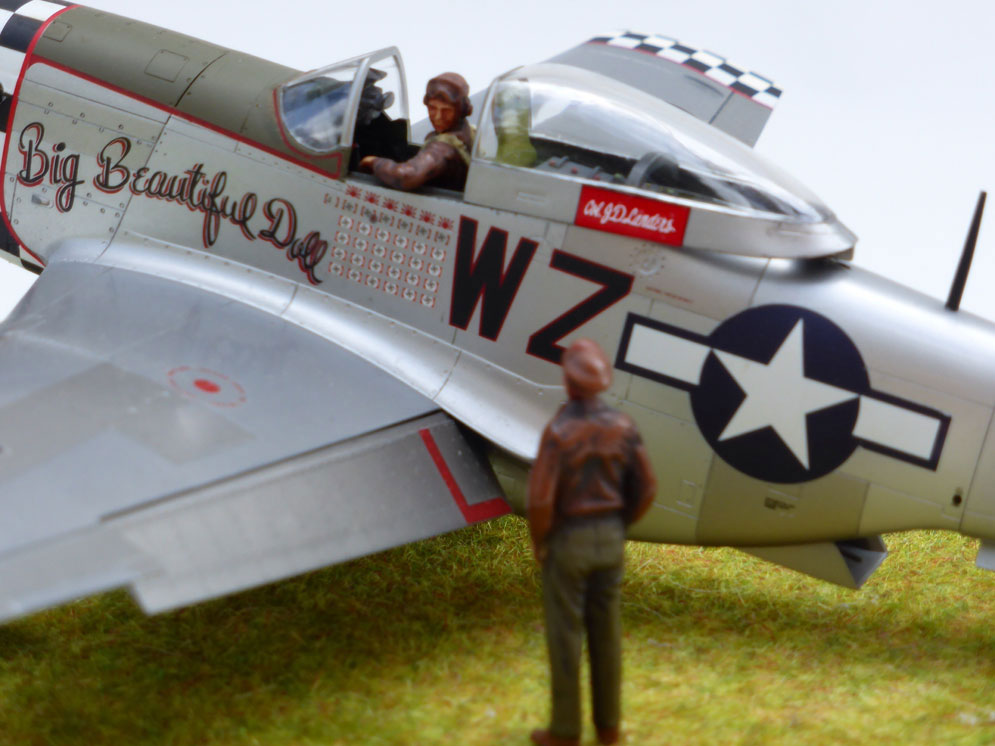
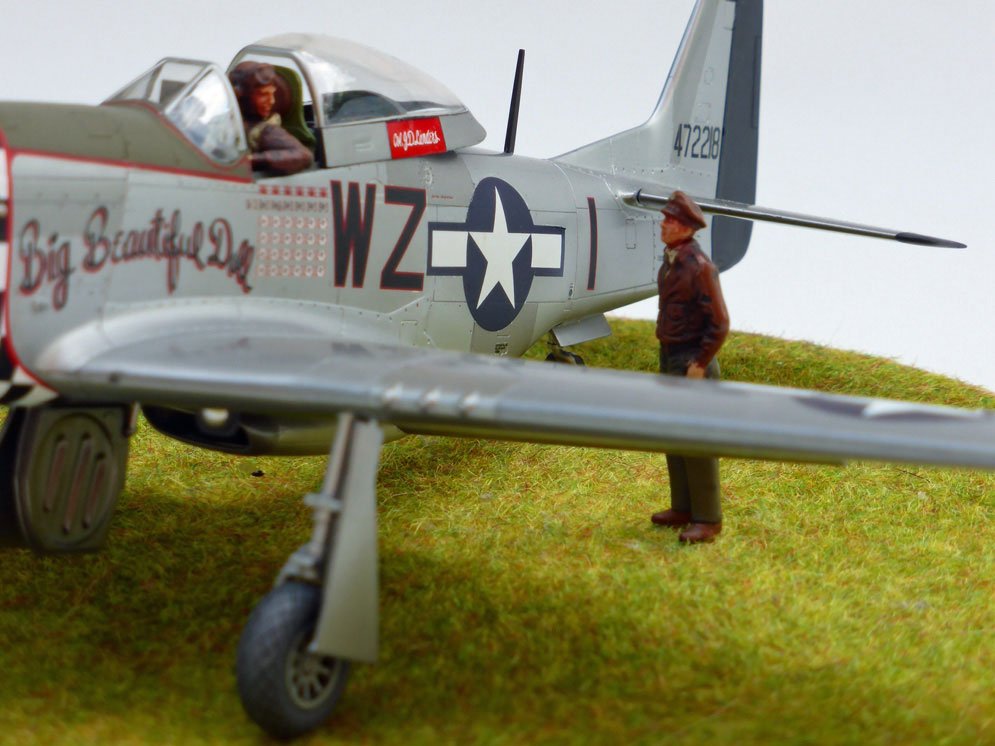
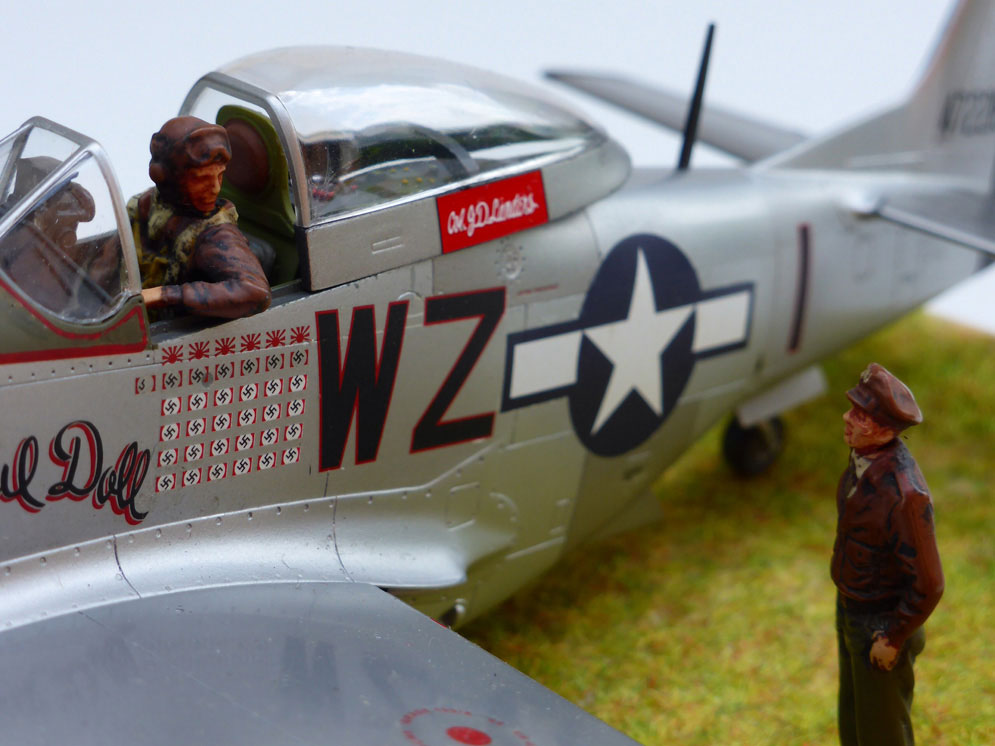
An Eduard Ammo Bay detailing set was used for the starboard gun bay. Again, I found the ammo chute links difficult to put together, the links being rather fragile when trying to bend them to shape! The wheels are resin replacement possessing a more natural sit than the kit items.
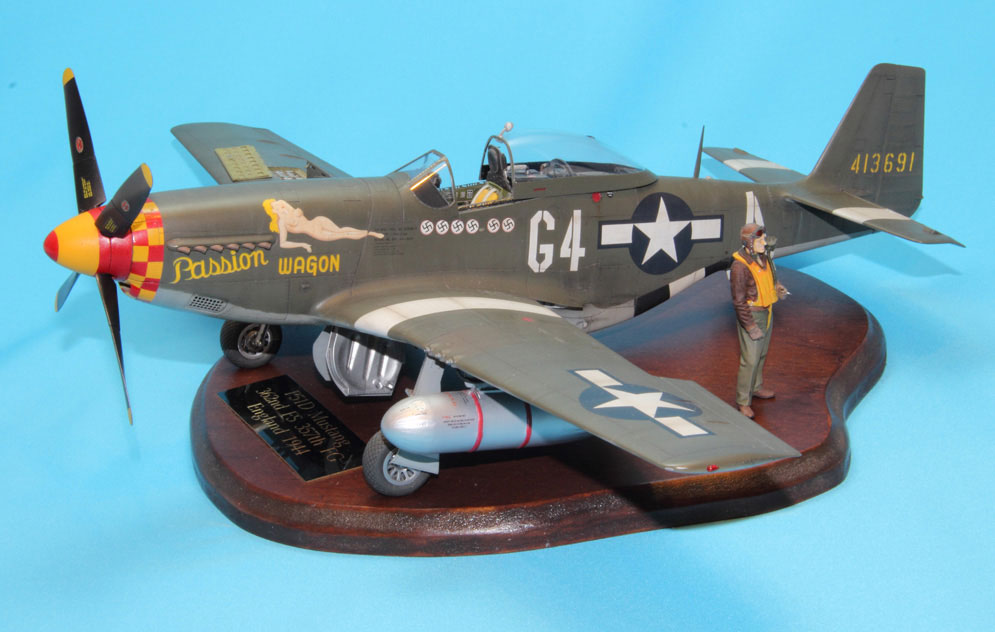
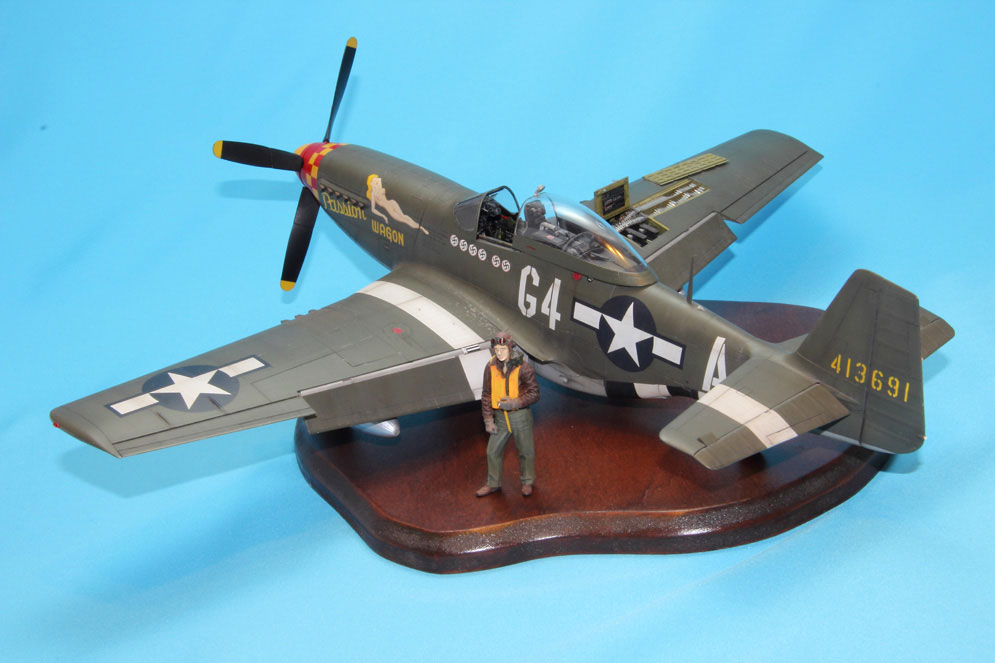
To finish off the construction – Barracuda “compressed paper drop tanks” with plumbing added by myself using spare Tamiya vinyl tubing inserted with copper wire. The Mustang was finished with Tamiya Acrylics using XF-81, RAF Dark Green and XF-83, RAF Medium Sea Grey. Research suggests that there would have been a strong possibility of their use on USAAF A/C operating in the European Theatre. Decals are from an Eagle Cal sheet “To war with the Yoxford Boys” aircraft flown by Lt. Arvil Robertson in 1944. Neither one of them looked as though they might fit the Tamiya nose, so, using them as a guide, I airbrushed the checks using Tamiya masking tape, time consuming, but was happy with the end result. The obvious bonus of using this process, was that the same mix of red and yellow on the checks was used on the spinner for a perfect match. Weathering consisted of a wash using Flory Models Dark Dirt. After a coat of matt acrylic varnish, I used my favourite oil dot method borrowed from the armour boys to tone down the paint. The figure is from Ultracast and is finished with a combination of Tamiya Acrylics and oils.


Well the model is the Tamiya 1:32 kit and it’s not actually flying at all!
This is how I did it… it’s easy… take very thin nylon line, and put a small electric motor with small battery in the plane. I had to destroy the original motor from the kit a little. Then go outside on a hill or a high house and hold it out of the window. Natural light is important. A few clouds are also good for a good picture.


This is my P-51D Israeli Mustang… I used the old Monogram 1:48 model kit.
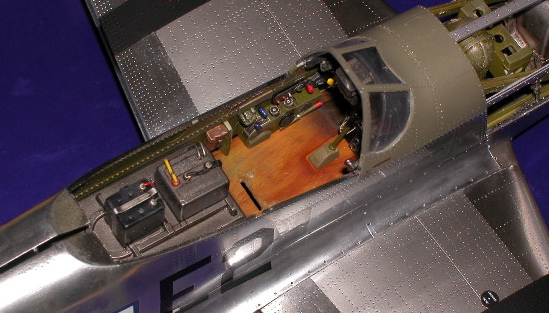
I re-scribed all the panel lines and hatches and sanded the instrument panel to the proper thickness so I could fit the decal in the back to give this cockpit much more realism.


I love the finish Adam has achieved here on his 1:72 scale Airfix Mustang using Alclad metallic paint. The model is made from their impressive kit released in 2012. Nice work Adam. You can find plenty of builds by Adam in your SMN, just click here! Geoff
“This model was my first NMF and this is the Trumpeter P-51 Mustang kit in 1:24th
It was quite a challenge, here goes:-
NMF probably in most modellers eyes can be really tricky and Not My Favourite! But this model came about as a result of eyeballing a P-51 at Goodwood some years ago. That is really what it takes to start a project like this. A real desire to build what you have seen.
It was my first project in metal at the time and the fact it was trumpeters 1:24th scale kit shows how uninformed I was about the difficulties to be faced.
Having enlarged the original image sufficiently to see what had happened to the surface a method of solving the problem was sorted out. It seemed to me that the general result of gradual oxidization was a greying of the aluminium on this bare metal aircraft. I liked this wear but I wanted a shinier finish. The greying I thought could be handled by the normal way of starting with a highly polished black base (gloss) and I guessed that the Chrome Alclad paint sprayed rather more generously than recommended could be rubbed back to create different textures. I used very light polish (like an almost dry T-cut) and masked off panels and, some I hardly touched, others I cut back enough to show some of the black through. I did this to the fuselage panels only and it worked well. So then I thought that I could see a bluish hue in some panels so I sprayed a thin (30%) coat of Tamiya Clear Blue over parts.
As it happened it was easier to work in this scale as it was not so fiddly.
Before starting to paint I had distressed the panels a bit using a small surgical blade (probably a 15) so the skin looked more “used”. This was done using a very light touch and spraying some gloss on to see the effect. Frankly this stressing only seems to be convincing in larger scales as otherwise it looks as if the aircraft has been involved in some sort of accident.
Alclad2 paints take quite a lot of punishment and the weathering I decided to apply straight onto an untreated surface. I just did not want to risk a product like “Future” fogging the surface. Starting with water colours and then Tamiya acrylics, both mixed with a bit of soap, I worked a mix of brown and black into areas likely to be affect by dirt and didn’t clean it up too much. Hope you like it?”


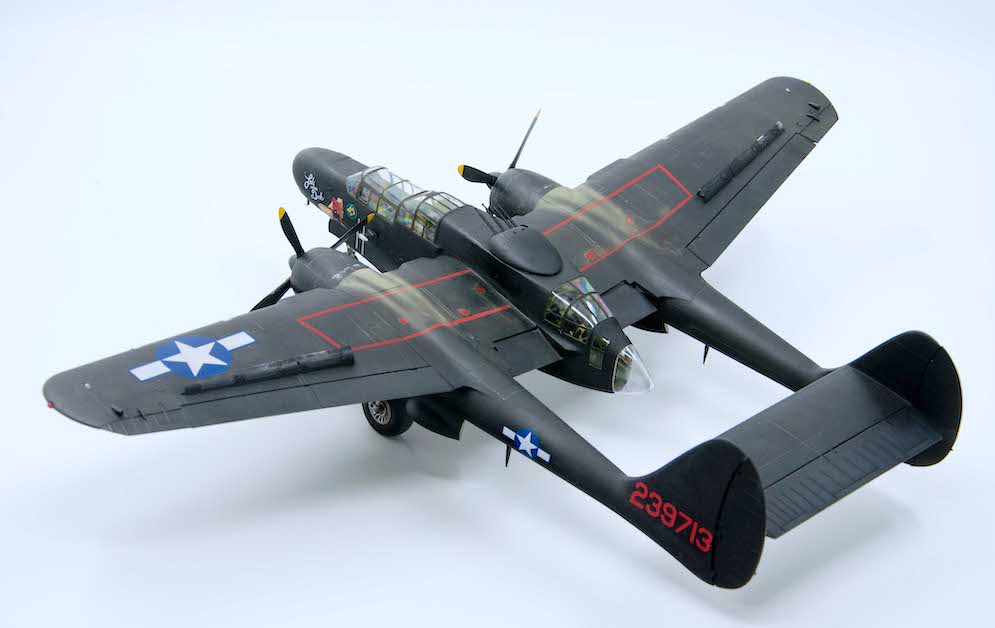
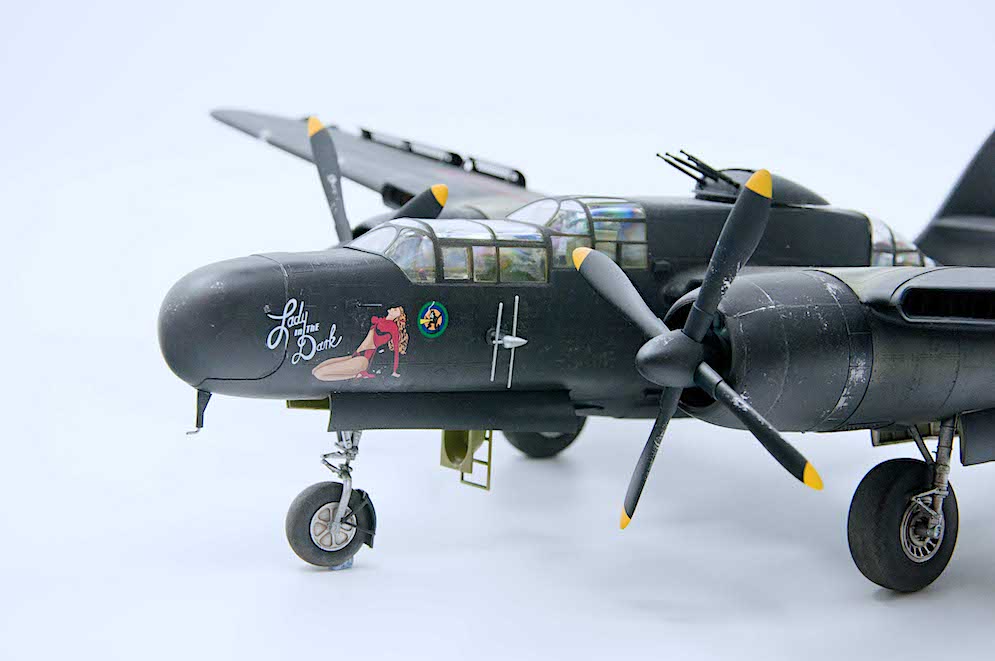
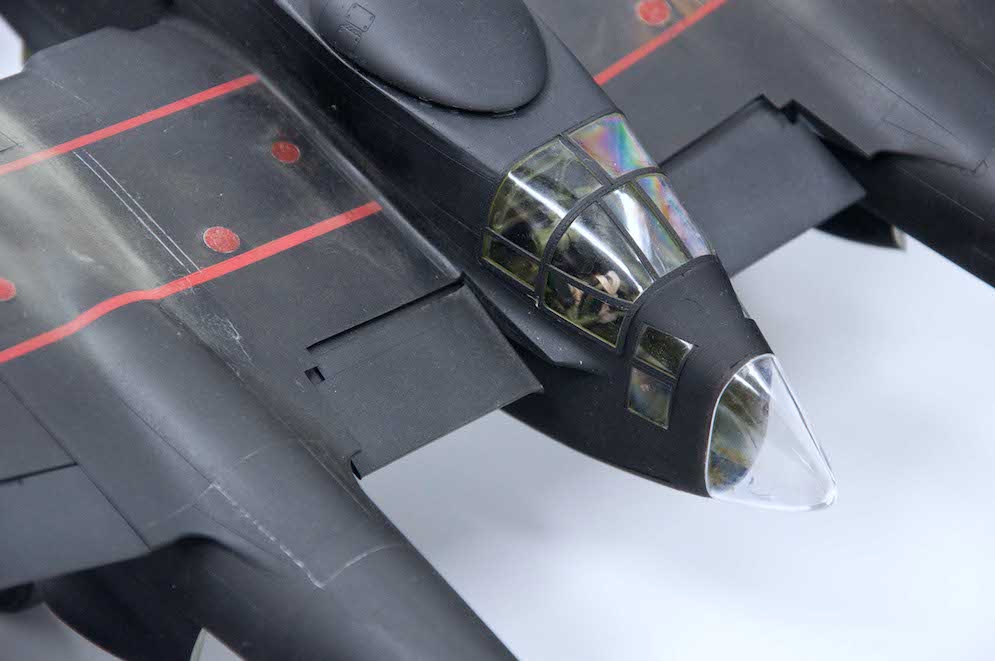

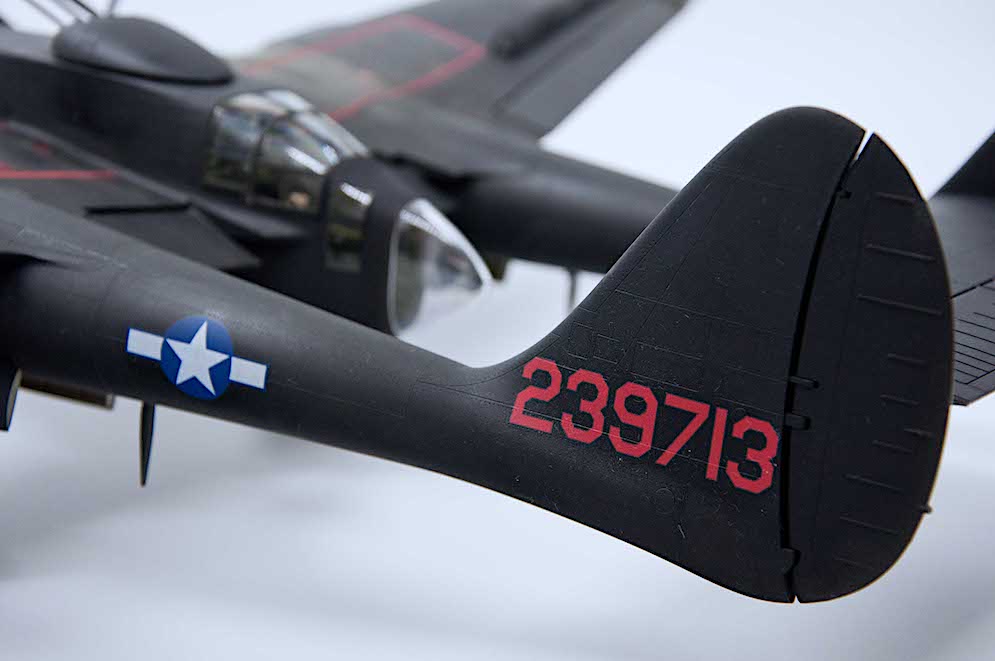
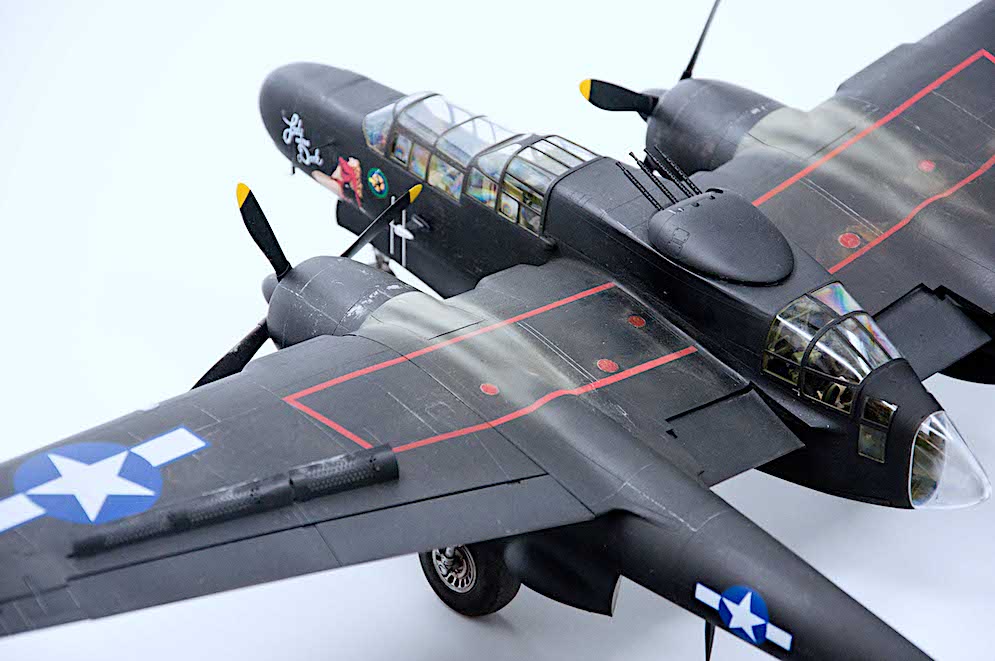
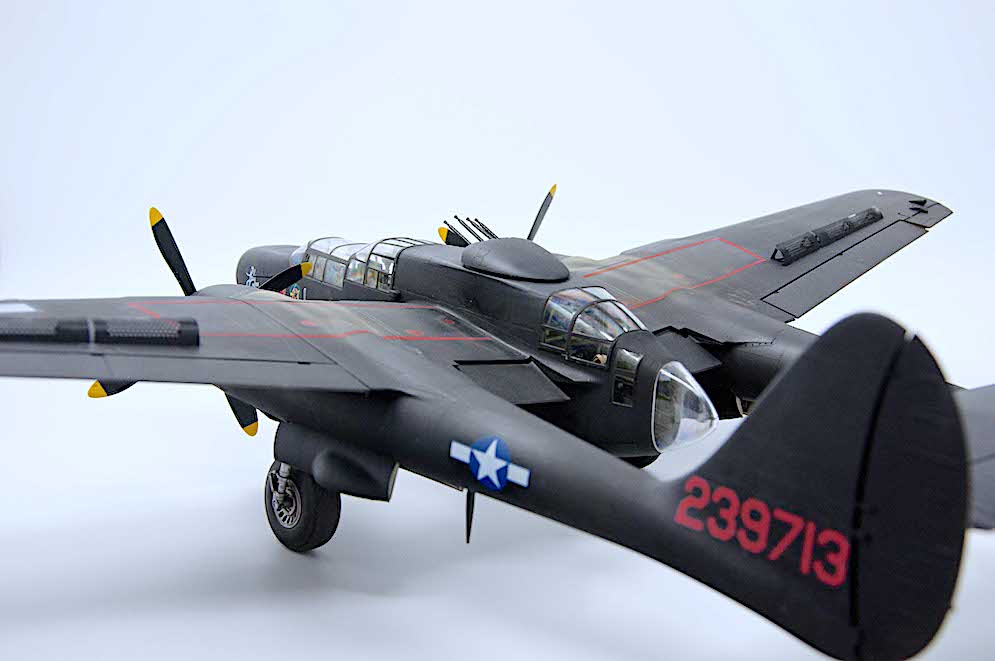

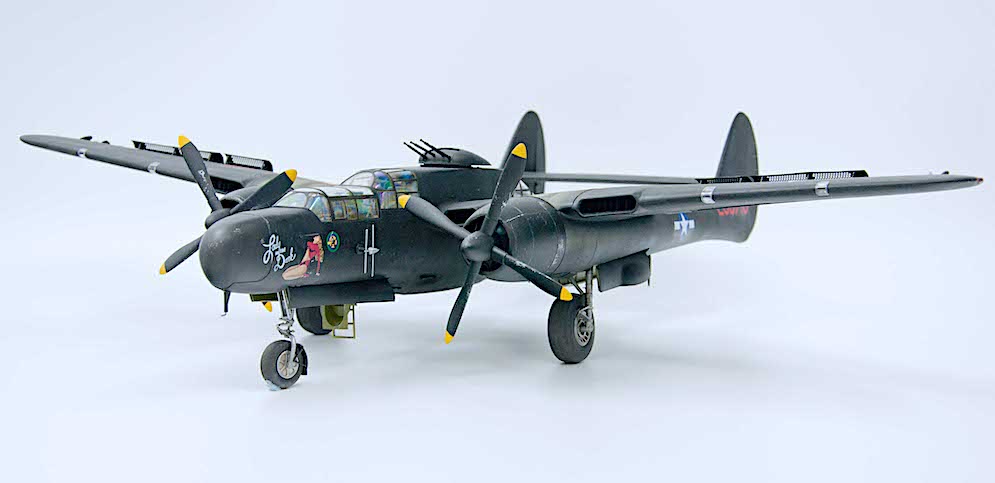
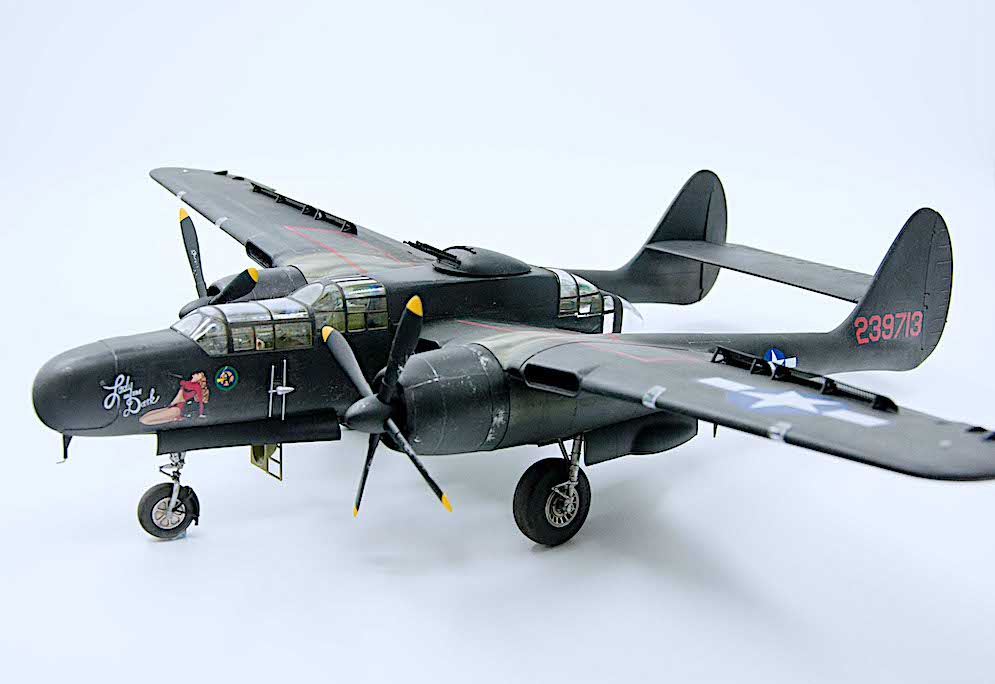
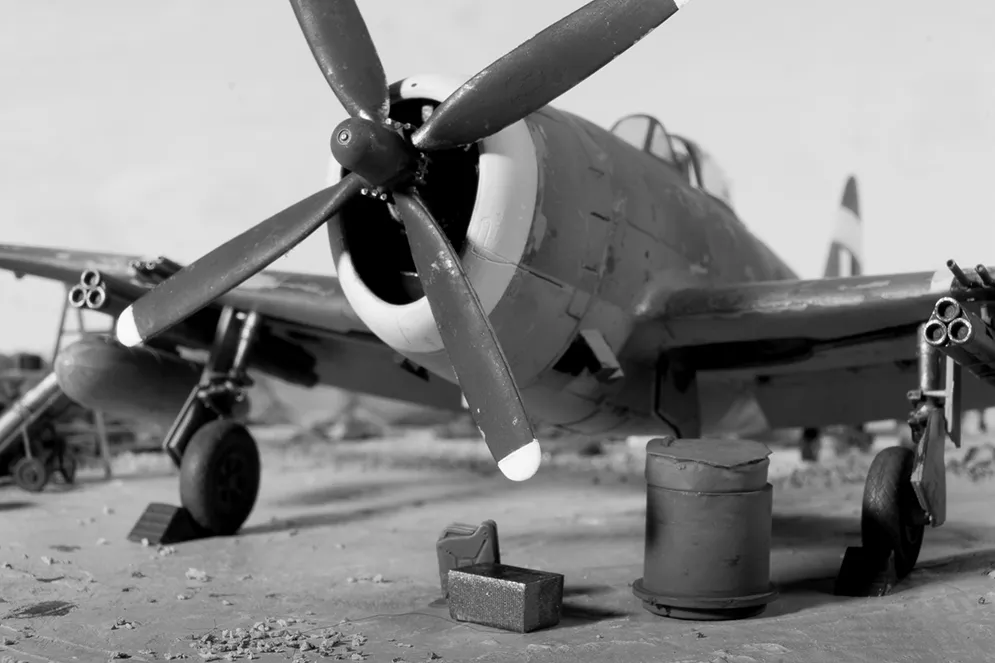
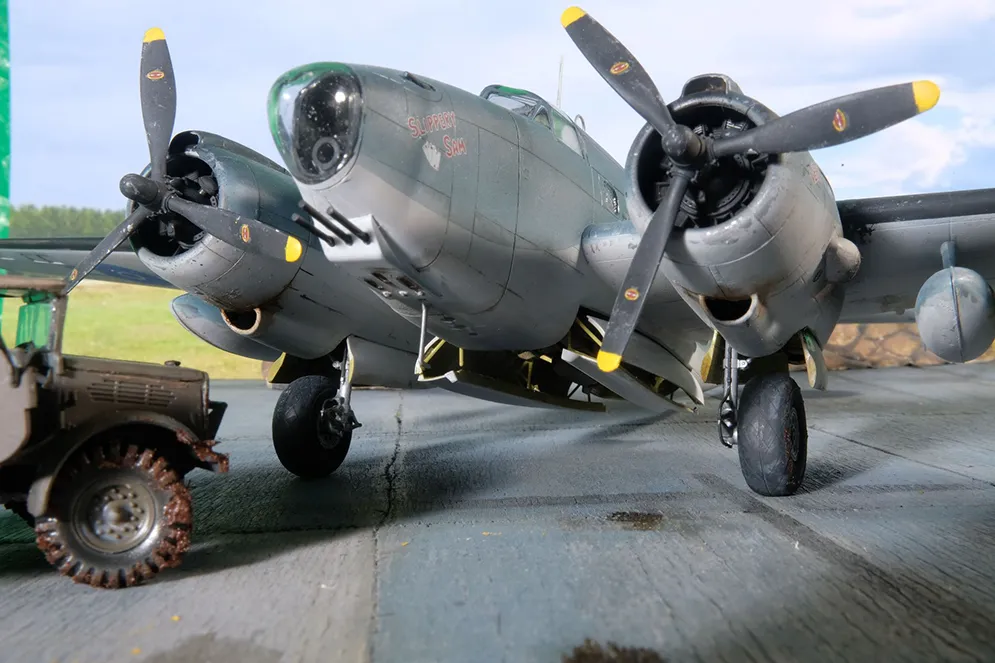
HobbyBoss 1:32 Northrop P-61 Black Widow – “Lady In The Dark”.
This was a particularly challenging kit. It seemed it wanted to fight at every single stage and I almost gave in more than once. Even though I did prevail, as you can probably guess from the small blob of Blu-Tac under the front wheel, it still managed to turn into a tail sitter, as I couldn’t fit all the weights provided. It all proved to be worth it, though.
Geoff C has a full build of this kit in SMN.
Dave P.
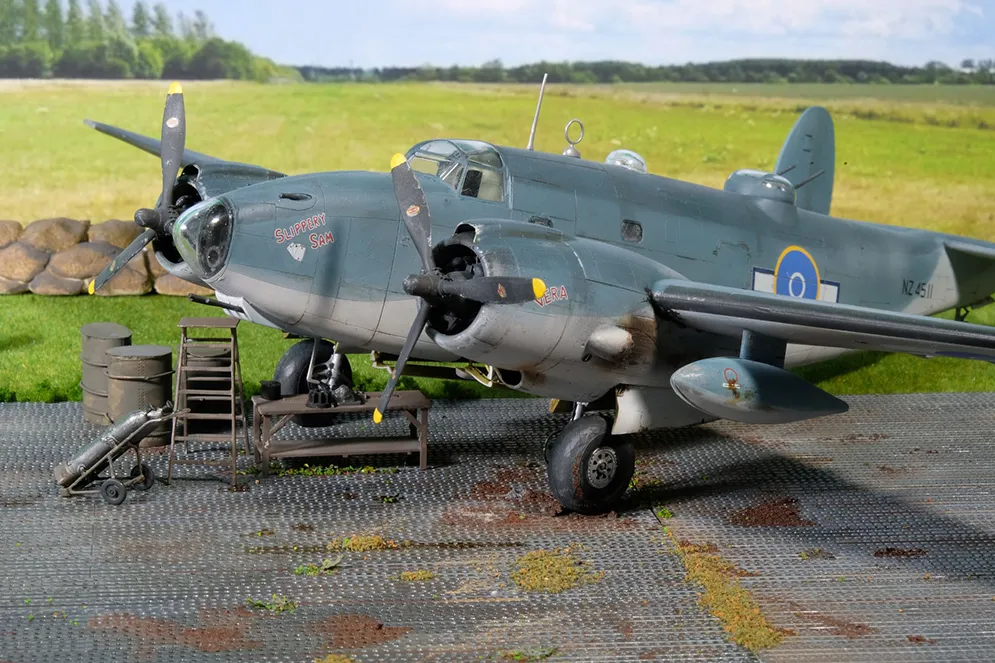
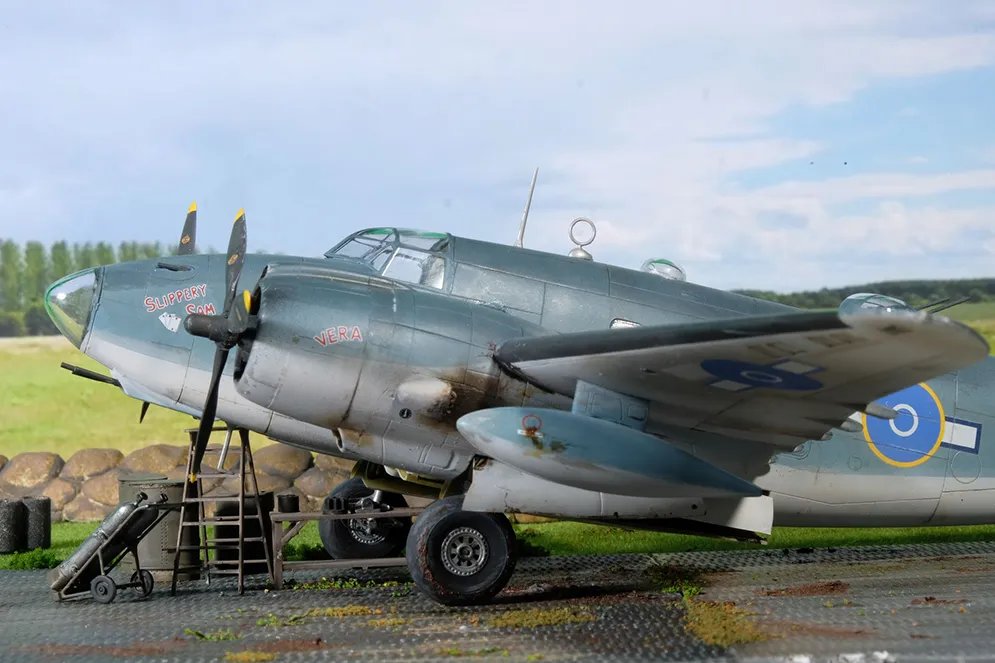
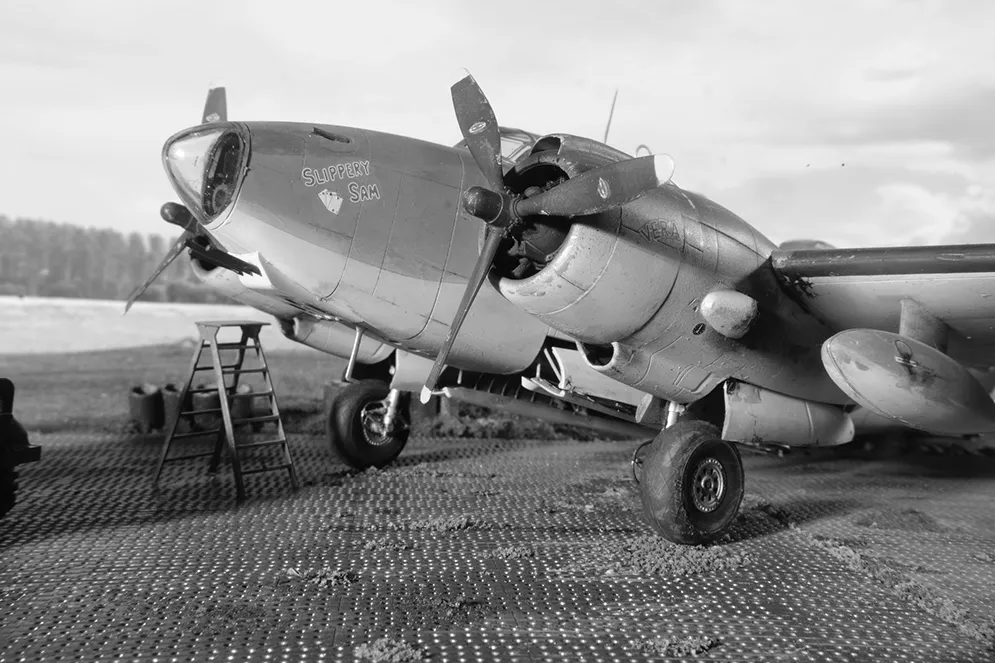
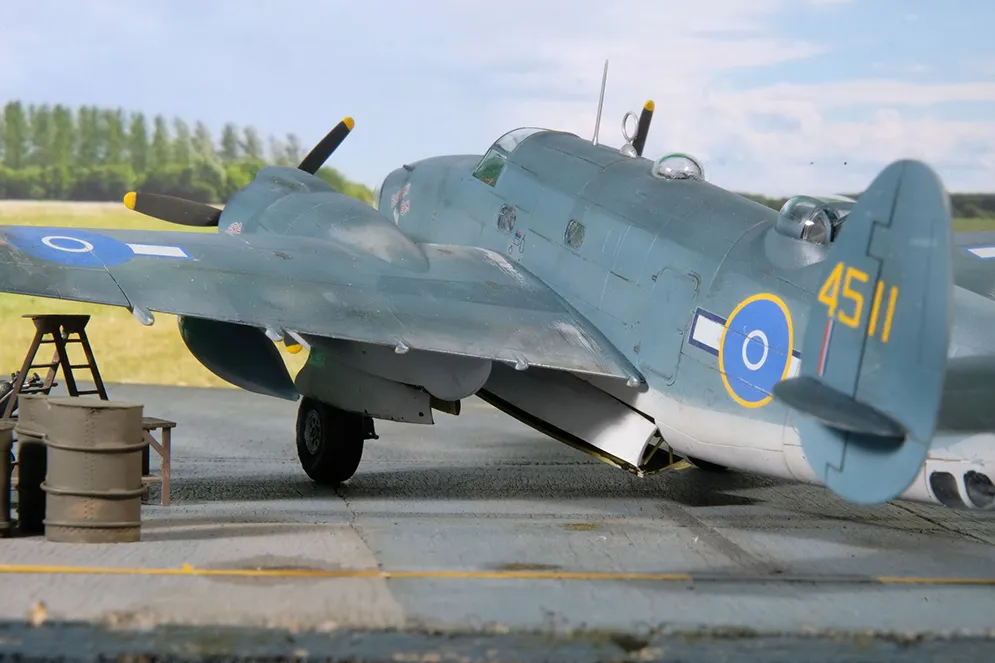

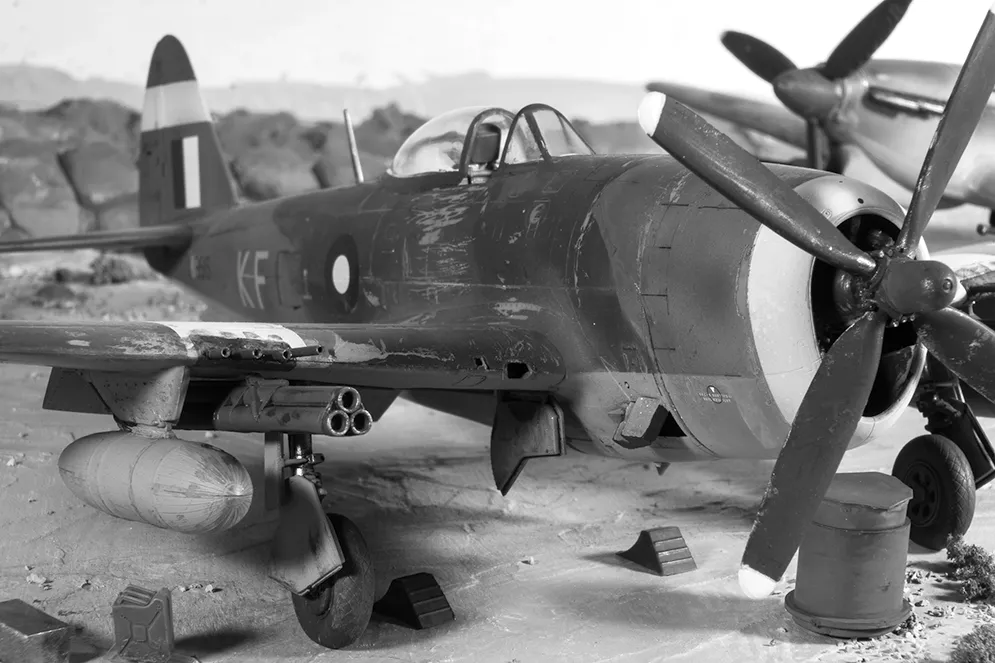
It utilises the Ventura Publications (V4882) decals set and is finished as a RNZAF aircraft, NZ4511, ‘Slippery Sam’, of No.1 (BR) Squadron.
The model is SOOB apart from a masking set, and was a straightforward and reasonably satisfying build overall.
I reckoned that it would be a reasonable assumption that this type of aircraft may well have been operated on the ubiquitous marston matting in widespread use in the Far east, so decided to team the aircraft with my newly completed example as well as my usual tarmac scene. I added a few home-made bits of airfield kit, including just visible in the background some sandbags cobbled together out of B&Q home filler (roughly cut into suitable size lumps, shaped and put together as a sandbag wall. It was allowed to dry with some encouragement against its natural propensity to ‘slump’ out of shape.) Lastly comes the excellent Airfix WW11 15-cwt truck which just features on a shot.
Pictures were taken with my usual ‘studio’ flash kit and Fujifilm camera…… more of that in the techniques bank!
Dave M
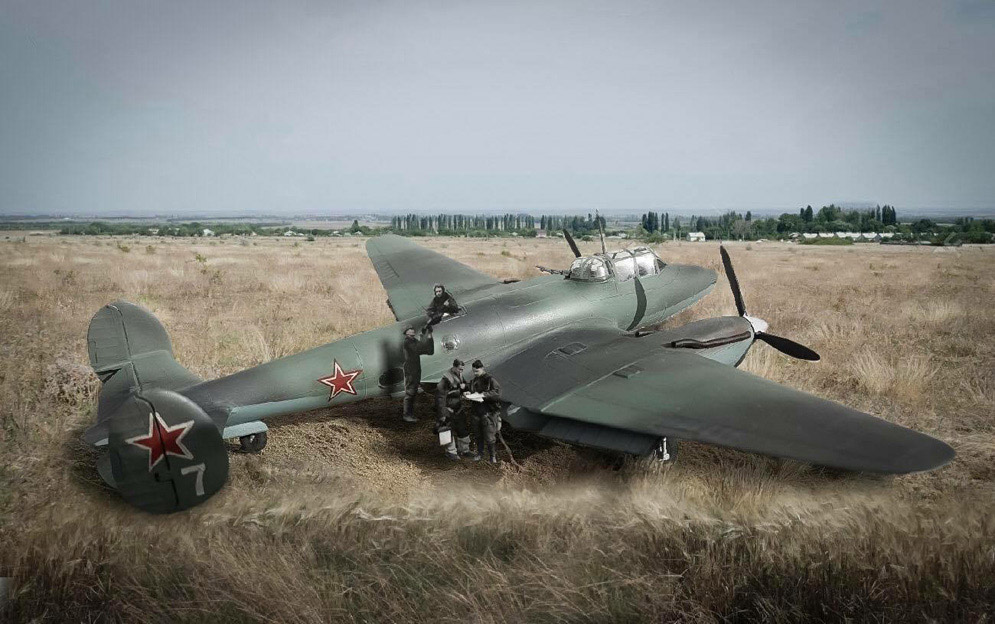
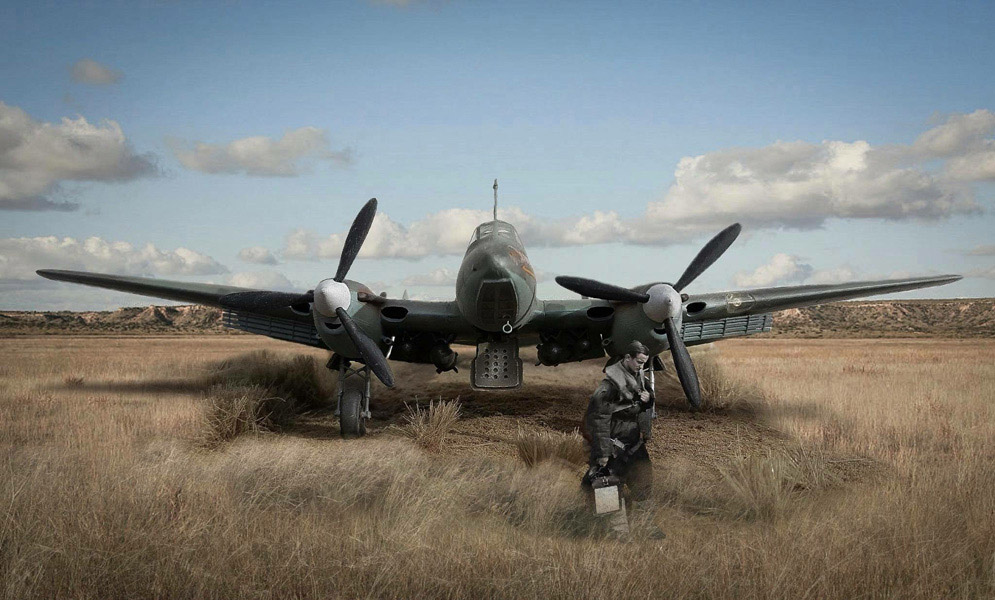
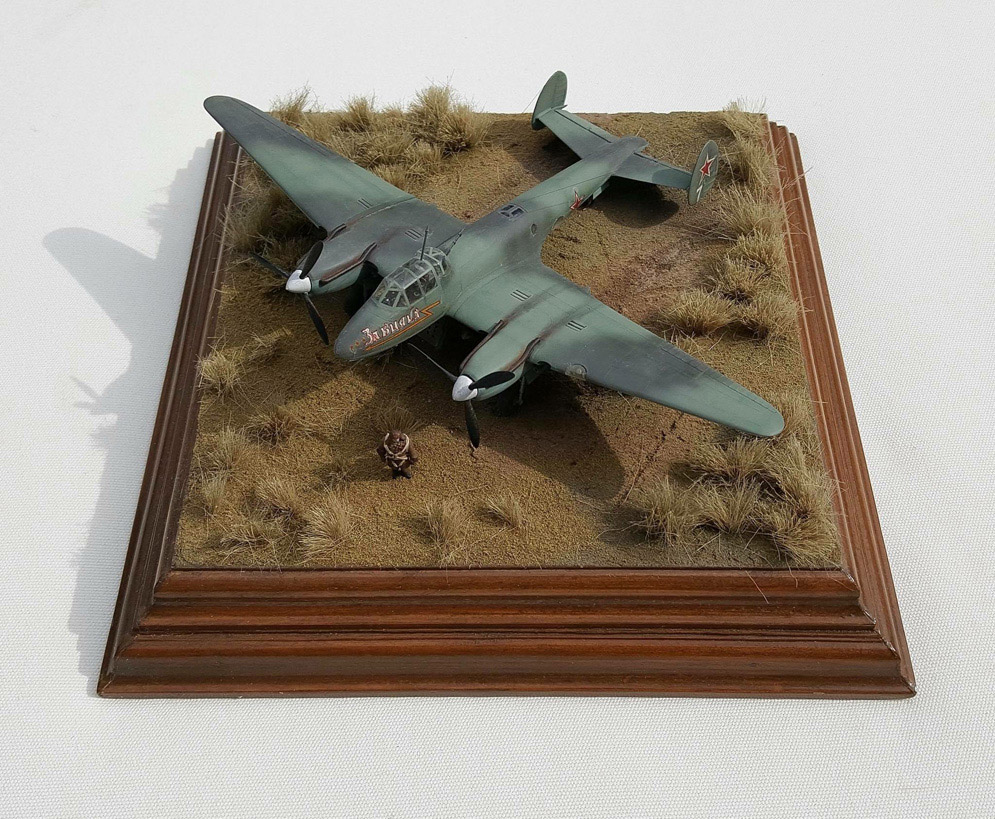
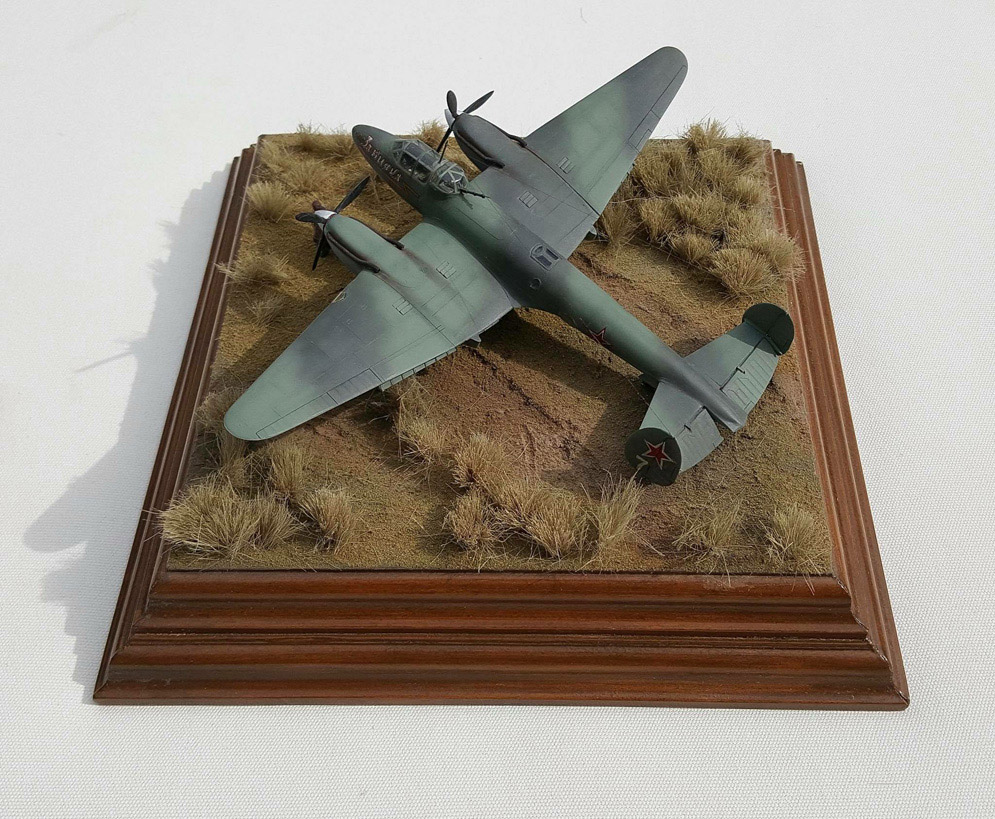
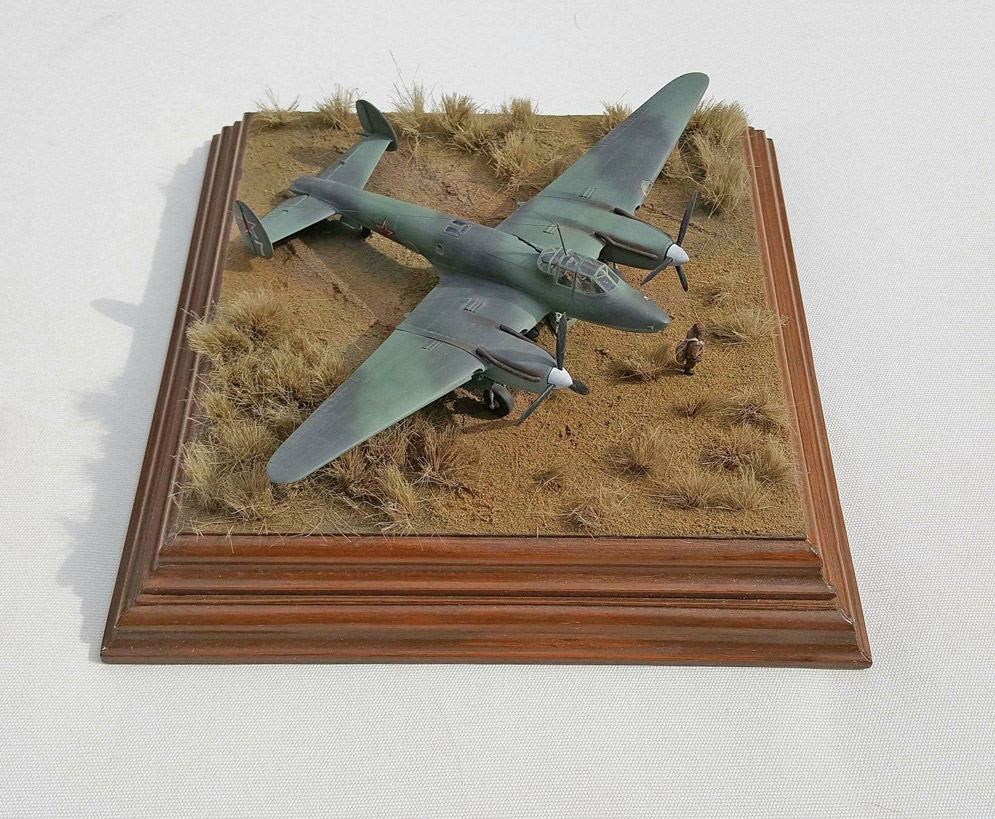
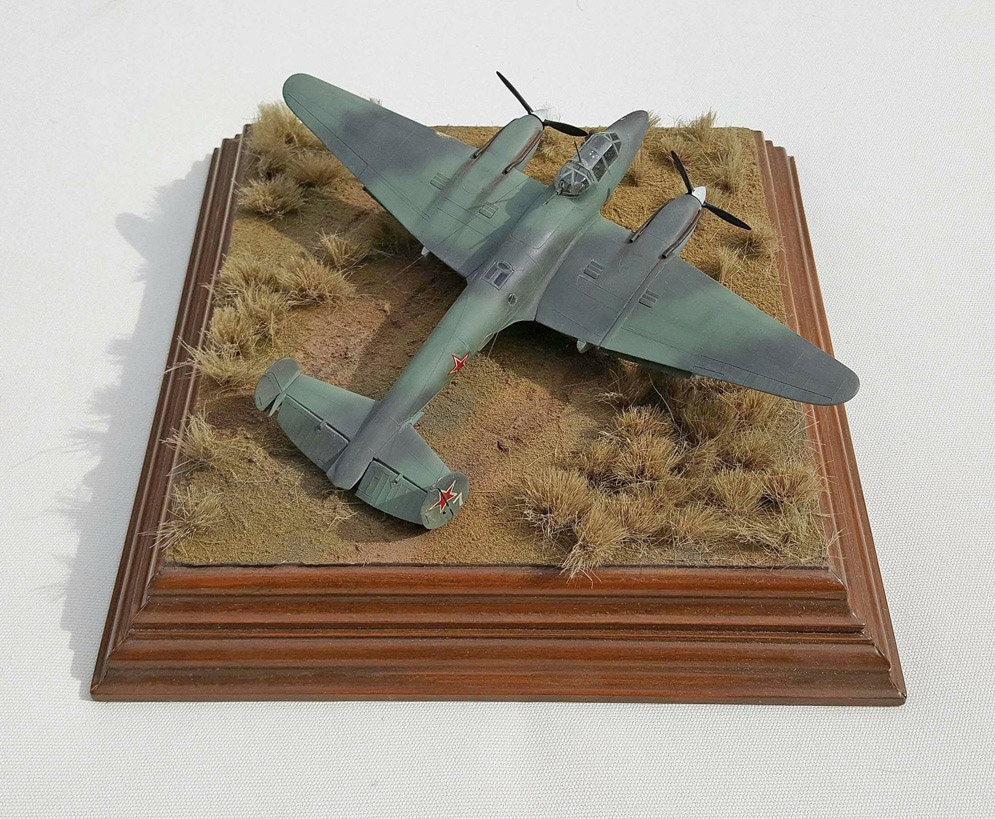
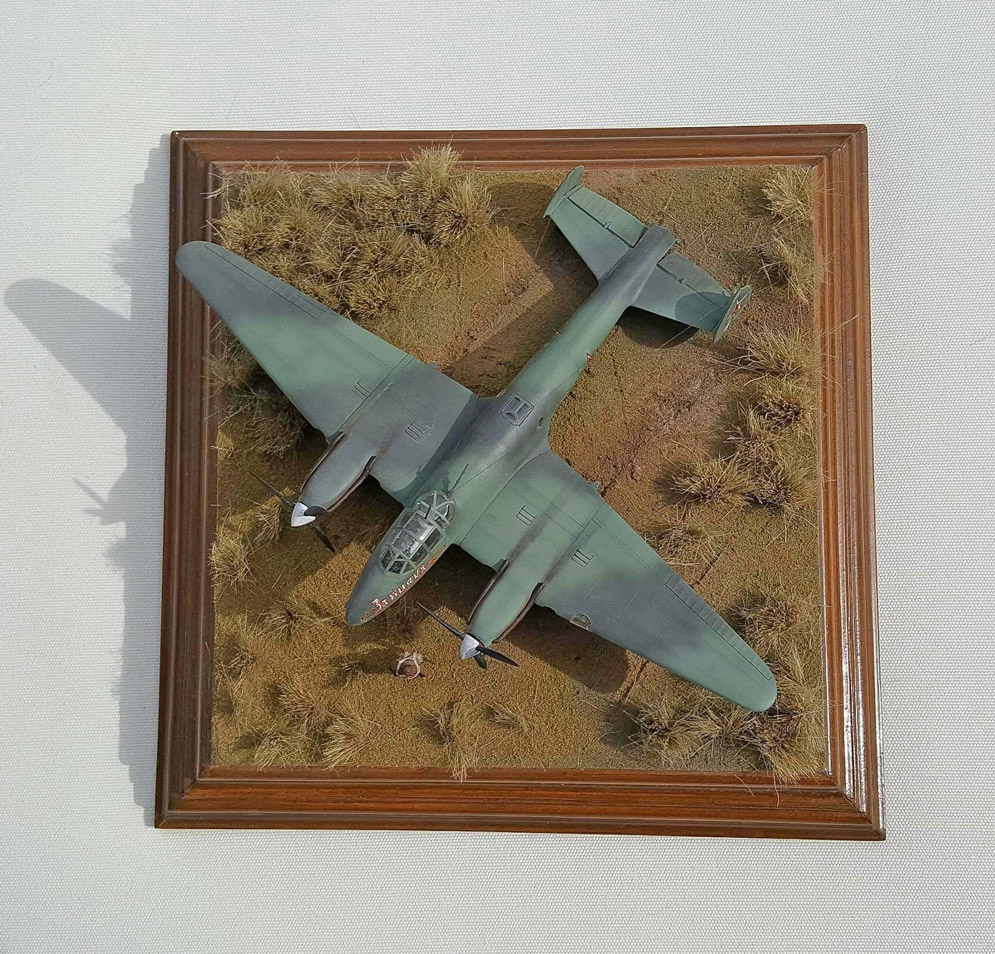
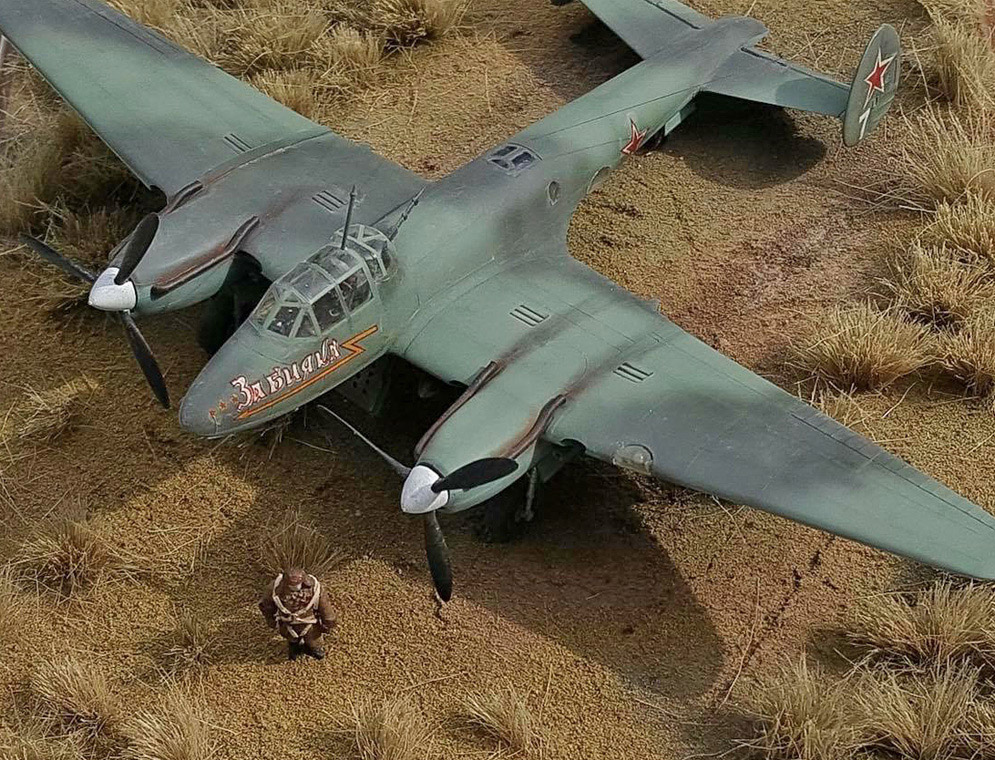
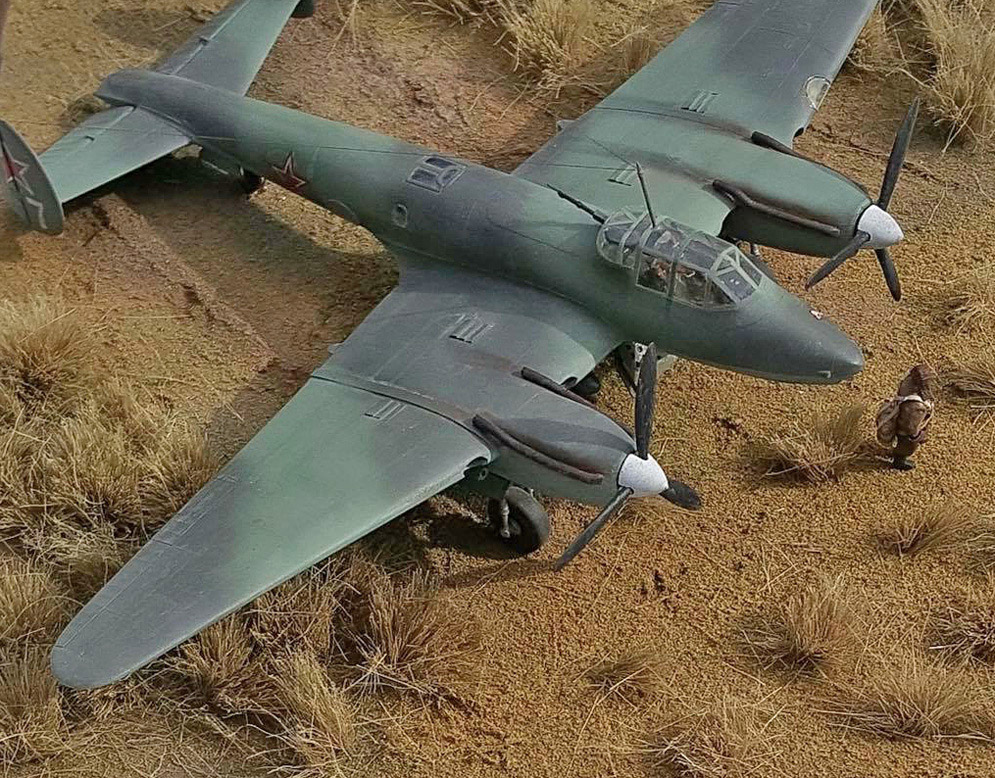
 I’ve been dusting off some old models and here is my Petlyakov Pe-2 Soviet dive bomber during WWII.
It’s built from the Zvezda 1:72 Scale model kit.
Hope you all like it.
Enrique G
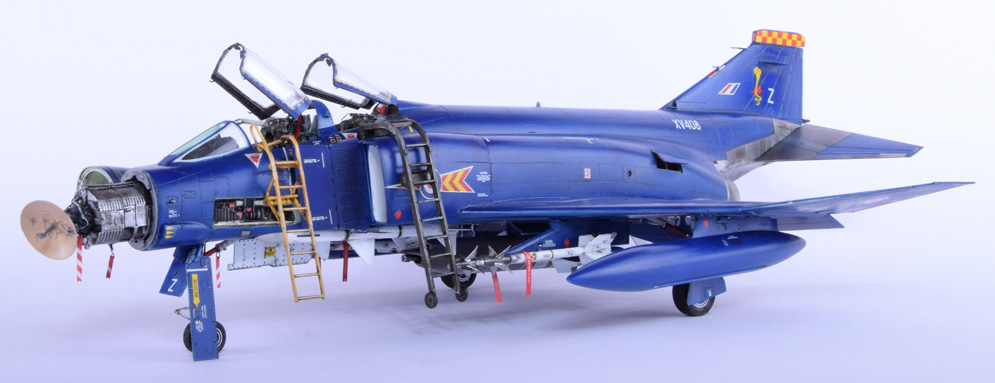
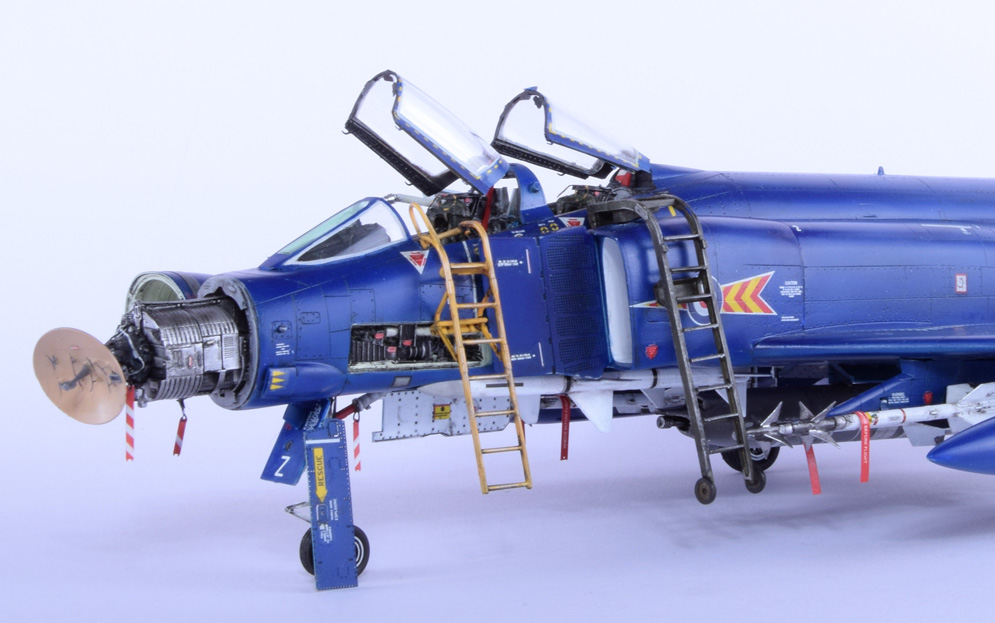

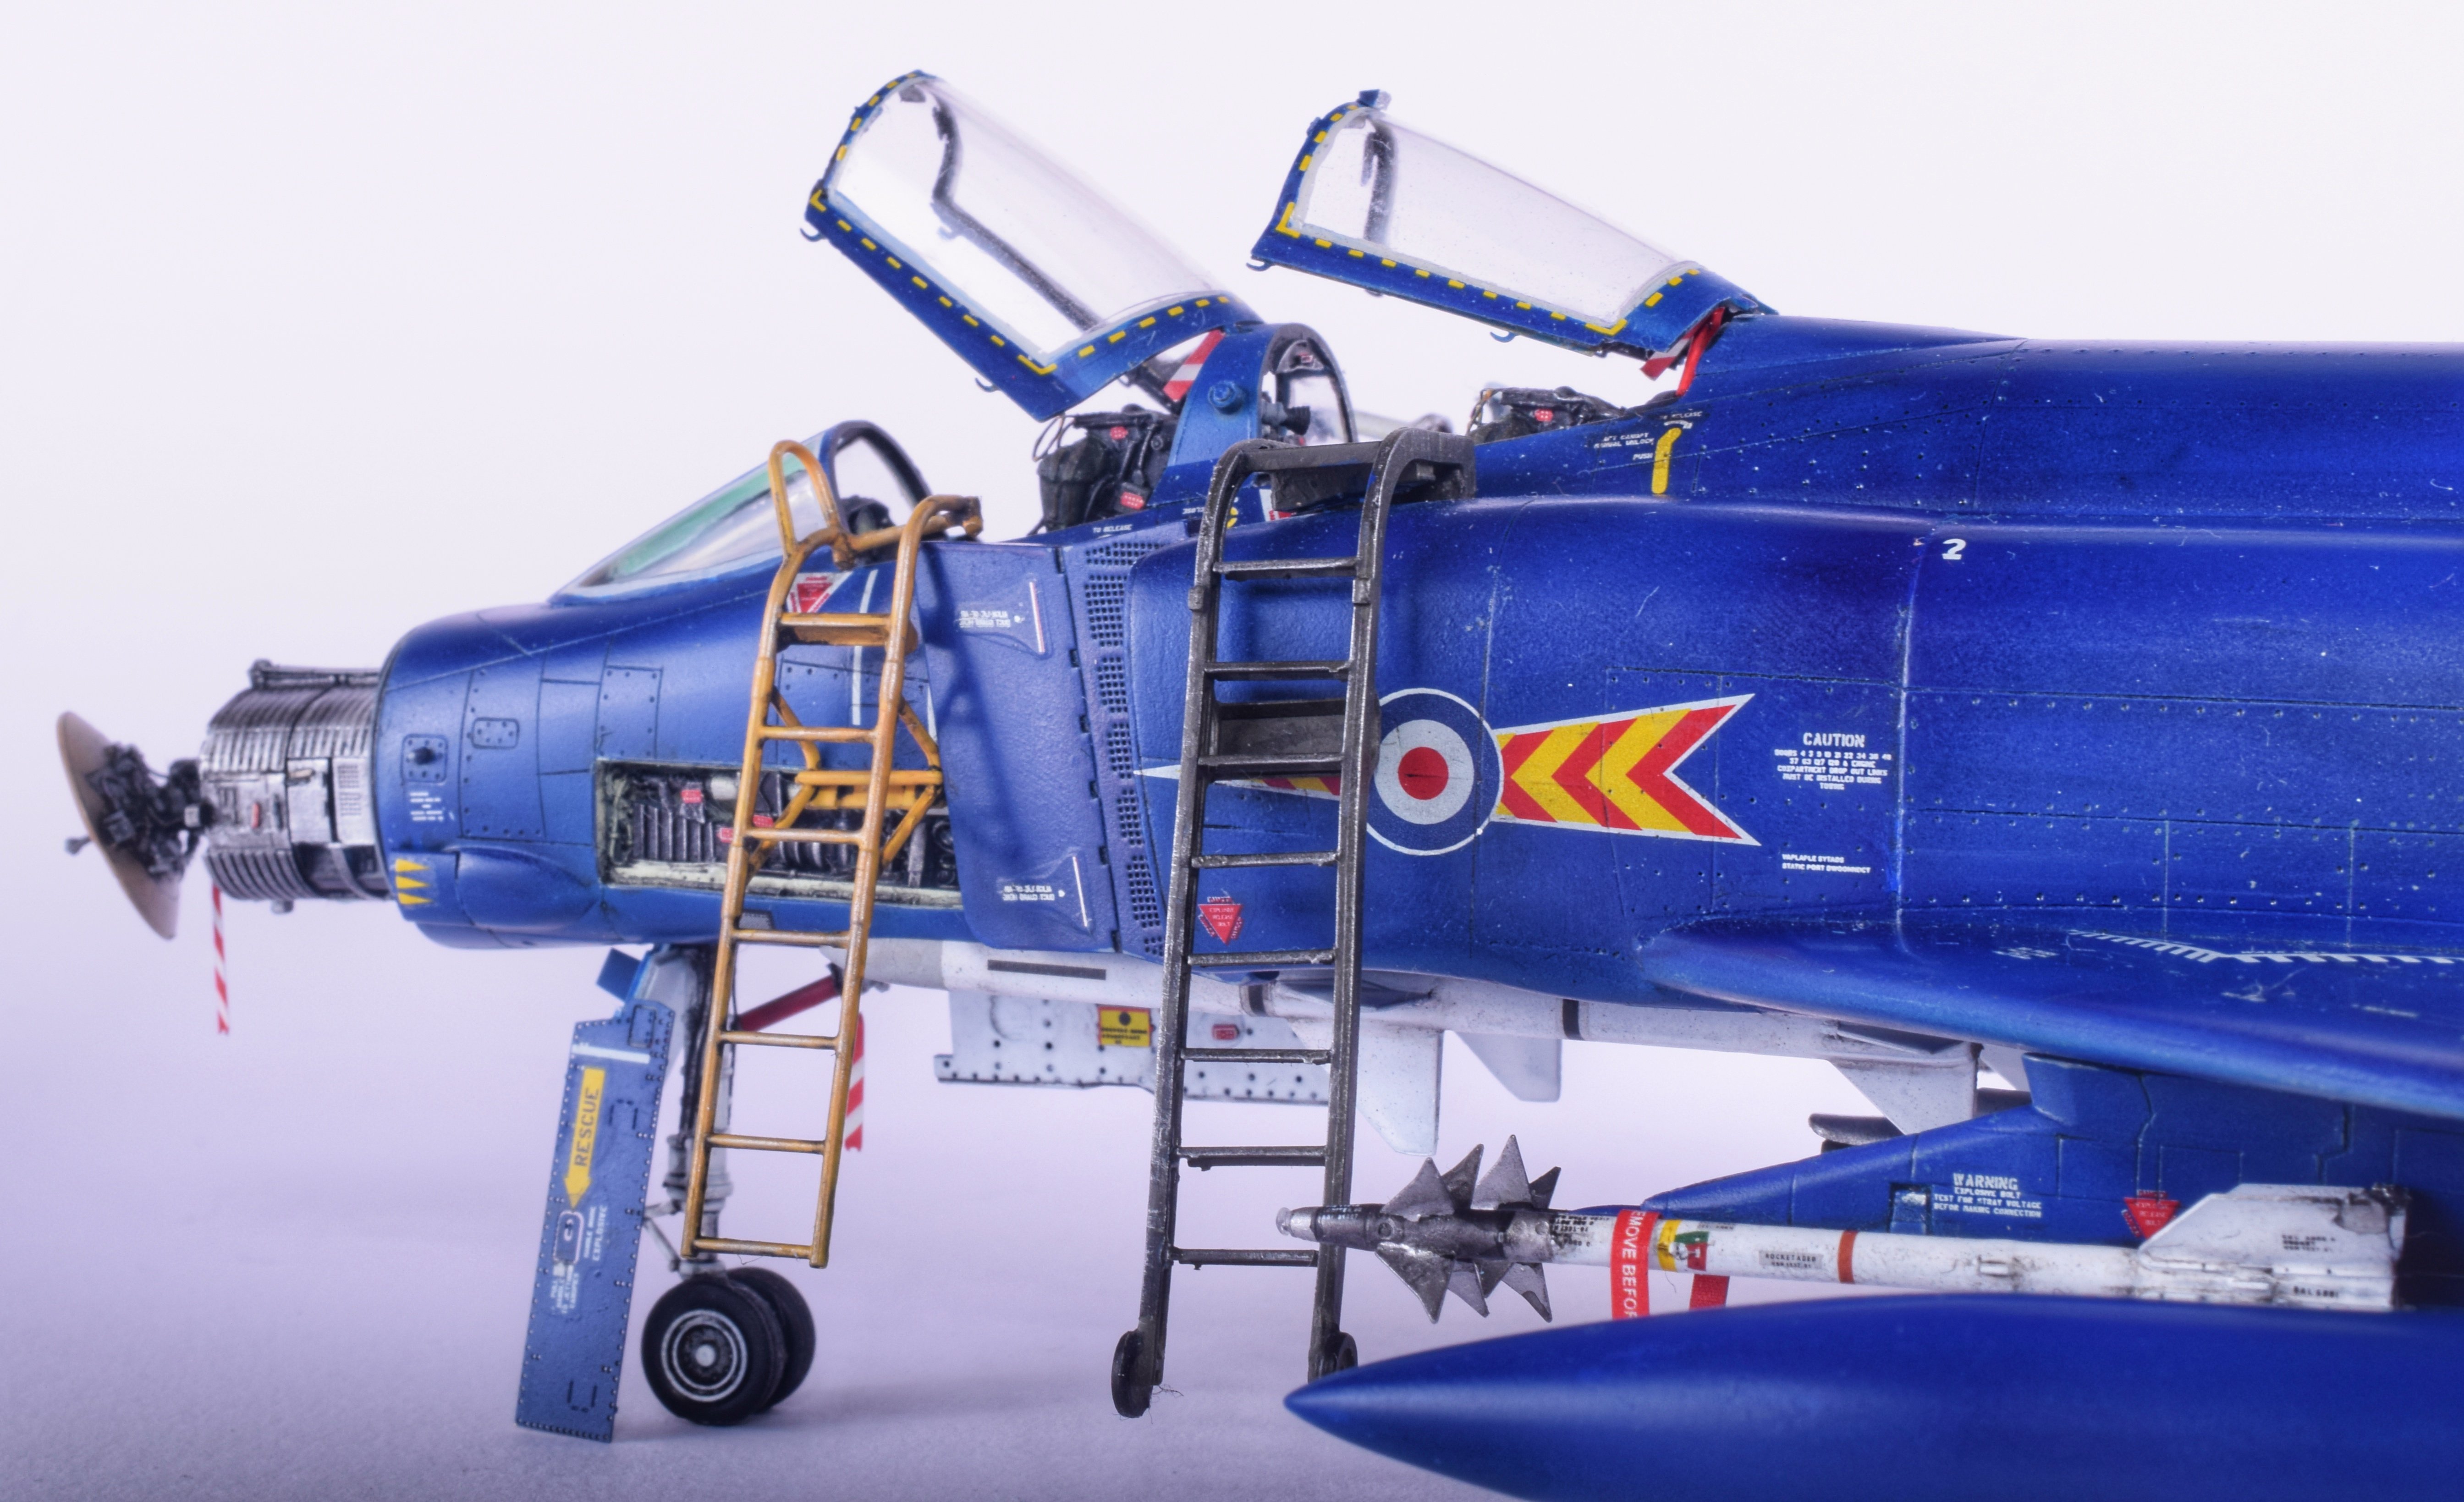
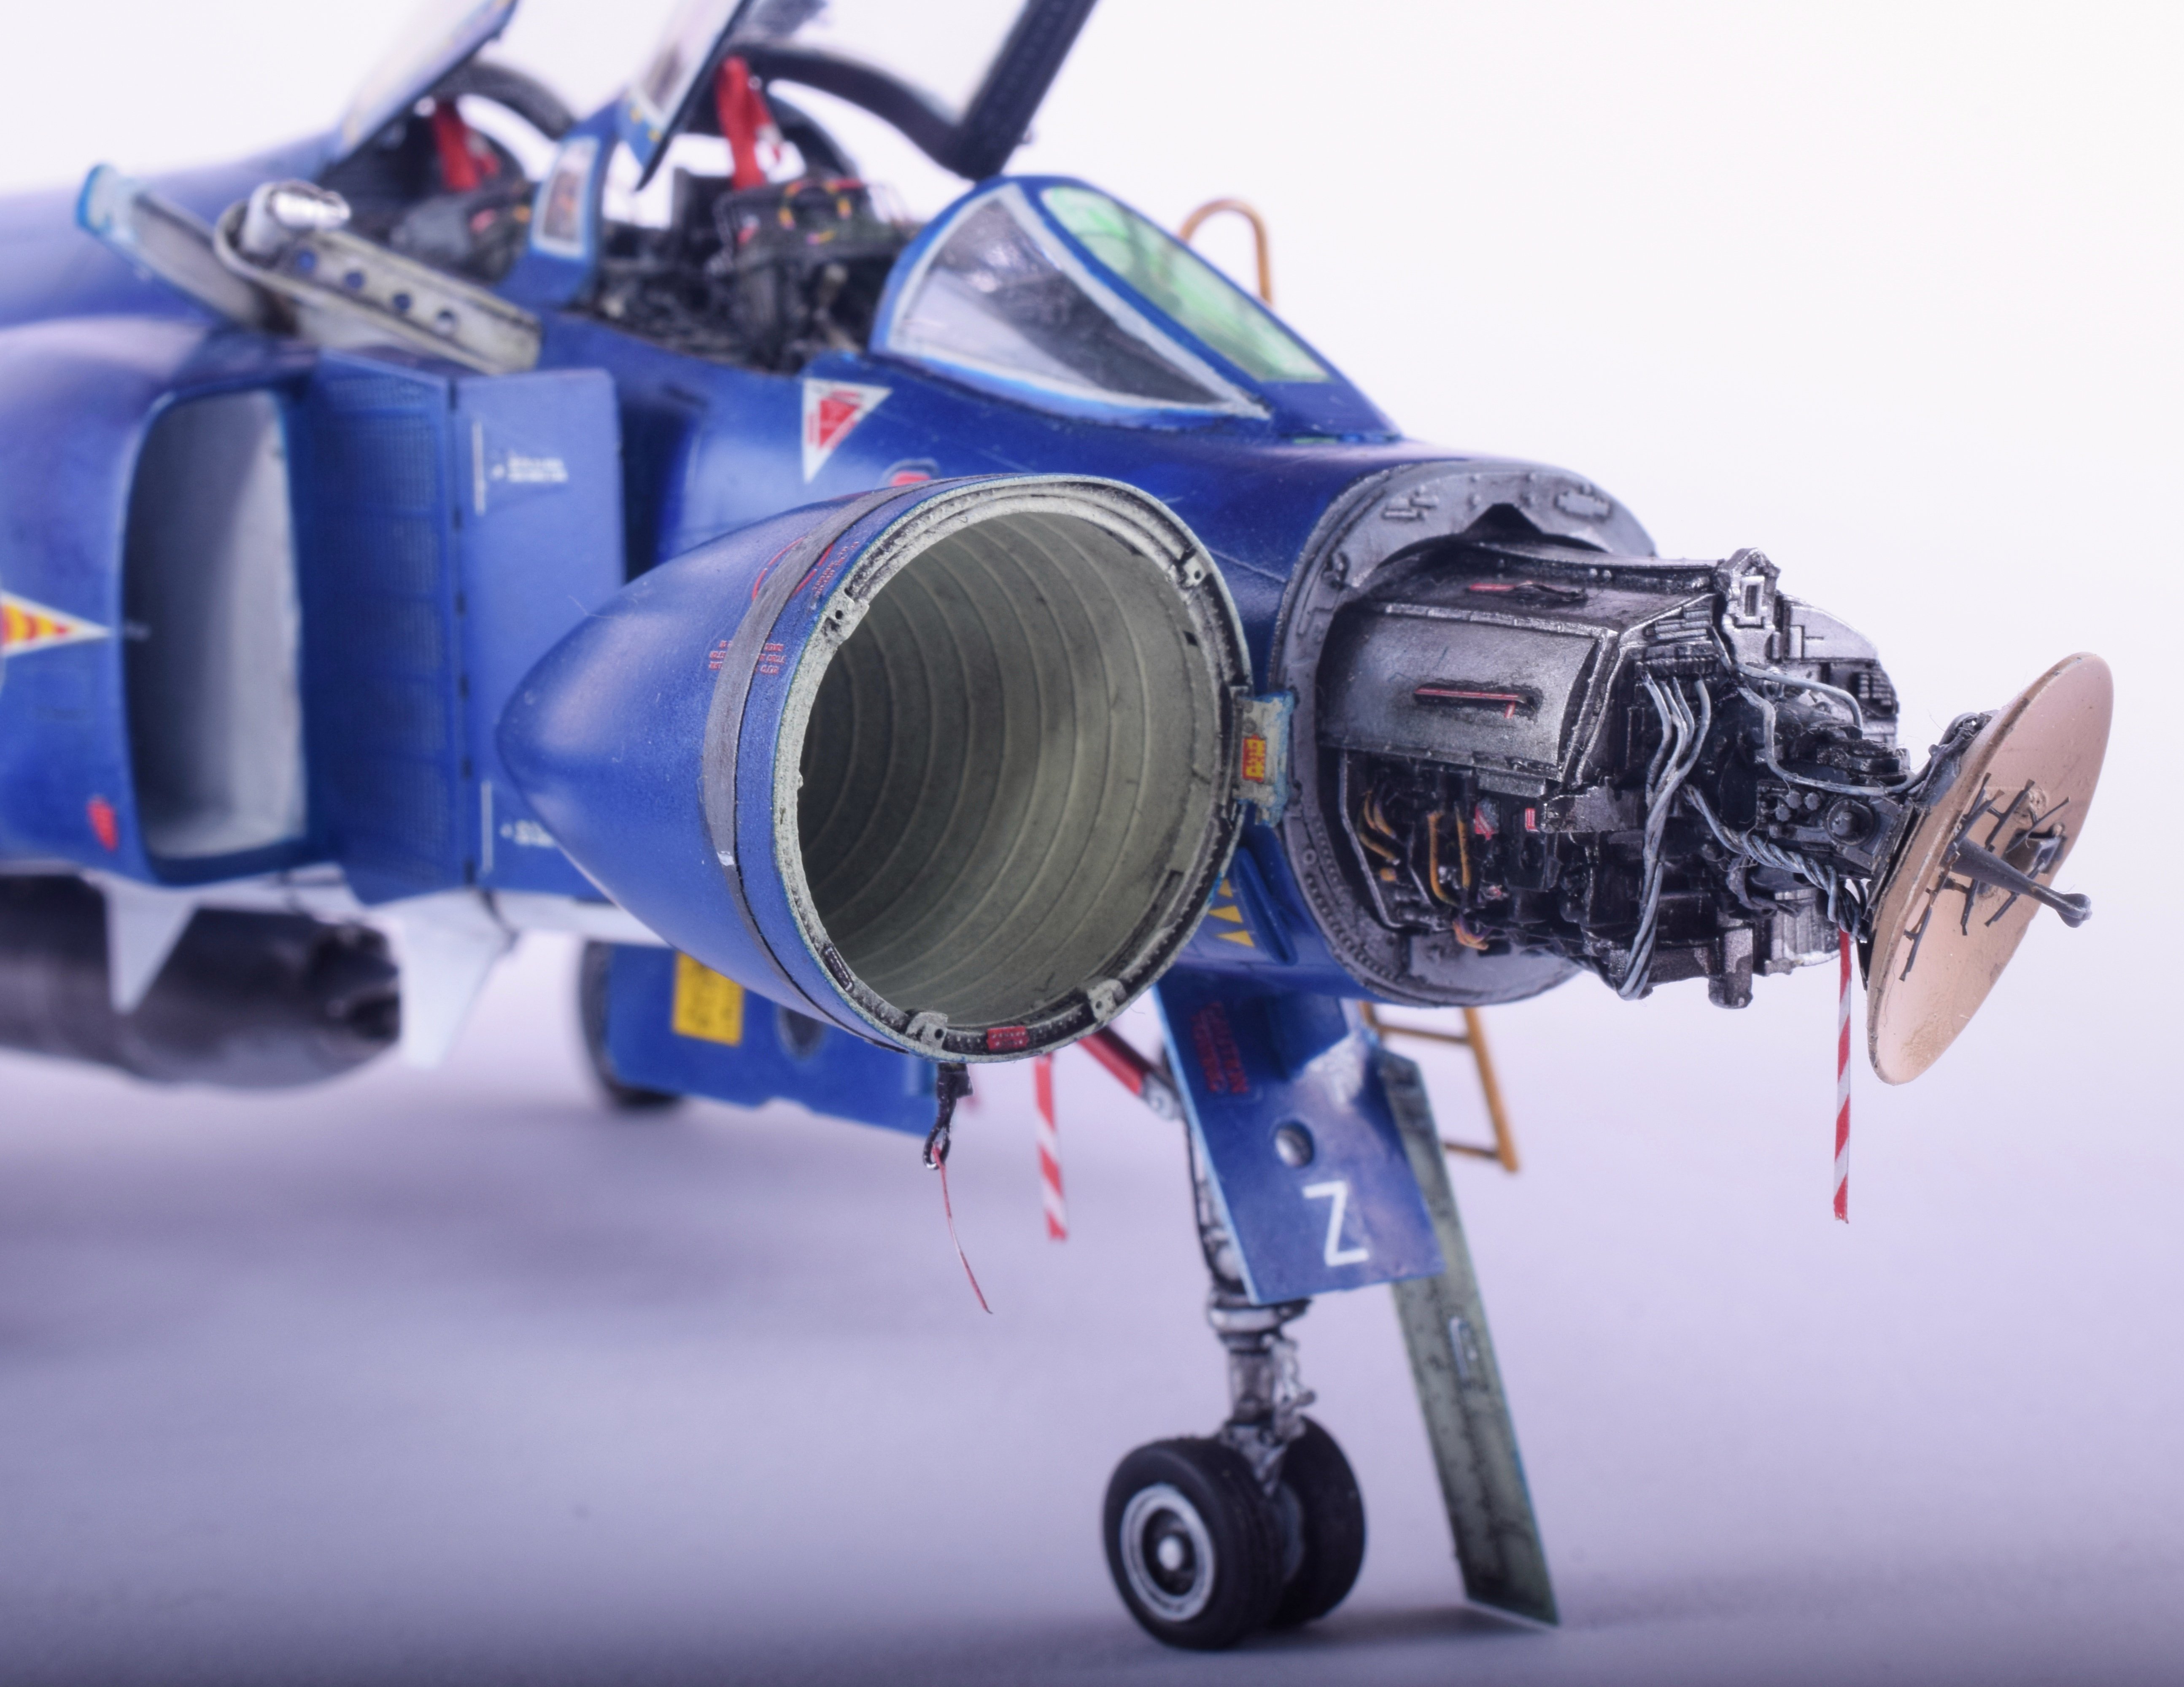
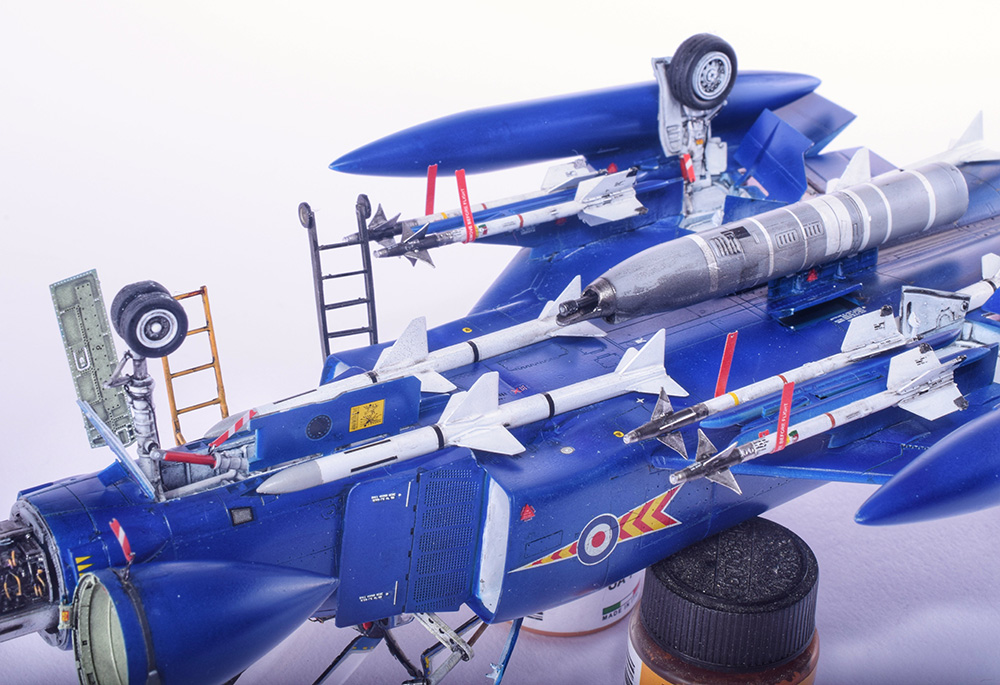
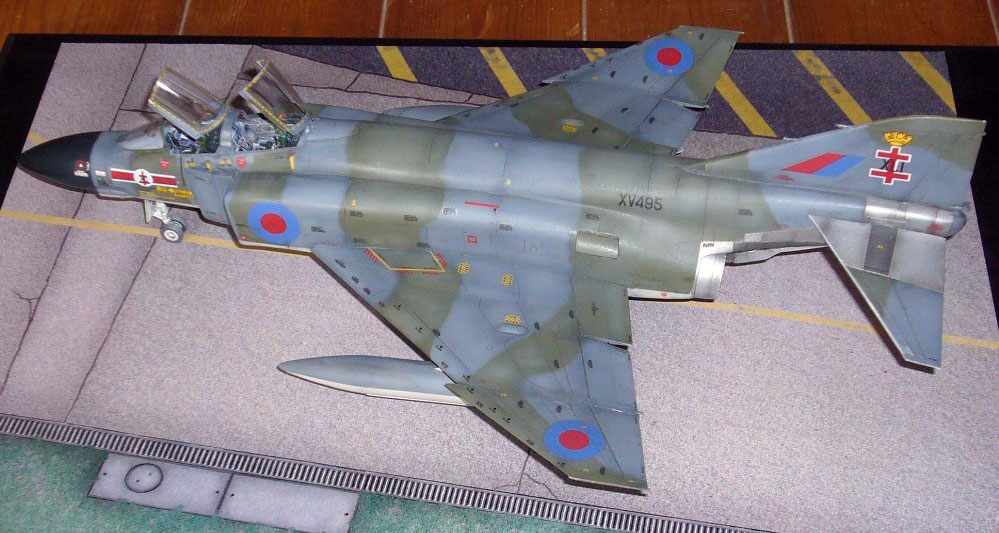
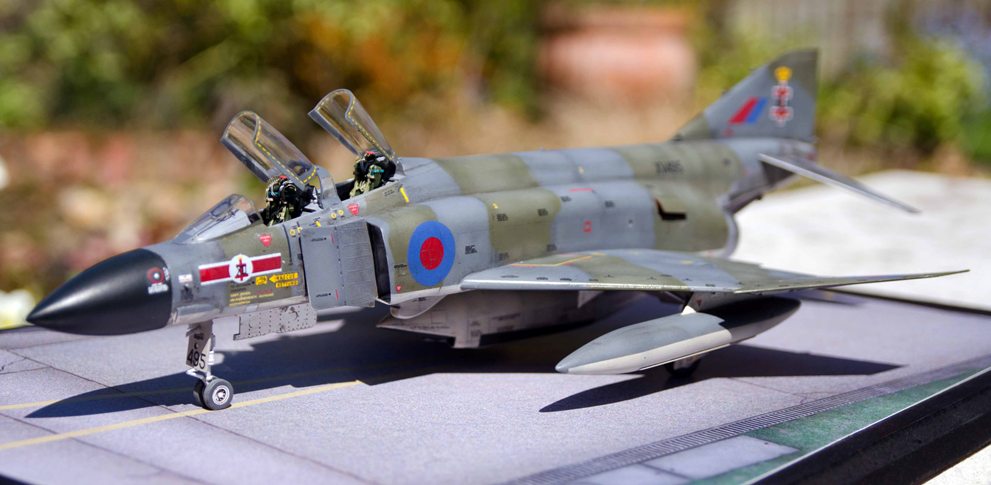
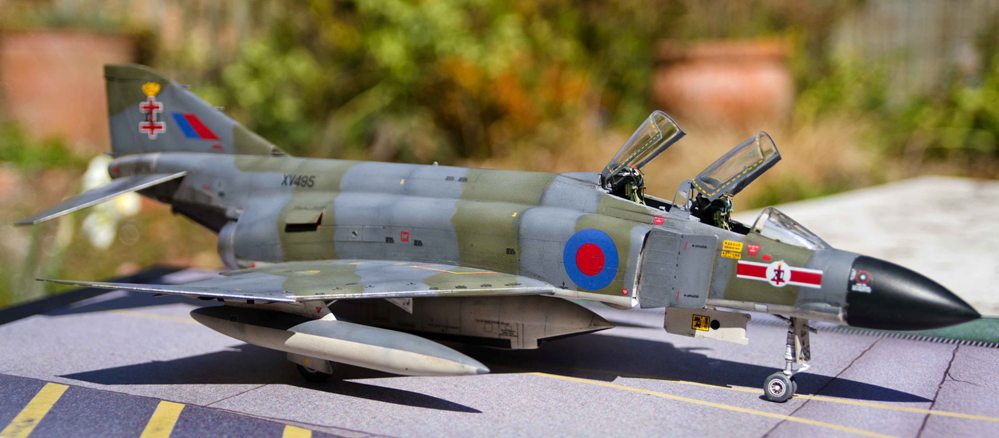
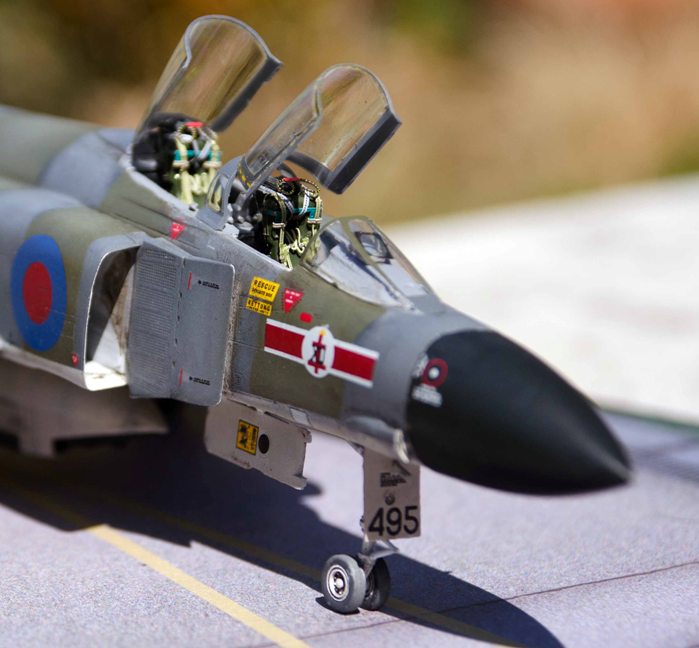
1:48 Phantom FGR2 92 Sqn by Hasegawa
This aircraft is close to my heart as it is one of the exhibits at my local museum: Tangmere Military Aviation Museum. As a member of the affiliated model club: Tangmere Sector Modellers IPMS, I have unprecedented access to this wonderful machine.
XV408 was 92 Sqn ‘ final airshow display aircraft in 1992. This model is by Hasegawa who did a Ltd Edition of this marque.
Extras included an Aires resin cockpit and avionics bay and nd a resin radar and nose cone. Painting was done with UP Light grey primer and Vallejo Air paints, I also used Vallejo metals for the metallic areas.
The museum is a gem and is packed full of historic aircraft, but XV408 will always be the star of the show.
Richard S.
James V.


I thought you might like some images of my latest finished project: a 1:48 Revell/Hasegawa Phantom FGR2 finished in the markings of 41 Sqn, RAF Coningsby circa 1974. The model carries the EMI recce pod on the centreline as 41 was a tactical recce squadron.
Finished mostly from the box, but with Eduard zoom in the cockpit, and their RAF Phantom seat set. Decals are by Almark.
There is a story to this; I was the Squadron Intelligence Officer on 41 Sqn in the early 90s when the Sqn flew Jaguars. Since leaving the RAF in 2011, I’ve set myself the challenge of building all the Sqn’s aircraft in 1:48, and this is my latest in that chain. Thankfully, there are new Jaguar kits imminent, and Airfix’s new Javelin, which means I can ignore that Dynavector vacform one in my stash! Now I just need a 1:48 Bloodhound SAM…
Best wishes Andy W.
The Cockpit is well detailed with excellent detailed levers; I decided to add some small pieces of wire to reproduce electrical cabling to add a little more interest to the pilot’s office only to find that when the fuselage halves are joined you cannot see any of this work! Unfortunately the cockpit floor is a bit inaccurate but I decided not to touch it because as I was keeping the cockpit doors closed almost nothing in the cockpit is visible, including the beautifully detailed instrument panel which I spent 2 hours hand painting! Eduard provided a decal for instrument panel, which in hindsight I wish I had used. Installing the pilot’s seat was a little tricky but if you carefully follow the instructions you can achieve the angles required. Once assembled it looks great and even better with the addition of some scratch built seat belts made from masking tape and copper wire. I glued the fuselage halves together and almost no filler was needed, it’s a shame the same could not be said for the fuselage to wing joint! No matter how hard I tried I could not get this joint to close using glue alone, so out came the plastic card and green putty to solve the problem. In the end the result was ok but I am still not happy about the seam on the underside of the body to the rear of the wheel wells. Next we had the nicely detailed engine, it is a shame that once installed it is hardly visible but I like to say I know it is there. I drilled the gun barrels and venture tube using a No. 10 scalpel blade just to add a little more realism. The undercarriage is precise and absolutely in scale. At first I thought it could easily snap but when I joined them (using cyno) it becomes a very compact and rather sturdy item. The undercarriage doors are a bit complicate to install but if you follow the steps in the instruction sheet it is really easy and if I may say with all those rivets look realistic and effective. At the very end I added a piece of buff coloured cotton from the centre of wheel hub to the small hole at the roof of the undercarriage bay to reproduce gear retraction system. I painted my I-16 using my usual Vallejo Model Air paints and applied lots of post shading via the airbrush (the ever faithful Tamiya smoke heavily diluted with liquor thinner) and applied heavy weathering, using Mig filters, pigments and oil washes as I wanted to represent a battle weary well-used fighter.
This was a very enjoyable build but the best part of it for me was the painting stage. In its base colours it looked like something my 10 year old nephew would have done and it took a considerable amount of time to finally achieve the finish I was happy with.


I know, it is certainly difficult to find a British Phantom operating in this condition, but I wanted to work a bit with a stronger weathering. This is my model of a British F-4 Phantom FGR-2 on No.56 Squadron, RAF Wattisham, Suffolk around 1992.
Excellent kit the Fujimi 1:72 kit, with pretty nice details. I worked a few areas with Rosie the Riveter, added two Aires seats and some decals from AirDoc. The rest out of the box.
The idea was to focus on the painting process and so was finished it. Thanks for looking, Ángel Expósito


Here is a beautifully made and finished model by Zdenko of the 1:32 Polikarpoz R-1 by Wingnut Wings.
Zdenko says his model is built straight from the box with just the rigging added as usual – what a great build – I love the subtle weathering that gives such a high level of authenticity to his work.
It’s also worth taking a look at the perfect composition and quality of his photography – we’ll be taking a look at model photography in your SMN Techniques Bank in the near future so keep an eye on that.
Thanks again Zdenko for a great contribution to your SMN Subscribers’ Gallery.


