Galleries: A | B | B-2 | C | D-E | F | G | H | I-L | M | N-R | S | T-V | W-Z
More of our Subscribers’ amazing aircraft: H
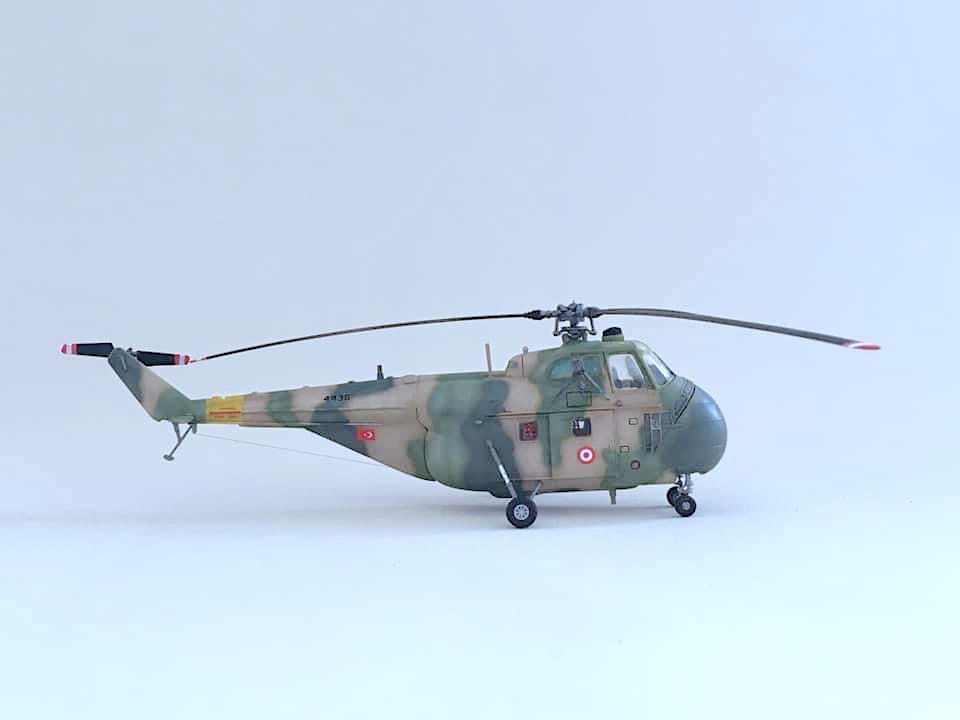
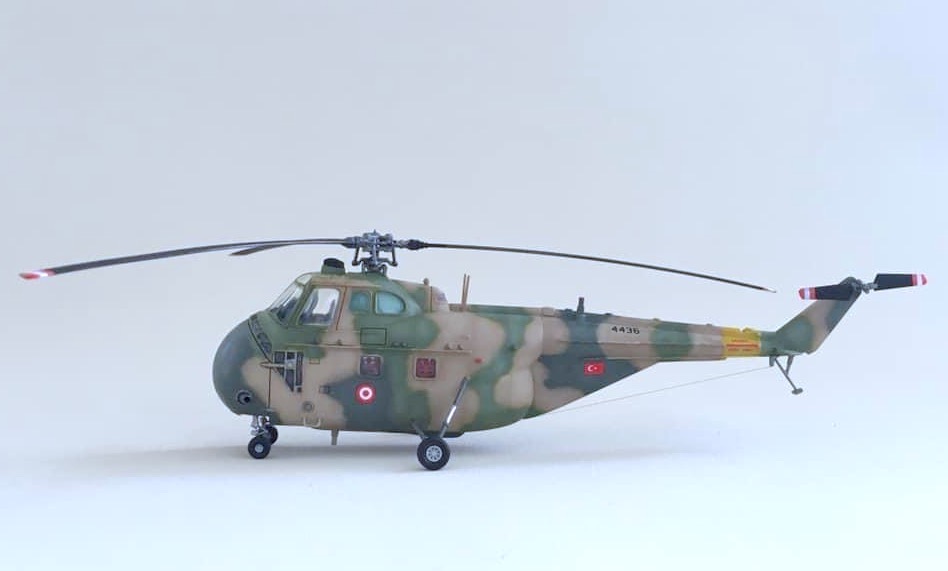
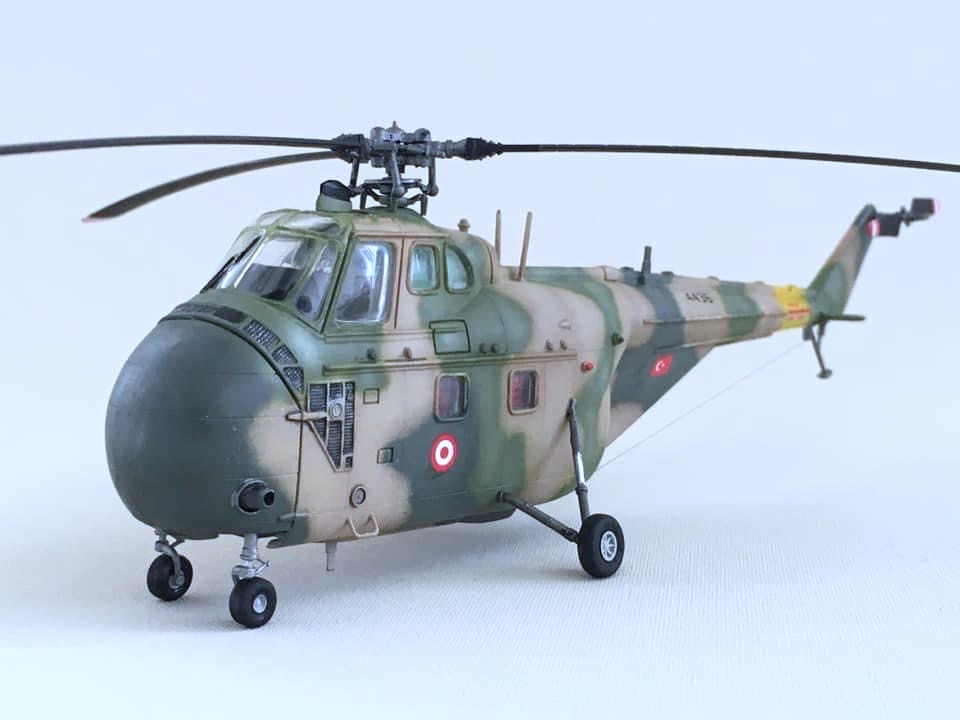

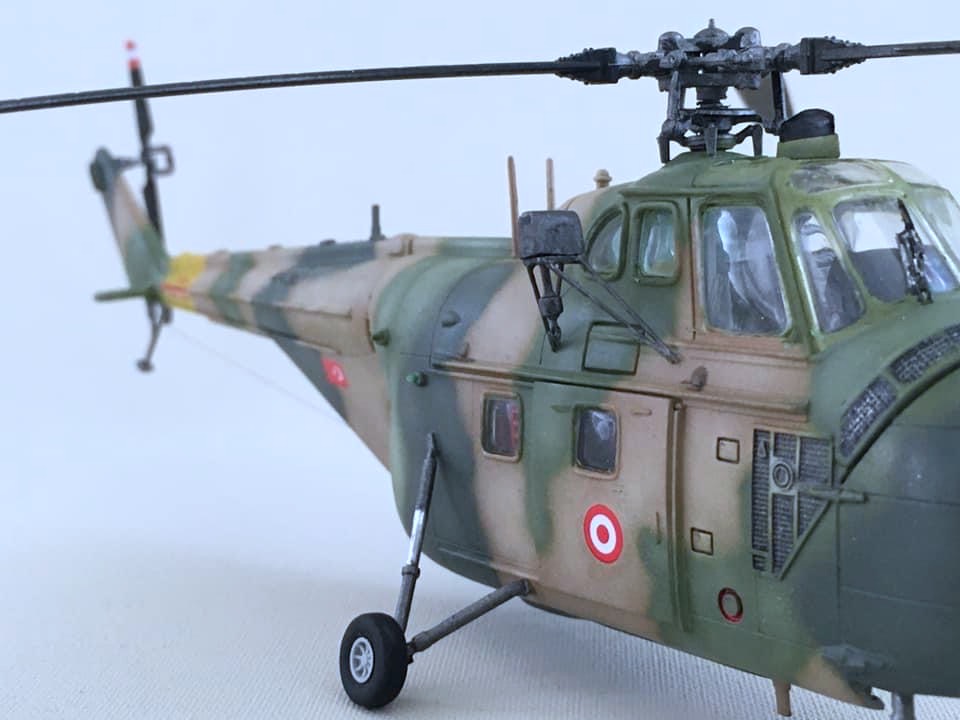
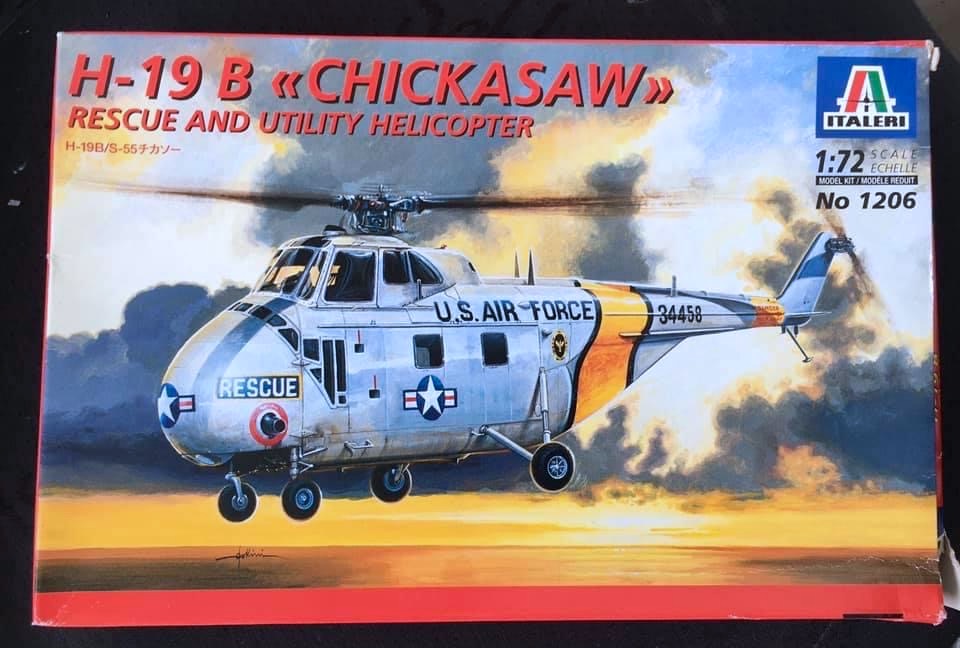
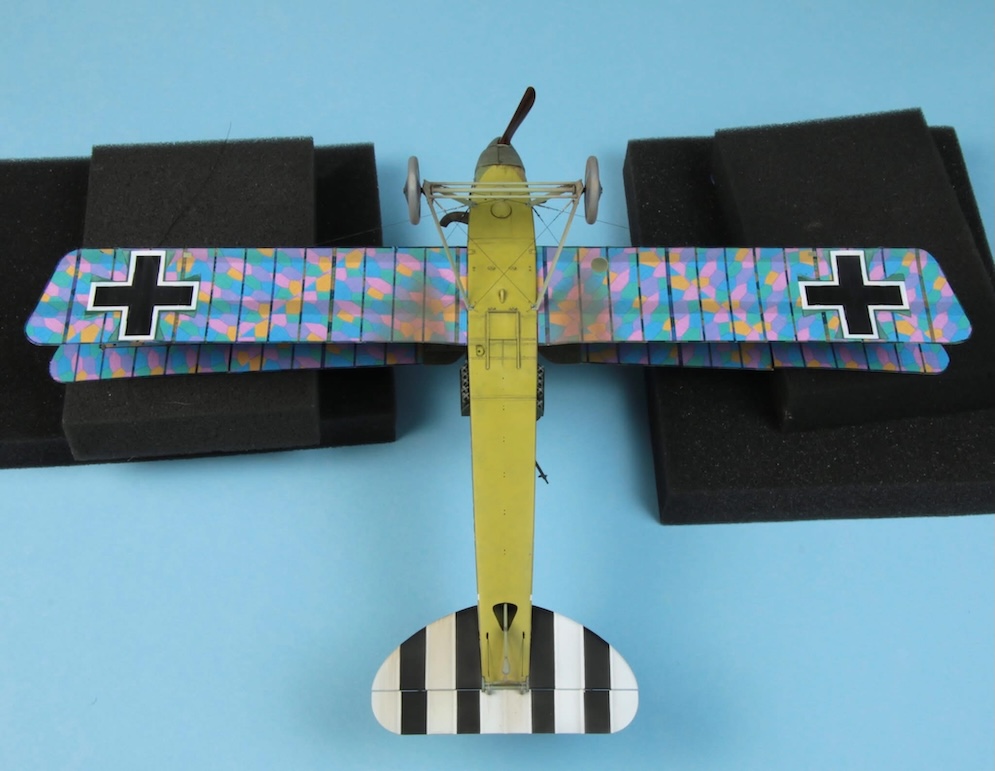
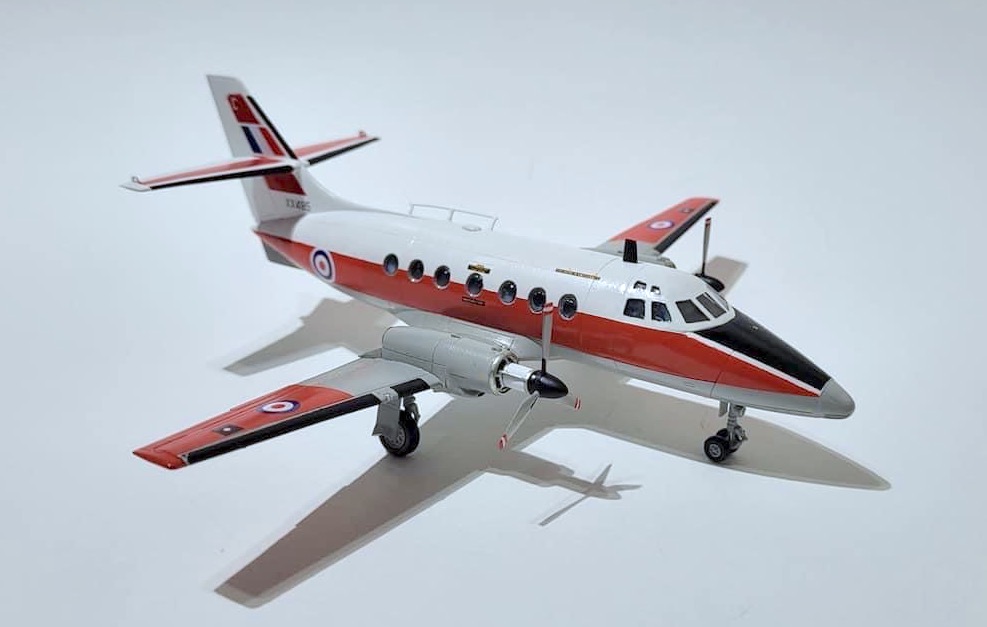
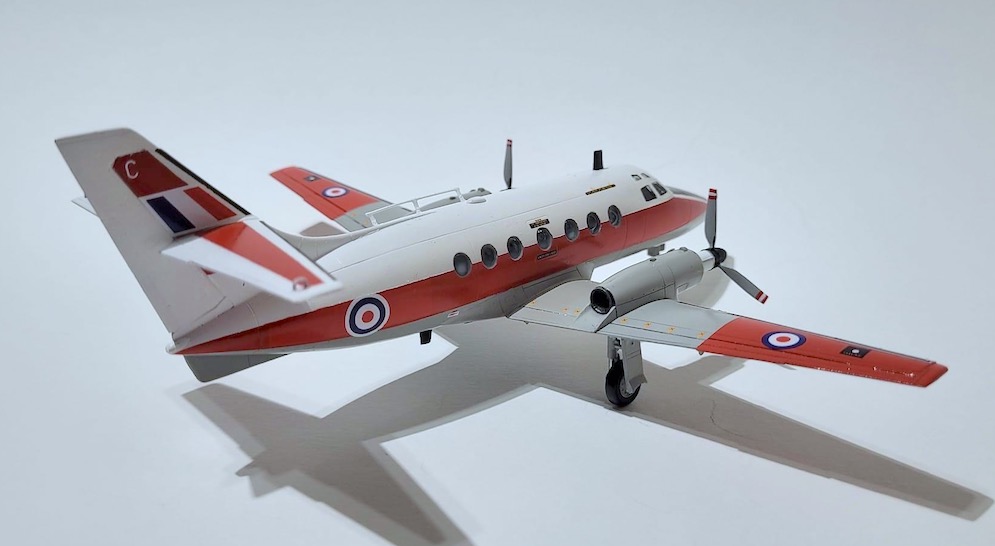
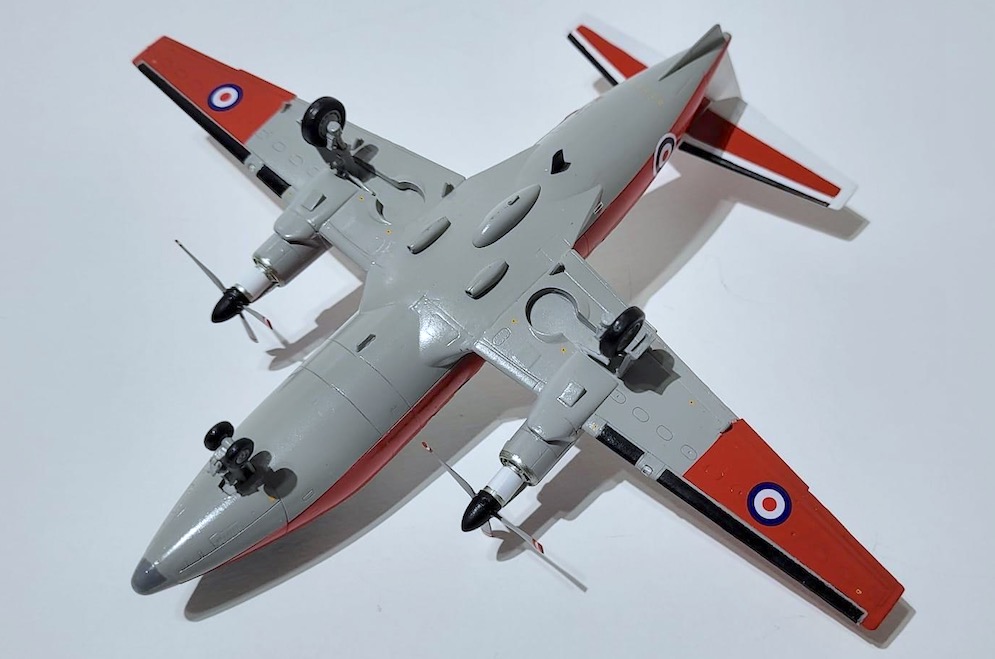
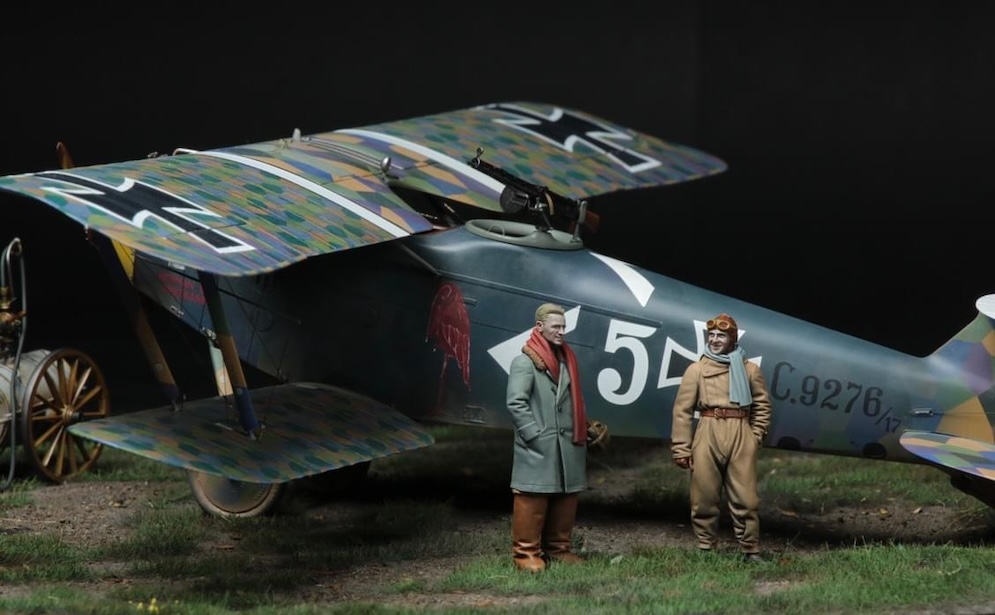
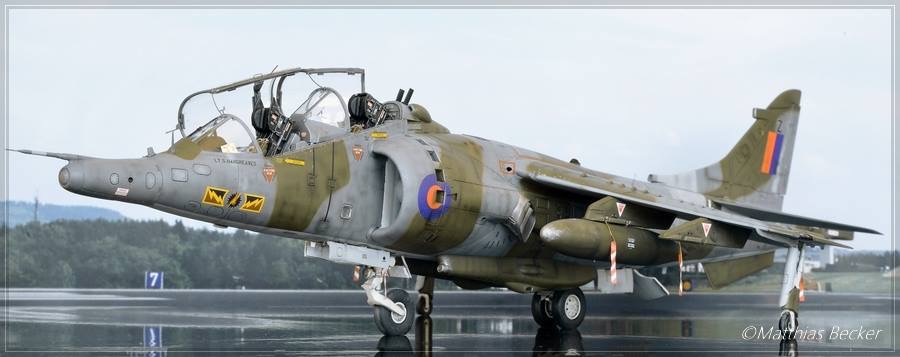
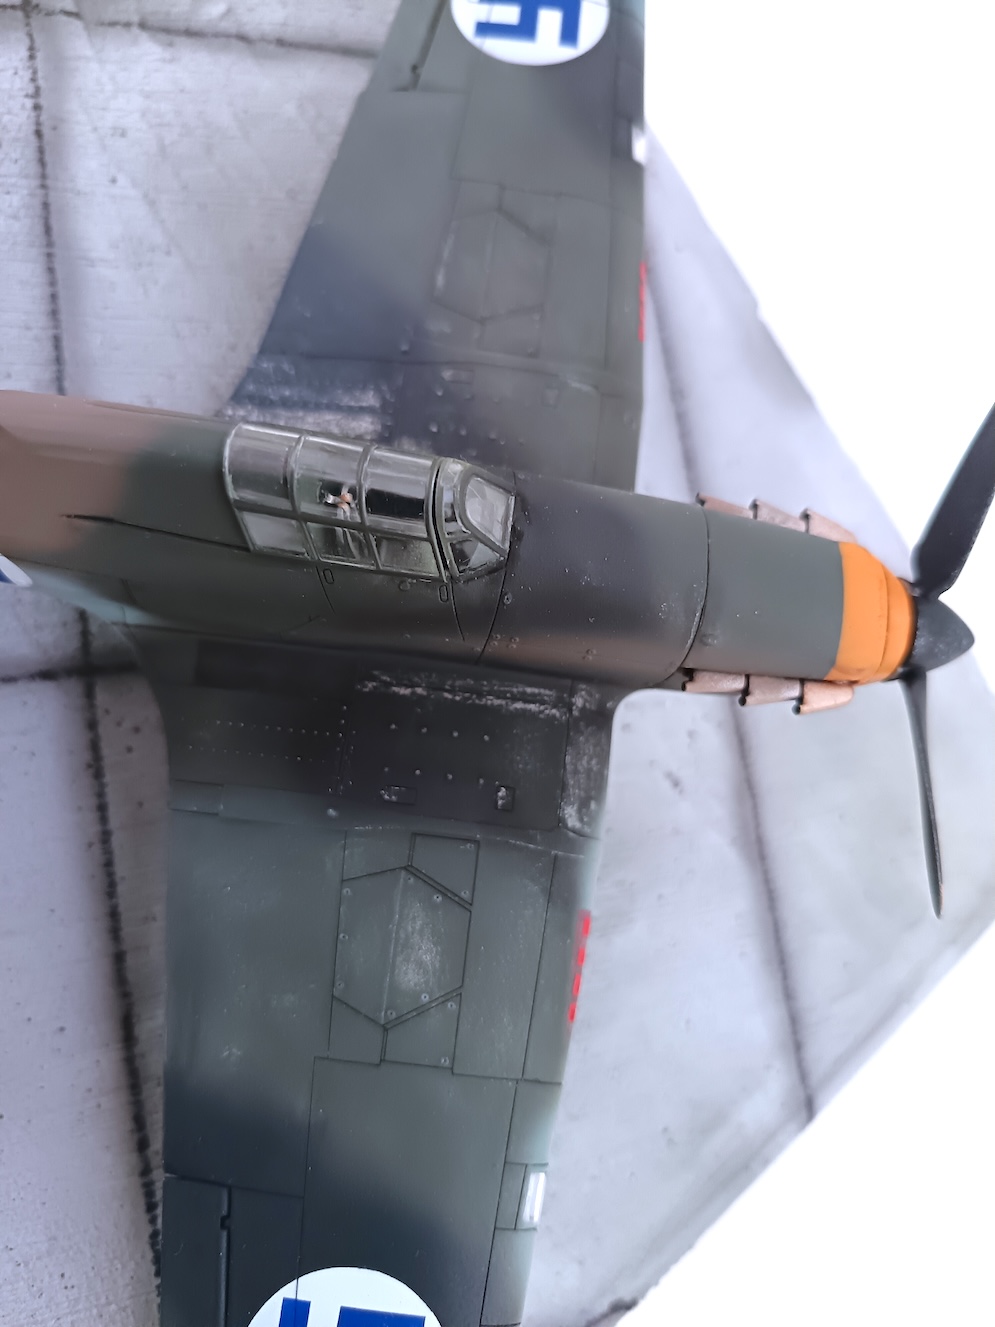
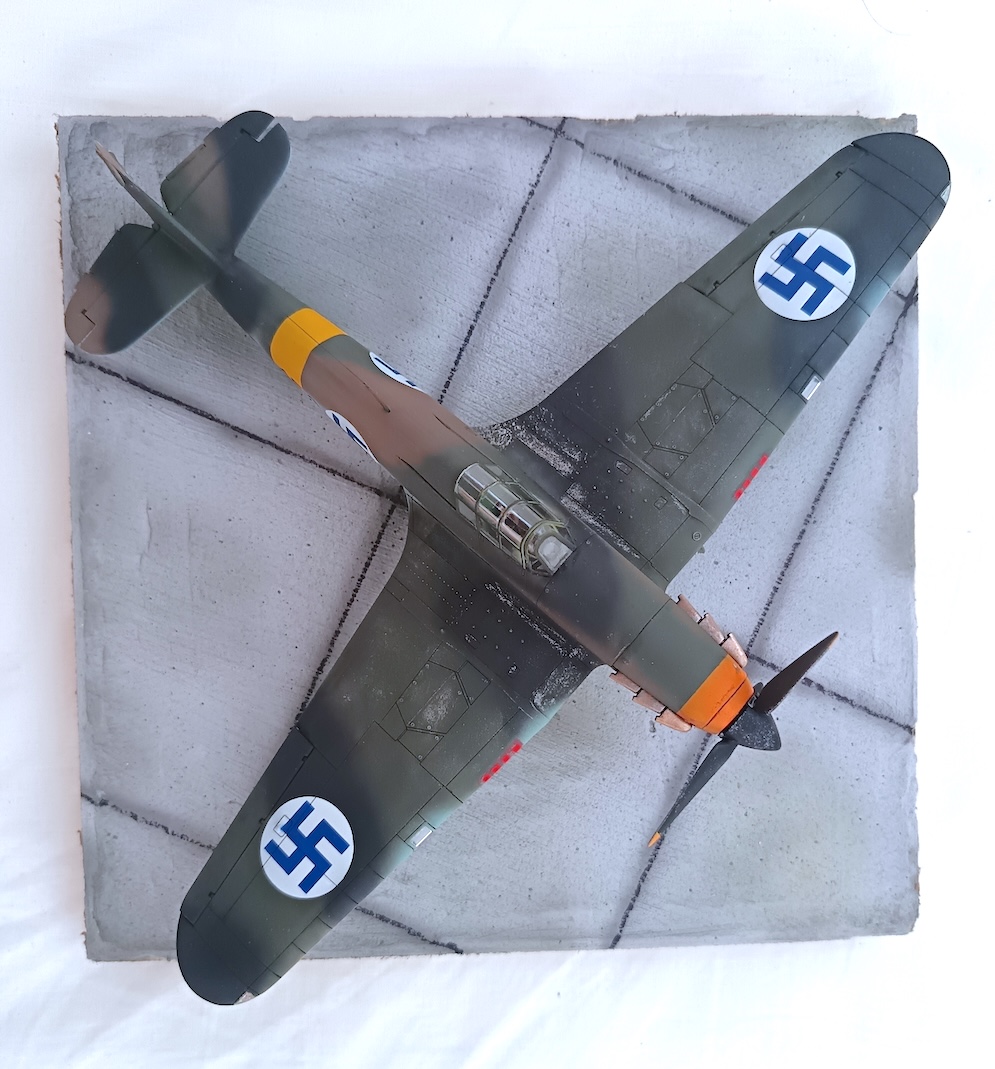
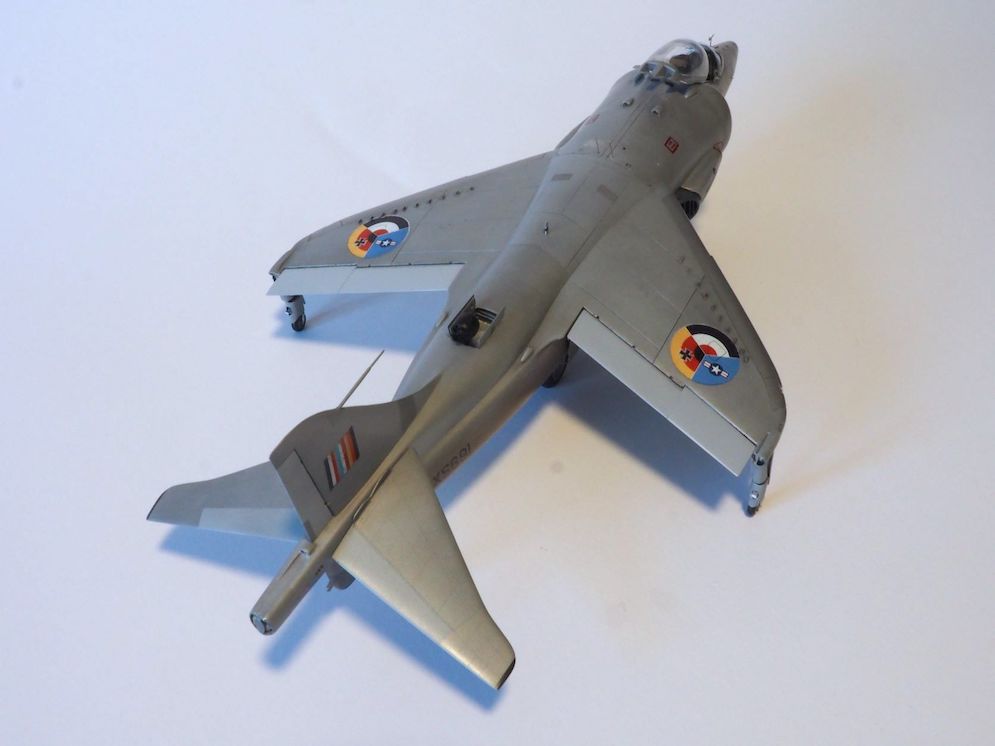
Scale: 1:72
Model:H-19B
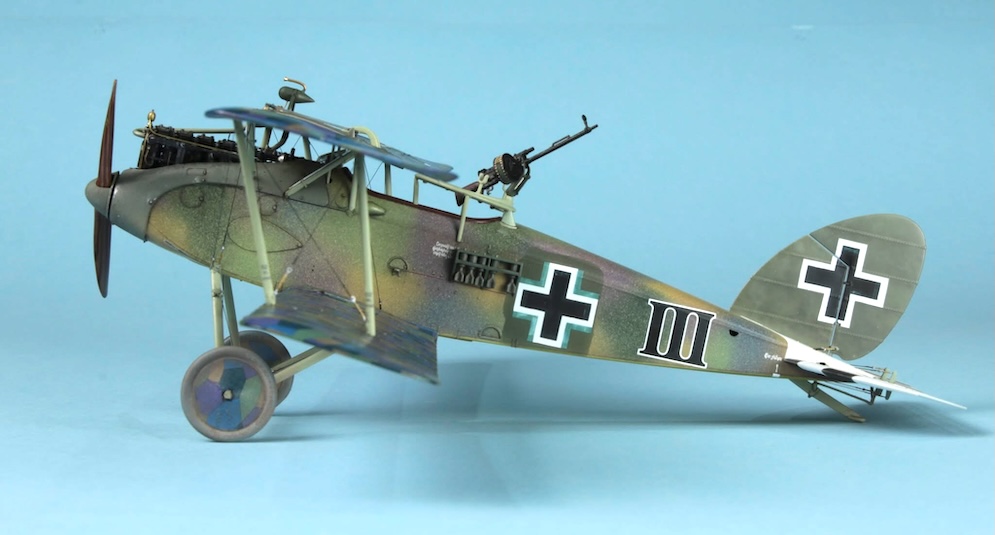
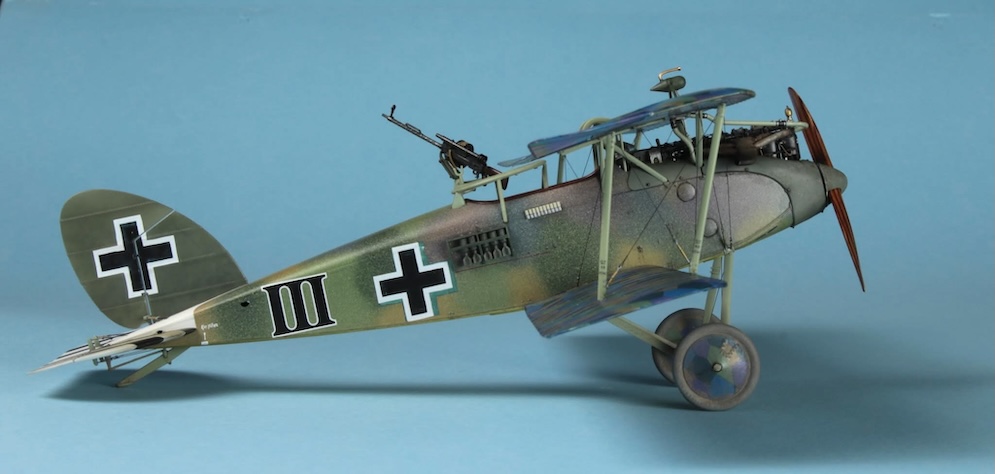
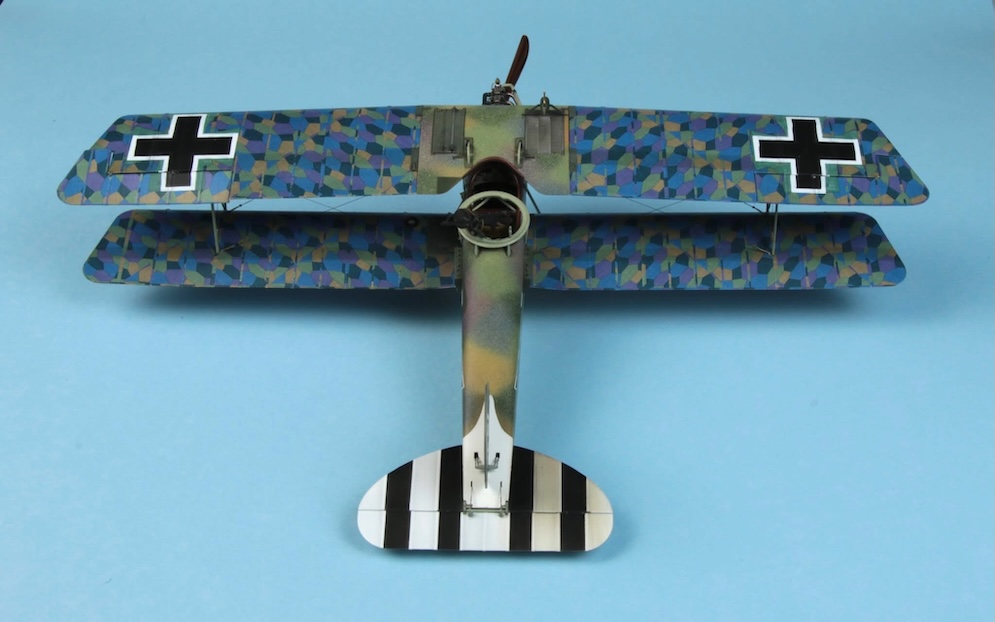
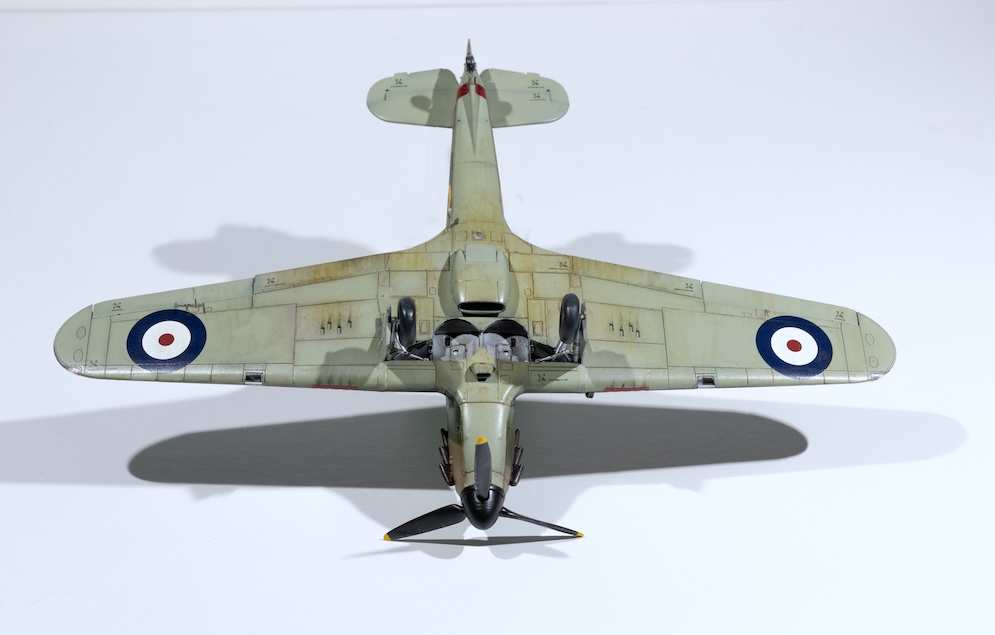
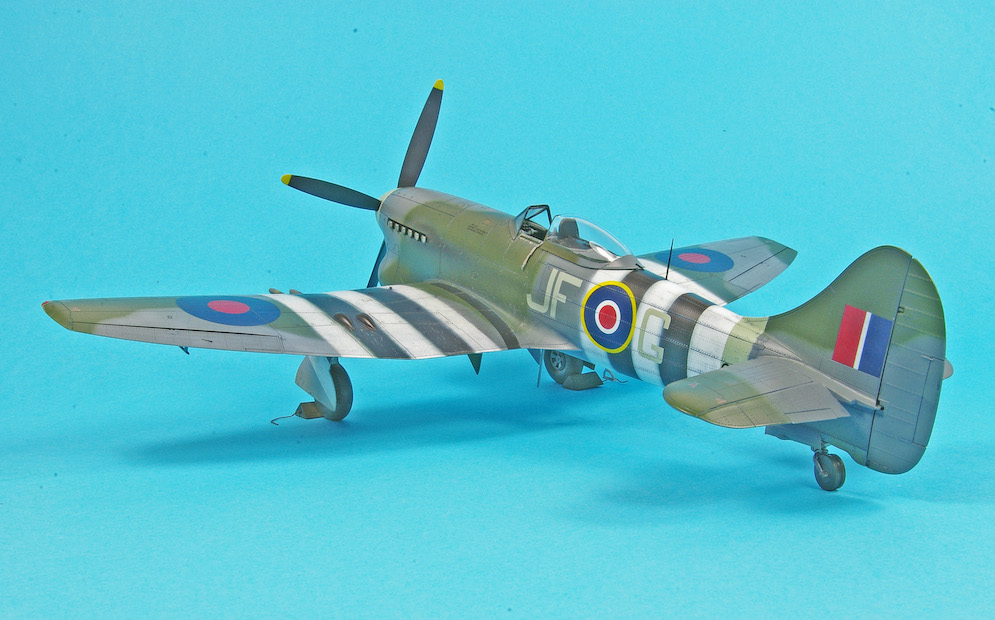
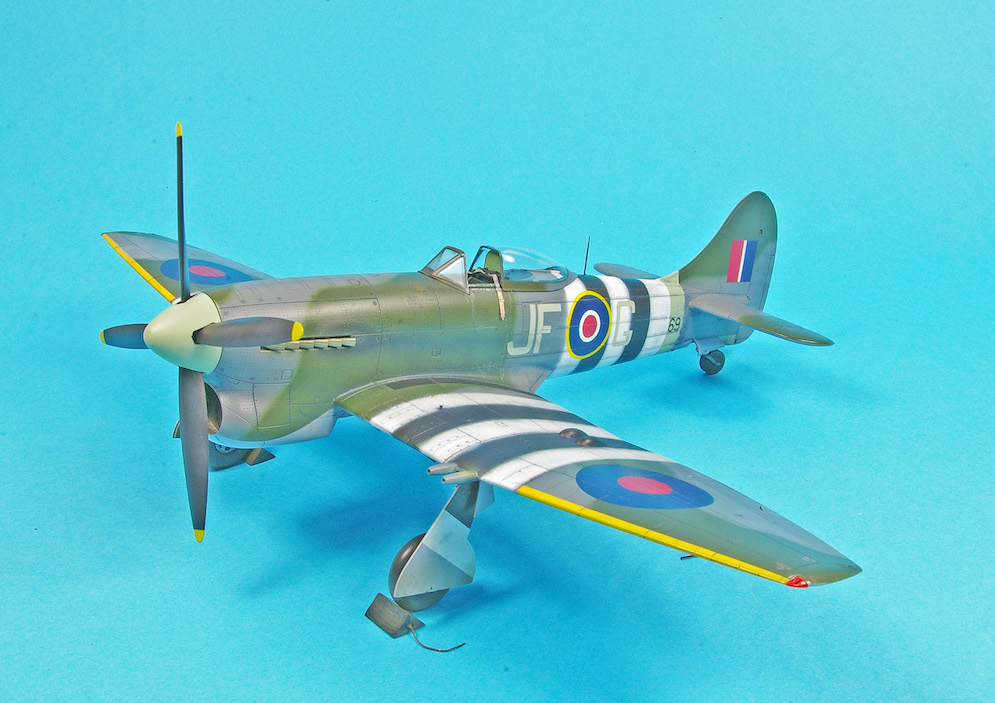
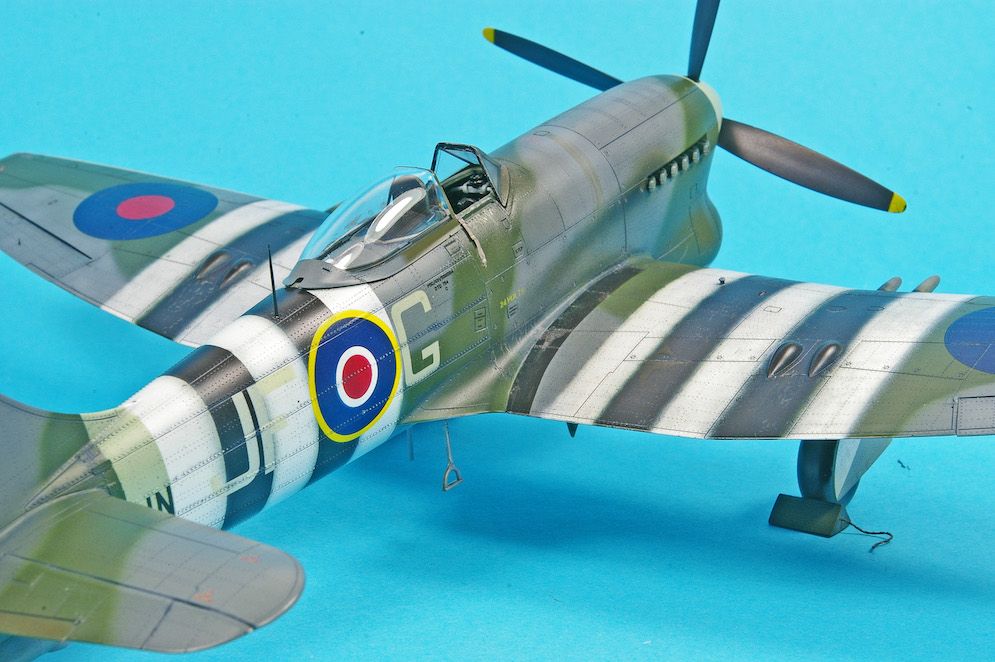
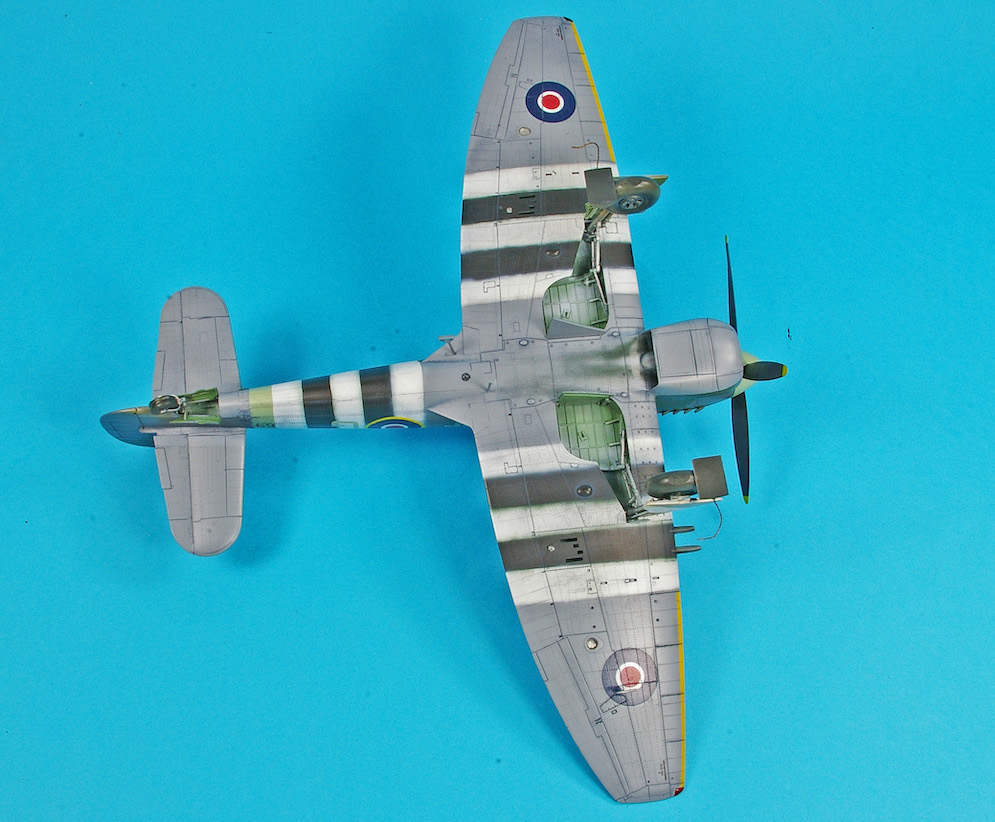
This time again a first I guess – I have never seen a model with this pattern. If there is anyone who does, I will cord my jacket with respect.
Endless thanks to Haluk brother and Çetin teacher for the logistic support. But with a separate thank you, this goes to my dear brother Metin ÖZREK. For colour separation and paint pattern (camouflage transitions.. etc) hours of work, we finally got me pumped up and came up with this model… thank you and thank you… a thousand thanks 🙏🙏🙏
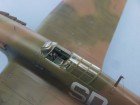
I did not do the cockpit glass masking. Directly painted model (working on some delicate work… ), cleaned the paint mess on the glass with car polish with a little brush and toothpicks. Also, the crane is my own production; we had to get it when it didn’t come out of the model.
We are happy to add one of our Turkish coat of arms to our collection. Looking forward to seeing many Turkish armour models, stay healthy… greetings and love.
Izzet C.
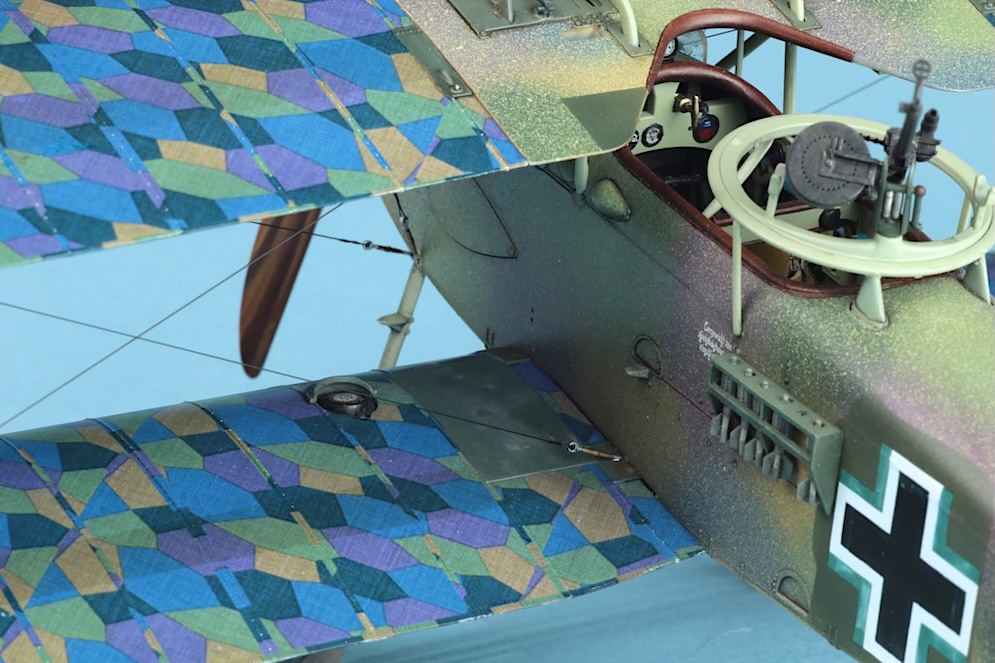
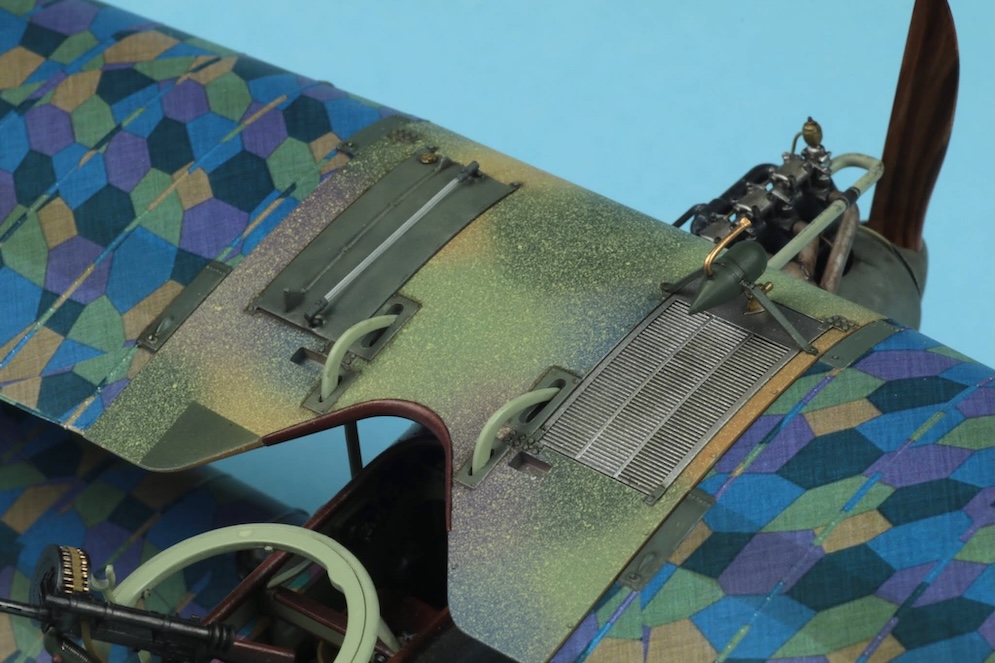
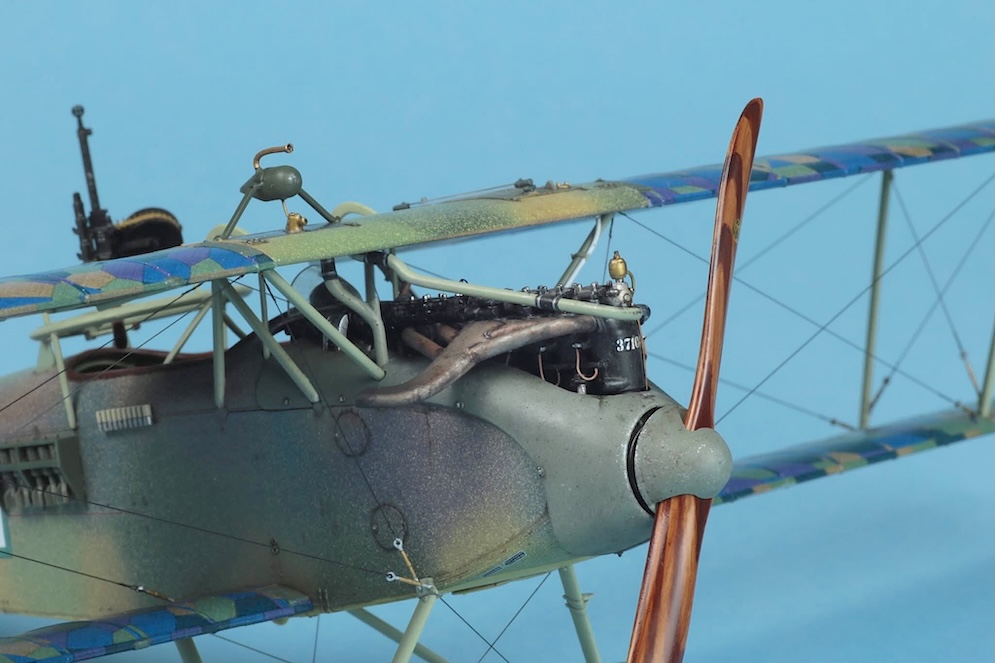
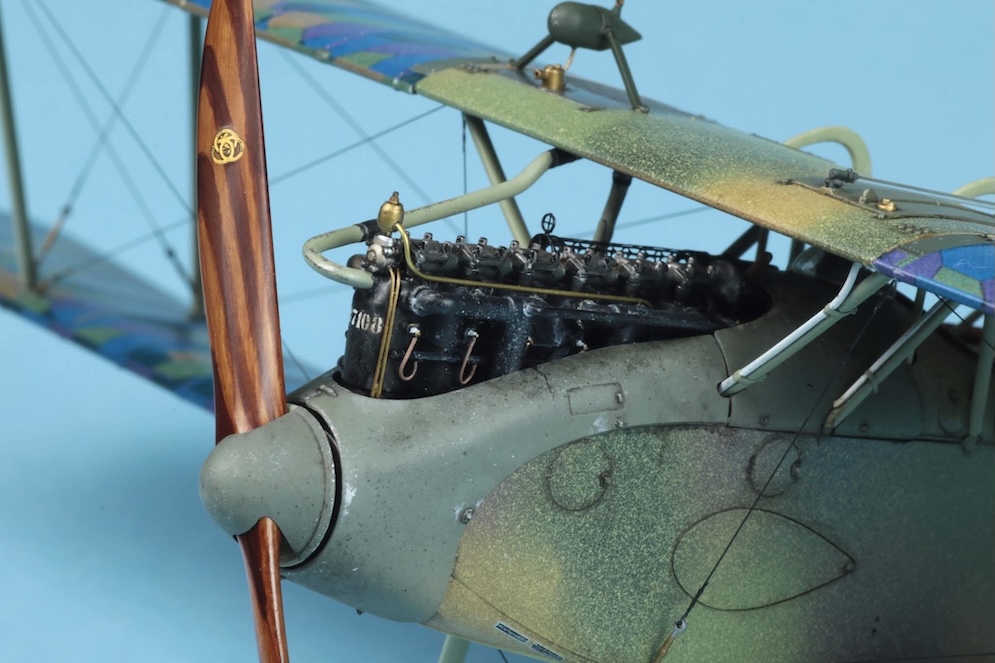
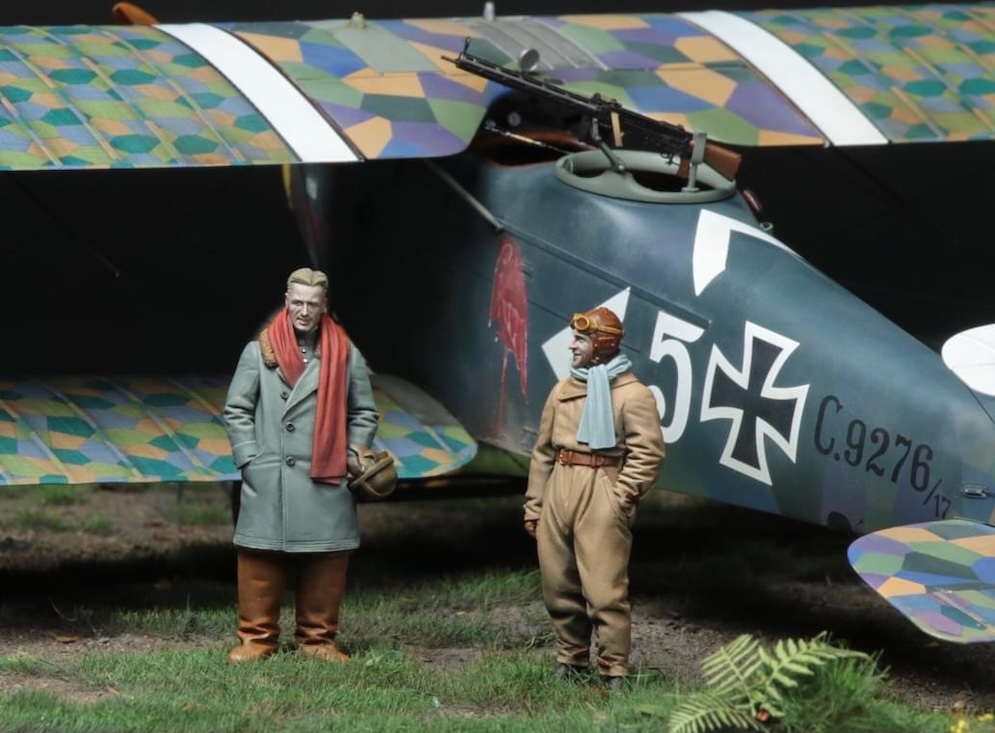
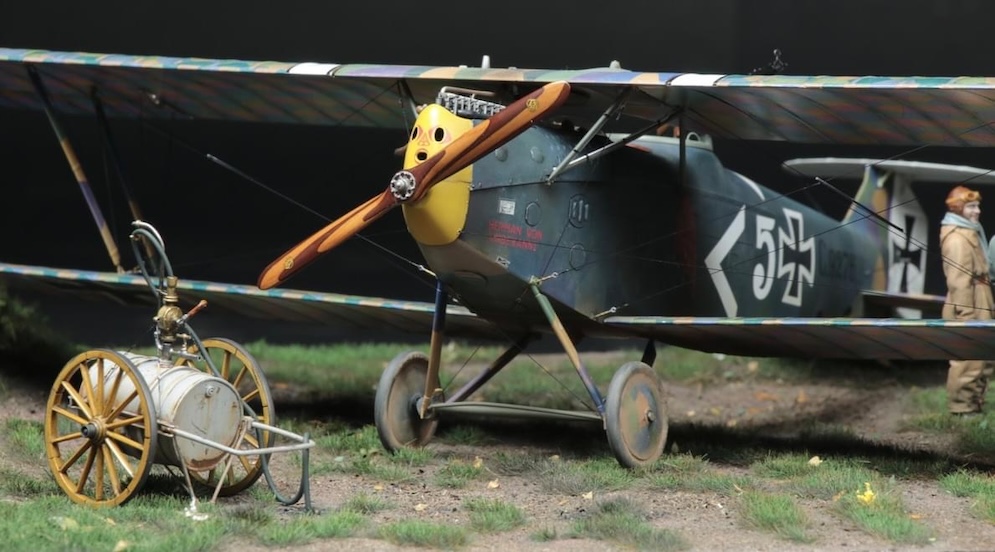
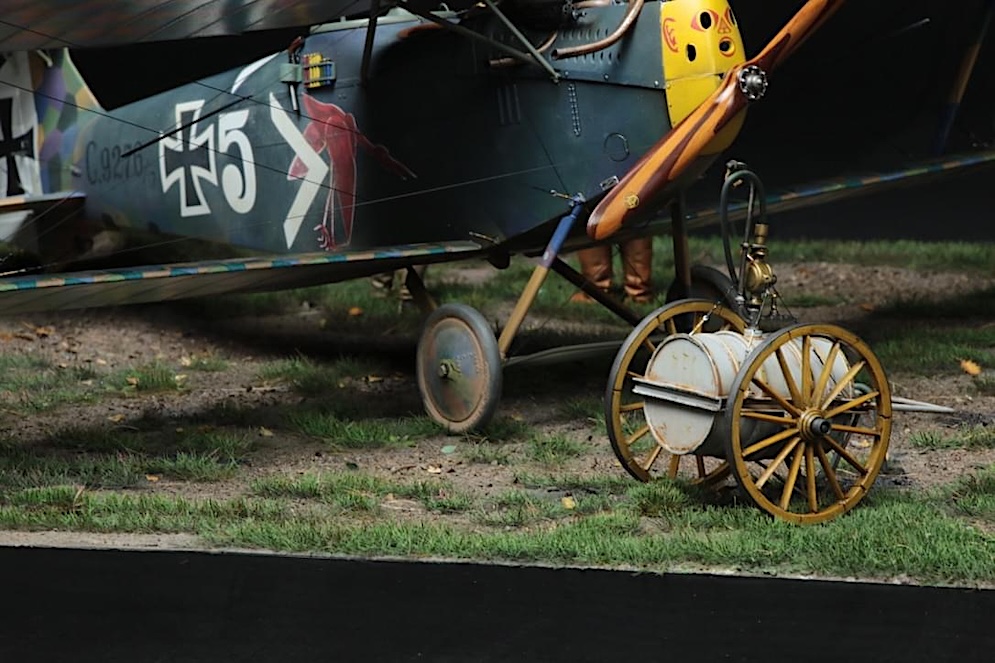
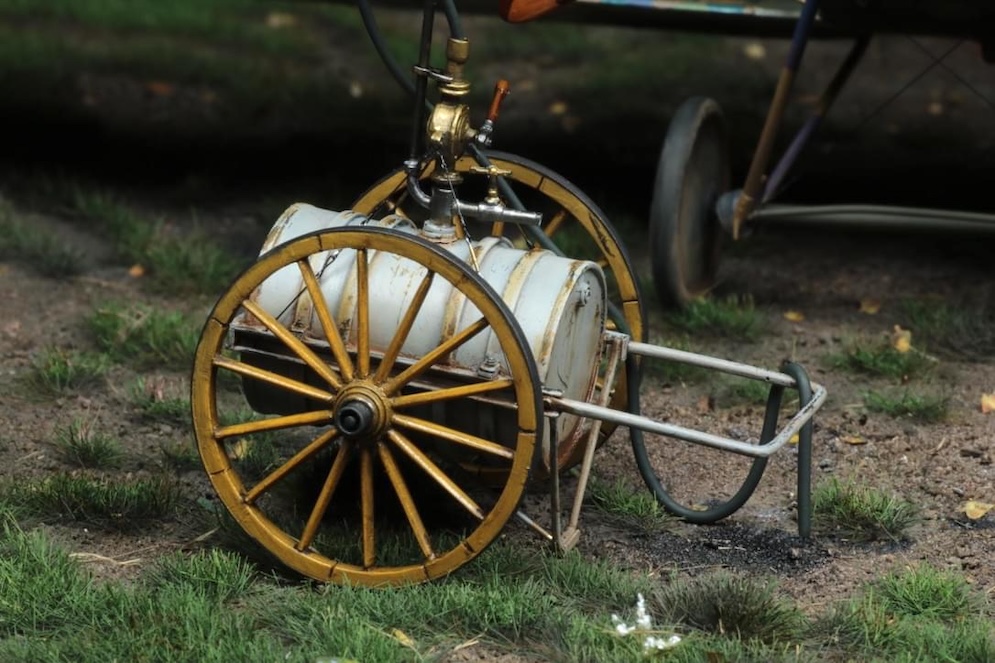
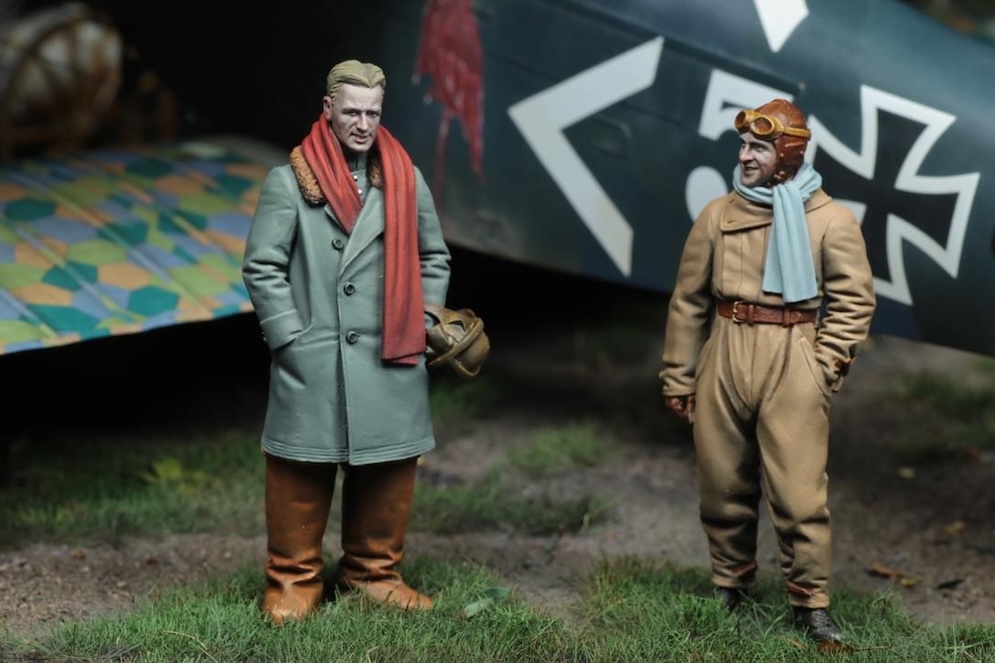
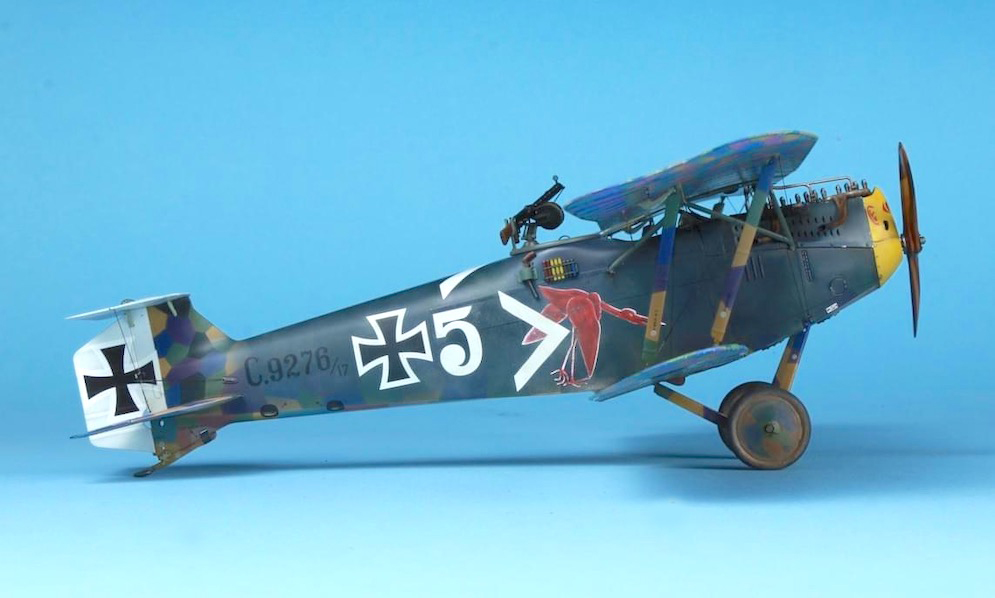
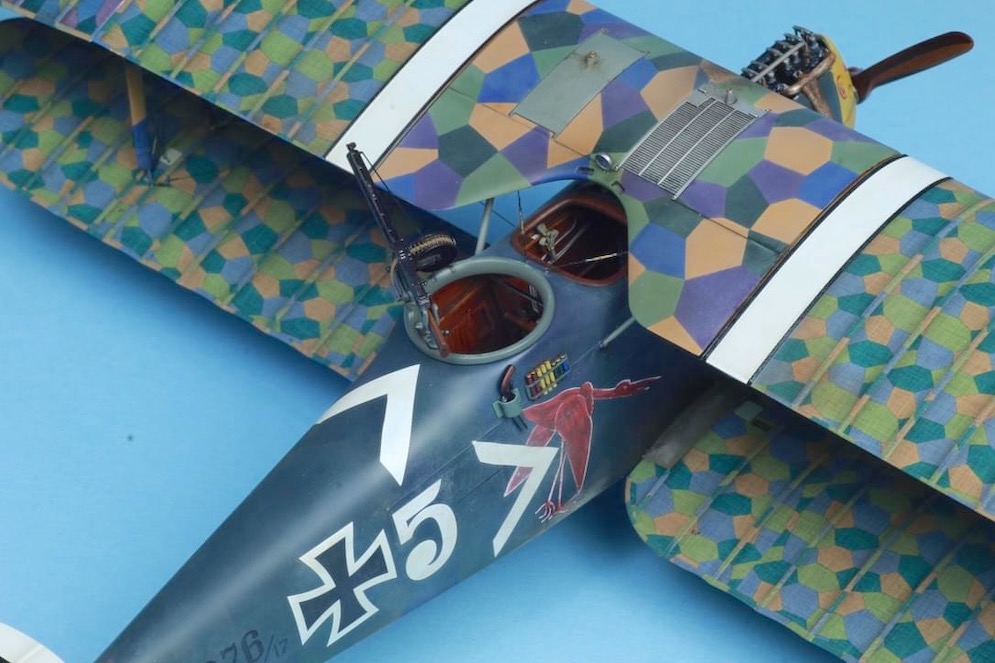
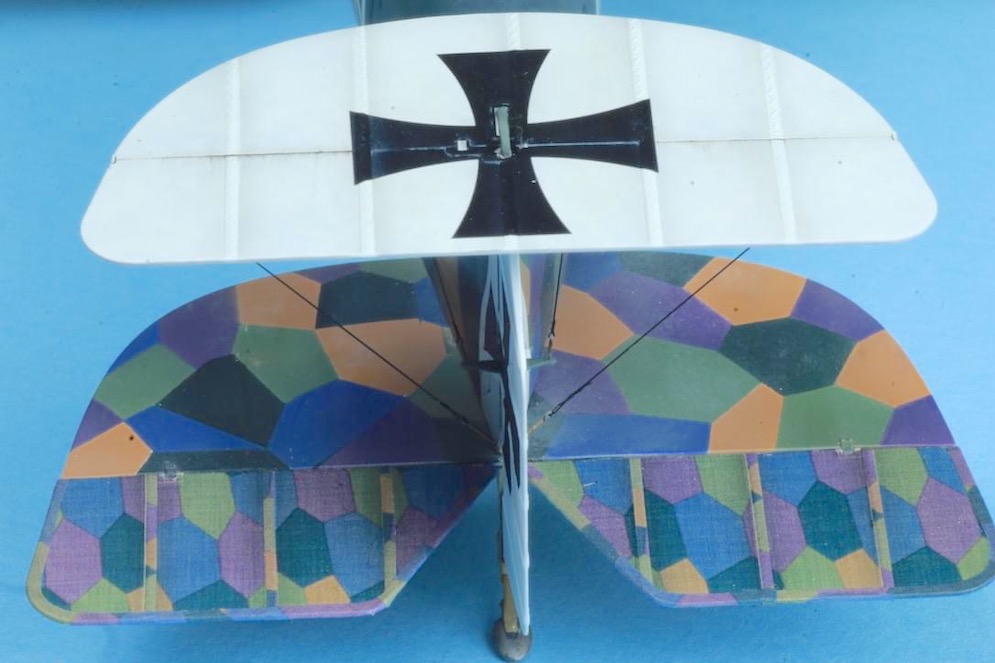
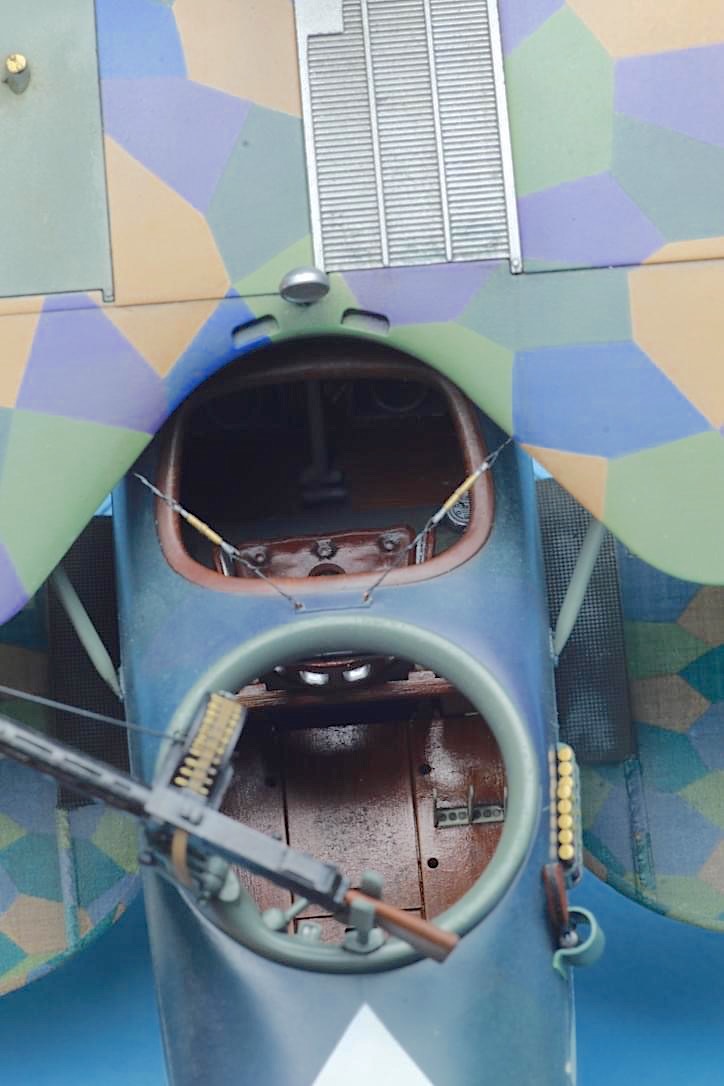
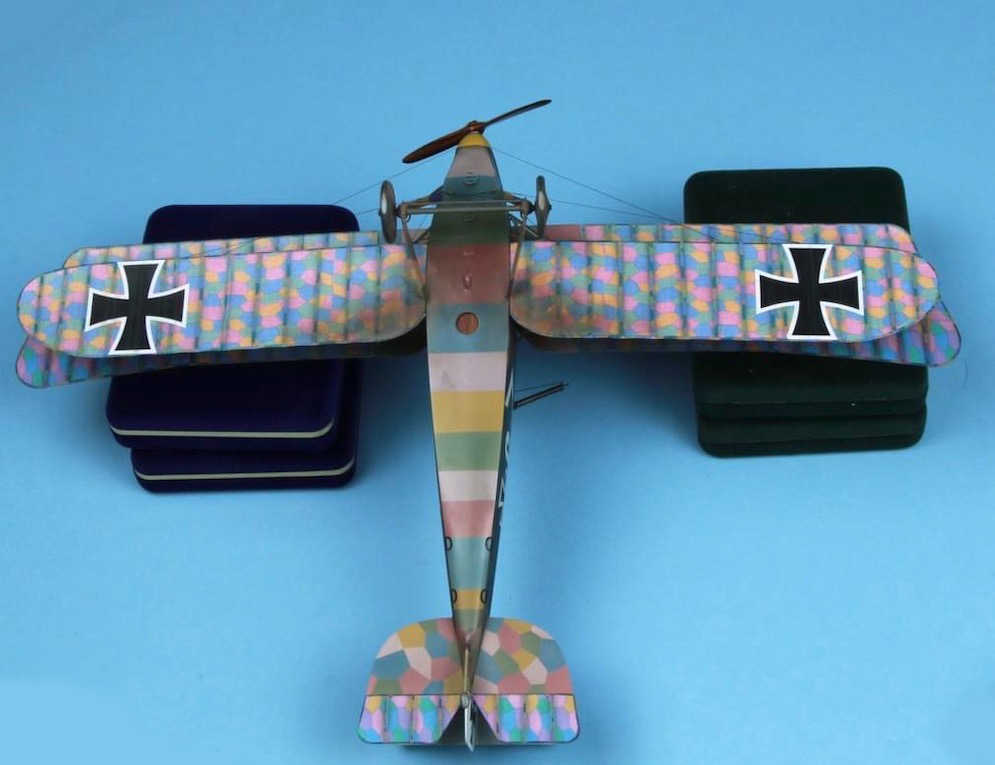
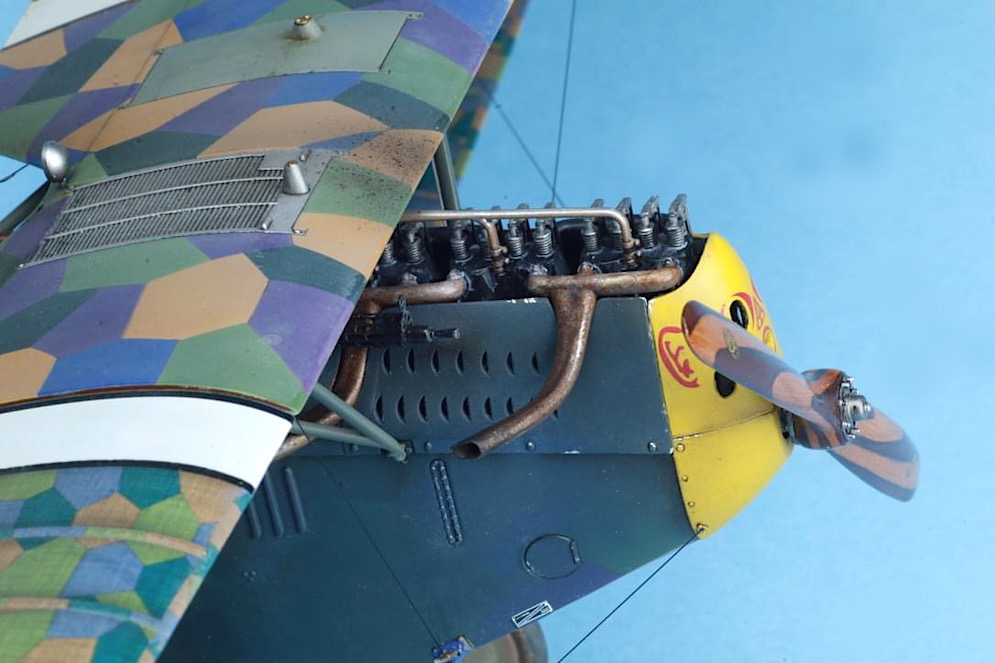
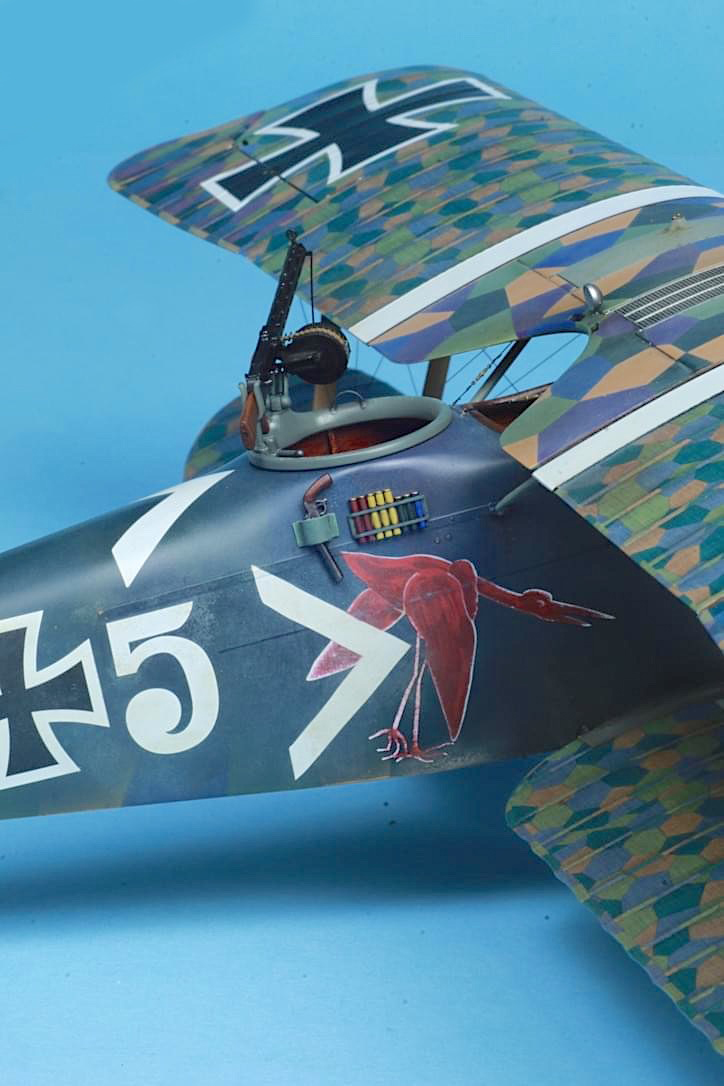
Wingnut Wings 1:32
Tamiya paints inc speckle fuselage
Gaspatch parabellum and turnbuckles
Model Kasten rigging
Aviattic lozenge wing decals
Prop: oils over acrylics
David L.

Tamiya, Gunze Sangyo, Humbrol and Xtracrylix for the paints and Xtradecal decals.
Chris A. P

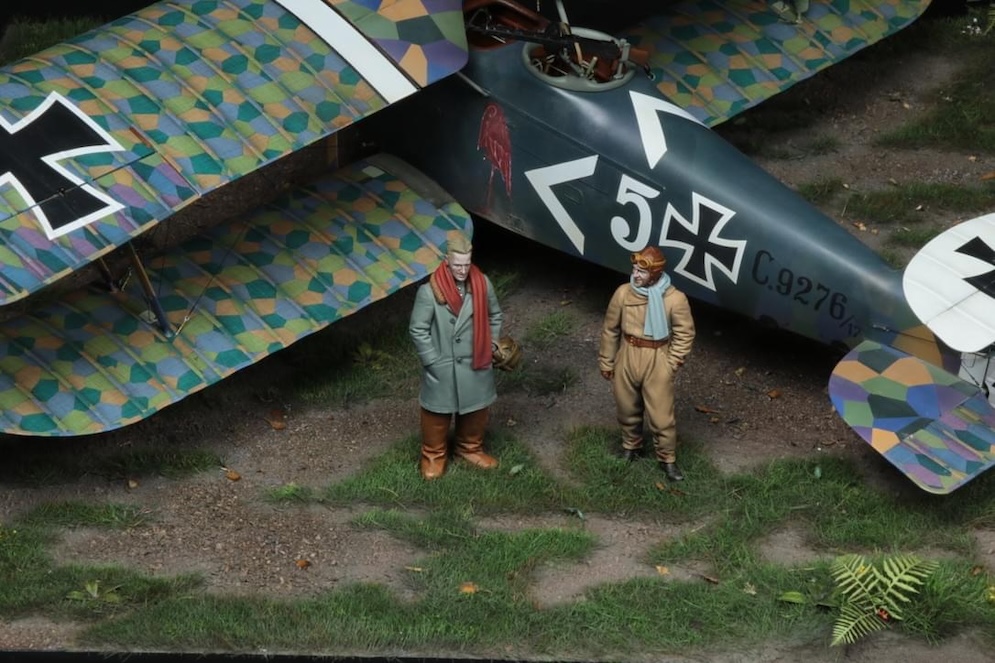
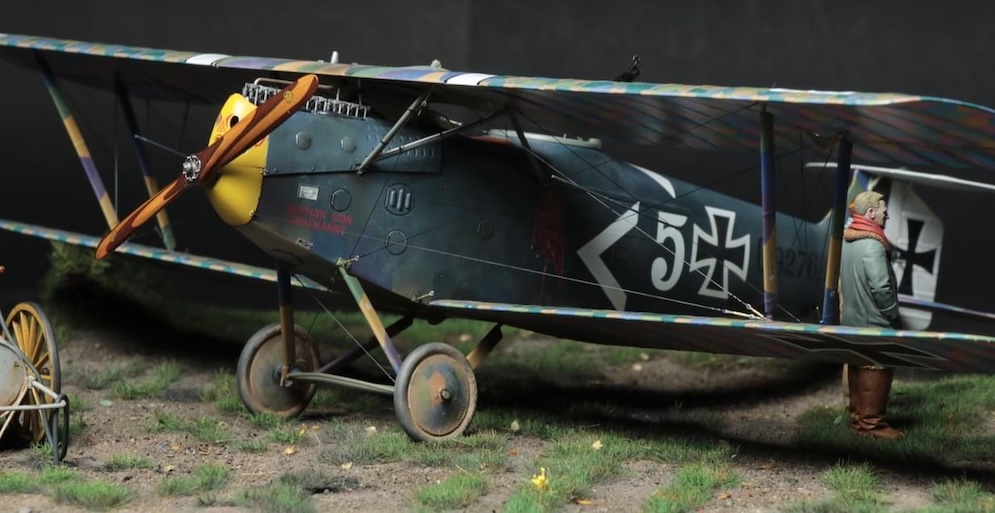
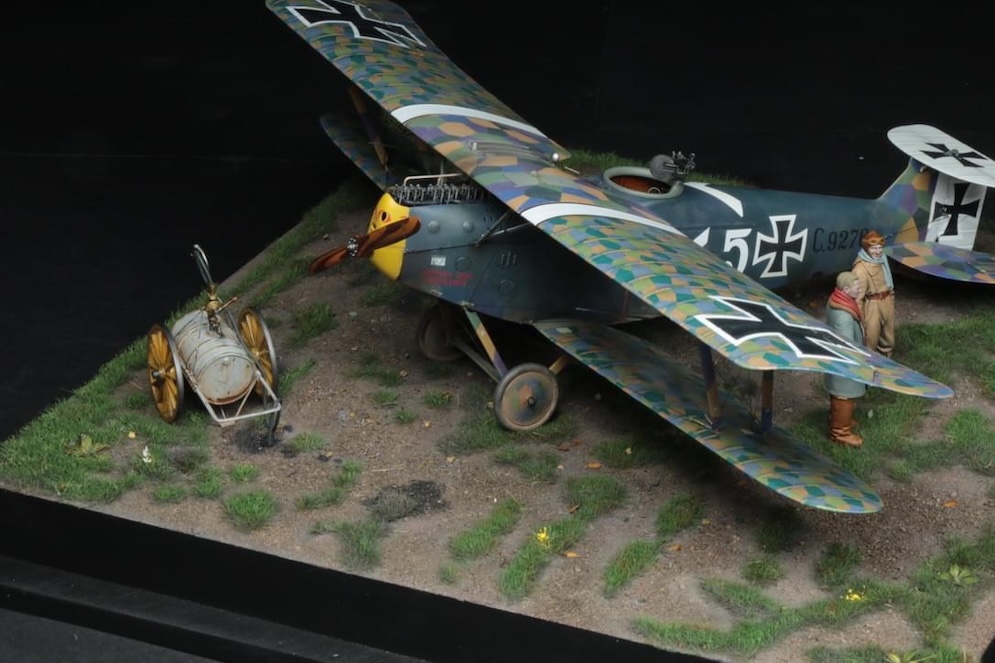
David L.
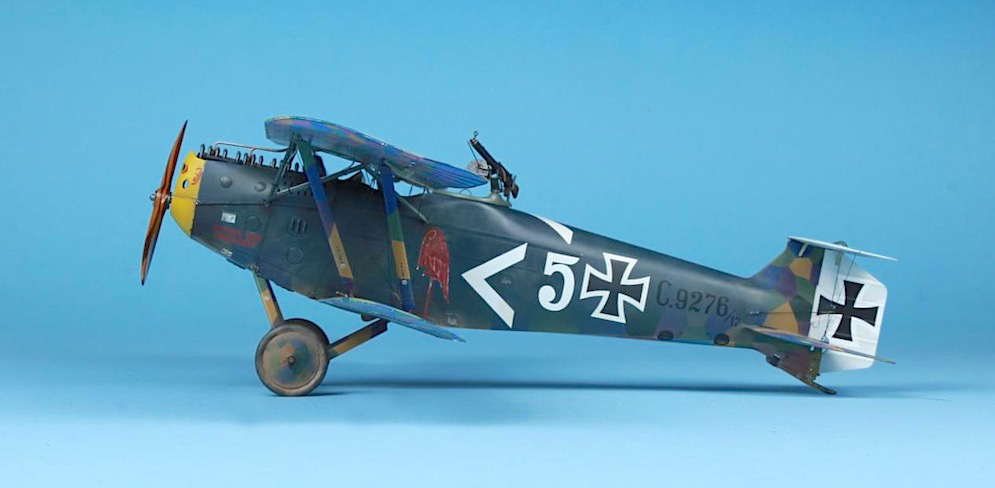


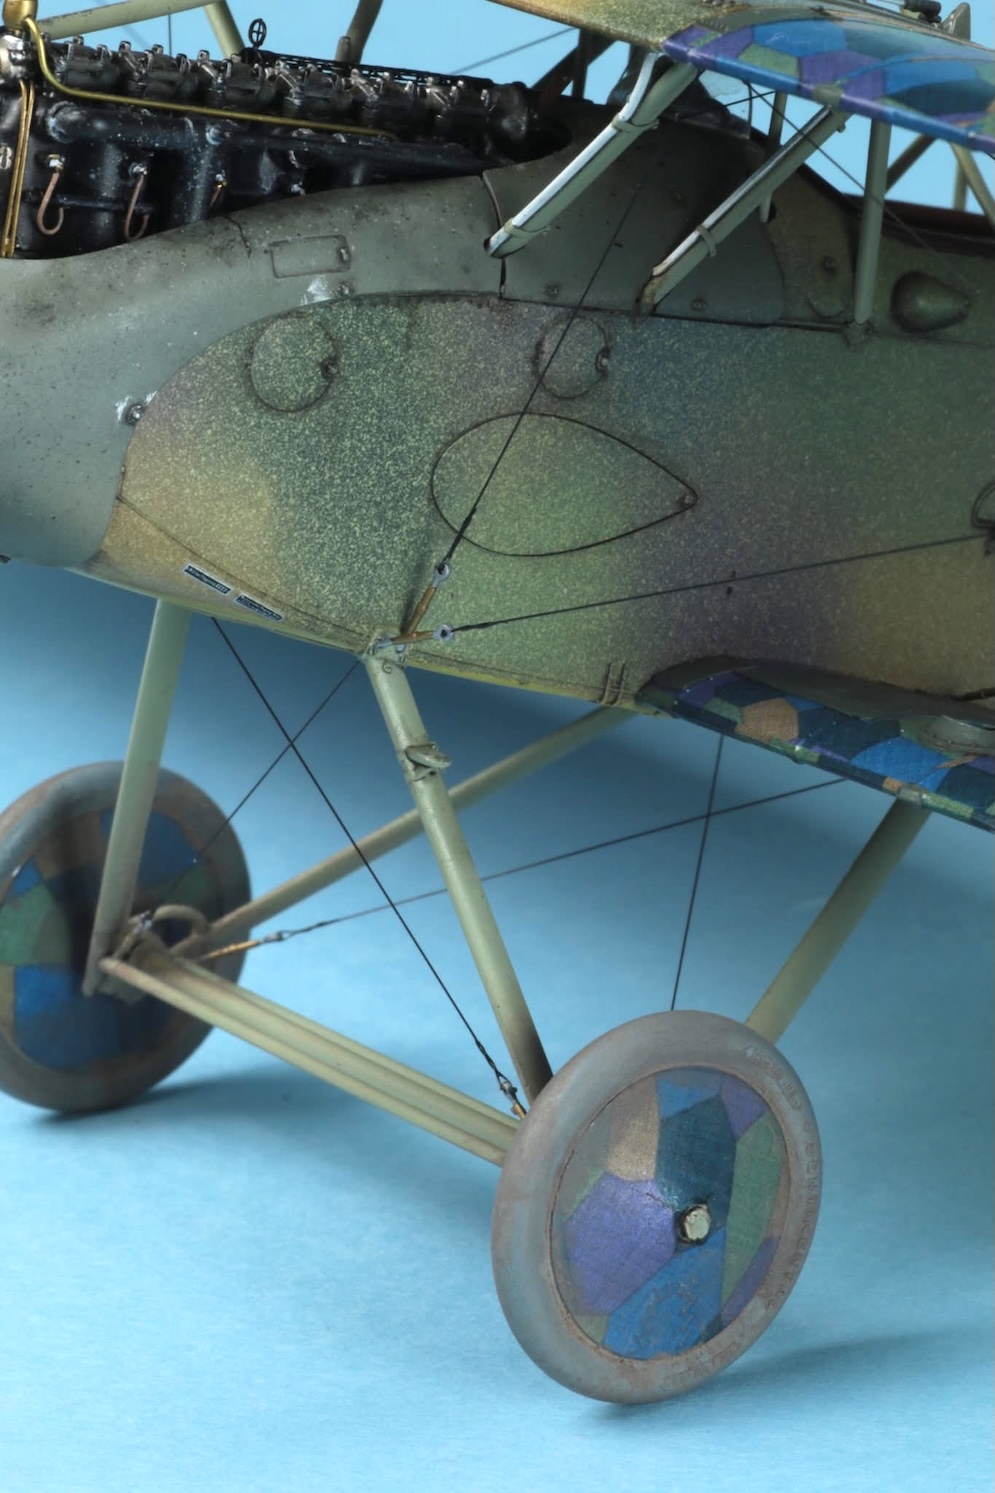
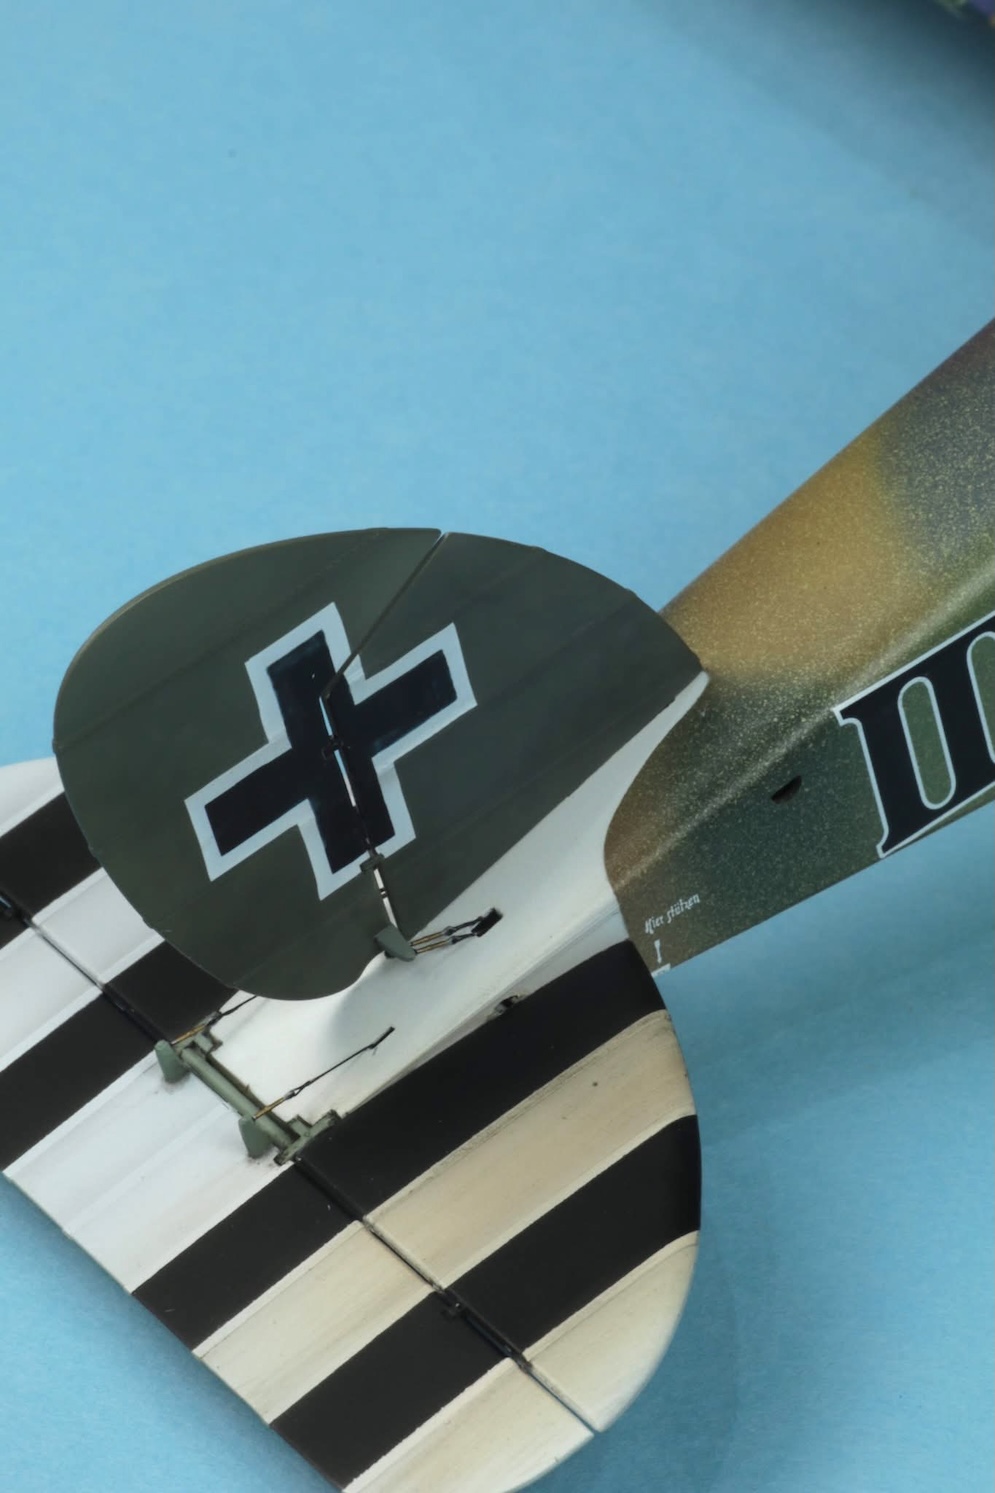
Late 1917-1918
Kit: Wingnut Wings 32079
Tamiya paint
Printing inks
Oil paint weathering
Prop:oils over acrylic
Fuselage lozenge done the tedious way with multiple masking sessions. Over-sprayed with grey-blue then oil paints to weather.
Aviattic lozenge cut to fit from masks. Note the mix of 4 and 5 colour lozenge. Rib and edging tape cut from white backed matching decal. Upper wing centre section and tail part roughly matched to 5 colour lozenge.
Model Kasten rigging; Gaspatch and Properplane turnbuckles
David L.
Quite chuffed with it as the kit is a sod to fit (nose and engine intact area).

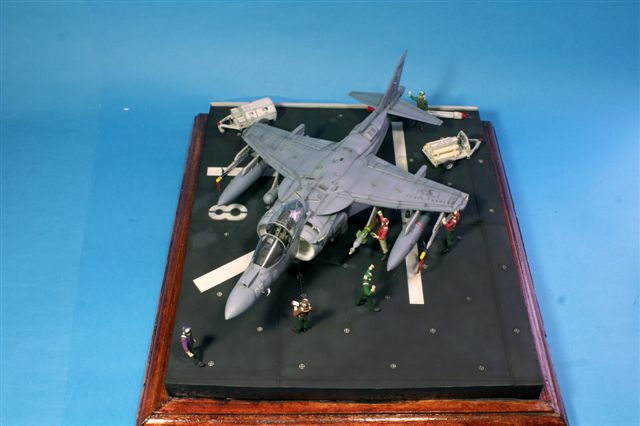
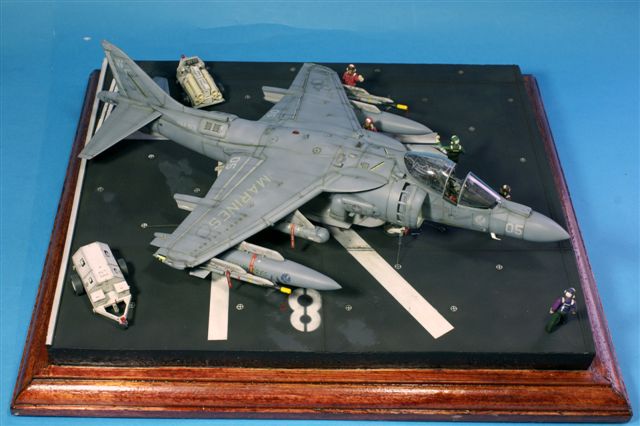
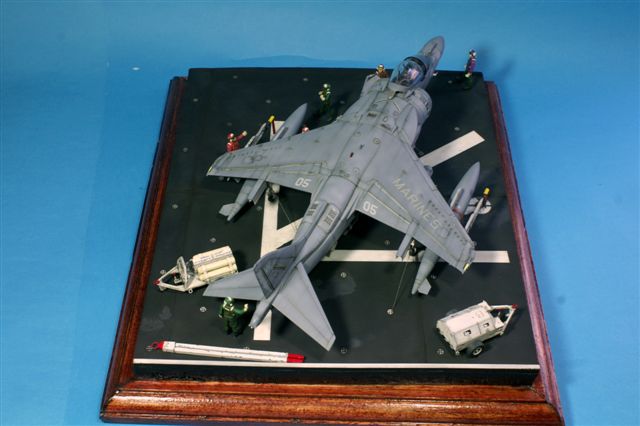

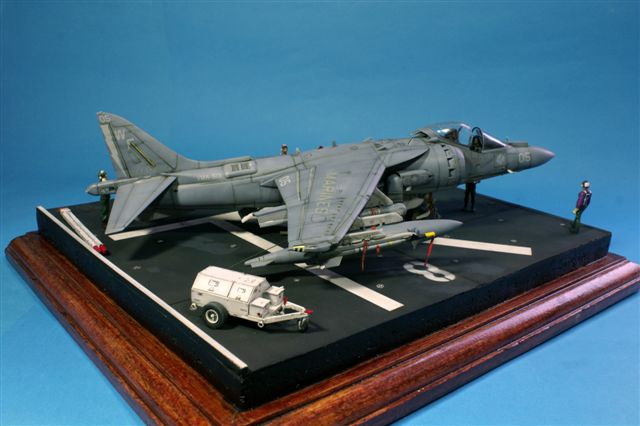
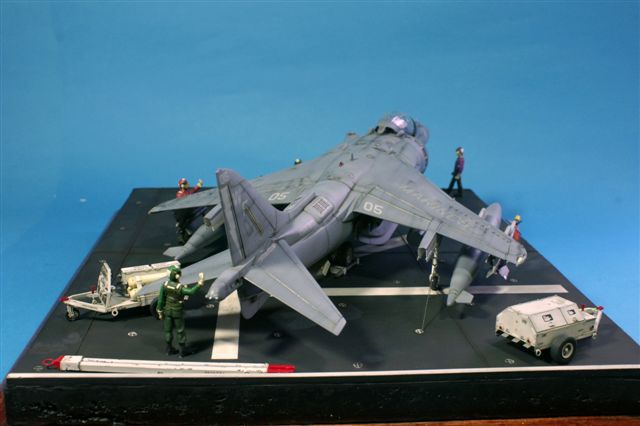
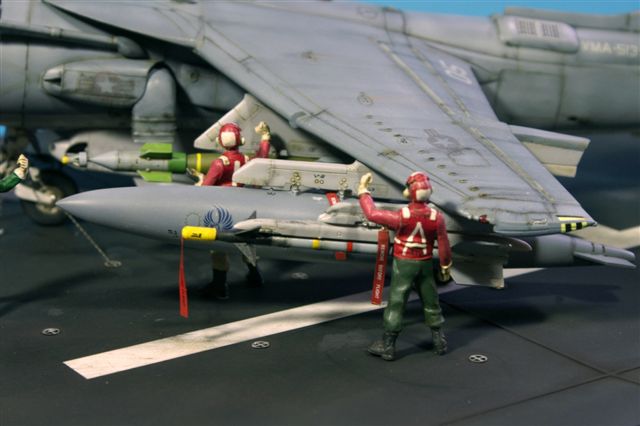
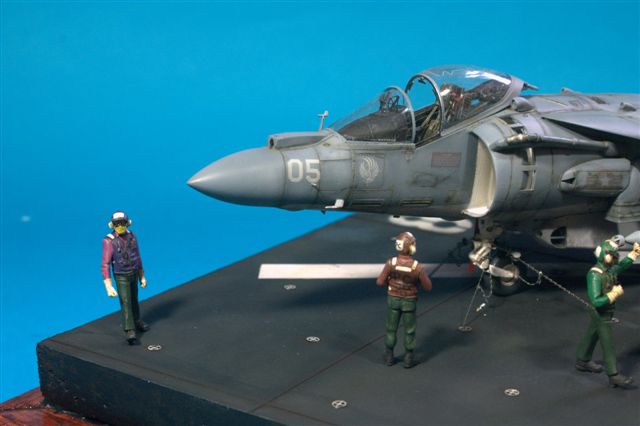
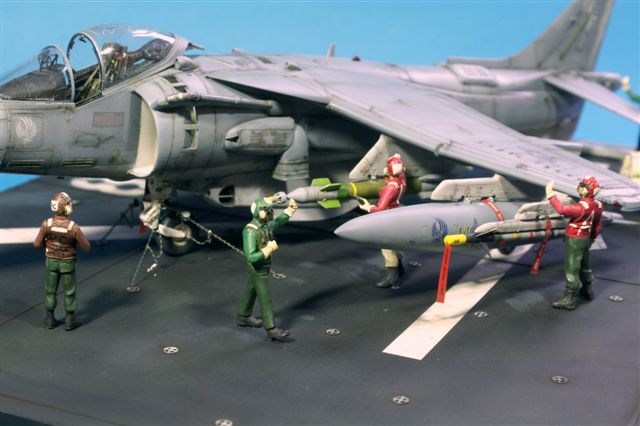
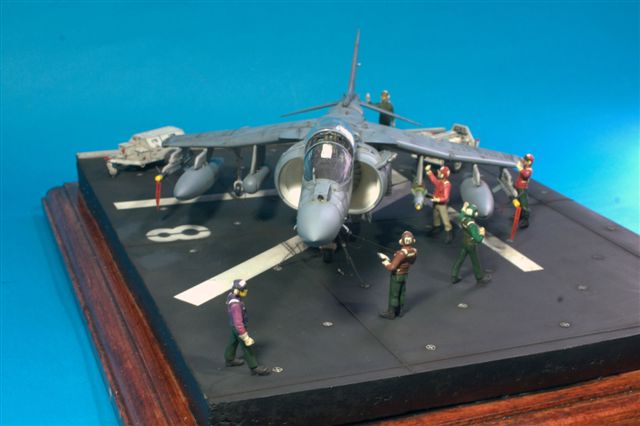
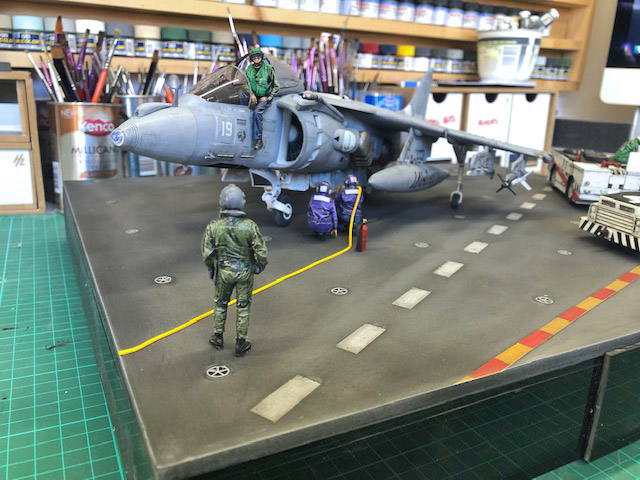

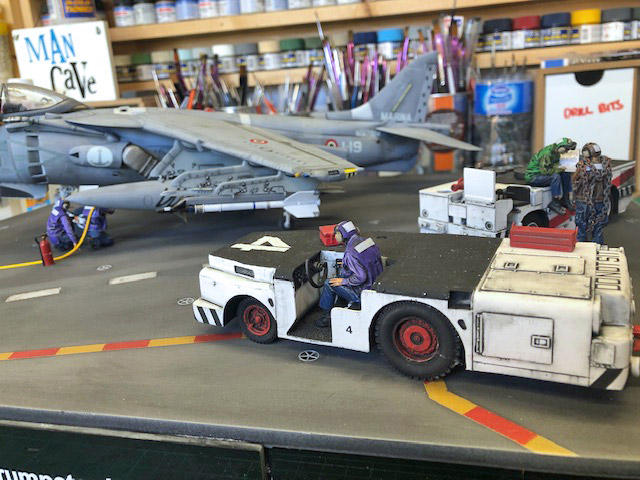
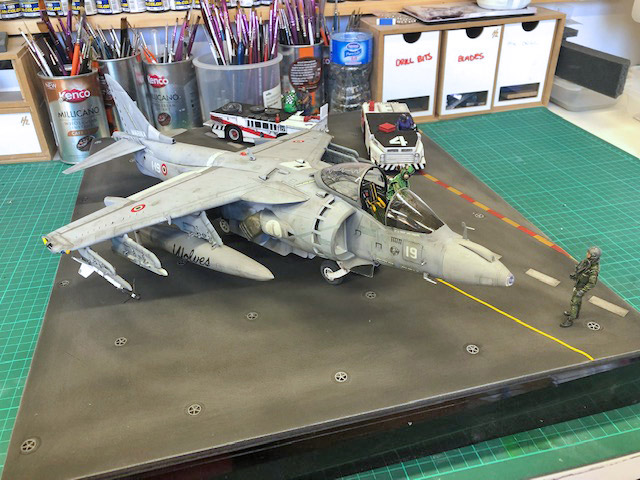
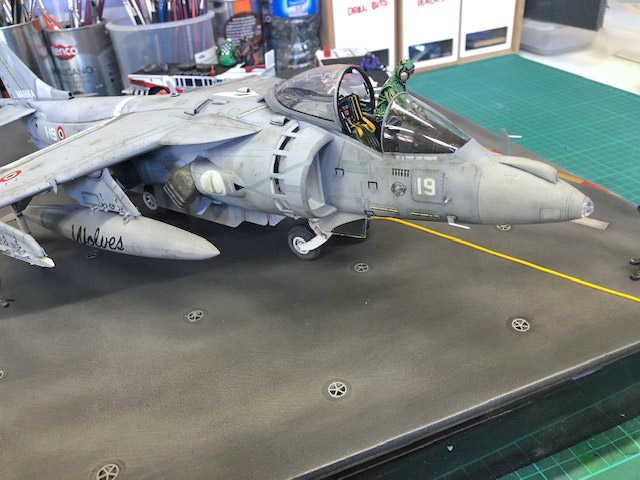
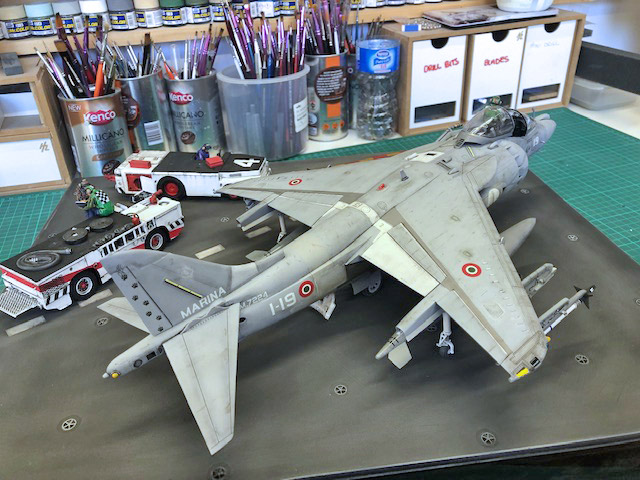
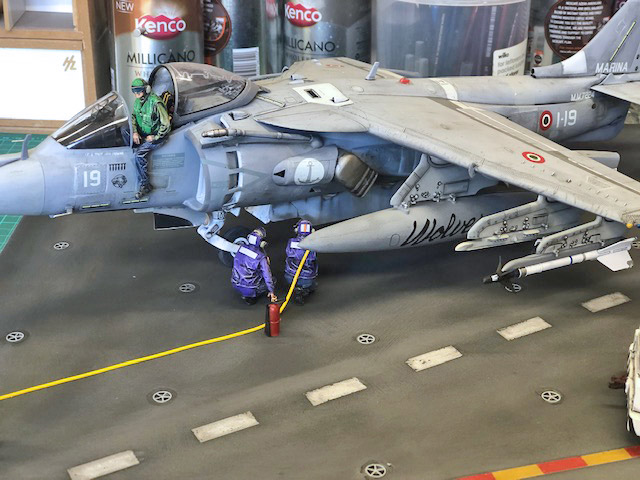
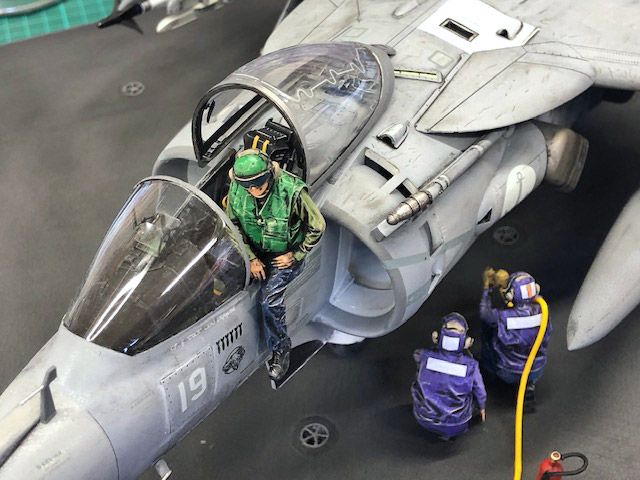
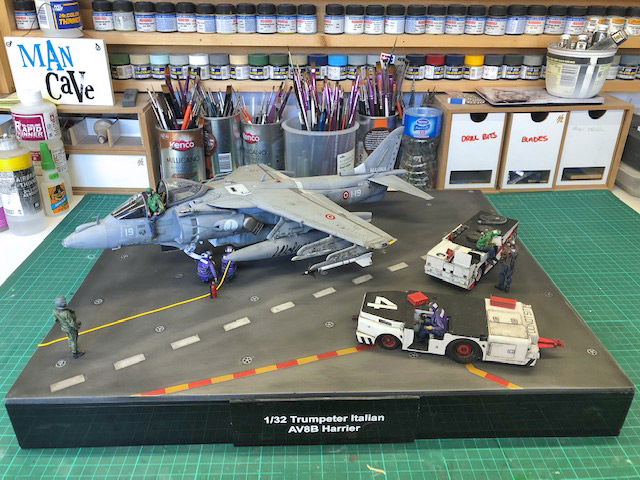

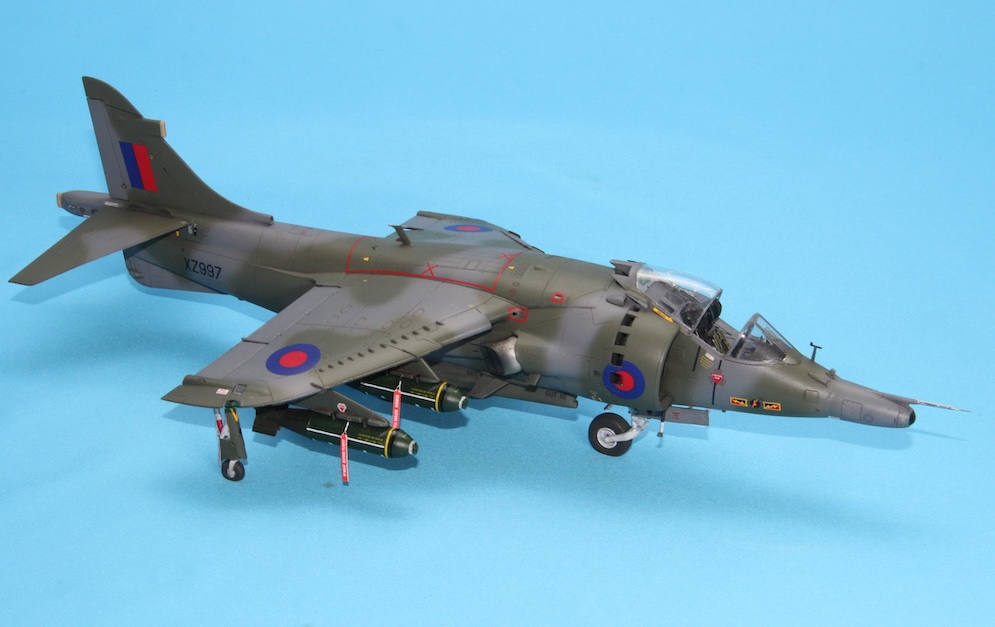
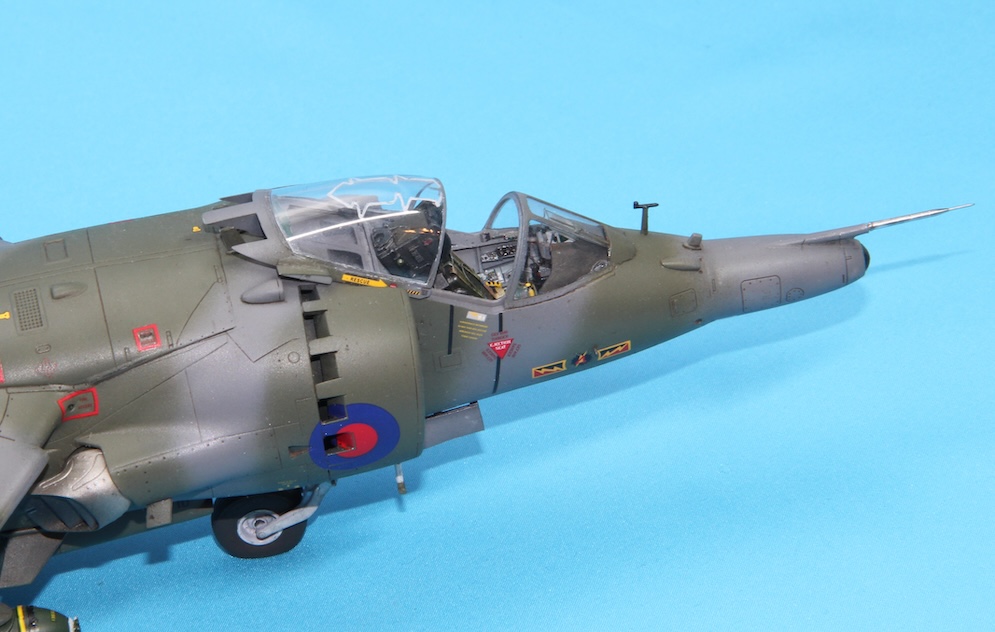
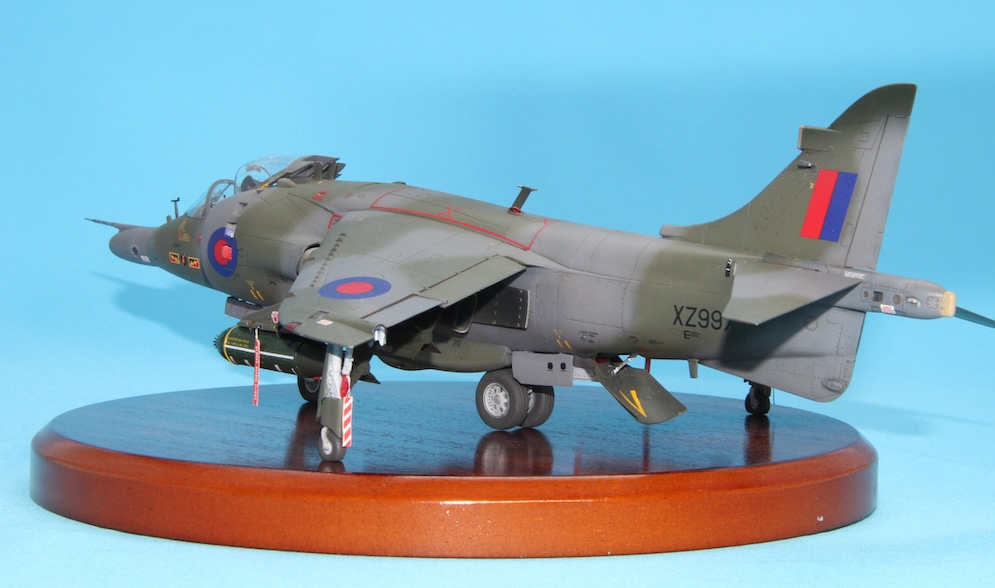
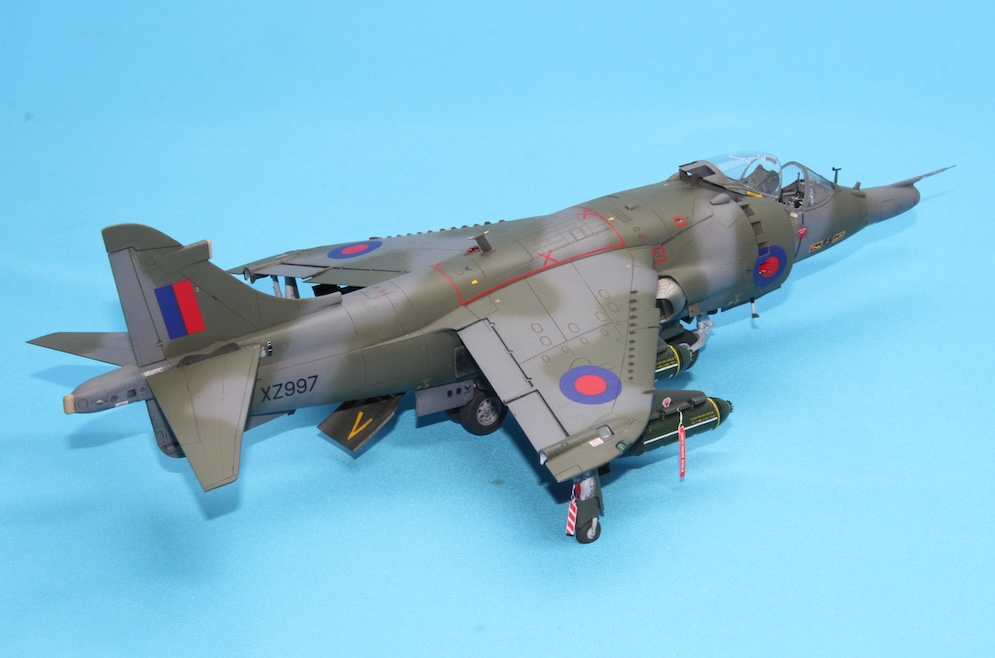
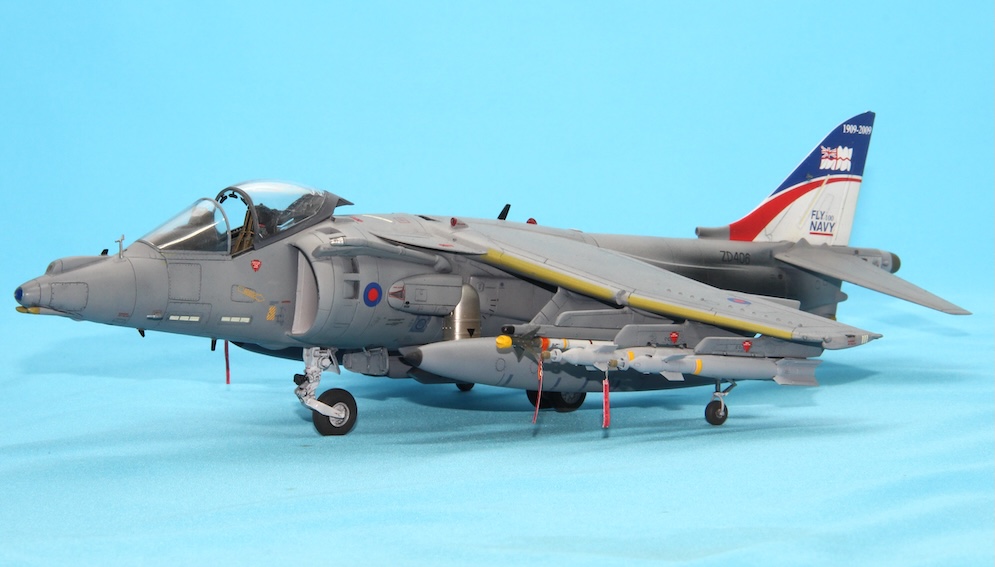
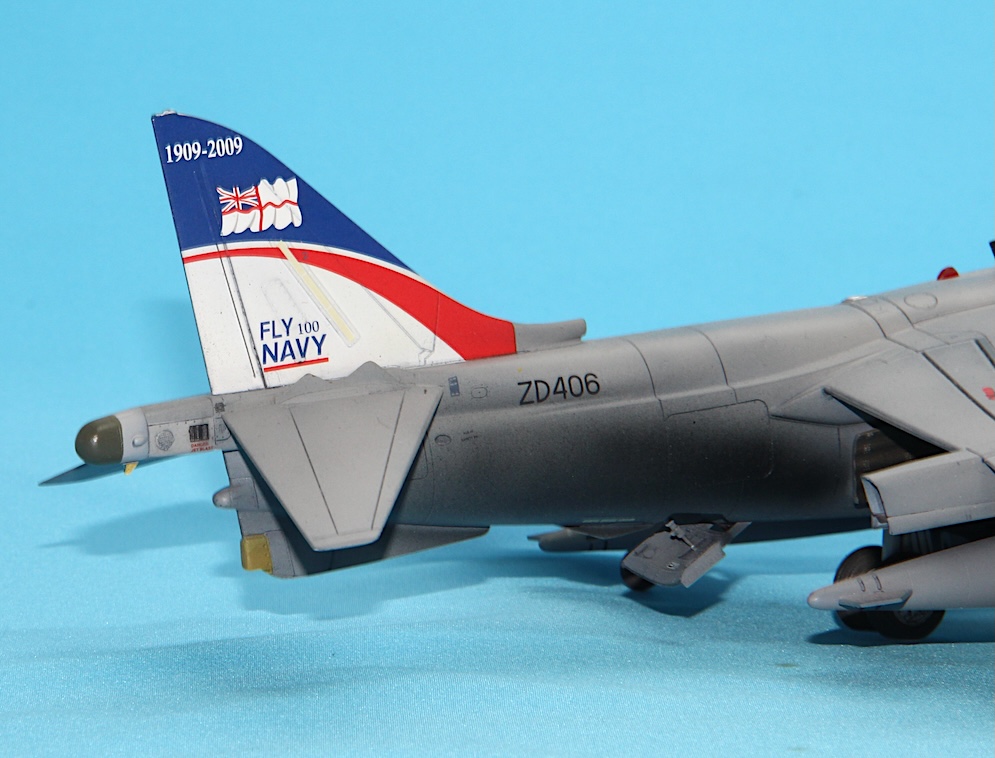
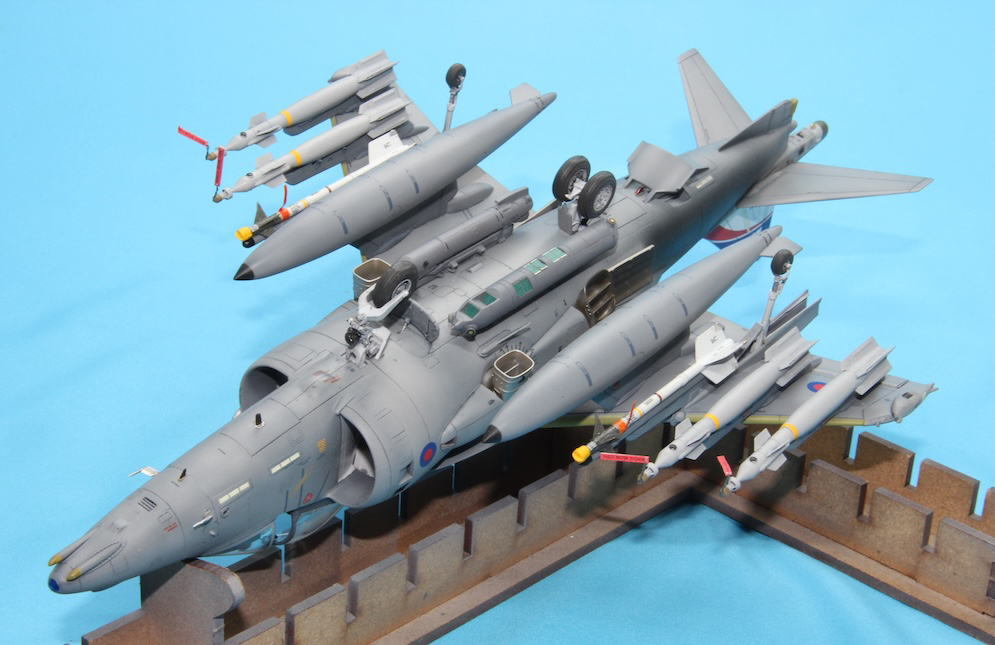
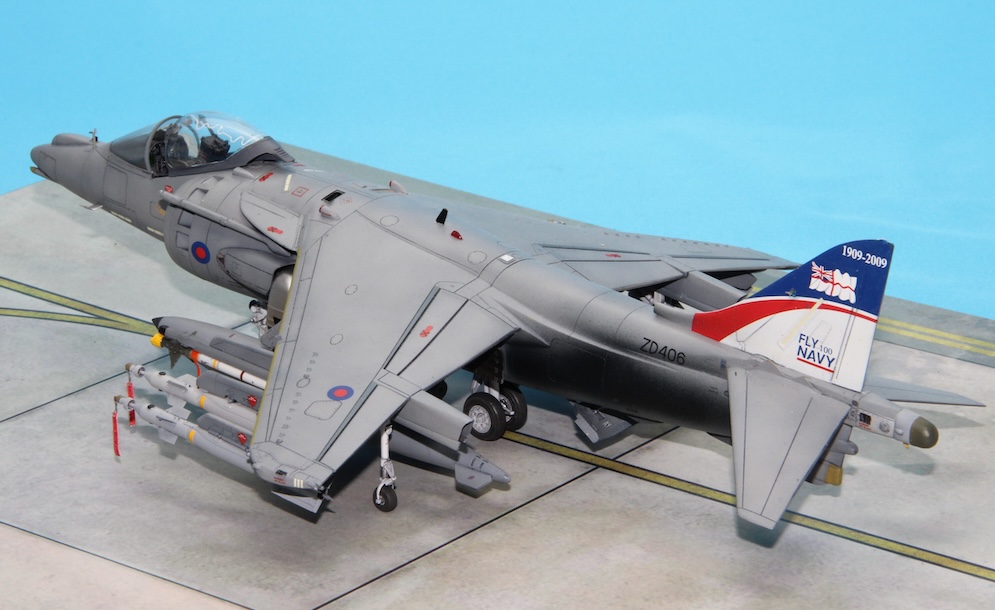
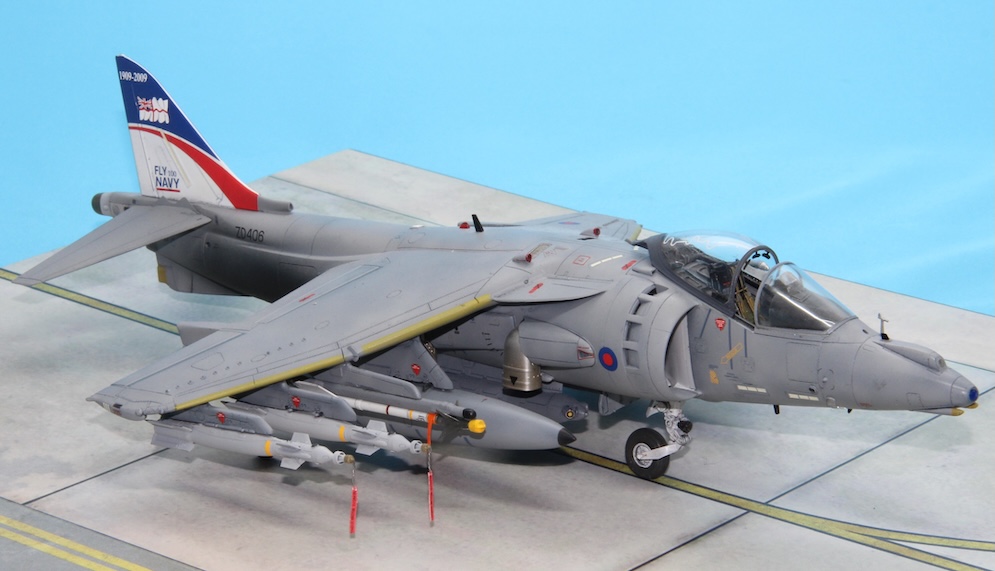
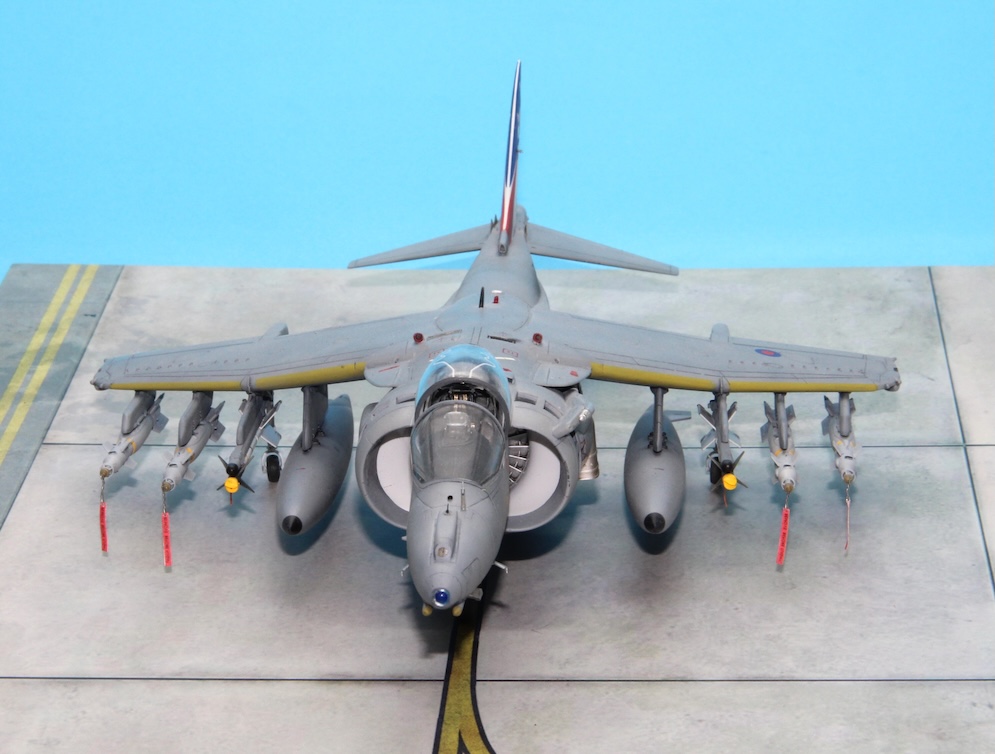
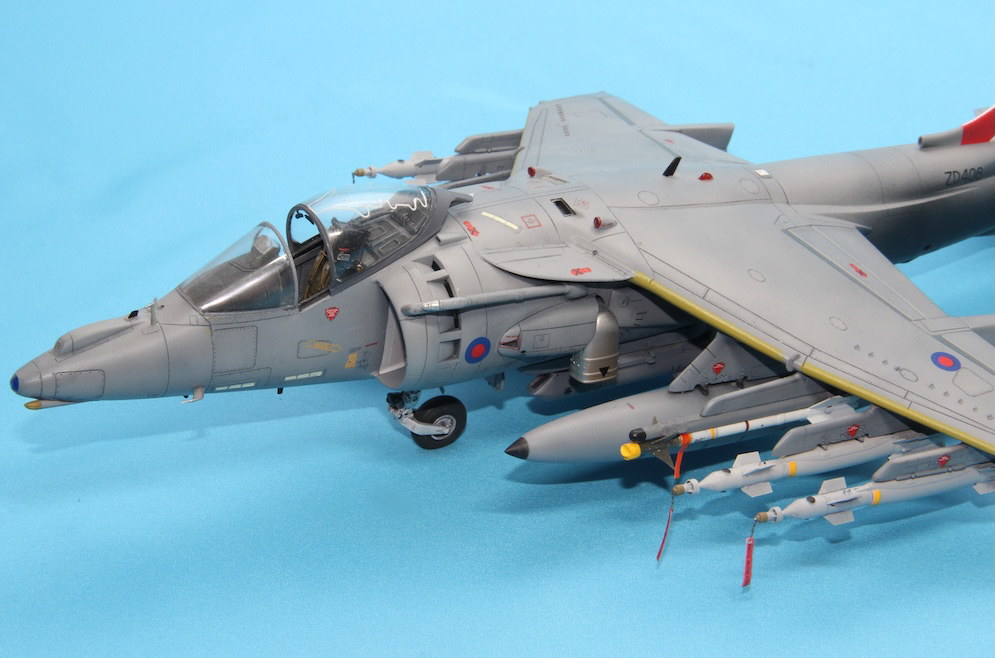
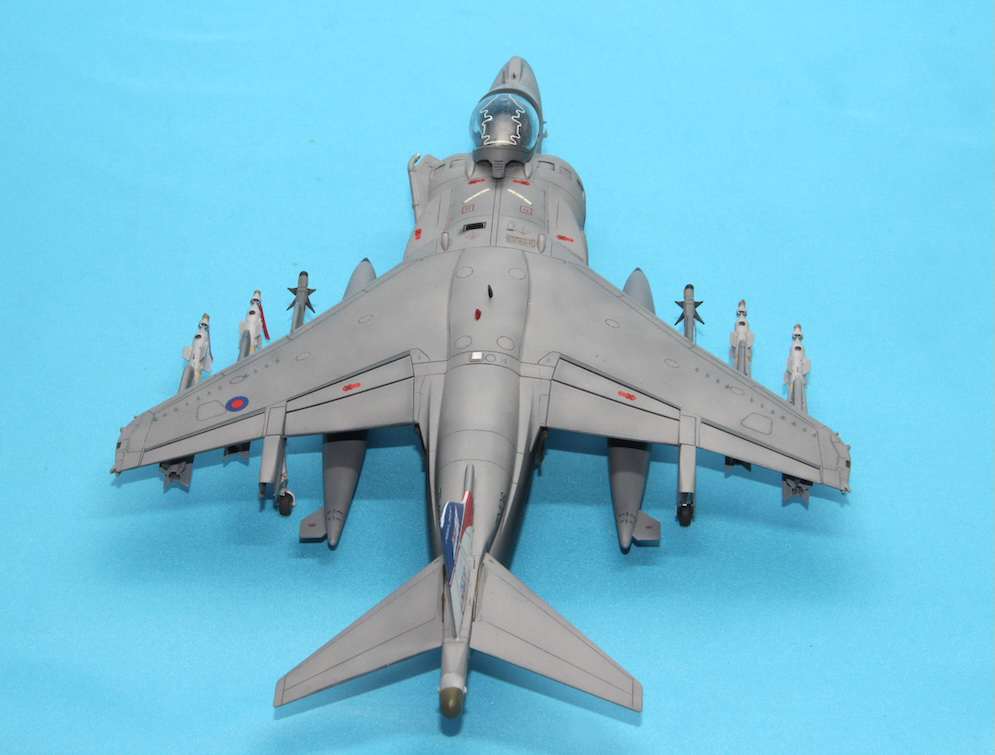
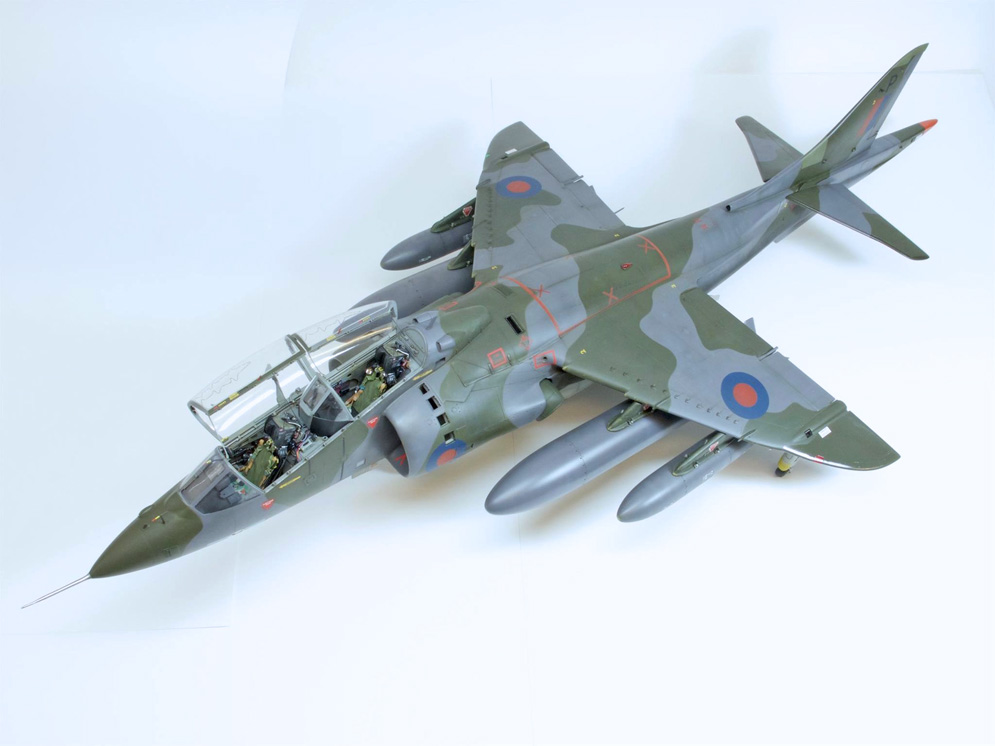
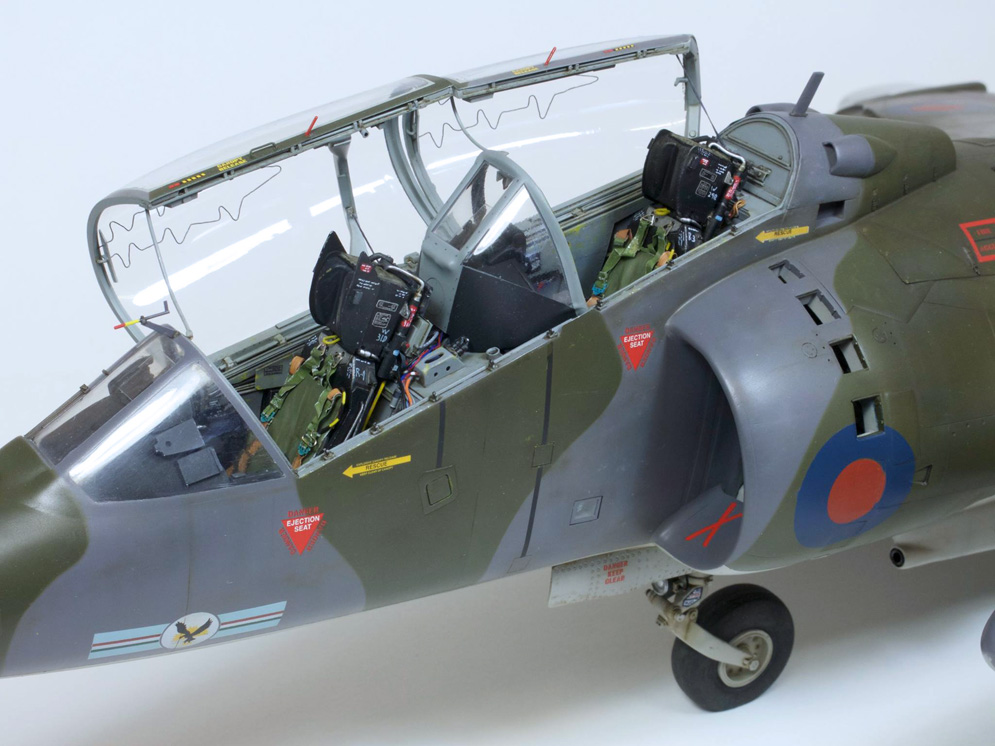
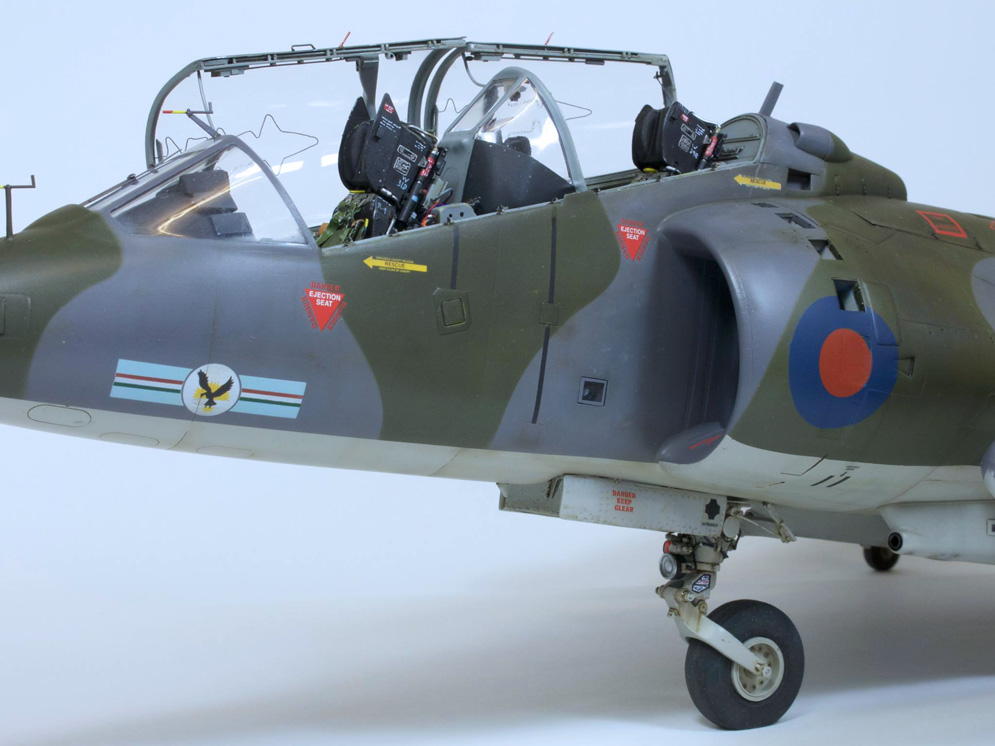
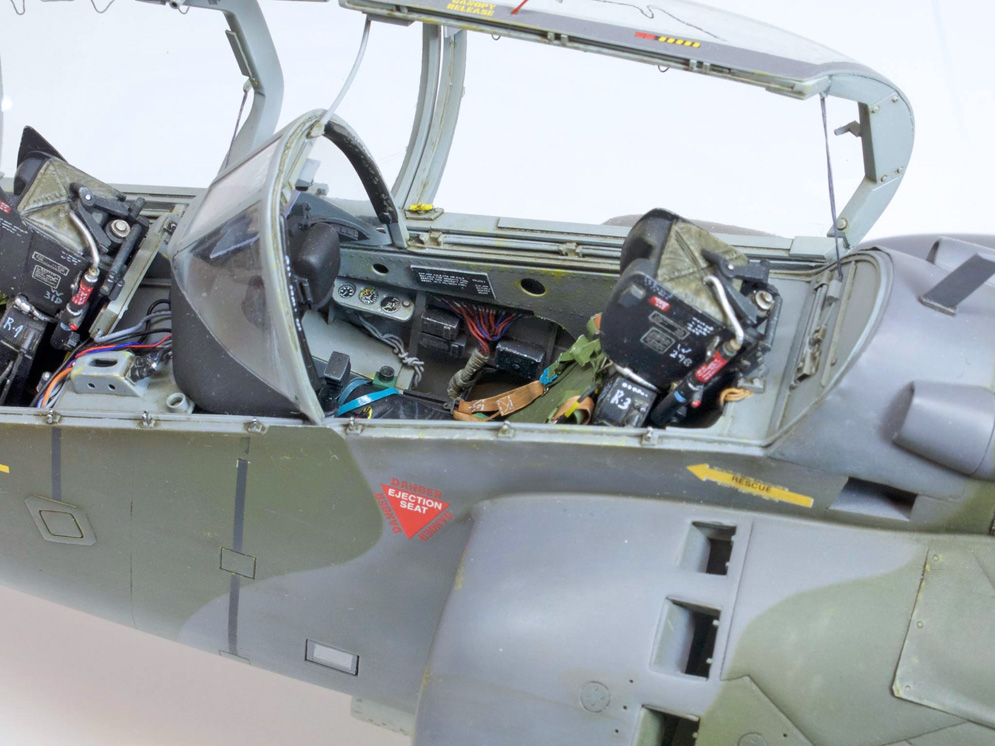
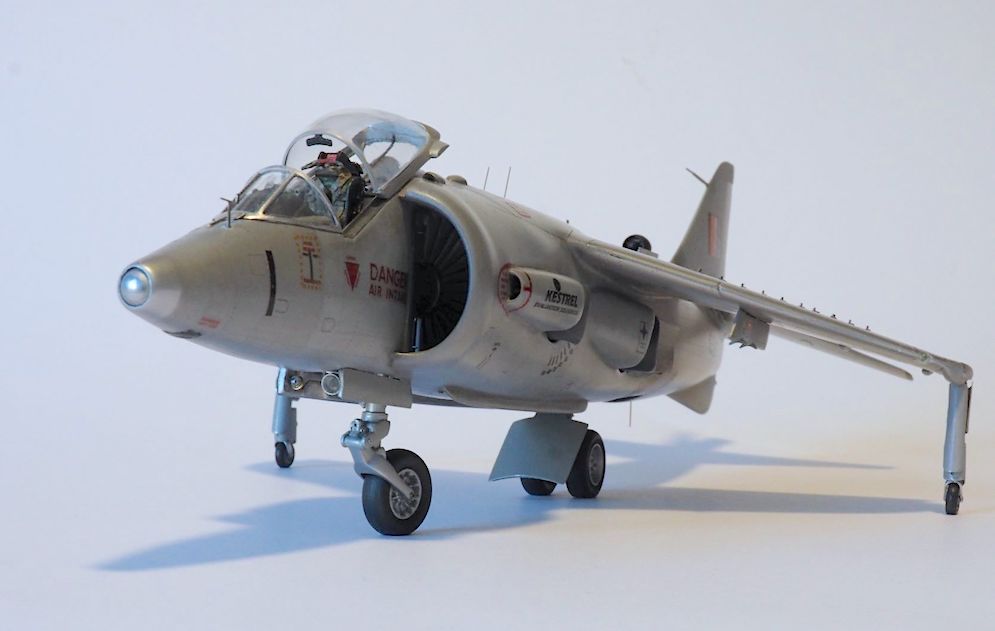
AV-8B Harrier II shown in its Italian markings. The Trumpeter kit is showing its age, but with a little TLC it can be turned in to a rather nice kit.
I used the Aires cockpit, and wheel wells, along with Reedoak figures, and Verlinden carrier deck trucks.
Below is the back story…
An Italian AV-8B Harrier hitched a ride home aboard Wasp-class amphibious assault ship USS Kearsarge (LHD 3) after six months of maintenance in the US.
The Italian aircraft, along with its flight crew, returned to Grottaglie Naval Base, Italy, on January 3, after the six months of scheduled maintenance at Marine Corps Air Station Cherry Point, North Carolina, and two weeks of final checks and training aboard Kearsarge.
Hope you enjoy!
Mike T.

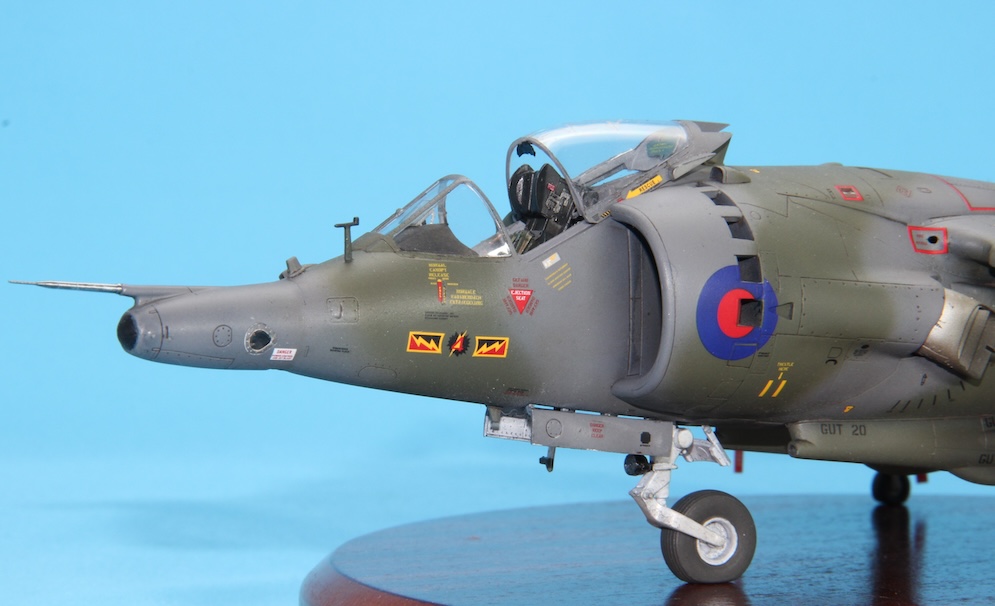
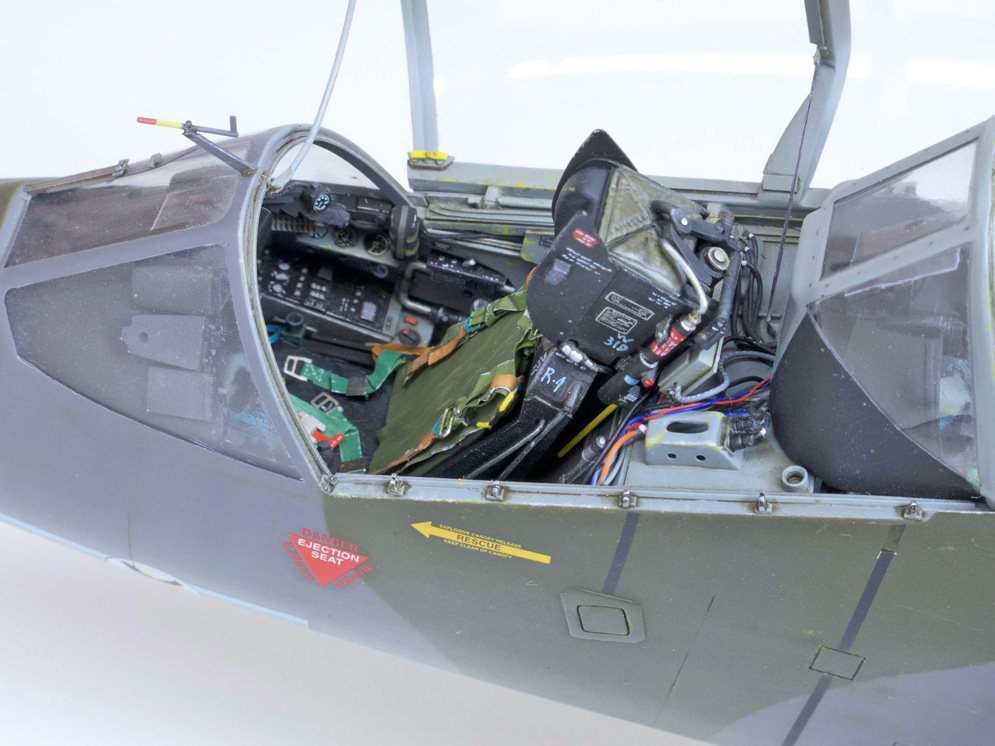
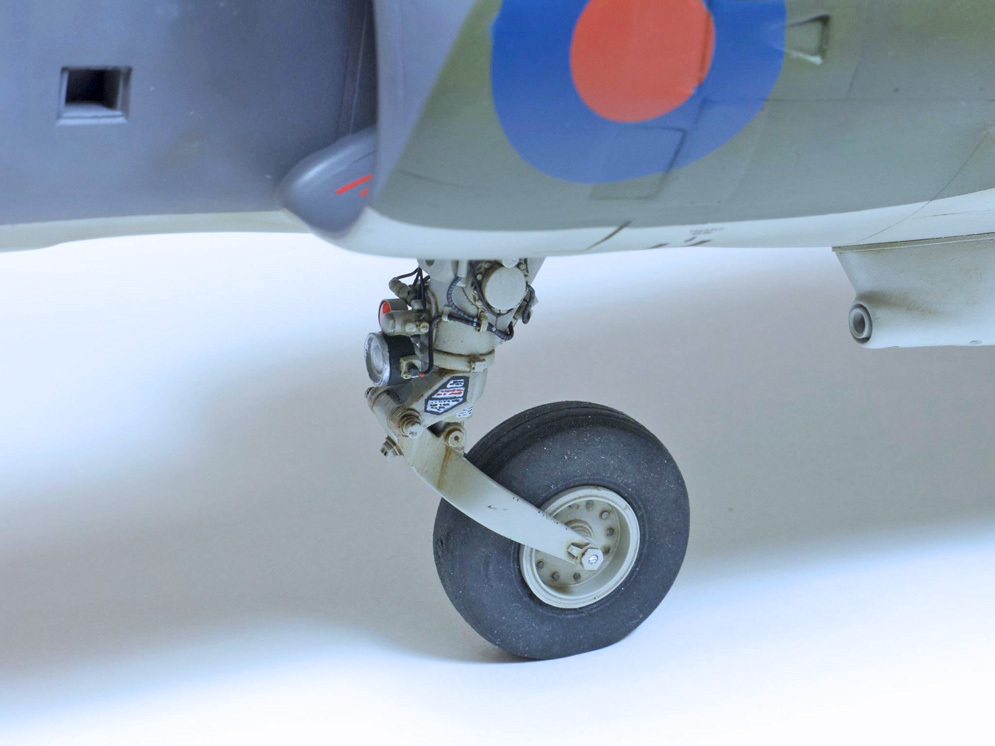
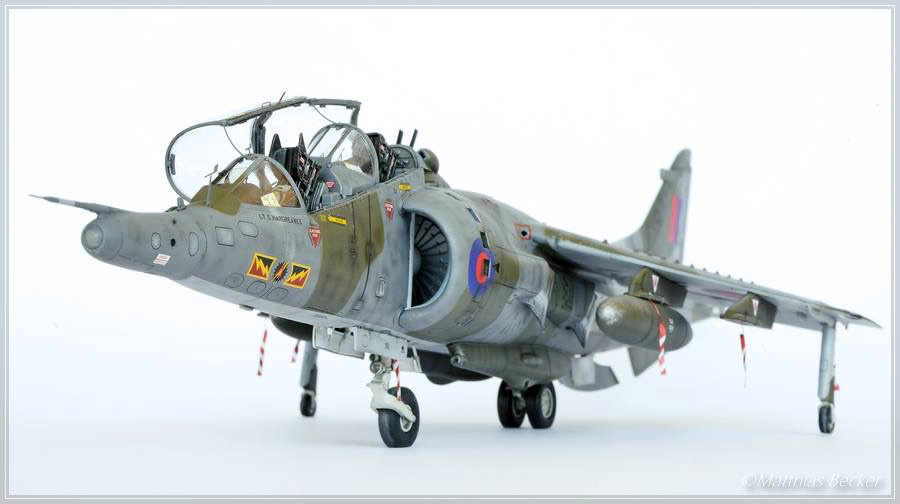
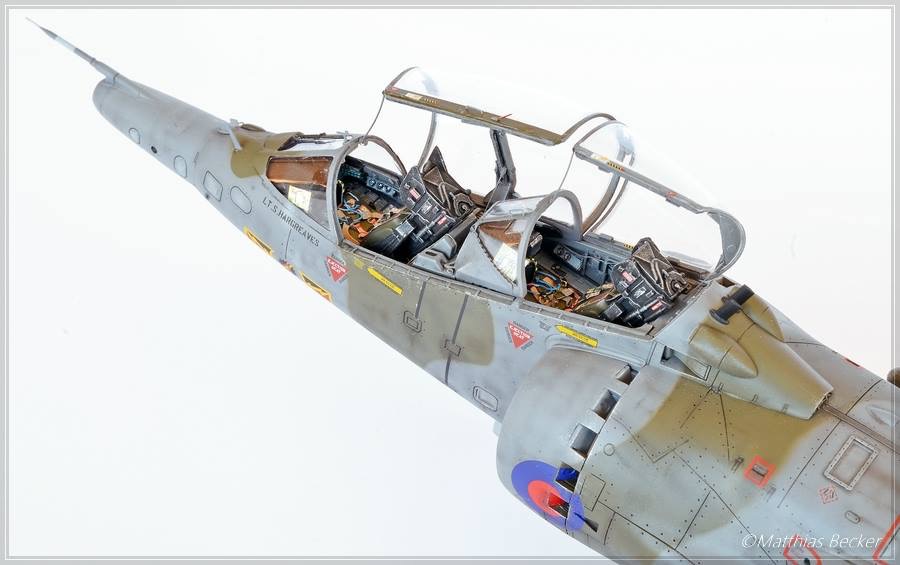
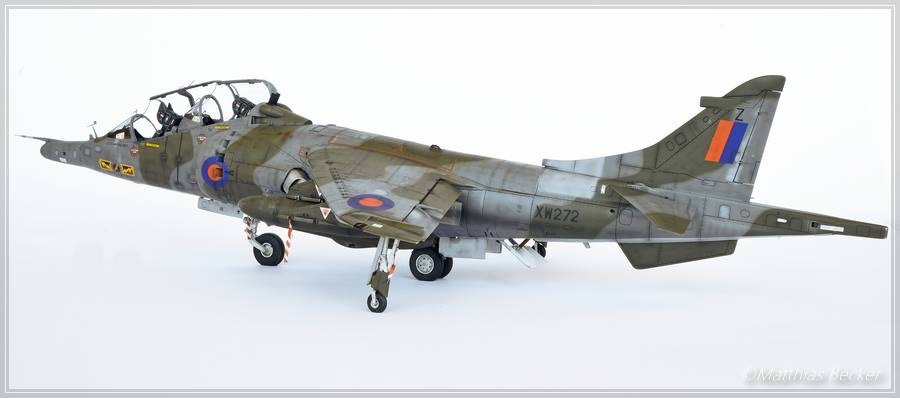
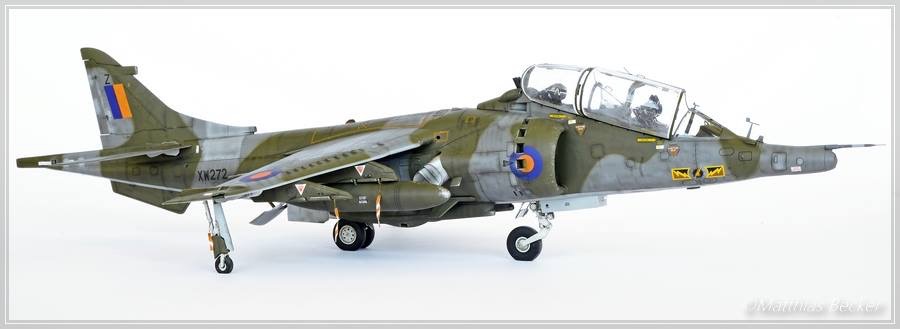
My initial goal was to construct one of the earlier GR1’s. However, whilst perusing the Eduard online store, I came across their Brassin range Hunting BL755 Cluster Bomb units. Having already used (and been thoroughly impressed) with their Brassin range of weapons on previous projects, it was decided to build the 4 Sqn. aircraft based at RAF Gutersloh in the mid 80’s. The Germany based Harrier Force main task on an invasion of NATO territory would have been to slow down the advance of Soviet armour and personnel. The Hunting BL755 Cluster bomb would have been the weapon of choice as the 146 bomblets that were carried by each cluster unit possessed both an anti-armour and anti-personnel capability. RAF Gutersloh was close to the East German border and for this reason flying time and range to an enemy forces engagement would be minimal – no need for under wing fuel tanks, hence the stores fit of 4 x BL755’s!
In addition to the Eduard’s resin BL755’s, other embellishments to the kit were the use of the following; Quinta Studios superb interior 3D decal set. Elements of Eduard’s interior/exterior set and their steel ejection seat belts. QuickBoost’s replacement inner intake walls (which fitted beautifully) and also their air scoops. Model Detail’s Harrier air intake fan. Aires replacement resin exhaust nozzles. Reskit resin wheel set was used but limited to the replacement of the nose and twin main U/C wheels only – the outrigger wheels (although to scale) were found to be too big to fit the kits outrigger legs. Additionally, the twin main wheels (because of their weighted flat spots!) were found not to touch the ground. To get around this problem, thick plastic card was super glued to the flat spot and re-profiled to a “round wheel shape” and rotated 180 degrees to hide any imperfections of my fix!
Finally, PP Aeroparts paper RBF pennants together with twisted thin copper wire, finished off the added detail. Paint was sprayed-on freehand using Hataka’s Orange range Lacquer paints thinned with their own thinner. These are superb paints to spray, with good coverage and a quick drying time. Mr Color UV Cut Clear Gloss Varnish was then laid down before the application of the decals. Mr Color UV Cut Flat Varnish completed the project. This Kinetic kit was a frustrating project at times, but perseverance finally resulted in reasonably accurate model of the Harrier GR.3.
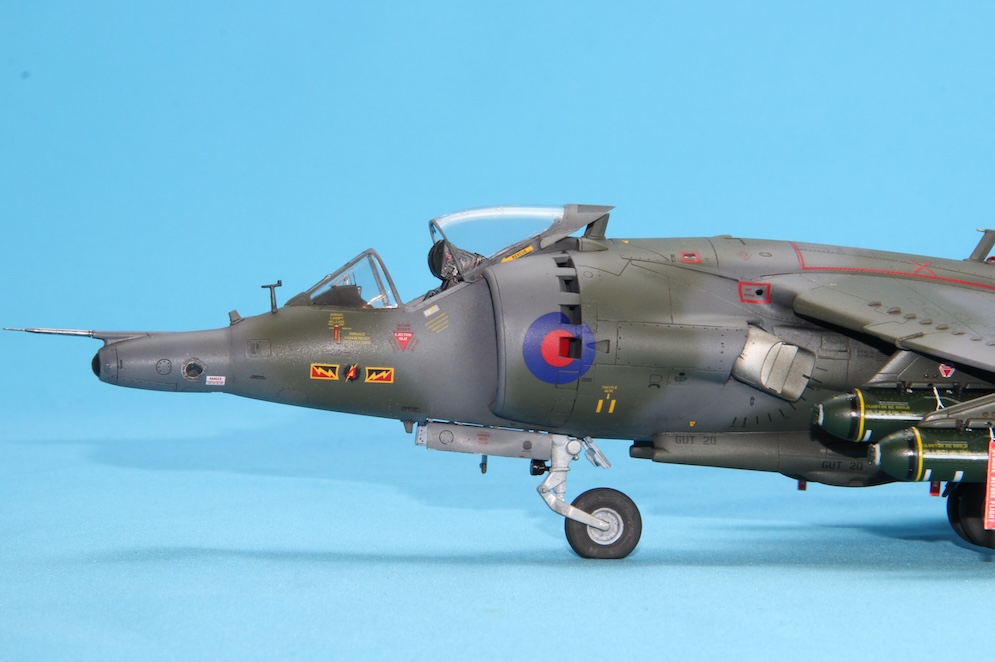
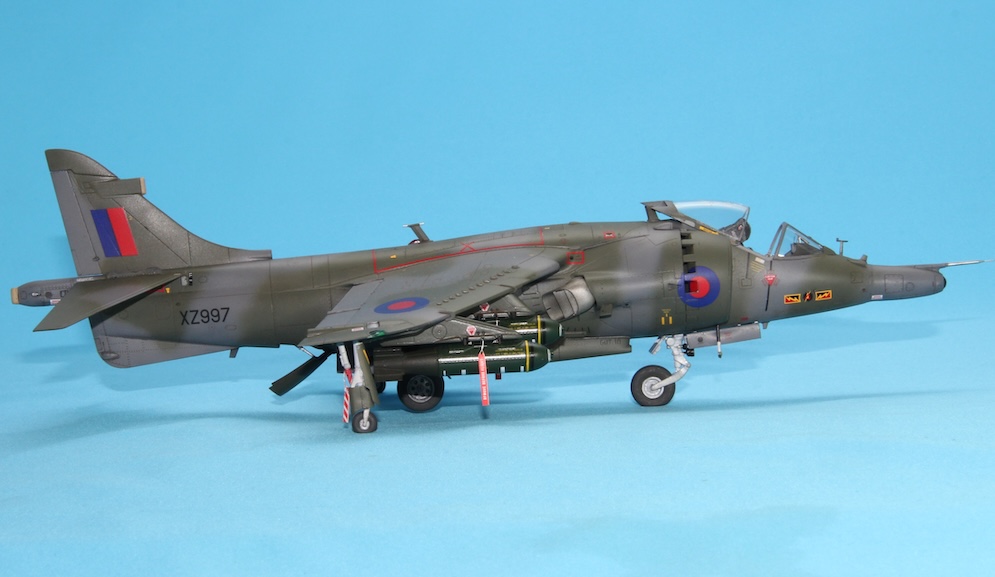
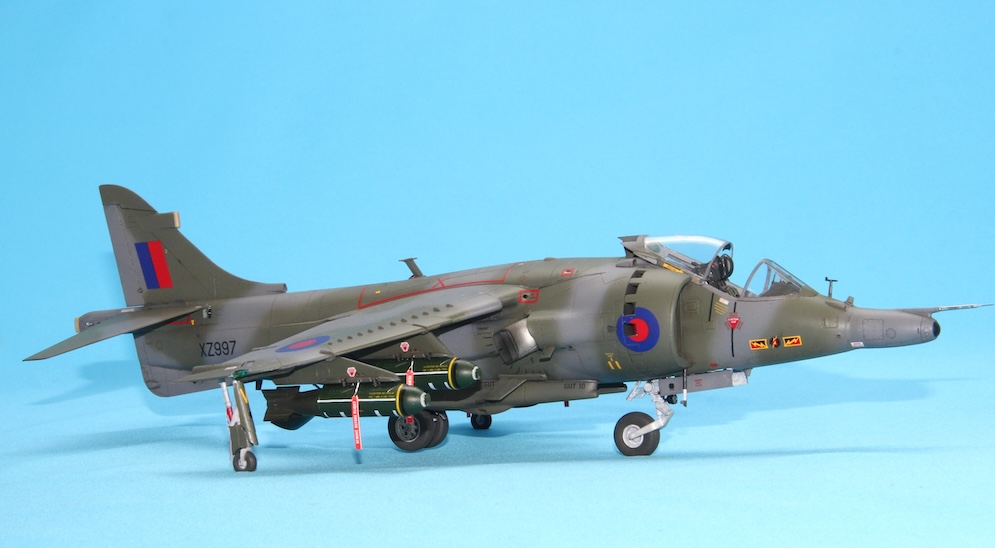
Mark R.
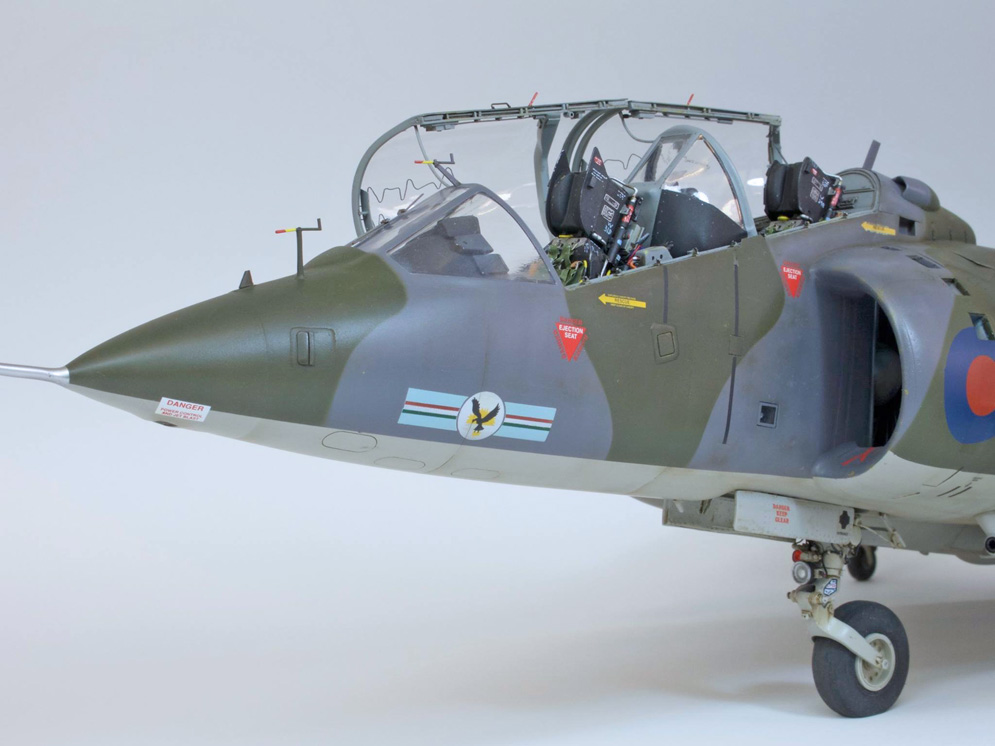
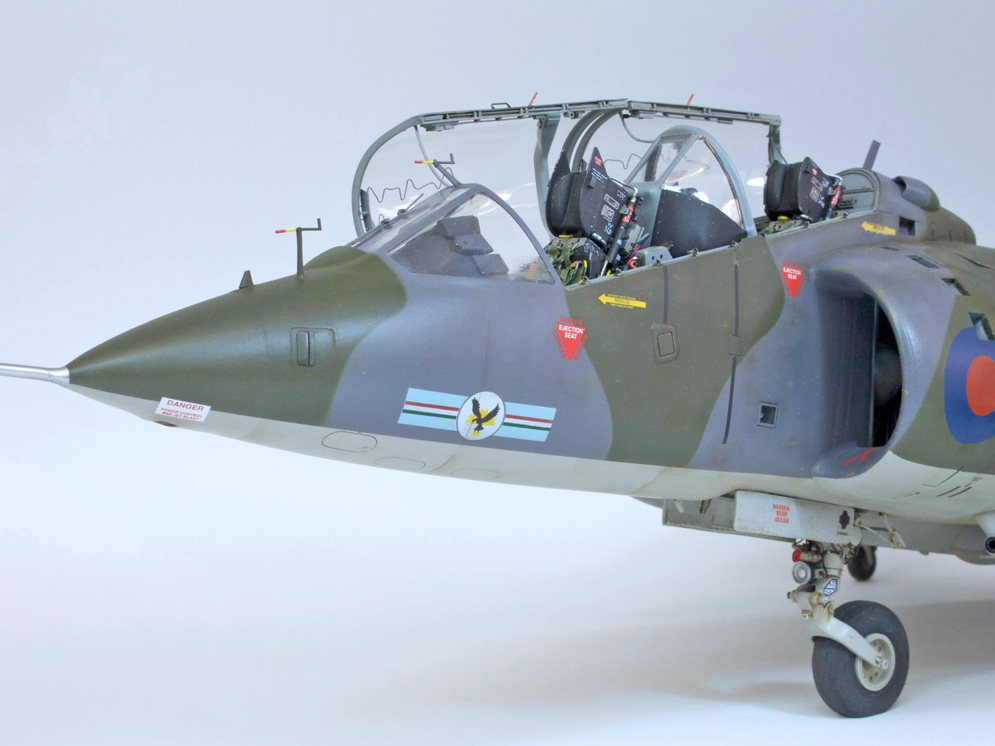
In addition, I also added further upgrades from Eduard’s Brassin range – these being their resin nozzles, Sniper ATP and Terma pod. Lastly, I also acquired Jet Passions Paveway IV LGB’s.
For various reasons (mostly my own incompetence) I really struggled to complete this project – the fitting of the intakes and LERX being very problematic! However, dogged determination and depression of failure spurred me on to complete the kit.
The markings used are those provided in the kit and went down well with the use of Mr Softer and Setter decal solutions.
Paints used were from the Hataka Orange range. It’s probably not a stores fit you would see on this particular Harrier – all being live as if in an operational theatre – but my former life as an Armourer got the better of me! Because of that same mind set, I did have the intention of fitting all weapon safety devices. Unfortunately, toward the end of the project my ‘mojo’ was running very low, so went for a compromise and decided on a ‘Combat Armed’ weapon state i.e. just the noddy cap and AOTD cover on the Sidewinders and RBF pennants on the protective caps of the Paveway IV’s.
Mark R.
As many will know, the conversion is 99% scratchbuilt, created in collaboration with David Haggas, Nick Greenall and Dave Fleming who all provided technical information on every aspect of the conversion, Mal Mayfield who created the masks that allowed almost all of the markings to be airbrushed on, Tim Perry who created the patterns and vac-formed parts for the amazing ferry tanks that are fitted under the wings and finally, Haris Ali who vac-formed the canopies and laser-cut the wonderful base that the model sits on. Thank you all so much!
I hope that you like it! :)
Spencer P.


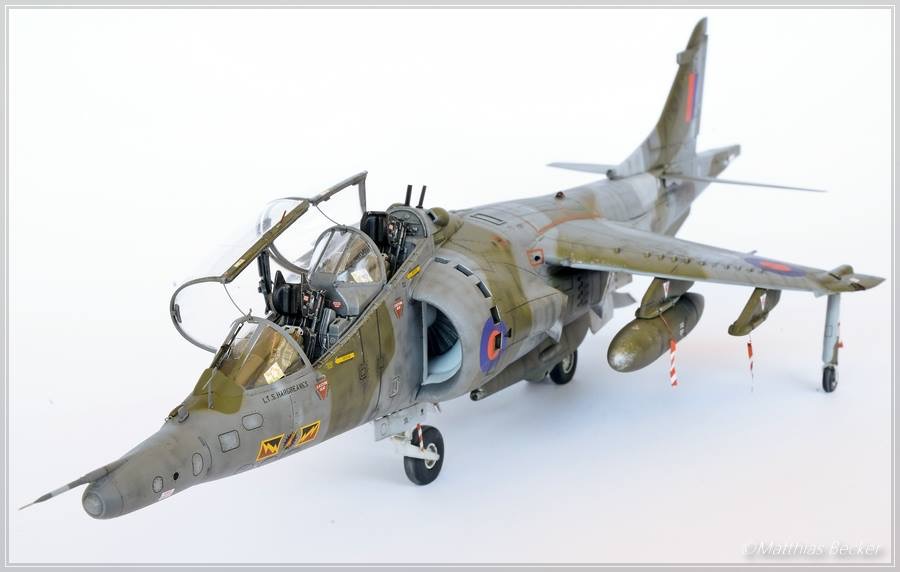
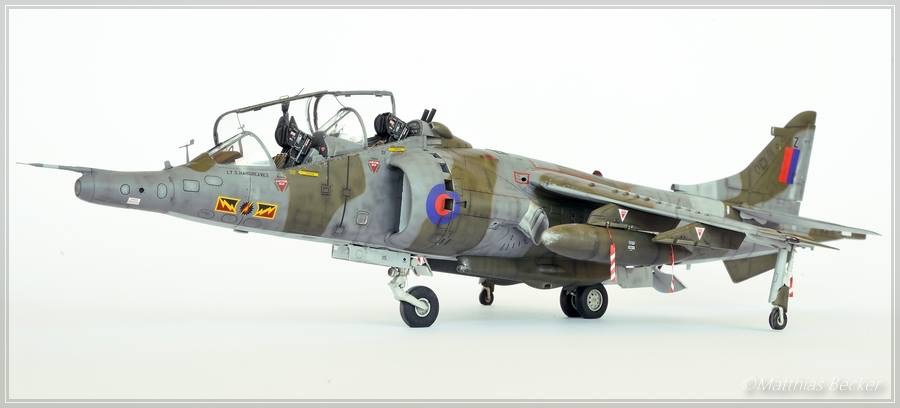
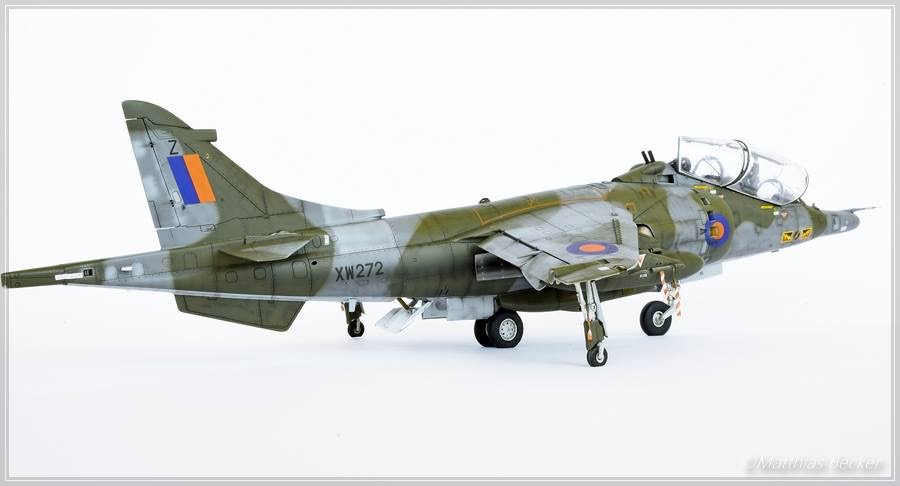

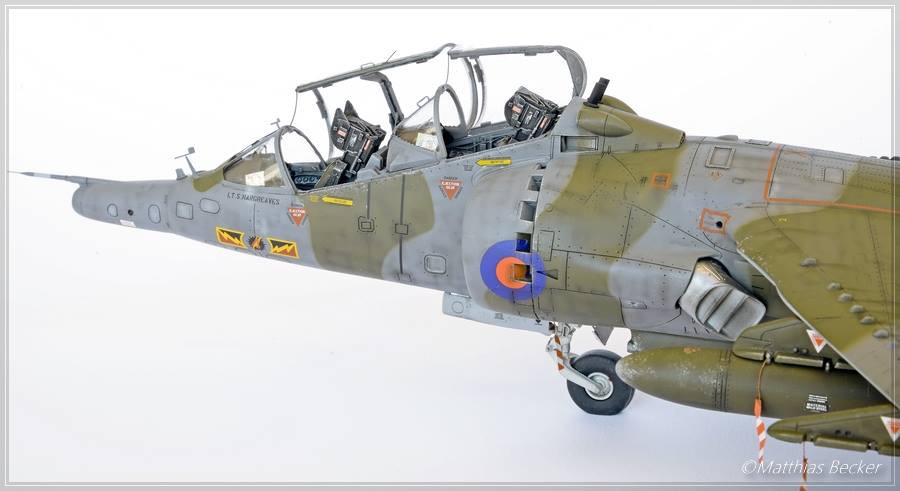
This is my Bae Harrier T.4 made from the 1:48 Kinetic kit.
Matthias B.
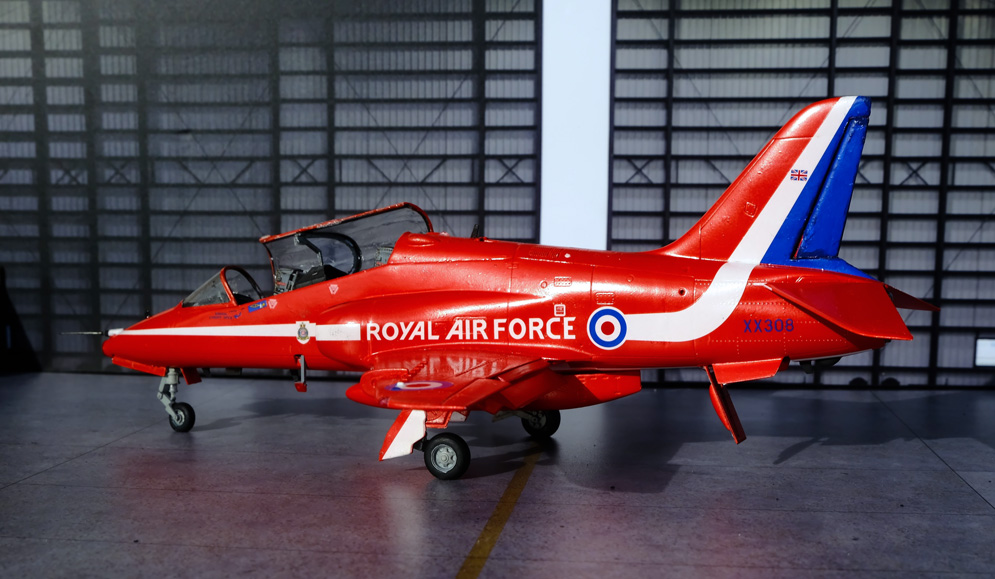
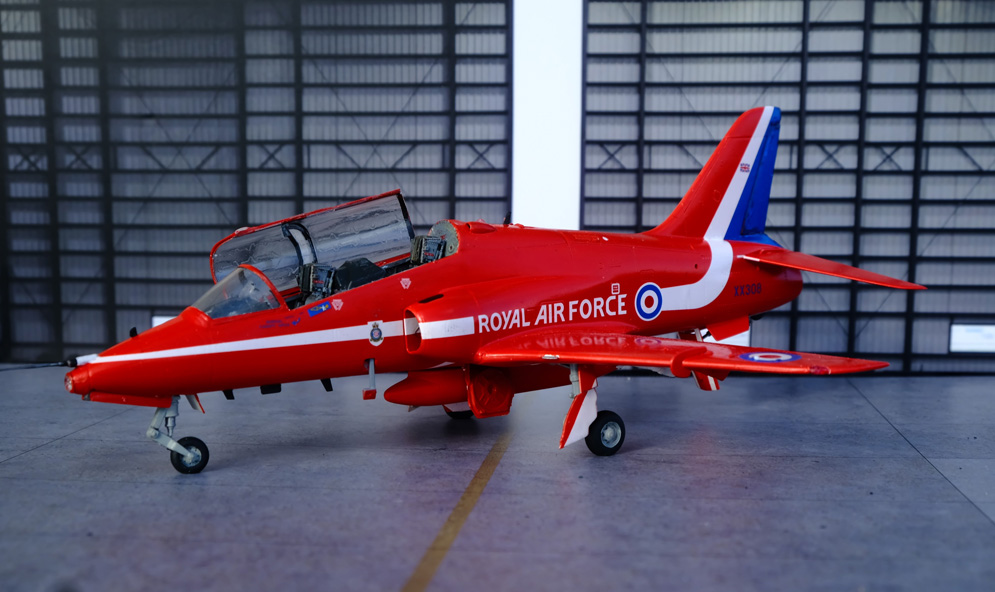
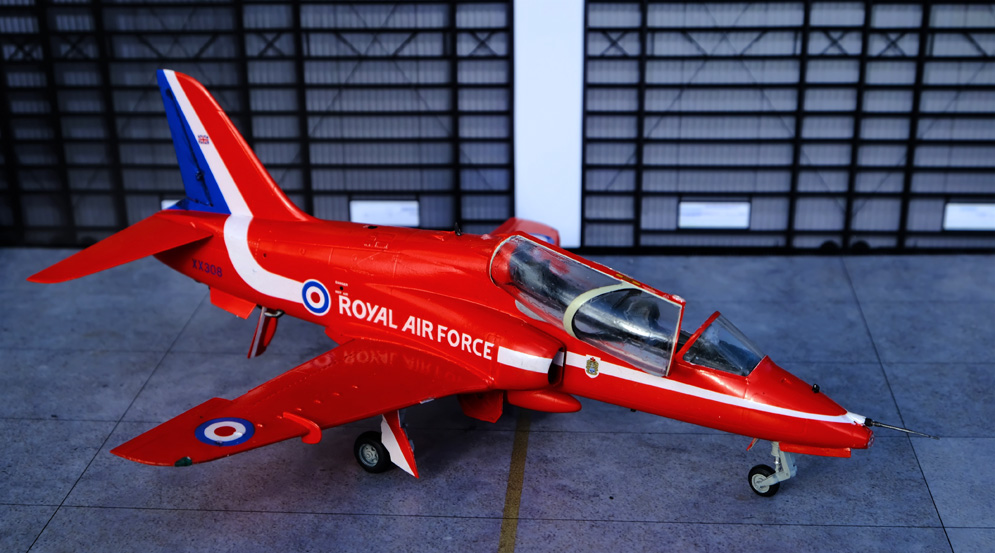
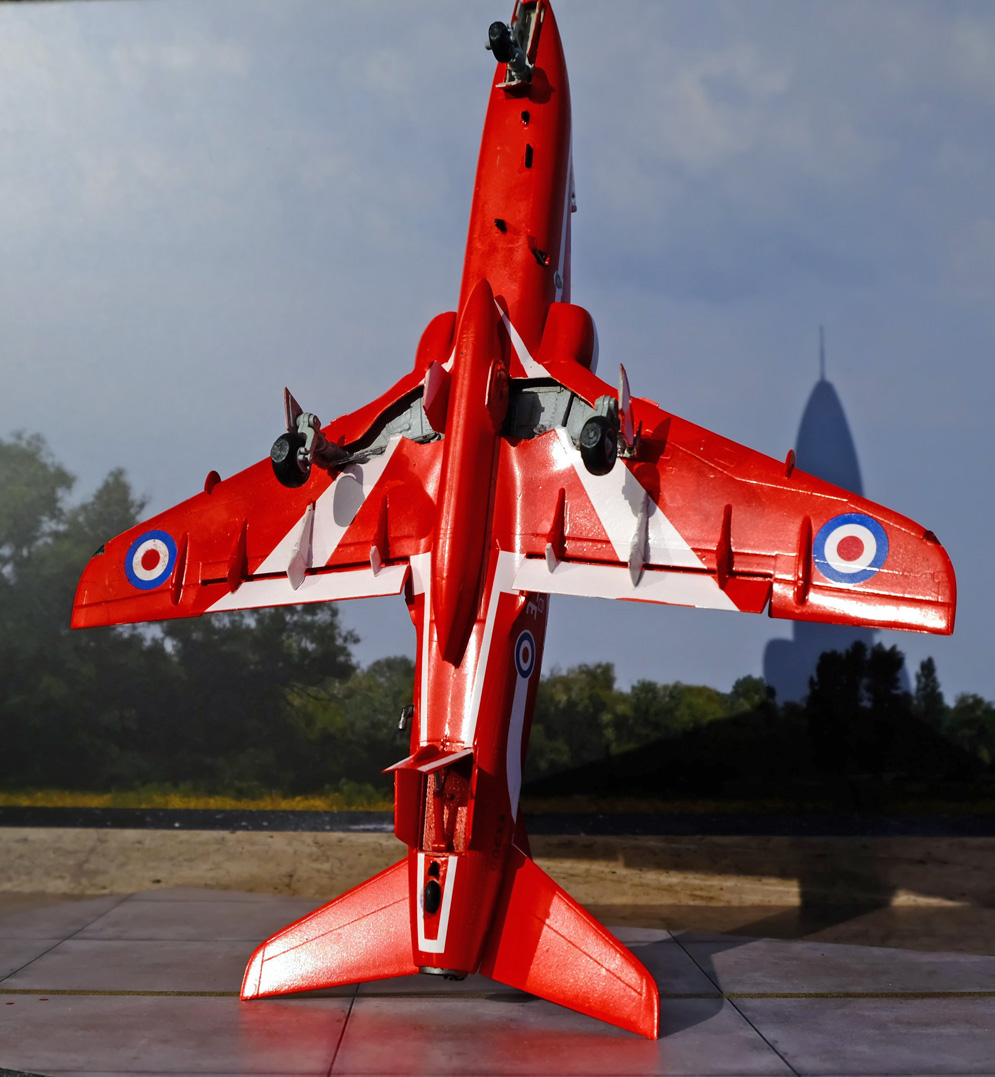
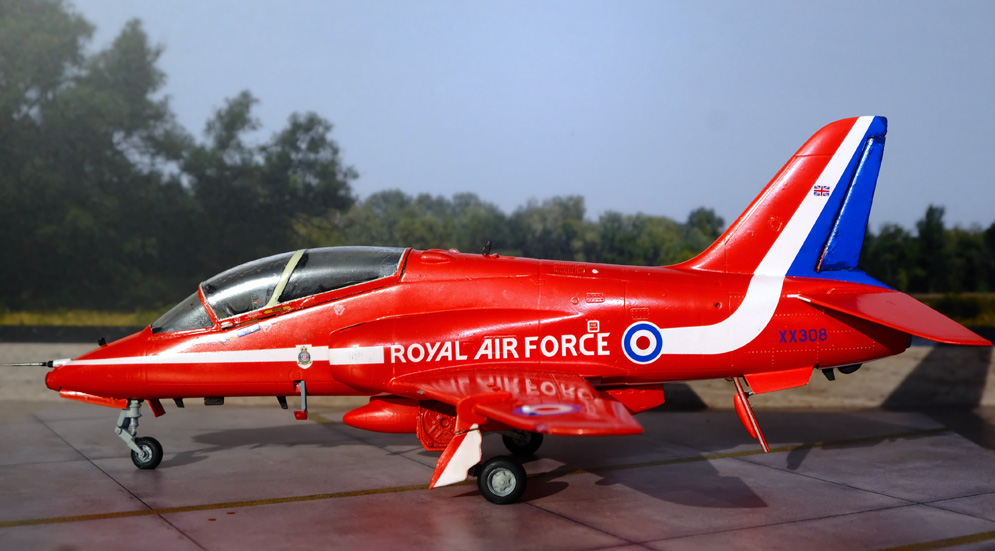
The Hawk was built pretty much out of the box, with the exception of cutting the flap slats down to the scale length shown in the SMN full-size details and the addition of a Master pitot tube as the kit one was more like a pole for vaulting!
Paints used were Halfords white aerosol primer flatted with 3600 Micromesh underneath Hannants Xtracrylix Red Arrows Signal Red for the main scheme with Tamiya Light Grey used in wheel wells.
The off-white canopy bands were painted using a lightened Humbrol Linen acrylic sprayed on before masking for the airframe red.
Tamiya Flat white used for the underside Arrow touch up around the decals.
Tamiya Rubber black for the tyres and Molotow Chrome Paint Pen was used for the chrome undercarriage details and noselight reflector.
Alclad 2 metallic were used for the exhaust tailpipe and smoke fluid injectors.
Flory polishing sticks were used to get a gloss for the decal application, and where the blue fin decal gave some challenges but Micro Sol softening solution came to the rescue with some use of Hannants Roundel Blue to touch up edges. Next time, I will mask and spray the blue rudder area!
Post decaling, the model was sprayed with Alclad2 Light Sheen clear lacquer and I am pleased with the realistic level of gloss on the model using this method.
All in all, a great model, available around the £20-30 price point with a few minor tweaks can be completed as you see here and yes I have bought another one!
Stuart M.
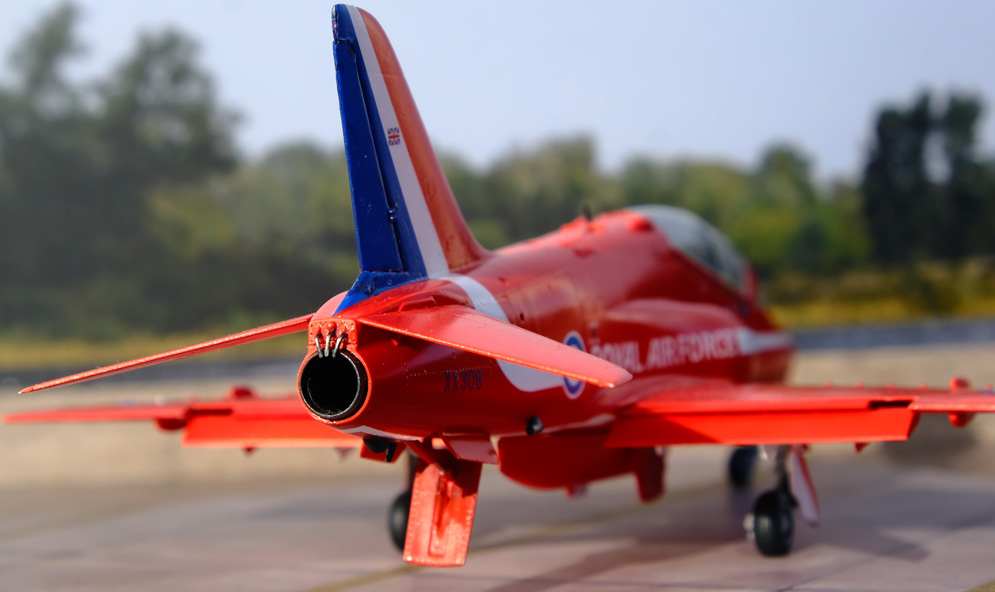
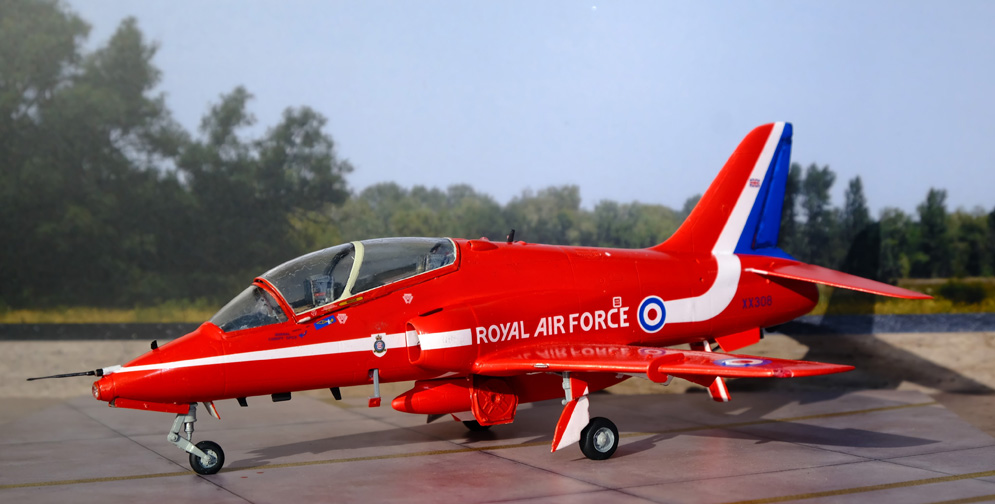
First impressions on opening the box were very favourable, once I got past “Gosh, It’s Red!”. It is an experience that can only be likened to opening the box of the Hasegawa RAF Rescue Sea King. It’s rare for me to start a kit the day I bring it home. Most of them sit in the stash for a while. But this one went straight onto the production line. Two more boxes went straight into the stash, along with a selection of Xtradecal recent releases.
The build was pretty straightforward, but I did need a little filler at the wing roots especially underneath between the wheel wells and the intakes.
Since I was aiming for an out of the box Red Arrow, I decided to capitalise on that bright red plastic. As has been described in the review, the plastic surface is slightly textured, so I went over it lightly with fine glass paper first. After a good soapy wash and thorough drying, I sprayed thinned Revell no. 31 enamel direct onto the plastic. The result was a beautifully smooth satin finish. The rear portion of the tail fin was finished with Revell’s no. 51 enamel.
The decals are beautifully thin and conform very well to surface curves and details. Micro Sol was barely necessary. If there is a price to pay for the thinness of the decals, it is in a slight lack of opacity in the whites, but I think that they got the balance right.
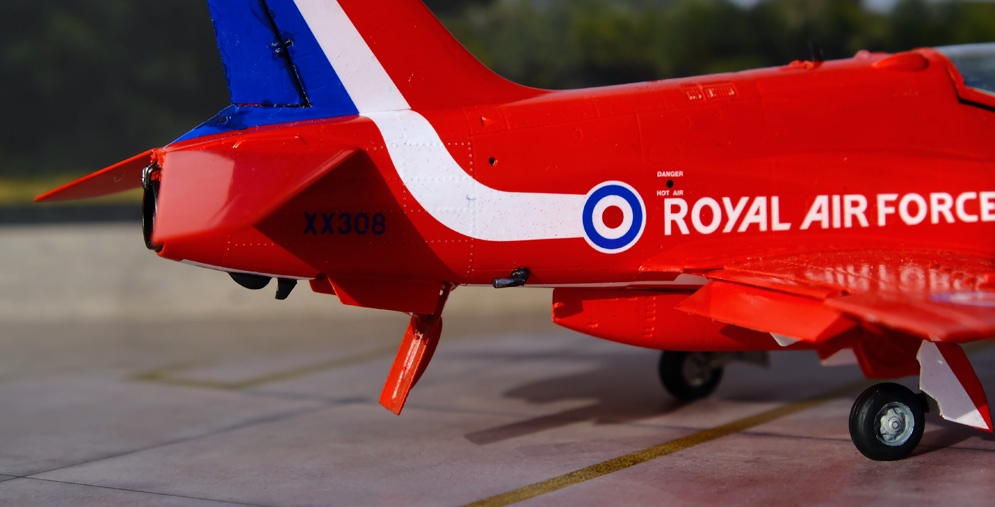
There were a few near disasters along the way though…
Disaster number one was realising that in my eagerness to progress the build, I had forgotten to add any weight to the nose. What to do? Open the airbrake wide enough to take the weight? Maybe.
Next up, imagine my horror when I peered into the cockpit one day to see the front instrument panel had taken on the appearance of a badly corroded battery terminal! I think I must have been a little more liberal than intended with the cyano that held the front fairing in place. So out came the decal sheet from one of the two other Revell Hawks in my stash, the scanner and inkjet decal paper. Every cloud has a silver lining though, when I took the fairing off, it revealed a space big enough to conceal a lead fishing weight!
Disaster number three was mistaking part of the front undercarriage for a sprue entry gate and leaving it behind when removing the parts!
The final horror. I never quite got to the bottom of how this happened, but when the end was nearly in sight, I came home to find one of the main undercarriages broken. I think the moral of that tale was not to leave your pride and joy on the kitchen worktop beneath an over filled biscuit cupboard. This had to be drilled out and strengthened with wire.


Hasegawa/Monogram kit
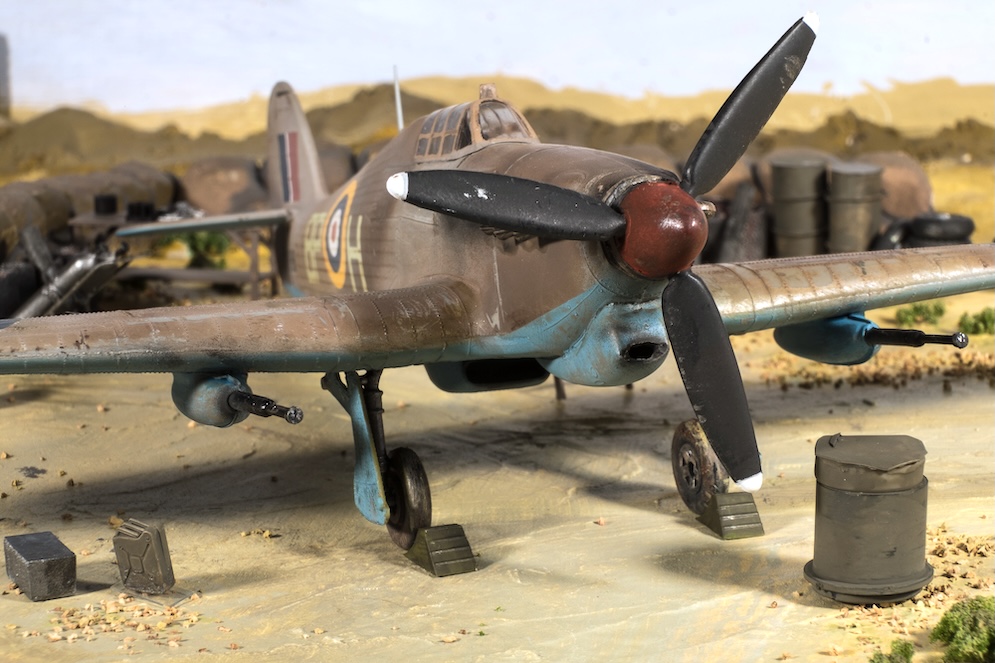
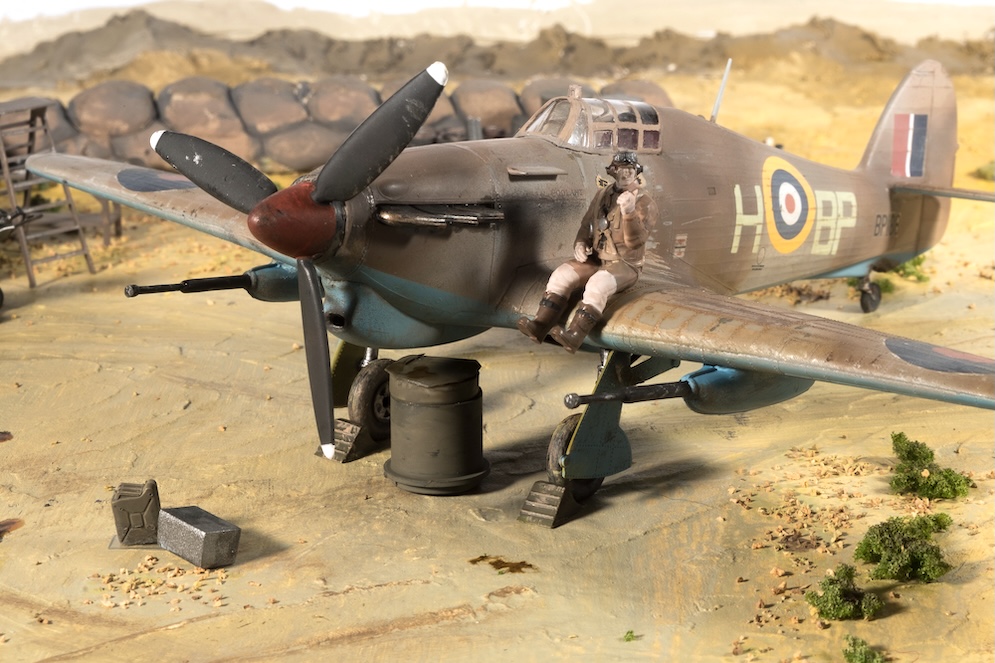
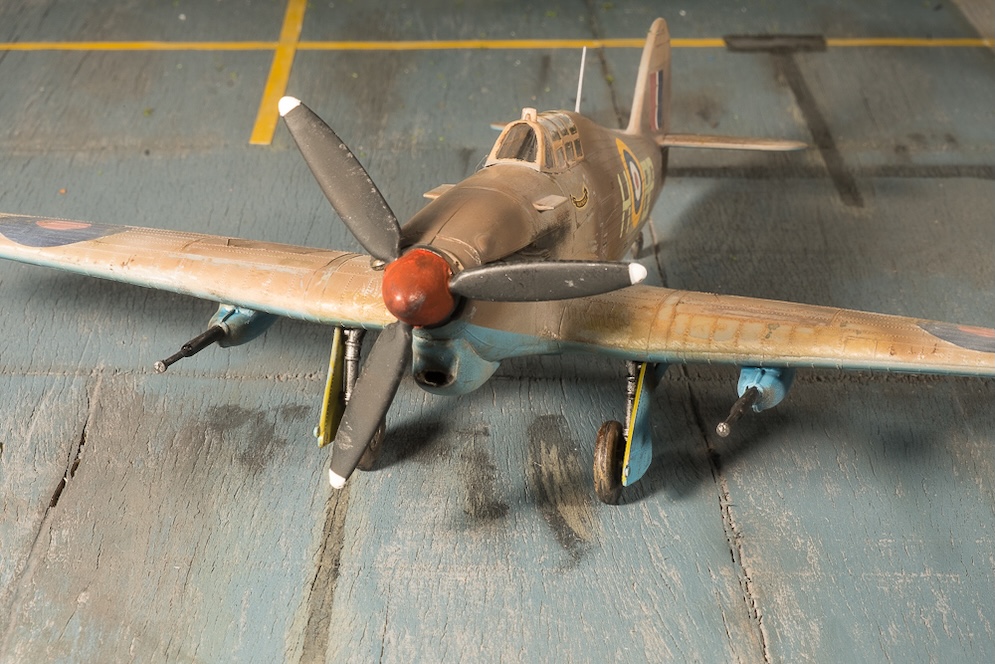
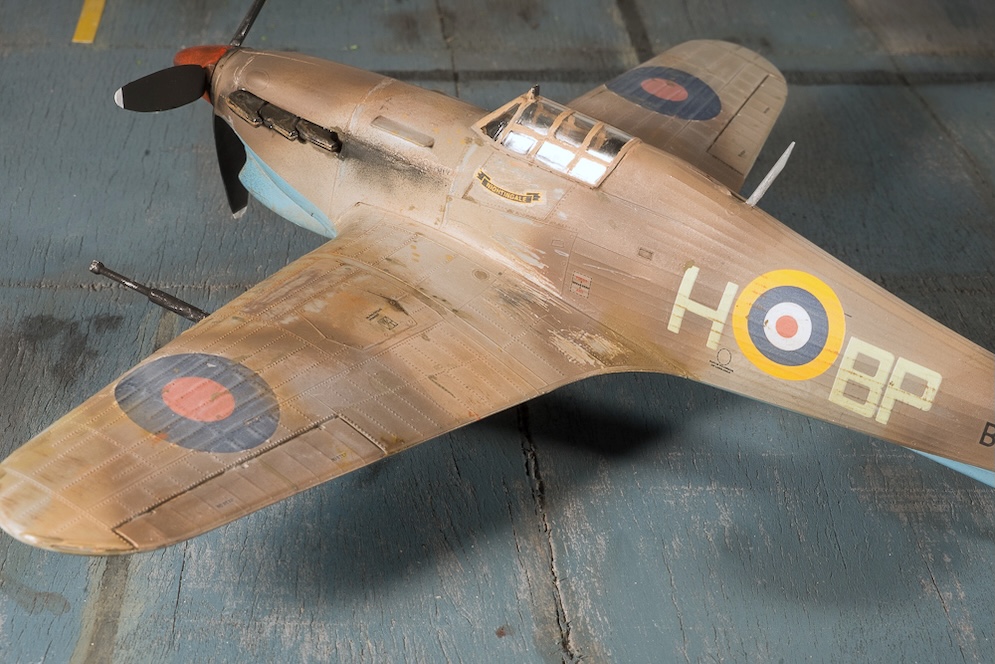
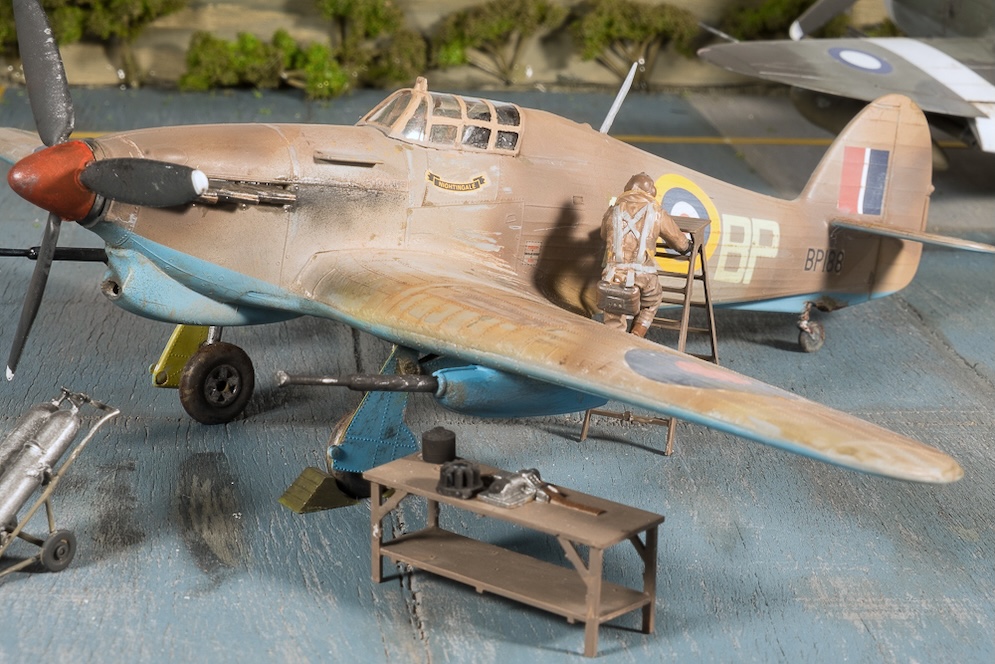
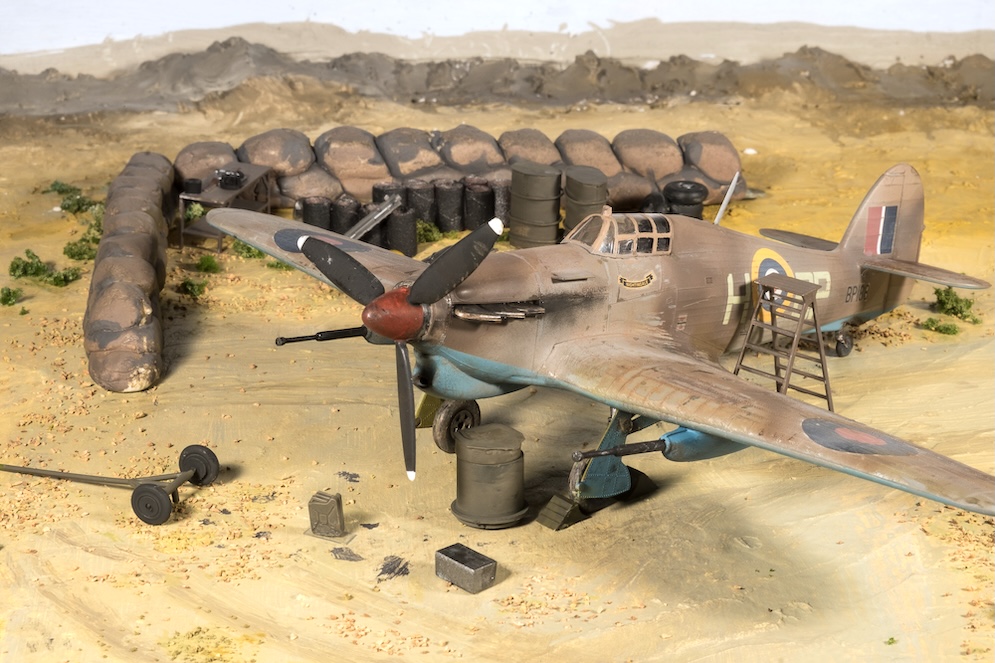
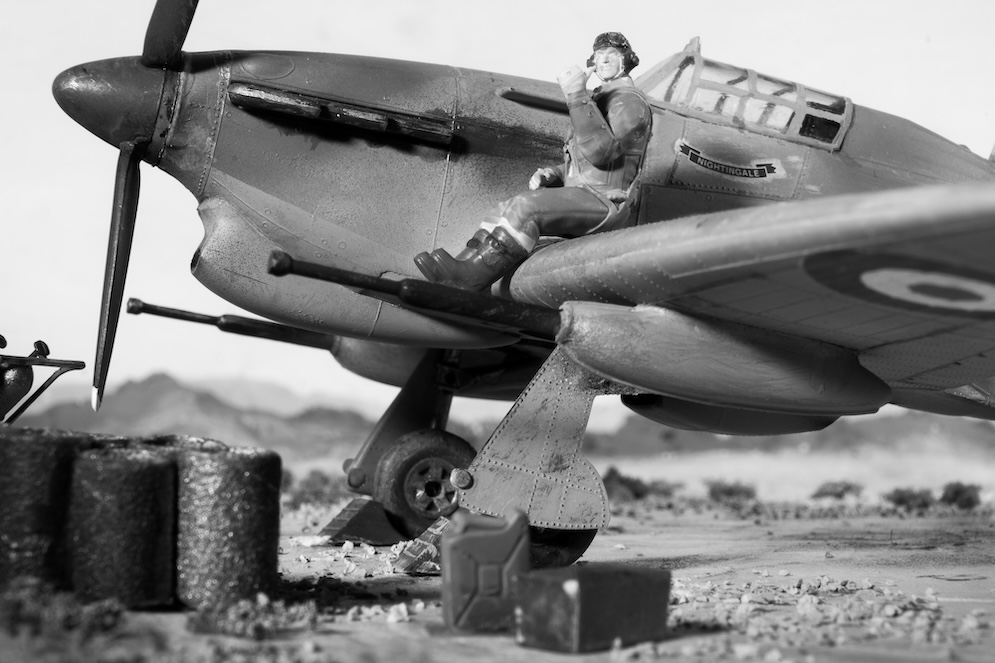
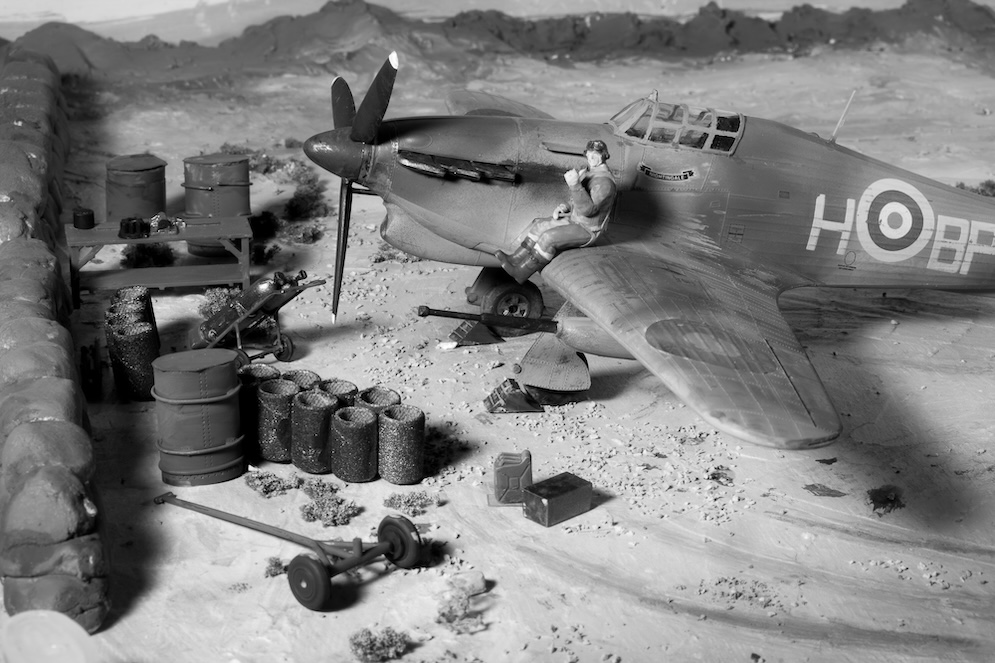
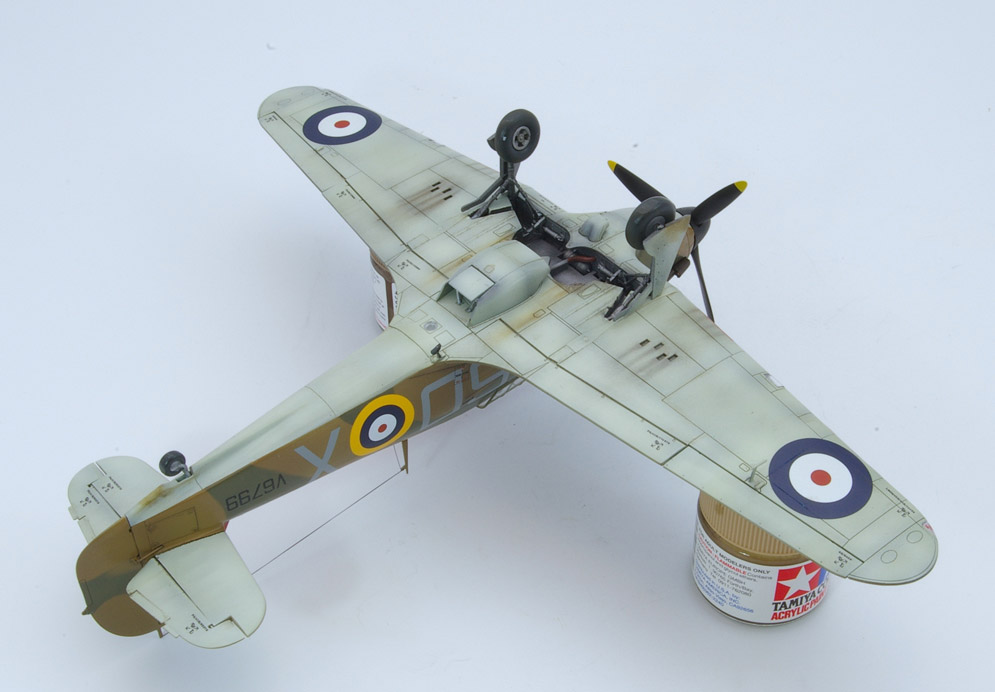
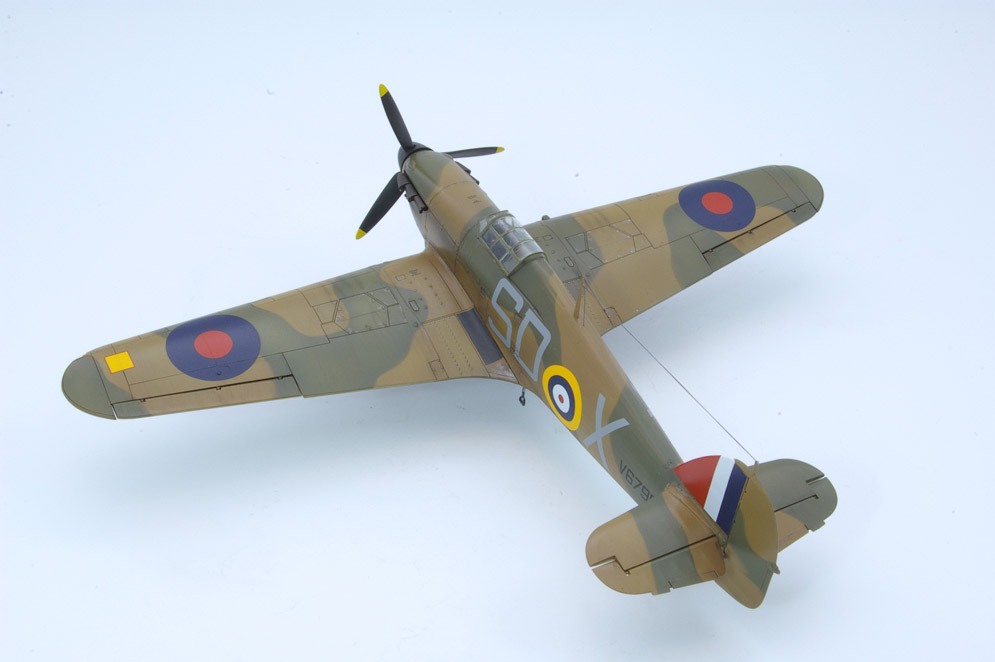
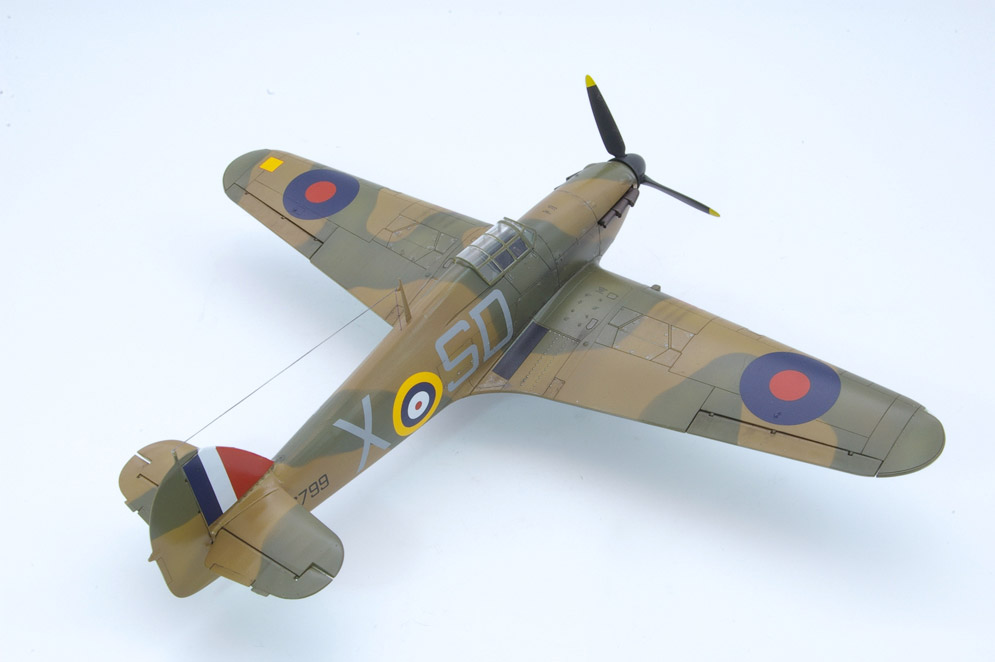
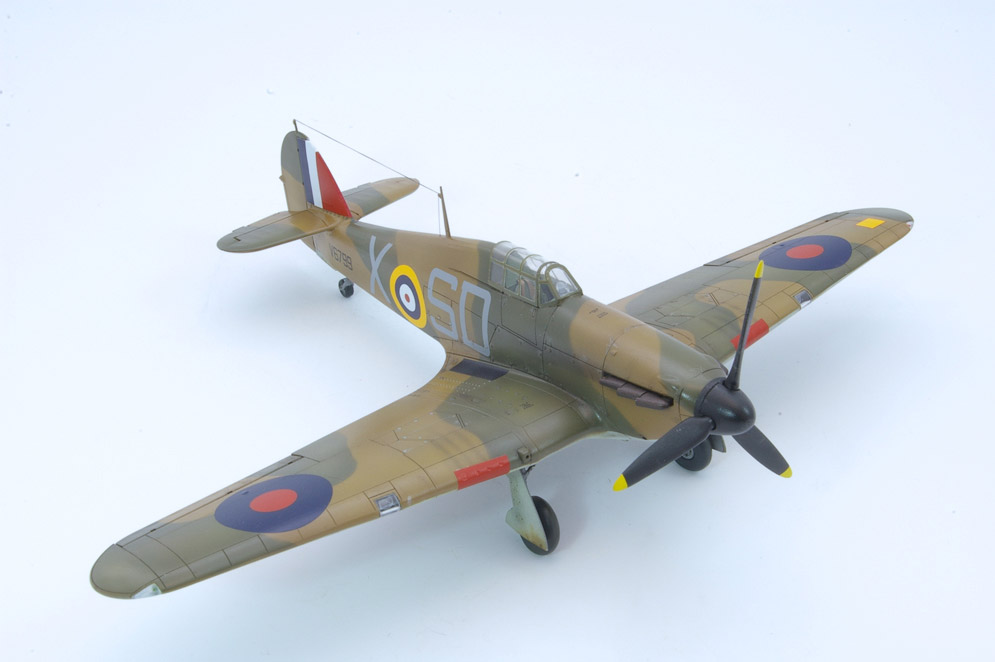
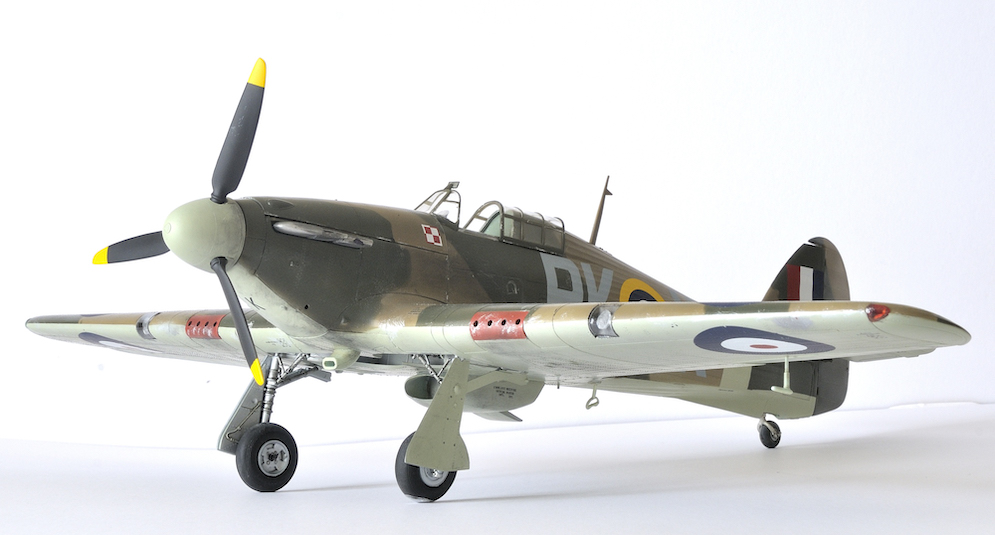
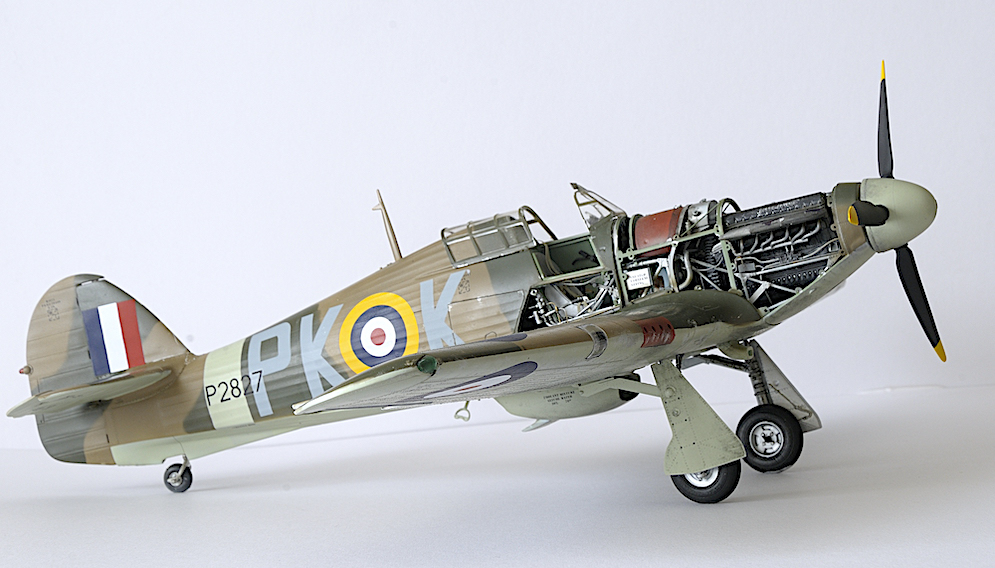
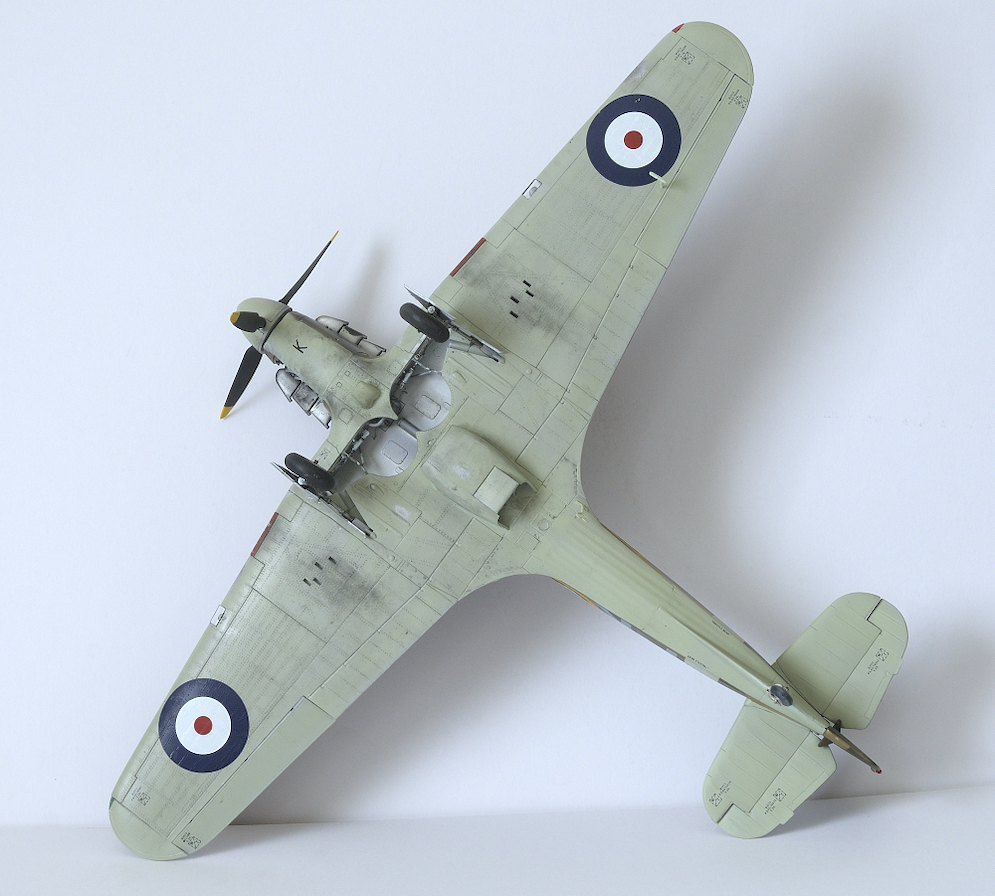
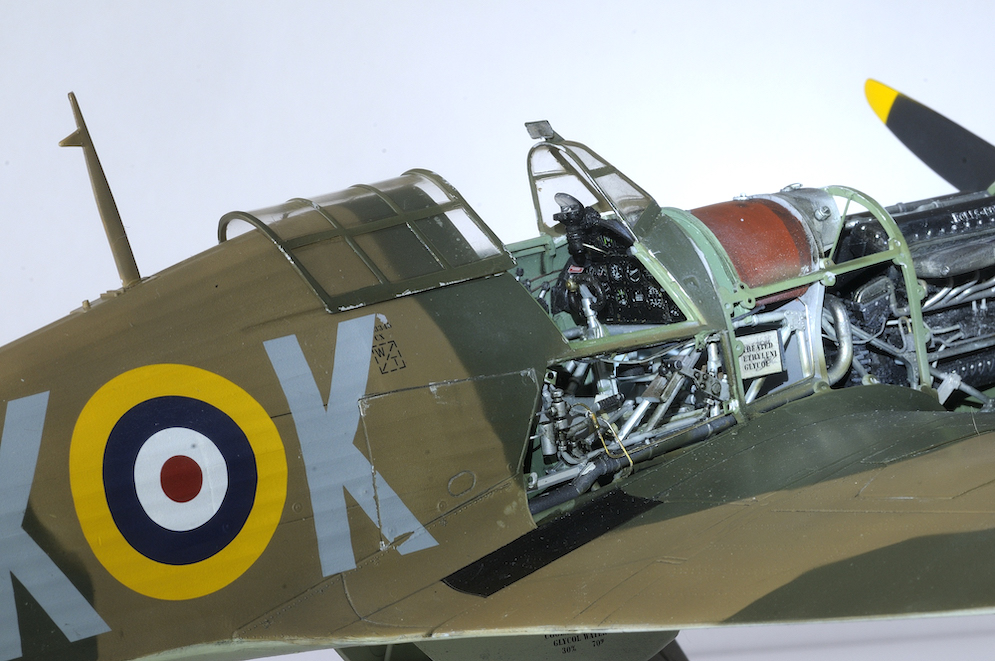
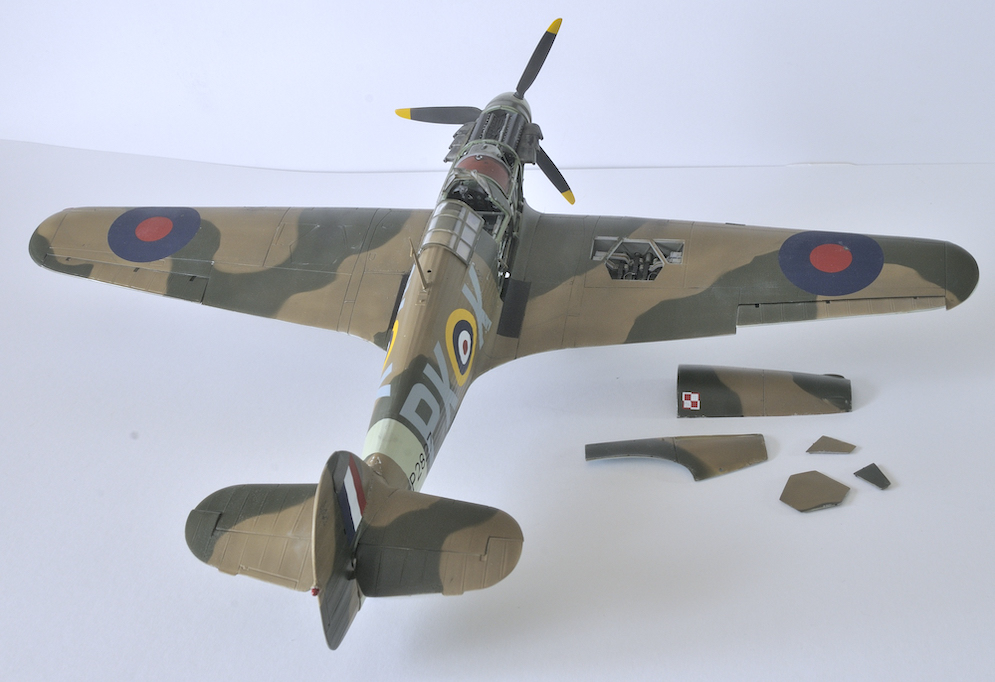
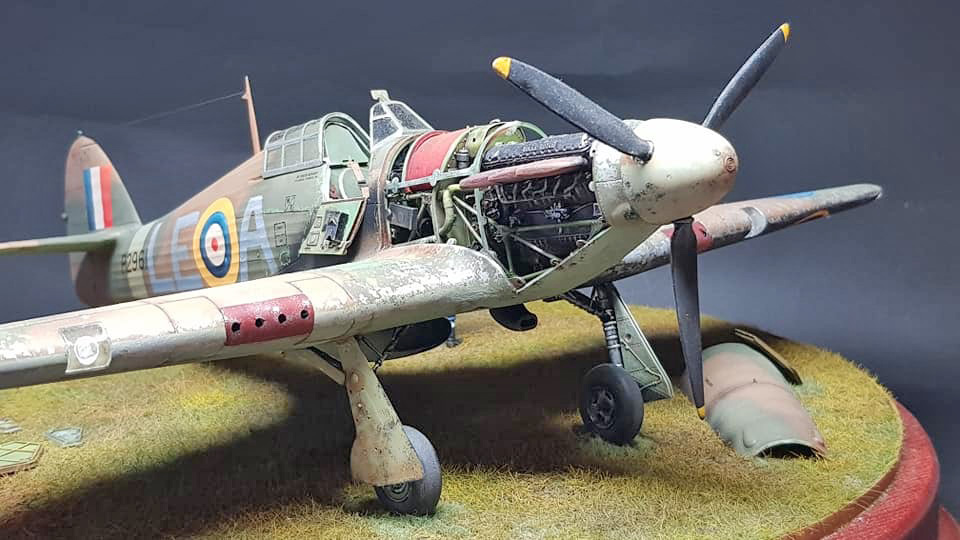
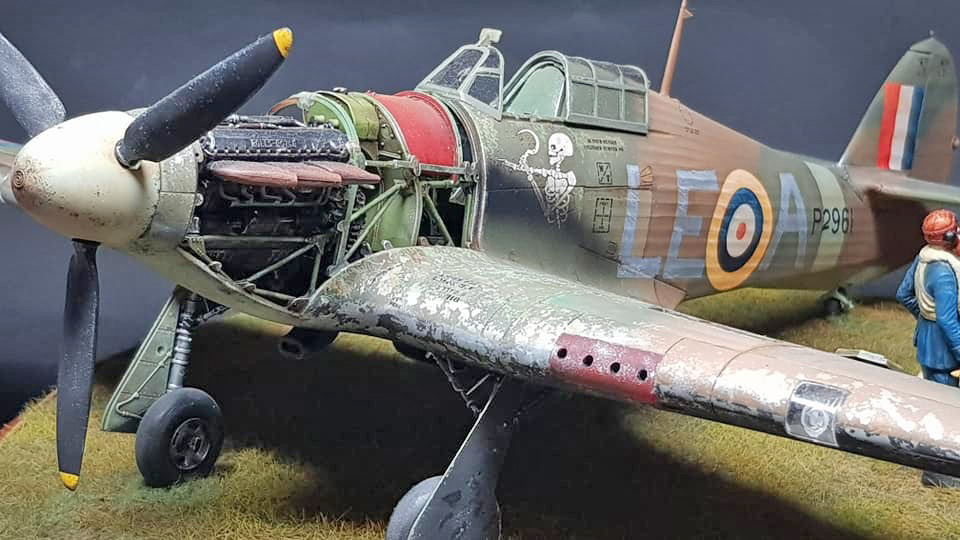
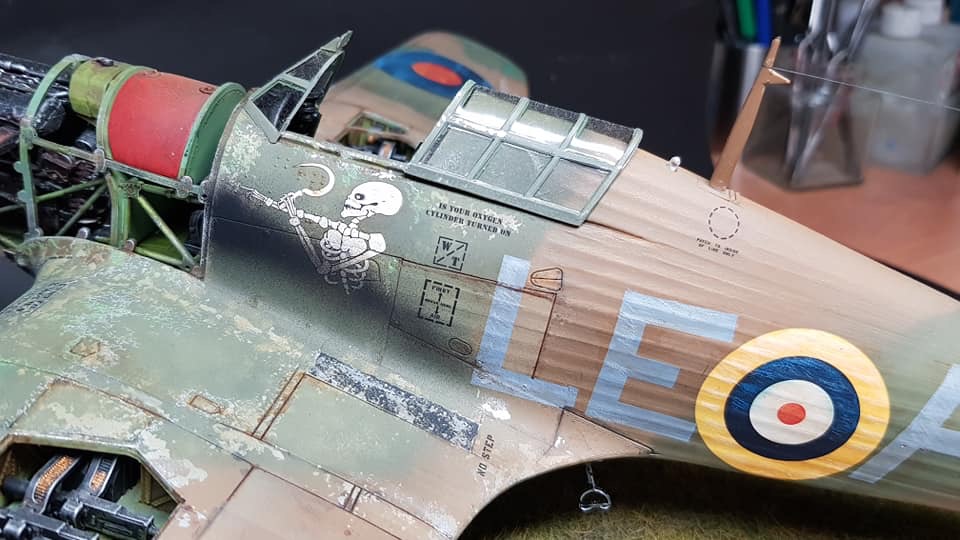
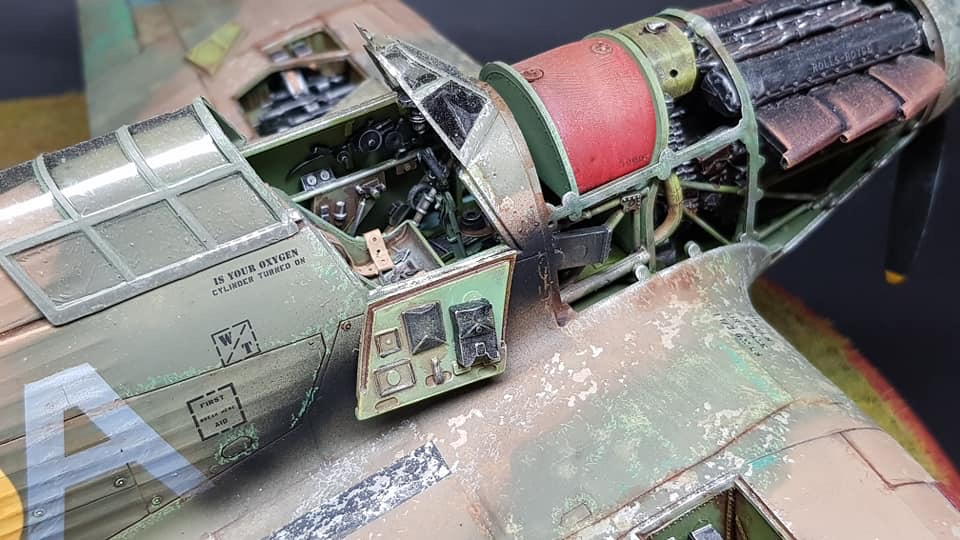
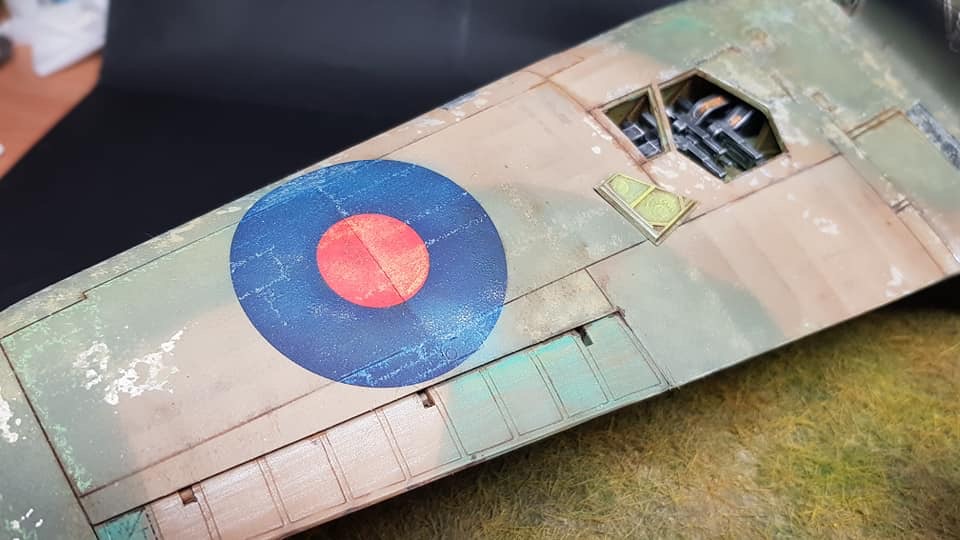
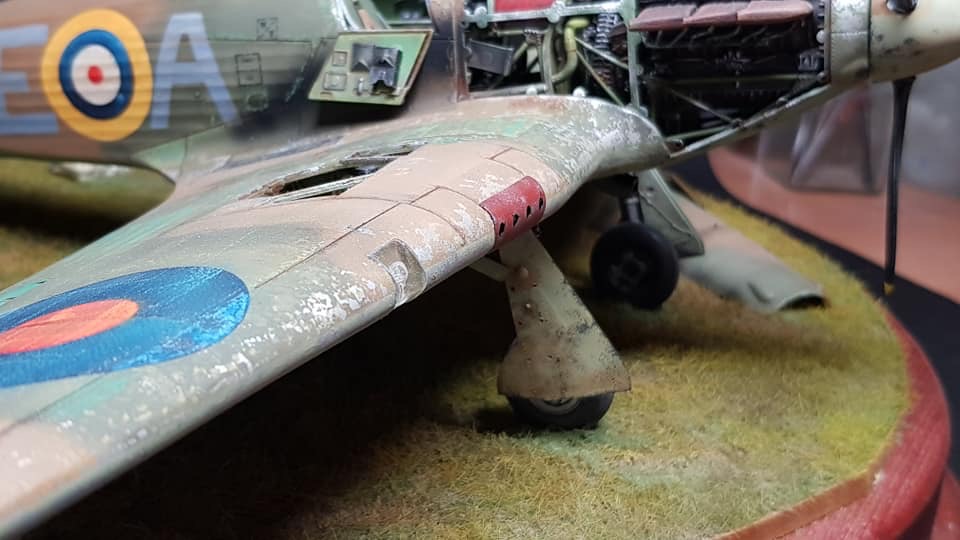
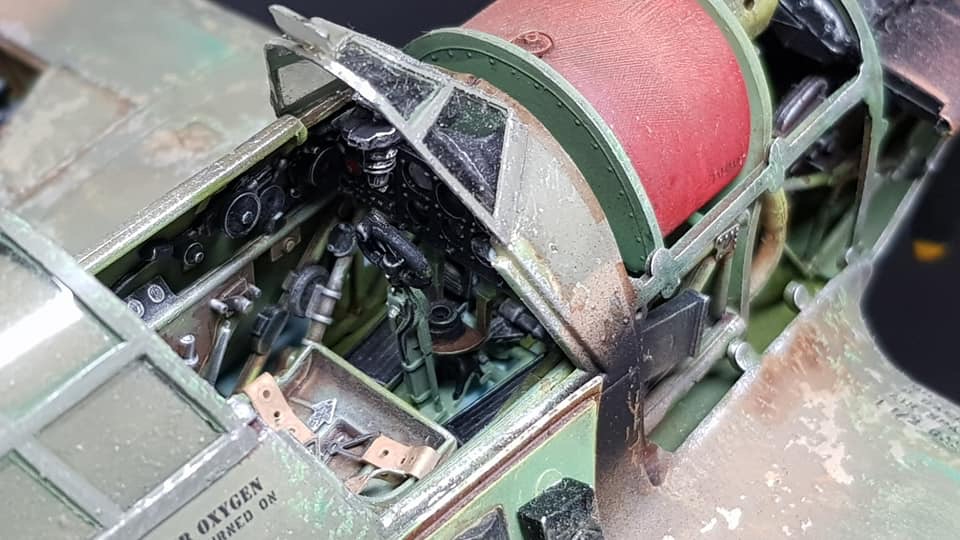
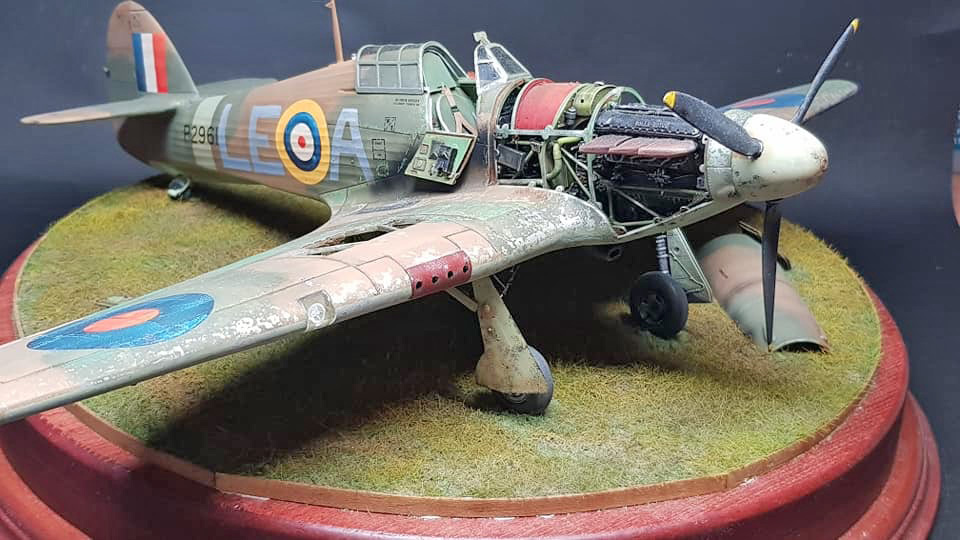
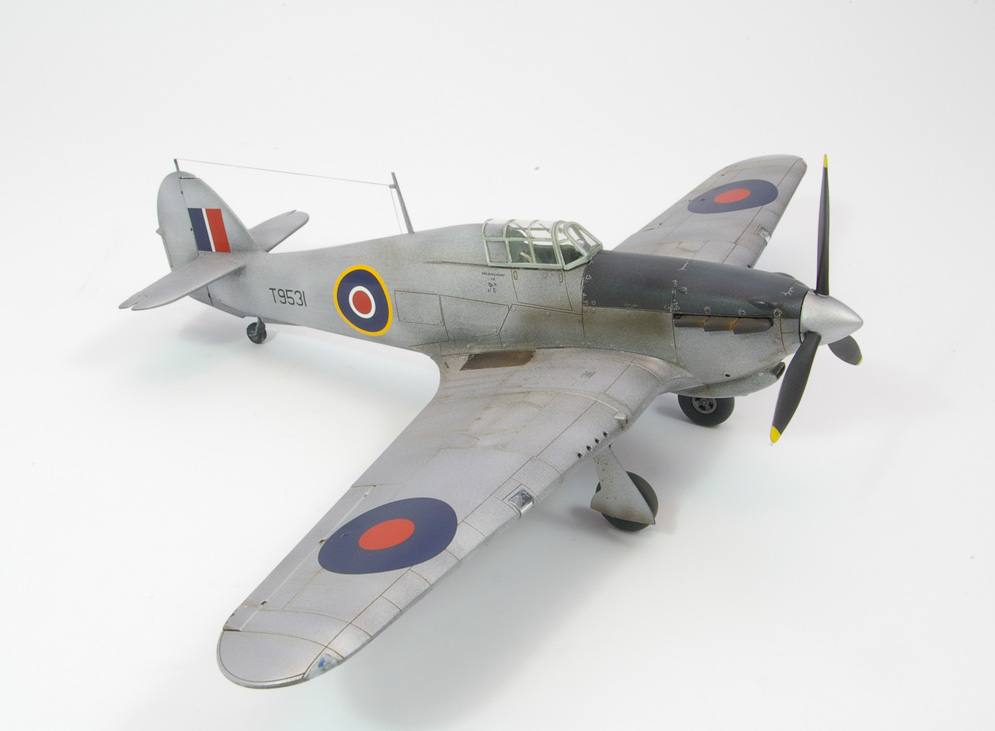
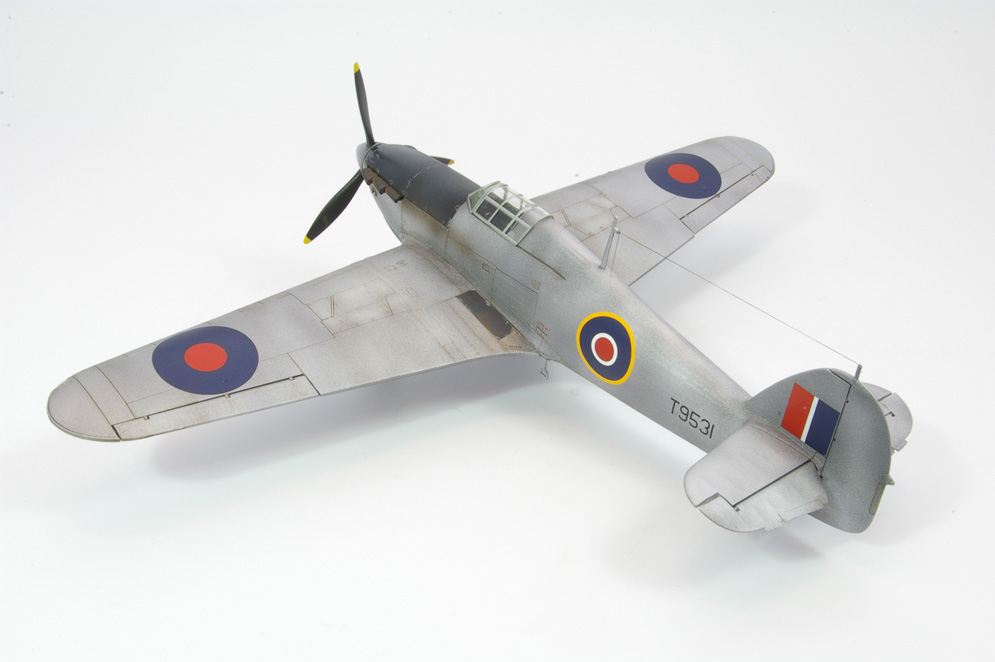
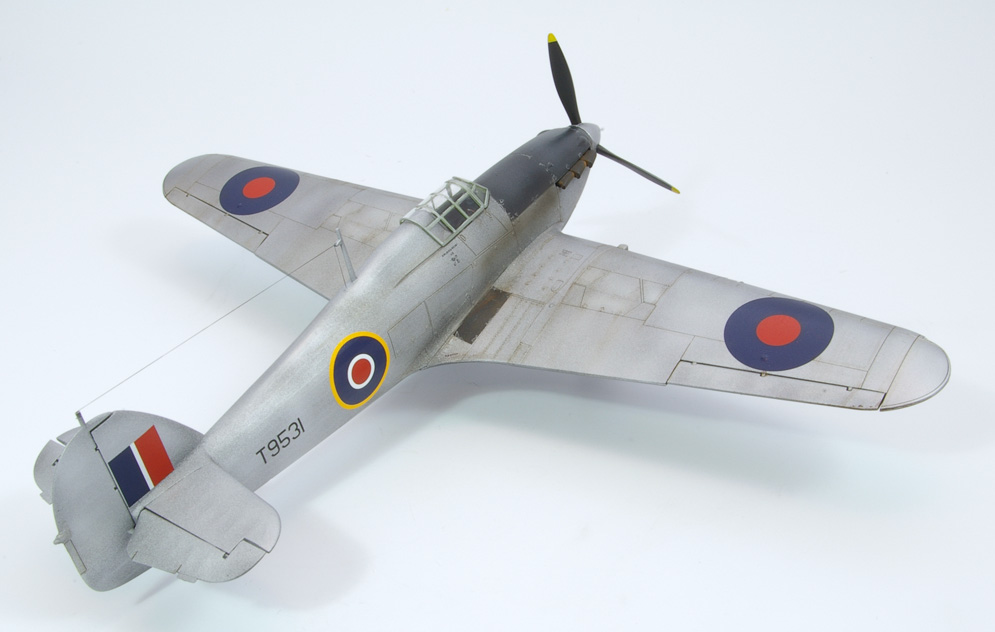
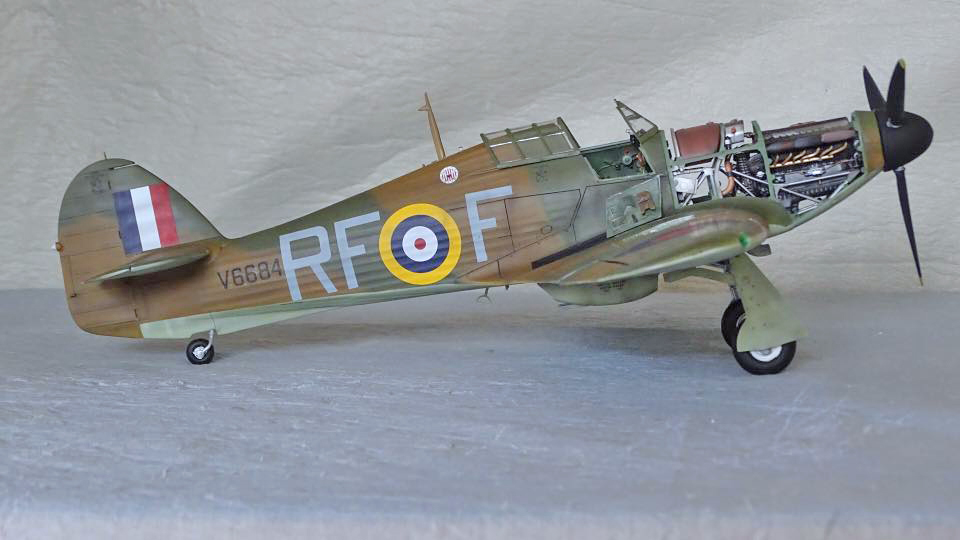
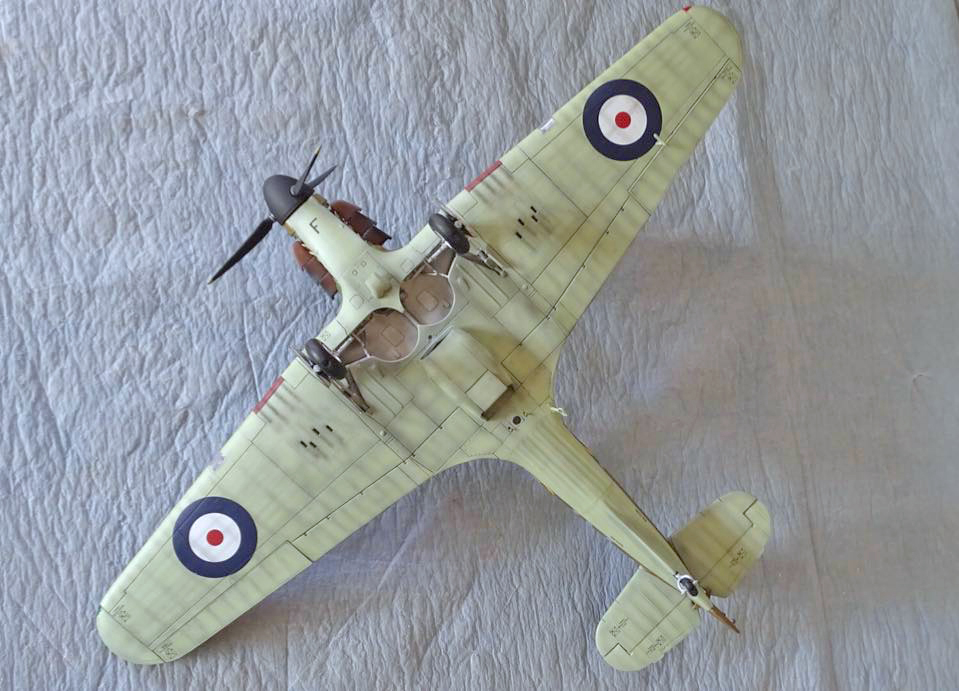
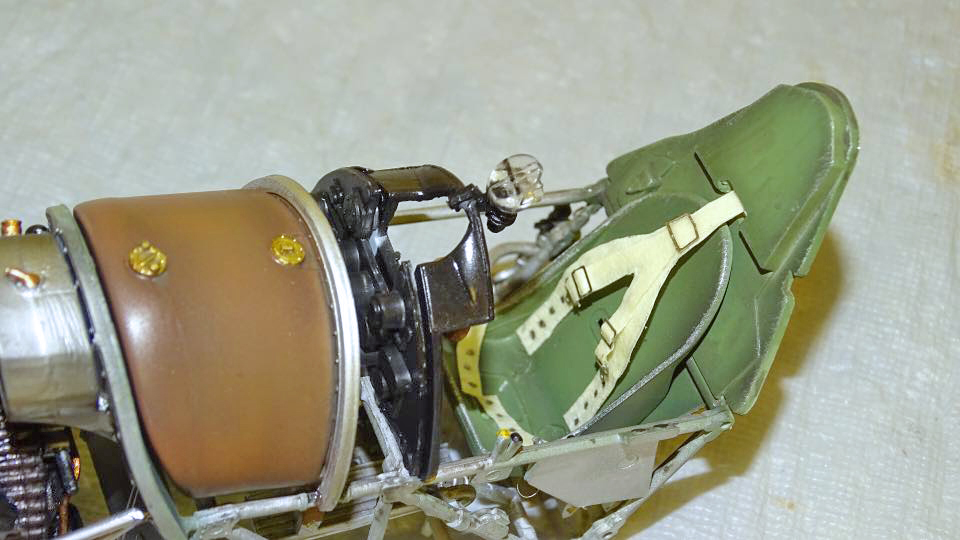
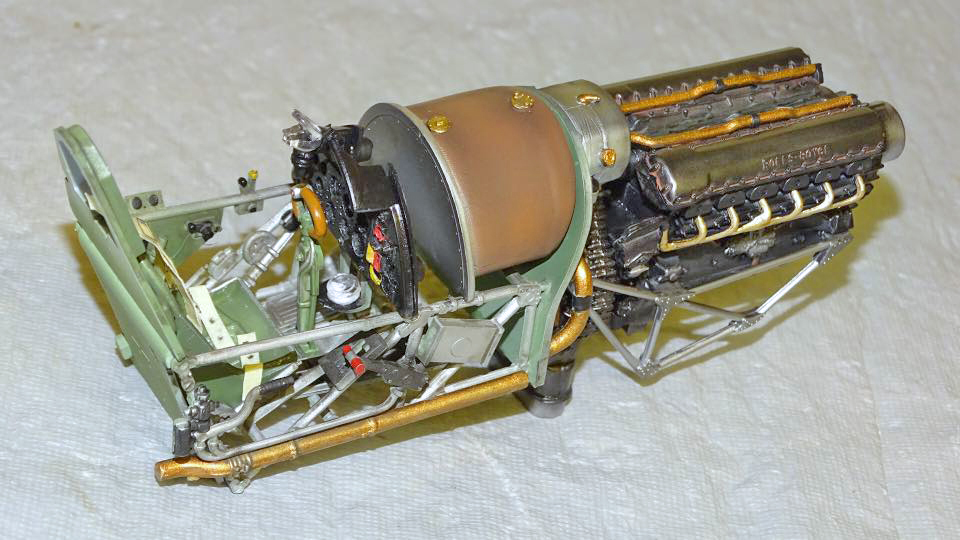
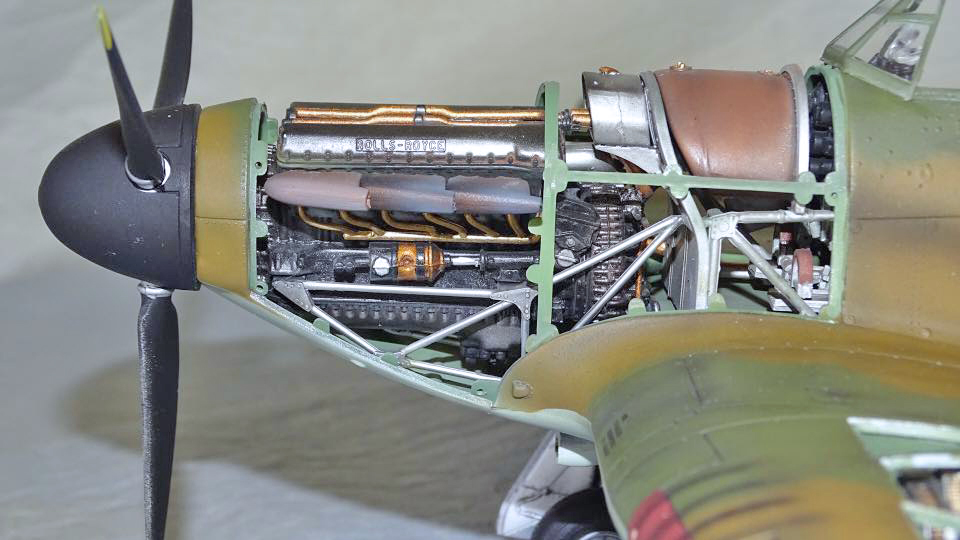
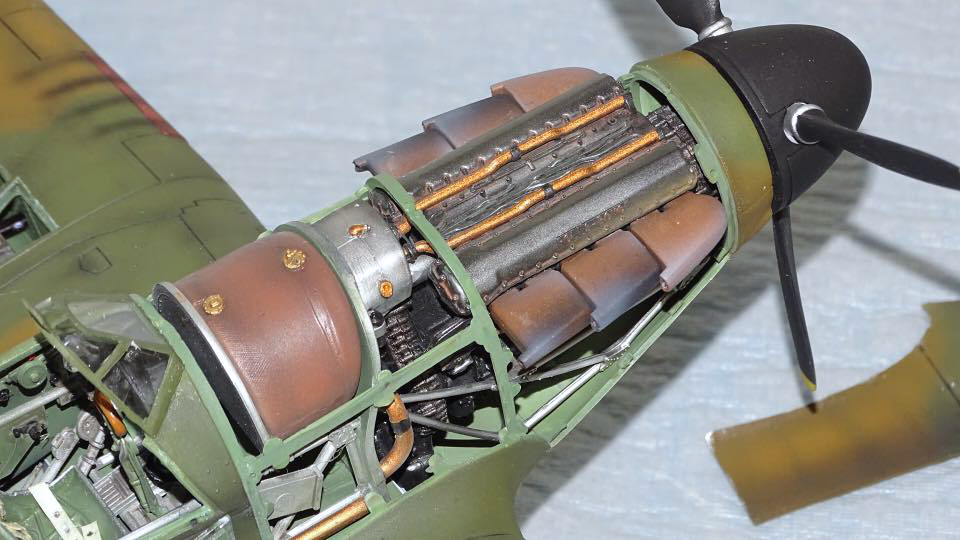
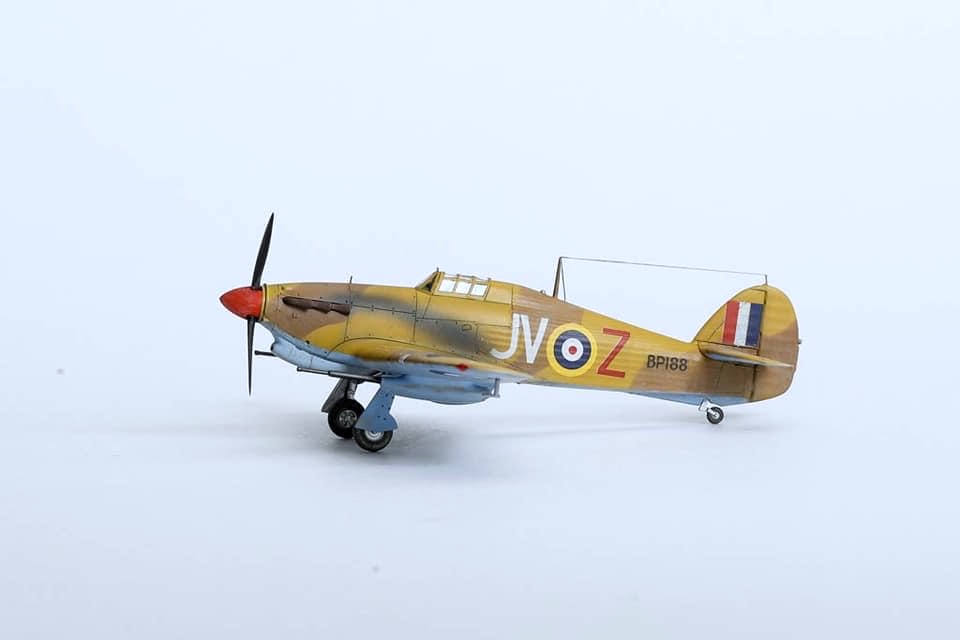
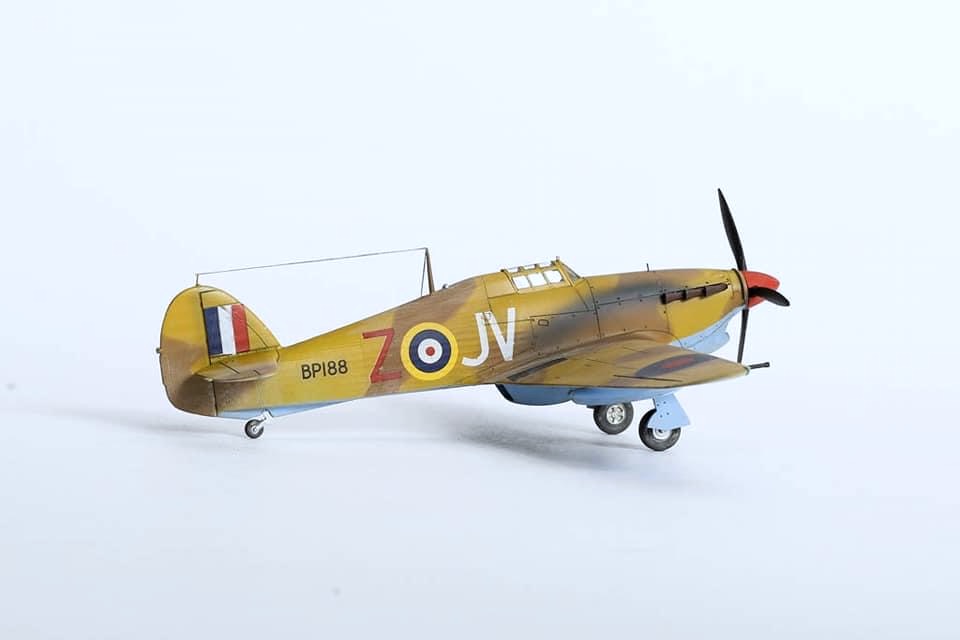
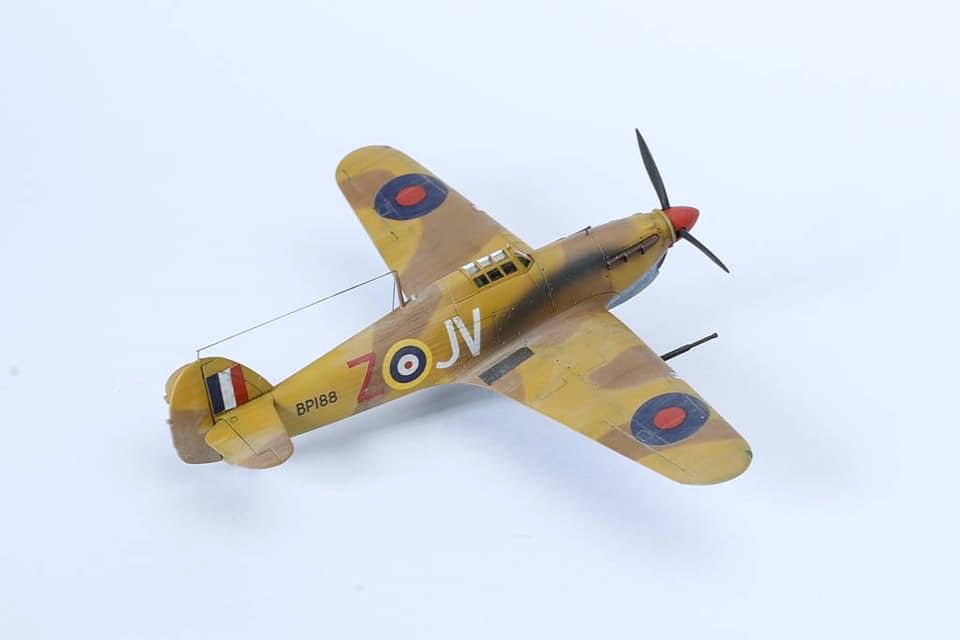
This is a hard to find example from the huge quantity of Hurricane kits out there. So I was really pleased to acquire this one, it represents a fairly obscure version of what can be, from my perspective, a very ‘obvious’ (though certainly iconic) aircraft type.
Just to explain…… My ‘perspective’ for the last 18 months or so is one of returning to modelling after a three year break having previously worked through a lot of the obvious RAF aircraft in 1:48 scale out there.
My return to the craft has been a huge learning curve, triggered by an RAF Air Cadets project I was leading, delving into the enormous quantity of on-line information and gradually building up my experience and resources.
Being an ex-professional photographer I have always been interested in how best to record my modelling work, and soon graduated from just putting the model on a plain background to researching and then creating my own airfield diorama’s of varying complexity. Not being satisfied with the obvious top views to show the superb craftsmanship of my finished models (no, not really) I started to include ‘ground’ level shots as if seen by a bystander. This was after a comment by my wife who made the suggestion…….
The desert Hurri is my latest diorama, (though you see also my original airfield diorama, too) featuring an attempt at trying to lend the shots a ‘period’ look with black and white. The scenes feature a mix of scratch built and bought accessories. Delving into the scrap box and bodging components together has been rather fun ! One of my concerns had been the rather obsessive collecting of spare parts and scrap plastic in compartment boxes, and to what end ?
After-market additions include Revell WW11 ground crew and airfield accessories.
Raw materials include Tamiya acrylic colours, Mantis chipping fluid, Roket cyano (thanks for the recommendation, Geoff), Abteilung oils, Lyra pastels, Mig panel line wash, domestic filler and scrap polystyrene packaging , and the usual plethora of gizmos’ and stuff one collects when ‘I won’t be doing modelling anymore’ turns back into being an all absorbing hobby and craft (or maybe ‘obsession’ ?)
Finally, my recent comeback to this noble craft has been one of expanding my aviation awareness in terms of the vast range of options available to a lifelong RAF/British aviation enthusiast. This quest has been so fruitful that I have broken my starting rule of ‘don’t make an aircraft that I have done before’ (because you can do yet another version of it). I have also bought kits for my ever expanding stash that I wouldn’t have considered before. All this also includes research into what US origin aircraft did the RAF (or Fleet Air Arm) use, and how to finish those models appropriately.
David M.
I just use a pencil to add some highlights to the panel lines and work this subtly in and around the airframe with a cotton-bud.
Hope you like it… Graham M.
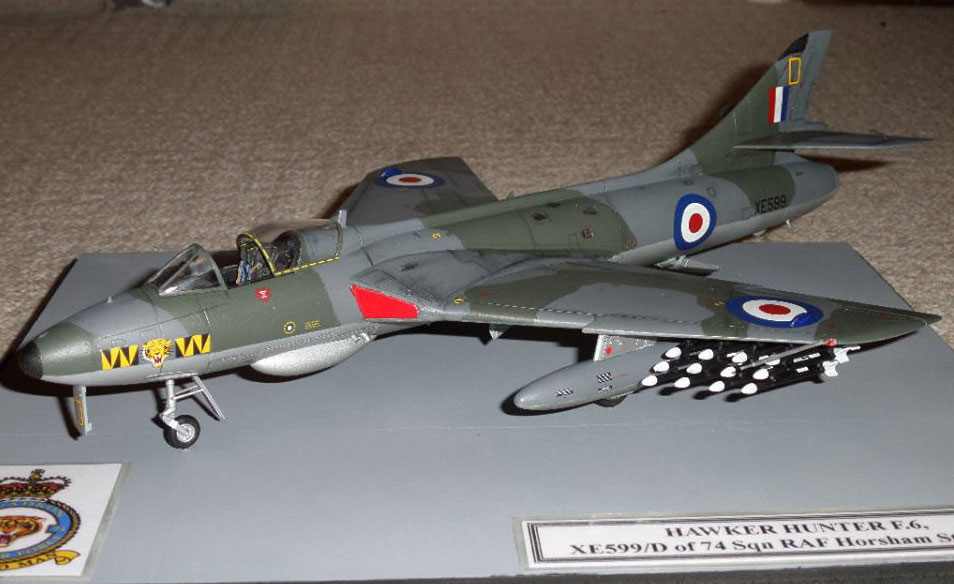
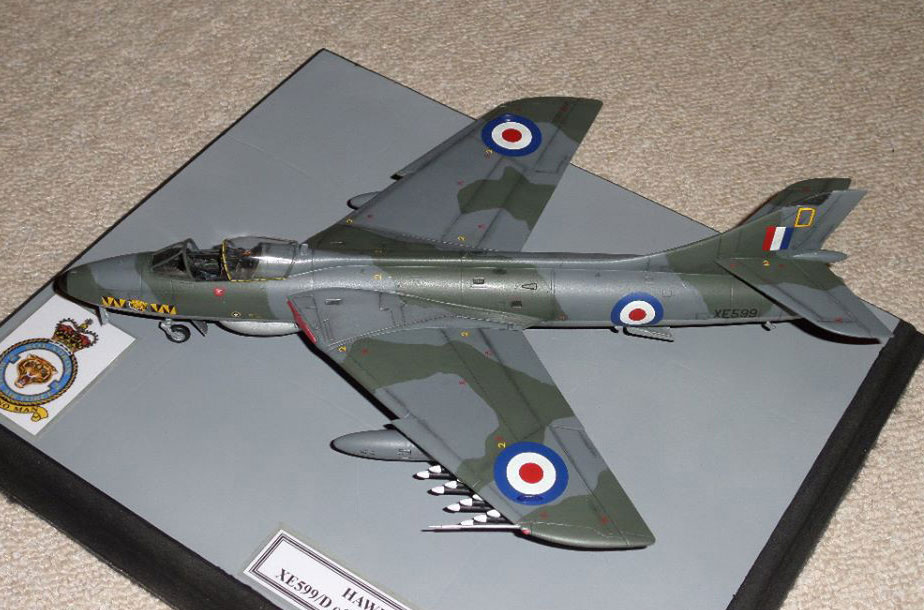
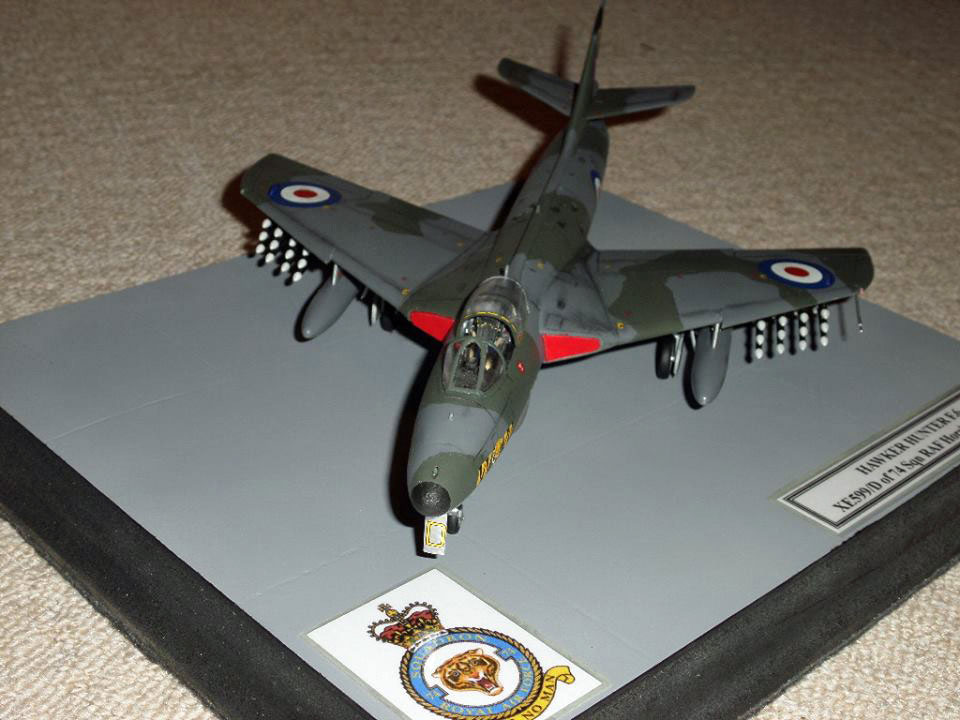
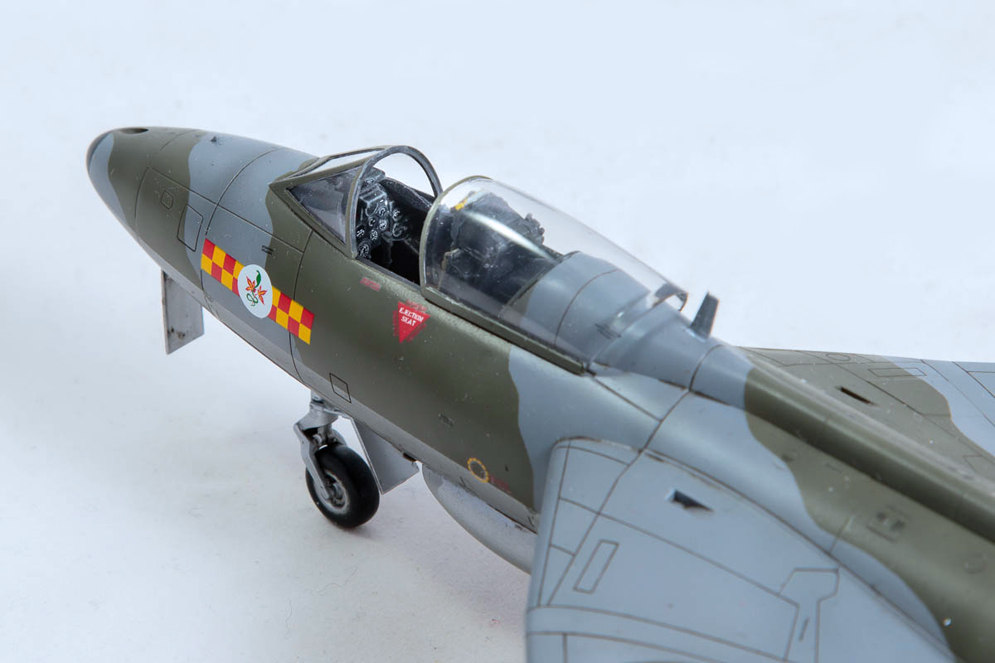
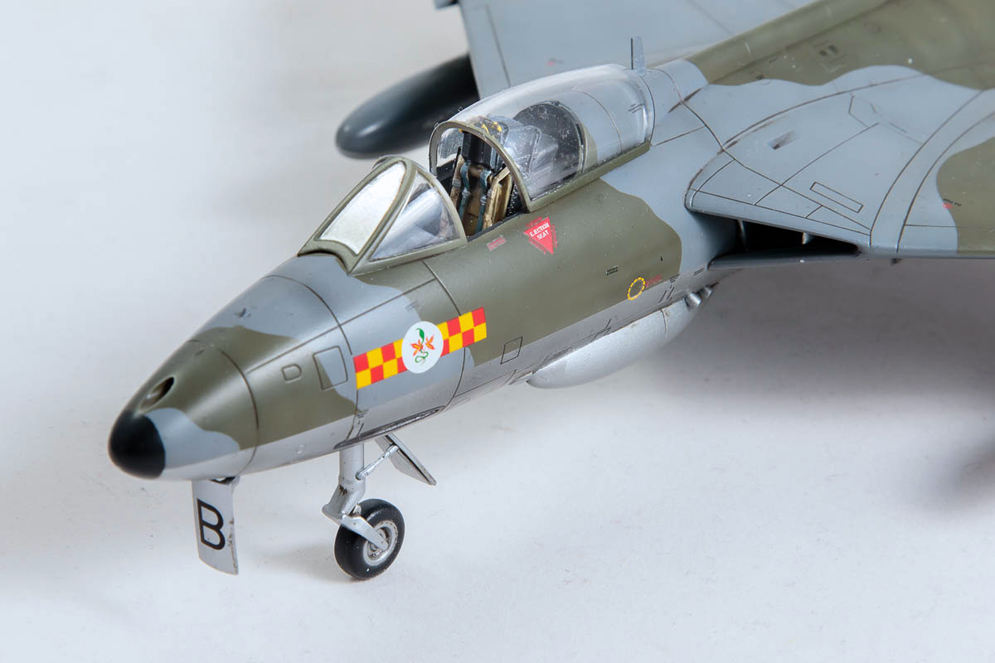
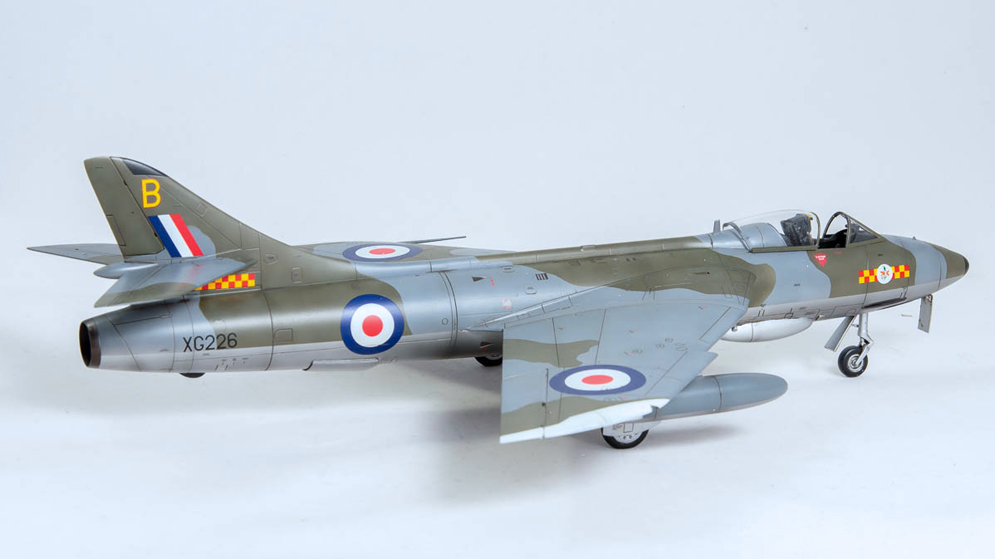
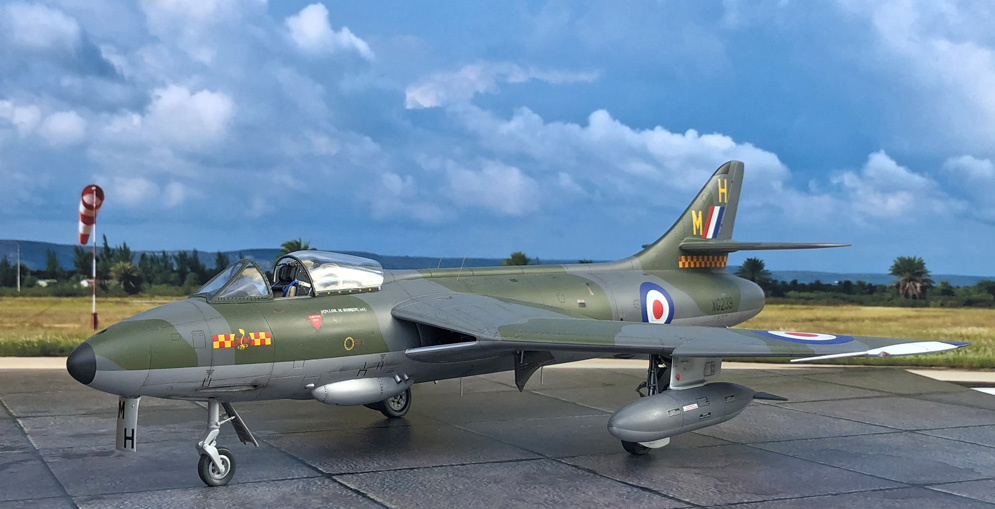
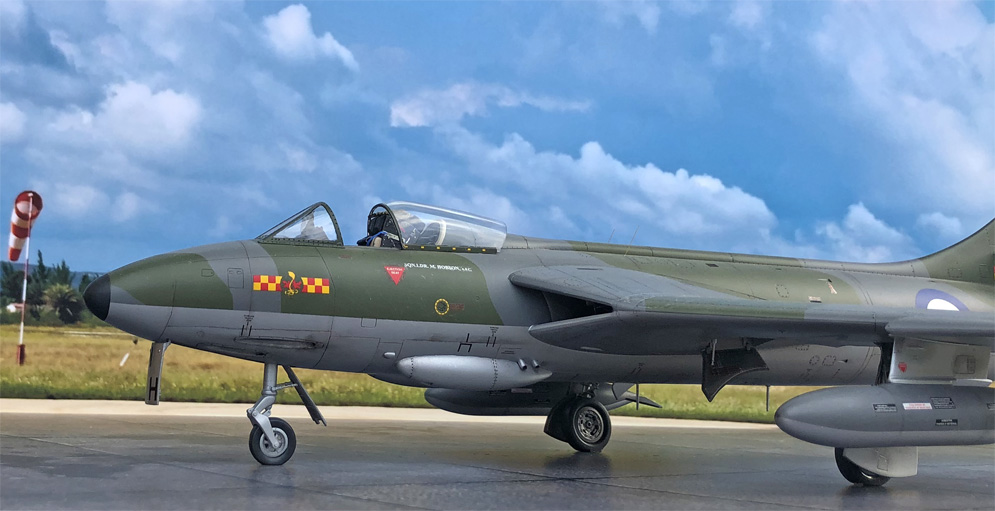
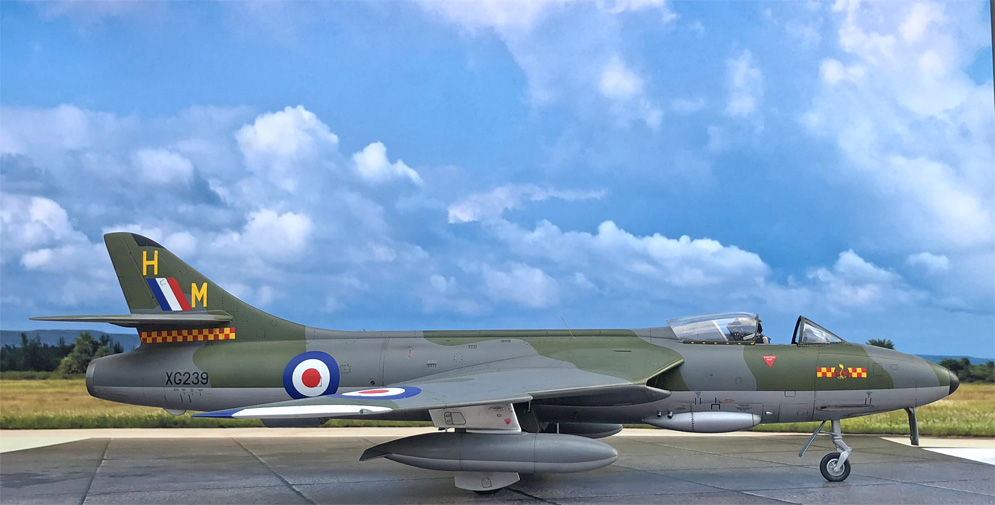
These are of my most recent completion – the 1:48 Airfix Hawker Hunter F.6.
I have added a Quickboost ejector seat and used Xtradecal sheet X48192 for the 92 Squadron markings.
I painted the model with AlcladII lacquers on the undersurfaces and MRP lacquers for the camouflage colours. It was weathered with MiG panel line washes and final varnish coat was Vallejo Matt Varnish.
Thanks, Phil J.


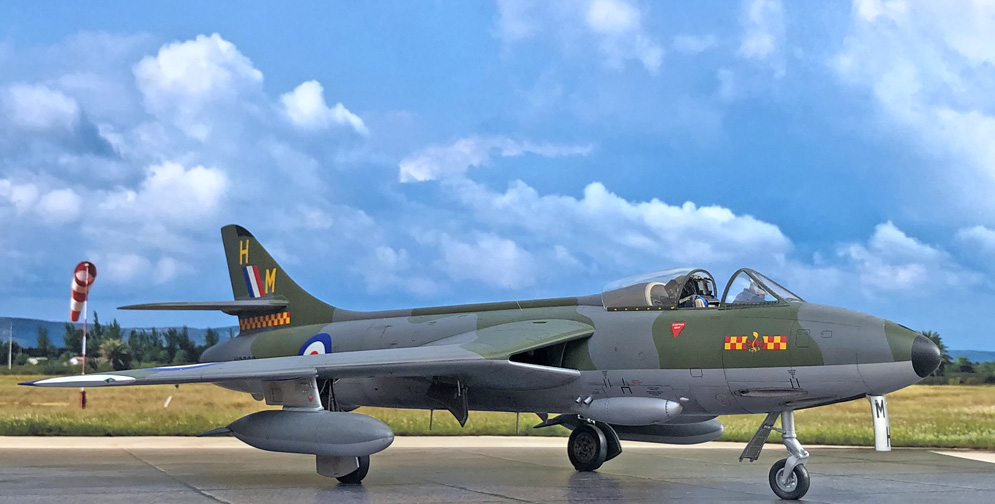
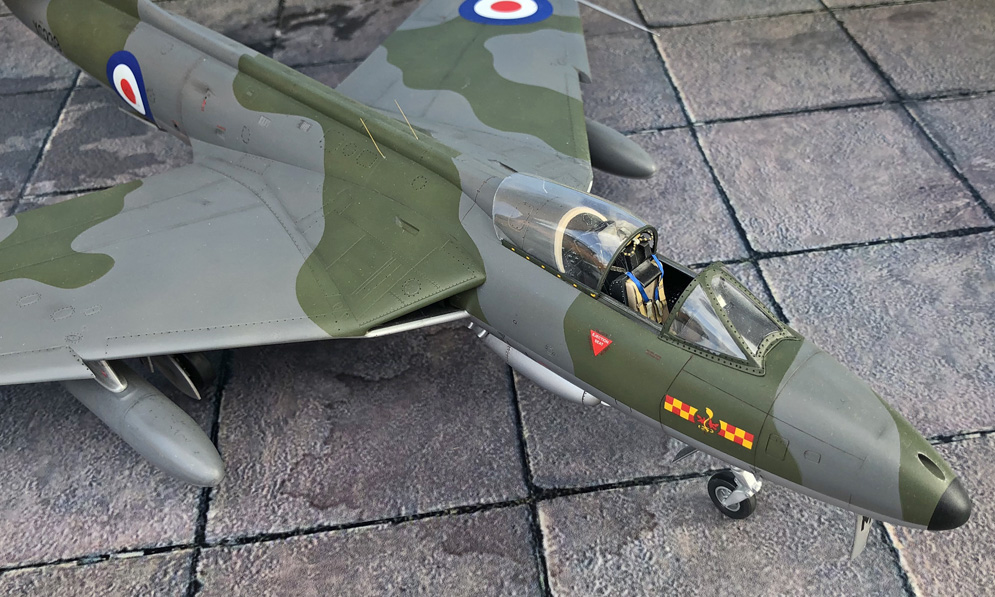

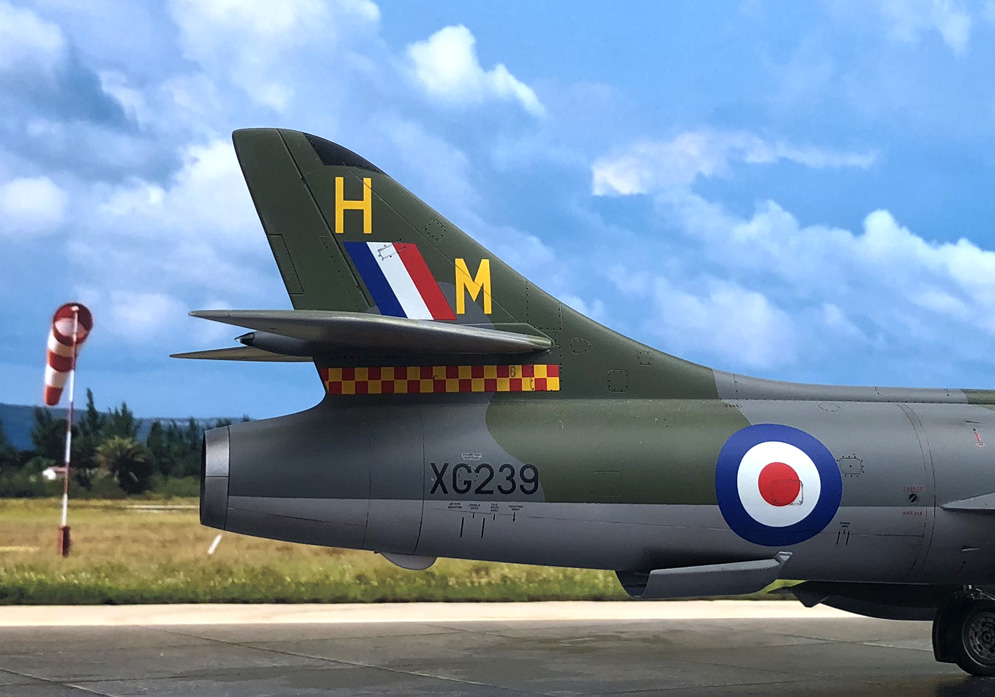
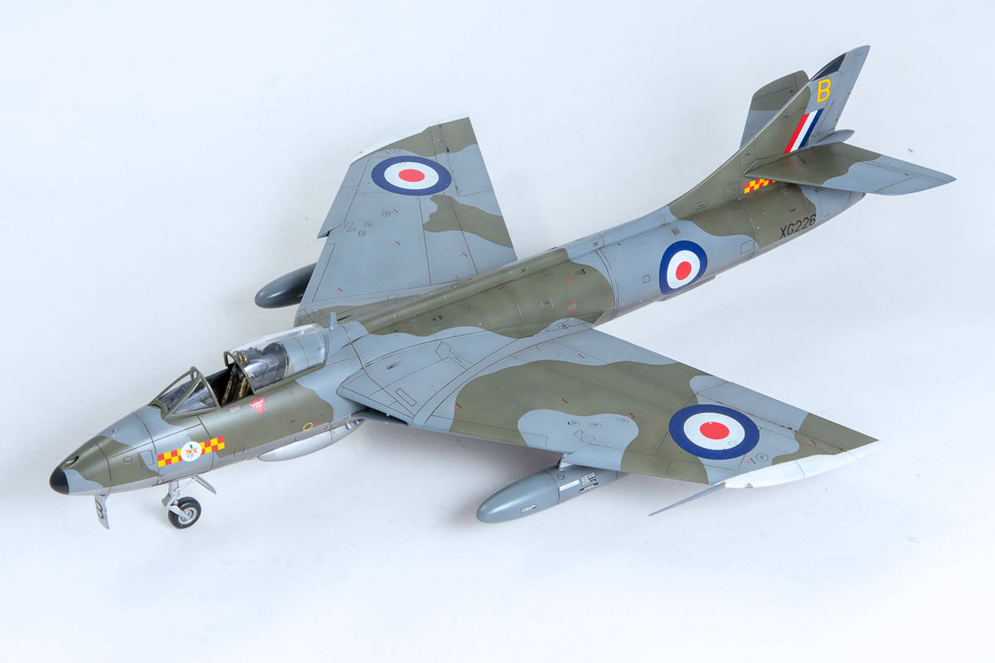
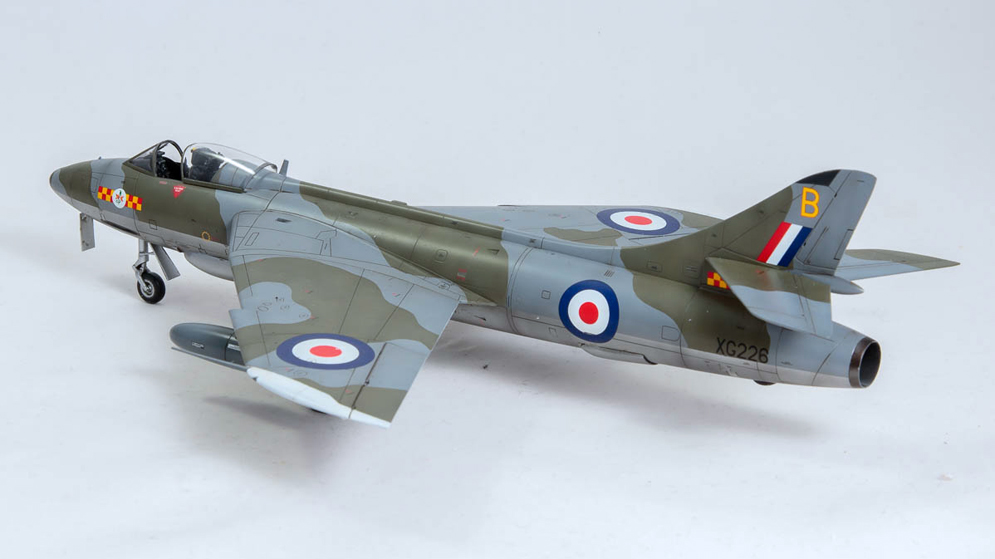
Here’s the 1:32 Revell Hawker Hunter in F.Mk.6 guise. A really nice, simple kit to build and looks great in the larger scale. If you can get a cockpit set for it that will add a bit to your finished model and here I used the True Details resin tub and seat.
I drilled out all the rivets just to add some interest and I think it adds a bit to the finished model.
Hope you like it…
Geoff C.
Here’s my most recent Revell 1:144th Hunter from the Abu Dhabi Air Force, sprayed with cellulose paint, gloss varnish, decals, matt varnish and pastel weathering.


This kit was built straight from the box as this was a commission build. Like all my models lately, this one received a first layer of Alclad black primer.
Paint used is Gunze Aqueous which I spray in very thin, almost translucent layers. This way you can create several shades of colour without mixing paint. Some shading with lighter shades of the basic colours was done.
Kit decals were used over a coat of Future, followed by a wash of Mig Productions dark wash.
Final coat is Alclad matte coat.
René van der Hart


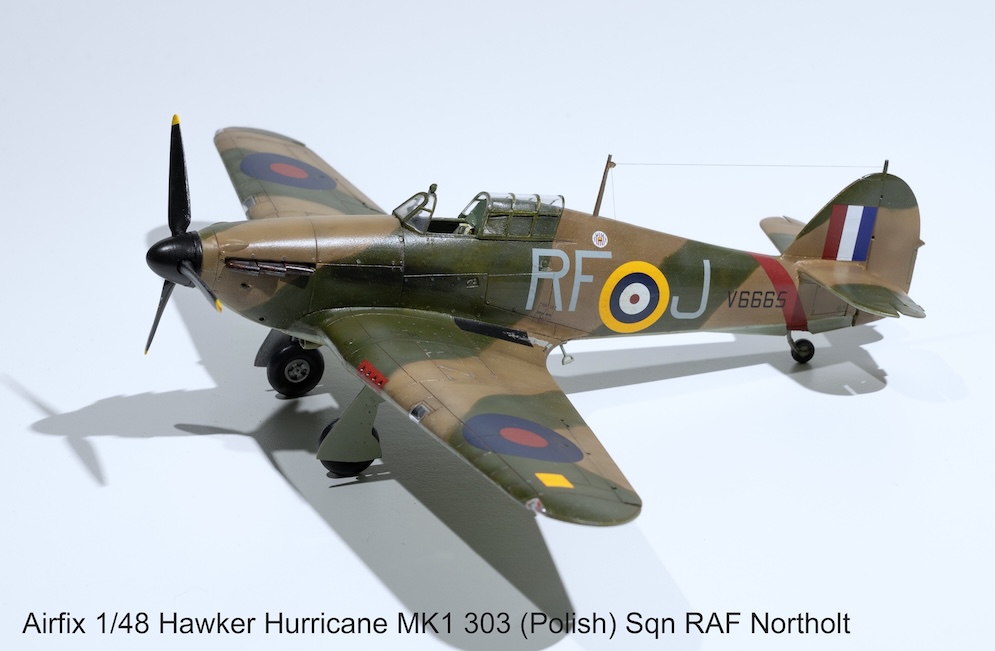
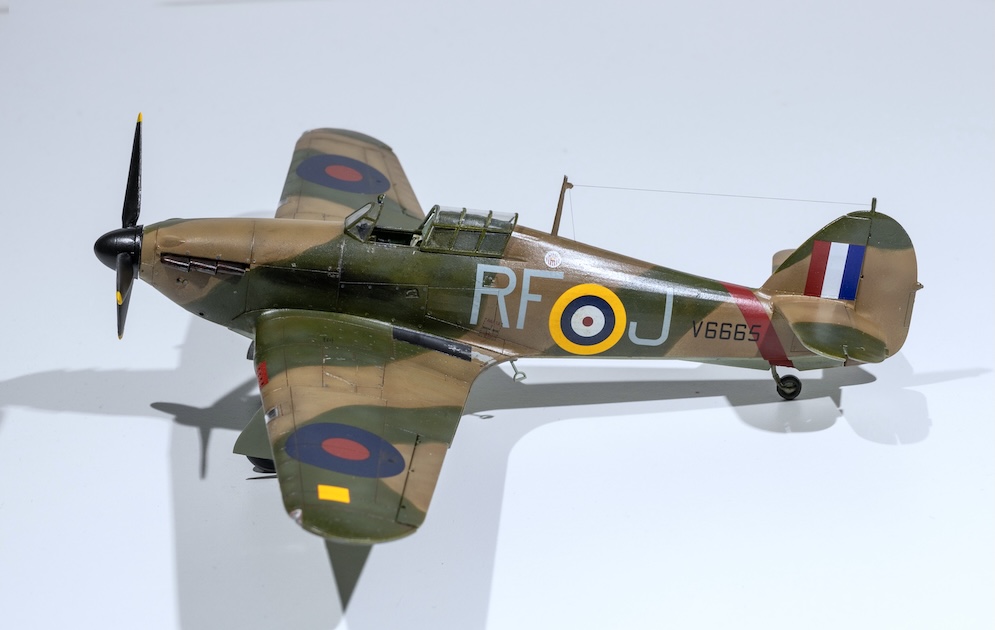
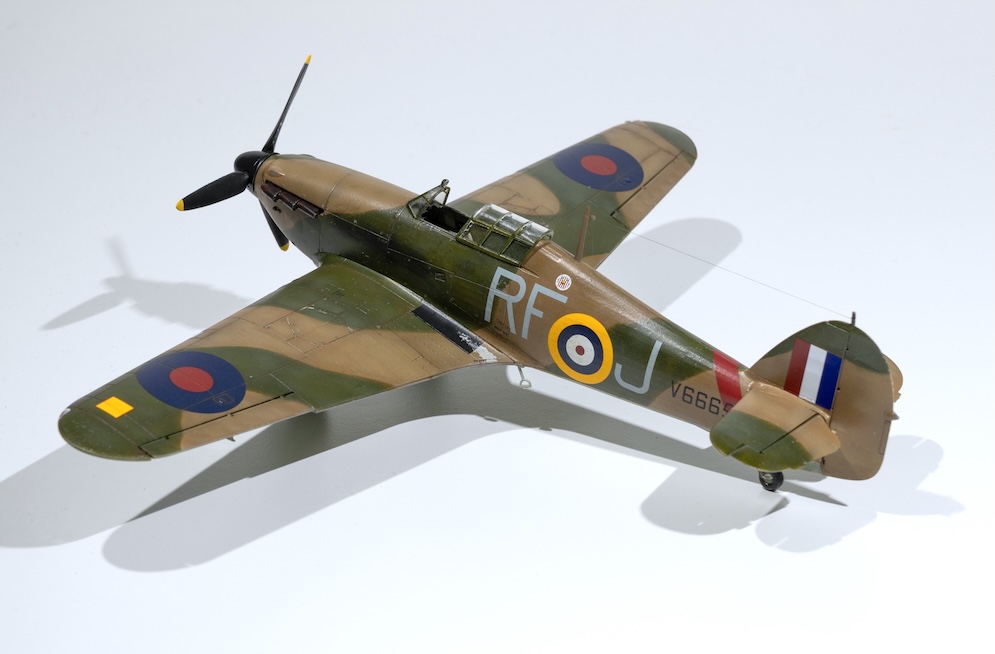

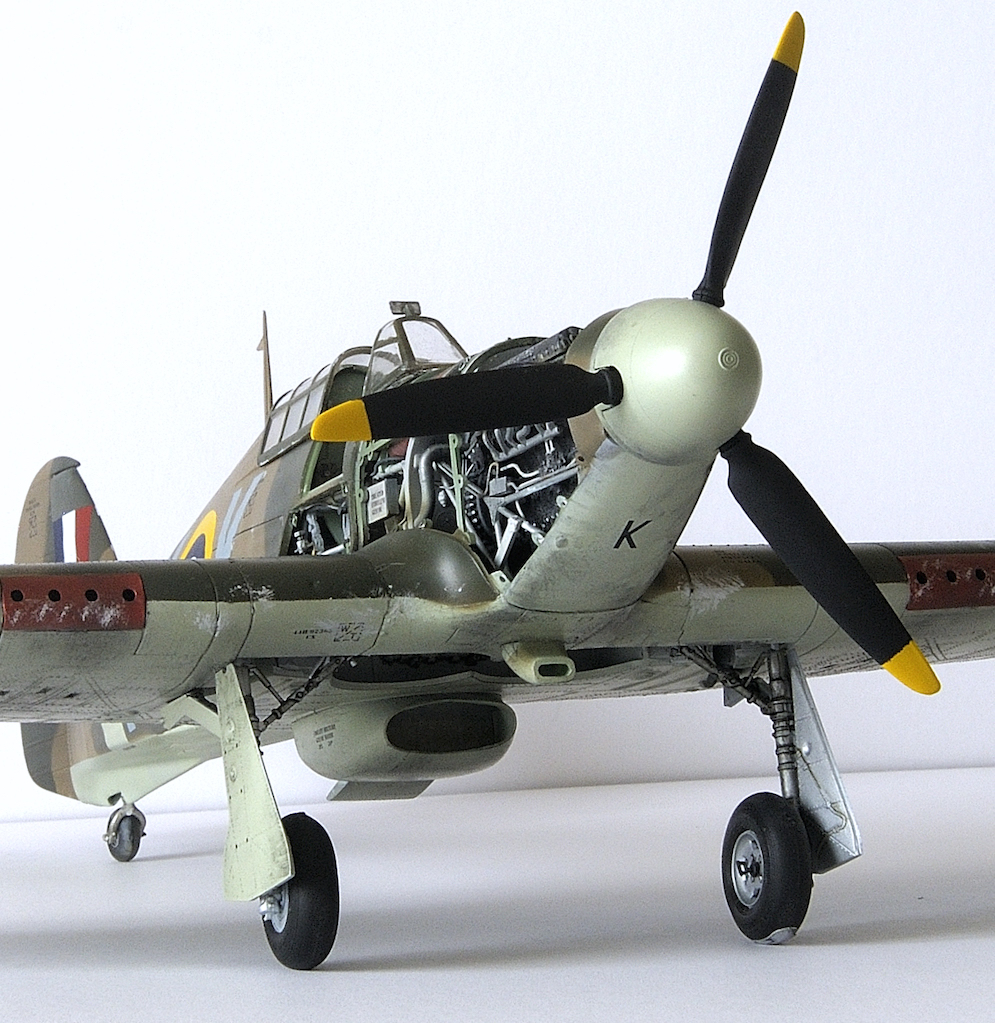
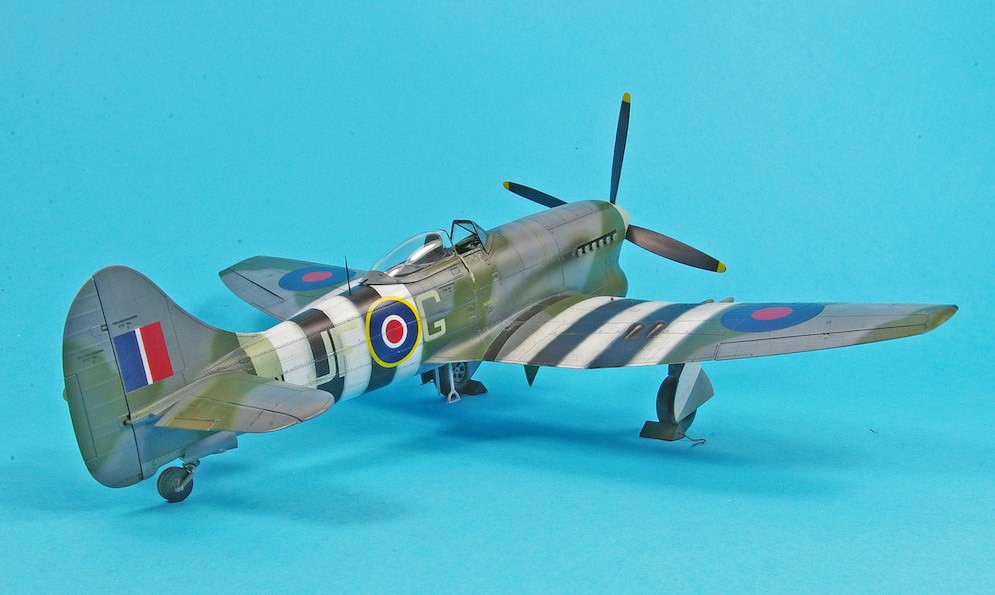
I have been planing to build the Airfix 1:48 Hurricane to complement my existing 1:48 Typhoon, Tempest, and Sea Fury, to show the wartime development of Hawker’s single seat fighter variants.
The Offering from Airfix is excellent, really on par with Eduard kits and exceeds Hasegawa’s Typhoon by some distance.
I have been that impressed, that I have just started the tropical version, and intend following Geoff Coughlin’s own build and videos on the SMN web site, If mine is half as good as Geoff’s I will be a happy modeller!
Amazing that November (2025) this year will mark the 90th anniversary of the Hurricane’s maiden prototype flight.
Richard A.
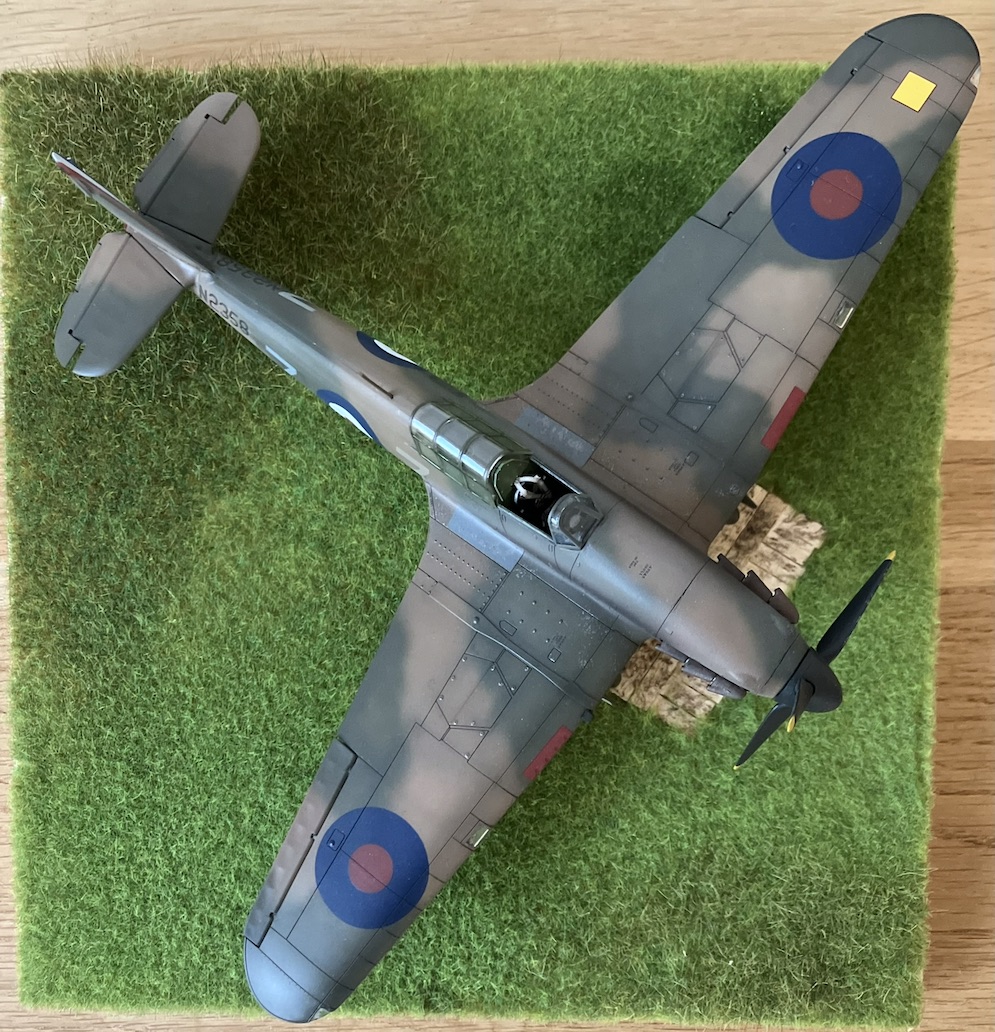
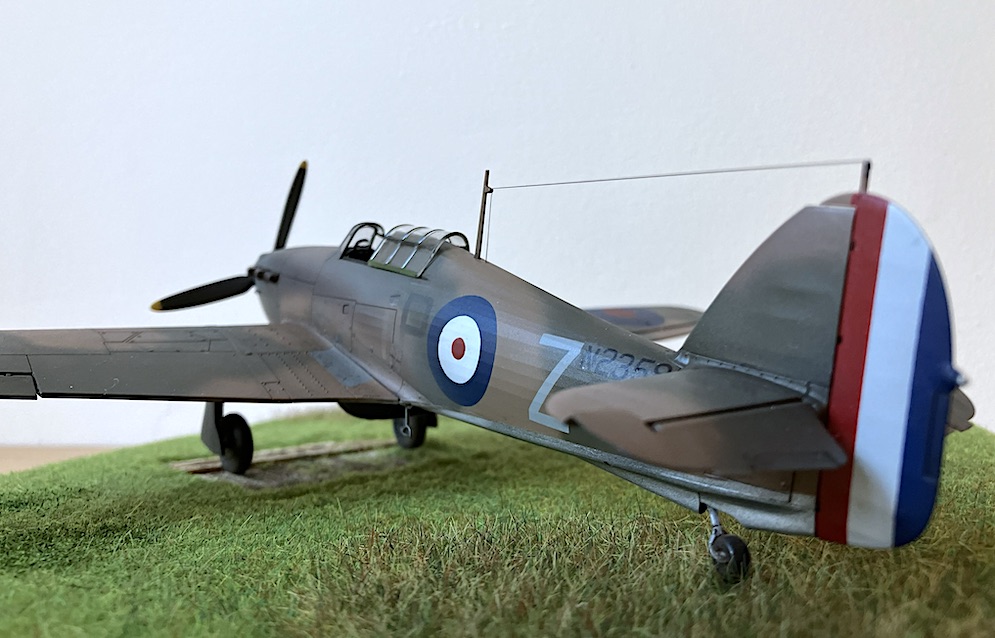
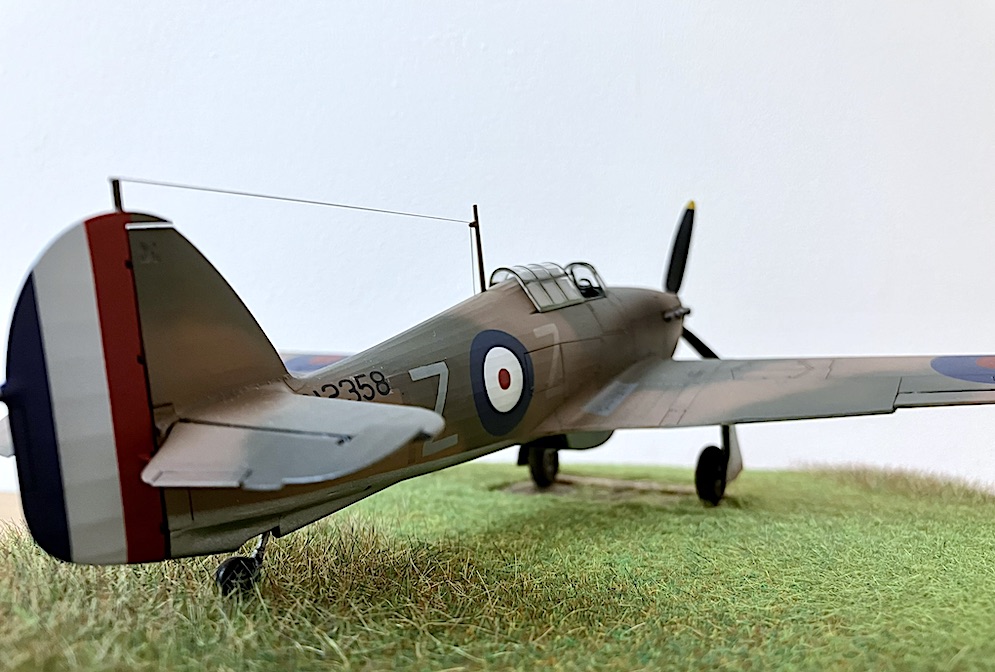
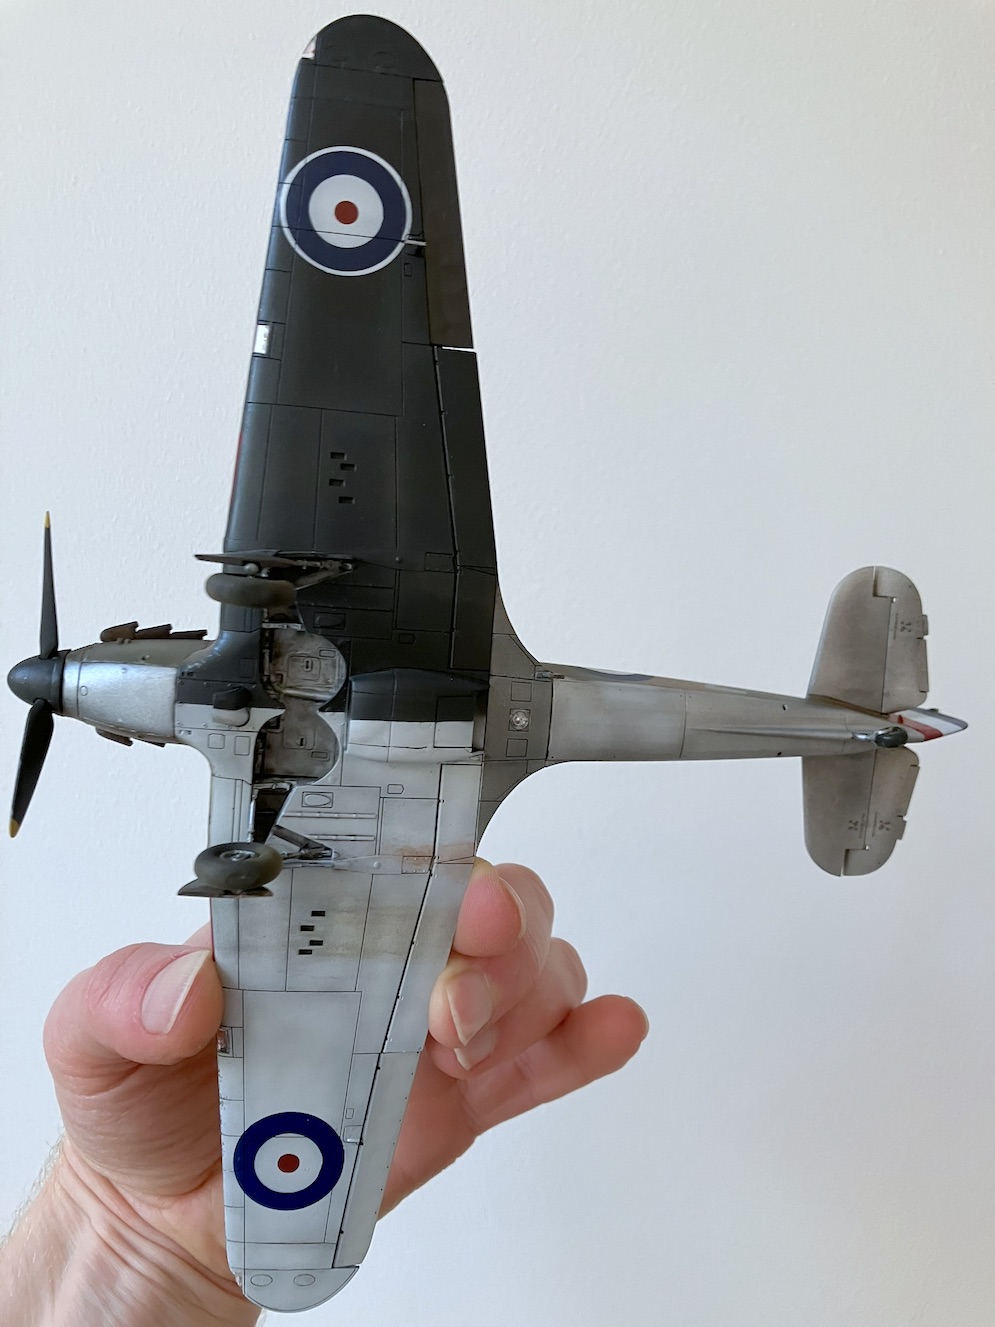
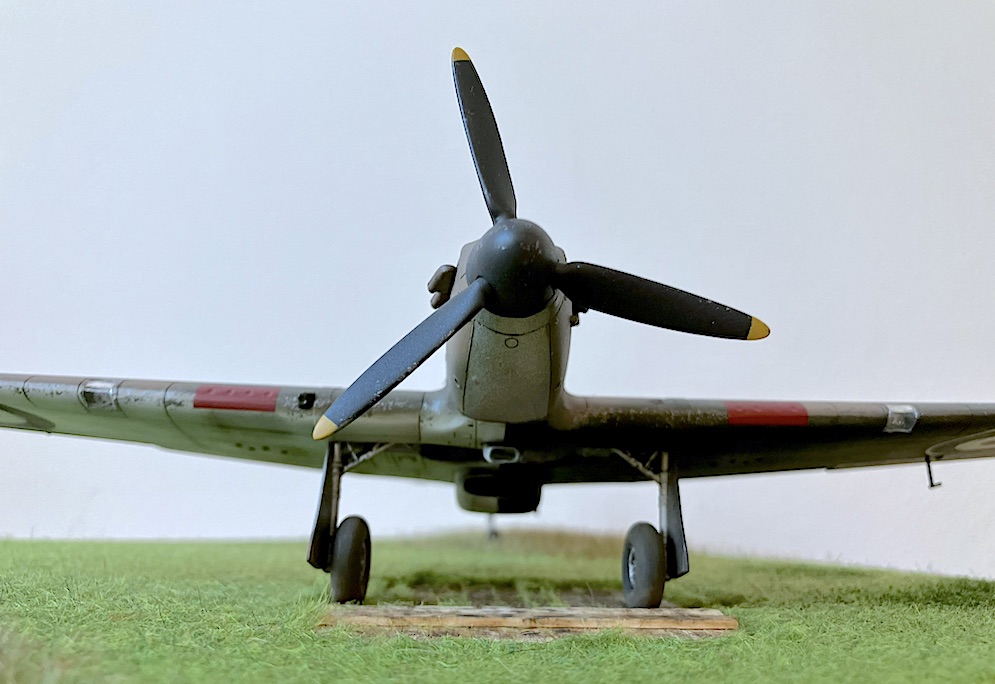
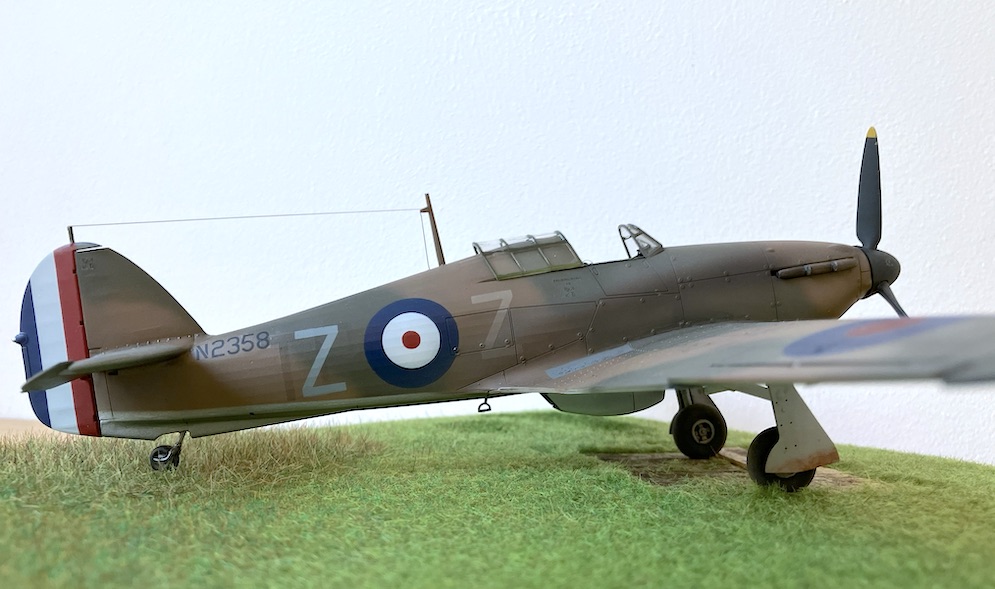
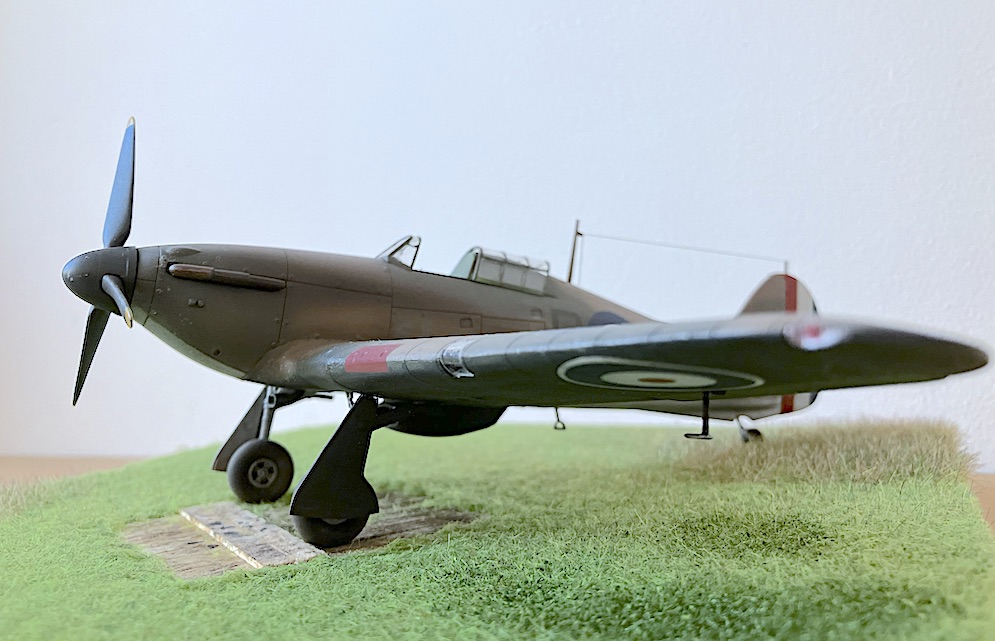
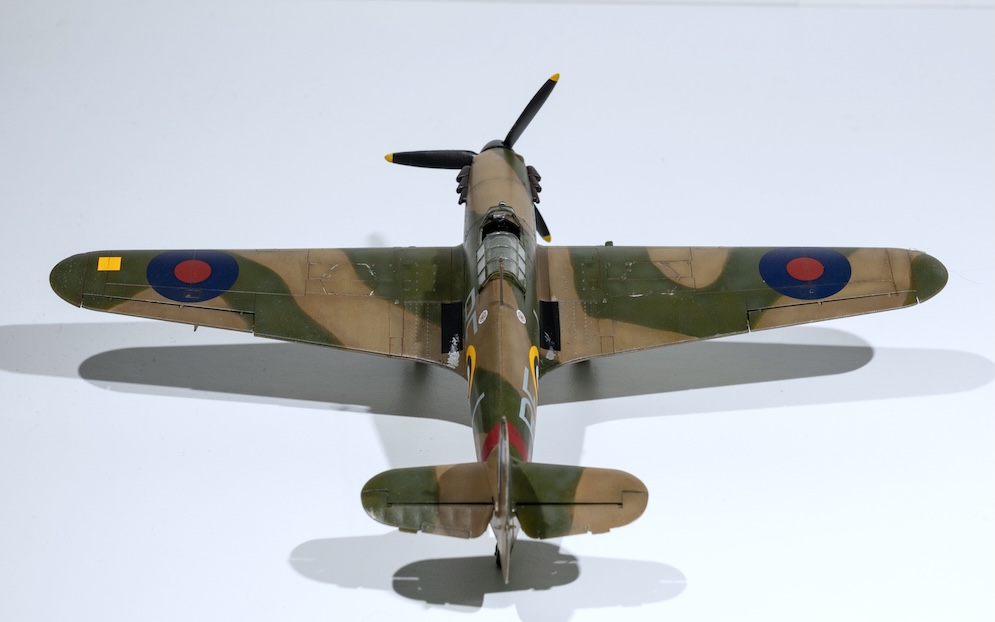
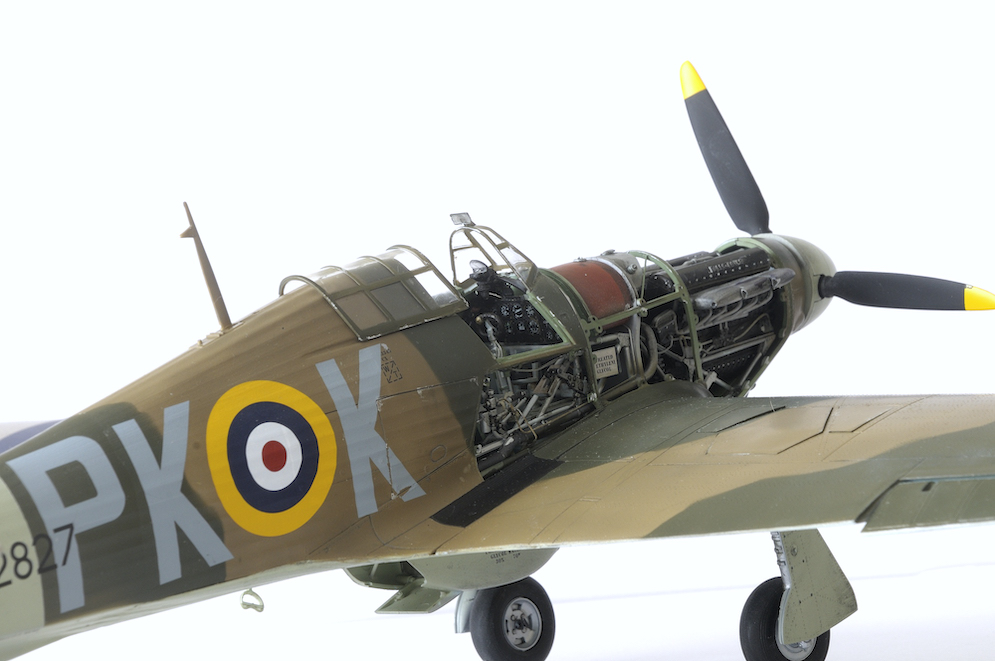
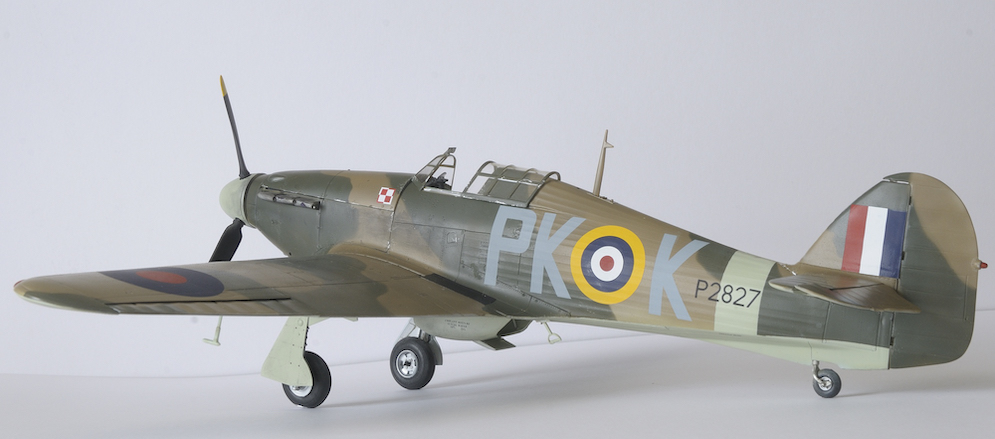
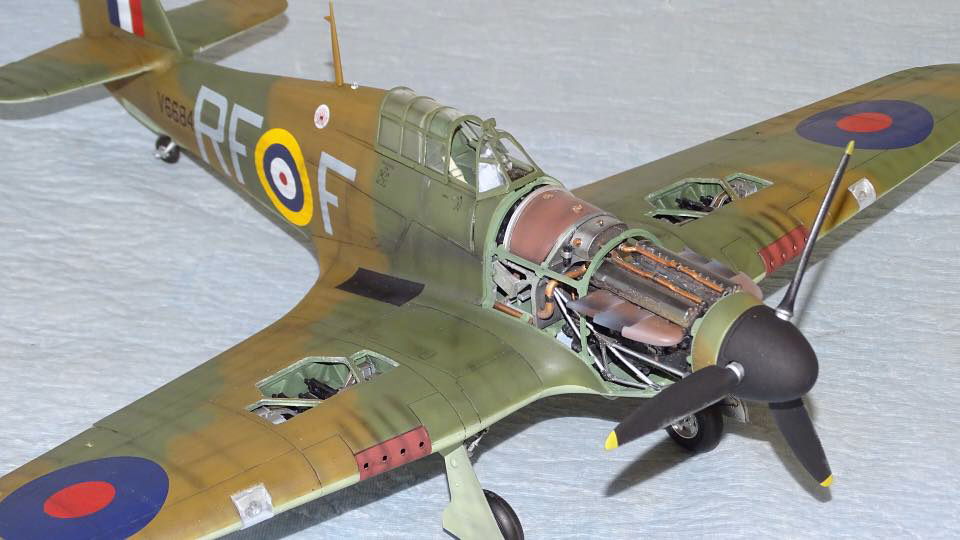
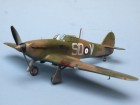
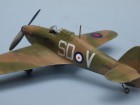
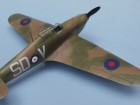
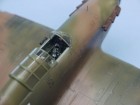
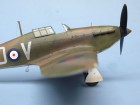
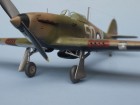
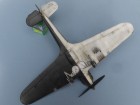
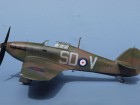
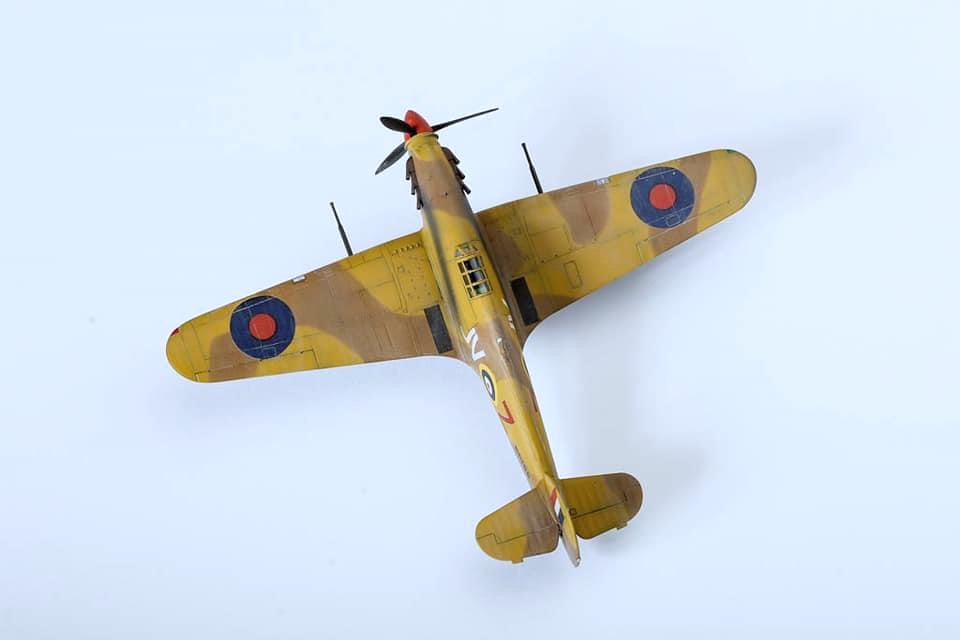
This is my take on N2358, featured in the well-known photo from 1940, OOB aside from the harness. The build was very straightforward. Insignia and code letters were masked and sprayed. The serial came from different sheets in the spares box, the first time I have made one up in this way. I’m pleased with the alignment, but its too high up on the fuselage. Lesson learned to properly consult the photos of the prototype!
A number of features are debatable. Apparently this aircraft originally carried the squadron code TP, which was painted over. I decided this had been done by hand in fresh paint. The result is perhaps too stark. I also decided that the underwing port roundel needed to stand out better against the black so gave it a white ring. I know that later in the year it would have had a yellow ring, perhaps no ring was applied originally? I only applied the black and white to the wings and not the fuselage based on what I think I can see in the photograph. I didn’t apply underwing stencils I thought they were likely overpaint and I didn’t have any in white, but I do wonder if there’s a ‘W/T’ near the end of the starboard wing. The photograph also shows a dark area on the bottom of the starboard undercarriage door. I don’t know what this was so have opted for mud, although the line looks very straight and the colour very dark so this may be incorrect. Finally in the photo the aircraft is stood on a wooden stand and I now think that this actually has a serrated front edge which I didn’t include.
Craig W.
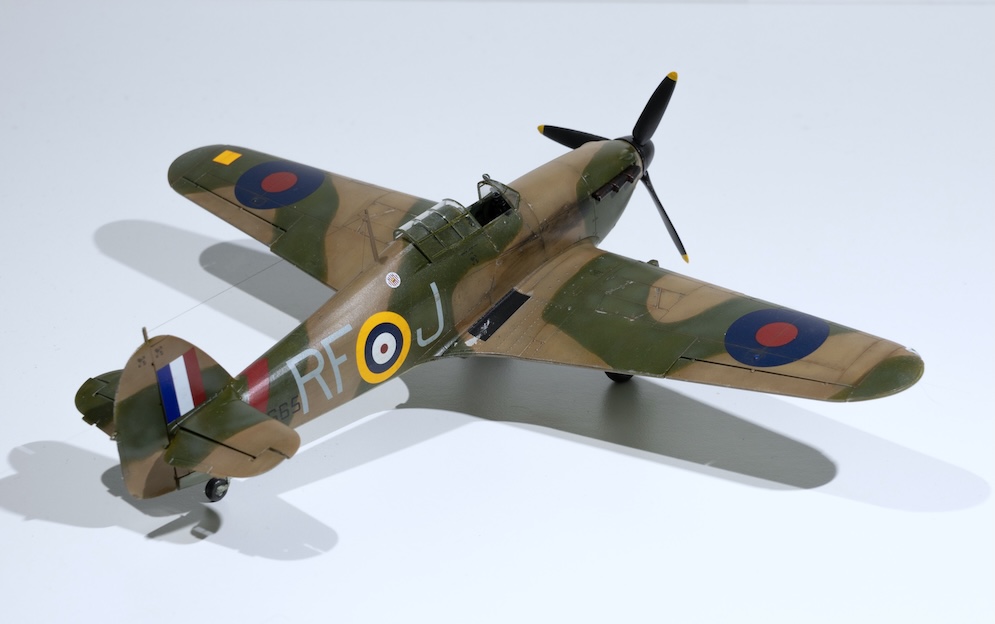
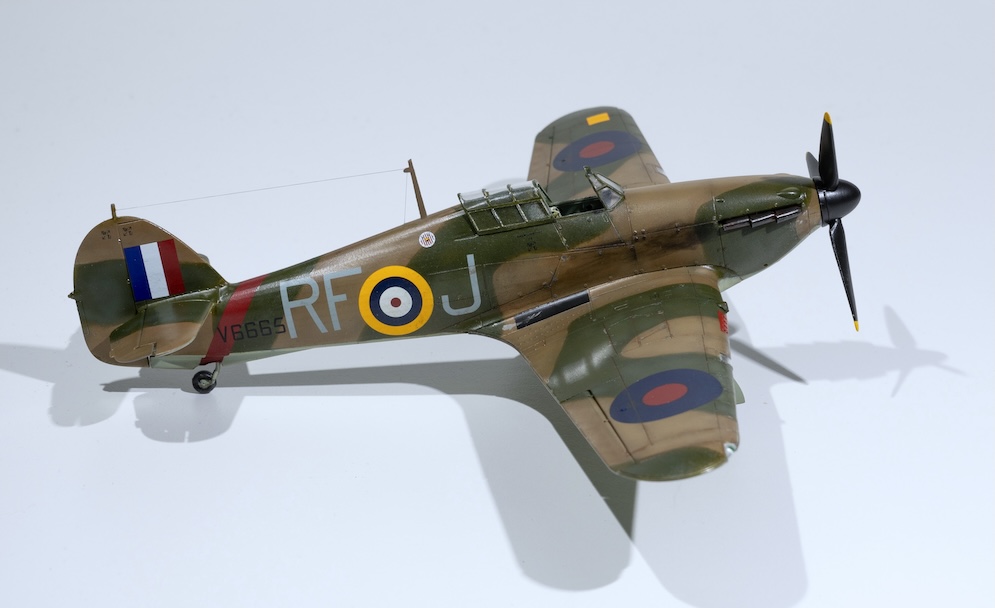
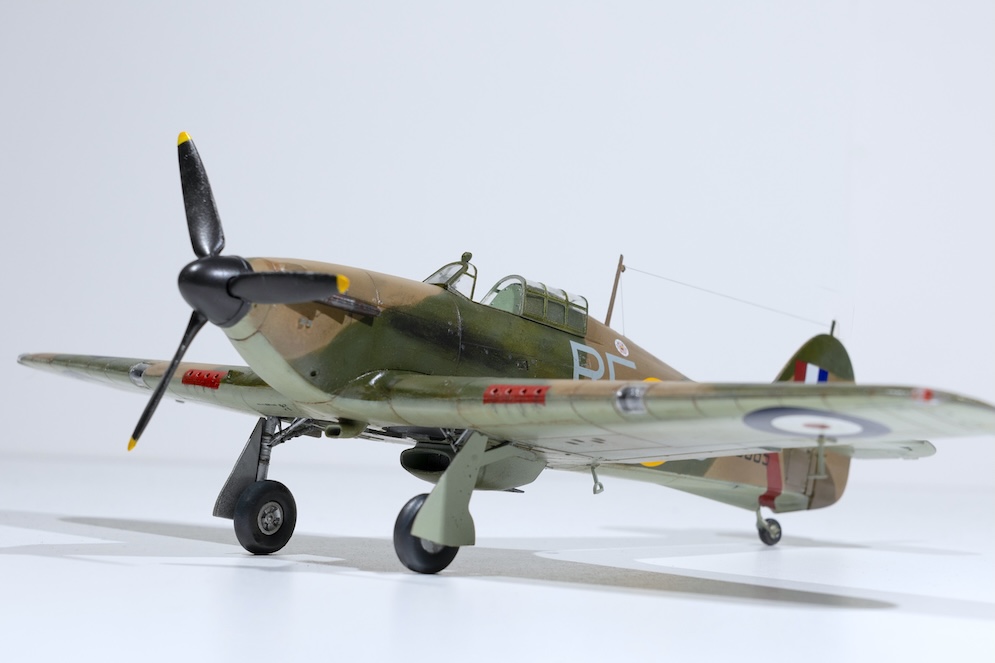
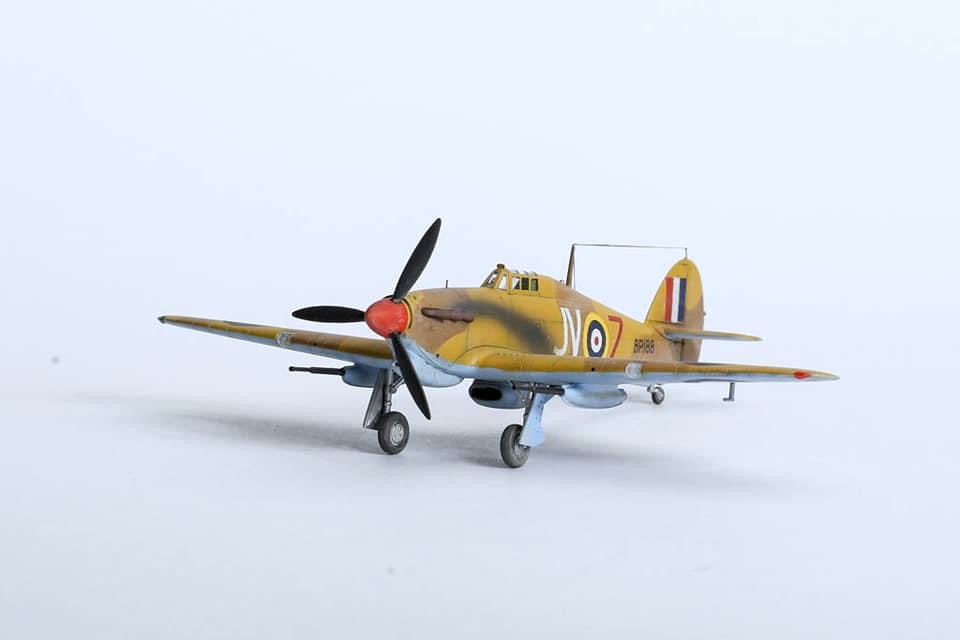
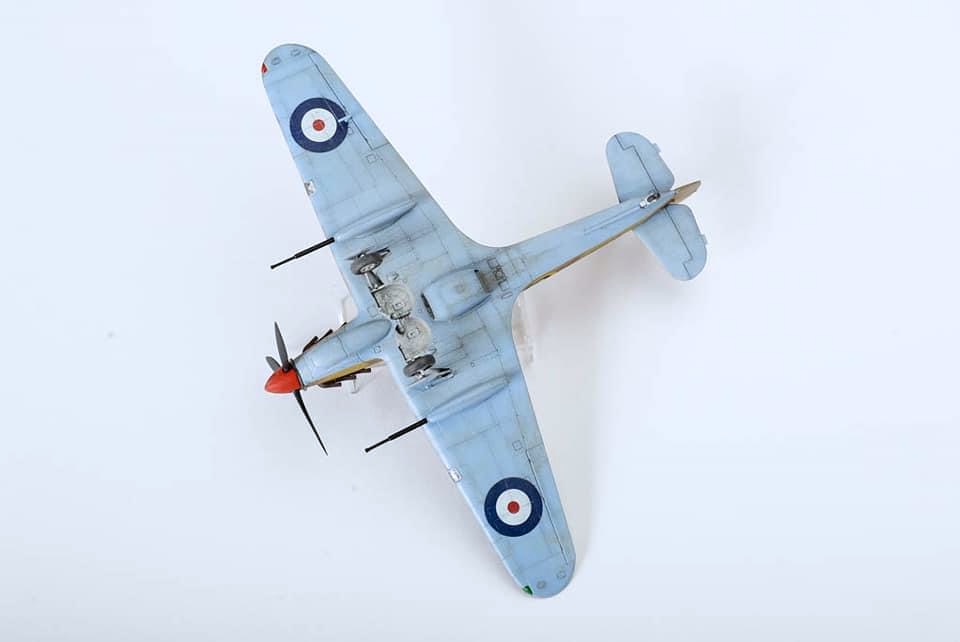
Airfix 1:48 Hawker Hurricane Mk.I kit. Aside from some Eduard seat belts the kit was made more or less from the box.
I drilled a small hole in the inside of the wingtip lights and filled these holes with red and green paint as appropriate to represent the bulbs.
The only issue I found with the model was a slight step on the front underside of the wing where it meets the underside of the front of the fuselage. The step was covered by the large air intake on the tropical version of the kit and so was not apparent. However, here I found it hard to disguise as filling and sanding would have eradicated the moulded detail. Clamps were used to hold the wing and fuselage firmly together while the glue set, in an attempt to reduce the appearance of the step. I have not heard of anyone else having problems in this area so I think that this was probably a problem with my inept construction rather than any shortcoming of the Airfix kit!
The model was finished with Mr Hobby paints which performed brilliantly and are now my favourites.
All in all this was a highly enjoyable build and I’ll certainly be building another – perhaps as a night fighter?
Dai W.


This is every bit the equal to the Spitfire kit in my opinion despite its age. I have built pretty much OTB but I replaced the instrument panel with an Airscale upgrade and the original decals after 50 years were not up to much, so I replaced them with Techmod…. probably would have been better off with the originals TBH as the Techmod items pretty much disintegrated at the sight of water. I’m sure many here could do a much better job than me but even my limited skills have turned out something that looks fine on the shelf next to my Spitfire.
Paints are from the excellent MRP range.
Paddy B.


This is my Hurricane Mk.I, 1:24 by Airfix. I had this in my stash since the 80s. Back then, these kits were very hard to find in Greece and my older cousin bought it for me, in Sweden, and gave it to me. So, I dedicate it to him, since he got me into modelling when I was much younger.
The kit is well detailed, great fit, and poses no problems. Just be careful with the fragile frame that supports the engine cowls.
I built it OOB, just to enjoy the engineering of the kit (ok, I am lazy…) and I really liked the light blue colour of the plastic spues! It brought back a lot of childhood memories.
The only add-ons were the decals (Techmod, I think) and P/E seatbelts. I think paper or fabric seatbelts would be better than P/E.
It’s mounted on a round wooden base and the pilot is from PJ.
I wanted a really weathered model and when I found a colour profile of a heavily chipped Hurricane, I was on! But, I took it a bit further and I used a lot of sponging, heavy washes (especially on the undersides), local fading by airbrushing, pencils (for a first time) etc.
I hope you like the end result. Now, the Me109E is gonna be next, after I find Galland’s markings…
Panos H.
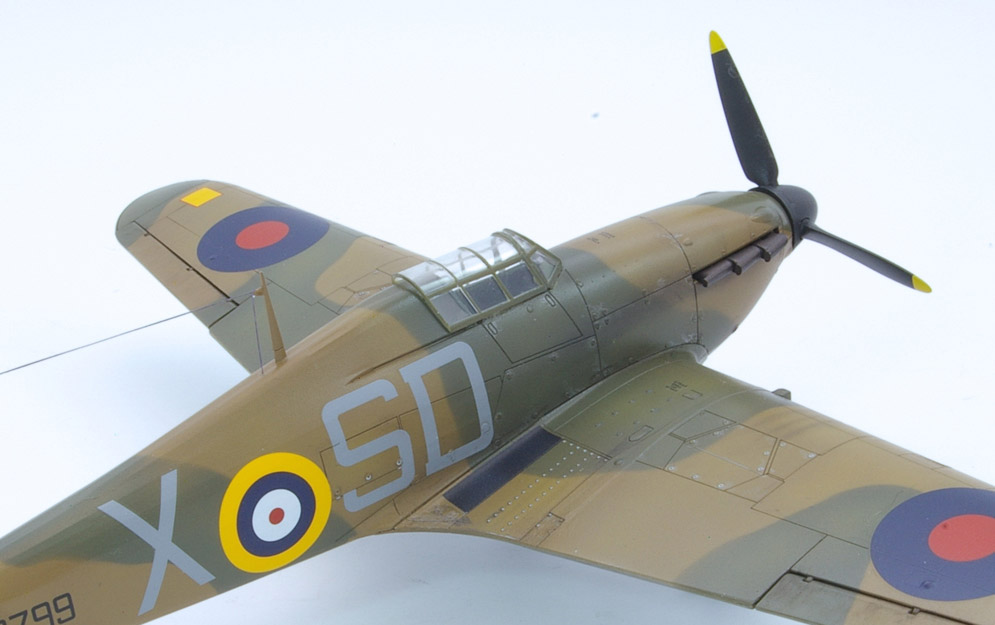
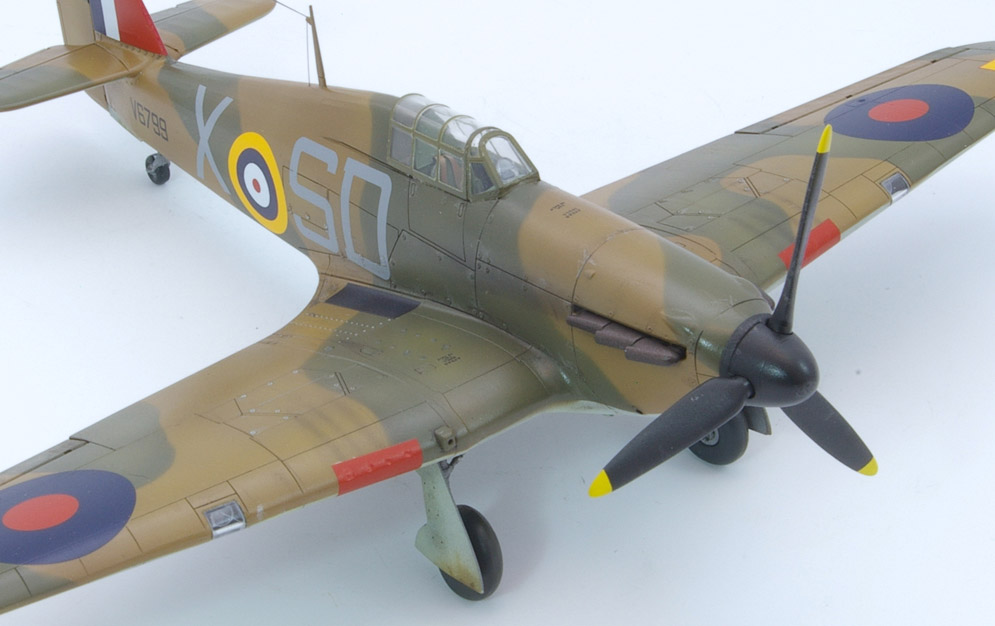
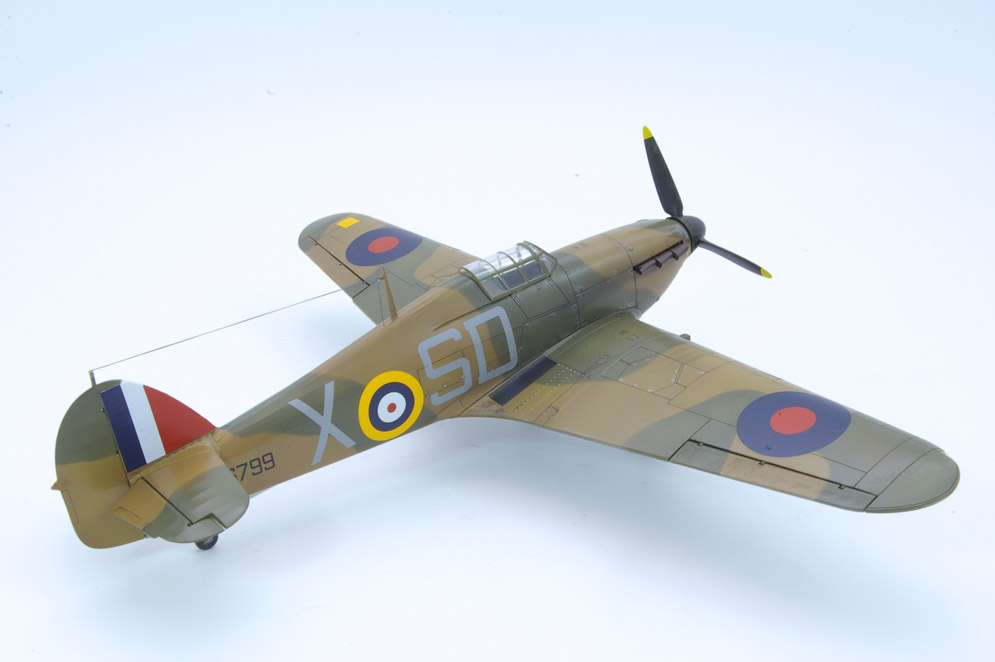
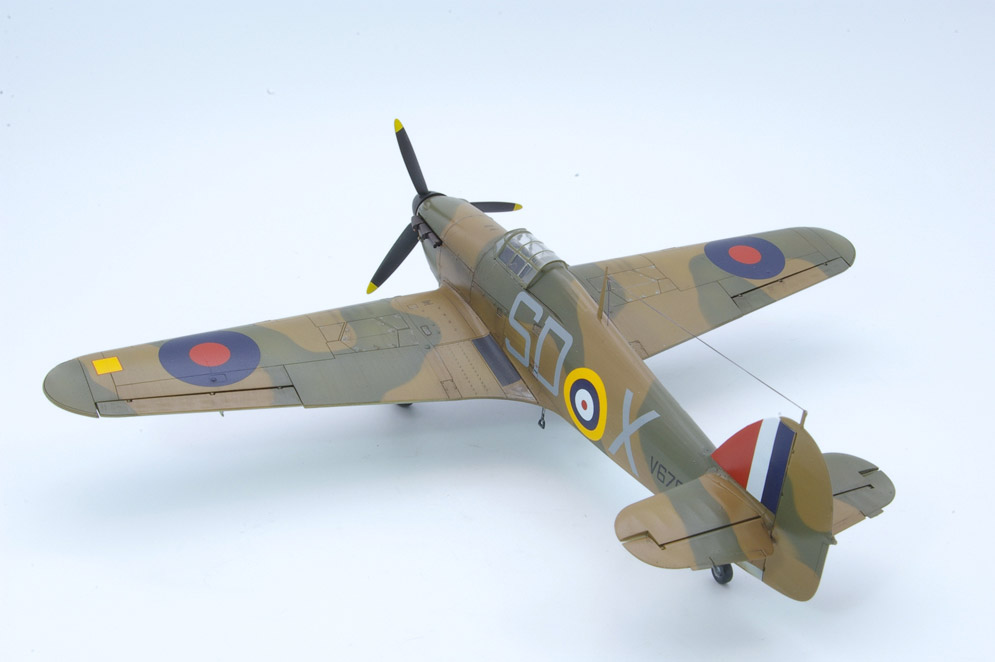
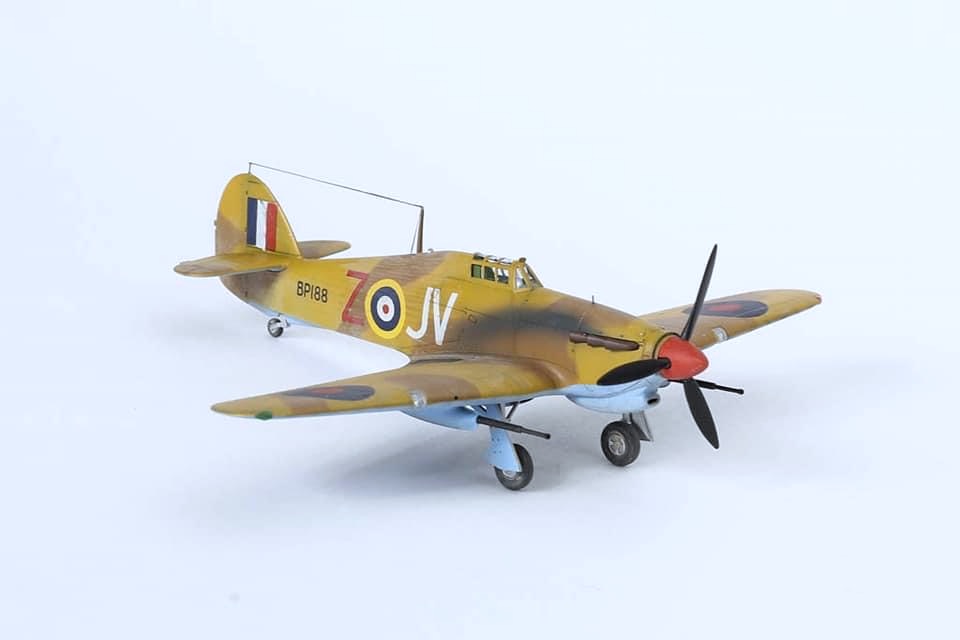
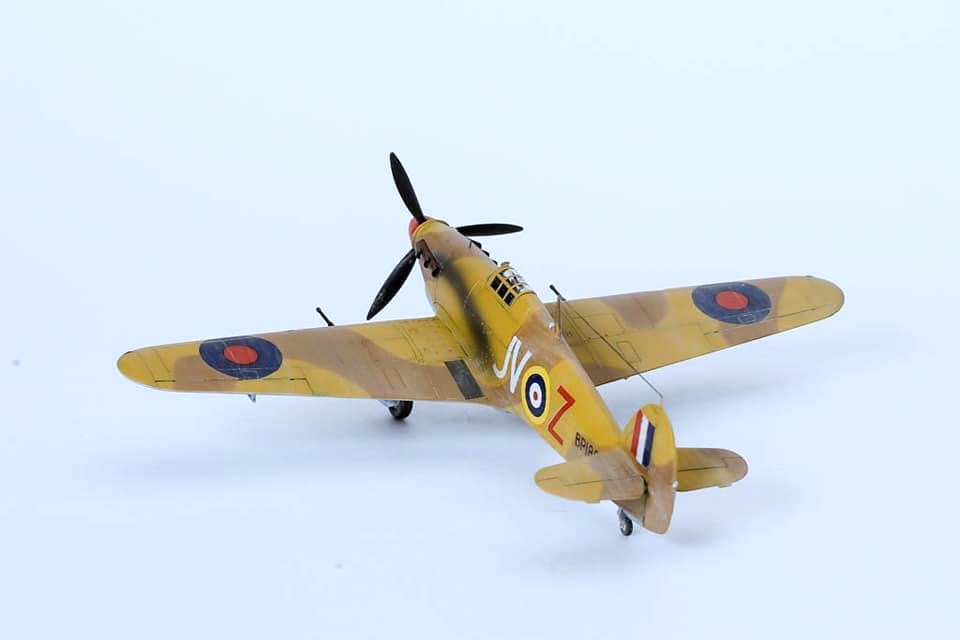
This model was made from the Airfix 1:48 Hawker Hurricane Mk. 1 (Tropical) kit.
This an excellent kit which I found went together very well without any issues. The only additions that I made were some seat belts from an Eduard set as none are supplied in the kit.
I drilled a small hole into the inside surface of each of the wingtip lights using a 0.4mm drill (I found it easiest to do this while they are still on the sprue). The holes were then carefully filled with paint to represent the red and green bulbs).
The model was finished using one of the schemes available in the kit which represents a training aircraft used by the South African Air Force.
The finish was overall Alclad Aluminium, but note these aircraft were not left in natural metal but were actually painted in silver overall, so having panels of slightly different shades is not appropriate here (though it would probably look nice!).
Weathering was kept to a minimum as these aircraft were not used on the front line. Exhaust staining was added using pastel chalks. The panel lines were outlined using highly diluted raw umber oil paint. Some chipping was applied to the anti-glare panel using a silver pencil.
The aerial wire was made using Uschi Van Der Rosten elastic rigging thread (standard size) and the lead-in wire was made from a piece of wire rolled straight under a steel ruler and coloured to match with a dark grey marker pen.
I had masked the canopy with Tamiya tape and I first sprayed the frames with the interior colour. The Alclad was then sprayed over this, the intention being that the interior colour would be visible on the inside of the canopy. The interior colour is a little prominent for my liking so perhaps next time I’ll invest in some ready cut masks which would probably give a better finish.
Hope you like it.
Dai W.
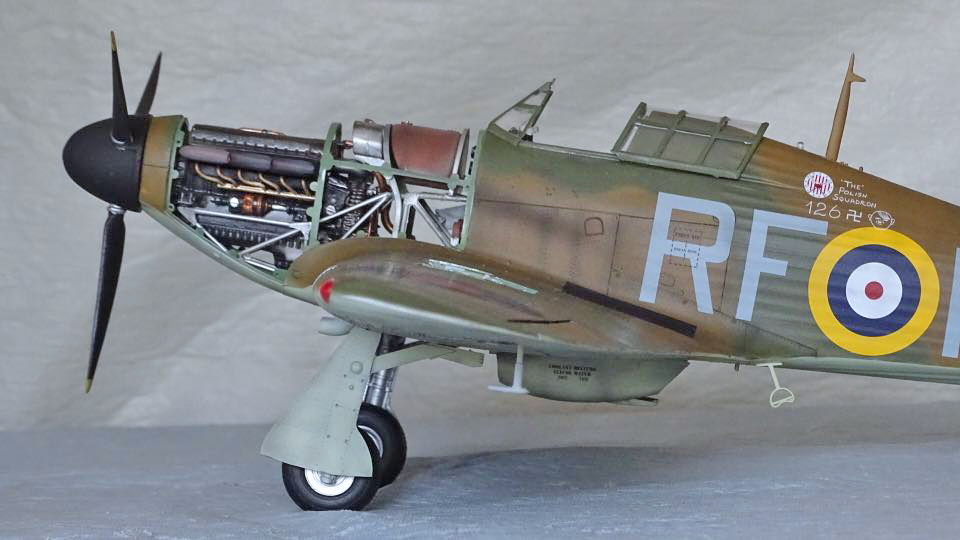

Here’s my Airfix 1:24 Hawker Hurricane MKI using aftermarket decals of No. 303 Polish Sqdn, September 1940 and some seat belts. Other than that, pretty much out of the box.
Hope you all like it.
Andy PP.
This kit fought me all the way but was worth the effort I think. She really captures the look of the Hurricane.
Regards, Gerry D.


Izzet C.
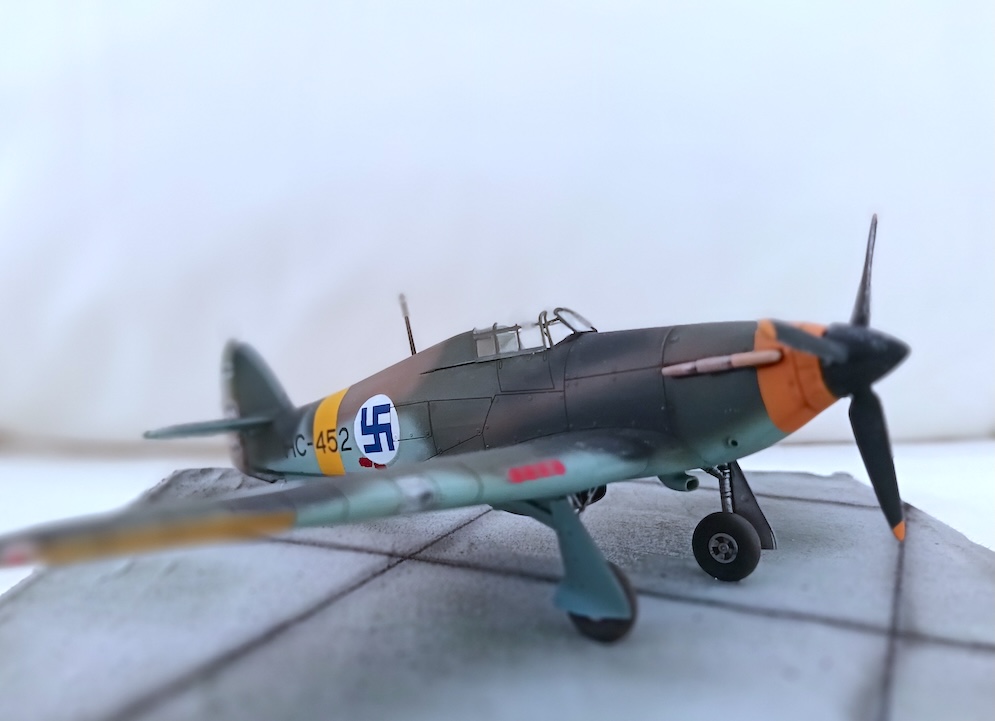
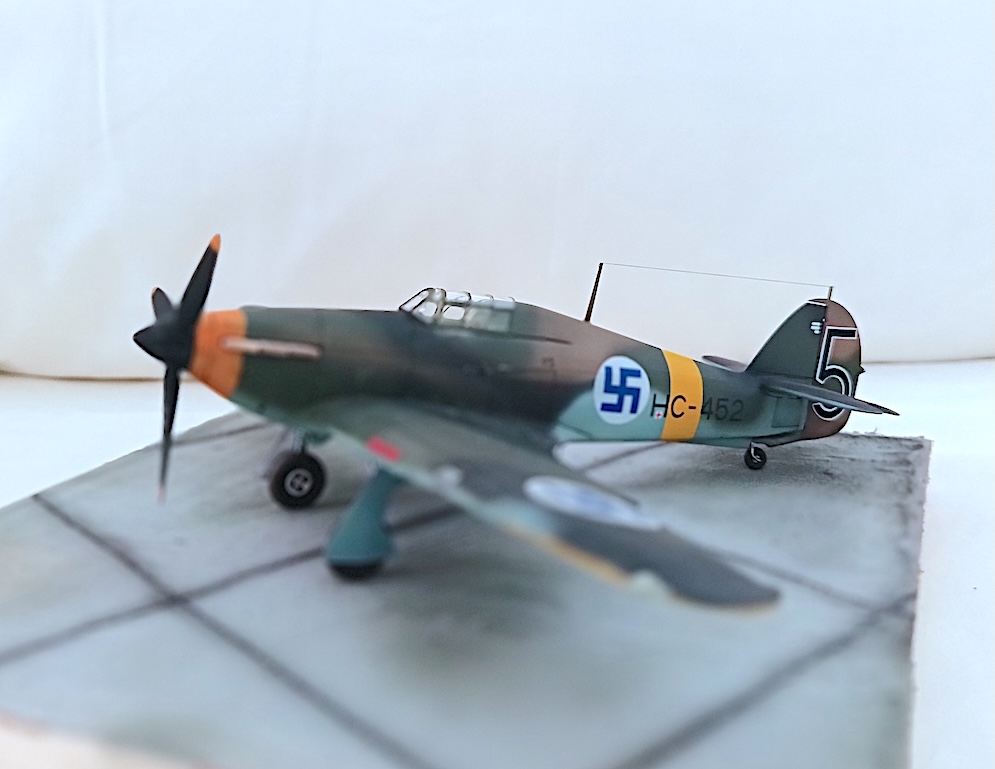
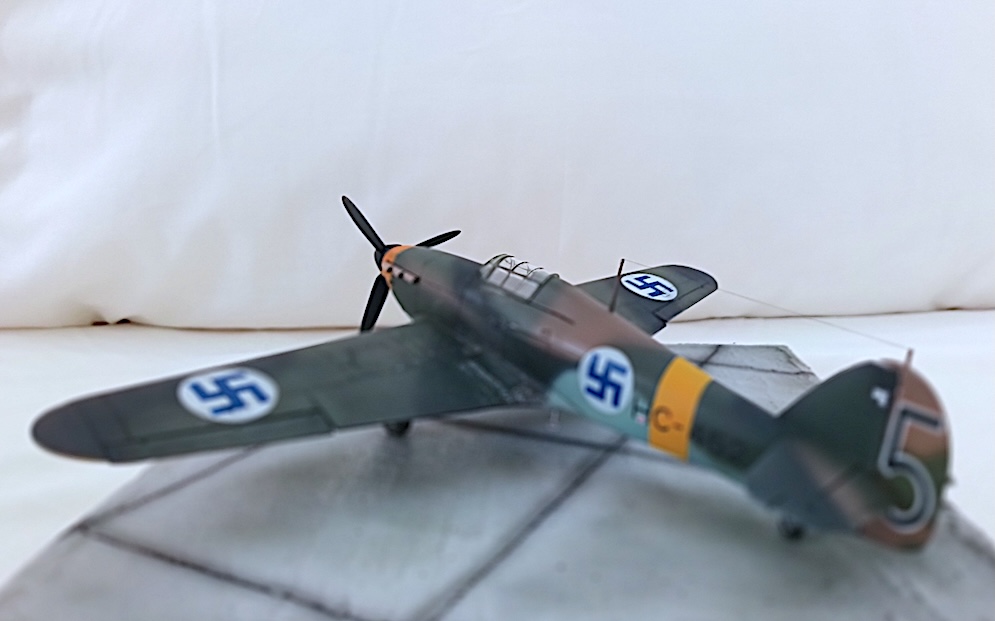
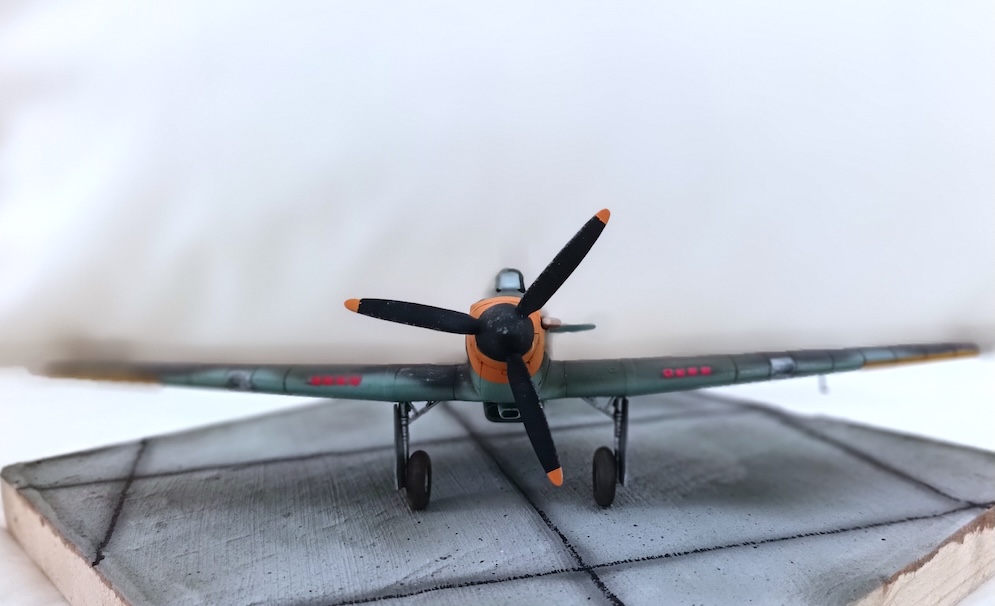
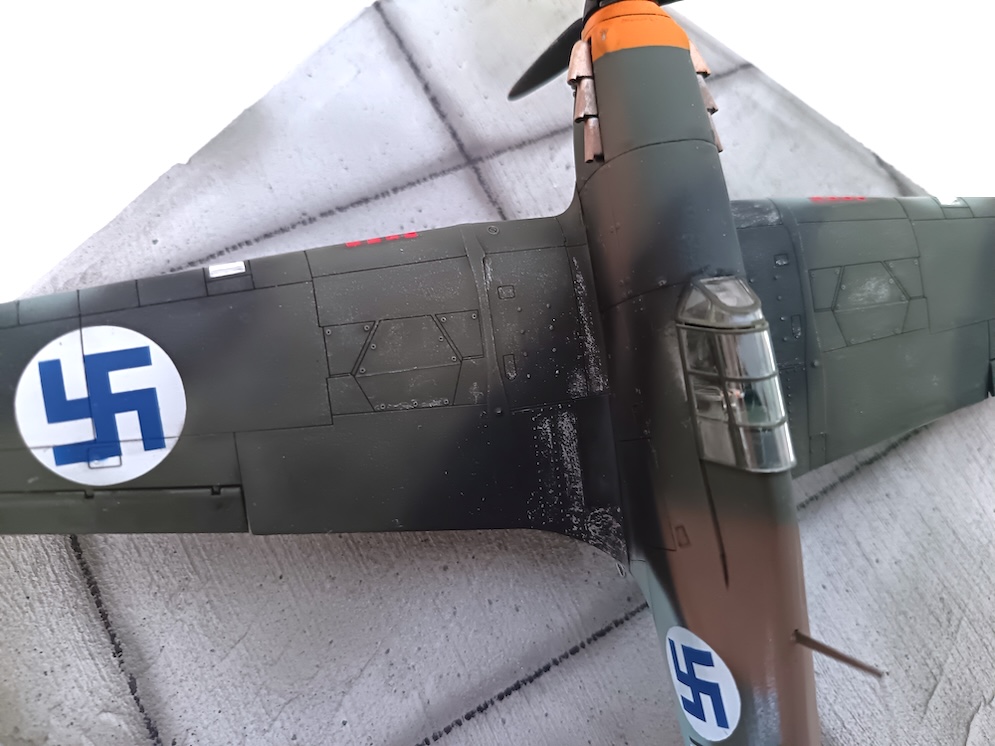
Built OOB apart from seatbelts which were a mash-up from spares. It builds nicely with some care/scraping needed around the wing roots.
All markings are painted, the only decals used being the tape over the gun ports. Chipping (which is restrained compared to the pre-restoration photos online) was achieved by… chipping. I painted metal areas silver first, left them to dry, then applied camouflage, followed by a coat of future and left it overnight. Use of a mixture of a snapped barbecue skewer, cocktail stick and a couple of different grades of sandpaper worked well for me. No hairspray or chipping fluid in sight.
Overall I’m pleased with how it turned out, but I think there are a few errors: HC-452 seems not to have had the hatch behind the cockpit on the starboard side, nor the filler cap(?) on the port wing near the root. I also think the radio mast may not taper, and I can’t tell if there is supposed to be a radio wire. All of these could easily be corrected if I had caught them in time.
Craig W.
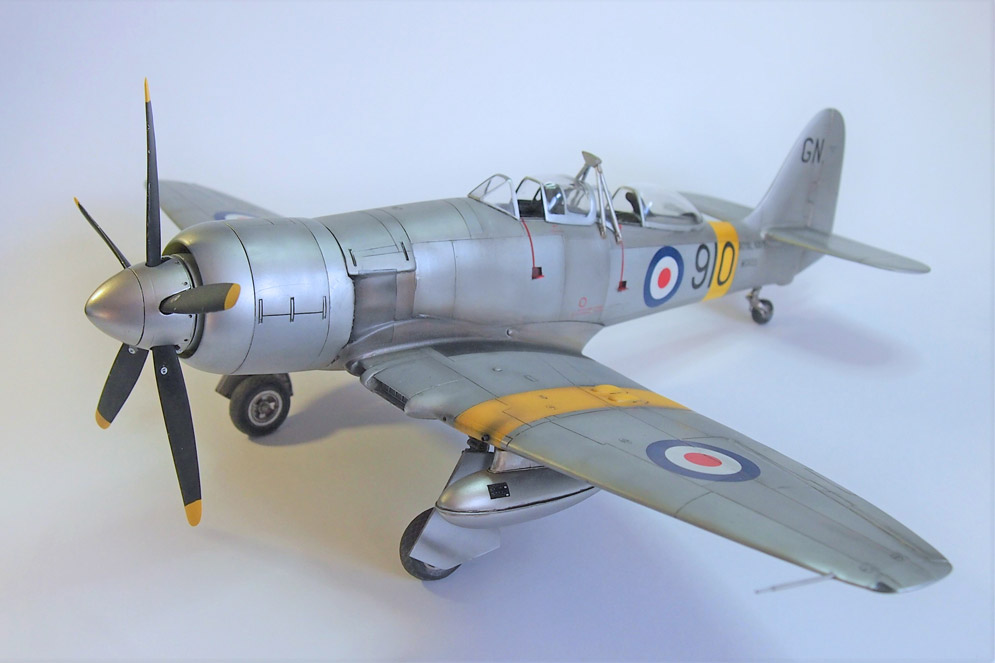
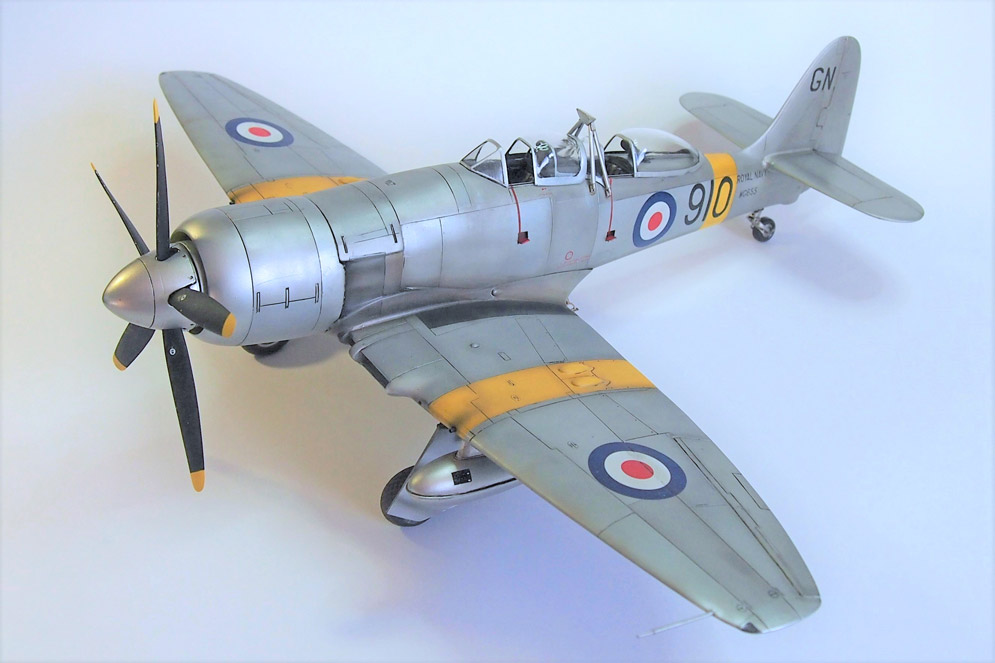
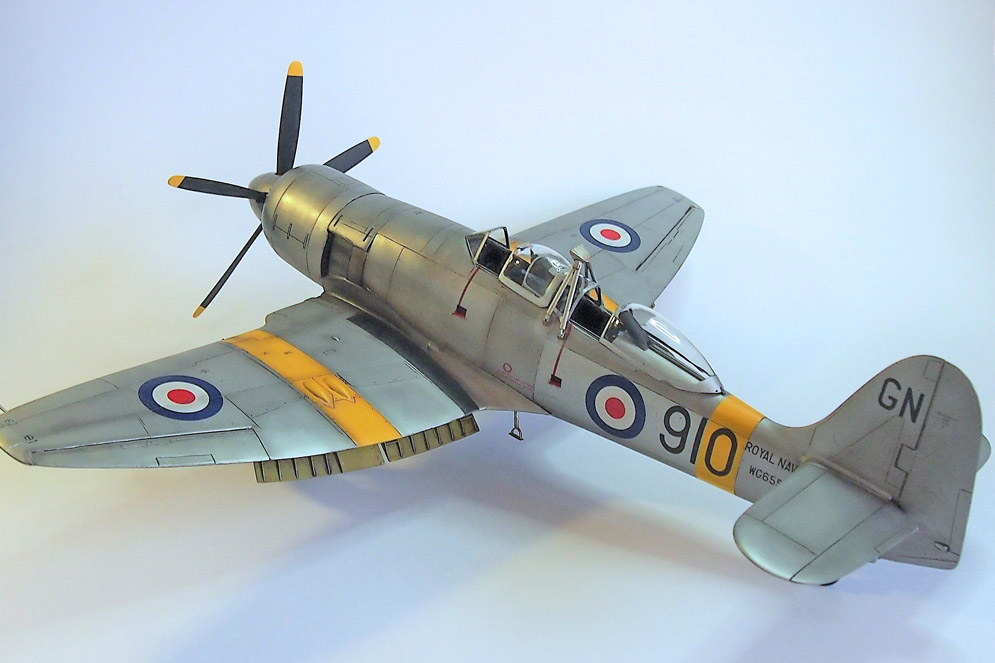
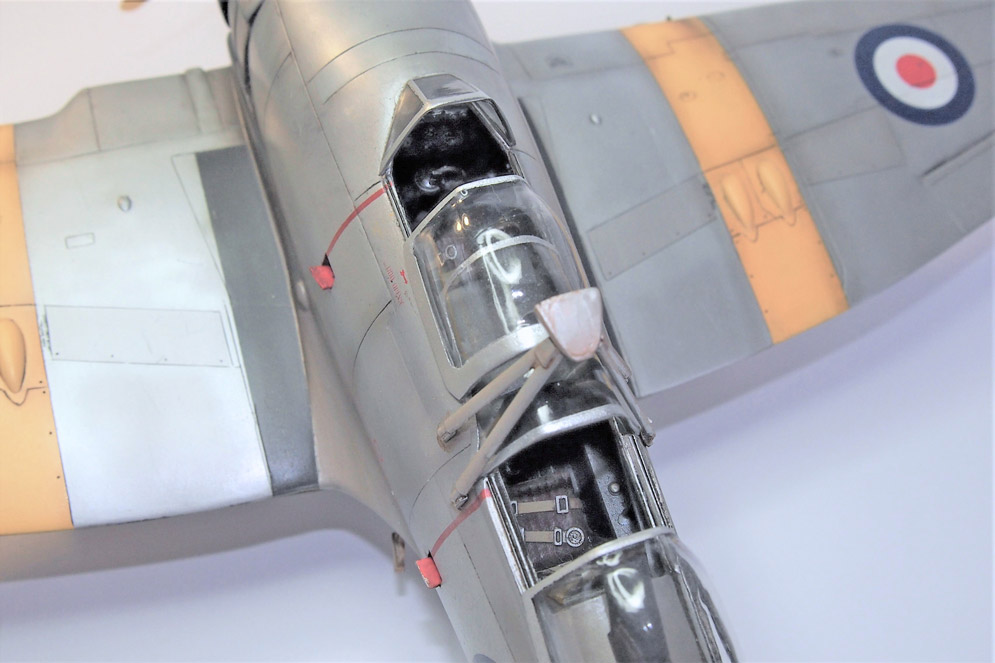
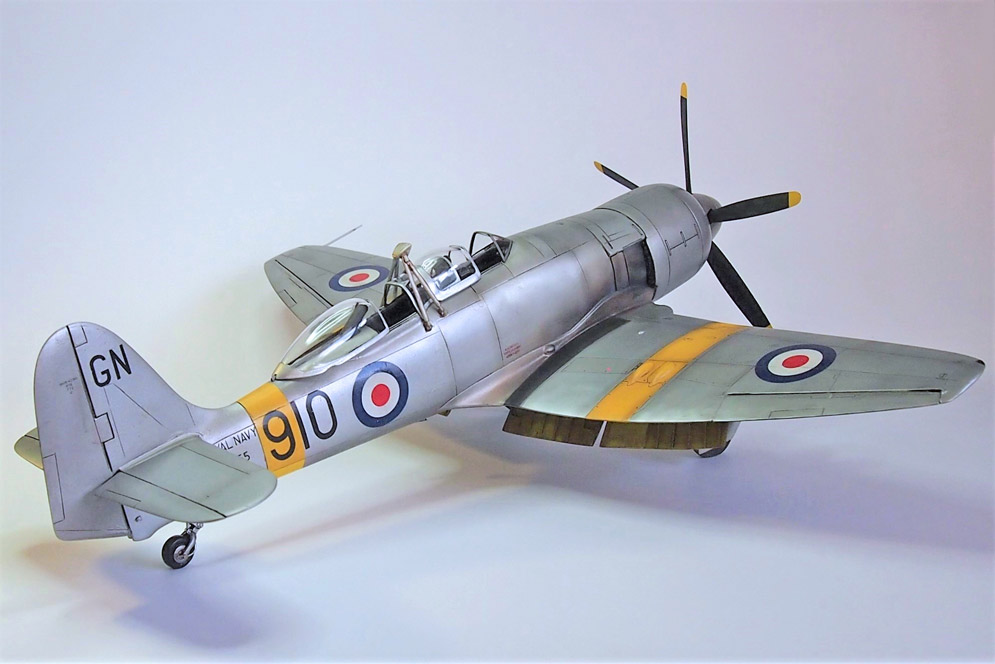
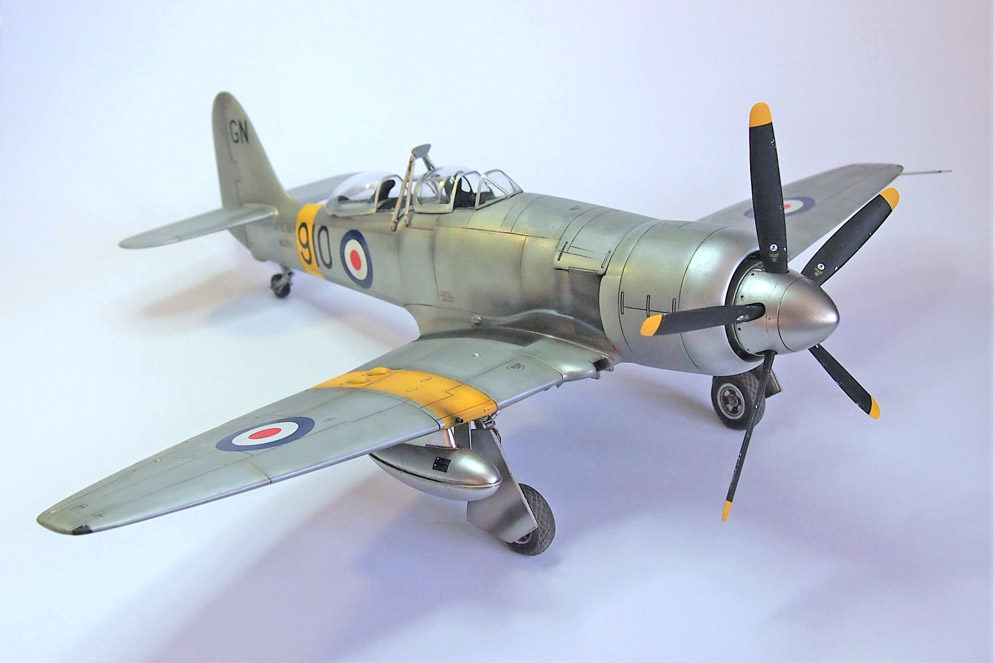
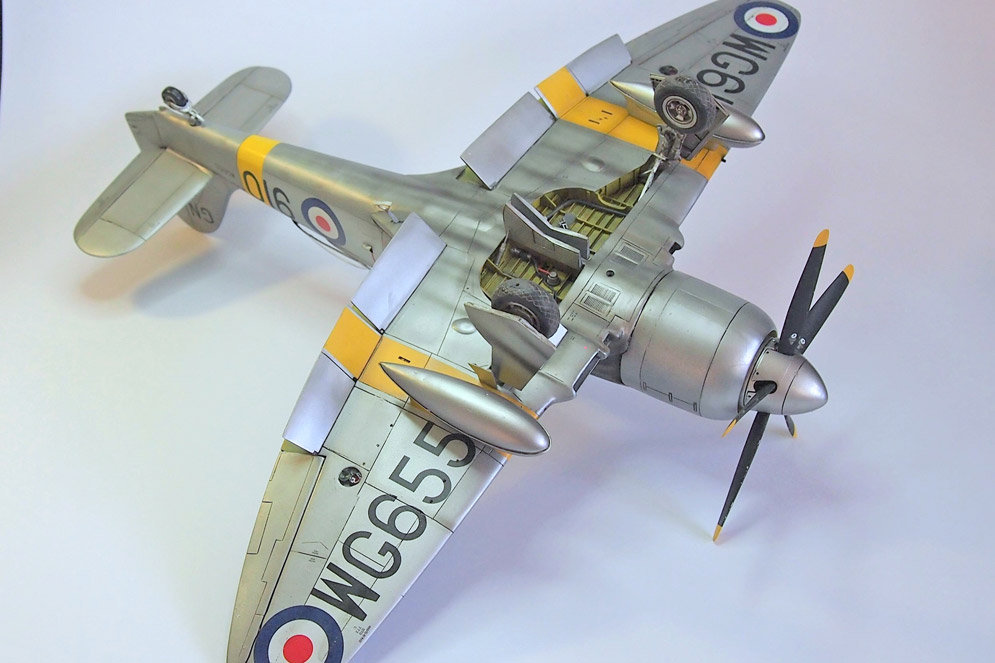
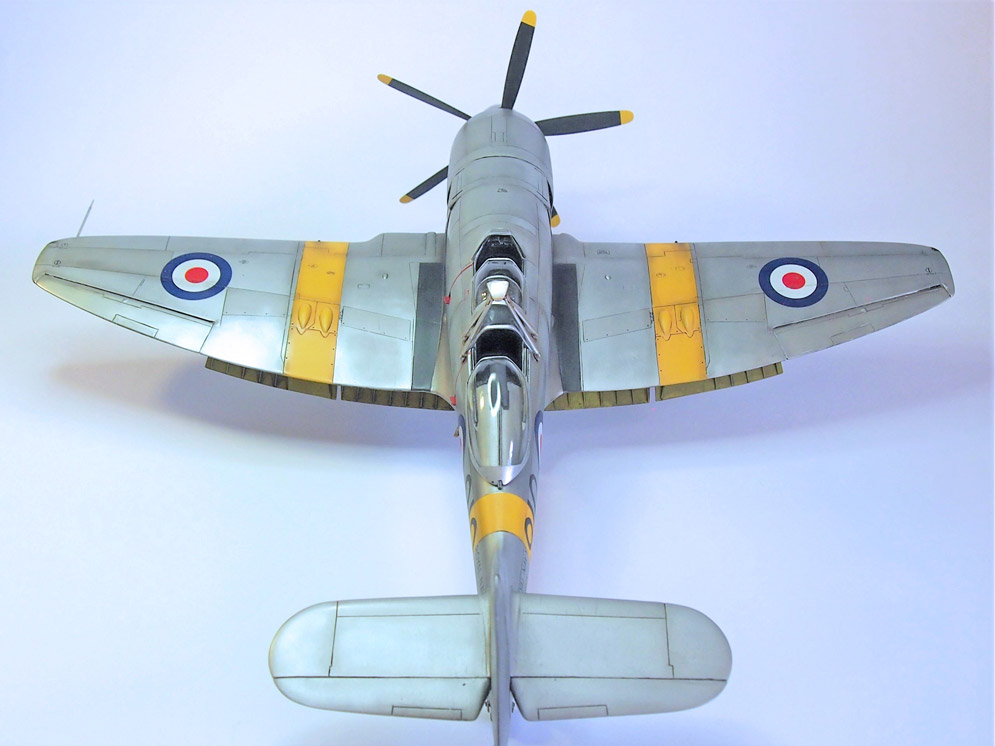
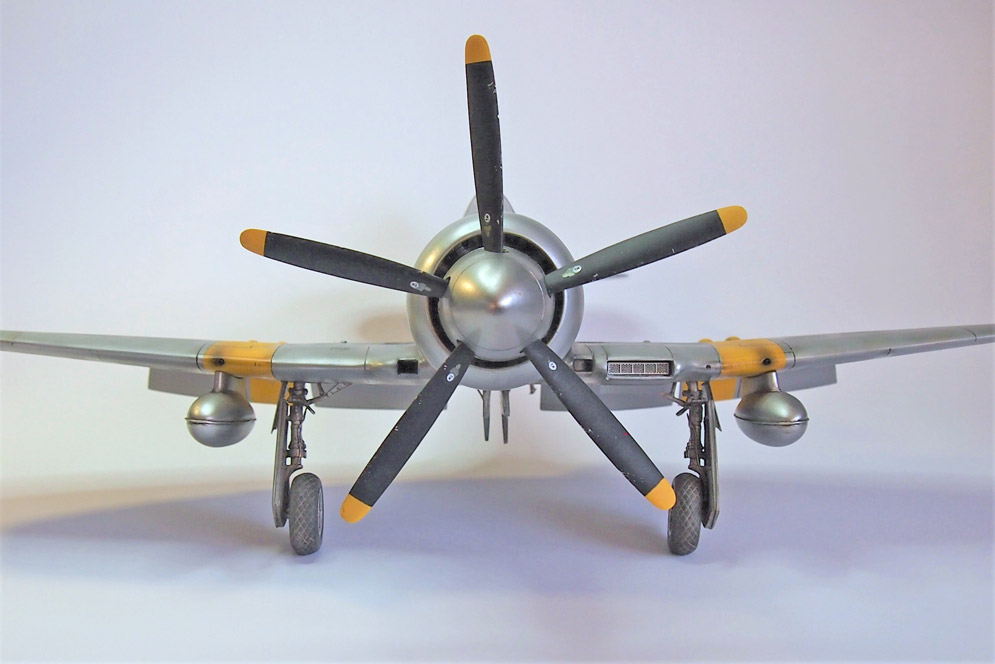
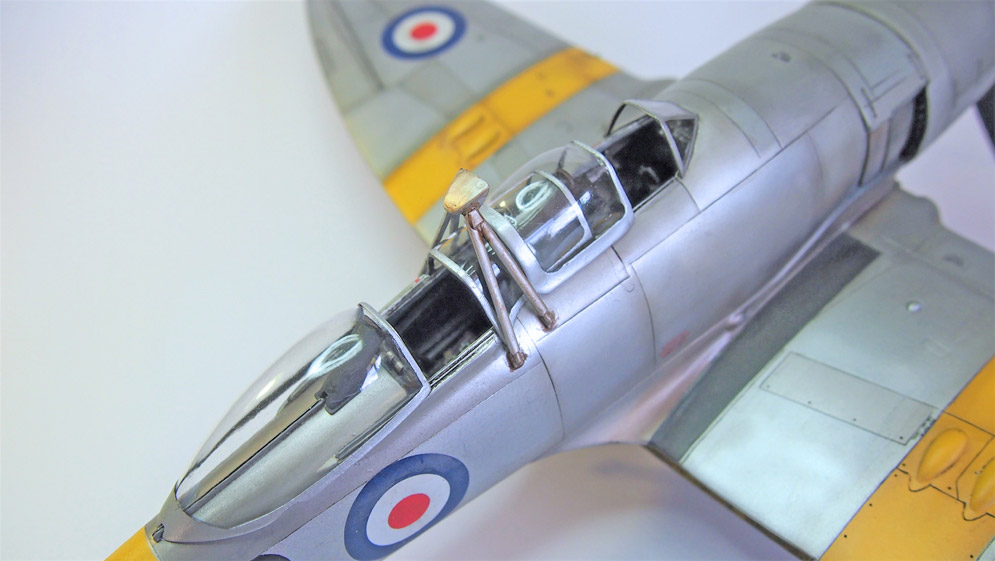
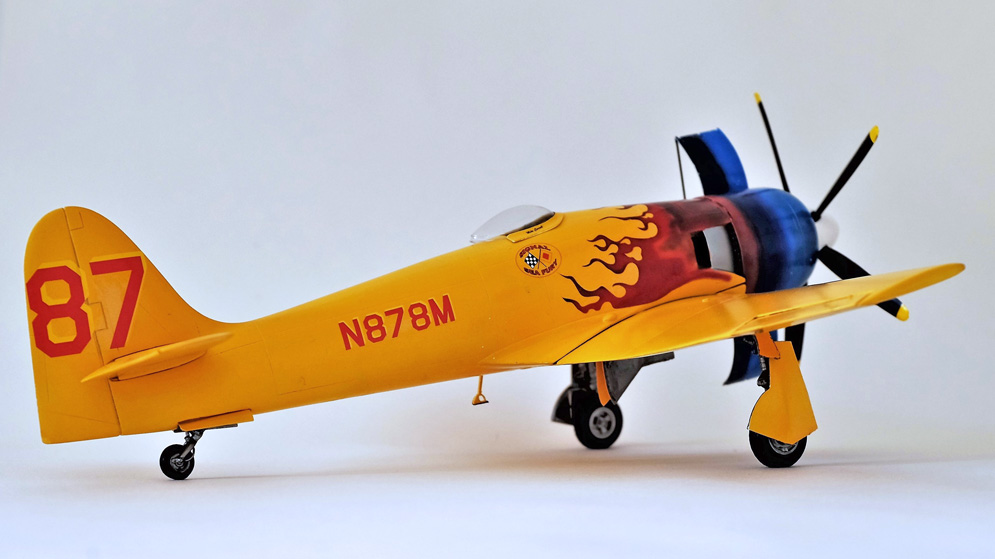
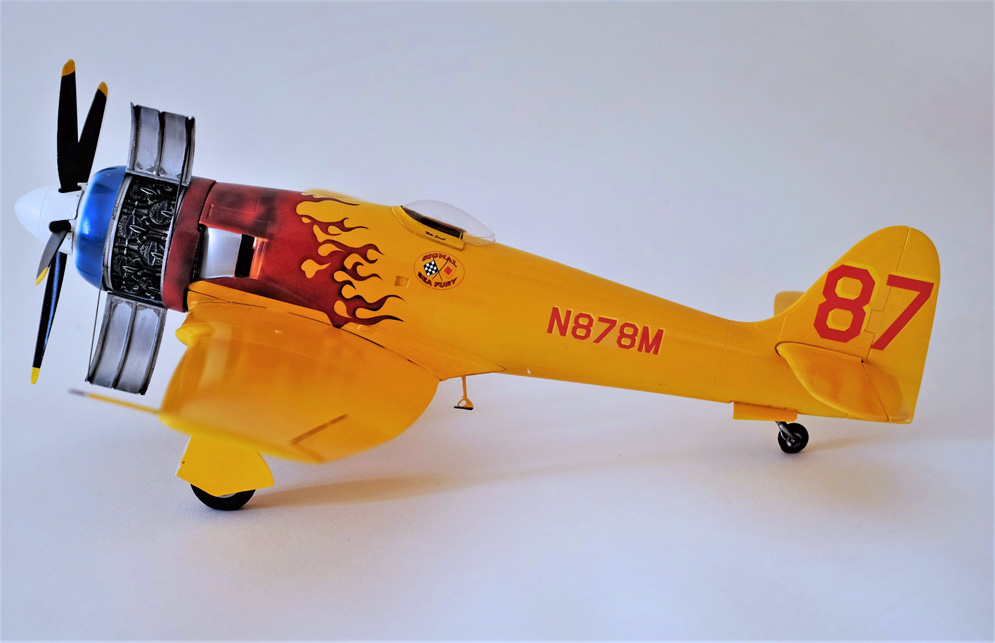
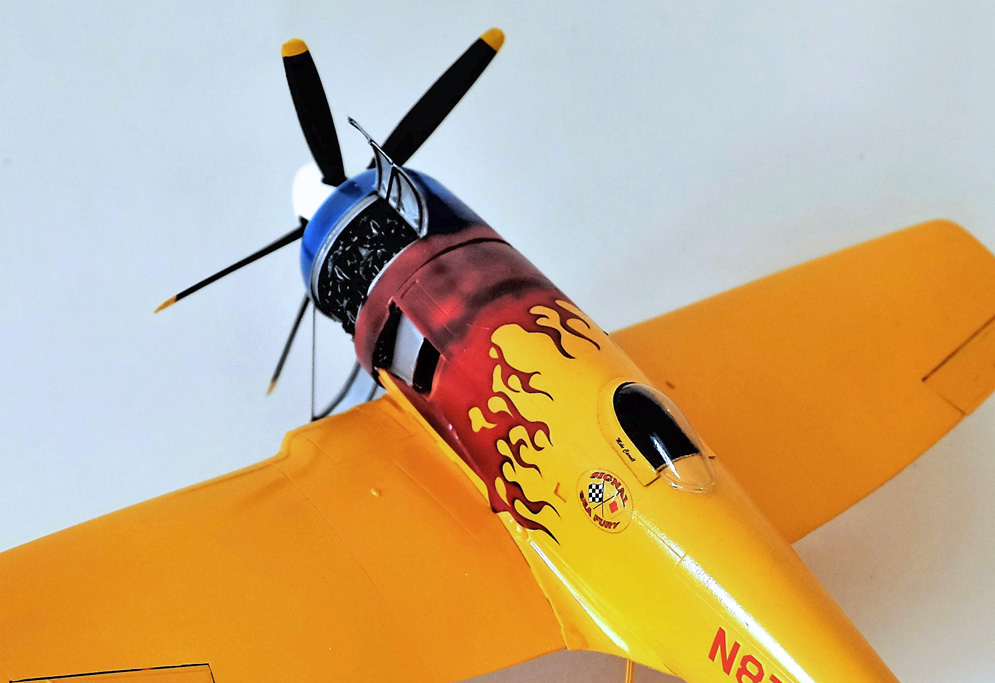
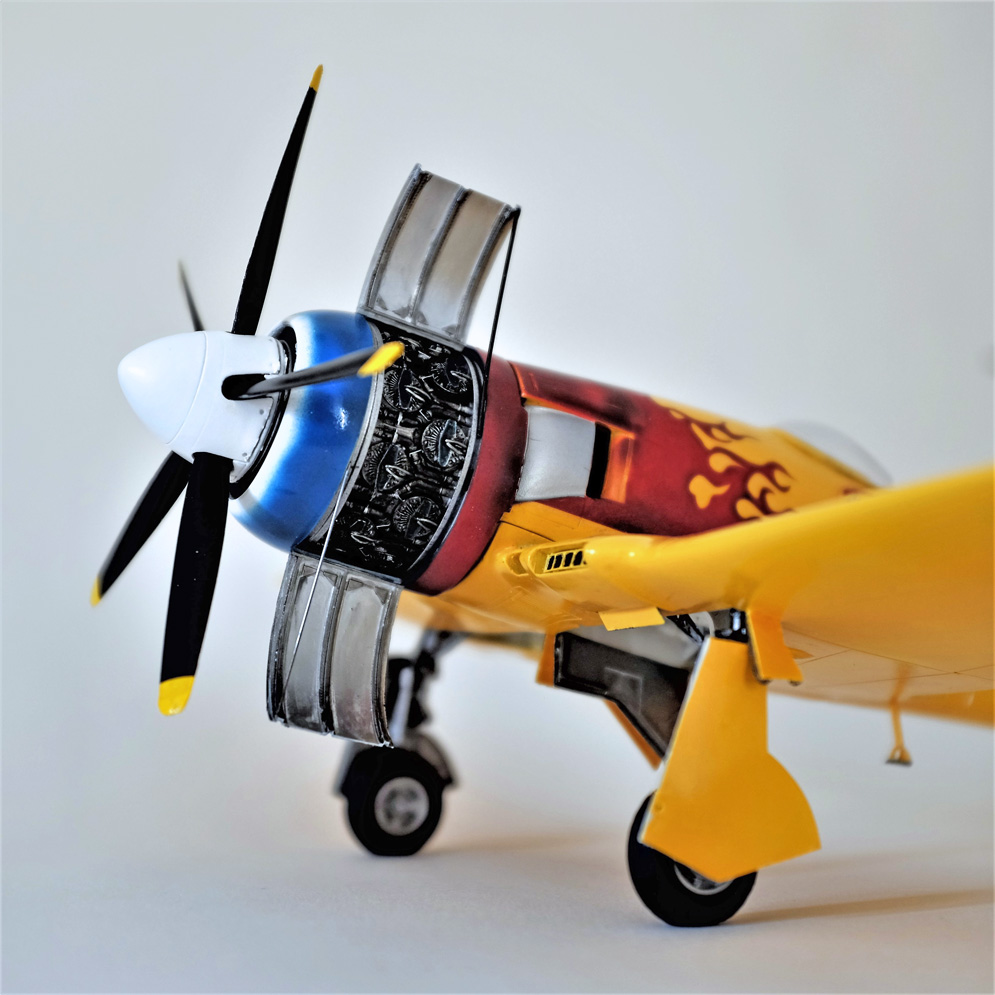
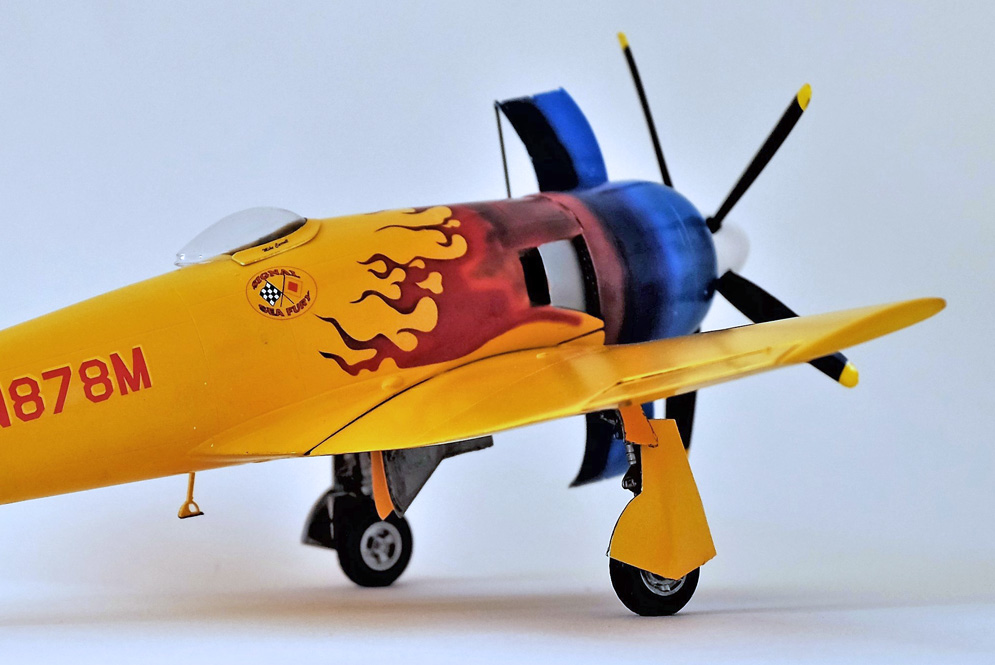
I finally got round to taking fresh photos of the Fisher Sea fury T.20. It is done in the scheme of WG655 as it may have looked after two harsh years in the Northern Ireland weather, (1954-56 RNAS Eglinton, GN for HMS Gannet).
It’s built out of the box, but the serials and station code were cut from Tamiya masking sheets and sprayed on.
I used Vallejo model air and Vallejo metal with Tamiya flat coat.
Hope you like, Kenneth M.
She’s painted with Gunze and finished with a mixture of satin and matte varnishes. I only added harnesses and the ejection seat handles, as well as the modification of the Sidewinder.
It depicts an aircraft from Rota Air Base circa 1982. Hope you enjoy the pics.


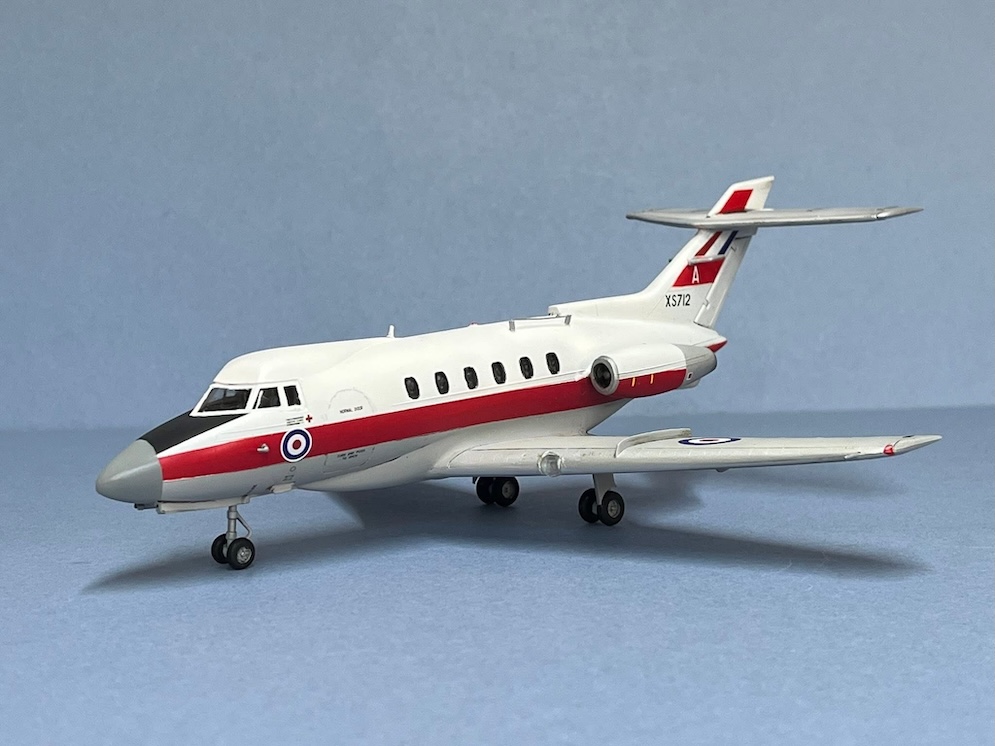
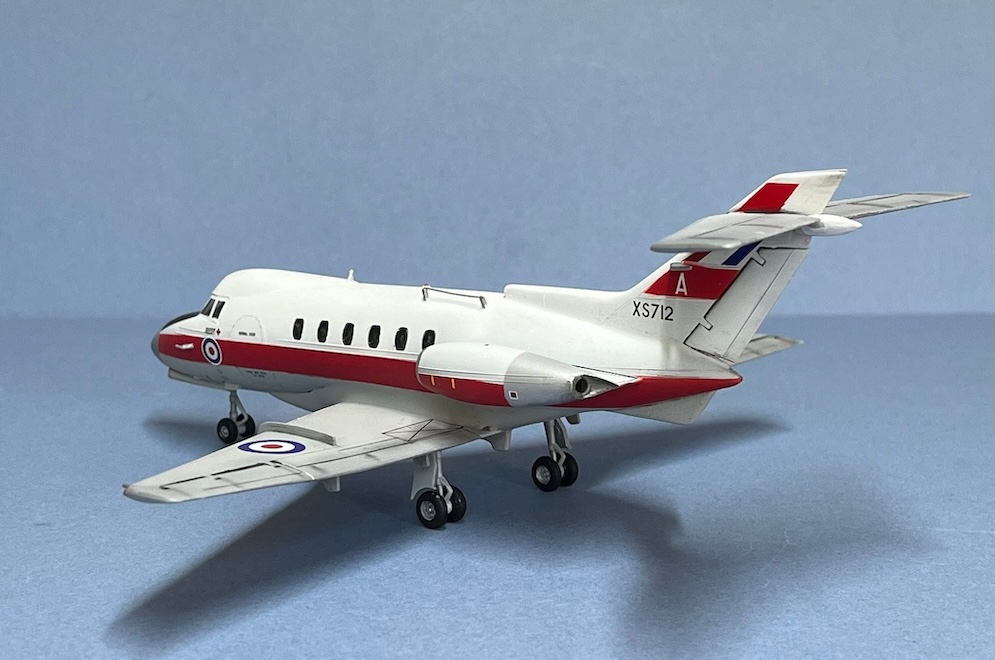
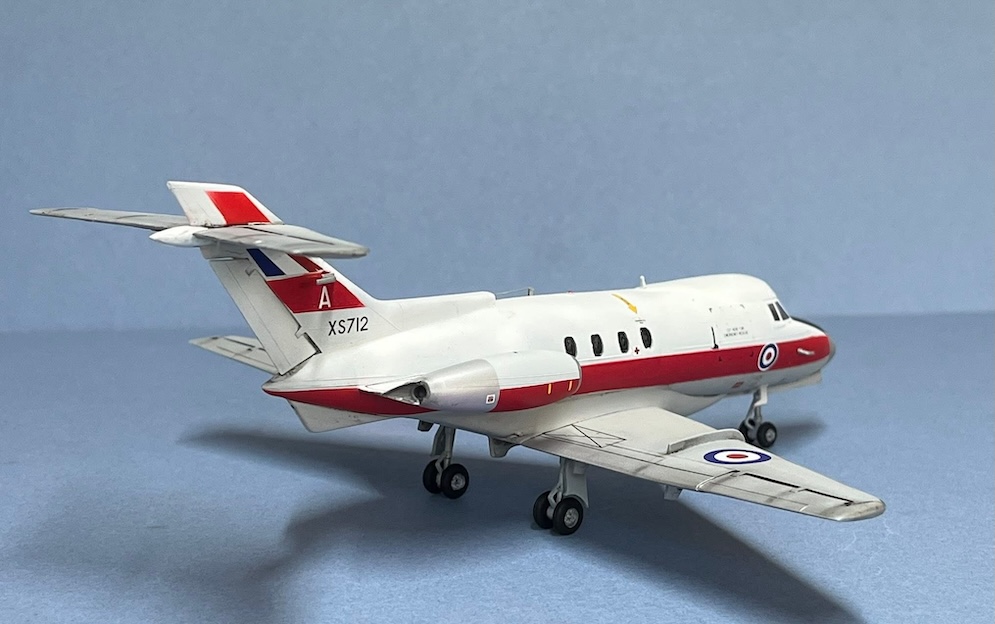
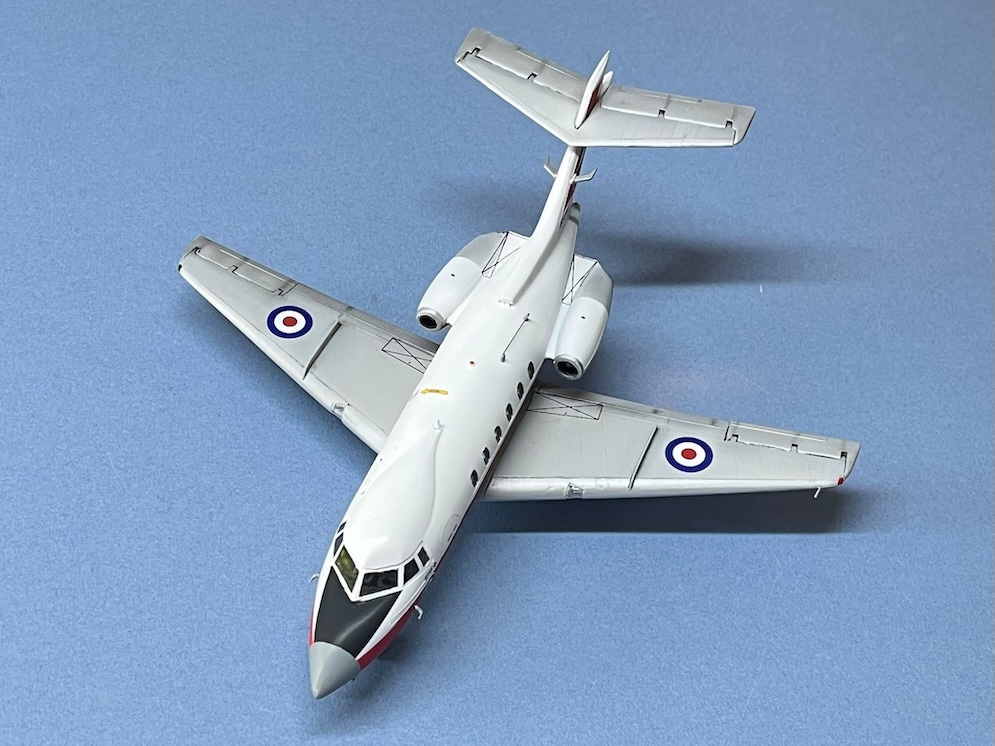
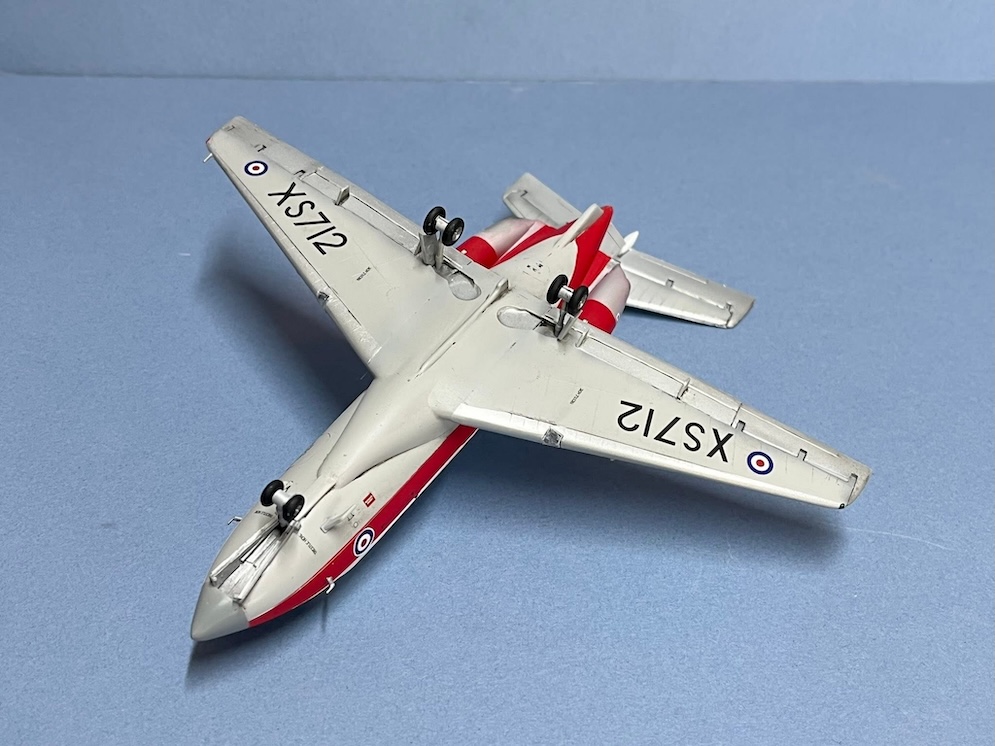
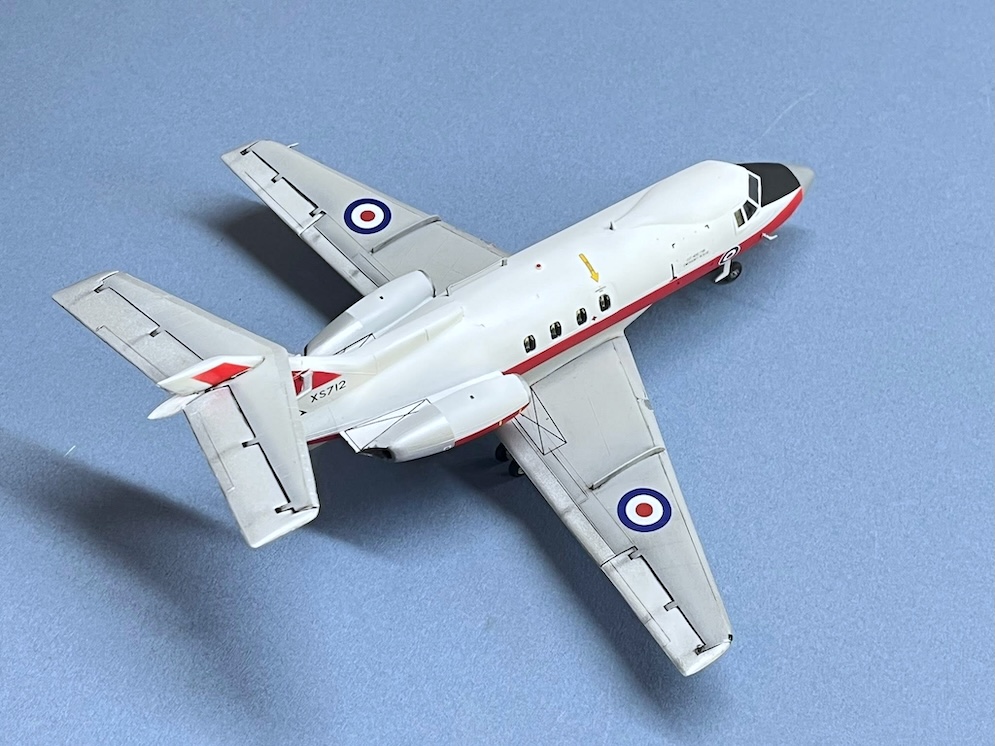
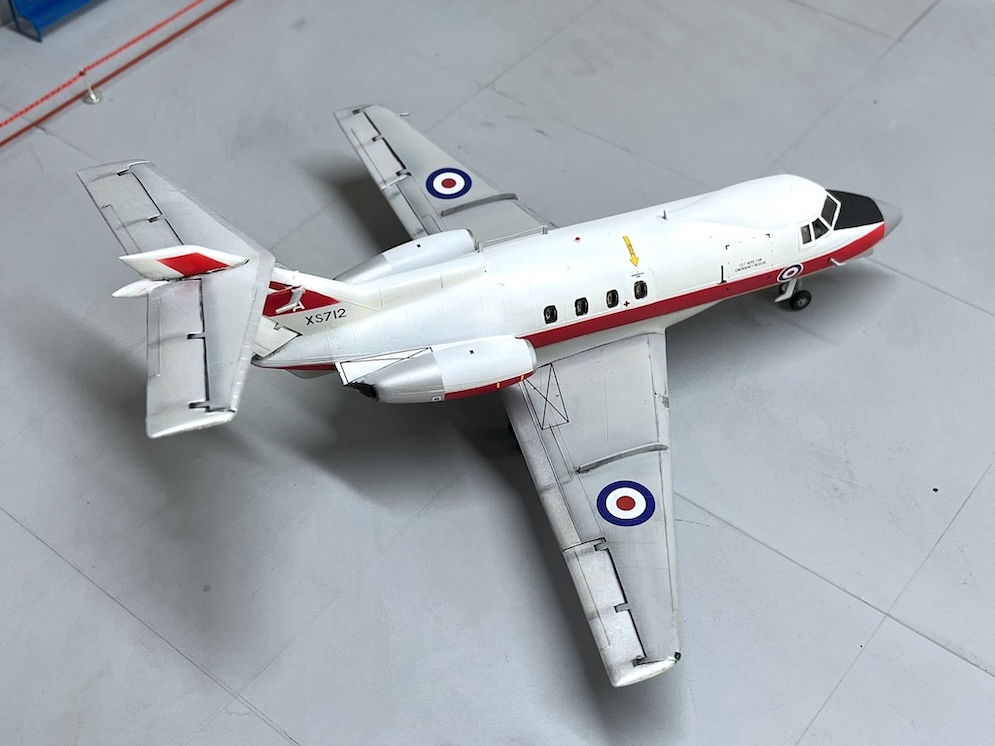
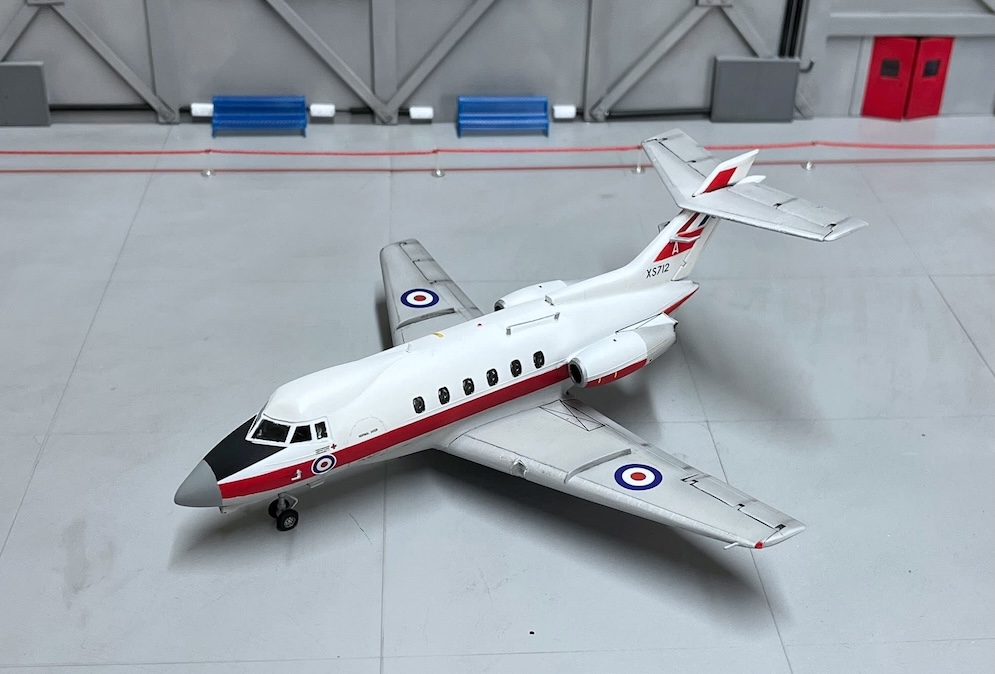
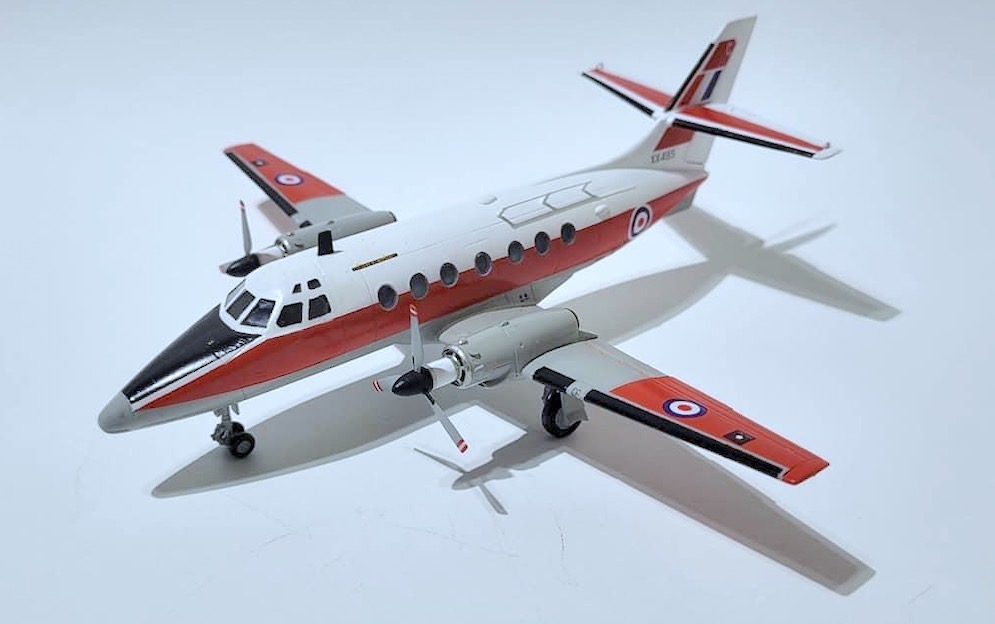
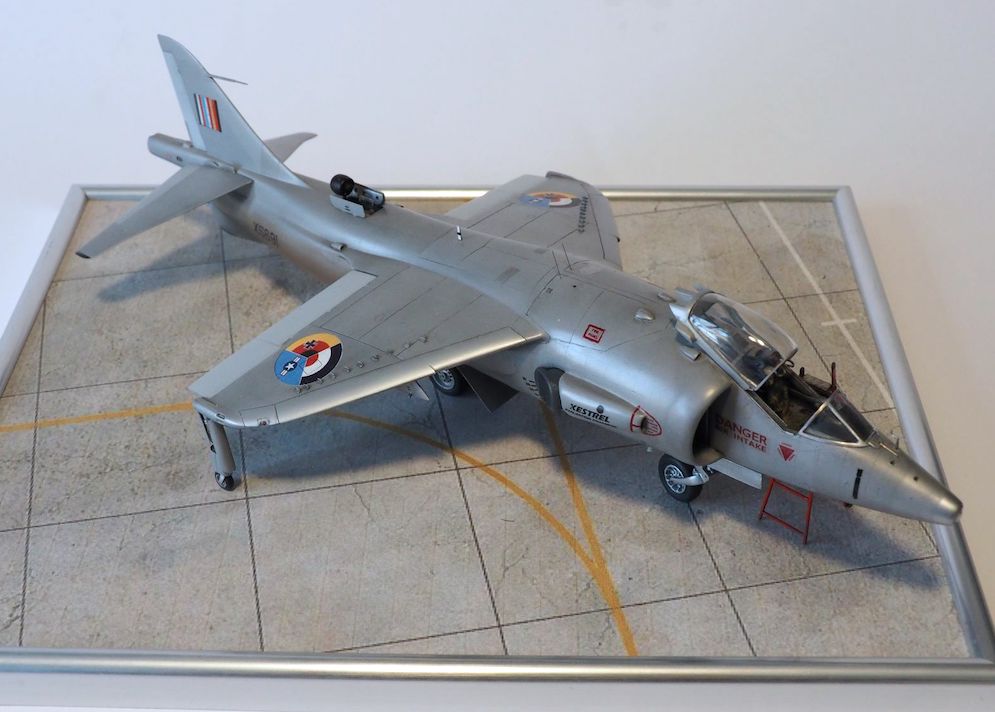
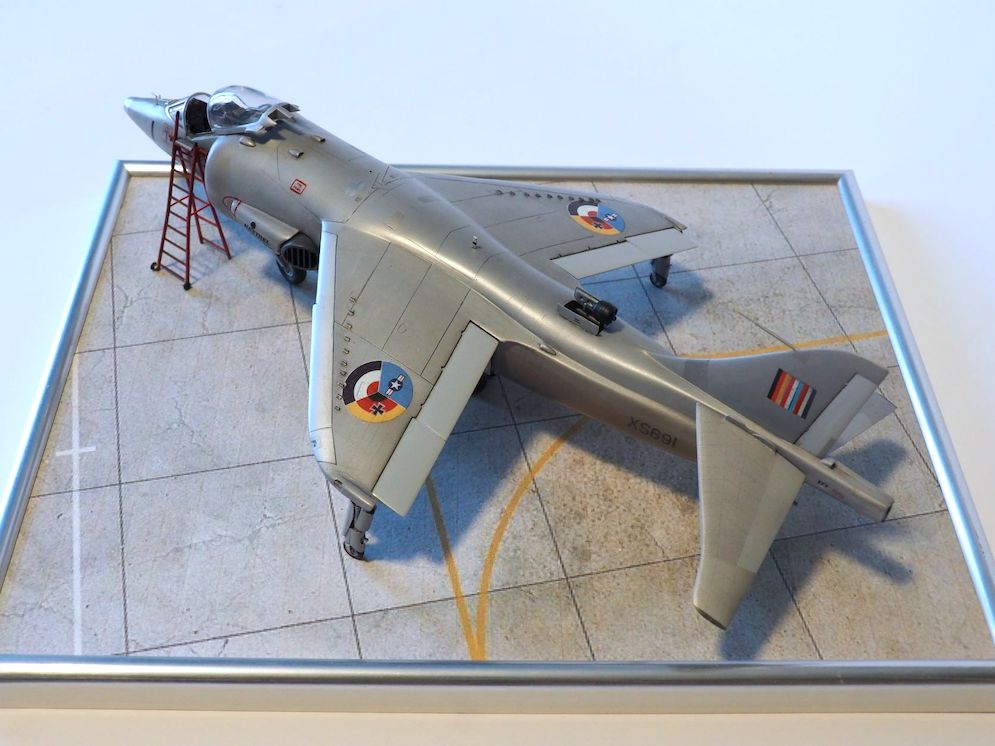
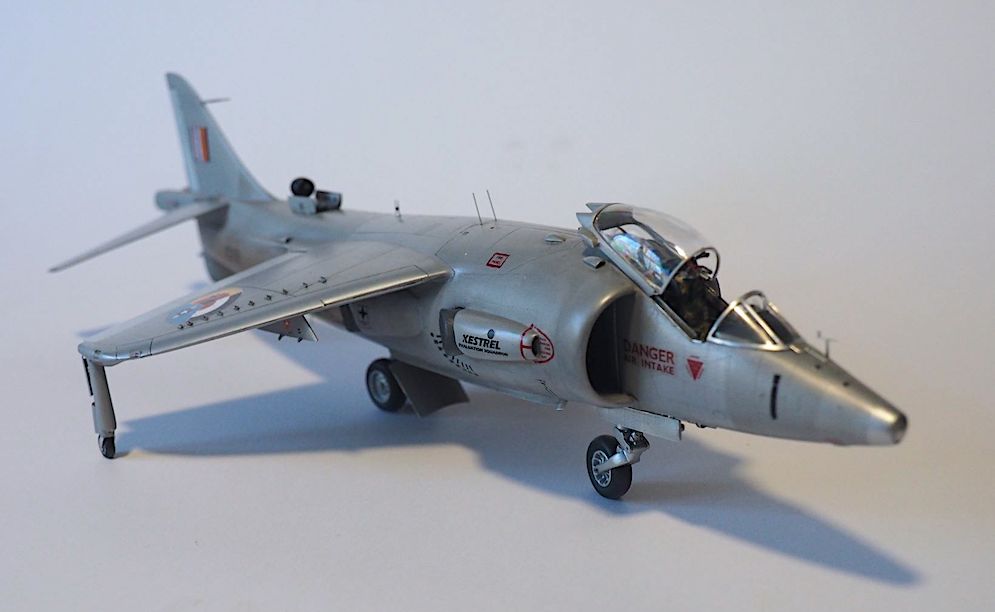
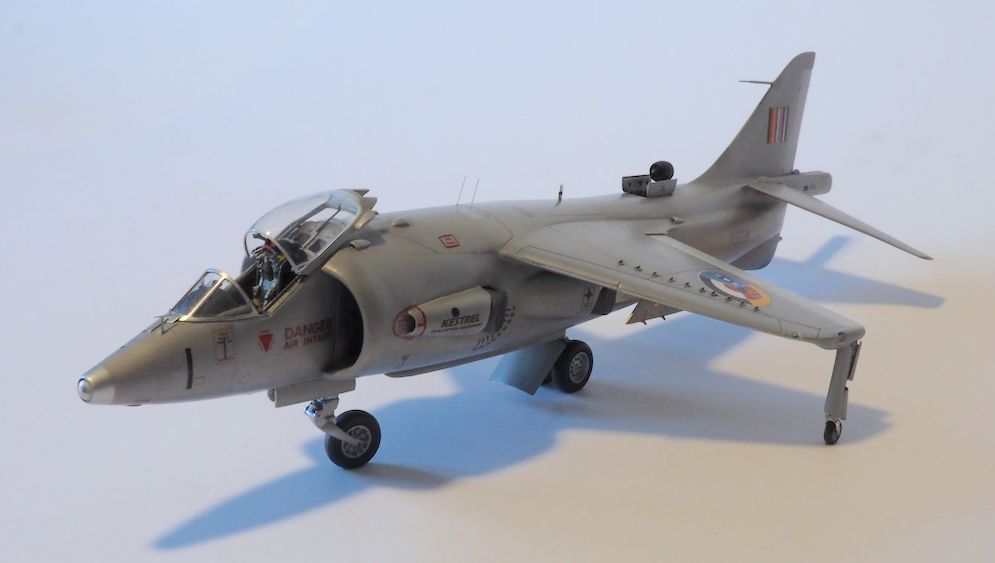
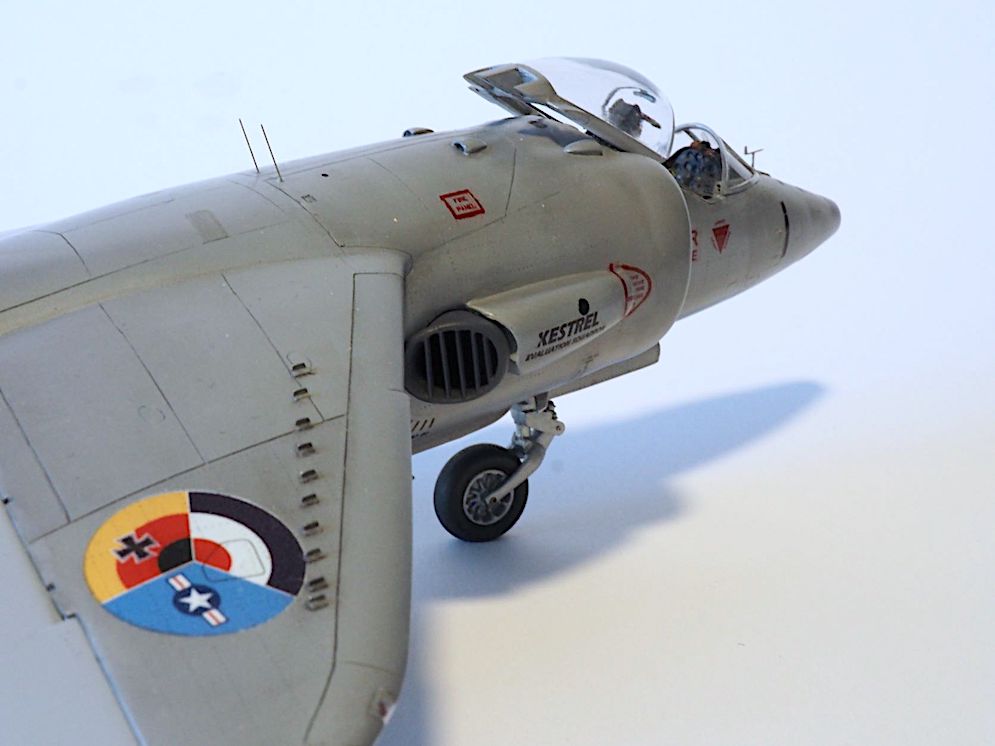
This is the reissue version or a reissued version with the markings for XS712 RAF Stradishall 1968. I wanted to go with some markings from my local former station of RAF Finningley but were unable to obtain any at the time of building. Like I said this is a vintage kit so don’t expect anything spectacular. Just got to make the best of what you have and that’s what I have attempted to do. I have modded the cockpit slightly with some simple belts and added a few bits and bobs just to create some interest for internal viewing. The inner fuselage is just bare as you can’t really see anything in there through the small windows. Only real issues is the wing lights which are a terrible fit. If I ever build another I may try and do something different with these as they really are that bad, on my particular example anyway. In the end it’s probably 1960s moulding and a simple enjoyable build – apart from the paint masking🙂😱
Nick T.
Numerous scratch-built items were also added to the model. These included: all of the undercarriage units plus their bays & doors/covers, the cockpit interior, the engine intakes & compressor fan, the spin-chute housing, the exhaust nozzles, fairings & heat deflectors, the windscreen and the canopy rail, the underwing pylons and the pop-up, emergency generator. To complete the display, I also added a scratch-built crew access ladder.
The model was painted using Tamiya Lacquers and weathered using a variety of oils & washes. All of the markings are home designed and printed decals.
The model was awarded Gold in Class 14 (1:48 aircraft conversions) at Scale ModelWorld 2022.
Nick H.

This is a Fisher 1:32 Sea Fury which I have had in my stash for some time but never had the confidence to take on the mad paint job. Having used my airbrush previously only as a spray gun I was daunted by the shading on the cowl and phasing into the decals. Fortunately attending the recent Scale Modelling Now Workshop set that concern to right so I had a bash at it!
I modified the standard kit by fitting the Fisher Centaurus engine and cowling. Paul Fisher wasn’t 100% sure it would fit this particular kit as it was designed for the RN version. There were a few adjustments required, but I’m pretty happy with it.
Paints used were Tamiya Fine White Surface primer. Mr Hobby Base White 1000 and Tamiya Chrome Yellow (spray can). The business end of the plane was airbrushed with Mr Hobby Hobbycolor acrylics. Metals were Vallejo Metalcolor and engine was detailed with Rowney oils over a Vallejo Metalcolor base.
Best Regards, Alan R.
The kit was painted using MRP throughout. Wheel chocks made out of plastic card.
Andrew T.
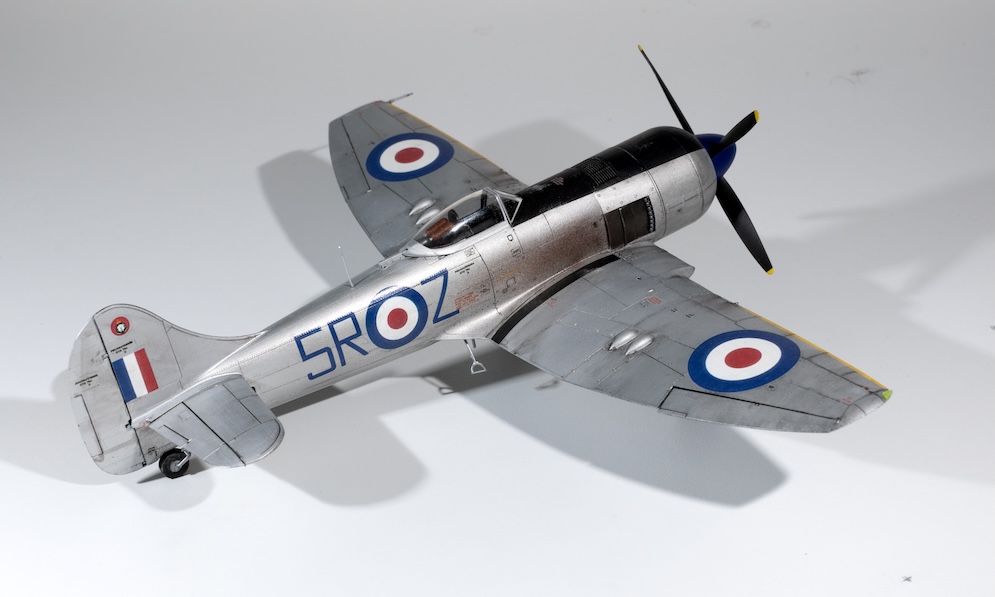
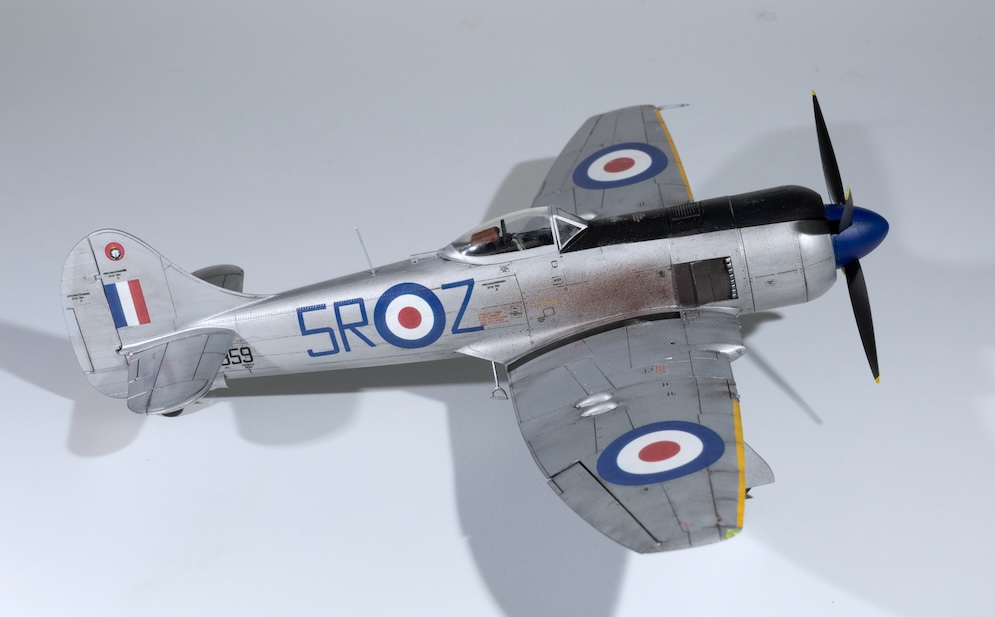
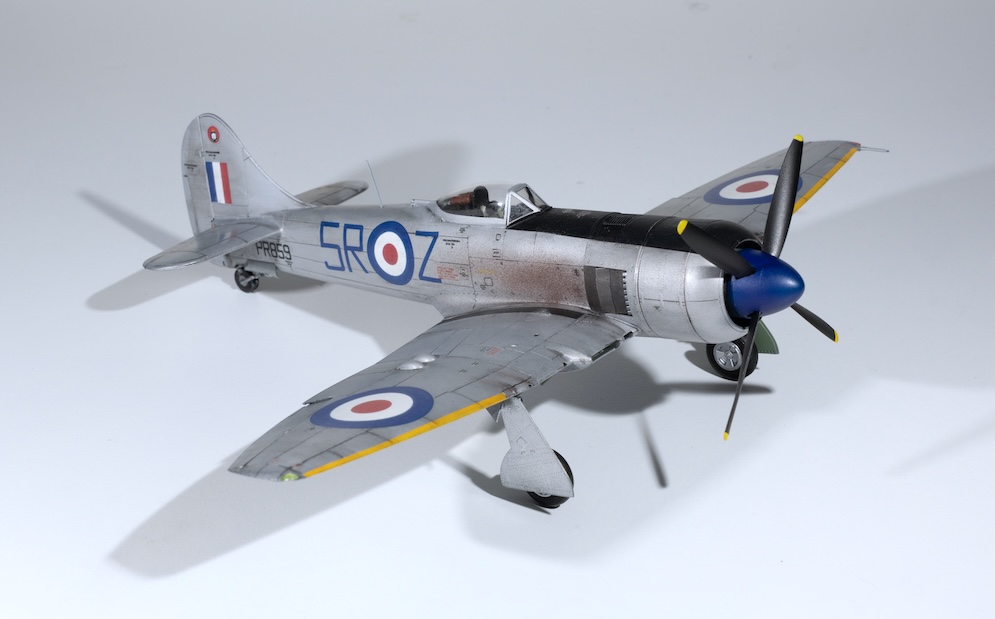

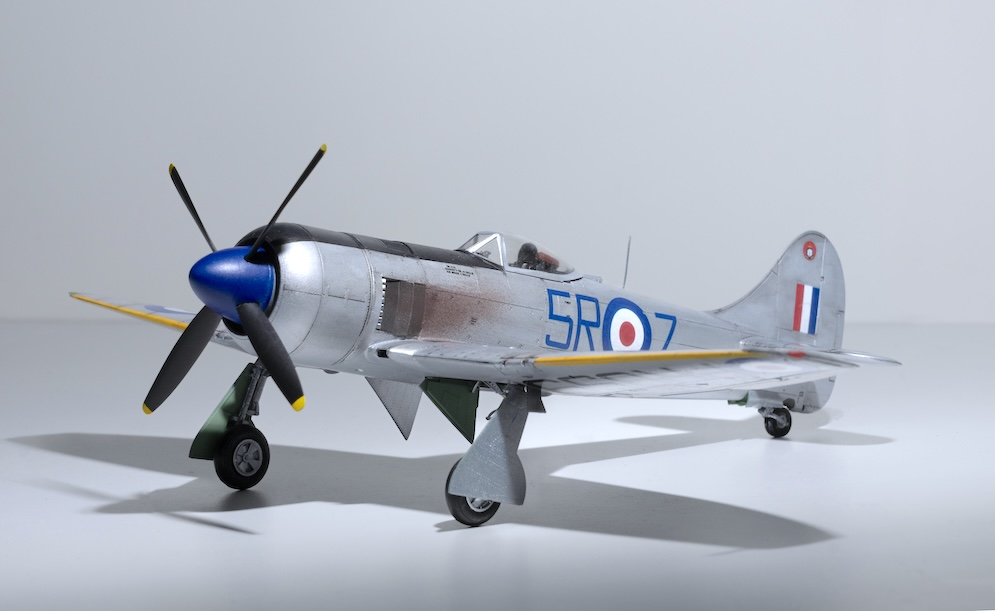
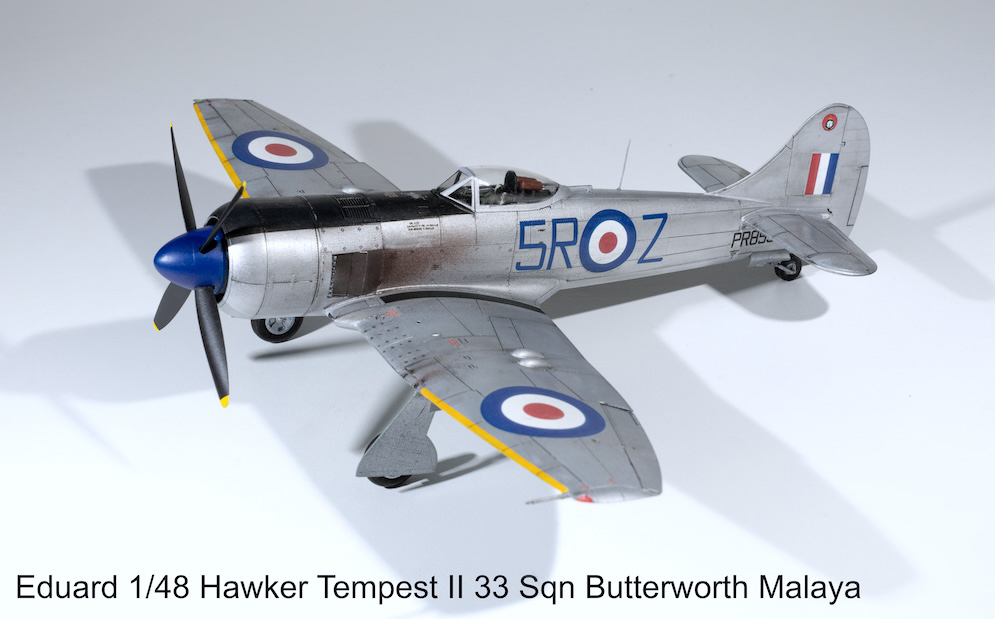
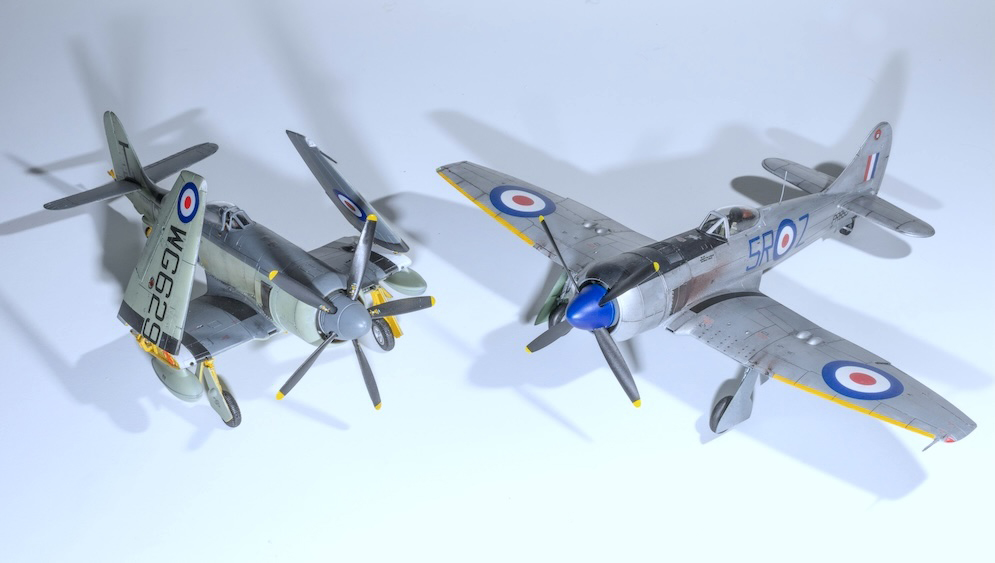
I am quite new to Eduard but I have recently completed two Spitfire 1:48 Vbs, both Weekend Editions, and was blown away by these kits and especially the value for money. The only extras I found it needed were photo etch seat harness, which replaced the kit decals provided, which in all honesty were not great.
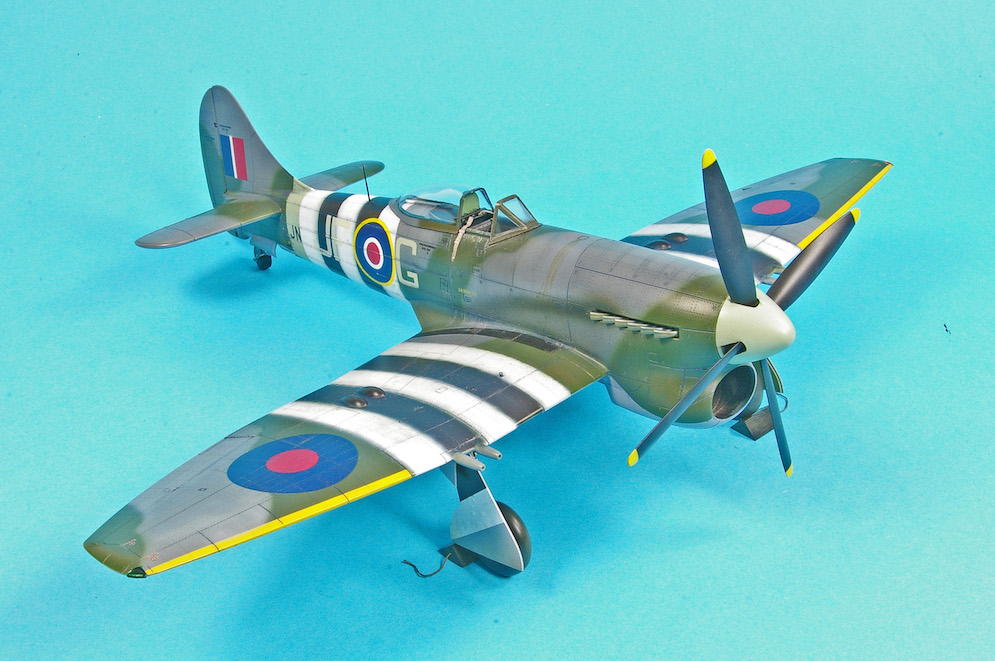
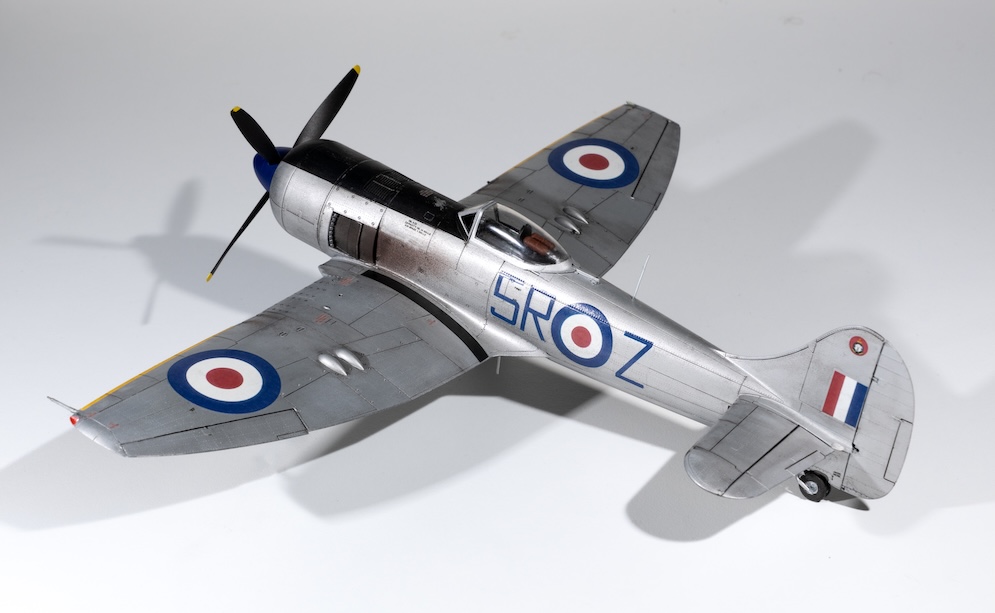
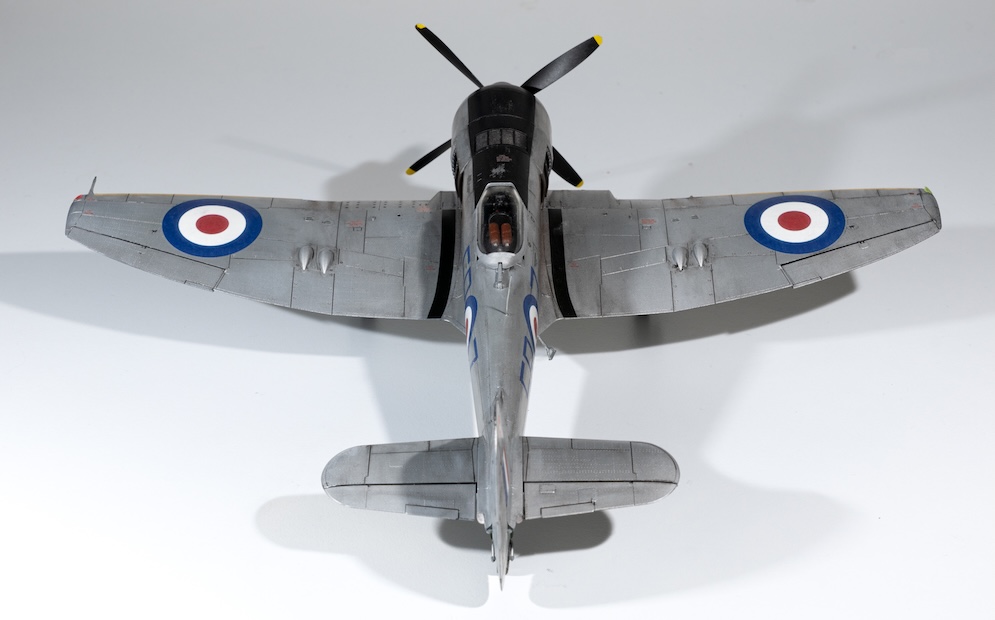
My Tempest was finished in the all-metallic finish of 33 Sqn, based in Malaya, which I think really compliments the aircraft. A panel line wash was used and exhaust smoke added to complete the look.
The Tempest really epitomised the huge advances in piston engined fighter development during the 40’s and was arguably, along with the Sea Fury, the best single engined fighters prior to the jet-engined fighters that followed.
Richard A.
Galleries: A | B | B-2 | C | D-E | F | G | H | I-L | M | N-R | S | T-V | W-Z